Discovery of Blimey
Blimey Information
Morphology: Siphoviridae

Sample Collection
| Collector Name |
Cally | Kinley | Adriana | Mckenna |
Other group (Not sure who it was!!) |
| Sample No. | 1 | 2 | 3 | 4 | 5 |
| Date of Collection | 8/24/25 | ||||
| Sample Type | soil | soil | soil | soil | soil |
| General Location | Stephenville Tx | Stephenville Tx | Stephenville Tx | Farmersville, Tx | The sample was collected from the soil directly adjacent to my house. The house was located on W Park St. |
| Location Description | Backyard | Front yard | ? | Cow Barn | The sample was collected near my front door. The soil was brittle and almost sand-like. No trees near with little to no flowers nearby. |
|
GPS Coordinates.
|
32.22362 N, 98.22796 W | 32.22336 N, 98.22292 W | ? | 33.24359N, 96.37316W | 32.22398804010444, -98.22279642405333 |
| Sample Depth | Surface | Surface | Surface | Surface | Surface |
| Ambient Temperature | 81 Deg | 77 Deg | ? | 73 Deg | 22.7 C |
Isolation/Purification
Sample 1 Direct Isolation
Date: 08/28/2025
Redo: No
Purpose: To determine if a viable phage is present in Sample 1 for further purification.
Notes:
-
Environmental sample collected (soil). 15 mL conical tube filled halfway with soil; 5 mL liquid media added to submerge soil (~3 mL above soil).
-
Tube capped and inverted several times to mix thoroughly. Incubated in shaking incubator at 250 rpm for 1 hour.
-
Sample centrifuged at 2,000 x g for 10 min to settle particulate matter.
-
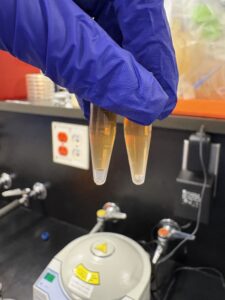
2 mL of supernatant removed and filtered through 0.22 µm syringe filter; filtrate collected in microcentrifuge tube and stored at 4 °C until plaque assay.
-
Plaque assay: 500 µL of filtrate added to 250 µL host bacteria, mixed gently, 3 mL top agar added and plated. Plate incubated 48 hours at 29 °C.
Results:
-
No plaques observed.
Conclusions/Next Steps:
-
Direct isolation unsuccessful. Proceed to enriched isolation for Sample 1.
- Photo:
Sample 1 Enriched Isolation
Date: 09/08/2025
Redo: yes
Purpose: To amplify any phages present in Sample 1.
Notes:
-
Soil sample (15 mL) added to 50 mL conical tube with 35 mL liquid media; vortexed 1–2 hours at 250 rpm.
-
Centrifuged 2,000 x g, 10 min; supernatant filtered through 0.22 µm filter.
-
0.5 mL host bacteria added; incubated 220 rpm for 2–5 days.
-
1.4 mL aliquots transferred to microcentrifuge tubes; centrifuged to pellet bacteria; supernatant filtered.
-
Plaque assay: 10 µL of enriched culture added to 250 µL host bacteria; plated with 3 mL top agar; incubated 48 hours at 29 °C.
Results:
-
No plaques observed.
Conclusions/Next Steps:
-
Enriched isolation also unsuccessful. Proceed to Sample 2.
- Photo:
Sample 2 Enriched Isolation
Date: [Insert date]
Redo: No
Purpose: To isolate viable phages from Sample 2.
Notes:
-
Soil sample (15 mL) added to 50 mL conical tube with 35 mL liquid media; vortexed 1–2 hours at 250 rpm.
-
Centrifuged 2,000 x g, 10 min; supernatant filtered through 0.22 µm filter.
-
0.5 mL host bacteria added; incubated 220 rpm for 2–5 days.
-
1.4 mL aliquots transferred to microcentrifuge tubes; centrifuged to pellet bacteria; supernatant filtered.
-
Plaque assay: 10 µL of enriched culture added to 250 µL host bacteria; plated with 3 mL top agar; incubated 48 hours at 29 °C.
- Plaque assay performed after incubation: Plaque assay: 10 µL of enriched culture added to 250 µL host bacteria; plated with 3 mL top agar; incubated 48 hours at 29 °C.
Results:
-
No plaques observed.
Conclusions/Next Steps:
-
Sample 2 contained no detectable phages. Proceed to Sample 3.
- Photo:
Sample 3 Enriched Isolation
Date: [Insert date]
Redo: No
Purpose: To isolate viable phages from Sample 3.
Notes:
-
Soil sample (15 mL) added to 50 mL conical tube with 35 mL liquid media; vortexed 1–2 hours at 250 rpm.
-
Centrifuged 2,000 x g, 10 min; supernatant filtered through 0.22 µm filter.
-
0.5 mL host bacteria added; incubated 220 rpm for 2–5 days.
-
1.4 mL aliquots transferred to microcentrifuge tubes; centrifuged to pellet bacteria; supernatant filtered.
-
Plaque assay: 10 µL of enriched culture added to 250 µL host bacteria; plated with 3 mL top agar; incubated 48 hours at 29 °C.
- Plaque assay performed after incubation: Plaque assay: 10 µL of enriched culture added to 250 µL host bacteria; plated with 3 mL top agar; incubated 48 hours at 29 °C.
Results:
-
No plaques observed.
Conclusions/Next Steps:
-
Sample 3 contained no detectable phages. Proceed to Sample 4.
Sample 4 Enriched Isolation
Date: [Insert date]
Redo: No
Purpose: To isolate viable phages from Sample 4.
Notes:
-
Soil sample (15 mL) added to 50 mL conical tube with 35 mL liquid media; vortexed 1–2 hours at 250 rpm.
-
Centrifuged 2,000 x g, 10 min; supernatant filtered through 0.22 µm filter.
-
0.5 mL host bacteria added; incubated 220 rpm for 2–5 days.
-
1.4 mL aliquots transferred to microcentrifuge tubes; centrifuged to pellet bacteria; supernatant filtered.
-
Plaque assay: 10 µL of enriched culture added to 250 µL host bacteria; plated with 3 mL top agar; incubated 48 hours at 29 °C.
- Plaque assay performed after incubation: Plaque assay: 10 µL of enriched culture added to 250 µL host bacteria; plated with 3 mL top agar; incubated 48 hours at 29 °C.
Results:
-
Plaque assay produced faint, small plaques observed
Conclusions/Next Steps:
-
Plaques are small and faint but were advised to try the 1st serial dilution
- Photo:
Sample 4 First Serial Dilution
Date: [Insert date]
Redo: No
Purpose: To isolate viable phages from Sample 4.
Notes:
-
Serial dilution performed (10-fold) using picked plaque.
-
10 µL of each dilution added to 250 µL host bacteria; plated with 3 mL top agar.
-
Plates incubated 48 hours at 29 °C.
Results:
Plaques not robust enough to survive serial dilution. Proceed to Sample 5 using another group’s plaque.
Photo:
Conclusions/Next Steps:
-
Serial Dilution was not successful. Proceed to sample 5 from another group.
Sample 5 Enriched Isolation and Plaque Assay
Date: [Insert date]
Redo: No
Purpose: To isolate viable phages from Sample 5.
Notes:
!!!These steps were completed by another group!!!
-
Soil sample (15 mL) added to 50 mL conical tube with 35 mL liquid media; vortexed 1–2 hours at 250 rpm.
-
Centrifuged 2,000 x g, 10 min; supernatant filtered through 0.22 µm filter.
-
0.5 mL host bacteria added; incubated 220 rpm for 2–5 days.
-
1.4 mL aliquots transferred to microcentrifuge tubes; centrifuged to pellet bacteria; supernatant filtered.
-
Plaque assay: 10 µL of enriched culture added to 250 µL host bacteria; plated with 3 mL top agar; incubated 48 hours at 29 °C.
- Plaque assay performed after incubation: Plaque assay: 10 µL of enriched culture added to 250 µL host bacteria; plated with 3 mL top agar; incubated 48 hours at 29 °C.
Results:
-
Distinct, abundant plaques observed.
Conclusions/Next Steps:
-
Successful isolation achieved. Plaques can be used for the next step, Serial Dilution
Sample 5 First Serial Dilution
Date: 10/8/2025
Redo: No
Purpose: To isolate the phage further
Notes:
-
Serial dilution performed (10-fold) using picked plaque.
-
10 µL of each dilution added to 250 µL host bacteria; plated with 3 mL top agar.
-
Plates incubated 48 hours at 29 °C.
Results:
-
Distinct, abundant plaques observed.
- Photo:
Conclusions/Next Steps:
-
Successful isolation achieved. Plaques can be used for Second Serial Dilution
Sample 5 Second Serial Dilution
Date: 10/8/2025
Redo: No
Purpose: To isolate the phage further from serial dilution 1
Notes:
-
Serial dilution performed (10-fold) using picked plaque.
-
10 µL of each dilution added to 250 µL host bacteria; plated with 3 mL top agar.
-
Plates incubated 48 hours at 29 °C.
Results:
-
Distinct, abundant plaques observed.
- Photo:


Conclusions and Next Steps:
The serial dilutionwas sucesful and distinct plaques grew. We can now move on the obtain the lysate.
Amplification
Sample 5 Low-Volume Lysate Collection
Date: XX/XX/2025
Redo: n/a
Date: 9/15/2025
Redo: No
Purpose:
- To collect a low-volume lysate from the webbed plate for further phage amplification.
Notes:
- Using aseptic technique, 8 mL of PYCa phage buffer was pipetted onto the webbed plate.
- The plate was left at room temperature for approximately 3 hours to allow the buffer to absorb phage particles from the bacterial lawn.
- After incubation, the plate was propped at an angle using its lid to allow the lysate to pool
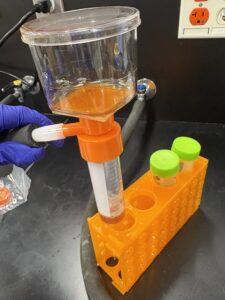
- A 5 mL syringe was then used to aspirate the lysate, which was passed through a sterile 0.22 µm syringe filter into a labeled 15 mL conical tube.
- The lysate was stored at 4°C for two days.
Results:
- A clear low-volume lysate was successfully collected and stored.
- Photo:
Conclusions/Next Steps:
- A low-volume lysate was obtained. The next step is to perform a third serial dilution to obtain a webbed plate.
Sample 5 Third Serial Dilution
Date: xx/xx/2025
Redo: No
Purpose:
- To perform a third serial dilution using the low-volume lysate in order to obtain a webbed plate.
Notes:
1. Serial dilutions were prepared aseptically using 10 µL of the low-volume lysate.
2. Five microcentrifuge tubes were labeled 10⁰ through 10⁻⁵. Using a micropipette, 10 µL was transferred sequentially between tubes to create 10-fold dilutions.
3. Each dilution was then mixed with 250 µL of host bacteria and combined with 3 mL of molten top agar.
4. The mixture was poured onto corresponding labeled agar plates and gently rotated to evenly coat the surface.
5. Plates were left to solidify for 20 minutes and incubated at 29°C for five days.
Results:
- Plaques were observed across the dilution series, and one plate was determined to be optimally webbed.
- Photo:
- Conclusions/Next Steps:
- The dilution series produced a webbed plate suitable for amplification. The next step is to create multiple webbed plates for high-volume lysate collection.
Sample 5 Web Plate Amplification
Date: 10/29/2025
Redo: No
Purpose:
To amplify phage by producing multiple web plates from the low-volume lysate.
Notes:
1. Ten-fold dilutions of the low-volume lysate were prepared, and 10 µL from each dilution was mixed with host bacteria cultures.
2. Each mixture was combined with 3 mL of molten top agar and plated on labeled agar plates.
3. Plates were rotated to distribute evenly, allowed to solidify for 20 minutes, and incubated at 29°C for 48 hours.
Results:
Failed, Nothing grew on the plates
Photo:
Conclusions/Next Steps:
This procedure failed, we will repeat the procedure to amplify phage by producing multiple web plates from the low-volume lysate.
Sample 5 Web Plate Amplification
Date: 11/3/2025
Redo: yes
Purpose:
To amplify phage by producing multiple web plates from the low-volume lysate.
Notes:
(The previous procedure failed because we did not use the original sample to make multiple webbed plates. We will pick a plaque again to get an original sample to be able to make 5 webbed plates 10 to the -2)
1. Ten-fold dilutions of the low-volume lysate were prepared, and 10 µL from each dilution was mixed with host bacteria cultures.
2. Each mixture was combined with 3 mL of molten top agar and plated on labeled agar plates.
3. Plates were rotated to distribute evenly, allowed to solidify for 20 minutes, and incubated at 29°C for 24 hours.
Results:
Failed because we did not use the low volume lysate and we used the first sample on accident.
Photo: 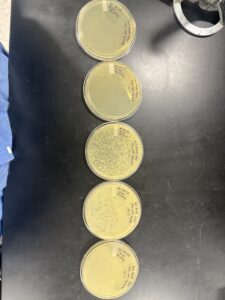


Conclusions/Next Steps:
Sample 5 Web Plate Amplification
Date: 11/5/2025
Redo: yes
Purpose:
To amplify phage by producing multiple web plates from the low-volume lysate.
Notes:
(The previous procedure failed because we did not use the original sample to make multiple webbed plates. We will pick a plaque again to get an original sample to be able to make 5 webbed plates 10 to the -2)
1. Ten-fold dilutions of the low-volume lysate were prepared, and 10 µL from each dilution was mixed with host bacteria cultures.
2. Each mixture was combined with 3 mL of molten top agar and plated on labeled agar plates.
3. Plates were rotated to distribute evenly, allowed to solidify for 20 minutes, and incubated at 29°C for 48 hours.
Results:
Photo:
Conclusions/Next Steps:
Sample 5 High-Volume Lysate Collection
Date: 11/7/2025
Redo: No
Purpose:
To collect a high-volume lysate from multiple webbed plates for use in titer determination and future experiments.
Notes:
1. Using aseptic technique, 8 mL of PYCa phage buffer was added to each of the webbed plates.
2. The plates were allowed to sit at room temperature for approximately three hours to enable diffusion of the phage particles into the buffer.
3. After incubation, each plate was tilted by resting one edge on its lid to pool the lysate.
4. A sterile 10 mL syringe was used to carefully aspirate the pooled lysate from each plate.
5. The lysates from all plates were combined into a single 50 mL conical tube, then passed through a fresh 0.22 µm syringe filter to remove any remaining bacterial debris.
6. The final filtered lysate was labeled with sample number, date, and initials, and stored at 4°C until further testing.
Results:
high-volume lysate was successfully collected and stored for later use.
Photo:
Conclusions/Next Steps:
A high-volume lysate was obtained and is ready for titer determination to quantify phage concentration.
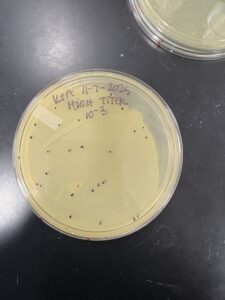
Sample 5 Titer Determination
Date: 11/7/2025
Redo: No
Purpose:
To determine the phage concentration (titer) of the high-volume lysate by performing a serial dilution and plaque assay.
Notes:
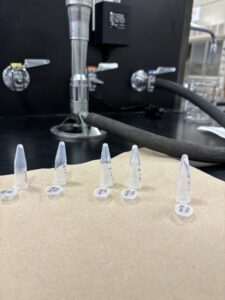
- A series of 10-fold serial dilutions were prepared aseptically using the high-volume lysate as the starting sample.
- Five microcentrifuge tubes were labeled 10⁰ through 10⁻⁶.
Using a micropipette, 10 µL of lysate was transferred sequentially between tubes, each containing 90 µL of phage buffer, to achieve accurate dilutions. - From each dilution, 10 µL was mixed with 250 µL of host bacteria and incubated briefly to allow phage adsorption.
- Each mixture was combined with 3 mL of molten top agar, poured onto labeled agar plates, rotated gently for even coating, and allowed to solidify for 20 minutes.
- Plates were incubated at 29°C for 48 hours.
Results:
Plaques of varying density were observed across the dilution series. A countable plate was selected, and plaque-forming units (PFU/mL) were calculated to determine the phage titer.
Conclusions/Next Steps:
The titer of the high-volume lysate was successfully determined. The lysate can now be used and we can move to the next step, DNA extraction
Sample 5 High-Volume Lysate Collection
Date: 11/17/2025
Redo: Yes
Purpose:
To collect a high-volume lysate from multiple webbed plates for use in DNA Extraction
Notes:
1. Using aseptic technique, 8 mL of PYCa phage buffer was added to each of the webbed plates.
2. The plates were allowed to sit at room temperature for approximately three hours to enable diffusion of the phage particles into the buffer.
3. After incubation, each plate was tilted by resting one edge on its lid to pool the lysate.
4. A sterile 10 mL syringe was used to carefully aspirate the pooled lysate from each plate.
5. The lysates from all plates were combined into a single 50 mL conical tube, then passed through a fresh 0.22 µm syringe filter to remove any remaining bacterial debris.
6. The final filtered lysate was labeled with sample number, date, and initials, and stored at 4°C until further testing.
Results:
high-volume lysate was successfully collected and stored for later use.
Photo: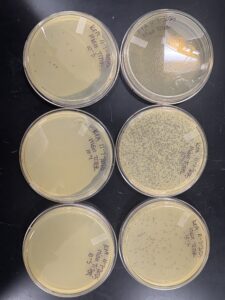
Conclusions/Next Steps:
A high-volume lysate was obtained and is ready for DNA Exraction
Electron Microscopy
Date: 11/17/2025
Redo: No
Purpose: The purpose of this experiment is to prepare a TEM grid
- Prepare phage samples.
- Aseptically transfer 1 ml of your high-titer lysate into a sterile microcentrifuge tube.
- Balance the tube(s) and centrifuge for 1 hour at 4 °C at top speed to concentrate the phage particles at the bottom of the tube.
- Using a micropipettor, carefully remove as much supernatant as possible without disrupting the concentrated phage at the bottom of the tube.
- Add 100 μl of phage buffer and let resuspend at 4 °C for 30 minutes to one hour.
- Proceed with the rest of the protocol immediately to avoid damaging the phage heads.
- Prepare your work area.
- Put on a fresh pair of gloves.
- Cover the designated work area with bench paper or a Kimwipe to create a clean work surface.
- Remove the cover from a 5 x 5 cm piece of parafilm, and place the parafilm into the lid of Petri dish.
- Place a PELCO Tab or small piece of double-sided tape onto the parafilm in the lid of the Petri dish. Expose the adhesive or the tab.
- Using EM forceps, remove a fresh grid from a box of unused grids, touching only the very edge of the grid.
- Place the grid dark-and-shiny side UP, on the edge of the tab or double-sided tape so that only the very edge of the grid (no more than 0.5 mm) is touching the adhesive.
- Mount and stain your phage.
- Using a micropipettor, place 10 μl of lysate onto the grid without touching the tip to the grid itself.
- Allow the phage settle and attach onto the grid for 7 minutes
- Using a small wedge of filter paper, wick off the excess fluid.
- Add 10 μl of 1 % uranyl acetate to the grid.
- Let it sit for 2 minutes.
- Wick off excess stain by using a wedge of filter paper. UA staining occurs by leaving a very thin layer of stain dried across the entire grid. You should continue to wick away the stain until the surface of the grid looks like a rainbow oil slick. Then allow the grid to air dry before putting it safely back into the grid box.
- Observe your phage.
- Place your grid in the designated grid box for storage. Blimey sample was placed in the A1 spot.
- Transport your samples to your EM facility for imaging.
Results:
Photo:
Conclusions/Next Steps:
DNA Extraction
Electron Microscopy
Date: 10/13/2025
Redo: No
Purpose:
The objective of this experiment is to prepare a TEM grid for phage visualization.
Procedure/Notes:
Phage Sample Preparation:
-
Prepare phage samples.
-
Aseptically transfer 1 mL of high-titer lysate into a sterile microcentrifuge tube.
-
Balance the tube(s) and centrifuge at maximum speed for 1 hour at 4 °C to concentrate the phage particles at the bottom.
-
Carefully remove as much supernatant as possible using a micropipettor without disturbing the phage pellet.
-
Resuspend the phage in 100 μL of phage buffer and incubate at 4 °C for 30–60 minutes.
-
Proceed with the following steps immediately to prevent damage to the phage heads.
prep:
-
Wear a fresh pair of gloves.
-
Cover the work surface with bench paper or a Kimwipe.
-
Place a 5 × 5 cm piece of parafilm in the lid of a Petri dish.
-
Attach a PELCO Tab or small piece of double-sided tape to the parafilm, exposing the adhesive.
-
Using EM forceps, remove a fresh grid from its box, handling only the edges.
-
Position the grid dark-and-shiny side up on the adhesive so that only the edge (~0.5 mm) touches the tape.
Grid Mounting and Staining:
-
Apply 10 μL of lysate to the grid without touching the grid with the pipette tip.
-
Allow the phage to settle and attach for 7 minutes.
-
Wick away excess fluid using a small wedge of filter paper.
-
Add 10 μL of 1% uranyl acetate to the grid and incubate for 2 minutes.
-
Remove excess stain by wicking with filter paper until the grid surface appears like a thin “rainbow oil slick.”
-
Air dry the grid completely before returning it to the grid box.
Observation and Storage:
-
Place the prepared grid in the designated grid box for storage (Blimey sample placed in the A1 spot).
-
Transport the samples to the EM facility for imaging.
Results:
not back yet
Conclusions and Next Steps:
not back yet
DNA Extraction Part 1
Date: 11/17/2025
Redo: n/a
Purpose: The purpose of this experiment is to extract the DNA from the high volume lysate
Notes:
1. Gently mix your HVL, then aliquot 5mL of your lysate into a 15 mL conical tube. Give that tube
to a GSI or TA who will add 20uL of nuclease mix for you.
2. Once nuclease has been added, gently invert the tube and incubate at 37°C for 10min.
3. Aliquot lysate into 5 microfuge tubes, 1mL each.
4. To each tube, add 20uL of ZnCl2, mix gently by inversion, and incubate at 37°C for 5min. This
“precipitates” the phage.
5. Centrifuge at 10,000rpm for 1min to pellet the phage.
STEPS 6 and 7 MUST BE DONE QUICKLY AND EFFICIENTLY
6. KEEP THE PELLET. Remove supernatants by aspiration, but try not to disturb the pellet.
Discard the liquid filled pipette tips in the sharps trash.
7. Resuspend pellets in 500uL TES buffer per tube, and incubate at 60°C for 15min. This will
denature the capsids, exposing the DNA, while protecting it from the nuclease activity (EDTA in
the TES sequesters divalent cations required for nuclease function).
8. Add 1uL of Proteinase K and mix gently. Incubate at 37°C for 10min to completely eliminate
any residual nuclease activity.
9. Add 60uL of potassium acetate to each tube. Mix well and leave on ice for 15min. A white,
dense precipitate will form. This represents your capsids.
the pellets.
11. Add 500uL of isopropanol to each of the tubes with the supernatant, mix, and leave on ice
overnight (or until next lab).
Day Two
12. Centrifuge at top speed for 10min to pellet DNA, and discard the supernatant into a WASTE
tube. It is OK if you do not see a pellet.
13. Add 250uL of 70% ethanol in each tube, and spin again for 1min, at top speed. This washes
your DNA pellet. Discard supernatants into a WASTE tube.
14. Dry the DNA pellets at room temperature by turning upside-down onto paper towels, tapping out
excess liquid, and leaving upside-down until pellets begin to turn clear. The tubes can also be
placed in a fume hood or 30⁰C incubator to help with drying. DO NOT RUSH THIS STEP! If not
dry enough, you will NOT recover enough DNA!
15. Resuspend the first pellet in 50uL nuclease-free water. Then use that solution to resuspend the
next pellet. Continue until all 5 pellets have been resuspended in the same 50uL of water.
16. Check DNA concentration and quality (A260:280 and A260:230) with the Nanodrop.
Results:
DNA Extraction was successful
Photo: 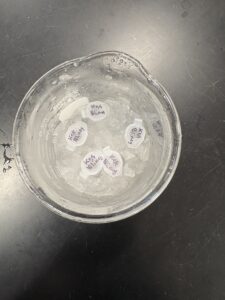
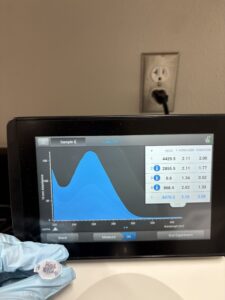
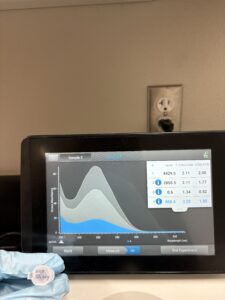


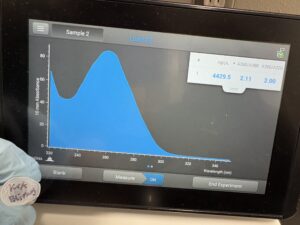
A260:280: A260:230:
Conclusions and Next Steps:
Since the procedure of extracting the DNA was successful, we can now move on to preparing a gel for electrophoresis
Characterization
Casting Agarose Gel
Date: 11/19/2025
Redo: n/a
Purpose: The purpose of this experiment is to To prepare an agarose gel for electrophoresis
Notes:
- Pour a 0.8 % (w/v) agarose gel.
- Set up gel apparatus according to your instructor’s directions.
- Prepare enough 0.8 % agarose gel to cover the tips of the gel combs by ~2–3 mm
- Weigh out the appropriate mass of agarose powder, and then transfer the powder to an Erlenmeyer flask.
- Add the appropriate volume of 1X TBE buffer to the agarose powder. Swirl gently to mix. Take note of the volume of liquid in the flask.
- Heat the mixture in the microwave just until it boils (1–2 minutes). As soon as it boils, stop heating.
- Using a heat-resistant glove or mitt, carefully remove the flask from the microwave, remembering to face the open mouth of the flask away from yourself and others.
- Very gently, swirl to mix and then examine the solution for small transparent clumps. If clumps remain, return the flask to the microwave and continue heating until the mixture boils again. Repeat this process until no clumps are visible.
Important: Take care not to splash the hot liquid or touch the hot flask. - Check the volume of the solution. If it has decreased, bring it back to the original volume using ddH2O. Swirl to mix.
- Allow the solution to cool to between 50 °C and 60 °C (very warm to the touch but not hot enough to burn). This typically takes 10–15 minutes.
- Once the solution is sufficiently cool, put on latex gloves and add the gel dye of your choice.
- If using ethidium bromide (EtBr) as a DNA dye, add enough to achieve a final concentration of 0.5 μg/ml in the agarose solution. Swirl to mix.
Important: Use extreme caution when handling EtBr and other DNA dyes. They are mutagens that intercalate (insert) between nucleotide bases.Example: You want 100-ml agarose with 0.5 μg/ml EtBr and therefore need to use an unknown volume of 10 mg/ml EtBr stock. (Remember that 10 mg/ml = 10 μg/μl). Using the C1V1 = C2V2 equation:(100 ml) (0.5 μg/ml EtBr) = ( X ) (10 mg/ml)
(100)(0.5 μg) = X (10 μg/μl)
X = 5 μl
- If using ethidium bromide (EtBr) as a DNA dye, add enough to achieve a final concentration of 0.5 μg/ml in the agarose solution. Swirl to mix.
- Pour the agarose/EtBr mixture into the prepared gel apparatus, being careful not to introduce any bubbles. Insert the comb to cast the wells.
- Allow the gel to cool for 20–30 minutes.
- Once the gel has solidified, very carefully remove the comb by pulling it slowly straight up. Once the comb is removed, gently lift the gel platform out of the casting tray.
- Place the platform with the solidified gel into the gel box. The wells should be at the (-) cathode end of the box, where the black lead is connected.
- Pour 1X TBE buffer into the gel apparatus until your gel is submerged by ~ 1/4 inch of buffer.
- Load your samples and run the gel according to your instructor’s directions and the Gel Electrophoresis
Results:
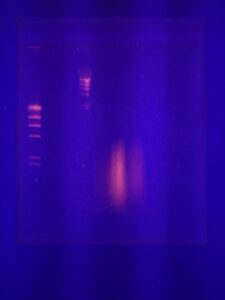
Conclusions and Next Steps:
Add conclusions and next steps here.