Discovery of Wednesday
Sample Collection
| Collector Name | Samantha Conger | Samantha Conger | Madison Crew |
| Sample No. | 1 | 2 | 3 |
| Date of Collection | September 3, 2019 | August 31, 2019 | September 1, 2019 |
| Sample Type | Soil | Soil | Soil |
| General Location | Arena | Park | Compost |
| Location Description | Grass Clearing | Under Tree | Grass field |
| GPS Coordinates | 32.2400, -98.1635 | 30.5103, -97.6654 | 32.3838, -98.1665 |
| Sample Depth | 6 cm | 8 cm | 10 cm |
| Ambient Temperature | 28 °C | 34 °C | 31°C |
Isolation/Purification
Direct Isolation of Sample 3
Date Started: Sep. 04, 2019 Redo? No
Purpose: Direct Isolation was used to extract phages from an environmental soil sample.
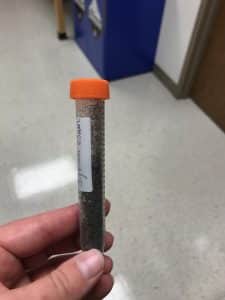
Environmental soil sample:
Notes:
A. Prepare work bench aseptically.
B. Extract phage:
- First, using a serological pipette, the liquid media was added into the the 15mL conical tube that the soil sample was gathered in until the soil was completely submerged with about 5mL of liquid. According to the lab guide, this was too much liquid media, but we didn’t remove any since the soil began to mix with the liquid.
- Next, the tube was capped and inverted several times to mix the contents thoroughly. Next it was put in the incubator and left for 3 hours.
- After removed from the incubator, the tube was placed in the fridge for 2.5 hours until we were able to come back to lab and complete the isolation.
C. Prepare phage filtrate using aseptic technique:
- The .20 micron filter and syringe were obtained and attached aseptically. About 2mL of liquid from our flooded sample was transferred into the syringe using a serological pipette.
- When the liquid sample was inside of the syringe, the plunger was depressed and the sample was filtered into a sterile 15mL conical tube. This process was repeated until no more of the liquid sample was left with the solid soil sample.
- The tube was capped and the syringe and filter were disposed of properly.
Results:
We now had supernatant that was ready to be plated using the plaque assay technique.
Conclusion and Next Steps:
Next we will mix the phage supernatant with host bacteria and plate it using top agar and a plaque assay.
Enriched Isolation of Sample 2
Date Started: Sep. 04, 2019 Redo? No
Purpose: Enriched isolation was used to extract and amplify phages from an environmental soil sample.
Notes:
A. Extract phage:
- First, into a 50mL conical tube, 10mL (instead of 15mL) of sample was added. Liquid media was added into the 50mL conical tube, the protocol says to fill it up until the 35mL mark; however, since we only used 10mL of sample, we lowered the liquid media volume by 5mL as well.
- We filled the conical tube with liquid media up to the 30mL mark. The tube was shaken to mix the contents together. The tube was then placed in the incubator for 3 hours and placed in the fridge for 2.5 hours until we were able to come back to the lab and continue. The tube was balanced in the centrifuge and spun for 10 minutes at 3100 rpm.
- At this point, we went back and did a direct isolation by accident… We plated the supernatant after it was spun in the centrifuge instead of proceeding with the enriched isolation protocol.
B. Prepare Phage Filtrate:
- The same technique just described in the direct isolation section was used. The syringe and filter were used to filter out everything but the phages. This supernatant was ready to be plated.
Results:
The filtrate was now ready to be plated in the plaque assay. We labelled the tube with an “E” for enriched isolation; however, this sample was started as an enriched but we accidentally finished it as a direct isolation.

Conclusions and Next Steps:
Next we will mix the supernatant with the host bacteria and plate it using top agar and a plaque assay.
Plaque Assay
Date Started: Sep. 04, 2019 Redo? No
Purpose: To detect the presence of phages on bacterial lawns.
Notes:
A. Prepare bench for aseptic work.
B. Inoculate the host bacteria with the phage sample:
- This was done two times, once for each sample. The red test tubes with 250uL of host bacteria were obtained, one for each sample.
- Using a serological pipette, 0.5mL of phage sample was siphoned up, dispensed into the red test tube, and was let to sit for 10 minutes to allow for attachment.
C. Plate samples with top agar:
- Two agar plates were obtained and labeled. Our labeled top agar was obtained and using a serological pipette, 3mL of molten top agar was siphoned up, transferred into the inoculated host test tube, and then immediately siphoned up and plated. Less than 0.5mL was left in the serological pipette to try to combat bubbles; however, we still ended up with a couple that we were able to pop.
- The lid was placed on the plate and it was tilted in multiple directions to spread the mixture until it coated the agar plate.
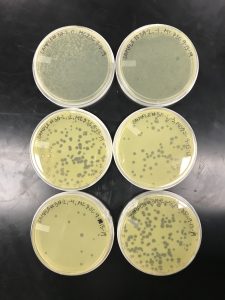
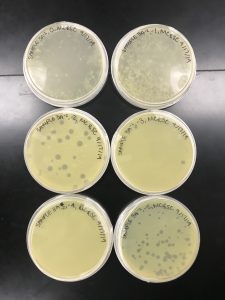
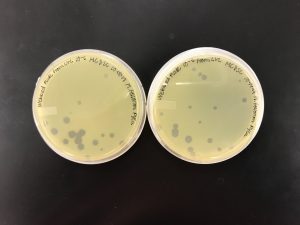
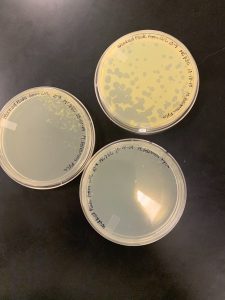
Results:
We got plaques the next day! These photos were taken after we had finished picking a plaque and plating our serial dilutions, about 32 hours after they were placed in the incubator.

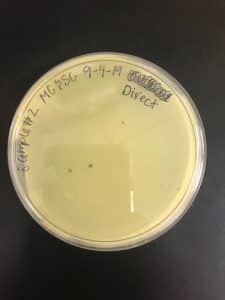
Conclusions and Next Steps:
Next, we picked plaques 3A and 3B. We ended up choosing sample 3 since there were so many plaques to choose from. We however did seal our sample 2 to allow for later plating and serial dilutions if we or other classmates end up needing to use it. After deciding which plaques we were going to continue with, we diluted them and plated them using the spot test technique and serial dilution technique.
Serial Dilutions & Spot Test
Date Started: Sep. 05, 2019 Redo? No
Purpose: To prepare a liquid phage sample of decreasing concentrations
Notes:
The plates were incubated for about 22.5 hours before we proceeded with the serial dilutions and spot test.

A. Prepared work bench for aseptic technique.
B. First, we prepared our agar plate that we would be preforming our Spot Test on.
- This was done by dividing the agar plate into sections and labeling a negative control and serial dilutions 10^0- 10^-5.
- We then needed to place our top agar on the plate along with hot bacteria. 3 mL of hot top agar was siphoned using a serological pipette, dispensed the top agar in the host bacteria tube and immediately re-siphoned then dispensed on the agar plate, and gently tilted to spread evenly.
- This plate was left, agar side down, untouched for a minimum of 20 minutes to let the top agar and host bacteria solidify.
C. While the top agar was setting, we prepared for our serial dilution.
- This was done by labeling the microcentrifuge tubes with the sample number as well as there concentration, 10^0 – 10^-5.
- 90uL of phage buffer was added the each one excepts the first tube, 10^0. This is because our plate assay had a small amount of contamination and we wanted to be very sure that we did not spread this contamination to our next plate for our Spot test.
D. To solve this problem we filter our 10^0 dilution.
- In a separate microcentrifuge tube we placed 90 uL of phage buffer. Using a sterile tip and micropipetter, the plaque was transferred to a this tube.
- We prepared our .22 micron filter by first wetting it using a syringe with phage buffer to avoid losing any sample.
- Using the micropipetter all of the 90uL of phage buffer and plaque transfer were placed into the syringe then filtered into the 10^0 labeled microcentrifuge tube. this insured our contamination would not spread.
E. We were now ready to start our serial dilution and spot plating.
- Using the micropipetter with a sterile tip 10uL was transferred from the 10^0 microcentrifuge tube to the 10^-1. After, the tip was dispensed and this process was repeated from the 10^-1 to the 10^-2, 10^-2 to the 10^-3, etc…
- Next, using the micropipetter and sterile tips, transfer 10uL from the serial dilution to the plate. For this procedure we were very careful to make sure that the sample and plate section were corresponding in dilution. For each transfer a new sterile tip was used.
- After the dilutions were plated the plate was left undisturbed for 15 minutes to let the phage buffer set into the top agar. then put into the incubator approximately 24 hours.
Results:
We got spots! This confirmed that we had found a phage!
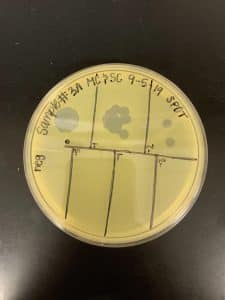

Conclusions and Next Steps:
Next, we will take a sample from a single plaque and repeat a serial dilution and plate each dilution and a separate plate in order to make a flooded plate sample.
Second Serial Dilution
Date Started:Sep. 13, 2019 Redo? No
Purpose: For the second serial dilution, we are using the smallest concentration from the first dilution to purify our phage.
Notes:
A. Prepare bench aseptically.
B. Set up 10-fold serial dilutions.
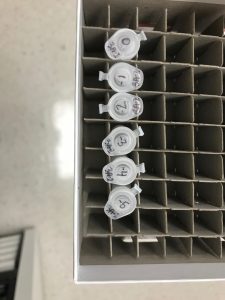
- We arranged six microcentrifuge tubes in a rack and labelled them accordingly.
- 90uL of phage buffer were added into 5 of the tubes. The first tube was set up with 100uL of phage buffer, this was our 10 to the zero dilution.
- We decided to pick a plaque from sample 3A, 10 to the negative 2. A micropipettor was used to pick up phage particles and transfer them into the 10 to the zero tube. This tube was our “undiluted” sample for the second round of serial dilutions.
C. To set up the webbed plates, we obtained 6 agar plates and labelled them. Our first try didn’t go as planned… we thought we were doing another spot test so we mixed the top agar and bacteria and plated it. Those plates were given to other students to reuse since there was no phage in the plates at all.
C. a. Our second go around we understood more clearly that we were performing a plaque assay to try to figure out what concentration would closely resemble our webbed plate.
- First, we took 10uL from each of the tubes, and using a new tip each time, placed the phage into the test tube of bacteria. These tubes were set aside for 10 minutes to allow for attachment.
- After 10 minutes, 3mL of top agar was dispensed into the test tube, immediately siphoned back up and then plated on the appropriately labelled plates.
- These plates were not inverted and they were left to solidify for about 20 minutes before placing in the incubator.
Results:
The plates were removed September 15th around noon; therefore, the plates were incubating for 43 hours before being removed.
In the protocol and flow chart, it describes these plates with having consistent morphologies and a 10% decrease in plaques as the solution became more diluted. It is evident that the plaque morphologies are fairly consistent but there was not a steady decrease in plaque concentration.
Conclusions and Next Steps:
Because the plates didn’t have a consistent 10% decrease in the amount of plaques from plate to plate, we decided to replate our dilutions.
Second Serial Dilution
Date Started:Sep. 17, 2019 Redo? Yes
Purpose: For the second serial dilution, we are using the smallest concentration from the first dilution to purify our phage.
Notes:
A. Prepare bench aseptically.
B. We used the same 10-fold serial dilutions as we did in our first try.
C. To set up the plaque assay, we obtained 6 agar plates and labelled them accordingly.
- First, we took 10uL from each of the tubes, and using a new tip each time, placed the phage into the test tube of bacteria. These tubes were set aside for 10 minutes to allow for attachment.
- After 10 minutes, 3mL of top agar was dispensed into the test tube, immediately siphoned back up and then plated on the appropriately labelled plates.
- These plates were not inverted and they were left to solidify for about 20 minutes before placing in the incubator.
Results:
The plates were checked less than 24 hours later, and the results were the same as the first try.
As shown in the picture, once again, the 10^-5 was more concentrated than 10^-4. And we can also assume the speckled appearance from the first two plates are because of a contaminant.
Conclusions and Next Steps:
After two times of obtaining similar incorrect results, we decided to pick the same plaque from our spot test and redo the serial dilutions.
Second Serial Dilution
Date Started:Sep. 18, 2019 Redo? Yes
Purpose: For the second serial dilution, we are using the smallest concentration from the first dilution to purify our phage.
Notes:
A. Prepare bench for aseptic work.
B. We returned to our spot test of our first serial dilution and grabbed a plaque from the same -2 fold, then restarted to second serial dilution.
- The serial dilution was set up with micro centrifuge tubes from 0 to 10^-5. 90uL of phage buffer was put into each micro centrifuge tube.
- Using the tip of a micropipettor, the plaque from the -2 fold of the first serial dilution spot test was picked and placed into the first, 0 fold micro centrifuge tube.
- Using a clean tip 10 micrometers of the 0 fold concentration was pipetted into the -1 fold micro centrifuge tube. This was repeated for each tube.
C. Next, we labeled 6 agar plates to create a webbed plate.
- First, we took 10uL from each micro centrifuge tube and placed it in individual host bacteria tubes and let sit fro 10 miners to allow for attachment.
- Next, 3mL of top agar was siphoned using a serological pipette and dispensed into the bacteria host and phage mixture. This was immediately siphoned back up and plated.
- The plate was quickly but gently tilted to spread the agar, then left agar side down and let sit for 25 minutes to solidify before placing in the incubator.
Results:
From the serial dilution we received a correct decrease of plaques as the dilution increased and a webbed plate from our -2 fold dilution.

Conclusions and Next Steps
Next we will take the webbed plate and flood it with phage buffer to collect phage lysate.
Amplification
Flooding Webbed Plate & Collecting Lysate
Date Started:Sep. 25, 2019 Redo? No
Purpose: To generate a plate with a high phage concentration as well as a highly concentrated liquid phage sample.
Notes:
A. Prepare bench aseptically.
B. The plate to be webbed was our 10^-1 serial dilution. This plate was obtained and all other supplies were collected.

C. 8mL of sterile phage buffer was collected in a 10mL serological pipette, and was dispensed onto the webbed plate. This plate was left to sit at the back of the room for 4 hours.
D. After the plate was left for 4 hours, the lysate was collected using a syringe. Before dispensing the syringe into a sterile 15mL conical tube, it was filtered to remove any agar particles or any bacteria.
Results:
We now had a low volume lysate, which is a concentrated liquid phage sample, to use for further purification and finally amplification.
Conclusions and Next Steps:
This lysate will be used to complete spot/full plate titers to determine the concentration. Next we will use the serial dilution protocol to dilute the lysate to determine the concentration needed to create webbed plates.
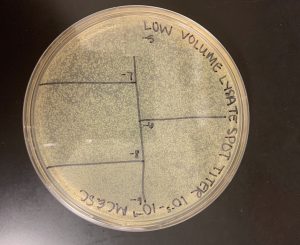
Serial Dilution and Spot Titer of Low Volume Lysate
Date Started:Sep. 25, 2019 Redo? No
Purpose: Serial dilutions are used to dilute the original sample down to purify the phage sample. We want to dilute our lysate so we can use a spot titer figure out the concentration needed to create webbed plates.
Notes:
A. Using the lysate collected from the webbed plate we perform a serial dilution of 10^-5.
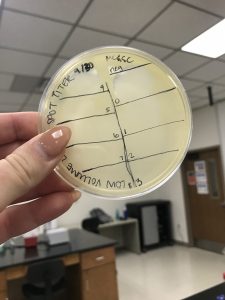
B. Spot the dilutions
- We prepare the agar plate by sectioning the desired serial dilutions.
- We prepared a bacterial lawn by siphoning 3mL of hot top agar, dispensing into the host bacteria tube and immediately siphoning back up and dispensing on the agar plate. Let stand for 15 minutes to solidify.
- Next, 3uL of desired serial dilutions were added to each corresponding section of the agar plate using a micropipettor.
- After all the serial dilutions were plated, the plate was left for 15 minutes and then placed into the incubator for 45 hours.
Results:
The serial dilution was not done far enough, there were no countable number of plaques.

Conclusions and Next Steps:
Next we are redoing the serial dilution and spot titer of our low volume lysate, we are going to dilute it down to 10^-8 to be able to count the plaques.
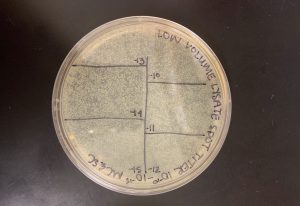
Serial Dilution and Spot Titer of Low Volume Lysate
Date Started:Sep. 30, 2019 Redo? Yes
Purpose: Serial dilutions are used to dilute the original sample down to purify the phage sample. We want to dilute our lysate so we can use a spot titer figure out the concentration needed to create webbed plates.
Notes:
A. It had been several days since we did our initial serial dilutions, so we decided to redo the dilutions instead of using the ones had already done. We set up serial dilutions to 10^-8.
B. Using aseptic technique and the serial dilution protocol we diluted our low volume lysate to 10^-8.
C. Next, we used one agar plate and spotted all of our dilutions in their corresponding locations.
D. This plate was left to incubate for 27 hours before it was checked.
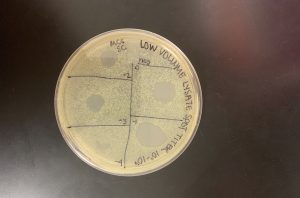
Results:
When the plate was pulled, it was evident there was contamination present. We could also tell that the sections were not big enough for the spot it was supposed to contain, and our spots were fairly large.
Even though contamination is obviously present, we could still tell that a -8 dilution was still not a dilute enough solution.
Conclusions and Next Steps:
We decided to redo our serial dilutions in case it was the dilutions which were contaminated. We also decided to use a smaller micropipettor to spot the dilutions. We were using the middle micropipettor and corresponding tips with a 1uL – 200uL range. For the next dilution, we were planning to use the smallest micropipettor along with the smaller tips, with a range of 1uL – 10uL, for more precise spotting. Lastly, we decided to use 3 agar plates instead of 1 to allow the spots more room in their section.
Serial Dilution and Spot Titer of Low Volume Lysate
Date Started: Oct. 2, 2019 Redo? Yes
Purpose: Serial dilutions are used to dilute the original sample down to purify the phage sample. We want to dilute our lysate so we can use a spot titer figure out the concentration needed to create webbed plates.
Notes:
A. The bench was prepared aseptically.
B. First, the agar plates were plated with bacteria and top agar to allow it to solidify while the serial dilutions were being made.
C. Using the serial dilution protocol and extra caution with aseptic technique, a serial dilution was performed down to 10^-15.
- Before spotting, each microcentrifuge tube was vortexed and examined for bubbles, which would complicate the spotting process.
- Using the small micropipettor tips (1uL – 10uL), we spotted our negative, the low volume lysate, and 10^-1 through 10^-4.
- We continued this technique of spacing out the spots between the three agar plates until all dilutions were plated.
- The plates were left to set for 25 minutes before placing into the incubator.
D. The next day the plates were checked after 25 hours of incubating with minimal results, so we allowed the plates to remain in the incubator for closer to the 48 hour mark.
Results:
When we returned after allowing the plates 48 hours in the incubator, there was still no growth. We informed our instructors and through troubleshooting decided that we had accidentally used the wrong agar plates.
Conclusions and Next Steps:
Before obtaining agar plates, we are going to thoroughly read the label to ensure we are using PYCa agar plates. This will help us be more successful in our experiments.
Our plan is to plate our 10^-15 serial dilutions for a second time, making sure to read the label on the agar plates.
Serial Dilution and Spot Titer of Low Volume Lysate
Date Started: Oct. 7, 2019 Redo? Yes
Purpose: Serial dilutions are used to dilute the original sample down to purify the phage sample. We want to dilute our lysate so we can use a spot titer figure out the concentration needed to create webbed plates.
Notes:
A. The bench was prepared aseptically.
B. First, the agar plates were plated with bacteria and top agar to allow it to solidify. When the top agar was plated, we noticed that it looked fairly rough, as if it wasn’t hot enough to begin with; however, our lab was currently making new agar plates and there were no more available. We decided to go ahead and try to use these already prepared plates instead of waiting a couple of days for the new ones.
C. It had been 5 days since we performed our serial dilutions, and we decided to go ahead and reuse the dilutions we had already made.
- Before spotting, each microcentrifuge tube was vortexed and examined for bubbles, which would complicate the spotting process.
- Using the small micropipettor tips (1uL – 10uL), we spotted our negative, the low volume lysate, 10^-1 through 10^-4.
- We continued this technique of spacing out the spots between the three agar plates until all dilutions were plated.
- The plates were left to set for 25 minutes before placing into the incubator.
Results:
We pulled out our plates 48 hours after being placed in the incubator.

We thought that by not waiting for the new agar plates we would’ve saved a couple of days worth of time, but this was not the case. The bacteria came out speckled on our plate. We had thought this was due to the room temperature top agar, but throughout our entire class there was not much bacteria growth and all of the plates came out of the incubator looking strange. Instead of pushing forward, we had a class troubleshooting session. After a few experiments to figure out what was wrong, we determined our host bacteria was dying. Our intern was working on a new culture of bacteria that would be ready within the next couple of days. We decided to halt our experiments until this new bacteria was done growing.
Conclusions and Next Steps:
We will wait for the new culture of M. Foliorum to finish growing and replate our serial dilutions. We will most likely redilute our lysate since it will have been longer than one week since we made our 10^-15 dilutions.
Serial Dilution and Spot Titer of Low Volume Lysate
Date Started: Oct. 11, 2019 Redo? Yes
Purpose: Serial dilutions are used to dilute the original sample down to purify the phage sample. We want to dilute our lysate so we can use a spot titer figure out the concentration needed to create webbed plates.
Notes:
A. The bench was prepared aseptically.
B. First, the agar plates were plated with bacteria and top agar to allow it to solidify while the serial dilutions were being made.
C. Using the serial dilution protocol and extra caution with aseptic technique, a serial dilution was performed down to 10^-15.
- Before spotting, each microcentrifuge tube was vortexed and examined for bubbles, which would complicate the spotting process.
- Using the small micropipettor tips (1uL – 10uL), we spotted our negative, the low volume lysate, and 10^-1 through 10^-3.
- We continued this technique of spacing out the spots between the three agar plates until all dilutions were plated.
- The plates were left to set for 15 minutes before placing into the incubator.
D. The plates were checked the next day, about 24 hours after being placed in the incubator.
Results:

We finally obtained a countable number of plaques!!!! From our dilution to the -9, we were able to count 8 plaques. We used this pfu for our math to find the titer of the low volume lysate. The titer ended up as 2.67 x 10^12. Which is extremely high! However we do know that our phage is on the more virulent side, as it was continuing to form plaques even in the refrigerator.
Conclusions and Next Steps:
Since we are beginning to be on a time crunch for microscopy, we decided to skip the full plate titer step and just use the titer obtained from the spot titer. Next we will use this calculated titer and estimate the number of plaques needed for a webbed plate. To do this we will do some math and calculate how many microliters of which dilution to use to create a webbed plate.
Creating Webbed Plates from a Lysate of Known Titer
Date Started:Oct. 14, 2019 Redo? No
Purpose: Calculating the titer of the low volume lysate is helpful in determining the concentration of a webbed plate. Creating webbed plates is the first step in obtaining a high volume lysate which can be used for microscopy of the phage.
Notes:
A. First, the number of desired plaques was estimated and the number of microliters to be plated was calculated.
- Using a previous plate which was densely packed with plaques as a reference plate, one quadrant of plaques was counted. This number came out to be 70. This number was then multiplied by 4 to account for an entire plate. This came out to a plate with 280 plaques on it to be webbed.
- Next, we divided 280 pfu by our low volume lysate titer: 2.67 x 10^12 pfu/mL and then multiplied by 1000uL to obtain an answer in microliters. This gave us an answer of 11 microliters at a dilution of 10^-8.
- To account for error, we decided to do one dilution factor less than and one greater than -8.
- When all was said and done, we decided to plate 11 microliters of our 10^-7 dilution on one plate, 11 microliters of our 10^-8 dilution on another plate, and 11 microliters of our 10^-9 dilution on the last plate.
B. The bench was prepared aseptically.
C. Our low volume lysate was obtained as were our most recent serial dilutions. Following the plaque assay protocol, our dilutions were plated.
- First, 3 PYCa plates were obtained from the refrigerator and left to come to room temperature. When they warmed up, they were labelled accordingly.
- Next 11 microliters of the 10^-8 dilution was inoculated with 250uL of host bacteria, M. foliorum. This was repeated for the other two dilutions. These were left for 10 minutes to allow for attachment.
- When the 10 minutes were up, serological pipettes and top agar were obtained. 3mL of hot top agar were mixed with the phage-bacteria mixture and then plated on the coordinating plates without bubbles. This was repeated for the other two phage-bacteria mixtures.
D. The plates were all left for 15 minutes to solidify and then inverted and placed in the incubator.
Results:
The plates were checked after being in the incubator for 27 hours.
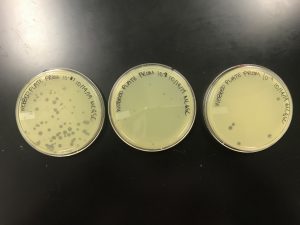
Since we were nowhere near creating a webbed plate, we will increase the desired number of plaques.
Conclusions and Next Steps:
Next we will recalculate the number of microliters needed to create a webbed plate by increasing the desired number of plaques to 5 times, 10 times, and 15 times the number of plaques on our reference plate.
Creating Webbed Plates from a Lysate of Known Titer
Date Started:Oct. 16, 2019 Redo? Yes
Purpose: Calculating the titer of the low volume lysate is helpful in determining the concentration of a webbed plate. Creating webbed plates is the first step in obtaining a high volume lysate which can be used for microscopy of the phage.
Notes:
A. First we decided to troubleshoot to figure out how to go about our second try.
- We counted the plaques on the 10^-7 plate from the first try since that had the most plaques on it. It had a total of 94 plaques. We decided we needed at LEAST 5 times this amount. We also decided to do 10 times the amount and 15 times as well.
- For 5 times the amount, we rounded 94 up to 100 and used 500 plaques as our desired number. To find the number of microliters needed to obtain this amount of plaques, we divided 500 pfu by 2.67 x 10^12 pfu/mL and multiplied by 1000uL to get a total of 19uL. of our 10^-8 diution. This step was repeated for 1000 pfu and 1500 pfu as the desired number of plaques. For 1000 pfu, we needed to plate 39uL of 10^-8 and for 1500 pfu, we needed to plate 58uL of 10^-8 dilution.
B. The above protocol for a plaque assay was then followed for each dilution factor.
C. The plates were left for 15 minutes to solidify, inverted, and then placed in the incubator.
Results:
The plates were checked after being in the incubator for 25 hours.
We realized from our results that we had gone to the wrong way with the dilutions. When we moved the decimal for the number of microliters, we should’ve gone to the 10^-6 dilution from 10^-7 instead of to 10^-8.
Conclusions and Next Steps:
Next we will target 1000 plaques as our goal and plate 39uL of our 10^-6 dilution. We will also plate 39uL of our 10^-3 dilutions to give us a range. That way, if our 10^-6 doesn’t yield webbed plates, but the 10^-3 dilution plates are closer, we know to go farther concentrated with our dilutions.
Creating Webbed Plates from a Lysate of Known Titer
Date Started:Oct. 17, 2019 Redo? Yes
Purpose: Calculating the titer of the low volume lysate is helpful in determining the concentration of a webbed plate. Creating webbed plates is the first step in obtaining a high volume lysate which can be used for microscopy of the phage.
Notes:
A. The bench was prepared aseptically.
B. 6 plates were obtained and warmed to room temperature. When they were warm, they were labelled accordingly. The bacteria and phage were als0 mixed together to inoculate.
C. After inoculation, top agar and serological pipettes were gathered. Following the plaque assay protocol, the top agar and phage-bacteria mix were plated.
- While we were plating the 10^-3 dilutions, we had made a mistake and forgotten to mix the top agar and bacteria-phage mix and accidentally just plated top agar. Therefore, we obtained a new agar plate and replated this one. We wanted to make sure we didn’t dispose of the wrong plate, so we put all four of the 10^-3 plates in the incubator.
Results:
The plates were pulled from the incubator after about 26 hours.

Since the phage on the 10^-3 plates lysed all of the bacteria, we were unable to tell which plate we had messed up on. But this was progress! From these plates, we could tell that 10^-6 was not concentrated enough to create webbed plates, but 10^-3 was too concentrated.
Conclusions and Next Steps:
Next we will plate 39uL of our 10^-4 dilution and our 10^-5 dilutions to see if those plates will yield webbed plates.
Creating Webbed Plates from a Lysate of Known Titer
Date Started:Oct. 18, 2019 Redo? Yes
Purpose: Calculating the titer of the low volume lysate is helpful in determining the concentration of a webbed plate. Creating webbed plates is the first step in obtaining a high volume lysate which can be used for microscopy of the phage.
Notes:
A. The bench was prepared aseptically and all the supplies needed were gathered and properly labelled.
B. The bacteria were inoculated with diluted phage samples:
- First, we needed to create more of our 10^-4 dilution by taking 10uL of our 10^-3 and adding it into 90uL of phage buffer in a new labelled 1.5mL tube. This procedure was repeated to make more of our 10^-5 dilution.
- Next, we added 39uL of each concentration to a tube of host bacteria. This was done in six total tubes, three for each of the dilutions.
- The bacteria and phage were inoculated for about 8 minutes.
C. The bacteria and phage mixture was combined with the top agar and plated.
- Using a serological pipette, 3mL of top agar was siphoned and released into the tube of host bacteria and phage.
- It was then immediately re-siphoned and dispensed on to the PYCa plate.
- The plate was left on the bench to solidify. After approximately 2o minutes, the plates were inverted and placed into the incubator agar side up.
Results:
The plates were checked after being in the incubator for 45 hours.
We aren’t quite sure what happened here with the 10^-4 plates. The plates were checked at 36 hours and weren’t quite webbed so we placed them back in the incubator. However, less than 10 hours later when the plates were checked again, they did not make a consistent plaque formation.
However, we were able to see that 10^-5 did not yield enough plates to create a webbed plate. (Only two pictured, the third plate was unable to be found.) We were able to conclude that the 10^-4 dilution was our best bet for a webbed plate.
Conclusions and Next Steps:
We will simply redo the protocol once again with our 10^-4 dilution with the same number of microliters of our 10^-4 so that we are able to create a consistent plaque formation.
Creating Webbed Plates from a Lysate of Known Titer
Date Started:Oct. 20, 2019 Redo? Yes
Purpose: Calculating the titer of the low volume lysate is helpful in determining the concentration of a webbed plate. Creating webbed plates is the first step in obtaining a high volume lysate which can be used for microscopy of the phage.
Notes:
A. The work bench was prepared aseptically and all the supplied needed were gathered and properly labelled.
B. The bacteria were inoculated with diluted phage samples:
- First, we needed to create more of our 10^-4 dilution by taking 10uL of our 10^-3 and adding it into 90uL of phage buffer in a new labelled microcentrifuge tube.
- Next, we added 39uL of our 10^-4 dilution to a tube of host bacteria. This was done three in three different tubes.
- The bacteria and phage were inoculated for about 8 minutes.
C. The bacteria and phage mixture was combined with the top agar and plated.
- Using a serological pipette, 3mL of top agar was siphoned and released into the tube of host bacteria and phage.
- It was then immediately re-siphoned and dispensed on to the PYCa plate.
- The plate was left on the bench to solidify for about 20 minutes.
- While plating the top agar, one of the plates was moved and the top agar was slightly disturbed. To ensure this wasn’t going to mess up our results, we repeated the above steps to produce a fourth plate.
- Lastly, the plates were inverted and placed into the incubator agar side up.
Results:
WE GOT A WEBBED PLATE! In the midst of our excitement to flood this webbed plate, we forgot to take a picture… However, the bacteria wasn’t fully developed so the plaques were very faint and likely would’ve not been able to be seen in a picture.
Conclusions and Next Steps:
The next steps are to flood this webbed plate, collect the lysate, and calculate the titer of our high volume lysate.
Flooding Webbed Plate & Collecting Lysate
Date Started: Oct. 21, 2019 Redo? No
Purpose: To generate a plate with a high phage concentration as well as a highly concentrated liquid phage sample.
Notes:
A. The bench was prepared aseptically.
B. The plates to be flooded were three 10^-4 dilutions. These plates were obtained and all other supplies were collected.
C. 8mL of sterile phage buffer was collected three different times in 10mL serological pipettes, and dispensed onto each of the webbed plates. These plates were left to sit at the back of the room for 4 hours.
D. After the plates were left for 4 hours, the lysate was collected using a syringe. Before dispensing the lysate into a sterile 50mL conical tube, it was filtered to remove any agar particles or any bacteria.
Results:
We now had 25mL of our high volume lysate to use for DNA extraction.
Conclusions and Next Steps:
Next we will begin our DNA extraction.
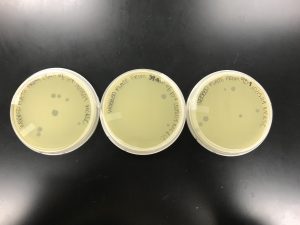
Creating Webbed Plates from a Lysate of Known Titer
Date Started: Nov 4, 2019 Redo? Yes
Purpose: Creating webbed plates is the first step in obtaining a high volume lysate which is used for DNA extractions.
Notes:
A. Since we needed to perform multiple DNA extractions, we were using up all of our high volume lysate. We need to create more high volume lysate for more extractions and archiving.
B. The work bench was prepared aseptically and all the supplied needed were gathered and properly labelled.
C. The bacteria were inoculated with diluted phage samples:
- We added 39uL of our 10^-4 dilution to each tube of host bacteria. This was done four time in four different tubes.
- The bacteria and phage were inoculated for about 8 minutes.
D. The bacteria and phage mixture was combined with the top agar and plated.
- Using a serological pipette, 3mL of top agar was siphoned and released into the tube of host bacteria and phage.
- It was then immediately re-siphoned and dispensed on to the PYCa plate.
- The plate was left on the bench to solidify for about 20 minutes.
- Lastly, the plates were inverted and placed into the incubator agar side up.
Results:
The plates were left in the incubator for 24 hours. When they were checked there was no plaques on them.
Picture
Conclusions and Next Steps:
We decided that the dilutions we used had degraded too much and that we needed to dilute our lysate again instead of using dilutions that were already made.
Creating Webbed Plates from a Lysate of Known Titer
Date Started: Nov 5, 2019 Redo? Yes
Purpose: Creating webbed plates is the first step in obtaining a high volume lysate which can be used for microscopy of the phage. In this instance, we are making more high volume lysate because the DNA extraction protocol must be completed again and for archiving purposes.
Notes:
A. The work bench was prepared aseptically and all the supplied needed were gathered and properly labelled.
B. We created new serial dilutions:
- First we labeled microcentrifuge tubes from 10^-1 to 10^-10. (We did this originally because we thought we were doing a spot titer.) 90uL of phage buffer was added to each tube.
- Next, we put 10uL of the low volume lysate (10^0) into the 10^-1 tube. We vortexed this tube to mix it all together then took 10uL from it and transferred it to the next dilution tube. This was done until 10uL was moved into the 10^-10 tube.
C. The bacteria and phage were combined and plated with top agar:
- We used a micropipetter and took 39uL of 10^-4 and added it to a tube of M. foliorum host bacteria and allowed to inoculate for 10 minutes. This was done three times, one for each of the plates.
- Using a serological pipette, 3mL of top agar was siphoned and released into the tube of host bacteria and phage.
- It was then immediately re-siphoned and dispensed on to the PYCa plate.
- The plate was left on the bench to solidify for about 20 minutes.
- Lastly, the plates were inverted and placed into the incubator agar side up.
Results:
We left them in the incubator for 30 hours, and they came out beautifully webbed! We flooded these plates each with 8mL of phage buffer, left them in the fridge to flood overnight (~10 hours), and obtained about 22mL of high volume lysate from them.

Conclusions and Next Steps:
Next we are using the high volume lysate for archiving and to perform more DNA extractions.
DNA Extraction
DNA Extraction: Protocol 3.5 M. foliorum
Date Started: Oct. 28, 2019 Redo? No
Purpose: To isolate genomic DNA from the phage.
Notes:
A. The DNA was extracted from the phage and pelleted out of solution:
- The high volume lysate was gently mixed and 5mL were aliquotted into a 15 mL conical tube. The tube was given to the TA who added 20uL of nuclease mix into the tube.
- Once nuclease was added, the tube was inverted and incubated at 37° for 15 minutes.
- The incubated lysate was then aliquotted into 5 microcentrifuge tubes, 1mL in each tube.
- Into each tube, 20uL of ZnCl2 was added, inverted, and incubated at 37°C for 5 minutes.
- These tubes were then balanced in a centrifuge and spun at 10,000rpm for 1 minute to pellet the phage.
- The supernatants were then removed by aspiration without disturbing the pellet. The liquid was discarded into a waste tube.
- Using a micropipettor, 500uL of TES buffer was added to each tube to resuspend the DNA, and incubated at 60°C for 15 minutes.
- 1uL of Proteinase K was added and gently mixed. The tubes were incubated at 37°C for 10 minutes.
- Next, 60uL of potassium acetate was added to each tube. The tubes were mixed well and left on ice for 15 minutes.
- After the 15 minutes was up, the tubes were centrifuged at 4°C for 1 minute at 12,000rpm to pellet the capsids.
- 500uL of isopropanol was added to each of the tubes with the supernatant, mixed, and left on ice for 4 hours.
B. The DNA was repelleted and resuspended in molecular water. The concentrations were also checked using a Nanodrop and Qubit:
- The tubes were removed from the ice and centrifuged at top speed for 10 minutes to pellet the DNA, the supernatant was discarded into a waste tube.
- Using a micropipettor, 250uL of 70% ethanol was added into each tube and spun again for 1 minute at top speed.
- The tubes were carefully turned upside down and slowly drained of the supernatent. They were then left open to air dry for an hour and a half. To help with the drying, the tubes were put in the 37 C heat block for 30 minutes and then the 60 C heat block for 20 minutes. After this the DNA was fully dry.
- The pellet in the first tube was resuspended with 50uL of molecular water. This 50uLs was transferred into the second tube, which was transferred to the rest of the tubes one by one. In the end we had all of the DNA resuspended in the same 50uL of molecular water.
- The concentration of the DNA was checked with the Nanodrop and the Qubit with high sensitivity.
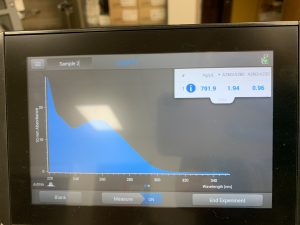
Results:
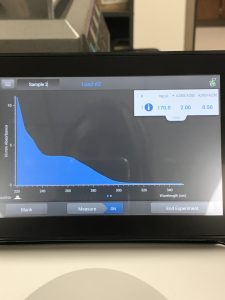
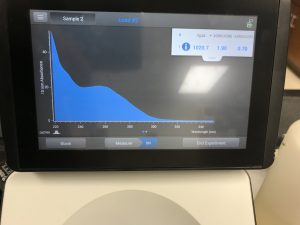
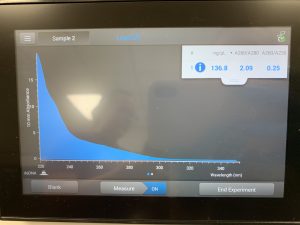
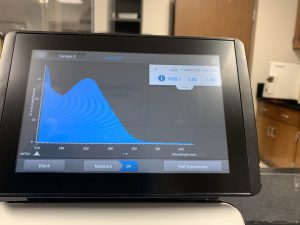
The Nanodrop reading was fairly good at 1528! The first peak represents the amount of salt we have present in the sample, and that is a little higher than we would really want, but since the peak around 260 is strong, and the other ratios are good with A260/A280 being 2.02 and A260/A230 being 1.30, this was considered a successful DNA extraction!

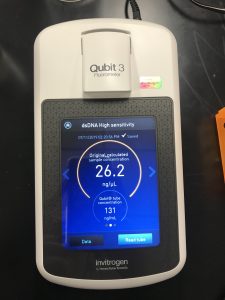
We also ran our DNA through the Qubit fluorometer. When the DNA was first loaded into the Qubit, it said the concentration was too high to be read, so we diluted the sample by adding 1uL of DNA into 19uL of water, so the sample was 20 times more dilute. We then tried again and this reading was also considered successful! The Qubit read 6.82ng/uL, this multiplied by 2o to get the undiluted sample came out to be 136ng/uL.

Conclusions and Next Steps:
Next we are using our DNA to create enzyme digests and run a gel electrophoresis!
DNA Extraction: Protocol 3.5 M. foliorum
Date Started: Nov. 1, 2019 Redo? Yes
Purpose: To isolate genomic DNA from the phage.
Notes:
A. The DNA was extracted from the phage and pelleted out of solution:
- The high volume lysate was gently mixed and 5mL were aliquotted into a 15 mL conical tube. The tube was given to the TA who added 20uL of nuclease mix into the tube.
- Once nuclease was added, the tube was inverted and incubated at 37° for 10 minutes.
- The incubated lysate was then aliquotted into 5 microcentrifuge tubes, 1mL in each tube.
- Into each tube, 20uL of ZnCl2 was added, inverted, and incubated at 37°C for 5 minutes.
- These tubes were then balanced in a centrifuge and spun at 10,000rpm for 1 minute to pellet the phage.
- The supernatants were then removed by aspiration without disturbing the pellet. The liquid was discarded into a waste tube.
- Using a micropipettor, 500uL of TES buffer was added to each tube to resuspend the DNA, and incubated at 60°C for 15 minutes.
- 1uL of Proteinase K was added and gently mixed. The tubes were incubated at 37°C for 10 minutes.
- Next, 60uL of potassium acetate was added to each tube. The tubes were mixed well and left on ice for 15 minutes.
- After the 15 minutes was up, the tubes were centrifuged at 4°C for 1 minute at 12,000rpm to pellet the capsids.
- 500uL of isopropanol was added to each of the tubes with the supernatant, mixed, and left on ice for 1 hour and 30 minutes.
B. The DNA was repelleted and resuspended in molecular water. The concentrations were also checked using a Nanodrop and Qubit:
- The tubes were removed from the ice and centrifuged at top speed for 10 minutes to pellet the DNA, the supernatant was discarded into a waste tube.
- Using a micropipettor, 250uL of 70% ethanol was added into each tube and spun again for 1 minute at top speed.
- The tubes were carefully turned upside down and slowly drained of the supernatent. They were then left open to air dry for an hour and a half. To help with the drying, the tubes were put in the 37 C heat block for 30 minutes and then the 60 C heat block for 20 minutes. After this the DNA was fully dry.
- The pellet in the first tube was resuspended with 50uL of molecular water. This 50uLs was transferred into the second tube, which was transferred to the rest of the tubes one by one. In the end we had all of the DNA resuspended in the same 50uL of molecular water.
- The concentration of the DNA was checked with the Nanodrop.
- The reading on the nanodrop was not good enough to need a reading on the Qubit.
Results:
The results obtained from the nanodrop showed that there was just not much DNA in the sample. Most of what the nanodrop was reading was salt.
Conclusions and Next Steps:
Since the nanodrop reading was no so good, we troubleshooted what we think could’ve gone wrong. We compared what we did the first time and what we did this time. We decided on step 11 we needed to leave the tubes on ice for longer than 1 hour and 30 minutes. It is possible that since the tubes were only left on ice for a shorter amount of time, the DNA didn’t have enough time to precipitate out. Next attempt we need to leave it on ice for at least 3 or 4 hours.
DNA Extraction: Protocol 3.5 M. foliorum
Date Started: Nov. 4, 2019 Redo? Yes
Purpose: To isolate genomic DNA from the phage.
Notes:
A. The DNA was extracted from the phage and pelleted out of solution:
- We decided to double the amount of lysate used to increase the amount of DNA extracted.
- The high volume lysate was gently mixed and 10mL were aliquotted into a 15 mL conical tube. The tube was given to the TA who added 40uL of nuclease mix into the tube.
- Once nuclease was added, the tube was inverted and incubated at 37° for 10 minutes.
- The incubated lysate was then aliquotted into 10 microcentrifuge tubes, 1mL in each tube.
- Into each tube, 20uL of ZnCl2 was added, inverted, and incubated at 37°C for 5 minutes.
- These tubes were then balanced in a centrifuge and spun at 10,000rpm for 1 minute to pellet the phage.
- The supernatants were then removed by aspiration without disturbing the pellet. The liquid was discarded into a waste tube.
- Using a micropipettor, 500uL of TES buffer was added to each tube to resuspend the DNA, and incubated at 60°C for 15 minutes.
- 1uL of Proteinase K was added and gently mixed. The tubes were incubated at 37°C for 10 minutes.
- Next, 60uL of potassium acetate was added to each tube. The tubes were mixed well and left on ice for 15 minutes.
- After the 15 minutes was up, the tubes were centrifuged at 4°C for 1 minute at 12,000rpm to pellet the capsids.
- 500uL of isopropanol was added to each of the tubes with the supernatant, mixed, and left on ice for 1 hour and 30 minutes.
B. The DNA was repelleted and resuspended in molecular water. The concentrations were also checked using a Nanodrop and Qubit:
- The tubes were removed from the ice and centrifuged at top speed for 10 minutes to pellet the DNA, the supernatant was discarded into a waste tube.
- The tubes were carefully turned upside down and slowly drained of the supernatent. They were then left open to air dry for an hour and a half. To help with the drying, the tubes were put in the 37 C heat block for 30 minutes and then the 60 C heat block for 20 minutes. After this the DNA was fully dry.
- The pellet in the first tube was resuspended with 100uL of molecular water. This 100uLs was transferred into the second tube, which was transferred to the rest of the tubes one by one. In the end we had all of the DNA resuspended in the same 100uL of molecular water.
- The concentration of DNA was checked using the nanodrop.
Results:
The results obtained from the nanodrop showed that there was just not much DNA in the sample. Most of what the nanodrop was reading was salt.
After discussing with the TA about our next steps, we realized that we COMPETELY SKIPPED THE ETHANOL WASH!! This would make sense, the main reason for an ethanol wash is to wash away salt from the DNA. We decided to go back and complete an ethanol wash.
- We went back to the second part of the DNA extraction protocol. Since the DNA was resuspended in 100uL of water, we added 250uL of 100% ethanol so the water would dilute the ethanol down to the 70% ethanol needed in this step.
- The ethanol filled tube was then mixed by inversion and centrifuged for 1 minute.
- The supernatent was then aspirated using a micropipettor and the pellet was left to dry.
- These above steps were followed once more, to wash the DNA twice.
- The concentration was again checked with the nanodrop.

While this reading is better than the last, it was still not great.
Conclusions and Next Steps:
This DNA was stored in the refrigerator and another DNA extraction was to be started the next day. We also want to continue washing this DNA extraction to see if it can continue to get better nanodrop readings.
Nov. 5, 2019:
We decided to add more ethanol to this extraction to continue to wash it and purify the DNA. This time, we washed it with 250uL of ethanol and left the tube on ice over night to precipitate out as much DNA as possible.
- We came back the next day (Nov. 6, 2019) and centrifuged the tube to pellet the DNA. We then aspirated the supernatent and washed it again with ethanol once more. We aspirated the ethanol and left the pellet to dry, and then tested the concentration using the nanodrop again.
While this reading showed improvement, there was still SO much salt in with the DNA. We decided to use a different protocol to wash the DNA, the crush gel method. Even though it is called the crush gel method, we didn’t use a gel, we started halfway through the protocol to wash our DNA.
- First we added 1/10th of the amount in our tube of 3M Sodium Acetate, this came out to 4.7uL.
- We then added 3 times the amount in the tube of ethanol, which came out to be 141uL.
- This mixture was left to sit for 5 minutes, then centrifuged for 10 minutes at top speed.
- The supernatent was aspirated, and the pellet was washed with 1000uL (1mL) of cold 70% ethanol.
- This was centrifuged for 2 minutes, and the supernatent was aspirated as much as possible and the pellet was left to dry.
- The pellet was resuspended in 50uL of nuclease-free water.
- This DNA was checked using the nanodrop.
Once again, this reading showed improvement but still not great; however, we were told that while this reading was not necessarily great, it might be good enough to work with. We decided to run this sample through the Qubit and this was our reading:
We wanted to continue to perform more DNA extractions to see if we could get one better than this. However, we were told to keep this extraction just in case another one didn’t work out. We also put this extraction on ice with another ethanol wash to continue the next day.
Nov. 7, 2019
We came back to lab, and rewashed this extraction using the protocol from 3.5. Here was the nanodrop reading:
We decided to keep this extraction in case another one didn’t work, but we were finished washing this one. Another extraction was started.
DNA Extraction: Protocol 3.5 M. foliorum
Date Started: Nov. 5, 2019 Redo? Yes
Purpose: To isolate genomic DNA from the phage.
Notes:
A. The DNA was extracted from the phage and pelleted out of solution:
- The high volume lysate was gently mixed and 5mL were accidentally aliquotted into 5 microcentrifuge tubes instead of a 15 mL conical tube. To fix this, instead of putting 20uL of nuclease mix into the conical tube, the TA added 4uL of nuclease into each microcentrifuge tubes. These were each thoroughly mixed and incubated at 37° for 10 minutes.
- The incubated lysate was then aliquotted into 5 microcentrifuge tubes, 1mL in each tube.
- Into each tube, 20uL of ZnCl2 was added, inverted, and incubated at 37°C for 5 minutes.
- These tubes were then balanced in a centrifuge and spun at 10,000rpm for 1 minute to pellet the phage.
- The supernatants were then removed by aspiration without disturbing the pellet. The liquid was discarded into a waste tube.
- Using a micropipettor, 500uL of TES buffer was added to each tube to resuspend the DNA, and incubated at 60°C for 15 minutes.
- 1uL of Proteinase K was added and gently mixed. The tubes were incubated at 37°C for 10 minutes.
- Next, 60uL of potassium acetate was added to each tube. The tubes were mixed well and left on ice for 15 minutes.
- After the 15 minutes was up, the tubes were centrifuged at 4°C for 1 minute at 12,000rpm to pellet the capsids.
- 500uL of isopropanol was added to each of the tubes with the supernatant, mixed, and left on ice overnight.
B. The DNA was repelleted and resuspended in molecular water. The concentrations were also checked using a Nanodrop and Qubit:
- The tubes were removed from the ice and centrifuged at top speed for 10 minutes to pellet the DNA, the supernatant was discarded into a waste tube.
- Using a micropipettor, 250uL of 70% ethanol was added into each tube and spun again for 1 minute at top speed. After the ethanol was aspirated, this step was followed a second time to try to get rid of as much salt as possible.
- The tubes were carefully turned upside down and slowly drained of the supernatent. They were then left open to air dry for an hour and a half. To help with the drying, the tubes were put in the 37 C heat block for 30 minutes and then the 60 C heat block for 20 minutes. After this the DNA was fully dry.
- The pellet in the first tube was resuspended with 50uL of molecular water. This 50uLs was transferred into the second tube, which was transferred to the rest of the tubes one by one. In the end we had all of the DNA resuspended in the same 50uL of molecular water.
- The concentration of the DNA was checked with the Nanodrop.
- The reading on the nanodrop was not good enough to need a reading on the Qubit.
Results:
The results obtained from the nanodrop were terrible. There was no peak at 260, showing no DNA found in the sample. This sample was trashed.
Conclusions and Next Steps:
We are going to try another DNA extraction.
DNA Extraction: Protocol 3.5 M. foliorum
Date Started: Nov. 6, 2019 Redo? Yes
Purpose: To isolate genomic DNA from the phage.
Notes:
A. The DNA was extracted from the phage and pelleted out of solution:
- The high volume lysate was gently mixed and 5mL were aliquotted into a 15 mL conical tube. The tube was given to the TA who added 20uL of nuclease mix into the tube.
- Once nuclease was added, the tube was inverted and incubated at 37° for 10 minutes.
- The incubated lysate was then aliquotted into 5 microcentrifuge tubes, 1mL in each tube.
- Into each tube, 20uL of ZnCl2 was added, inverted, and incubated at 37°C for 5 minutes.
- These tubes were then balanced in a centrifuge and spun at 10,000rpm for 1 minute to pellet the phage.
- The supernatants were then removed by aspiration without disturbing the pellet. The liquid was discarded into a waste tube.
- Using a micropipettor, 500uL of TES buffer was added to each tube to resuspend the DNA, and incubated at 60°C for 15 minutes.
- 1uL of Proteinase K was added and gently mixed. The tubes were incubated at 37°C for 10 minutes.
- Next, 60uL of potassium acetate was added to each tube. The tubes were mixed well and left on ice for 15 minutes.
- After the 15 minutes was up, the tubes were centrifuged at 4°C for 1 minute at 12,000rpm to pellet the capsids.
- 500uL of isopropanol was added to each of the tubes with the supernatant, mixed, and left on ice for 4 hours.
B. The DNA was repelleted and resuspended in molecular water. The concentrations were also checked using a Nanodrop and Qubit:
- The tubes were removed from the ice and centrifuged at top speed for 10 minutes to pellet the DNA, the supernatant was discarded into a waste tube.
- Using a micropipettor, 250uL of 70% ethanol was added into each tube and spun again for 1 minute at top speed.
- The tubes were carefully turned upside down and slowly drained of the supernatent. They were then left open to air dry for an hour and a half. To help with the drying, the tubes were put in the 37 C heat block for 30 minutes and then the 60 C heat block for 20 minutes. After this the DNA was fully dry.
- The pellet in the first tube was resuspended with 50uL of molecular water. This 50uLs was transferred into the second tube, which was transferred to the rest of the tubes one by one. In the end we had all of the DNA resuspended in the same 50uL of molecular water.
- The concentration of the DNA was checked with the Nanodrop.
- The reading on the nanodrop was not good enough to need a reading on the Qubit.
Results:
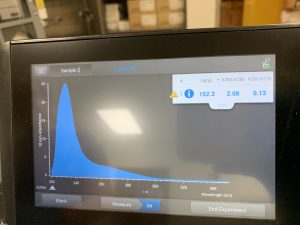
The results obtained from the nanodrop showed that there was DNA extracted in the sampe, but there was also still a lot of salt.
Conclusions and Next Steps:
We know we can get a better reading that this, we decided to continue trying more extractions since it was doable before.
DNA Extraction: Protocol 3.5 M. foliorum
Date Started: Nov. 7, 2019 Redo? Yes
Purpose: To isolate genomic DNA from the phage.
Notes:
A. The DNA was extracted from the phage and pelleted out of solution:
- The high volume lysate was gently mixed and 5mL were aliquotted into a 15 mL conical tube. The tube was given to the TA who added 20uL of nuclease mix into the tube.
- Once nuclease was added, the tube was inverted and incubated at 37° for 10 minutes.
- The incubated lysate was then aliquotted into 5 microcentrifuge tubes, 1mL in each tube.
- Into each tube, 20uL of ZnCl2 was added, inverted, and incubated at 37°C for 5 minutes.
- These tubes were then balanced in a centrifuge and spun at 10,000rpm for 1 minute to pellet the phage.
- The supernatants were then removed by aspiration without disturbing the pellet. The liquid was discarded into a waste tube.
- Using a micropipettor, 500uL of TES buffer was added to each tube to resuspend the DNA, and incubated at 60°C for 15 minutes.
- 1uL of Proteinase K was added and gently mixed. The tubes were incubated at 37°C for 10 minutes.
- Next, 60uL of potassium acetate was added to each tube. The tubes were mixed well and left on ice for 15 minutes.
- After the 15 minutes was up, the tubes were centrifuged at 4°C for 1 minute at 12,000rpm to pellet the capsids.
- 500uL of isopropanol was added to each of the tubes with the supernatant, mixed, and left on ice for 1 hour and 30 minutes.
B. The DNA was repelleted and resuspended in molecular water. The concentrations were also checked using a Nanodrop and Qubit:
- The tubes were removed from the ice and centrifuged at top speed for 10 minutes to pellet the DNA, the supernatant was discarded into a waste tube.
- Using a micropipettor, 250uL of 70% ethanol was added into each tube and spun again for 1 minute at top speed.
- The tubes were carefully turned upside down and slowly drained of the supernatent. They were then left open to air dry for an hour and a half. To help with the drying, the tubes were put in the 37 C heat block for 30 minutes and then the 60 C heat block for 20 minutes. After this the DNA was fully dry.
- The pellet in the first tube was resuspended with 50uL of molecular water. This 50uLs was transferred into the second tube, which was transferred to the rest of the tubes one by one. In the end we had all of the DNA resuspended in the same 50uL of molecular water.
- The concentration of the DNA was checked with the Nanodrop.
- The reading on the nanodrop was not good enough to need a reading on the Qubit.
Results:
The pellets for this extraction were HUGE! This meant there was also a lot of salt in the pellet… which was easily shown by the nanodrop.
Conclusions and Next Steps:
We’re not sure what happened in this extraction.. but we’re running out of time!! We are starting two more DNA extractions.
DNA Extraction: Protocol 3.5 M. foliorum
Date Started: Nov. 8, 2019 Redo? Yes
Purpose: To isolate genomic DNA from the phage.
Notes:
A. The DNA was extracted from the phage and pelleted out of solution:
- The high volume lysate was gently mixed and 5mL were aliquotted into a 15 mL conical tube. The tube was given to the TA who added 20uL of nuclease mix into the tube.
- Once nuclease was added, the tube was inverted and incubated at 37° for 10 minutes.
- The incubated lysate was then aliquotted into 5 microcentrifuge tubes, 1mL in each tube.
- Into each tube, 20uL of ZnCl2 was added, inverted, and incubated at 37°C for 5 minutes.
- These tubes were then balanced in a centrifuge and spun at 10,000rpm for 1 minute to pellet the phage.
- The supernatants were then removed by aspiration without disturbing the pellet. The liquid was discarded into a waste tube.
- Using a micropipettor, 500uL of TES buffer was added to each tube to resuspend the DNA, and incubated at 60°C for 15 minutes.
- 1uL of Proteinase K was added and gently mixed. The tubes were incubated at 37°C for 10 minutes.
- Next, 60uL of potassium acetate was added to each tube. The tubes were mixed well and left on ice for 15 minutes.
- After the 15 minutes was up, the tubes were centrifuged at 4°C for 1 minute at 12,000rpm to pellet the capsids.
- 500uL of isopropanol was added to each of the tubes with the supernatant, mixed, and left on ice for 4 hours.
B. The DNA was repelleted and resuspended in molecular water. The concentrations were also checked using a Nanodrop and Qubit:
- The tubes were removed from the ice and centrifuged at top speed for 10 minutes to pellet the DNA, the supernatant was discarded into a waste tube.
- Using a micropipettor, 250uL of 70% ethanol was added into each tube and spun again for 1 minute at top speed.
- The tubes were carefully turned upside down and slowly drained of the supernatent. They were then left open to air dry for an hour and a half. To help with the drying, the tubes were put in the 37 C heat block for 30 minutes and then the 60 C heat block for 20 minutes. After this the DNA was fully dry.
- The pellet in the first tube was resuspended with 50uL of molecular water. This 50uLs was transferred into the second tube, which was transferred to the rest of the tubes one by one. In the end we had all of the DNA resuspended in the same 50uL of molecular water.
- The concentration of the DNA was checked with the Nanodrop and the Qubit with high sensitivity.
Results:
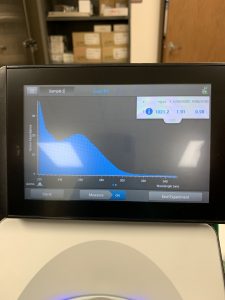
WE FINALLY DID IT!!!! And it only took 8 tries! Our nanodrop concentration read at 4541, with A260/A280 being 2.10 and A260/A230 being 1.71.
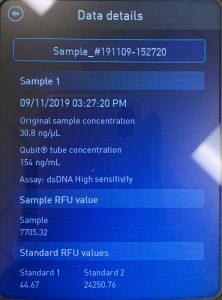
First we ran the Qubit with an undiluted sample and it was too high for the machine to read. So we diluted the sample by putting 1uL into 19uL of water so the sample was 20 times more dilute. Our concentration was 30.8ng/uL, this multiplied by 20 would yield our actual concentration, which came out to be 616ng/uL.
Conclusions and Next Steps:
Next we are finishing the other extraction started on Friday morning, and then on Sunday we will make our enzyme digests and run a gel electrophoresis!
DNA Extraction: Protocol 3.5 M. foliorum
Date Started: Nov. 8, 2019 Redo? Yes
Purpose: To isolate genomic DNA from the phage.
Notes:
A. The DNA was extracted from the phage and pelleted out of solution:
- The high volume lysate was gently mixed and 5mL were aliquotted into a 15 mL conical tube. The tube was given to the TA who added 20uL of nuclease mix into the tube.
- Once nuclease was added, the tube was inverted and incubated at 37° for 10 minutes.
- The incubated lysate was then aliquotted into 5 microcentrifuge tubes, 1mL in each tube.
- Into each tube, 20uL of ZnCl2 was added, inverted, and incubated at 37°C for 5 minutes.
- These tubes were then balanced in a centrifuge and spun at 10,000rpm for 1 minute to pellet the phage.
- The supernatants were then removed by aspiration without disturbing the pellet. The liquid was discarded into a waste tube.
- Using a micropipettor, 500uL of TES buffer was added to each tube to resuspend the DNA, and incubated at 60°C for 15 minutes.
- 1uL of Proteinase K was added and gently mixed. The tubes were incubated at 37°C for 10 minutes.
- Next, 60uL of potassium acetate was added to each tube. The tubes were mixed well and left on ice for 15 minutes.
- After the 15 minutes was up, the tubes were centrifuged at 4°C for 1 minute at 12,000rpm to pellet the capsids.
- 500uL of isopropanol was added to each of the tubes with the supernatant, mixed, and left on ice for 3 hours and 30 minutes.
B. The DNA was repelleted and resuspended in molecular water. The concentrations were also checked using a Nanodrop and Qubit:
- The tubes were removed from the ice and centrifuged at top speed for 10 minutes to pellet the DNA, the supernatant was discarded into a waste tube.
- Using a micropipettor, 250uL of 70% ethanol was added into each tube and spun again for 1 minute at top speed.
- The tubes were carefully turned upside down and slowly drained of the supernatent. They were then left open to air dry for an hour and a half. To help with the drying, the tubes were put in the 37 C heat block for 30 minutes and then the 60 C heat block for 20 minutes. After this the DNA was fully dry.
- The pellet in the first tube was resuspended with 50uL of molecular water. This 50uLs was transferred into the second tube, which was transferred to the rest of the tubes one by one. In the end we had all of the DNA resuspended in the same 50uL of molecular water.
- Since the pellets wouldn’t resuspend in the water, the protocol was stopped here.
Results:
This extraction looked fantastic in the beginning.. once again we’re not exactly sure what happened but the DNA wouldn’t even resuspend in 50uL of water. Therefore no nanodrop or Qubit was ran.
Conclusions and Next Steps:
This extraction will be thrown away and we will move forward with the extraction above!
Characterization
Electron Microscopy: Mounting Sample
Date Started:Oct. 28, 2019 Redo? No
Purpose: To prepare the phage sample for viewing through a transmission electron microscope.
Notes:
A. The phage samples were prepared:
- 1mL of high volume lysate was transferred into a sterile microcentrifuge tube.
- The tubes were then centrifuged for 1 hour at 4°C at top speed.
- Using a micropipettor, as much supernatant as possible was removed without disrupting the concentrated phage pellet at the bottom.
- 100uL of phage buffer into the tube and it was left to suspend at 4°C for a little over an hour.
B. The microscopy grid was prepared:
- In the fume hood, the supplies were gathered.
- First, the cover of the petri dish was removed and a parafilm square was placed on the inside surface of the cover.
- A PELCO Tab was placed onto the parafilm and the cover was peeled off to expose the adhesive of the tab.
- Using EM forceps, a fresh grid was removed from a box of unused grids, touching only the edge of the grid.
- The grid was placed dark and shiny side up on the edge of the tab tab to adhere the edge of the grid onto the petri dish lid.
C. The phage sample was mounted and stained:
- Using a micropipettor, 10uL of our high volume lysate sample was placed onto the grid without touching the tip of the pipette to the grid itself.
- The phage was allowed to settle and attach onto the grid for 2 minutes.
- After two minutes, the excess fluid was wicked off using a small wedge of filter paper.
- The grid was then washed twice using 10uL of water, waiting two minutes, and then wicking off the excess water.
- Lastly, 10uL of 1% uranyl acetate was pipetted onto the grid, left to sit for 2 minutes and then the excess stain was wicked off using filter paper.
- The grid was allowed to air dry before placing it safely into the grid storage box.
D. The phage was observed using transmission electron microscopy.
Results:

Created by Digital Micrograph, Gatan Inc.
Our phage is a siphovirus!
Conclusions and Next Steps:
Since we used our low volume lysate for microscopy, next we need to collect our high volume lysate for DNA Extraction.
Setting Up Restriction Enzyme Digests
Date Started: Oct. 31, 2019 Redo? No
Purpose: To cut the phage into multiple fragments based on its DNA sequence.
Notes:
A. The volume of DNA sample for each tube was calculated:
- We multiplied our Qubit reading of 6.82ng/uL by 20 to account for the dilution we did. This number came out to 136ng/uL. To convert this unit (ng/uL) to ug/mL, we multiplied by 1000uL and then divided by 1000ng to obtain the value of 136ug/mL.
- We were instructed to use to equivalent of 1ug instead of 0.5ug of DNA. Therefore, we used this equation: 1ug x (1mL/136ug)(1000uL/1mL) = 7.4uL of DNA.
- We double checked that we would have enough DNA for the 5 restriction enzymes: for all the tubes we would use 37uL of DNA plus another 7.4uL for the uncut DNA well. This total is 44uL, we calculated that we had 47uL left in our tube after the Qubit and Nanodrop.
B. The enzyme digests were made:
- We used a total reaction volume of 25uL for each tube. This was calculated to use 2.5uL of 10x reaction buffer, 0.5uL of restriction enzymes, 7.4uL of DNA, and 14.6uL of water.
- For the restriction enzymes, we used HaeIII, HindIII, NspI, SacII, and SalI. We made a tube for each of these enzymes.
- When we made the last enzyme digest, we had ran out of DNA. We didn’t have enough to make an uncut DNA well… we attributed this to a couple different things, a couple including mathematical error or pipetting error.
- The enzyme digests were stored in the freezer and a gel was not ran.
Results:
Since we didn’t have enough DNA for an uncut well, we decided to not run the gel. We felt there was not much that could be determined from a gel without a control.
Conclusions and Next Steps:
The uncut DNA needs to be from the same DNA extraction to eliminate another variable; therefore, we needed to complete another successful DNA extraction.
Setting Up Restriction Enzyme Digests
Date Started: Nov 10, 2019 Redo? Yes
Purpose: To cut the phage into multiple fragments based on its DNA sequence.
Notes:
A. The volume of DNA sample for each tube was calculated:
- We multiplied our Qubit reading of 30.8ng/uL by 20 to account for the dilution we did. This number came out to 616ng/uL. To convert this unit (ng/uL) to ug/mL, we multiplied by 1000uL and then divided by 1000ng to obtain the value of 616ug/mL.
- We wanted to use 250ng of our DNA in each tube to minimize DNA loss.
B. The enzyme digests were made:
- We used a total reaction volume of 25uL for each tube. This was calculated to use 2.5uL of 10x reaction buffer, 0.5uL of restriction enzymes, 7.4uL of DNA, and 14.6uL of water.
- For the restriction enzymes, we used HaeIII, HindIII, NspI, SacII, and SalI. We made a tube for each of these enzymes. As well as a tube with a ladder and uncut DNA.
- These tubes were incubated at 37°C for 1 hour.
Results:
Now we had completed enzyme digests to run in a gel electrophoresis.
Conclusions and Next Steps:
Next we will run the gel electrophoresis with these enzyme digests.
Casting Agarose Gels
Date Started: Nov 10, 2019 Redo? No
Purpose: To prepare an agarose gel for electrophoresis.
Notes:
A. An 0.8% (w/v) agarose gel was prepared:
- A gel apparatus was constructed and set aside.
- First, the amount of agarose powder needed was calculated to be 0.32g.
- 40mL of total volume was multiplied by 0.008 which equalled 0.32g of agarose powder.
- Agarose powder was weighed out to 0.32g and then transferred to an Erlenmeyer flask.
- 0.32g of agarose was subtracted from 40mL total volume, to get 39.68mL of 1X TBE buffer. This was measured out as precisely as we could get it, which was about 39.5mL, and this was added to the agarose powder. It was gently swirled and a tampon was stuffed in the top of the flask.
- The mixture was heated in the microwave for 1–2 minutes.
- The flask was carefully removed from the microwave with a oven mitt.
- The solution was left to cool. This typically takes 10–15 minutes.
- 40mL of total volume was multiplied by 0.008 which equalled 0.32g of agarose powder.
- Once the solution was sufficiently cool, 1mL of Ethidium Bromide was added and the solution was swirled.
- The agarose/EtBr mixture was poured into the prepared gel apparatus. The comb was inserted to cast the wells, and the gel was left to solidify for 20-30 minutes.
- Once the gel solidified, the comb was removed by pulling it slowly straight up. Once the comb was removed, the gel platform was lifted out of the casting tray and repositioned to allow the buffer to be poured over the gel.
- The platform with the solidified gel was placed into the gel box. The wells were at the negative cathode end of the box, where the black lead was connected.
- 1X TBE buffer was poured into the gel apparatus until the gel was submerged by ~ 1/4 inch of buffer.
Results:
We now have a solidified gel to pipet our enzyme digests into.
Conclusions and Next Steps:
Next we are running our gel with the restriction enzymes.
Gel Electrophoresis of Restriction Enzyme Digests
Date Started: Nov 10, 2019 Redo? No
Purpose: To separate DNA fragments via agarose gel electrophoresis.
Notes:
A. The gel electrophoresis equipment was set up using the previous protocol.
- Wearing gloves, the gel was oriented in such a way that the wells were closest to the cathode (black electrode).
B. Restriction enzyme digest samples were prepared for electrophoresis.
- Add 5 μl of concentrated 6x loading dye to each 25 µl restriction enzyme sample.
- Place samples at 65 °C, either in a heat block or a hot water bath, for 5 minutes. Immediately place the samples on ice to cool, and then spin them in a microcentrifuge for ~ 15 seconds at 10,000 rpm.
- This step prevents annealing of the cohesive ends of phage DNA.
C. The gel was loaded in the following order:
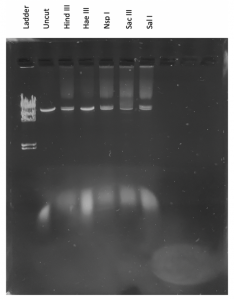
Ladder Uncut DNA Enzyme-1 Enzyme-2 Enzyme-3 Enzyme-n
- The gel was carefully loaded with the proper volume of DNA ladder.
- Using a fresh tip on the micropipettor for each sample, 20uL of each RE reaction was placed into the wells in the order suggested above.
- Using both hands to hold the pipette, the tip was placed directly above the well but just below the surface of the buffer. We were careful to not miss the wells or puncture the bottom or sides of the wells.
- The pipette plunger was slowly depressed which allowed the solution to slowly sink into the well.
- The pipette was removed from the gel before the plunger was released.
- The electrodes were plugged into the appropriate locations on the power supply. The power supply was turned on and set the voltage to 100V.
- The gel was ran until the purple dye front had migrated at least 3.5 inches from the well. It took approximately 1 hour.
- After the one hour, the power supply was turned off.
D. The gel was visualized.
- Using gloves, the gel was carefully removed from the electrophoresis chamber.
- To visualize the gel, it was carefully placed on top of the ultraviolet light.
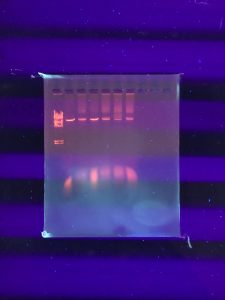
Results:
It doesn’t seem like the DNA was cut very much… our instructor decided that we should try to run the gel again but double the amount of DNA in the enzyme digests. We also needed to dilute our DNA ladder.
Conclusions and Next Steps:
We are setting up and running another gel.
Setting Up Restriction Enzyme Digests
Date Started: Nov 10, 2019 Redo? Yes
Purpose: To cut the phage into multiple fragments based on its DNA sequence.
Notes:
A. The volume of DNA sample for each tube was calculated:
- We mulitplied our Qubit reading of 30.8ng/uL by 20 to account for the dilution we did. This number came out to 616ng/uL. To convert this unit (ng/uL) to ug/mL, we multiplied by 1000uL and then divided by 1000ng to obtain the value of 616ug/mL.
- We wanted to use 500ng of our DNA in each tube to minimize DNA loss.
B. The enzyme digests were made:
- We used a total reaction volume of 10uL for each tube. This was calculated to use 2uL of 10x reaction buffer, 1uL of restriction enzymes, 4.1uL of diluted DNA, and 2.9uL of water.
- For the restriction enzymes, we used HaeIII, NspI, SacII, and SalI; we took our HindIII since it didn’t cut our DNA the first time and so we could use the time saver safe protocol. We made a tube for each of these enzymes. As well as a tube with a ladder and uncut DNA.
- These tubes were incubated at 37 C for 15 minutes.
Results:
Now we had completed enzyme digests to run in a gel electrophoresis.
Conclusions and Next Steps:
Next we will run the gel electrophoresis with these enzyme digests.
Results:
We now have enzyme digests with more DNA than last time that will most likely be easier to visualize.
Conclusions and Next Steps:
Next we need to prepare the agarose gel to run the gel.
Casting Agarose Gels
Date Started: Nov 10, 2019 Redo? Yes
Purpose: To prepare an agarose gel for electrophoresis.
Notes:
A. An 0.8% (w/v) agarose gel was prepared:
- A gel apparatus was constructed and set aside.
- First, the amount of agarose powder needed was calculated to be 0.32g.
- 40mL of total volume was multiplied by 0.008 which equalled 0.32g of agarose powder.
- Agarose powder was weighed out to 0.32g and then transferred to an Erlenmeyer flask.
- 0.32g of agarose was subtracted from 40mL total volume, to get 39.68mL of 1X TBE buffer. This was measured out as precisely as we could get it, which was about 39.5mL, and this was added to the agarose powder. It was gently swirled and a tampon was stuffed in the top of the flask.
- The mixture was heated in the microwave for 1–2 minutes.
- The flask was carefully removed from the microwave with a oven mitt.
- The solution was left to cool. This typically takes 10–15 minutes.
- 40mL of total volume was multiplied by 0.008 which equalled 0.32g of agarose powder.
- Once the solution was sufficiently cool, 1mL of Ethidium Bromide was added and the solution was swirled.
- The agarose/EtBr mixture was poured into the prepared gel apparatus. The comb was inserted to cast the wells, and the gel was left to solidify for 20-30 minutes.
- Once the gel solidified, the comb was removed by pulling it slowly straight up. Once the comb was removed, the gel platform was lifted out of the casting tray and repositioned to allow the buffer to be poured over the gel.
- The platform with the solidified gel was placed into the gel box. The wells were at the negative cathode end of the box, where the black lead was connected.
- 1X TBE buffer was poured into the gel apparatus until the gel was submerged by ~ 1/4 inch of buffer.
Results:
We now have a solidified gel to pipet our enzyme digests into.
Conclusions and Next Steps:
Next we are running our gel with the restriction enzymes.
Gel Electrophoresis of Restriction Enzyme Digests
Date Started: Nov 10, 2019 Redo? Yes
Purpose: To separate DNA fragments via agarose gel electrophoresis.
Notes:
A. Set up the gel electrophoresis equipment:
- Wearing gloves, orient the gel in such a way that the wells are closest to the cathode (black electrode).
B. Prepare your restriction enzyme digest samples for electrophoresis.
- Add 5 μl of concentrated 6x loading dye to each 25 µl restriction enzyme sample.
- Place samples at 65 °C, either in a heat block or a hot water bath, for 5 minutes. Immediately place the samples on ice to cool, and then spin them in a microcentrifuge for ~ 15 seconds at 10,000 rpm.
- This step prevents annealing of the cohesive ends of phage DNA.
C. Load the gel in the following order:
Ladder Uncut DNA Enzyme-1 Enzyme-2 Enzyme-3 Enzyme-n
- Carefully load the gel with the proper volume of DNA ladder. Each manufacturer is different, so follow the manufacturer’s instructions.
- Using a fresh tip on your micropipettor for each sample, pipette 20 μl (or as much will fit in the well) of each RE reaction into the wells in the order suggested above.
- Holding the pipette in both hands, place your elbows on either side of the gel apparatus.
- Situate your eyes directly above the wells to make the wells easier to see.
- Place the pipette tip directly above the well, just below the surface of the buffer. Do not try to get the pipette tip into the well, or you might puncture the bottom of the gel.
- Slowly depress the pipette plunger, allowing the solution to slowly sink into the well.
- Remove the pipette from the gel before releasing the plunger.
- Draw a picture of the gel in your lab notebook, making note of where your samples are relative to your classmates’ samples. (Once the gels are loaded, everyone’s samples look alike!)
- Plug the electrodes into the appropriate locations on the power supply. Turn on the power supply and set the voltage to 100 V.
- Run the gel until the blue dye front has migrated at least 3.5 inches from the well. This will take approximately 1 hour.
- Turn off the power supply.
D. Photograph the gel.
- Using gloves, carefully remove the gel from the electrophoresis chamber.
- Photograph your gel, following your instructor’s directions.
- Include a copy of the gel photograph in your laboratory notebook.
Results:
Our gel doesn’t look a whole lot different than the first one, but the ladder looks better and we could more clearly see that the restriction enzymes used didn’t seem to cut our DNA. This could be for a number of reasons, one of which being that they just won’t cut our DNA sequence. So if we continue characterizing our phage, we should research different restriction enzymes to use.
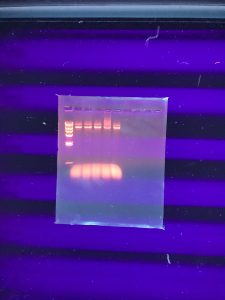

Conclusions and Next Steps:
Now we will present our phage to the class and hope Wednesday gets sent off for sequencing!