Discovery of Epsy
Sample Collection
| Collector Name | Chloe | Riley | Riley |
| Sample No. | 1 | 2 | 3 |
| Date of Collection | 9/2/19 | 9/2/19 | 9/3/19 |
| Sample Type | soil | Soil | Soil |
| General Location | Alexandria, VA | Stephenville,TX | Stephenville,TX |
| Location Description | muddy, moist soil along the waterfront | Near a water runoff drain in the Bosque River Apartments | The base of a tree at Jaycee Park |
| GPS Coordinates | 38.8068Lat, -77.0391Long | 32.1991Lat, -98.2459Long | 32.2242Lat, -98.2302Long |
| Sample Depth | 5.5.cm | 2-3 cm | 3-4 cm |
| Ambient Temperature | 79F | 70F | 83F |
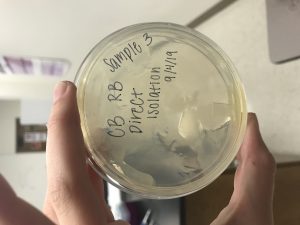
Isolation/Purification
 Title: Procedure (Sample 1)–Riley
Date Started:Sep. 04, 2019 Redo? no
Purpose: To separate phages from the soil sample and amplify them by using the bacterial hosts and incubation.
Notes:
To begin the enriched isolation, the soil sample was placed into a 50ml conical tube, and due to the nature of the moist soil, only approximately 10ml of the suggested 15ml was used for the sample. The conical tube was then mixed with the liquid media until the 30ml mark and placed in the shaking incubator at about 10:40 am.
We returned to the experiment at 6:30 pm the same day and allowed the mixture to separate and settle until about 7pm. Once the mixture was fully separated, we drew up the top liquid and placed it into another 50ml conical tube, and immediately capped to prevent contamination. The tube was then taken to another filter and vacuum. After the phages were filtered into a 50ml tube, the new tube was immediately capped.
Once the phages are in the new tube, 0.5ml of bacterial hosts are added to the sample and placed back in the shaking incubator for 2-5 days.
Results:
A possible issue is the amount of phages in the sample because of the small amount of soil used.
Conclusions and Next Steps:
The next step in the isolation is filter the enriched culture and begin the plaque assay.
Title: Procedure (Both Sample 2 and 3)–Chloe
Date Started:Sep. 04, 2019 Redo? yes
Purpose: For sample 2, we decided to use direct isolation to be able to map out what phages we have. The sample we got is used to infect the host bacteria via the plaque assay. This allows us to see what phages are present by locating the spots on the plaque that the bacteria has been eaten away.
Notes:
We started our direct isolation on Wednesday (9/4) at 10am. The first step we took was to add 3ml of liquid media, with a pipette, to the 15ml conical tube filled with our sample soil. Then, cap the tube and shake well. Once we shook it, we placed it in the incubator.
At 6:30pm on Wednesday, we took sample 2 out of the incubator. After waiting about 20 minutes for the contents to settle and the media to separate from the soil, we drew up 2ml of the liquid on top with a pipette. From there, we dispensed the liquid into a syringe connected to a filter. While holding a micro centrifuge tube right below the filter, we pushed down on the syringe plunger to lead the liquid through the filter into the tube. We then capped the micro centrifuge tube and disposed of the used materials (syringe, filter, pipette). Now, we move onto the plaque assay.
Starting out with the plaque assay, we needed to get an aliquot of 250 microliters of bacterial host. Using a pipette, we drew up 500 microliters of the filtered phage sample from the micro centrifuge tube, and dropped it into the tube with the bacterial host. After capping and gently shaking the tube, we waited about 10 minutes before we touched the sample again. We then began plating!
After obtaining an agar plate, top agar (from the 55 C bath), and pipette, we started plating protocol. Using the pipette, we picked up 3ml of top agar and dropped it into the inoculated host tube (the one that contains the aliquot of bacterial host + phage). Immediately, we drew up all of the liquid from the tube, opened the agar plate and dropped it onto the gel. We then put the lid on the plate and gently moved it around to spread the liquid. After waiting 20-25 minutes, our plate was not solidified. It was still very liquid-like. We decided to leave our plate in the incubator over night, in hopes that it would solidify. Sadly, it did not. Therefore, we repeated the process for better results, the next day.
On Thursday (9/5) at 6pm-8pm, we finished our plaque assay. After retrieving another aliquot of bacterial host, we dispensed 500 microliters of the phage sample into the tube of bacterial host. We capped it, then, gently shook the tube, and waited 10 minutes and gathered our supplies for plating. After the 10 minutes, we drew up 3ml of top agar and dropped it into the inoculated host tube. As soon as it completely dropped, we immediately picked all of the liquid back up and dropped it on the agar plate. We than put the lid on the plate and slowly moved it around to spread the liquid. We waited 20 minutes for the plate to solidify. However, this time did not work either!
We were skeptical that maybe the top agar was part of the problem, so we tested a new top agar in a plate by itself. Within just a couple of minutes, it started to solidify. We knew that we had located our problem. Then, we started our third trial.
After obtaining an aliquot of bacterial host, we dropped 500 microliters of phage sample into the bacterial host tube using a pipette. Ten minutes later, we drew up 3ml of our new top agar and dispensed it into the inoculated host tube. We immediately drew up all of the liquid out of the tube and dropped it on our new plate. After 15-20 min, the plate solidified and we placed it in the incubator.
Results:
Our results from our first two attempts at plating were very liquid-like. Since they didn’t look good, we re-plated. The third time it worked and it solidified. Currently, sample 2 and 3’s plaque assays are in the incubator.


Conclusions and Next Steps:
Our next step will be to pick a plaque and do our first serial dilution.
Title: Phage Purification (Sample 2)– Riley
Date Started:Sep. 13, 2019 Redo? no
Purpose: The purpose of the experiment is to fully dilute the phage sample and replate to ensure there is only one type of phage remaining.
Notes:
On Friday (9/13) we decided to continue with sample 2 even though there was only one small, clear plaque. The plaque was picked using a clean micropipette tip and essentially scraped off of the plate, without touching the outer bacterial lawn. The plaque was then placed into a microcentrifuge tuber already containing 200 microliters of phage buffer, then vortexed until the tube was well mixed.
After setting up the serial dilution tubes, we labeled them according to the dilution number until 10^-8 and added 90 micrometers of phage buffer into each tube using aseptic technique. 10 microliters of the original sample (phage buffer and plaque) were added to the 10^-1 sample using a clean micropipettor to begin the dilution of the samples. The new sample was then vortexed and the process was repeated from sample 10^-1 to 10^-2 and so on until 10^-8. A clean pipette tip was used between each sample.
The next step in the purification process is the plaque assay for each of the dilutions used. Each plate for the dilutions were allowed to reach room temperature then labeled accordingly, while 10 microliters were pipetted out of each dilution and individually mixed with 250 microliters of host bacteria, and allowed to settle for 5-10 minutes. Then 3 ml of top agar were dispensed into the host bacteria and phage mix, before being immediately sucked back up and plated. This was repeated for the original sample and samples 10^-1 to 10^-8. They were then placed in the incubator for 24-48 hours.
Conclusions and Next Steps:
The next step in the process is to pick another plaque from the dilution set and begin a second dilution and plaque assay. From there, we will begin making webbed plates and the low volume lysate.
Title: Phage Purification (Sample 2) cont… –Chloe
Date: September 16, 2019
Notes and Results:
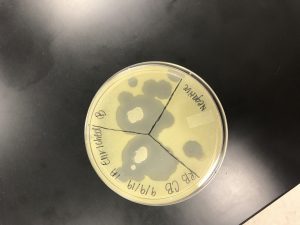
On September 16, we continued the purification process by fulfilling the protocol for “Plaque Assay for Purification”. The first step in doing this is drawing circles around the plaques on he bottom of the agar plates and label each of them. We then picked a plaque from SD1 10^-3. First, in picking a plaque, we obtained a microcentrifuge tube, labeled it, and aliquoted 10 microliters of phage buffer into the microcentrifuge tube. Then, we gently stabbed the center of the plaque with the sterile tip on our micropipettor. We placed the tip of the micropipettor in the phage buffer and pipetted up and down to dislodge phage particles, then mixed by vortexing.
After we picked a plaque, we performed our second round of serial dilutions. First, we collected 8 microcentrifuge tubes and labeled them SD2 10^-1, SD2 10^-2,… SD2 10^-8. Then, we added 90 microliters of phage buffer to each of the tubes. We added 10 microliters of the undiluted phage sample to the 10^-1 tube and then mixed by vortexing. Then, we transferred 10 microliters of the 10^-1 sample into the 10^-2 tube. We continued each successive dilution until we got to the last tube.
The last part of the 6.1 protocol was to do the plaque assay for our second round of serial dilutions. First, we collected 8 aliquots of bacterial host and 8 agar plates, and labeled all of them (ex. SD2 10^-1, CB, RB, 9/16). We then, transferred 10 microliters of SD2 10^-1 to the bacterial host for 10^-1. Then, transfer 10 microliters of SD2 10^-2 to the bacterial host for 10^-2. We followed his trend for transferring all serial dilutions to the bacterial hosts. After waiting 5-10 min, we added 3ml of top agar to SD2 10^-1 of the inoculated host and immediately aspirated the mixture and dropped it onto the SD2 10^-1 agar plate. Then, we added 3ml of top agar to SD2 10^-2 of the inoculated host and immediately drew it up and dropped it onto agar plate SD2 10^-2. We followed this pattern with the rest of the inoculated hosts. We then incubated the plates for the next 48 hours.
On September 18 at 10am, we started the “Collecting Plate Lysates” protocol. We brought our 8 plates from the plaque assay of Serial Dilutions 2 out and observed their plaque morphology. From least diluted to most diluted, there was less and less that the phage had eaten away. The 10^-1 sample was perfectly clear, meaning he bacteria had been completely eaten away by the phage. The 10^-8 plate was very yellow, and contained no plaques. We chose one plate to flood and use as our webbed plate sample. This one was SD2 10^-5. We added 8ml of phage buffer onto the plate and let it sit at room temperature for the next few hours.
At 3pm on September 18, we harvested our plate lysate. While tilting the plate to one side, we pipetted the lysate up, and dropped it into a syringe attached o a filter. Below the filter, we placed a labeled 15ml conical tube for the filtered lysate to flow through. We then placed the tube in the fridge and parafilmed the plate that we harvested the lysate from.
Next Steps:
This week we will try to collect more lysate from another webbed plate from our second round of serial dilutions and then pool them together. Then we will perform he spot titer procedure followed by the full plate titer.
Title: Spot Test/ Enriched Day 2 (Sample 1)– Riley
Date Started:Sep. 9, 2019 Redo? no
Purpose: The purpose of the experiment is to confirm the presence of phage in a sample using a spot test.
Notes:
On Monday (9/9) the enriched was pulled from the incubator and using a serological pipette, 1.4 ml of the sample was transferred into a Microcentrifuge tube and the process was repeated with a new pipette into another tube, resulting in 2 small samples. The tubes were then spun at a very high speed for 1 minute to force the bacteria to the bottom and clear out the supernatant. Then 1 ml of the supernatant was transferred into a new tube, while being careful to avoid the bacterial pellet. The tubes were then capped and labelled, and ready to begin the spot test.
For the spot test, the plate was divided into three portions on the bottom and labelled as 1A, 1B, and the negative. We then combined 250 microliters of bacteria with 3 ml of molten top agar and plated, then left to sit for approximately 20 minutes to solidify. Then 10 microliters of sample 1A were taken, using a micropipettor, and dropped into a “spot” in the designation portion of the plate. The process was repeated with sample 1B and the negative control (phage buffer). Then the plate was left to sit for 10-15 minutes and place in the incubator for 24-48 hours.
Results:
After 24 hours, the plate showed signs of phage in the negative control, so we will restart the process.
Conclusions and Next Steps:
The next step is to begin the serial dilutions for the sample.
On Monday, September 16, we parafilmed Sample 1 and are keeping it in the fridge, until we decide to continue on with it.
Title: Purification (sample 2): Spot Titer 1 and Full Plate Titer 1– Riley
Date Started:Sep. 23, 2019 Redo? Yes, the following week.
Purpose: The purpose of the experiment is to confirm the presence of phage in a sample using a spot test.
Notes:
On Monday (9/23) the low volume lysate was used for a Spot Titer in order to calculate the titer concentration. After the lysate was collected, a serial dilution was set up for the titer, and we had chosen to go from 10^-1 till 10^-8. To begin we placed 100 microliters of phage buffer into the first Microcentrifuge tube with the original sample, and for each of the dilutions, only 90 microliters in each Microcentrifuge tube. Only 10 microliters of the low volume lysate was added to the original dilution before the full serial dilution was preformed.
While the dilution was carried out, 250 microliters of host bacteria and 3 ml of molten top agar were aseptically plated and allowed to solidify, then the plate was labelled and sectioned off according to which dilution would be set there.
On Wednesday, 9/25/19, we started our full plate titer. First we set up an 8-fold serial dilutions, starting with 10^-1 and ending with 10^-8. For the serial dilutions, we first added 90 microliters of phage buffer to each of the micro centrifuge tubes. We, then stabbed a plaque on 10^-3 of our spot titer plate and dispensed 10 microliters of it into the 10^-1 tube and vortexed it. We, then, transferred 10 microliters of the 10^-1 solution to the 10^-2 tube. This process was continued all the way to the 10^-8 tube.
Next, we set up to do a plaque assay for each of the dilutions. After we labeled all of the plates, we got started. First, we transferred 10 microliters of the 10^-1 sample to an aliquot of bacterial host (which we labeled 10^-1 to correspond). Then, we let the tube sit undisturbed for 5-10 min, and moved onto the next dilution. We transferred 10 microliters of the 10^-2 sample to its corresponding aliquot of bacterial host, and let it sit. We carried this out for all of the dilutions.
When 5-10 min. had passed, we started plating. First, we transferred 3mL of top agar into the inoculated bacterial host (10^-1), and then drew up the solution and dropped it on its corresponding, labeled agar plate. We did the same for each of the other inoculated hosts with their corresponding plates.
After waiting about 20 minutes for the plates to solidify, we inverted them and placed in the incubator.
Results:
We found the next week that our Full plate 1 had been contaminated.
Conclusions and Next Steps:
The next step is to redo the spot titer, since we did not have enough plaques on our first one. From there, we will do full plate titer 2.
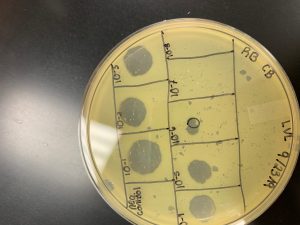
Title: Purification (sample 2): Spot Titer 2– Chloe
Date Started:Sep. 30, 2019 Redo? no
Purpose: The purpose of this experiment was to redo the spot titer to confirm the presence of phage.
Notes:
On Monday (9/30/19), we redid our Spot Titer because not enough plaques formed from our last one. First, we got a new agar plate and labeled the bottom, starting with buffer, then 10^-1, 10^-2…. 10^-8. We, then prepared a bacterial lawn. To do this, we transferred 3 mL of top agar to a 250 microliter aliquot of bacterial host (using a 5 mL pipette). Then, aspirate the solution, and dispense onto the agar plate. Gently and quickly, we tilted the plate to spread the mixture.
While we waited for the plate to solidify, we started serial dilutions. First, we set up 9 micro centrifuge tubes and dropped 90 microliters of phage buffer into each of them. Second, we added 10 microliters of our low volume lysate to the 10^-1 tube and vortexed it. Then, we transferred 10 microliters of the 10^-1 solution to the 10^-2 and vortexed. We continued this process all the way through 10^-8. One at a time, transfer 3 microliters of each dilution to its designated spot on the plate. We also put 3 microliters of phage buffer in buffer spot. We then let these sit on a plate for 30 min, then placed it in the incubator (right-side up).
Results:
On Wednesday (10/2/19), we checked our Spot Titer plate, and found several plaques, starting on 10^-1, up to10^-5.
The 10^-1 spot had 2 plaques and a calculated titer of 6.7×10^3 pfu/mL.
The 10^-2 spot had 2 plaques with a calculated titer of 6.7×10^4 pfu/mL.
The 10^-3 spot had 3 plaques with a calculated titer of 1×10^6 pfu/mL.
The 10^-4 spot had 3 plaques with a calculated titer of 1×10^7 pfu/mL.
The 10^-5 spot had 1 plaque and a calculated titer of 3.3×10^7 pfu/mL.
The 10^-6, 10^-7, and 10^-8 had no plaques.
Conclusions and Next Steps:
Since the 10^-3 yielded the greatest number of plaques, we will stab the 10^-3 in our full plate titer. Next up is the second round of the full plate titer.
Title: Purification (sample 2): Full Plate Titer 2– Chloe
Date Started: October 02, 2019 Redo? yes
Purpose: The purpose of this experiment was to determine the concentration of phage particles in our lysate by using the plaque assays created from dilutions.
Notes:
On Wednesday (October 2, 2019), we completed our full plate titer protocol. First we set up an 8-fold serial dilutions, starting with 10^-1 and ending with 10^-8. For the serial dilutions, we first added 90 microliters of phage buffer to each of the micro centrifuge tubes. We, then stabbed a plaque on 10^-3 of our spot titer plate and dispensed 10 microliters of it into the 10^-1 tube and vortexed it. We, then, transferred 10 microliters of the 10^-1 solution to the 10^-2 tube. This process was continued all the way to the 10^-8 tube.
Next, we set up to do a plaque assay for each of the dilutions. After we labeled all of the plates, we got started. First, we transferred 10 microliters of the 10^-1 sample to an aliquot of bacterial host (which we labeled 10^-1 to correspond). Then, we let the tube sit undisturbed for 5-10 min, and moved onto the next dilution. We transferred 10 microliters of the 10^-2 sample to its corresponding aliquot of bacterial host, and let it sit. We carried this out for all of the dilutions.
When 5-10 min. had passed, we started plating. First, we transferred 3mL of top agar into the inoculated bacterial host (10^-1), and then drew up the solution and dropped it on its corresponding, labeled agar plate. We did the same for each of the other inoculated hosts with their corresponding plates.
After waiting about 20 minutes for the plates to solidify, we inverted them and placed in the incubator.
Results:
On Wednesday, October 9, we found that nothing had shown up on our plates. Since there was no growth, we are skeptical about the lab equipment we have used. We took that day to trouble shoot and see what was wrong.
On October 9, we inoculated the bacteria to test if it is actually still alive. If no growth occurs, then the bacteria is dead. If we do see growth, then we need to inspect another factor that may be causing our plates to not show proper results.
Conclusions and Next Steps:
Our next step is to do the full plate titer once more for better results, so that we can collect our high volume lysate.
Title: Purification (sample 2): Full Plate Titer 3– Chloe
Date Started: October 07, 2019 Redo? no
Purpose: The purpose of this experiment was to determine the concentration of phage particles in our lysate by using the plaque assays created from dilutions.
Notes:
On Monday, October 7th, we received our results from our full plate titer that we performed the previous week. Our plates had shown no sign of bacterial growth, therefore, the phage couldn’t eat away anything. Therefore, we needed to redo the full plate another time.
To do the full-plate titer protocol, we started with serial dilutions. We set up 8 micro centrifuge tubes and marked them appropriately (starting with 10^-1 and ending at 10^-2), then added 90 microliter of phage buffer to each of the tubes. Next, we stabbed the 10^-2 spot on the spot titer plate and dropped 10 microliter of it into the 10^-1 tube. After vortexing, we drew up 10 microliter of the 10^-1 solution and dropped it in the 10^-2 tube, and vortexed. We continued this process through all of the micro centrifuge tubes.
We, then, performed the plaque assay protocol for each of the dilutions. First, we labeled our plates and obtained 8 aliquots of bacterial host. For the first one, we transferred 10 microliters of the 10^-1 sample to the first aliquot of bacteria. We capped it, then moved onto the next one. We transferred 10 microliter of the 10^-2 sample to the second aliquot of bacteria. This process was continued for the rest of the dilutions, and their corresponding bacteria.
After the inoculated host had waited 5-10 minutes, we started plating. First, we drew up 3mL of hot agar and dropped it into the 10^-1 inoculated host. Immediately after, we drew this up and dropped the solution on the 10^-1 plate. We, then, capped the plate and gently moved the plate around to spread the solution. We continued this course of action for all of the other inoculated hosts and their corresponding plates.
After the plates had set (about 20 minutes), we inverted them and placed them in the incubator.
Results: On Wednesday, October 16, we found that two of our full plate titer 3 plates were webbed. Next week, we will perform the protocol to get our high volume lysate.

Title: Purification (sample 2): Collecting a High Volume Lysate– Chloe
Date Started: October 16, 2019 Redo? no
Purpose: To harvest a highly concentrated liquid phage sample from the webbed plates that resulted from the full plate titer.
Notes:
On Wednesday, 10/16/19, we found that our 10^-1 and 10^-2 plates from our Full Plate Titer were webbed. We decided to use these to obtain our high volume lysate. At 9am, we began the protocol for collecting a lysate. First, we dropped 8mL of phage buffer onto each webbed plate, and then capped it and swirled the liquid around. We set our plates up on the counter (room temperature) for the next few hours.
At 4pm on that same Wednesday, we came back to harvest the lysate. First we tilted the 10^-1 plate and aspirated the top liquid using a pipette. Then, we dropped that solution into a syringe connected to a filter. While holding a 15 mL conical tube below the filter, we pushed down on the syringe plunger, so that our filtered lysate would fill inside the tube.
We did the same process for the 10^-2 flooded plate. We drew up the solution on top of the agar plate in a pipette (a clean, new one) and dropped it into a syringe connected to a filter (both clean and new). Then, we placed the SAME 15 mL conical tube under the filter and pushed down on the plunger to receive the rest of the lysate.
Results and Next Steps:
We collected nearly 10 mL of our high volume lysate. If we don’t have enough, we may need to repeat the process to get more lysate. If we have enough, our next step is to do another spot titer.
Amplification
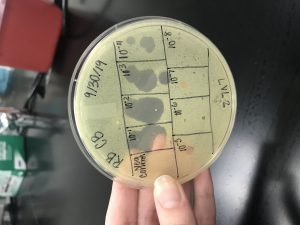
Spot Titer With High Volume Lysate–Chloe
Date Started: October, 21 2019 Redo? no
Purpose: We performed a spot titer so that we could find out the concentration of phage particles that were present in the high volume lysate. We did this by doing a round of serial dilutions and plating the different diluted solutions by way of spot test.
Notes:
On Monday, October 21, 2019, we started the amplification process by doing a spot titer. First, we labeled the bottom of an agar plate by making a grid/chart with a label in each box. Starting with negative control, we then labeled from 10^-1 to 10^-8 to indicate which dilution was plated where. We, then, dropped 3mL of top agar into an aliquot of 250 microliters of bacteria host. Immediately after this was dropped in the tube, we drew it up with the pipette and dropped it on the plate. We proceeded to the serial dilutions protocol while we let the plate set.
To start the serial dilutions, we added 90 microliters of phage buffer to each of the 9 microcentrifuge tubes (10^0, 10^-1…, 10^-8). We then added 10 microliters of our High Volume Lysate (HVL) to the 10^-1 micro centrifuge tube and vortexed. Then, we transferred 10 microliters of the 10^-1 solution to the 10^-2 tube and vortexed. This process was continued for each of the rest of the tubes.
Once the serial dilutions were finished, we aseptically transferred 3 microliters of each dilution to their designated box on the plate. After waiting 30 minutes for the liquid to settle into the plate, we inverted the plate and placed it in the incubator.
Results:
On Tuesday (October 22,2019), we received our results and calculated the titer for our plate. Based off of the number of plaques, we were able to see which spot would work best for our next step-microscopy.

These are the calculations for the High Volume Lysate Spot Titer:
10^-1: 1 plaque ->Titer= 3.3×10^3 pfu/ml.
10^-2: 1 plaque -> Titer= 3.3×10^4 pfu/ml.
10^-3: 2 plaques -> Titer= 6.7×10^5 pfu/ml.
10^-4: 1 plaque -> Titer= 3.3×10^6 pfu/ml.
10^-5: 4 plaques -> Titer= 1.3×10^8 pfu/ml.
10^-6: 2 plaques -> Titer= 6.7×10^8 pfu/ml.
10^-7: 3 plaques -> Titer= 1.0×10^10 pfu/ml.
10^-8: 0 plaques -> Titer= 0 pfu/ml.
Conclusions and Next Steps:
Since the concentration of our 10^-7 dilution was very high, we will move forward into microscopy and preparation on Wednesday, 10/23/19.
Microscopy- Mounting Phage Samples for TEM and staining with Uranyl Acetate–Chloe
Date Started: October 23, 2019 Redo? no
Purpose: To prepare our phage in such a way that it can be viewed from under an electron microscope.
Notes:
First, we transferred 100 microliters of our high volume lysate into a microcentrifuge tube. We balanced the tube and centrifuged at high speed (9:45am) for an hour, to pellet the bacteria. Once the hour was up (10:45am), we drew up the supernatant, being careful not to touch the bacterial pellet at the bottom. We dropped this supernatant into another micro centrifuge tube, and placed the tube in the fridge, until we could continue the next steps.
That afternoon (at 4:10pm), we dropped 100 microliters of phage buffer into the supernatant tube that was refrigerated, and then resuspended the micro centrifuge tube. We let this sit for the next hour there.
At 5:10pm, we started part b of the protocol. First we placed a 5x5cm piece of parafilm on a Petri dish lid. Then we placed the sticky side of a Pelco tab in the center of the parafilm. Using EM forceps, we removed a grid from the box of unused grids, and placed it right beside the Pelco tab. Using a micropipettor, we transferred 10 microliters of lysate onto the grid, then waited two minutes. When the two minutes were up, we carefully moved a filter paper right over the grid to pickup the liquid. We then used this process twice with water, and then once with Uranyl Acetate.
Once the grid was dry, we picked it up with the EM forceps and moved it to the designated grid box for storage.
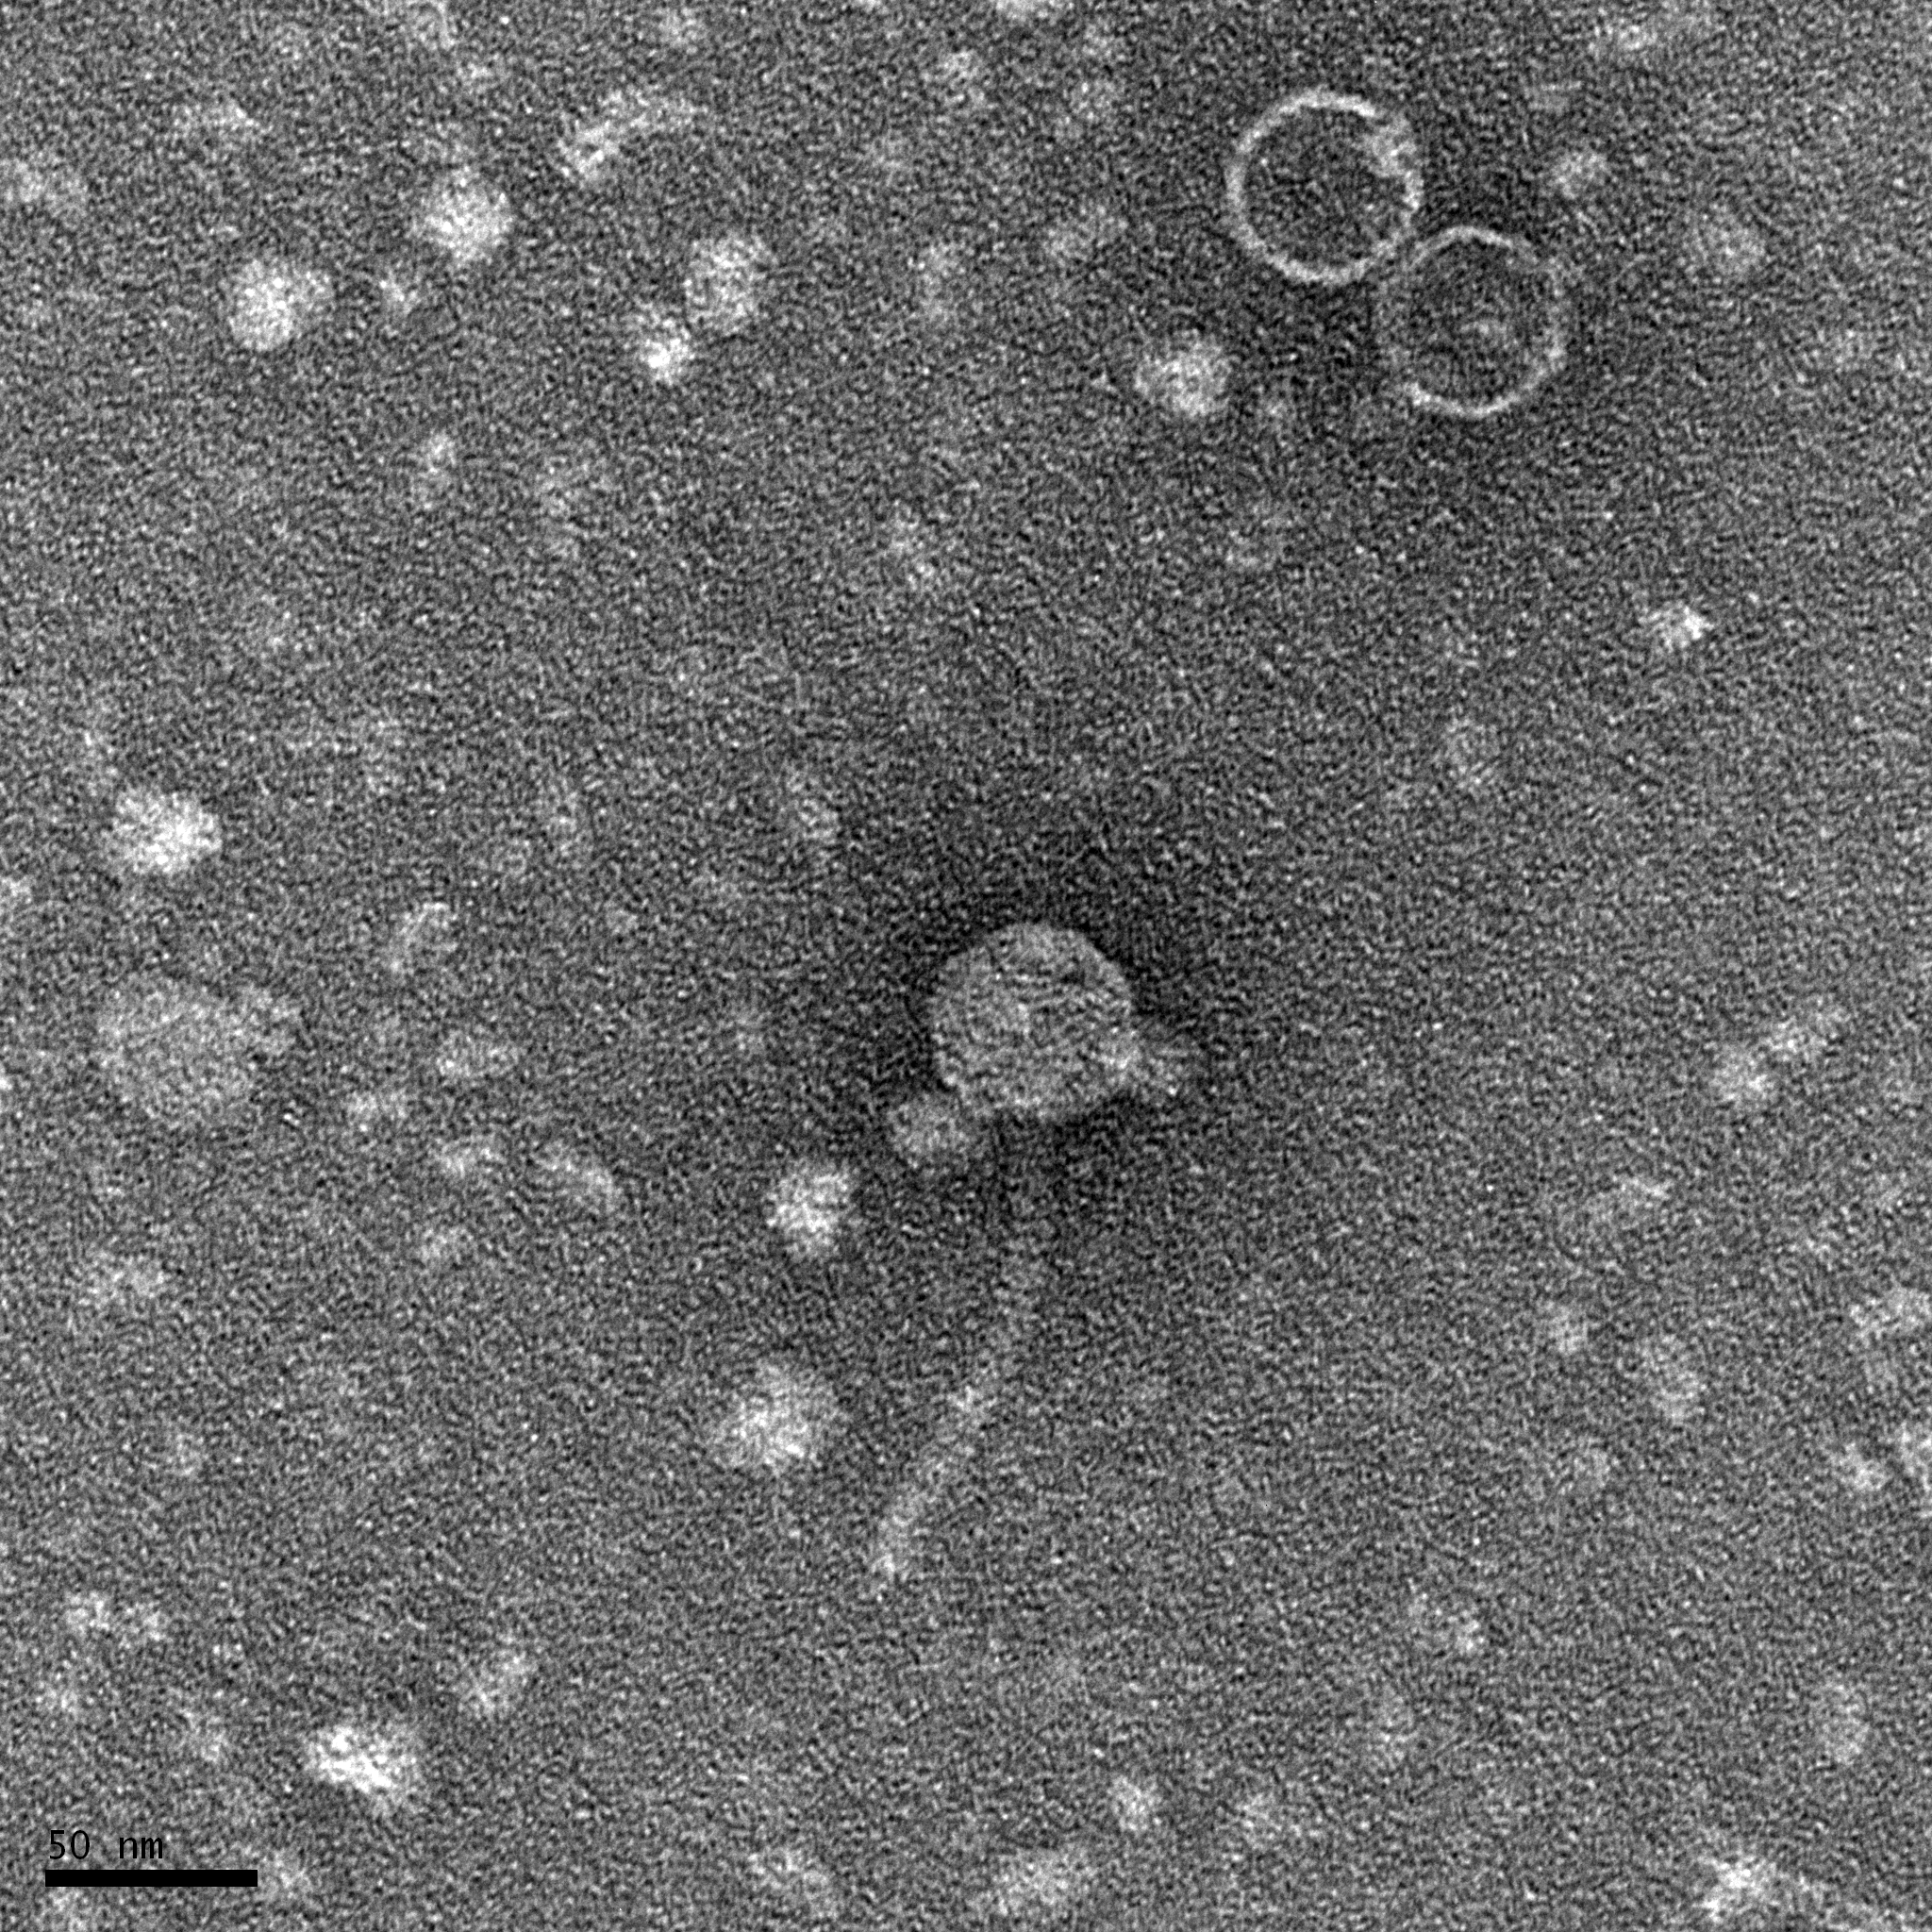
Results:
This is the image we got back for TEM.
Conclusions and Next Steps:
Our next step is to start and finish DNA Extraction.
DNA Extraction
Date Started: October 30, 2019 Redo? yes
Purpose: In DNA extraction, we are trying to isolate our phage’s DNA, so that we can use it for enzyme digestion and DNA sequencing.
Notes:
On Wednesday, October 30, we started the DNA Extraction (3.5- Zinc Chloride) protocol. First we mixed the High Volume Lysate that we got in a previous week and then transferred 5mL of it to a 15 mL conical tube. Once this was done, 20 microliters of nuclease was added and we inverted the tube three times to mix. Then, this conical tube was placed in the incubator at 37 degrees Celsius for 10 minutes. While this was sitting in the incubator, we prepared for the next steps. Once time was up, we transferred 1mL of the solution to each of the 5 micro centrifuge tubes we put in a rack. Then 20 microliters of Zinc Chloride was dropped into each of the micro centrifuge tubes, and the tubes were mixed by inversion. Once inverted, each of the tubes were placed in a 37 degrees Celsius incubator for 5 minutes. After 5 minutes, the tubes were centrifuged at 10,000 rpm for 1 minute. This pellets the phage to the bottom. Once centrifuged, we removed the supernatants of each of the tubes, being careful to not disturb the pellet at the bottom. Since we didn’t need the supernatant from this step, we threw it away. Once the pellet was by itself, we added 500 microliters of TES buffer to each tube and placed the tubes in a 60 degrees Celsius heat block incubator for 15 minutes. When the timer went off, we retrieved the Proteinase K tube from the freezer and proceeded to add 1 microliter of it to each of our 5 micro centrifuge tubes. Then, we mixed the tubes and incubated at 37 degrees Celsius for 10 minutes. Following incubation, 60 microliters of potassium acetate were added to each of the tubes. After mixing, we left the tubes on ice in the fridge for 15 minutes.
Straight out of the freezer, we centrifuged the 5 tubes for 1 minute at 12,000 rpm. We labeled 5 new micro centrifuge tubes and transferred the new supernatants over into the new micro centrifuge tubes, and left the pellets in the original tubes. We kept the tubes with the supernatants and discarded the tubes with pellets. Lastly, we added 500 microliters of isopropanol to each of the tubes and placed them in ice overnight.
The next day (Thursday, October 31, 2019), we came back to do the second day of the DNA extraction protocol. When we came in, we took our 5 tubes out of the ice bucket and centrifuged them at top speed for 10 minutes to pellet the DNA. This resulted in little white, crystal-like pellets at the bottom. We, then, transferred the supernatant of each of the tubes into one waste tube (15 mL conical tube). The next step is to add 250 microliters of 70% ethanol to each tube, but instead we had molecular water open and started transferring this. We transferred 150 microliters of molecular water to two of our tubes. When we realized that this was wrong, we taped these tubes and set them to the side. We proceeded to follow the procedure with our three other tubes. We added 250 microliter of 70% ethanol to each of these three tubes and centrifuged them at top speed for 1 minute. We then spilled the supernatant onto a paper towel and placed the tubes in a 30 degrees Celsius incubator to dry the tubes. After an hour, the tubes were still wet. Therefore, we turned the temperature to 60 degrees Celsius. Once the tubes were SUPER DRY, we added 50 microliters of molecular water to the first tube. This 50 microliters was then transferred to the second tube, and then to the third tube. When this was complete, we used the Nanodrop and the Qubit to see what our sample concentration was.
Results:

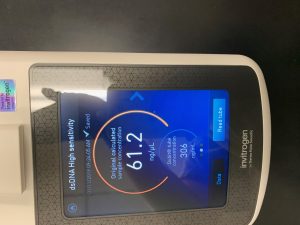
The Nanodrop gave us a A260:A280 reading of 1.81 and a A260:A230 reading of 0.48, indicating that our DNA is contaminated with something. Although we do not know what the contamination is from, one of our leading suspects is Guanidine.
The Qubit gave us a 61.2 nanogram/microliter reading, which is in the healthy range. However, we cannot depend solely on this.
Conclusions and Next Steps:
Based off of the results of the Nanodrop, we will do another DNA extraction next week to try to get better results.
Alternative DNA Isolation Protocol using ZnCl– Chloe
Date Started: November 04, 2019 Redo? yes, but only Day 2
Purpose: For this protocol, we are trying to isolate our phage’s DNA and decrease the amount of salt, so that we can proceed to enzyme digestion and gel elecrophoresis.
Notes:
On Monday, November 4, 2019, we started DNA Extraction for the second time. First off, we gently mixed our HVL, then added 5mL of our lysate into a 15 mL conical tube. Then we had 20uL of nuclease mix added to that tube. Once the nuclease had been added, we inverted the tube three times and incubated at 37°C for 10min. Then, we aliquoted 1mL of lysate into each of the 5 microfuge tubes. To each tube, we added 20uL of ZnCl and mixed gently by inversion, and incubated it at 37°C for 5min. Once this was done, we centrifuged at 10,000rpm for 1min to pellet the phage. We then quickly, removed the supernatants and discarded them. Immediately, we added 500uL of TES buffer to each tube, and incubated at 60°C for 15min. Next, we added 1uL of Proteinase K and mixed gently. Then, we incubated at 37°C for 10min. After the 10 minutes, 60uL of potassium acetate were added to each tube, then mixed and left on ice for 15min. After 15 min., we centrifuged at 4°C for 1min at 12,000rpm to pellet the capsids. We then transferred the supernatants into 5 new micro centrifuge tubes and threw away the tubes with the pellets. We added 500uL of isopropanol to each of the tubes with the supernatant, mixed them, and left on ice overnight.
On Tuesday (11/5/19), we performed day 2 of DNA Extraction. First, we took our tubes out of the ice and centrifuged at top speed for 10 min to pellet the DNA, and then discarded the supernatant into a waste tube. Next, we added 250uL of 70% ethanol in each tube, and spun them again for 1min, at top speed. Then, the supernatant was discarded into a waste tube. We dried the DNA pellets by placing them into an incubator at 30⁰C . Once dried, we added 50uL of nuclease-free water to the first tube. Then, we used that solution to resuspend the next pellet. We continued this process for the next tubes. Once this was complete, we ran the Nanodrop and Qubit to see if we could continue onto enzyme digestion and gel electrophoresis.
Since the results from the Nanodrop and Qubit were not good enough, we redid Day 2 to try to eliminate the amount of salt in our sample. On Tuesday, after running the Qubit, we readded 125 microliters of EtOH to our sample and put it on ice.
On Wednesday (11/6/19), we microcentrifuged our sample for 10 minutes and removed the supernatant and placed it into a waste tube.
On Thursday (11/7/19), we came in to do part 2 of day 2 DNA Extraction. We first dried our sample by placing it in the heat block. Once this was as dry as can be, we added 50 microliters of nuclease-free water to the tube. Then, we ran the Nanodrop and Qubit one more time.
Results:
The Nanodrop reading from Tuesday was 9152.0 ng/uL, an A260/A280 reading of 1.38, and an A260/A230 reading of 0.74. The Qubit reading on Tuesday was 0.178 ng/uL, which was too low.

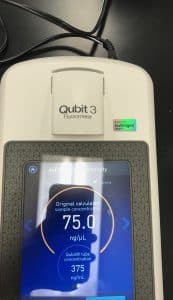
Our Nanodrop results from Friday were 2895.5 ng/uL, an A260/A280 reading of 2.04, and an A260/A230 reading of 1.67. Our Qubit reading was 75.0 ng/uL, which is an acceptable reading to be able to move onto restriction enzyme digest and gel electrophoresis.

Conclusions and Next Steps:
Since, we received better results from the Nanodrop and Qubit, we will be continuing onto Enzyme Digestion and Gel Electrophoresis.
Characterization
OnRestriction Enzyme Digest and Gel Electrophoresis
Date Started: November 07, 2019 Redo? no
Purpose: For restriction enzyme digest, we are trying to cut our phage’s genome into multiple fragments, so that we can place them on a gel for visual evidence. By creating an agrose gel, we’ll be able to see evidence of the fragments of DNA.
Notes:
On Thursday (11/7/19), we started the restriction enzyme digest protocol. We started by gently mixing our DNA by flicking the tube, then we incubated for 10 minutes at 65 degrees Celsius. Once the 10 minutes was up, we placed it on ice overnight.
The next day (11/8/19), we took our tube out of the ice and incubated to warm it and then centrifuged for less than a minute. Next, we retrieved three microcentrifuge tubes and labeled one “Uncut”, another “NSPI”, and the last one “SacII”. Based off of the 75 ng/uL reading from the Qubit, we calculated the amount of DNA and water needed to be added to each of the tubes. These amounts came out to be 5.4 uL of H2O and 2.6 uL of DNA. To each of the tubes, we transferred 5.4 uL of H2O and 1 uL of 10x Buffer. In the “NSPI” tube, we added 1 uL of the NSPI restrictive enzyme. In the “SacII” tube, we added 1 uL of the SacII restrictive enzyme. We didn’t add an enzyme to the “Uncut” tube because that was our negative control. We, then, added 2.6 uL to each of the three tubes. We then gently mixed and placed them in a microcentrifuge for less than a minute. Once this was done, we incubated the three tubes at 37 degrees Celsius for 1 hour.
An hour later, we started the “Casting Agarose Gels” (10.2) protocol. First, we created our agarose gel by measuring out 0.32g of agrose and pouring it into an Erlenmyer flask. We then poured 50 mL of of TBE buffer and 150 mL of DI water to the flask. We, then, swirled the glass is circular motions to mix the contents. Once this was done, we clogged the top of the flask with a paper towel and placed it in the microwave for 30 seconds. Once the 30 seconds were up, we saw that it was not yet boiling, so we heated it for another 30 seconds. At this point, it started to boil so we took the flask out of the microwave and removed the paper towel. We swirled the flask. Then, we let this mixture cool. Once cooled, we added the gel dye to the mixture. We poured this, gently, into a gel apparatus and slid the comb in, to cast wells. After about 10 minutes, the gel was ready for us to use.
First, before we added our solutions to the gel wells, we needed to make our ladder. We had a 500 ng/uL ladder and wanted 200ng/uL. We diluted 1 uL of ladder to 4 uL of water, creating 100 ng/uL. To make OUR ladder, we used 2 uL of the 100ng/uL ladder, 8 uL of H2O, and 1 uL of loading dye. This made a total of 11 uL of our new ladder that we would use on our gel.
Next, we took the comb out of the gel and started filling the wells with our solutions. First, we transferred 1 uL of our ladder to the first well. Then, we transferred 1 uL of the “Uncut” to the next well, then 1 uL of the NSPI to the third well, and 1 uL of SacII to the fourth well. Once all of these were set in their designated spots, we added TBE Buffer to the gel apparatus until the gel was submerged by 1/4 inch of buffer. We plugged in the electrodes and turned the power supply on. We had the gel run for the next hour and then received our results.
Once the hour was up, we removed the gel from the electrophoresis chamber and carried it to a dark room with a UV light. We analyzed our results using the UV light.
Results:
On November 08, we received our gel electrophoresis results. Below is a picture of our gel.