Discovery of Enchi
Enchi Information
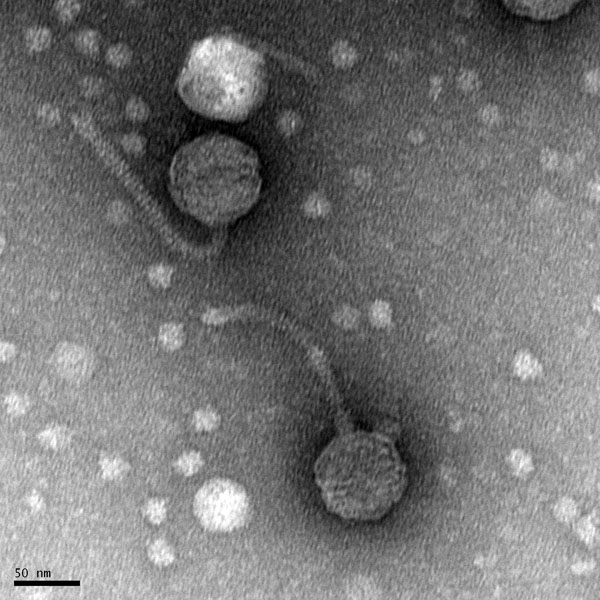
Morphology: Siphoviridae
Sample Collection
| Collector Name |
Sydney | Grace Clements | Grace Clements | ||
| Sample No. | 1S | G1 | G2 | ||
| Date of Collection | 08/28/2021 | 08/29/2021 | 09/08/2021 | ||
| Sample Type | Soil | Soil | Soil | ||
| General Location | Cloudy, OK | Burleson, Tx | Stephenville,Tx | ||
| Location Description | Collected in bar ditch with standing water and mushrooms growing | Near duck habitat very muddy and wet. | Next a tree in near a walking path lots of little ants around | ||
| GPS Coordinates | 34.386513,-95.175157 | 32.493827,-97.367906 | 32.225622,-98.202876 | ||
| Sample Depth | 3in | 2 inches | 1 to 2 inches | ||
| Ambient Temperature | 31°C | 28°C | 24°C |
Isolation/Purification
Title: Direct Isolation
Date: 08/30/2021 Redo: No Sample: #1G
Purpose: This procedure is to separate bacteriophages from the natural soil samples. Then to use the bacteriophage to infect a host bacteria using a plaque assay.
Notes:
1.)To ensure a sterile work environment we washed our hands as soon as we entered the lab. Then we put on gloves and cleaned the counter top with CiDecon and used ethyl alcohol to dry and sterilize the surface. Next we lit a Bunsen burner to ensure the area around our work space stayed sterile.
2.) The sample was in a 15mL tube and when we began the soil was very compact within the tube so it was difficult to extract. We used a larger tube to tap the soil into in order to be able to access the sample.
3.) Once the soil was loose we moved about 7.5 mL of soil back into a different 15 mL tube. We then added 2.5 mL of PYCa with a serological pipette. into the tube with the soil and put the lid back on the tube and shook the tube to mix the PYCa and the soil sample.
3.) At the end of class we took the tube and placed it in a shaking machine at 250 rpm for 1-2 hours. After that the tube was moved to a refrigerator at 4 degrees celsius until we were able to continue our day one work. Before leaving the lab we cleaned the tabletop once more the same way we did at the beginning in order to reduce contamination risks.
4.) We returned to the lab at about 4 pm and removed the sample from the fridge. Initially the sample was well separated into about three layers where the solids had sunk to the bottom and there was a yellowish mostly clear liquid on top with a bit of dirt still floating in it. Then we began to use a serological pipette to extract only the liquid from the tube. The problem was at this time the tube had accidentally been shaken and the sediment was no longer resting at the bottom.
5.) We then took our tube and placed it into the centrifuge for ten minutes. After removing it from the centrifuge we were able to successfully extract the 2mL of fluid from the sample.
6.) After filtering the fluid with a 0.2um syringe filter we syringed about 0.5 mL of the liquid into a microcentrifuge tube and placed the cap and allowed the sample to sit for 10 minutes.
7.) After 10 minutes we added 3mL molten top agar to the sample then immediately moved into a plate. We then evenly spread the sample across the plate and left the plate undisturbed for 15 minutes so that the sample could solidify.
8.) Then the plate was moved to the incubator at approximately 5:30 on 09/01/2021
Results:
When we returned to the lab 2 days later it was observed that there was no bacteriophage growth within our plaque.

Conclusions and Next Steps:
Test more samples possible enriched isolation or maybe another direct isolation in order to find a bacteriophage.
Title: Enriched Isolation
Date: 09/01/2021 Redo: No Sample: #1S
Purpose: This procedure is to amplify possible phages present in the soil sample using a bacteria growth media and incubating to encourage growth and replication of phages.
Notes:
- We first added liquid media to the soil sample and placed it into the shaker for approximately an hour.
- We then put the soil sample/media mixture into a centrifuge for 10 minutes to allow the soil to pellet (AKA settle to the bottom of the tube).
- Next, we filtered the sample to rid unwanted bacteria and soil particulates. This step is crucial to prevent contamination.
- On the final part of day 1, we added host bacteria to the sample and shook for…
Results:
The sample was lost so we weren’t able to complete the isolation.
Conclusions and Next Steps:
We need to make sure all of the tubes are labeled. Our next step is to complete direct isolation with another sample.
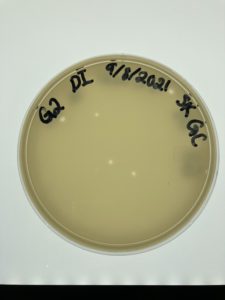
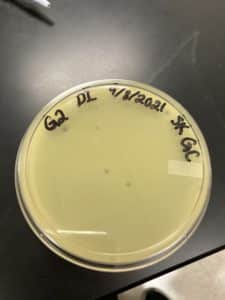
Title: Direct Isolation
Date: 09/08/2021 Redo: No Sample: #G2
Purpose: This procedure is to separate bacteriophages from the natural soil samples. Then to use the bacteriophage to infect a host bacteria using a plaque assay.
Notes:
1.) To ensure a sterile work environment I washed my hands as soon as I entered the lab. Then I put on gloves and cleaned the counter top with CiDecon and used ethyl alcohol wiping with kimwipes to dry and sterilize the surface. Next we lit a Bunsen burner to ensure the area around our work space stayed sterile.
2.) Soil sample was collected into a 15 mL conical tube about 2/3 of the way filled. Using a 5 mL serological pipette 3 mL of PYCa media was added to the tube. Then the tube was capped and placed in the shaker machine for 2-3 hours.
3.) The sample ended up having to be centrifuged at 2000 rpm for 10 minutes twice to pellet the soil enough to extract fluid from the tube.
4.) Using a micropipette the liquid was extracted from the conical tube and dispensed onto a 5 mL syringe and pushed through a 0.22 um filter into a microcentrifuge tube and then the tube was capped.
We then began the steps of a plaque assay
5.)An agar plate taken from the fridge and placed into the incubator to warm up
6.) We grabbed a tube of host bacteria and rubbed the bottom of the tube on the table top to break up chunks in the bacteria itself.
7.)Using a micropipette 500 microliters of phage sample was added to a culture tube of host bacteria. The tube was then left undisturbed for 10 minutes.
8.) The agar plate was removed from the incubator and labeled with our initials, the date, the sample number and direct isolation
9.) Using a 5 mL serological pipette 3 mL of top agar was added to the host bacteria and immediately syringed back up and dispensed into an agar plate.
10.) The plate was then tilted to ensure even spreading of the agar around the plate. The plate was then left undisturbed on the table top for 15 minutes
11.) Sample was moved to the incubator at approximately 7:20 pm on 09/08/2021.
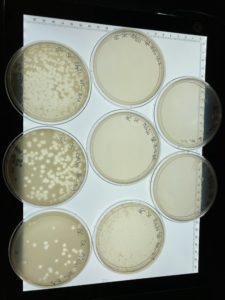
Results:
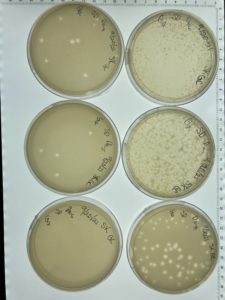
Positive Result:
Plate was removed from incubator to check for plaques at 4:15 pm on 09/09/2021
Conclusions and Next Steps:
Possible phage found now to pick a plaque on monday 09/13/2021.
Title: Picking a Plaque and Serial Dilution
Date: 09/13/2021 Redo: No Sample: #G2 A
Purpose: This procedure is to extract phage particles from a plaque and create a liquid sample. Then plate them at decreasing concentrations of the phage sample.
Notes:
1.) We prepared for aseptic work by washing our hands. We then cleaned the table top by wiping it with a kim wipe using CiDecon and ethyl alcohol. Then we lit a bunsen burner to reduce particulates from the air that would make our workspace nonsterile. All work is done close to the flame to reduce contamination.
2.) We then circled the plaque that we wanted to pick and labeled it A and we also labeled a B (we did try to pick two plaques on this day but ended up autoclaving all of our B samples for the sake of time).
3.) The morphology of plaque A is small and cloudy.
4.) We then labeled 7 microcentrifuge tubes in the following way A10-0, A10-1, A10-2, A10-3, A10-4, A10-5, and A10-6.
5.) We then used a micropipette to add 100uL of phage buffer to the A10-0 microcentrifuge tube. Disposing of the micropipette tip into a biohazard container.
6.) We then removed the lid of our plate close to the bunsen burner. Using a micropipette perpendicular to our plate we stabbed the middle of the plaque. We were careful not to stab all the way through the agar and to not stab the surrounding bacteria.
7.) We then placed the micropipette tip into the tube labeled A10-0 wiping it on the walls of the tube and pipetting up and down to release any possible phage particles on the tip into the phage buffer.
8.) Then we capped the tube and vortexed it for a few seconds to make sure the phage particles were well mixed into the phage buffer solution.
We then moved onto the steps for serial dilution.
1.) We added 90 ul of phage buffer with a micropipette to tubes A10-1 through A10-6.
2.) We took 10 ul using a micropipette of the undiluted sample in tube A10-0 and added it to tube A10-1. Then capped both tubes and placed A10-0 to a side and vortexed A10-1 to mix the phage sample and phage buffer. Afterwards placing the pipette tip into the biohazard container.
3.) Next we used the micropipette to add 10ul of the A10-1 sample to the A10-2 tube, capped the tubes and vortexed to mix well . We repeated this process for all the samples replacing pipette tips between each one until we reached sample A10-6.
*Note by this time we were running out of class time and our procedures were becoming panicked and rushed as we began plating our plaque assays*
4.) We grabbed 6 bacterial cultures because we did not know at the time that we were supposed to plate our undiluted sample. Breaking up any chunks in the bacteria by rubbing the bottom of the tube on the table top in a figure 8 motion.
5.) We dispensed 10 ul of each diluted phage sample into a different bacterial tube and allowed the tubes to sit for 10 minutes. We labeled the bacterial tubes 1 through 6 to make sure we did not mix them up.
6.) While we were waiting we began labeling the plates with the date, our initials , G2 A and the corresponding dilution number. (5 out of the 6 plates were labeled on the wrong side of the plate)
7.) We then obtained six 5 ml serological pipettes and placed them unopened on the table and waited for the 10 minutes to be done.
8.) We then plated our samples one by one using 3 mL molten top agar. This was done by pipetting 3 mL of the agar into the bacterial tubes and immediately pipetting it back up and dispensing it onto the agar plates. After filling the plated they then had to sit for 20 minutes This was done for all 6 samples and then the plates were placed in the incubator at approximately 11:30 am
Results:
Negative results plates not clear enough to see any phage growth. Many bubbles present because the top agar was not plated evenly.

Conclusions and Next Steps:
In our rush the samples were plated poorly with many bubbles and the top agar began to solidify before we were done plating. We did not try to remedy this therefore when we returned to the lab to check the plates there was no clear growth of plaques in our plates. Next steps- Retry serial dilution with a new plaque on 09/15/21.
Title: Picking a Plaque and Serial Dilution
Date: 09/15/2021 Redo: No Sample: # G2 C
Purpose: This procedure is to extract phage particles from a plaque and create a liquid sample. Then plate them at decreasing concentrations of phage sample.
Notes:
1.) To ensure a sterile work environment we washed our hands as soon as we entered the lab. Then we put on gloves and cleaned the counter top with CiDecon and used ethyl alcohol to dry and sterilize the surface. Then we lit a bunsen burner to reduce particulates from the air that would make our workspace nonsterile. All work is done close to the flame to reduce contamination.
2.) The first thing we did was take out 7 plates from the fridge to allow them to come to room temperature when we were ready to use them. Then we acquired 7 microcentrifuge tubes and labeled them C10-0, C10-1, C10-2, C10-3, C10-4, C10-5, C10-6. Then using a micropipette put 100 ul of phage buffer into a tube labeled C10-0 and 90 ul into each of the other 6 microcentrifuge tubes. Capping each one once full to reduce contamination.
3.) We circled our chosen plaque and labeled it C. Then we opened our plate close to the flame and used a micropipette perpendicular to the plate to stab the plaque, being careful not to poke all the way through the agar or to stab the surrounding bacteria. We then placed the lid back on our plate and took the micropipette tip and dipped it into the tube labeled C10-0 pipeting up and down and tapping the walls of the tube to try to get as much phage material into the tube as possible. We then discarded the tip into the biohazard container and capped our tube. We then flicked the bottom of the tube and flipped it upside down a few times to ensure it was mixed well.
4.) Next we opened tubes C10-0 and C10-1 near the flame and micropipetted with a new tip 10ul of C10-0 contents into tube C10-1 capped both tubes and placed C10-0 to a side. We then used the same methods as before to ensure tube C10-1 was mixed well.
5.) Next we opened tubes C10-1 and C10-2 near the flame and micropipetted with a new tip 10ul of C10-1 contents into tube C10-2 capped both tubes and placed C10-1 to a side. We then used the same methods as before to ensure tube C10-2 was mixed well.
6.)Next we opened tubes C10-2 and C10-3 near the flame and micropipetted with a new tip 10ul of C10-2 contents into tube C10-3 capped both tubes and placed C10-2 to a side. We then used the same methods as before to ensure tube C10-3 was mixed well.
7.)Next we opened tubes C10-3 and C10-4 near the flame and micropipetted with a new tip 10ul of C10-3 contents into tube C10-4 capped both tubes and placed C10-3 to a side. We then used the same methods as before to ensure tube C10-4 was mixed well.
8.)Next we opened tubes C10-4 and C10-5 near the flame and micropipetted with a new tip 10ul of C10-4 contents into tube C10-5 capped both tubes and placed C10-4 to a side. We then used the same methods as before to ensure tube C10-5 was mixed well.
9.)Next we opened tubes C10-5 and C10-6 near the flame and micropipetted with a new tip 10ul of C10-5 contents into tube C10-6 capped both tubes and placed C10-5 to a side. We then used the same methods as before to ensure tube C10-6 was mixed well.
10.) We then obtained 7 bacterial cultures and rubbed the tube bottoms on the table top to break up any chunks of bacteria. Then we labeled the lids of the tubes 0,1,2,3,4,5,6 so that we did not mix them up. Then we used the micropipette to take 10ul of each phage sample from their microcentrifuge tube and add it to a bacterial tube. Changing the tip between each one. The bacterial tubes were then left to sit for 20 minutes.
11.) While we waited we labeled our agar plates with G2 C10-#, our initials, the date and serial dilution. Then we acquired seven 5 mL serological pipettes in preparation for plating.
12.) We began plating by getting out top agar out of the 55 degrees celsius bath. We carefully and quickly pipetted up 3 mL of top agar down into our bacterial tube then immediately pipetted it back up and onto the plate avoiding bubbles (sucking them up if they were present) then picking up the plate and tilting it to ensure even distribution then we put the lid on the plate and set it aside repeating this process for all the samples. We took breaks between samples to place the agar back into the heat bath so that it would not solidify on us.
13.) Once all the bacterial tubes were plated we let them sit for 20 minutes then the plates were moved to the incubator at approximately 11:00 am.
Results:
When the plated were removed from the incubator on 09/16/2021 plaques had appeared in a diluted form.
Conclusions and Next Steps:
Since it appears that our phage has multiple morphologies within our dilution plates (goes from large plaques to small plaques and back to larger plaques). We plan to do another serial dilution to see if this is consistent with our phage or see if we possibly have more than one phage within our plates.
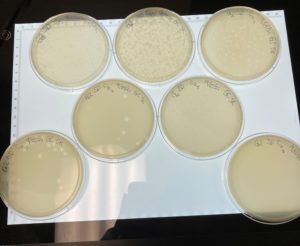
Title: Serial Dilution
Date: 09/20/2021 Redo: No Sample: #G2 D
Purpose: This procedure is to extract phage particles from a plaque and create a liquid sample. Then dilute the sample and plate in order to see a decrease in concentrations between the samples.
Notes:
*Sample D was picked from a plaque plate C10-2 ( a previous serial dilution)
1.) To ensure a sterile work environment we washed our hands as soon as we entered the lab. Then we put on gloves and cleaned the counter top with CiDecon and used ethyl alcohol to dry and sterilize the surface. Then we lit a bunsen burner to reduce particulates from the air that would make our workspace nonsterile. All work is done close to the flame to reduce contamination.
2.) We acquired 7 microcentrifuge tubes and labeled them D10-0, D10-1, D10-2, D10-3, D10-4, D10-5, and D10-6. Using a micropipette 10o uL was added to the D10-0 tube and then the tip was discarded.
3.) Using a new tip the micropipette was inserted into the center of the chosen plaque, being careful not to stab all the way through and not to stab the bacteria around the plaque. The plate was then covered with the lid. Using the micropipette the phage sample was then added to the D10-0 tube by pipetting up and down and rubbing the tip on the walls of the tube to try to get as much sample into the tube as possible. Then the tube was capped and shaken in order to ensure the sample was mixed into the phage buffer.
4.) Using the micropipette 90 uL of phage buffer was added to tubes D10-1 through D10-6. Each tube was then capped.
5.) Next we opened tubes D10-0 and D10-1 near the flame and micropipetted with a new tip 10ul of D10-0 contents into tube D10-1 capped both tubes and placed D10-0 to a side. We then used the same methods as before to ensure tube D10-1 was mixed well.
6.) Next we opened tubes D10-1 and D10-2 near the flame and micropipetted with a new tip 10ul of D10-1 contents into tube D10-2 capped both tubes and placed D10-1 to a side. We then used the same methods as before to ensure tube D10-2 was mixed well.
7.)Next we opened tubes C10-2 and C10-3 near the flame and micropipetted with a new tip 10ul of C10-2 contents into tube C10-3 capped both tubes and placed C10-2 to a side. We then used the same methods as before to ensure tube C10-3 was mixed well.
8.)Next we opened tubes D10-3 and D10-4 near the flame and micropipetted with a new tip 10ul of D10-3 contents into tube D10-4 capped both tubes and placed D10-3 to a side. We then used the same methods as before to ensure tube D10-4 was mixed well.
9.)Next we opened tubes D10-4 and D10-5 near the flame and micropipetted with a new tip 10ul of D10-4 contents into tube D10-5 capped both tubes and placed D10-4 to a side. We then used the same methods as before to ensure tube D10-5 was mixed well.
10.)Next we opened tubes D10-5 and D10-6 near the flame and micropipetted with a new tip 10ul of D10-5 contents into tube C10-6 capped both tubes and placed D10-5 to a side. We then used the same methods as before to ensure tube D10-6 was mixed well.
11.) We then obtained 7 bacterial cultures and rubbed the tube bottoms on the table top to break up any chunks of bacteria. Then we labeled the lids of the tubes 0,1,2,3,4,5,6 so that we did not mix them up. Then we used the micropipette to take 10ul of each phage sample from their microcentrifuge tube and add it to a bacterial tube. Changing the tip between each one. The bacterial tubes were then left to sit for 20 minutes.
12.) We acquired 7 agar plates from the fridge and placed them into the incubator for 7 minutes to warm up to room temperature . Then we labeled our agar plates with G2 D10-#, our initials, the date and serial dilution. Then we acquired seven 5 mL serological pipettes in preparation for plating.
12.) We began plating by getting out top agar out of the 55 degrees celsius bath. We carefully and quickly pipetted up 3 mL of top agar down into our bacterial tube then immediately pipetted it back up and onto the plate avoiding bubbles (sucking them up if they were present) then picking up the plate and tilting it to ensure even distribution then we put the lid on the plate and set it aside repeating this process for all the samples. We took breaks between samples to place the agar back into the heat bath so that it would not solidify on us.
13.) Once all the bacterial tubes were plated we let them sit for 20 minutes then the plates were moved to the incubator at approximately 11:00 am.
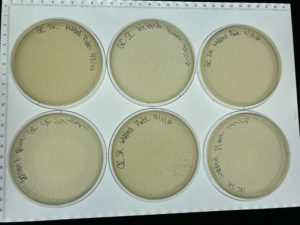
Results:
The serial dilution was successful except there was a mistake made where plate D10-2 had no plaques and it was then autoclaved; the rest of the serial dilution worked as expected. Dilution is pictured with and without plate D10-2
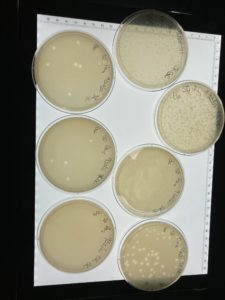
Conclusions and Next Steps:
This is the second successful serial dilution we have done. The next step we will take is to flood plate D10-1 because it has plaques that are webbed in order to obtain a low volume Lysate.
Title: Collecting Plate Lysates
Date: 09/22/2021 Redo: No Sample: #G2 D10-1
Purpose: This procedure is to obtain a concentrated liquid phage sample.
Notes:
1.) To ensure a sterile work environment we washed our hands as soon as we entered the lab. Then we put on gloves and cleaned the counter top with CiDecon and used ethyl alcohol to dry and sterilize the surface. Then we lit a bunsen burner to reduce particulates from the air that would make our workspace nonsterile. All work is done close to the flame to reduce contamination.
2.) We chose plate D10-1 as our webbed plate. The plate was flooded by adding 8 mL of phage buffer with a serological pipette to the plate. The lid was then placed back onto the plate. The plate was then placed on the back counter at room temperature at approximately 9:30 am.
3.) We returned to the lab at approximately 4:30 pm to collect the lysate. First we prepared for aseptic work the same way as before then placed our flooded plate on the lab table.
4.) The lid of the plate was removed and placed under one side of the plate to allow the lysate to puddle at one edge of the plate. A 0.22 um filter was then opened and placed on the table still in the packaging.
5.) Using a 5 mL syringe the liquid was aspirated from the top of the plate.
6.) The filter was then attached to the syringe and the fluid was pushed through the filter into a 15 mL tube and the tube was capped.
7) The tube was then labeled and placed into the fridge at 4°C for later usage.
Results:
5 ml of lysate was successfully collected.
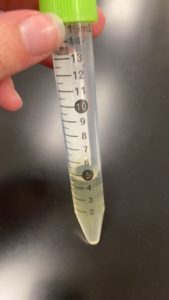
Conclusions and Next Steps:
We collect 5 mL of filtered lysate from our plate. Monday 09/27/2021 we will begin the steps of a full plate titer.
Title: Full Plate Titer
Date: 09/27/2021 Redo: No Sample: # G2
Purpose: This procedure is to figure out the concentration of our low volume lysate.
Notes:
1.) To ensure a sterile work environment we washed our hands as soon as we entered the lab. Then we put on gloves and cleaned the counter top with CiDecon and used ethyl alcohol to dry and sterilize the surface. Then we lit a bunsen burner to reduce particulates from the air that would make our workspace nonsterile. All work is done close to the flame to reduce contamination.
2.) We obtained 8 microcentrifuge tubes and labeled them 10-1, 10-2, 10-3, 10-4 …..10-8. Then 90uL of phage buffer was added to each of the tubes using a micropipette.
3.) 10uL of our low volume lysate was added to tube 10-1 using a micropipette. It was then capped and then we flicked the bottom of the tube and flipped it upside down a few times to ensure it was mixed well. Then discarded the micropipette tip in the biohazard container.
4.) Then 10 uL of the contents of tube 10-1 was moved with a micropipette into tube 10-2. Then we capped both tubes and placed the previous one to the side. We then flipped tube 10-2 and flicked the bottom of the tube to make sure it was mixed well. Then discarded the micropipette tip in the biohazard container.
5.) Then 10 uL of the contents of tube 10-2 was moved with a micropipette into tube 10-3. Then we capped both tubes and placed the previous one to the side. We then flipped tube 10-3 and flicked the bottom of the tube to make sure it was mixed well. Then discarded the micropipette tip in the biohazard container.
6.) Then 10 uL of the contents of tube 10-3 was moved with a micropipette into tube 10-4. Then we capped both tubes and placed the previous one to the side. We then flipped tube 10-4 and flicked the bottom of the tube to make sure it was mixed well. Then discarded the micropipette tip in the biohazard container.
7.) Then 10 uL of the contents of tube 10-4 was moved with a micropipette into tube 10-5. Then we capped both tubes and placed the previous one to the side. We then flipped tube 10-5 and flicked the bottom of the tube to make sure it was mixed well. Then discarded the micropipette tip in the biohazard container.
8.) Then 10 uL of the contents of tube 10-5 was moved with a micropipette into tube 10-6. Then we capped both tubes and placed the previous one to the side . We then flipped tube 10-6 and flicked the bottom of the tube to make sure it was mixed well. Then discarded the micropipette tip in the biohazard container.
9.) Then 10 uL of the contents of tube 10-6 was moved with a micropipette into tube 10-7. Then we capped both tubes and placed the previous one to the side. We then flipped tube 10-7 and flicked the bottom of the tube to make sure it was mixed well. Then discarded the micropipette tip in the biohazard container.
10.) Then 10 uL of the contents of tube 10-7 was moved with a micropipette into tube 10-8. Then we capped both tubes and placed the previous one to the side. We then flipped tube 10-8 and flicked the bottom of the tube to make sure it was mixed well. Then discarded the micropipette tip in the biohazard container.
11.) We then obtained 8 bacterial cultures and rubbed the tube bottoms on the table top to break up any chunks of bacteria. Then we labeled the lids of the tubes 1,2,3,4,5,6,7,8 so that we did not mix them up. Then we used the micropipette to take 10ul of each phage sample from their microcentrifuge tube and add it to a bacterial tube. Changing the tip between each one. The bacterial tubes were then left to sit for 20 minutes.
12.)While we waited we labeled our agar plates with our initials,the dilution number, the date and LD for lysate dilution. Then we acquired eight 5 mL serological pipettes in preparation for plating.
13.) We began plating by getting out top agar out of the 55 degrees celsius bath. We carefully and quickly pipetted up 3 mL of top agar down into our bacterial tube then immediately pipetted it back up and onto the plate avoiding bubbles (sucking them up if they were present) then picking up the plate and tilting it to ensure even distribution then we put the lid on the plate and set it aside repeating this process for all the samples. We took breaks between samples to place the agar back into the heat bath so that it would not solidify on us.
14.) Once all the bacterial tubes were plated we let them sit for 20 minutes then the plates were moved to the incubator at approximately 11:00 am.
Results:

Conclusions and Next Steps:
The first 4 plates were completely depleted of bacteria when the plates were taken out of the incubator plate 5 was webbed. Plate 10-8 was counted and 10 plaques were present and plate 10-7 had 100 plaques. Next steps calculate how much the lysate has to be diluted in order to create a webbed plate.
Amplification
iTitle: Making Webbed Plates from a Lysate of Known Titer
Date: 09/29/2021 Redo: No Sample: #G2
Purpose: This procedure is to create plates with a high number of plaques from our known titer.
Notes:
1.) To ensure a sterile work environment we washed our hands as soon as we entered the lab. Then we put on gloves and cleaned the counter top with CiDecon and used ethyl alcohol to dry and sterilize the surface. Then we lit a bunsen burner to reduce particulates from the air that would make our workspace nonsterile. All work is done close to the flame to reduce contamination.
2.)First we counted the plaques on plates 10-8 and 10-7 from our full plate titer: Plate 10-8 = 10 plaques Plate 10-7= 100 plaques
3.) We then calculated the titer using the formula:
Titer (pfu/mL) = (# pfu/ volume used in μL) x (10^3 μL/mL) x dilution factor
Titer (pfu/mL) = (10pfu/10uL) x (10^3 uL/mL) x (10^8)
Titer (pfu/mL) = 1.0 x 10^11
Plate 10-5 from our full plate titer was webbed so we wanted 1.0 x 10^5 and we had 1.0 x 10^11 so we divided 1.0 *1051.0*1011= 1.0 x 10^-6
1.0 x 10^-6 x1000 = 1.0 x 10^-3 or 0.001
4.) In order to get a 1:1000 ratio of our lysate to phage buffer we had to dilute the lysate because we can not measure out 0.001 uL of our lysate.
So instead we measured out:
1uL of low volume lysate and 999uL of phage buffer using a micropipette into a microcentrifuge tube
5.) Then we took 7uL of our diluted LVL and combined it with 63uL of phage buffer in a separate microcentrifuge tube. Resulting in a 1:10,000 ratio of lysate to phage buffer.
6.) We then obtained 6 bacterial cultures and using a micropipette put 10uL of the last dilution of our LVL into each of the cultures and allowed the bacterial tubes to sit undisturbed for 20 minutes
7.) While we waited we labelled our agar plates with the date, webbed plate and our initials and got out six 5mL serological pipettes in preparation for a plaque assay.
8.) After the 20 minutes was over we got out top agar out of the 55 degree Celsius bath and placed it on the table near our flame loosening the lid for easier access. We then used a serological pipette to take 3 mL of top agar and put it down into our bacterial tube and then pipette it back up and into our agar plate. We quickly sucked up any bubbles that may have formed and tilted the plates for even distribution. After every few plates we placed the top agar back into the bath to prevent it from cooling too much and solidifying. We repeated this for all 6 plates. After the plates sat undisturbed for 20 minutes they were moved to the incubator at approximately 6:30 pm.
Results:
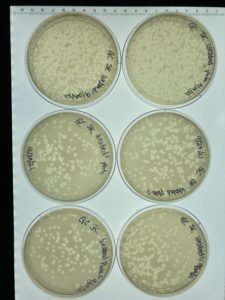
Conclusions and Next Steps:
The next day when the plates were removed from the incubator all 8 had webbed with many plaques. Next steps flood all 6 plates to collect a high volume lysate.
Title: Collecting Plate Lysates
Date: 09/30/2021 Redo:No Sample: #G2
Purpose: This procedure is to collect a concentrated liquid phage sample with high enough titer to complete DNA extraction and electron microscopy.
Notes:
1.) To ensure a sterile work environment we washed our hands as soon as we entered the lab. Then we put on gloves and cleaned the counter top with CiDecon and used ethyl alcohol to dry and sterilize the surface. Then we lit a bunsen burner to reduce particulates from the air that would make our workspace nonsterile. All work is done close to the flame to reduce contamination.
2.) We placed our 6 webbed plates on the counter top and added 8 mL of phage buffer to each plate using a serological pipette. After the phage buffer was added the lid to each plate was placed back onto the plate. Then all 6 plates were carefully placed on the back counter at approximately 5 pm.
3.) At approximately 7 pm group members returned to the lab to collect the lysate. First we sterilized our work area as before. Then we obtained the following supplies: a 5 mL serological pipette, a 0.22 uL filter, a 5 mL syringe and a 50 mL conical tube.
4.) Each plate was carefully placed on the counter top then one by one we removed the lid of the plate and placed the lid under one side of the plate allowing the lysate to puddle to one side. Then using the 5 mL serological pipette the lysate was aspirated up and dispensed into the 5 mL syringe with the filter attached. Then using the syringe the lysate was pushed through the filter into the tube. This was repeated with all 6 plates until all the lysate was collected.
Results:
I forgot to take a picture of the HVL tube one will be added soon.
Conclusions and Next Steps:
About 30 mL of Lysate was collected. Next steps perform a full plate titer to determine the titer and see if it is high enough for electron microscopy and DNA extraction.
Title: Full Plate Titer
Date: 10/04/2021 Redo: No Sample: # G2
Purpose: This procedure is to determine the titer of our high volume lysate the goal is to have a lysate with titer of 5 x 10⁹ pfu/mL or higher to move on to DNA extraction and electron microscopy.
Notes:
1.) To ensure a sterile work environment we washed our hands as soon as we entered the lab. Then we put on gloves and cleaned the counter top with CiDecon and used ethyl alcohol to dry and sterilize the surface. Then we lit a Bunsen burner to reduce particulates from the air that would make our workspace nonsterile. All work is done close to the flame to reduce contamination.
2.) We first labeled 8 microcentrifuge tubes 10-1, 10-2,……10-8. After that using a micropipette 90uL of phage buffer was added to each tube. Next we removed our high volume lysate from the fridge and using a micropipette added 10 uL of lysate to tube 10-1. We then flicked and flipped tube 10-1 to ensure it was mixed well. Then we replaced our micropipette tip.
3.) Next we used a micropipette to add 10uL of the contents of tube 10-1 to tube 10-2. We then flicked the bottom of tube 10-2 to ensure it was mixed well. Then we placed tube 10-1 to a side and replaced our micropipette tip.
4.) Next we used a micropipette to add 10uL of the contents of tube 10-2 to tube 10-3. We then flicked the bottom of tube 10-3 to ensure it was mixed well. Then we placed tube 10-2 to a side and replaced our micropipette tip.
5.) Next we used a micropipette to add 10uL of the contents of tube 10-3 to tube 10-4. We then flicked the bottom of tube 10-4 to ensure it was mixed well. Then we placed tube 10-3 to a side and replaced our micropipette tip.
6.)Next we used a micropipette to add 10uL of the contents of tube 10-4 to tube 10-5. We then flicked the bottom of tube 10-5 to ensure it was mixed well. Then we placed tube 10-4 to a side and replaced our micropipette tip.
7.) Next we used a micropipette to add 10uL of the contents of tube 10-5 to tube 10-6. We then flicked the bottom of tube 10-6 to ensure it was mixed well. Then we placed tube 10-5 to a side and replaced our micropipette tip.
8.) Next we used a micropipette to add 10uL of the contents of tube 10-6 to tube 10-7. We then flicked the bottom of tube 10-7 to ensure it was mixed well. Then we placed tube 10-6 to a side and replaced our micropipette tip.
9.) Next we used a micropipette to add 10uL of the contents of tube 10-7 to tube 10-8. We then flicked the bottom of tube 10-8 to ensure it was mixed well.
10.) We then obtained 8 bacterial cultures and rubbed the tube bottoms on the table top to break up any chunks of bacteria. Then we labeled the lids of the tubes 1,2,3,4,5,6,7,8 so that we did not mix them up. Then we used the micropipette to take 10ul of each phage sample from their microcentrifuge tube and add it to a bacterial tube. Changing the tip between each one. The bacterial tubes were then left to sit for 20 minutes.
11.)While we waited we labeled our agar plates with our initials, the dilution number, the date and LD for lysate dilution. Then we acquired eight 5 mL serological pipettes in preparation for plating.
12.) We began plating by getting out top agar out of the 55 degrees Celsius bath. We carefully and quickly pipetted up 3 mL of top agar down into our bacterial tube then immediately pipetted it back up and onto the plate avoiding bubbles (sucking them up if they were present) then picking up the plate and tilting it to ensure even distribution then we put the lid on the plate and set it aside repeating this process for all the samples. We took breaks between samples to place the agar back into the heat bath so that it would not solidify on us.
13.) Once all of the bacterial cultures were plated they were left undisturbed for 20 minutes then moved to the incubator at approximately 11 am.
Results:
Conclusions and Next Steps:
Full plate titer was successful with a high enough concentration to move on to DNA extraction and electron microscopy.
38 plaques were counted on plate 10-8 and the following calculation was done to find the titer:
Titer(pfu/mL)=(# pfu/mL)(10^3 uL)(dilution factor)
Titer(pfu/mL)=(38 pfu/mL)(10^3uL/mL)(10^8)
=3.8 x 10^11
Title: Archiving Samples
Date: 10/07/2021 Redo: No Sample: #G2
Purpose: This procedure is to prepare lysate samples for long term storage and phage is added to the phagesdb
Notes:
All work was done for this procedure under the biosafety hood to ensure the workspace was sterile.
1.) Our phage name and information about where it was found was added to Phagesdb.org
2.) We filled 3 Hatful tubes about 3/4 full with sterile beads.
3.) 2.8 mL of our HVL was added to a 15 mL tube using a serological pipette.
4.) Then 200 uL of Dimethyl Sulfoxide (DMSO) was added to the tube. We then capped the tube and shook for 30 seconds to mix well.
5.) Then using a serological pipette each of the Hatful tubes were filled to just where the beads were covered with the lysate DMSO mixture.
6.) the tubes were then capped and labeled with Enchi and our titer of 3.8 x 10^11.
Results:
3 tubes were successfully stored I did not take a picture of the tubes
Conclusions and Next Steps:
Monday morning begin the steps of DNA extraction. Waiting for results of electron microscopy.
Title: Making Webbed Plates from a Lysate of Known Titer
Date: 11/3/2021 Redo: No Sample: # G2
Purpose: This procedure is to create plates with a high density of plaques in order to be able to flood them and collect a HVL.
Notes:
1.) To ensure a sterile work environment we washed our hands as soon as we entered the lab. Then we put on gloves and cleaned the counter top with CiDecon and used ethyl alcohol to dry and sterilize the surface. Then we lit a bunsen burner to reduce particulates from the air that would make our workspace nonsterile. All work is done close to the flame to reduce contamination.
2.)First we counted the plaques on plates 10-8 and 10-7 from our full plate titer: Plate 10-8 = 10 plaques Plate 10-7= 100 plaques
3.) We then calculated the titer using the formula:
Titer (pfu/mL) = (# pfu/ volume used in μL) x (10^3 μL/mL) x dilution factor
Titer (pfu/mL) = (10pfu/10uL) x (10^3 uL/mL) x (10^8)
Titer (pfu/mL) = 1.0 x 10^11
Plate 10-5 from our full plate titer was webbed so we wanted 1.0 x 10^5 and we had 1.0 x 10^11 so we divided 1.0 *1051.0*1011= 1.0 x 10^-6
1.0 x 10^-6 x1000 = 1.0 x 10^-3 or 0.001
4.) In order to get a 1:1000 ratio of our lysate to phage buffer we had to dilute the lysate because we can not measure out 0.001 uL of our lysate.
So instead we measured out:
1uL of low volume lysate and 999uL of phage buffer using a micropipette into a microcentrifuge tube
5.) Then we took 7uL of our diluted LVL and combined it with 63uL of phage buffer in a separate microcentrifuge tube. Resulting in a 1:10,000 ratio of lysate to phage buffer.
6.) We then obtained 6 bacterial cultures and using a micropipette put 10uL of the last dilution of our LVL into each of the cultures and allowed the bacterial tubes to sit undisturbed for 20 minutes
7.) While we waited we labelled our agar plates with the date, webbed plate and our initials and got out six 5mL serological pipettes in preparation for a plaque assay.
8.) After the 20 minutes was over we got out top agar out of the 55 degree Celsius bath and placed it on the table near our flame loosening the lid for easier access. We then used a serological pipette to take 3 mL of top agar and put it down into our bacterial tube and then pipette it back up and into our agar plate. We quickly sucked up any bubbles that may have formed and tilted the plates for even distribution. After every few plates we placed the top agar back into the bath to prevent it from cooling too much and solidifying. We repeated this for all 6 plates. Then the plates were left undisurbed for 20 minutes then moved to the incubator.
Results:
Conclusions and Next Steps:
Flood plates and collect lysate.
Title:
Date: Month/Day/Year Redo: Yes or No Sample: #
Purpose: This procedure is to collect a concentrated liquid phage sample with high enough titer to complete DNA extraction and electron microscopy.
Notes:
1.) To ensure a sterile work environment we washed our hands as soon as we entered the lab. Then we put on gloves and cleaned the counter top with CiDecon and used ethyl alcohol to dry and sterilize the surface. Then we lit a bunsen burner to reduce particulates from the air that would make our workspace nonsterile. All work is done close to the flame to reduce contamination.
2.) We placed our 6 webbed plates on the counter top and added 8 mL of phage buffer to each plate using a serological pipette. After the phage buffer was added the lid to each plate was placed back onto the plate.
3.) At approximately 4:30 pm group members began to collect the lysate. First we sterilized our work area as before. Then we obtained the following supplies: a 5 mL serological pipette, a 0.22 uL filter, a 5 mL syringe and a 50 mL conical tube.
4.) Each plate was carefully placed on the counter top then one by one we removed the lid of the plate and placed the lid under one side of the plate allowing the lysate to puddle to one side. Then using the 5 mL serological pipette the lysate was aspirated up and dispensed into the 5 mL syringe with the filter attached. Then using the syringe the lysate was pushed through the filter into the tube. This was repeated with all 6 plates until all the lysate was collected.
Results:

Conclusions and Next Steps:
40 uL of lysate was collected next steps continue with DNA extractions.
DNA Extraction
Title: DNA Extraction
Date: 10/11/2021 Redo: No Sample: #G2
Purpose: This procedure is to isolate genomic DNA samples from the phage.
Notes:
Day 1
1.) The table was sterilized with CiDecon and a bunsen burner was lit to ensure an aseptic environment to work in. All work was done with gloves.
2.) Using a serological pipette 5 mL of lysate was added to a 15 mL tube. Then the rest of our lysate was placed back in the fridge and the flame was turned off.
3.) We then handed the tube to our TA; Marlee so she could add 20 uL of Nuclease mix (DNAasel + RNAaseA)to our tube.
4.) We then inverted the tube several times then placed it in an incubator at 37 degrees celsius for 10 minutes.
5). After 10 minutes we took the sample out of the incubator. Using a micropipette we dispensed 1 mL of the lysate into 5 different microcentrifuge tubes.
6.) Then using a micropipette 20 uL of ZnCl2 was added to each tube and they were shaken and placed into the 37 degree incubator for 5 minutes
7.) The tubes were placed in the microcentrifuge at 10,000 rpm for 1 minute .
By this time class was over so we placed the tubes in a rack and put them in the fridge at aproximately 11 am til we returned to the lab at 3 pm.
8.) When we returned to the lab the tubes were centrifuged again at the same settings for a minute.
THE NEXT TWO STEPS WERE DONE QUICKLY
9.) Keeping the pellet the fluid was sucked up from each tube using a serological pipette and dispensed into a waste tube.
10.) Using a micropipette 500 uL of TES buffer was added to each tube. The tubes were then capped and incubated at 60 degrees celsius for 15 minutes.
11.) One microliter of Proteinase K was added to the tubes with a micro pipette. Then they were closed and gently shaken to mix. Then they were placed in the incubator at 37 degrees for 10 minutes.
12.) Then 60 uL of potassium acetate was added to the tubes and then they were placed on ice for 15 minutes.
13) then we placed the tubes in the micro centrifuge again at 4 degrees and maximum speed for a minute. Then we sucked up the liquid from each tube and placed it into new microcentrifuge tubes. We then disposed if the tubes containing the pellet.
14.) 500 uL of 80% isopropanol was then added using a micropipette to the superanatant and the tubes were placed on ice til the next lab.
Day 2: October 14th 2021
The the table was cleaned with CiDecon and alcohol. All work was completer wearing nitrile gloves.
1.) The samples were taken out of the ice bath and placed into the centrifuge at top speed for 10 minutes.
2.) All supernatants were removed from the tubes using a serological pipette and put into a waste tube.
3.) 250 uL of 70% ethanol was added to each tube and then the tubes were centrifuged for a minute at top speed.
4.) We then removed all the liquid in the tubes and set the tubes upside-down on a kimwipe on the fan part of the biosafety hood. We waited about 25 minutes before moving on from this step to try to get the tubes as dry as possible.
5) Using a micropipette we added 50 uL of nuclease-free water to the first tube. We then suctioned it up and moved it to the next tube until it had gone through all 5 tubes. Finally it is left in the 5th tube and the tube is capped.
6.) We then tested our concentration and quality using the Nanodrop.
Results:
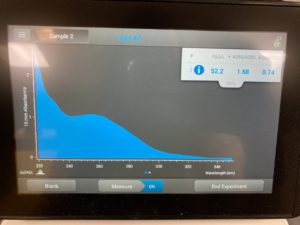
Conclusions and Next Steps:
ng/uL: 52.2
A260/A280: 1.68
A260/A230 :0.74
High salt contamination levels with low DNA concentration. Next steps retry DNA extraction.
Title: DNA Extraction
Date: 10/20/2021 Redo: No Sample: #G2
Purpose: This procedure is to isolate genomic DNA samples from the phage.
Notes:
1.) The table was sterilized with CiDecon and a bunsen burner was lit to ensure an aseptic environment to work in. All work was done with gloves.
2.) Using a serological pipette 5 mL of lysate was added to a 15 mL tube. Then the rest of our lysate was placed back in the fridge and the flame was turned off.
3.) We then handed the tube to our TA; Marlee so she could add 20 uL of Nuclease mix (DNAasel + RNAaseA)to our tube.
4.) We then inverted the tube several times then placed it in an incubator at 37 degrees celsius for 10 minutes.
5). After 10 minutes we took the sample out of the incubator. Using a micropipette we dispensed 1 mL of the lysate into 5 different microcentrifuge tubes.
6.) Then using a micropipette 20 uL of ZnCl2 was added to each tube and they were shaken and placed into the 37 degree incubator for 5 minutes
7.) The tubes were placed in the microcentrifuge at 10,000 rpm for 1 minute .
By this time class was over so we placed the tubes in a rack and put them in the fridge at aproximately 11 am til we returned to the lab at 3 pm.
8.) When we returned to the lab the tubes were centrifuged again at the same settings for a minute.
THE NEXT TWO STEPS WERE DONE QUICKLY
9.) Keeping the pellet the fluid was sucked up from each tube using a serological pipette and dispensed into a waste tube.
10.) Using a micropipette 500 uL of TES buffer was added to each tube. The tubes were then capped and incubated at 60 degrees celsius for 15 minutes.
11.) One microliter of Proteinase K and 1 microliter of nuclease free water were added to the tubes with a micropipette. Then they were closed and gently shaken to mix. Then they were placed in the incubator at 37 degrees for 10 minutes.
12.) Then 60 uL of potassium acetate was added to the tubes and then they were placed on ice for 15 minutes.
13) then we placed the tubes in the micro centrifuge again at 4 degrees and maximum speed for a minute. Then we sucked up the liquid from each tube and placed it into new microcentrifuge tubes. We then disposed if the tubes containing the pellet.
14.) 500 uL of 80% isopropanol was then added using a micropipette to the superanatant and the tubes were placed on ice til the next lab.
Day 2: October 25th 2021
The the table was cleaned with CiDecon and alcohol. All work was completer wearing nitrile gloves.
1.) The samples were taken out of the ice bath and placed into the centrifuge at top speed for 10 minutes.
2.) All supernatants were removed from the tubes using a serological pipette and put into a waste tube.
3.) 250 uL of 70% ethanol was added to each tube and then the tubes were centrifuged for a minute at top speed.
4.) We then removed all the liquid in the tubes and set the tubes upside-down on a kimwipe on the fan part of the biosafety hood. We waited about 25 minutes before moving on from this step to try to get the tubes as dry as possible.
5) Using a micropipette we added 50 uL of nuclease-free water to the first tube. We then suctioned it up and moved it to the next tube until it had gone through all 5 tubes. Finally it is left in the 5th tube and the tube is capped.
6.) We then tested our concentration and quality using the Nanodrop.
Results:

Conclusions and Next Steps:
ng/uL : 177.0
A260/A280 : 1.97
A260/A230 : 1.65
We got better results with lower salt contamination than our first attempt. Next steps retry DNA extraction to try to get a higher concentration of DNA particles.
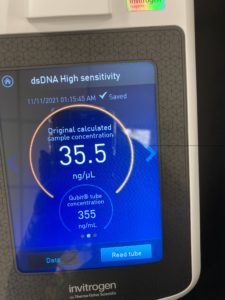
Qubit results :
27.4 ng/uL sample concentration
sample was retested on the nanodrop and Qubit on 11/10/2021
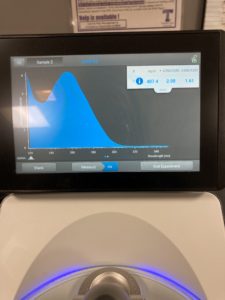
New nanodrop results:
ng/uL: 407.4
A260/A280: 2.08
A260/A230: 1.61
Qubit results :
27.4 ng/uL sample concentration
This sample was set aside for possible sequencing.
Title: DNA Extraction
Date: 10/27/2021 Redo: No Sample: #G2
Purpose: This procedure is to extract genomic DNA from the phage sample.
Notes:
1.) The table was sterilized with CiDecon and a bunsen burner was lit to ensure an aseptic environment to work in. All work was done with gloves.
2.) Using a serological pipette 5 mL of lysate was added to a 15 mL tube. Then the rest of our lysate was placed back in the fridge and the flame was turned off.
3.) We then handed the tube to our TA; Marlee so she could add 20 uL of Nuclease mix (DNAasel + RNAaseA)to our tube.
4.) We then inverted the tube several times then placed it in an incubator at 37 degrees celsius for 10 minutes.
5). After 10 minutes we took the sample out of the incubator. Using a micropipette we dispensed 1 mL of the lysate into 5 different microcentrifuge tubes.
6.) Then using a micropipette 20 uL of ZnCl2 was added to each tube and they were shaken and placed into the 37 degree incubator for 5 minutes
7.) The tubes were placed in the microcentrifuge at 10,000 rpm for 1 minute .
THE NEXT TWO STEPS WERE DONE QUICKLY
9.) Keeping the pellet the fluid was sucked up from each tube using a serological pipette and dispensed into a waste tube.
10.) Using a micropipette 500 uL of TES buffer was added to each tube. The tubes were then capped and incubated at 60 degrees celsius for 15 minutes.
11.) One microliter of Proteinase K and 1 microliter of nuclease free water were added to the tubes with a micropipette. Then they were closed and gently shaken to mix. Then they were placed in the incubator at 37 degrees for 10 minutes.
12.) Then 60 uL of potassium acetate was added to the tubes and then they were placed on ice for 15 minutes.
13) then we placed the tubes in the micro centrifuge again at 4 degrees and maximum speed for a minute. Then we sucked up the liquid from each tube and placed it into new microcentrifuge tubes. We then disposed if the tubes containing the pellet.
14.) 500 uL of 80% isopropanol was then added using a micropipette to the superanatant and the tubes were placed on ice til the next lab.
Day 2: November 1st 2021
The the table was cleaned with CiDecon and alcohol. All work was completer wearing nitrile gloves.
1.) The samples were taken out of the ice bath and placed into the centrifuge at top speed for 10 minutes.
2.) All supernatants were removed from the tubes using a serological pipette and put into a waste tube.
3.) 250 uL of 70% ethanol was added to each tube and then the tubes were centrifuged for a minute at top speed.
4.) We then removed all the liquid in the tubes and set the tubes upside-down on a kimwipe on the fan part of the biosafety hood. We waited about 25 minutes before moving on from this step to try to get the tubes as dry as possible.
5) Using a micropipette we added 50 uL of nuclease-free water to the first tube. We then suctioned it up and moved it to the next tube until it had gone through all 5 tubes. Finally it is left in the 5th tube and the tube is capped.
6.) We then tested our concentration and quality using the Nanodrop.
Results:
Conclusions and Next Steps:
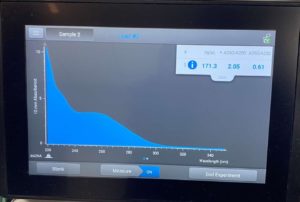
ng/uL: 171.3
A260/A280: 2.05
A260/A230: 0.61
High salt contamination low DNA concetration. Next steps create more HVL and retry DNA extraction.
Title: DNA Extraction
Date: 11/08/2021 Redo: No Sample: #G2
Purpose: This procedure is to extract genomic DNA from the phage sample.
Notes:
1.) The table was sterilized with CiDecon and a bunsen burner was lit to ensure an aseptic environment to work in. All work was done with gloves.
2.) Using a serological pipette 5 mL of lysate was added to a 15 mL tube. Then the rest of our lysate was placed back in the fridge and the flame was turned off.
3.) We then handed the tube to our TA; Marlee so she could add 20 uL of Nuclease mix (DNAasel + RNAaseA)to our tube.
4.) We then inverted the tube several times then placed it in an incubator at 37 degrees celsius for 10 minutes.
5). After 10 minutes we took the sample out of the incubator. Using a micropipette we dispensed 1 mL of the lysate into 5 different microcentrifuge tubes.
6.) Then using a micropipette 20 uL of ZnCl2 was added to each tube and they were shaken and placed into the 37 degree incubator for 5 minutes
7.) The tubes were placed in the microcentrifuge at 10,000 rpm for 1 minute .
THE NEXT TWO STEPS WERE DONE QUICKLY
9.) Keeping the pellet the fluid was sucked up from each tube using a serological pipette and dispensed into a waste tube.
10.) Using a micropipette 500 uL of TES buffer was added to each tube. The tubes were then capped and incubated at 60 degrees celsius for 15 minutes.
11.) One microliter of Proteinase K and 1 microliter of nuclease free water were added to the tubes with a micropipette. Then they were closed and gently shaken to mix. Then they were placed in the incubator at 37 degrees for 10 minutes.
12.) Then 60 uL of potassium acetate was added to the tubes and then they were placed on ice for 15 minutes.
13) Then we placed the tubes in the micro centrifuge again at 4 degrees at maximum speed for a minute. Then we sucked up the liquid from each tube and placed it into new microcentrifuge tubes. We then disposed if the tubes containing the pellet.
14.) 500 uL of 80% isopropanol was then added using a micropipette to the superanatant and the tubes were placed on ice til the next lab.
Day 2: November 10th 2021
The the table was cleaned with CiDecon and alcohol. All work was completer wearing nitrile gloves.
1.) The samples were taken out of the ice bath and placed into the centrifuge at top speed for 10 minutes.
2.) All supernatants were removed from the tubes using a serological pipette and put into a waste tube.
3.) 250 uL of 70% ethanol was added to each tube and then the tubes were centrifuged for a minute at top speed.
4.) We then removed all the liquid in the tubes and set the tubes upside-down on a kimwipe on the fan part of the biosafety hood. We waited about 25 minutes before moving on from this step to try to get the tubes as dry as possible.
5) Using a micropipette we added 50 uL of nuclease-free water to the first tube. We then suctioned it up and moved it to the next tube until it had gone through all 5 tubes. Finally it is left in the 5th tube and the tube is capped.
6.) We then tested our concentration and quality using the Nanodrop and Qubit
Results:

Conclusions and Next Steps:
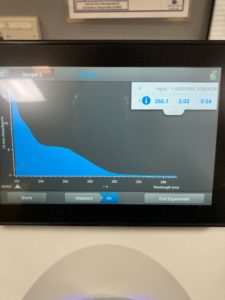
Nanodrop results :
ng/uL: 265.1
A260/A280: 2.03
A260/A230 : 0.54
Qubit results
sample concentration : 27.4 ng/uL
Next steps Restriction Enzyme Digest and gel electrophoresis
Characterization
Title: Mounting Phage Samples for TEM and staining with Uranyl Acetate
Date: 10/27/2021 Redo: No Sample: #G2
Purpose: This procedure is to prepare the sample for viewing with the Transmission Electron Microscope.
Notes:
All work is done with gloves on
1.) One mL of our high titer lysate (HVL) was moved into a microcentrifuge and placed into the microcentrifuge for an hour.
2.) Then using a micropipette the supernatants were removed from the tube.
3.) Then 100uL of phage buffer was added to the tube and the tube was placed into the fridge at 4 degrees for thirty minutes.
4.) After the thirty minutes we put on a new pair of gloves and worked over a pad to ensure a clean work environment.
5.) We then removed the cover from a 5×5 centimeter piece of parafilm and placed the parafilm into a petridish.
6.) Next a PELCO tab was placed onto the parafilm side of the dish and the tab was exposed.
7.) Using EM forceps a fresh grid was removed from the box.(touching only the edge)
8.) Then we placed the grid shiny side up on the tab so that no more than just the edge of the grid was touching the tab.
Then we mounted and stained the phage.
9.) Using a micropipette 10 uL of lysate was placed onto the grid being carful not to touch the grid.
The grid was then left undisturbed for 2 minutes.
10.) Then the excess fluid was taken off using a filter paper.
11.) The grid was then rinsed off twice with 10 uL of nuclease free water and then left undisturbed for 2 minutes again.
12.) Then the excess water was dried off
13.) Then using a micropipette 10 uL of 1% uranyl acetate was added to the grid and again the grid was left undisturbed for 2 minutes and again the excess was removed with filter paper.
14. The grid was then placed into the grid box and it was transferred off to be imaged.
Results:
Conclusions and Next Steps:
TEM grid sent off for imaging
Title: Enzyme Digest
Date: 11/12/2021 Redo: No Sample: #G2
Purpose: This procedure is to cut the phage DNA into fragments in order to do gel electrophoresis.
Notes:
All work is done with gloves on!
1.) After vortexing the DNA to mix it, we incubated the tube at 65 degrees C, then iced down.
2.) The tube was moved to the microcentrifuge and was spun for less than a minute to allow the liquid to settle.
3.) Next we calculated the volume of DNA concentrate needed to obtain 0.5 ug of DNA; 35uL/5= 7 total uL
4.) We were then ready to set up our enzyme digest reactions. Each of the reaction tubes were set up as followed:
Enzyme 1: 7 uL DNA, 2.5 uL buffer, 0.5 uL HAE III, 15 uL nuclease free water
Enzyme 2: 7 uL DNA, 2.5 uL buffer, 0.5 uL NSP I, 15 uL nuclease free water
Enzyme 3: 7 uL DNA, 2.5 uL buffer, 0.5 uL SAL I, 15 uL nuclease free water
Enzyme 4: 7 uL DNA, 2.5 uL buffer, 0.5 uL SAC II, 15 uL nuclease free water
Uncut DNA: 7 uL DNA, 2.5 uL buffer, 15.5 uL nuclease free water
5.) We gently mixed the contents of all the tubes and spun them in the microcentrifuge for 1 minute.
6.) Finally, we incubated our tubes at 37 degrees C for about an hour before storing them at -20 degrees C until use.
Results:
We now have our enzyme reactions set up for gel electrophoresis.
Conclusions and Next Steps:
Our next step is to cast the agragose gel.
Title: Setup Agragose Gel
Date: 11/12/2021 Redo: No Sample: #G2
Purpose: This procedure is to prepare and cast the agragose gel for gel electrophoresis.
Notes:
All work is done with gloves on!
1.) First we weighed out 0.24 g of agragose powder and transered it to a Erlenmeyer flask.
2.) Then we added 30 ml of 1x TBE Buffer and swirled the flask to mix.
3.) We transfered the flask to the microwave and heated the mixture until boiling. Using heat resistant gloves, we carefully removed the flask from the microwave and swirled to mix, looking for clumps.
4.) After allowing the mixture to cool, we added 1.5 uL of ethidium bromide dye and swirled to mix.
5.) We then poured the gel into the gel apparatus, inserted the comb and allowed it to cool for about 20 minutes.
6.) After it solidified, we carefully removed the comb, lifted the gel out of the casting tray and placed it in the gel box (with the wells facing the – cathode end).
7.) Finally, we poured 1x TBE buffer on top until the gel is submerged with 1/4 inch of buffer.
Results:
We now have our gel set up for gel electrophoresis.
Conclusions and Next Steps:
Our next step is to load and run the gel.
Title: Gel Electrophoresis
Date: 11/12/2021 Redo: No Sample: #G2
Purpose: This procedure is to load and run the enzyme digest samples for gel electrophoresis.
Notes:
All work is done with gloves on!
1.) First we added 5 μl of 6x loading dye to each restriction enzyme sample.
2.)We placed the samples at 65 °C in a heat block for 5 minutes. Then placed the samples on ice to cool, and spun them in a microcentrifuge for ~ 15 seconds at 10,000 rpm.
3.) Then using a fresh micropippeting tip for each sample, we loaded 20 uL into each well, labeled below in results.
4.) After plugging in the electrodes, we ran our gel at 100 Volts until the blue dye migrated to between the 5 and 6 on the gel rig. This took about an hour.
Results:
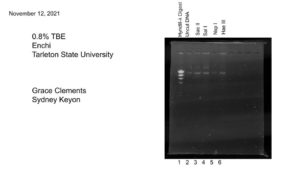
Conclusions and Next Steps:
We will next analyze our gel and determine the results.