Discovery of Titoz
Collecting Enviromental Sample
| Collector Name | Gustavo Vazquez | Gustavo Vazquez | Samuel Munoz | Samuel Munoz | Gustavo Vazquez | Gustavo Vazques | Samuel Munoz | Samuel Munoz |
| Sample No. | 3 | 1 | 2 | 4 | 5 | 8 | 7 | 6 |
| Date of Collection | 9-2-19 | 9-1-19 | 9-3-19 | 9-8-19 | 9-8-19 | 9-15-19 | 9-15-19 | 9-15-19 |
| Sample Type | Liquid | soil | Liquid | Liquid | liquid | soil | liquid | liquid |
| General Location | Pond beside agriculture land | Hay and feed barn | Forest strip in an industrialized are of town | River running through middle of park | Lake reservoir | dry paster farmland | River running through a park, mild vegetation | River with mild vegetation |
| Location Description |
very muddy area beside the pond. The water was not clear and it was roughly 50 square feet. |
the soil was collected underneath hay feed. The soil was very dry and the area was very humid | Stagnant stream bed. | slightly stagnant water, dark green, sand-like soil | odorless with dark color. The soil was sand like and very reposeful | very dry area, cow dug, hot open area | Stagnant river, mild vegetation, dark green water | Rocky, stagnant river, dark green water, algae-filled |
| GPS Coordinates |
Latitude: 31.956842 Longitude: -98.326389
|
Latitude: 31.9555521 Longitude-98.327712 |
Latitude: 32.2026 Longitude: -98.2415
|
Latitude: 32.2157 Longitude: -98.2019 |
Latitude: 31.995915 Longitude -98.460716 |
latitude 31.955241 Longitude -98.327544 |
Latitude: 32.2149 Longitude: -98.2026 |
Latitude: 32.2149 Longitude: -98.2026 |
| Sample Depth | Above surface area | above surface area | above surface area | surface of water | surface of water | surface area | Surface | Surface |
|
Ambient Temperature
|
32 Celsius | 29 Celsius |
30 Celcius
|
35 Celsius | 31 Celsius | 33 celsius | 33 Celcius | 33 Celcius |
Isolation/Purification
Direct Isolation; Sample 2
Date Started:Sep. 04, 2019 Redo? No
Purpose: The purpose of using direct isolation is to purify the sample of everything and anything that is not a virus, resulting in an aseptic filtrate of only viruses.
Notes:
We used the direct isolation procedure listed on the phage discovery guide.
1) We started by sanitizing our work area with CiDecon and ethanol.
2) We then grabbed all the supplies and tools needed for this procedure; sample 2, sterile 5ml syringe, .22 um syringe filter, 5ml serological pipettes, 15ml conical tube, and a propane bunsen burner.
3) We prepared all everything needed to make our procedure run as smoothly and aseptic as possible; lighting the flame and opening the syringe filter package, leaving the syringe in it.
4) Making sure to be in the proximity of the flame, we used to syringe to extract 2ml of liquid from our sample.
5) We then attached the syringe filter to the syringe and proceeded to dispense the filtrate into a sterile 15ml conical tube and closing it immediately.
6) We then incubated the filtrate for 2 hours before moving on to the next procedure.
Results:
The final product for the direct isolation procedure was a 2ml filtrate sample in a 15ml conical tube.

Conclusions and Next Steps:
Not much can be determined this early. After 2 hours of incubation, we did the plaque assay procedure.
Title: Plaque Assay; Sample 2
Date Started:Sep. 04, 2019 Redo? No
Purpose: To visually see the phages on an aseptic agar plate.
Notes:
1) Before doing anything we properly cleaned our work area and collected all the required items and tools we needed; filtrate, Host bacteria, agar plate, top agar (near the end of the experiment), bunsen burner, and 5ml serological pipettes.
2) Prior to starting any experimentation, we lit our bunsen burner and gathered all the required items in close proximity
3) We started by putting our bacteria into the 15ml conical tube containing our filtrate, we then emptied it into the agar plate.
4) We then used the serological pipettes and added 3ml of top agar into the agar plate with the virus and bacteria.
5) We waited 15 minutes before we incubated it.
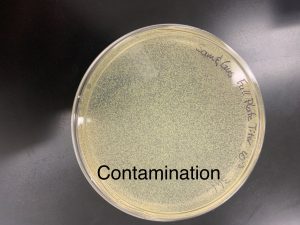
Results:
Agar plate with bacterium and virus. Contaminated and discarded; no further testing.
Conclusions and Next Steps:
Contaminated and properly discarded; No further experimentation.
Title: Enriched Isolation Day 1; Sample 3
Date Started:Sep. 04, 2019 Redo? No
Purpose: The purpose of enriched isolation is to increase the volume of phages (viruses) in the environment sample collected (liquid) by using a host bacteria that will promote growth and replication in a incubator for five days.
Notes:
We started the procedure at 2:20 P.M.
1). The first task was completed using the aseptic technique, with CiDecon and ethanol, before gathering the supplies; to avoid any contamination.
2) The supplies we use were; liquid environmental sample, 0.22 µm filters, 10X liquid media, 50 ml sterile conical tube, Host bacteria (500 μl), and propane bunsen burner.
3) The procedure is as follows; we filter 25 mL of liquid sample 3 through a .22um filter to remove unwanted bacteria and soil particles into the 50 mL sterile conical tube.
4) After this procedure we added 0.5 mL of the bacteria host into the 50 mL sterile conical tube.
5) Then we added 5 ml of 10x liquid media to the 50 ml sterile conical tube as a source of nutrients for the host bacteria.
6) The final step was to incubate the conical tube with the enriched culture (mixture) in it in the incubator shaking at 220 rpm for 5 days. We will remove the conical tube with the mixture on September 9, 2019.
Results:
The 50 ml conical tube will be taken out of the incubator on September 9, 2019 to observe if the supernatant is clear (host bacteria).
Conclusions and Next Steps:
After the 50 ml conical tube has been in the incubator for 5 days, we will observe for clear water (host bacteria) and proceed to spot test if instructor approves.
Title: Enriched Isolation Day 2; Sample 3
Date Started:Sep. 09, 2019 Redo? No
Purpose: The purpose of enriched isolation is to increase the volume of phages (viruses) in the environment sample collected (liquid) by using a host bacteria that will promote growth and replication in a incubator for five days.
Notes:
We started doing the protocol at 9:15 P.M
1). We started by the protocol by washing our hands for 10 seconds and proceed to the aseptic technique, with CiDecon, ethanol, and paper towels to avoid contamination.
2). The tools used during this protocol were; .22um syringe filters, 5 ml syringes, Micro-centrifuge tubes, enriched culture, propane bunsen burner.
3). We turn on the propane bunsen burner to avoid unwanted particles then filter the enriched culture that was incubated for 5 days by extracting 1.4 mL of the enriched culture using the 5mL syringe and then attaching the .22 um filter to the syringe. The 1.4 mL enriched culture was filter in a micro-centrifuge tube. We filter another 1.4 ml of the enriched culture in another micro-centrifuge.
4). The micro-centrifuges were then spin at 1,000 RCF for 60 seconds with a temperature of 4 degrees Celsius.
5). Base on our observation, we declare that our supernatants did not contain host bacteria (clear).
6). We filter the the supernatants through a .22 um filter at the same time ( 1ml from each micro-centrifuge into the 5ml syringe ) to a clean micro-centrifuge tube avoiding the bacterial pellet. We kept this procedure close to the flame.
7). The micro-centrifuge was cap immediately and proceed to the Spot test (5.6)
Results:
Nothing can be determine right now. We proceed to the Spot Test protocol (5.6). The rest of our enriched culture was disposed into an appropriate container as directed by our instructor.

Conclusions and Next Steps:
The next step is to test our supernatant for phages using the spot test protocol with out getting contamination.
Title: Enriched Isolation Spot Test Day 2; Sample 3
Date Started:Sep. 09, 2019 Redo? No
Purpose: To test our sample to verify the presence of phage in plaques
Notes:
We started the procedure at 10:05 A.M
1). The first task was completed using the aseptic technique, with CiDecon and ethanol, before gathering the supplies; to avoid any contamination.
2) The supplies we use were; liquid phage sample, Agar plates, Host bacteria, TOP agar, Phage buffer, 5ml serological pipette, and bunsen burner.
3) The procedure is as follows; label the bottom of the agar plate and with our name, sample and date. We also divide the plate into 3 sections. (2 liquid phage sample and one negative control)
4) After this procedure, we transfer 3ml of molten top agar with a 5ml pipette into the the culture tube containing 250 ul host bacteria then immediately draw the solution back into the same pipette.We notice that a lot of bubbles were withdrawing during this procedure. We made sure the bunsen and burner was on.
5) We dispense the top agar- bacteria mixture onto a agar plate as soon as possible so the agar will not solidify in the 5ml pipette. We tilt the plate in different direction until it is mix. Bubbles form as we dispense the top agar into the agar plate. This can have a negative result because it can be confuse with phages. We waited 11 minutes until the top agar solidifies.
6) After 11 minutes we aseptically transfer 10 ul of the liquid phage onto the two label locations of the plate using a pippetman. We did the same thing for the negative control ( phage buffer).
7). We waited 10 minutes for the spots to absorb into the agar and then incubate the plates for 24 hours.
Results:
We checked the plates on 9-10-19 at 4:19 P.M for spots, but the protocol got contaminated and there is no further experiment.
Conclusions and Next Steps:
One explanation as to why it got contaminated is our aseptic technique or procedure steps were not done careful enough to avoid contamination.We will collect more environmental samples and continue doing direct isolation.
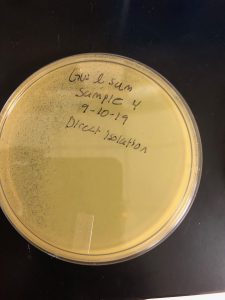
Title: Direct Isolation; Sample 4; liquid
Date Started:Sep. 10, 2019 Redo? yes
Purpose: The purpose of using direct isolation is to purify the sample of everything and anything that is not a virus, resulting in an aseptic filtrate of only viruses.
Notes:
We started the protocol at 6:15 P.M
1) The first task was completed using the aseptic technique, with CiDecon and ethanol, before gathering the supplies; to avoid any contamination.
2) We then grabbed all the supplies and tools needed for this procedure; sample 2, sterile 5ml syringe, .22 um syringe filter, 5ml serological pipettes, 15ml conical tube, and a propane bunsen burner.
3) We set up a bunsen burner to avoid unwanted particles and wash our hands one more time to prevent contamination. The .22 um syringe filter was open, but not taken out until the syringe had 2ml of liquid sample.
4) Making sure to be in the proximity of the flame, we used the 5ml syringe to extract 2ml of our liquid sample. we were careful not to get any extra dirt from the liquid sample
5) We then attached the syringe filter to the syringe and proceeded to dispense the filtrate into a sterile 15ml conical tube and closing it immediately.
6) We then incubated the filtrate for 2 hours before moving on the plaque assay protocol.
Results:
The filter liquid sample was more clear than before. Not much can be experimentally determine as of now. We washed our hands one more time after this protocol.
Conclusions and Next Steps:
Not much can be determined this early. After 2 hours of incubation, we did the plaque assay procedure.
Title: Plaque Assay; Sample 4
Date Started:Sep. 10, 2019 Redo? yes
Purpose: To visually see the phages on an aseptic agar plate.
Notes:
1) Before doing anything we properly cleaned our work area and collected all the required items and tools we needed; filtrate, Host bacteria, agar plate, top agar (near the end of the experiment), bunsen burner, and 5ml serological pipettes.
2) Prior to starting any experimentation, we lit our bunsen burner and gathered all the required items in close proximity. We washed our hands to avoid contamination.
3) We obtain 250 ul host bacteria from our professor. Then used a micropipettor to dispense 500 ul of phage into the 250 ul host bacteria. In order for the host to mix with the phage, we gently tap the tube several times. The sample then sat undisturbed for 10 minutes.
4) After 10 minutes had passed, we washed our hands one more time to avoid contamination and gather the top agar and a plate. We label the plate with our name, date, and tittle it; Direct Isolation.
5). Using a 5ml pipette, we transfer 3 ml of molten top agar to the inculated host tube that was undisturbed for 10 minutes. Immediately the mixture was sucked up into the pipette again and transfer to the plate so the agar will not solidify in the pipette.
6). Gently and quickly we tilt the plate in multiple directions so the mixture evenly coats the plate.
7). We waited for 24 minutes until the agar solidifies and then place the plate into the incubator for 48 hours
Results:
Agar plate with bacterium and virus got contaminated and discarded; no further testing.
Conclusions and Next Steps:
We will collect more environmental samples and repeat direct and enrichment isolation.
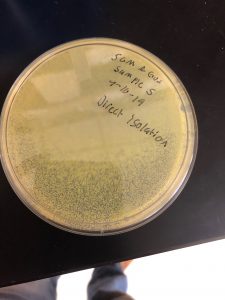
Title: Direct Isolation; Sample 5; liquid
Date Started:Sep. 10, 2019 Redo? yes
Purpose: The purpose of using direct isolation is to purify the sample of everything and anything that is not a virus, resulting in an aseptic filtrate of only viruses.
Notes:
We started the protocol at 5:30 P.M
1) The first task was completed using the aseptic technique, with CiDecon and ethanol, before gathering the supplies; to avoid any contamination.
2) We then grabbed all the supplies and tools needed for this procedure; sample 2, sterile 5ml syringe, .22 um syringe filter, 5ml serological pipettes, 15ml conical tube, and a propane bunsen burner.
3) We set up a bunsen burner to avoid unwanted particles and wash our hands one more time to prevent contamination. The .22 um syringe filter was open, but not taken out until the syringe had 2ml of liquid sample.
4) Making sure to be in the proximity of the flame, we used the 5ml syringe to extract 2ml of our liquid sample. we were careful not to get any extra dirt from the liquid sample
5) We then attached the syringe filter to the syringe and proceeded to dispense the filtrate into a sterile 15ml conical tube and closing it immediately.
6) We then incubated the filtrate for 2 hours before moving on the plaque assay protocol.
Results:
The filter liquid sample was more clear than before. Not much can be experimentally determine as of now. We washed our hands one more time after this protocol.
Conclusions and Next Steps:
Not much can be determined this early. After 2 hours of incubation, we did the plaque assay procedure.
Title: Plaque Assay; Sample 5
Date Started:Sep. 10, 2019 Redo? No
Purpose: To visually see the phages on an aseptic agar plate.
Notes:
1) Before doing anything we properly cleaned our work area and collected all the required items and tools we needed; filtrate, Host bacteria, agar plate, top agar (near the end of the experiment), bunsen burner, and 5ml serological pipettes.
2) Prior to starting any experimentation, we lit our bunsen burner and gathered all the required items in close proximity. We washed our hands to avoid contamination.
3) We obtain 250 ul host bacteria from our professor. Then used a micropipettor to dispense 500 ul of phage into the 250 ul host bacteria. In order for the host to mix with the phage, we gently tap the tube several times. The sample then sat undisturbed for 10 minutes.
4) After 10 minutes had passed, we washed our hands one more time to avoid contamination and gather the top agar and a plate. We label the plate with our name, date, and tittle it; Direct Isolation.
5). Using a 5ml pipette, we transfer 3 ml of molten top agar to the inculated host tube that was undisturbed for 10 minutes. Immediately the mixture was sucked up into the pipette again and transfer to the plate so the agar will not solidify in the pipette.
6). Gently and quickly we tilt the plate in multiple directions so the mixture evenly coats the plate. The bunsen and burner was not turn on so this will have a negative result.
7). We waited for 24 minutes until the agar solidifies and then place the plate into the incubator for 48 hours
Results:
Agar plate with bacterium and virus got contaminated and discarded; no further testing. One possible explanation was that the flame was not turn on while pippeting the mixture into the plate. Bubbles also form.
Conclusions and Next Steps:
We proceed to do another direct isolation with liquid sample 1 and 6
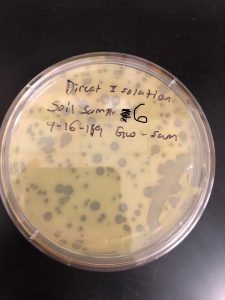
Title: Direct Isolation; Sample 1; Soil
Date Started:Sep. 16, 2019 Redo? yes
Purpose: The purpose of using direct isolation is to purify the sample of everything and anything that is not a virus, resulting in an aseptic filtrate of only viruses.
Notes:
We started the protocol at 9:15 A.M
1) The first task was completed using the aseptic technique, with CiDecon and ethanol, before gathering the supplies; to avoid any contamination. We wash our hands for 30 seconds.
2) We then grabbed all the supplies and tools needed for this procedure; sample 2, sterile 5ml syringe, .22 um syringe filter, 5ml serological pipettes, 15ml conical tube, propane bunsen burner, liquid media
3) We set up a bunsen burner to avoid unwanted particles and wash our hands one more time to prevent contamination.
4). We used all of our soil sample to fill it with liquid media until it submerge and mix thoroughly on the same 15 ml conical tube. After this we incubate the sample for 2 hours.
5). After the 2 hours we let the sample sit for 5 minutes so the soil can settle below the 15 ml conical tube. The .22 um syringe filter was open, but not taken out until the syringe had 2ml of liquid sample.
6) Making sure to be in the proximity of the flame, we used the 5ml syringe to extract 2ml of our soil sample. We were careful not to get any extra dirt from the liquid.
5) We then attached the syringe filter to the syringe and proceeded to dispense the filtrate into a microcentrifuge tube and closing it immediately.
Results:
The filter liquid sample was not as clear as a liquid sample we done previous before, but our instructor told us to proceed to plaque assay. We washed our hands one more time after this protocol.

Conclusions and Next Steps:
Plaque Assay protocol
Title: Plaque Assay; Sample 1 Soil
Date Started:Sep. 16, 2019 Redo? yes
Purpose: To visually see the phages on an aseptic agar plate.
Notes:
We started the procedure at 2:40 P.M
1) Before doing anything we properly cleaned our work area and collected all the required items and tools we needed; filtrate, Host bacteria, agar plate, top agar (near the end of the experiment), bunsen burner, and 5ml serological pipettes.
2) Prior to starting any experimentation, we lit our bunsen burner and gathered all the required items in close proximity. We washed our hands to avoid contamination.
3) We obtain 250 ul host bacteria from our professor. Then used a micropipettor to dispense 500 ul of phage into the 250 ul host bacteria. In order for the host to mix with the phage, we gently tap the tube several times. The sample then sat undisturbed for 10 minutes.
4) After 10 minutes had passed, we washed our hands one more time to avoid contamination and gather the top agar and a plate. We label the plate with our name, date, and tittle it; Direct Isolation.
5). Using a 5ml pipette, we transfer 3 ml of molten top agar to the inculated host tube that was undisturbed for 10 minutes. Immediately the mixture was sucked up into the pipette again and transfer to the plate so the agar will not solidify in the pipette.
6). Gently and quickly we tilt the plate in multiple directions so the mixture evenly coats the plate. The bunsen and burner was not turn on so this will have a negative result.
7). We waited for 24 minutes until the agar solidifies and then place the plate into the incubator for 48 hours
Results:
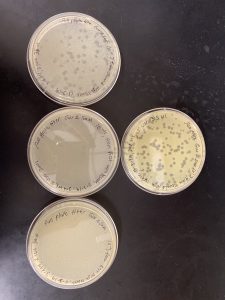
After 48 hours, plaques appear and continue with plaque assay for purification.
Conclusions and Next Steps:
plaque assay for purification (6.1)
Title: Direct Isolation; Sample 8; Soil
Date Started:Sep. 16, 2019 Redo? yes
Purpose: The purpose of using direct isolation is to purify the sample of everything and anything that is not a virus, resulting in an aseptic filtrate of only viruses.
Notes:
We started the protocol at 9:15 A.M
1) The first task was completed using the aseptic technique, with CiDecon and ethanol, before gathering the supplies; to avoid any contamination. We wash our hands for 30 seconds.
2) We then grabbed all the supplies and tools needed for this procedure; sample 2, sterile 5ml syringe, .22 um syringe filter, 5ml serological pipettes, 15ml conical tube, propane bunsen burner, liquid media
3) We set up a bunsen burner to avoid unwanted particles and wash our hands one more time to prevent contamination.
4). We used all of our soil sample to fill it with liquid media until it submerge and mix thoroughly on the same 15 ml conical tube. After this we incubate the sample for 2 hours.
5). After the 2 hours we let the sample sit for 5 minutes so the soil can settle below the 15 ml conical tube. The .22 um syringe filter was open, but not taken out until the syringe had 2ml of liquid sample.
6) Making sure to be in the proximity of the flame, we used the 5ml syringe to extract 2ml of our soil sample. We were careful not to get any extra dirt from the liquid.
5) We then attached the syringe filter to the syringe and proceeded to dispense the filtrate into a microcentrifuge tube and closing it immediately.
Results:
The filter liquid sample was not as clear as a liquid sample we done previous before, but our instructor told us to proceed to plaque assay. We washed our hands one more time after this protocol.
Conclusions and Next Steps:
Plaque Assay protocol
Title: Plaque Assay; Sample 8; Soil
Date Started:Sep. 16, 2019 Redo? yes
Purpose: To visually see the phages on an aseptic agar plate.
Notes:
We started the procedure at 2:40 P.M
1) Before doing anything we properly cleaned our work area and collected all the required items and tools we needed; filtrate, Host bacteria, agar plate, top agar (near the end of the experiment), bunsen burner, and 5ml serological pipettes.
2) Prior to starting any experimentation, we lit our bunsen burner and gathered all the required items in close proximity. We washed our hands to avoid contamination.
3) We obtain 250 ul host bacteria from our professor. Then used a micropipettor to dispense 500 ul of phage into the 250 ul host bacteria. In order for the host to mix with the phage, we gently tap the tube several times. The sample then sat undisturbed for 10 minutes.
4) After 10 minutes had passed, we washed our hands one more time to avoid contamination and gather the top agar and a plate. We label the plate with our name, date, and tittle it; Direct Isolation.
5). Using a 5ml pipette, we transfer 3 ml of molten top agar to the inculated host tube that was undisturbed for 10 minutes. Immediately the mixture was sucked up into the pipette again and transfer to the plate so the agar will not solidify in the pipette.
6). Gently and quickly we tilt the plate in multiple directions so the mixture evenly coats the plate. The bunsen and burner was not turn on so this will have a negative result.
7). We waited for 24 minutes until the agar solidifies and then place the plate into the incubator for 48 hours
Results:
After 48 hours, plaques appear and continue with plaque assay for purification.
Conclusions and Next Steps:
plaque assay for purification (6.1)
Title: Plaque Assay for purification; Sample 1
Date Started:Sep. 18, 2019 Redo? no
Purpose: To generate isolated plaques.
Notes:
We started the protocol at 10:30 A.M
1) The first task was completed using the aseptic technique, with CiDecon and ethanol before gathering the supplies to avoid any contamination. We wash our hands for 30 seconds after.
2) We gather the supplies needed for this protocol; phage sample, phage buffer, microcentrifuge tubes, host bacteria, 9 agar plates, top agar, 9 ml serological pipettes.
3) We drew a circle around a plaque that was most isolated from our phage.
4). After picking an isolated plaque we proceed to picking a plaque protocol (5.4) which will be describe in the following steps.
5). Label a microcentrifuge with date and number 1 to keep in mind what we were using.
6) Aliqout 100 ul of phage buffer into the microcentrifuge
5) . Carefully we place a sterile tip onto a p200 micropipettor and held the pipettor perpendicular to stab the top agar in the center of the plaque that we chose.
6). Then we place the end of the tip into the microcentrifuge with 100 ul of phage buffer and tap the tip on the wall of the tube and moved it up so the phage particles dislodge.
7). The last thing we did was vortex the microcentrifuge.
Results:
Nothing will be determine at this point. We will continue to the protocol Serial dilution.
Conclusions and Next Steps:
We could not determine if we contaminated the microcentrifuge so we proceed to serial dilution.
Title: Serial Dilution; Sample 1
Date Started:Sep. 18, 2019 Redo? no
Purpose: prepare liquid phage samples of decreasing concentrations.
Notes:
We started the procedure at 2:15 P.M
1) The first task was completed using the aseptic technique, with CiDecon and ethanol before gathering the supplies to avoid any contamination. We wash our hands for 30 seconds after.
2) We lit the flame to avoid contamination andgather 8 microcentrifuge and label them from 10-1 to 10-8 along with our initials and date. The set them on a stand.
3) Added 90 ul of phage buffer to each tube using a micropipettor
4) . We transfer 10 ul of phage sample into the “10-1” tube using a clean pipette tip. This tube now contains 1/10th the number of phage particles
5). Then we transfer 10 ul from “10-1” into the “10-2” by using a clean tip. This tube now contains 1/100th phage particles
6). We proceed using the same technique as step 5 until we reach to “10-8” tube.
7). We vortex all of our tubes at the end and proceed to plaque assay as instructed.
Results:
Nothing can be determine right now. The only thing we did different was vortex the tubes at the end. We will continue to do proceed to plaque Assay (5.3) protocol.
Conclusions and Next Steps:
Continue doing the plaque assay
Title: Plaque essay; Sample 1
Date Started:Sep. 18, 2019 Redo? no
Purpose: To visually see the phages on an aseptic agar plate.
Notes:
We started the procedure at 2:50 P.M
1) Before doing anything we properly cleaned our work area and collected all the required items and tools we needed; filtrate, 9 Host bacteria, agar plate, 9 top agar (near the end of the experiment), bunsen burner, and 9 (5ml) serological pipettes.
2) Prior to starting any experimentation, we lit our bunsen burner and gathered all the required items in close proximity. We washed our hands to avoid contamination.
3) We obtain 250 ul host bacteria from our professor. Then used a micropipettor to dispense 10 ul of phage into the 250 ul host bacteria. In order for the host to mix with the phage, we gently tap the tube several times. The sample then sat undisturbed for 10 minutes.
4) After 10 minutes had passed, we washed our hands one more time to avoid contamination and gather the top agar and a plate. We label the plate with our name, date, and tittle it; Direct Isolation.
5). Using a 5ml pipette, we transfer 3 ml of molten top agar to the inculated host tube that was undisturbed for 10 minutes. Immediately the mixture was sucked up into the pipette again and transfer to the plate so the agar will not solidify in the pipette.
6). Gently and quickly we tilt the plate in multiple directions so the mixture evenly coats the plate.
7). We repeated this procedure for all 8 microcentrifuge tubes remain.
7). We waited for 24 minutes until the agar solidifies and then place the 9 plate into the incubator for 48 hours
Results:
After 48 hours, web plates appear on the 10-3 plate and 10-4 and we will do another serial dilution with the least number of plaques which is 10-4.
Conclusions and Next Steps:
Do another Serial Dilution and Plaque Assay with the 10-4 plate.
Title: Plaque Assay for purification; “10-3” plate
Date Started:Sep. 20, 2019 Redo? no
Purpose: To generate isolated plaques.
Notes:
We started the protocol at 3:00 P.M
1) The first task was completed using the aseptic technique, with CiDecon and ethanol before gathering the supplies to avoid any contamination. We wash our hands for 30 seconds after.
2) We gather the supplies needed for this protocol; phage sample, phage buffer, microcentrifuge tubes, host bacteria, 9 agar plates, top agar, 9 ml serological pipettes.
3) We drew a circle around a plaque that was most isolated from our phage.
4). After picking an isolated plaque we proceed to picking a plaque protocol (5.4) which will be describe in the following steps.
5). Label a microcentrifuge with date and number 1 to keep in mind what we were using.
6) Aliqout 100 ul of phage buffer into the microcentrifuge
5) . Carefully we place a sterile tip onto a p200 micropipettor and held the pipettor perpendicular to stab the top agar in the center of the plaque that we chose.
6). Then we place the end of the tip into the microcentrifuge with 100 ul of phage buffer and tap the tip on the wall of the tube and moved it up so the phage particles dislodge.
7). The last thing we did was vortex the microcentrifuge.
Results:
Nothing will be determine at this point. We will continue to the protocol Serial dilution.
Conclusions and Next Steps:
We could not determine if we contaminated the microcentrifuge so we proceed to serial dilution.
Title: Serial Dilution;”10-3″ plate
Date Started:Sep. 20, 2019 Redo? no
Purpose: prepare liquid phage samples of decreasing concentrations.
Notes:
We started the procedure at 3:30 P.M
1) The first task was completed using the aseptic technique, with CiDecon and ethanol before gathering the supplies to avoid any contamination. We wash our hands for 30 seconds after.
2) We lit the flame to avoid contamination and gather 8 microcentrifuge and label them from 10-1 to 10-8 along with our initials and date. The set them on a stand.
3) Added 90 ul of phage buffer to each tube using a micropipettor
4) . We transfer 10 ul of phage sample into the “10-1” tube using a clean pipette tip. This tube now contains 1/10th the number of phage particles
5). Then we transfer 10 ul from “10-1” into the “10-2” by using a clean tip. This tube now contains 1/100th phage particles
6). We proceed using the same technique as step 5 until we reach to “10-8” tube.
7). We vortex all of our tubes at the end and proceed to plaque assay as instructed.
Results:
Nothing can be determine right now. The only thing we did different was vortex the tubes at the end. We will continue to do proceed to plaque Assay (5.3) protocol.

Conclusions and Next Steps:
Continue doing the plaque assay
Title: Plaque essay;”10-3″ plate
Date Started:Sep. 20, 2019 Redo? no
Purpose: To visually see the phages on an aseptic agar plate.
Notes:
We started the procedure at 3:55 P.M
1) Before doing anything we properly cleaned our work area and collected all the required items and tools we needed; filtrate, 9 Host bacteria, agar plate, 9 top agar (near the end of the experiment), bunsen burner, and 9 (5ml) serological pipettes.
2) Prior to starting any experimentation, we lit our bunsen burner and gathered all the required items in close proximity. We washed our hands to avoid contamination.
3) We obtain 250 ul host bacteria from our professor. Then used a micropipettor to dispense 10 ul of phage into the 250 ul host bacteria. In order for the host to mix with the phage, we gently tap the tube several times. The sample then sat undisturbed for 10 minutes.
4) After 10 minutes had passed, we washed our hands one more time to avoid contamination and gather the top agar and a plate. We label the plate with our name, date, and tittle it; Direct Isolation.
5). Using a 5ml pipette, we transfer 3 ml of molten top agar to the inculated host tube that was undisturbed for 10 minutes. Immediately the mixture was sucked up into the pipette again and transfer to the plate so the agar will not solidify in the pipette.
6). Gently and quickly we tilt the plate in multiple directions so the mixture evenly coats the plate.
7). We repeated this procedure for all 8 microcentrifuge tubes remain.
7). We waited for 24 minutes until the agar solidifies and then place the 9 plate into the incubator for 48 hours
Results:
We will record the results on 9-23-19
Conclusions and Next Steps:
Collect plate Lystates from 10-3 plate
Amplification
prepTitle: Collecting Plate Lysates;”10-3″ plate
Date Started:Sep. 25, 2019 Redo? no
Purpose: To create a highly concentrated liquid phage sample
Notes:
We followed the ‘Collecting Plate Lysates’ protocol from the phage discovery guide
1) The first task was completed using the aseptic technique, with CiDecon and ethanol before gathering the supplies to avoid any contamination. We wash our hands for 30 seconds after.
2) Prior to starting the procedures, we gathered the supplies needed; ’10-4′ webbed plate, phage buffer, propane bunsen burner, .22 um syringe filter, 5mL syringe, and 15mL conical tube.
3) We began by lighting the bunsen burner to maintain aseptic environment around our work station.
4) . We added 8mL of phage buffer to the webbed plate, flooding the lysate and we let it sit in room temperature for 4 hours.
5). After the 4 hours, we placed the upper lid under the bottom side of the plate and allowed the filtrate to settle to one side.
6). Using the 5mL syringe, we extracted the filtrate, connected the filter, and dispensed the filtered filtrate into the 15mL conical tube.
7). We the labled the tube and appropriatly stored it.
Results:
A highly concentrated filtrate sample
Conclusions and Next Steps:
We will determine the concentration of phage particles from the protocol 6.4 spot titer. This protocol will be conducted on 9-27-19.
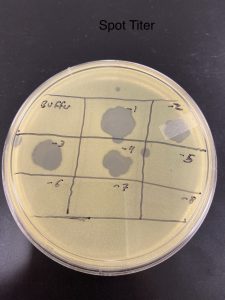
Title: Spot Titer (low-concentration)
Date Started:Sep. 27, 2019 Redo? no
Purpose: scientifically determine the phage particles in a lysate by doing a plaque assay using one agar plate for eight lysate dilutions which will allowed us to calculate the titer of the lysate.
Notes:
1). Before doing anything we properly cleaned our work area and collected all the required items and tools we needed; lysate, Agar plate, host bacteria, top agar, phage buffer, microtubes, and 5 mL serological pippet.
2). Our agar plate was label with our name date on the bottom and divided the plate into eight squares that were label -1…..-8. We included a negative control as well.
3). Then a bacterial lawn was perform using aseptic technique. We used the 5mL pippet to transfer 3mL of top agar into the host bacteria tube containing 250 uL and immediately draw it back it and dispense into the agar plate. We gently, but quickly tilt the plate and waited 10 minutes.
4). Perform serial dilution by arranging and labeling 8 microtubes on a stand from 10^-1…10^-8. Then we added 90 ul of phage buffer into each microtube using a micropipetter and changing the tip on every microtube to avoid contamination or error.
5). 10 ul of lysate was transfer using a the same micropippeter with a different tip into the 10-1 microtube and vortex.
6). Using the 10-1 we transfer 10 ul of it into the 10-2 using a different tip and vortex. Then we continue using the same procedure but using 10-2 into the 10-3 and so on until we reach the 10-8 microtube. We made sure to vortex everytime and use a different tip to avoid contamination or an error.
7).One at a time, we transfer 3 ul of each microtube into the proper location on the agar plate. For example the microtube 10-1 will corespond to the -1 square. We made sure to use a different tip everytime.
8). We use 3 ul of phage buffer as a negative control and waited 30 minutes. After 30 minutes we incubate the agar plate right side up. After 48 hours we will check for 10 fold reduction in the number of plaques.
Results:
After waiting 48 hours we notice that the results of our phage particles had a 10 fold reduction in the number of plaques as it moved through the spots -1…–8.
Conclusions and Next Steps:
we calculate the titer in pfu/ml on 9-30-19 and proceed to protocol 6.5 (full plate titer)
Title: Full Plate Titer 6.5 (low-concentration)
Date Started: Oct. 02, 2019 Redo? No
Purpose: Determine the concentration of phage particles in a lysate by using a plaque assay and calculate the titer in pfu/ml.
Notes:
1. We started by properly sanitizing our work area using the appropriate aseptic techniques.
2. Our next steps were to gather all the items needed for this procedure; propane bunsen burner, matches, micropipette with tips, top agar, agar plate, serial dilutions samples (10-2, 10-3, and 10-4), calculations from spot titer, 5mL serological pipettes, and 3 samples tubes of bacteria.
3. We started by lighting the bunsen burner to maintain an aseptic environment.
4. From the calculations made from the spot titer, we added 33uL from 10-2, 31uL from 10-3, and 30 from 10-4 and dispensed each sample to its own bacteria filled sample tubes.
5. We then aspirated 3mL of top agar and dispensed it into the bacteria-phage mixture. We immediately aspirated the mixture back into the serological pipette and dispensed the mixture into an agar plate. We repeated the same process for the other two liquid-phages.
6. After allowing the top agar to harden, we incubated the 3 plates for 48 hours.
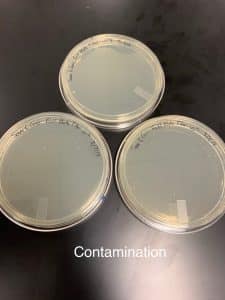
Results:
The full plate titer got contaminated due to possible different sleeve plates used or the top agar according to our lab instructor.
Samples were contaminated and properly discarded. Will repeat.
Conclusions and Next Steps:
Repeat procedure 6.5 and calculate the titer in pfu/ml using the formula; Titer (pfu/ml) = (24 pfu/10 μl) x (103 μl/ ml) x (105)
Title: Full Plate Titer 6.5 (low-concentration)
Date Started: Oct. 02, 2019 Redo? Yes
Purpose: Determine the concentration of phage particles in a lysate by using a plaque assay and calculate the titer in pfu/ml.
Notes:
1. We started by properly sanitizing our work area using the appropriate aseptic techniques.
2. Our next steps were to gather all the items needed for this procedure; propane bunsen burner, matches, micropipette with tips, top agar, agar plate, serial dilutions samples (10-2, 10-3, and 10-4), calculations from spot titer, 5mL serological pipettes, and 3 samples tubes of bacteria.
3. We started by lighting the bunsen burner to maintain an aseptic environment.
4. From our calculation we obtained from the spot titer, we added 33uL from 10-2, 31uL from 10-3, and 30 from 10-4 and dispensed each sample to its own bacteria filled sample tubes.
5. We then aspirated 3mL of top agar and dispensed it into the bacteria-phage mixture. We immediately aspirated the mixture back into the serological pipette and dispensed the mixture into an agar plate. We repeated the same process for the other two liquid-phages.
6. After allowing the top agar to harden, we incubated the 3 plates for 48 hours.
Results:
Contaminated sample; no further experimentation. Possible reasons for contamination are bacterium or agar plates; we will test bacterium to see if it is the reason.
Conclusions and Next Steps:
Repeat procedure 6.5 and calculate the titer in pfu/ml using the formula; Titer (pfu/ml) = (24 pfu/10 μl) x (103 μl/ ml) x (105)
Title: Bacterium contamination Test; Plaque Assay
Date Started: Oct. 09, 2019 Redo? No
Purpose: Determine if the Bacterium is contaminated.
Notes:
1. We started by properly sanitizing our work area using the appropriate aseptic techniques.
2. Our next steps were to gather all the items needed for this procedure; propane bunsen burner, matches, top agar, agar plate, 5mL serological pipettes, and 1 samples tubes of bacteria.
3. We started by lighting the bunsen burner to maintain an aseptic environment.
4. We added 3mL of top agar into our bacteria tube and immediately aspirated the mixture and dispensed it into the agar plate.
5. We waited 15 minutes before incubating.
Results:
Conclusions and Next Steps:
Repeat procedure 6.5 and calculate the titer in pfu/ml using the formula; Titer (pfu/ml) = (24 pfu/10 μl) x (103 μl/ ml) x (105)
Title: Full Plate Titer 6.5 (low-concentration)
Date Started: Oct. 14, 2019 Redo? Yes
Purpose: Determine the concentration of phage particles in a lysate by using a plaque assay and calculate the titer in pfu/ml.
Notes:
1. We started by properly sanitizing our work area using the appropriate aseptic techniques.
2. Our next steps were to gather all the items needed for this procedure; propane bunsen burner, matches, micropipette with tips, top agar, agar plate, serial dilutions samples (10-2, 10-3, and 10-4), calculations from spot titer, 5mL serological pipettes, and 3 samples tubes of bacteria.
3. We started by lighting the bunsen burner to maintain an aseptic environment.
4. From the calculations made from the spot titer, we added 33uL from 10-2, 31uL from 10-3, and 30 from 10-4 and dispensed each sample to its own bacteria filled sample tubes.
5. We then aspirated 3mL of top agar and dispensed it into the bacteria-phage mixture. We immediately aspirated the mixture back into the serological pipette and dispensed the mixture into an agar plate. We repeated the same process for the other two liquid-phages.
6. After allowing the top agar to harden, we incubated the 3 plates for 48 hours.
Results:
Waiting on results: will check on 10/16/19
Conclusions and Next Steps:
The next step is to make webbed plates from lysate of known titer.
Title: Collecting Plate Lysate 6.3 (high-concentration)
Date Started: Oct. 16, 2019 Redo? no
Purpose: To generate a highly concentrated liquid phage sample.
Notes:
1. Prior to starting the procedure we cleaned our work station using aseptic techniques.
2. We gathered all the supplies we would need for this procedure; Webbed plate, phage buffer, .22um filter, 5mL syringe, propane bunsen burner, and a 15mL conical tube.
3. We began by lighting the burner to maintain a sterile environment
4. We began by adding 8mL of phage buffer to the webbed plate and letting it sit in room temperature for 2 hours.
4. After the 2 hours, we put the top lid under the bottom lid; so that the lysate pulls on one side of the plate.
5. After about 2 minutes, we used the syringe to aspirate the lysate, we then attached the .22um filter to the syringe and dispensed it into the 15mL conical tube.
6. We repeated the process of filtering the lysate into the conical tube until there was no longer any lysate to aspirate.
7. We then stored it and the webbed plate.
Results:
Filtered, high concentrate lysate.

Conclusions and Next Steps:
Using the lysate, the next step is to perform a spot titer.
Title: Spot Titer 6.4 (high-concentration)
Date Started: Oct. 17, 2019 Redo? no
Purpose: To determine the concentration of phage particles in a lysate using a spot test
Notes:
We followed the ‘Spot Titer’ protocol from the phage discovery guide
1. Prior to starting the procedure, we cleaned our work station using aseptic techniques and we gathered the needed supplies; high concentrate lysate, agar plate, host bacteria, top agar, phage buffer, micro-centrifuge tubes, 5mL serological pipettes and propane bunsen burner.
2. We labeled the bottom of the agar plate and divided the plate into 8 sections.
3. We began by transferring 3mL of molten top agar the tube with the host bacteria, immediately aspirating it back into the serological pipette and dispensing it onto the agar plate; we left the plate undisturbed for 10 minutes.
4. While the plate sat, we performed a serial dilution on the concentrated lysate. We began by adding 90ul of phage buffer into 8 micro-centrifuge (labeled 10^-1….10^-8) tubes. We then transferred 10ul of our lysate the first micro-centrifuge tube (10^-1) and vortexed.
5. From the 1st tube, we transferred 10ul of the mixture into the 2nd tube (10^-2) and vortex. We repeated the same pattern through all of the micro-centrifuge tubes.
6. Upon completion of the serial dilution and 10 minutes of the plate being undisturbed, we transferred 3ul of all the samples on to their proper location in the bacterial lawn.
7. We let the agar absorb the liquid for 30 minutes and incubated for 48 hours.
Results:
Resulted in a phage growth.

Conclusions and Next Steps:
We must calculate the titer of the high concentrate lysate before moving on to the full plate titer.
Title: Full Plate Titer 6.4 (high-concentration) (10-5, 10-6, 10-7)
Date Started: Oct. 17, 2019 Redo? no
Purpose: To determine the concentration of phage particles in a lysate using a plaque assay
Notes:
We followed the ‘Full Plate Titer’ protocol from the phage discovery guide
1. Prior to starting the procedure, we cleaned our work station using aseptic techniques and we gathered the needed supplies; liquid phage, phage buffer, agar plate, top agar, host bacteria, propane bunsen burner, micro-centrifuge tubes, and a 5mL serological pipettes.
2. We labeled the bottom of the agar plate (10-5, 10-6, 10-7)
3. We began by adding 13.5ul of from our 10-5 tube, 14ul from the 10-6 tube, and 15ul from our 10-7.
4. We then added 3mL of top agar to the bacteria-lysate tube, immediately aspirating it and dispensing it onto the proper agar plate.
5. Repeated the same process for 10-6 and 10-7
6. We let the top agar harden for about 20 minutes and then incubated.
Results:
Calculations were wrong; resulted in insufficient phage growth
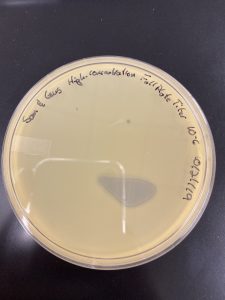


Conclusions and Next Steps:
Do calculations again and repeat.
Title: Microscopy (protocol 8.1b)
Date Started: Oct. 21, 2019 Redo? no
Purpose: To prepare your phage sample for viewing with a transmission electron microscope
Notes:
We followed the ‘Mounting Phage Samples for TEM and staining with Uranyl Acetate’ protocol from the phage discovery guide
1. Prior to starting the procedure, we cleaned our work station using aseptic techniques and we gathered the needed supplies for part 1; High-titer lysate, micro-centrifuge tube, micropipette, and bunsen burner.
2. We began by transferring 1mL of our lysate into a labeled micro-centrifuge tube.
3. We then centrifuged it the lysate for 1 hours at 4 degrees Celsius
4. We then carefully took out the supernatant and left the phage particle at the bottom, then added 100uL of phage buffer and resuspended at 4 degrees Celsius for 45 minutes.
5. After the 45 minutes, we gathered the rest of the supplies for the 2nd part of the procedure; gloves, kimwipes, parafilm, agar plate, EM forceps, grids,
6. We began the second part by putting our gloves on then placing kimwipes to avoid contamination. We put a 5×5 cm piece of parafilm in the agar plate and then placed the grid on top of the parafilm.
7. We put 10ul of lysate on the grid without touching the tip to the grid and let it sit for 7 minutes before a small piece of filter paper to wick off the excess fluid.
8. We then added 10ul of sterile water, being careful not to touch the tip with the grid, and left it for 2 minutes before using a small piece of filter paper to wick the water off. We repeated the same process again.
9. After wicking the water off for the 2nd time, we added 10ul of 1% uranyl acetate and let it sit for 2 minutes.
10. After the 2 minutes we used a small piece of filter paper to wick off the uranyl acetate and let it the grid air dry for 2-3 minutes before putting it into the grid box.
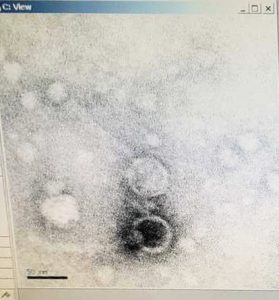
Results:
A grid containing our lysate that is prepped for observation
Conclusions and Next Steps:
Wait for electron image and proceed to DNA extraction.
Title: Full Plate Titer 6.4 (high-concentration) (10-5, 10-6, 10-7)
Date Started: Oct. 21, 2019 Redo? yes
Purpose: To determine the concentration of phage particles in a lysate using a plaque assay
Notes:
We followed the ‘Full Plate Titer’ protocol from the phage discovery guide
1. Prior to starting the procedure, we cleaned our work station using aseptic techniques and we gathered the needed supplies; liquid phage, phage buffer, agar plate, top agar, host bacteria, propane bunsen burner, micro-centrifuge tubes, and a 5mL serological pipettes.
2. We labeled the bottom of the agar plate (10-5, 10-6, 10-7)
3. We began by adding 13.5ul of from our 10-5 tube, 14ul from the 10-6 tube, and 15ul from our 10-7.
4. We then added 3mL of top agar to the bacteria-lysate tube, immediately aspirating it and dispensing it onto the proper agar plate.
5. Repeated the same process for 10-6 and 10-7
6. We let the top agar harden for about 20 minutes and then incubated.
Results:
Calculations were wrong; resulted in insufficient phage growth
Conclusions and Next Steps:
Do serial dilution with high concentrate lysate.
Title: Full Plate Titer 6.4 (high-concentration) (Serial Dilution)
Date Started: Oct. 23, 2019 Redo? yes
Purpose: To determine the concentration of phage particles in a lysate using a plaque assay
Notes:
We followed the ‘Full Plate Titer’ protocol from the phage discovery guide
1. Prior to starting the procedure, we cleaned our work station using aseptic techniques and we gathered the needed supplies; liquid phage, phage buffer, agar plate, top agar, host bacteria, propane bunsen burner, micro-centrifuge tubes, and a 5mL serological pipettes.
2. We labeled the bottom of the agar plate
3. We began by doing a serial dilution with the low concentration lysate to the power of 8. We added 90ul of Phage buffer to each micro-centrifuge tube then transferred 10ul of lysate into the first micro-centrifuge tube (10-1).
4. We then transferred 10ul from the first micro-centrifuge to the second. We continued to repeat the process of adding 10ul of lysate-phage buffer solution from the previous tube; we vortexed after every transfer
5. We then added the lysate-phage buffer to the host bacteria tubes and mix them.
6. After a few minutes, we added 3mL of top agar to each tube and then aspirated the mixture and dispensed each mixture into its own agar plate.
7. We let the phage buffer harden for about 15 minutes before incubating.
Results:
Resulted in multiple plates, giving us good webbed plates.

Conclusions and Next Steps:
Use plates to make obtain a high concentrate liquid lysate sample and produce more using the ‘Collecting Plate Lysates’ procedure.
Title: Collecting Plate Lysate
Date Started: Oct. 28, 2019 Redo? yes
Purpose: To generate a highly concentrated liquid phage sample
Notes:
We followed the ‘Collecting Plate Lysates’ protocol from the phage discovery guide
1. Prior to starting the procedure, we cleaned our work station using aseptic techniques and we gathered the needed supplies; webbed plate, phage buffer, .22um syringe filter, 5mL syringe and 15mL conical tube
2. We began by flooding the webbed plate with 8mL of phage buffer and left it alone in room temperature for four hours.
3. After the time was up, we put the top part under the bottom of one side to have the lysate pool to one side of the plate.
4. We then used the syringe to aspirate as much lysate as possible, then we attached the filter and dispensed the filtered lysate in the 15mL conical tube.
5. We repeated the same process till we could no longer aspirate liquid lysate from the webbed plate.
Results:
Resulted in a high concentration of liquid lysate.
Conclusions and Next Steps:
Create more webbed plates to produce even more liquid lysate.
Title: Plaque Assay (10-4 dilution)
Date Started: Oct. 29, 2019 Redo? no
Purpose: Detecting the presence of phages on bacterial lawns
Notes:
We followed the ‘Plaque assay’ protocol from the phage discovery guide
1. Prior to starting the procedure, we cleaned our work station using aseptic techniques and we gathered the needed supplies; Phage sample, host bacteria, agar plates, phage buffer, top agar and a 5mL serological pipettes.
2. Using the diluted lysate (10-4) from the previous full plate titer, we added 10ul to each of the host bacteria tubes, mixed, and let them sit for about 10 minutes.
3. After the time was up, we added 3mL of top agar to each bacteria-lysate tube, then immediately aspirated it and dispensed each into its own labeled agar plate.
5. We let the plates sit for 15 minutes before incubating them for two days.
Results:
insufficient growth of lysate; no webbed plates were made.

Conclusions and Next Steps:
perform another serial dilution and try again.
Title: Microscopy (protocol 8.1b)
Date Started: Oct. 30, 2019 Redo? yes
Purpose: To prepare your phage sample for viewing with a transmission electron microscope
Notes:
We followed the ‘Mounting Phage Samples for TEM and staining with Uranyl Acetate’ protocol from the phage discovery guide
1. Prior to starting the procedure, we cleaned our work station using aseptic techniques and we gathered the needed supplies for part 1; High-titer lysate, micro-centrifuge tube, micropipette, and bunsen burner.
2. We began by transferring 1mL of our lysate into a labeled micro-centrifuge tube.
3. We then centrifuged it the lysate for 1 hours at 4 degrees Celsius
4. We then carefully took out the supernatant and left the phage particle at the bottom, then added 100uL of phage buffer and resuspended at 4 degrees Celsius for 45 minutes.
5. After the 45 minutes, we gathered the rest of the supplies for the 2nd part of the procedure; gloves, kimwipes, parafilm, agar plate, EM forceps, grids,
6. We began the second part by putting our gloves on then placing kimwipes to avoid contamination. We put a 5×5 cm piece of parafilm in the agar plate and then placed the grid on top of the parafilm.
7. We put 10ul of lysate on the grid without touching the tip to the grid and let it sit for 2 minutes before a small piece of filter paper to wick off the excess fluid.
8. We then added 10ul of sterile water, being careful not to touch the tip with the grid, and left it for 2 minutes before using a small piece of filter paper to wick the water off. We repeated the same process again.
9. After wicking the water off for the 2nd time, we added 10ul of 1% uranyl acetate and let it sit for 2 minutes.
10. After the 2 minutes we used a small piece of filter paper to wick off the uranyl acetate and let it the grid air dry for 2-3 minutes before putting it into the grid box.
Results:
A grid containing our lysate that is prepped for observation
Conclusions and Next Steps:
Proceed to DNA extraction, but first we need to get more volume of high concentrated lysate.
Title: Full Plate Titer 6.4 (high-concentration) (10-1 to 10-6)
Date Started: Nov. 01, 2019 Redo? yes
Purpose: To determine the concentration of phage particles in a lysate using a plaque assay
Notes:
We followed the ‘Full Plate Titer’ protocol from the phage discovery guide
1. Prior to starting the procedure, we cleaned our work station using aseptic techniques and we gathered the needed supplies; liquid phage, phage buffer, agar plate, top agar, host bacteria, propane bunsen burner, micro-centrifuge tubes, and a 5mL serological pipettes.
2. We labeled the bottom of the agar plate
3. We began by doing a serial dilution with the highconcentration lysate to the power of 8. We added 90ul of Phage buffer to each micro-centrifuge tube then transferred 10ul of lysate into the first micro-centrifuge tube (10-1).
4. We then transferred 10ul from the first micro-centrifuge to the second. We continued to repeat the process of adding 10ul of lysate-phage buffer solution from the previous tube; we vortexed after every transfer
5. We then added the lysate-phage buffer to the host bacteria tubes and mix them.
6. After a few minutes, we added 3mL of top agar to each tube and then aspirated the mixture and dispensed each mixture into its own agar plate.
7. We let the phage buffer harden for about 15 minutes before incubating. The plates will be incubated for 48 hours to determine webplates
Results:
insufficient growth of lysate; no webbed plates were made.
Conclusions and Next Steps:
Perform another spot tier from both high lysates. We will use 10^-4 from the first high lysate and 10^-3 from second high lysate.
Title: Full Plate Titer 6.4 (1st high-concentration and 2nd high concentration) (10-4 to 10-3)
Date Started: Nov. 03, 2019 Redo? yes
Purpose: To determine the concentration of phage particles in a lysate using a plaque assay
Notes:
We followed the ‘Full Plate Titer’ protocol from the phage discovery guide
1. Prior to starting the procedure, we cleaned our work station using aseptic techniques and we gathered the needed supplies; liquid phage, phage buffer, agar plate, top agar, host bacteria, propane bunsen burner, micro-centrifuge tubes, and a 5mL serological pipettes.
2. We labeled the bottom of the agar plate
3. We began by gathering both serial dilutions micro tubes from the two high concentrations. We will use the microtube 10-4 from the first high lysate and 10-3 from the second high lysate.
5. We then label 4 plates since we will plate two from 10-4 and 10-3. We label them with our name, date and title.
6. After labeling, we extract 10 ul from microtube 10-4 and mix it with the 250 host bacteria. We repeat this again with the 10-3. After 10 minutes we can move to the next step.
6. After 10 few minutes, we added 3mL of top agar to each tube and then aspirated the mixture and dispensed each mixture into its own agar plate.
7. We let the phage buffer harden for about 15 minutes before incubating. The plates will be incubated for 48 hours to determine webplates
Results:
Conclusions and Next Steps:
Perform another serial dilution from the low lysate and repeat the full plate titer from 10-1 to 10-8.
Title: Serial Dilution; 1st low concentration lysate
Date Started: Nov. 4, 2019 Redo? yes
Purpose: prepare liquid phage samples of decreasing concentrations.
Notes:
We started the procedure at 9:00 A.M
1) The first task was completed using the aseptic technique, with CiDecon and ethanol before gathering the supplies to avoid any contamination. We wash our hands for 30 seconds after.
2) We lit the flame to avoid contamination andgather 8 microcentrifuge and label them from 10-1 to 10-8 along with our initials and date. The set them on a stand.
3) Added 90 ul of phage buffer to each tube using a micropipettor
4) . We transfer 10 ul of phage sample into the “10-1” tube using a clean pipette tip. This tube now contains 1/10th the number of phage particles
5). Then we transfer 10 ul from “10-1” into the “10-2” by using a clean tip. This tube now contains 1/100th phage particles
6). We proceed using the same technique as step 5 until we reach to “10-8” tube.
7). We vortex all of our tubes at the end and proceed to plaque assay as instructed.
Results:
Nothing can be determine right now. We will proceed to do a full plate titer to get webplates
Conclusions and Next Steps:
Continue doing the full plate titer
Title: Full Plate Titer 6.4 (low concentration)
Date Started: Nov. 4, 2019 Redo? yes
Purpose: To determine the concentration of phage particles in a lysate using a plaque assay
Notes:
We followed the ‘Full Plate Titer’ protocol from the phage discovery guide
1. Prior to starting the procedure, we cleaned our work station using aseptic techniques and we gathered the needed supplies; liquid phage, phage buffer, agar plate, top agar, host bacteria, propane bunsen burner, micro-centrifuge tubes, and a 5mL serological pipettes.
2. We labeled the bottom of the agar plate (10-1 to 10-8) with name, date and title
3. We began extracting 10 ul from 10-1 microtube and place it in 250 host bacteria. We continue the same procedure for all the micro tubes containing the lysate.
4. The tubes containing the host bacteria and lysate sat still for 10 minutes.
5. We then added 3mL of top agar to the bacteria-lysate tube 10-1 and immediately aspirating it and dispensing it onto the proper agar plate.
6. Repeated the same process for 10-6 and 10-7
7. We let the top agar harden for about 30 minutes and then incubated.
Results:
No webbed plates
Conclusions and Next Steps:
collect high lysate and complete DNA extraction
Title: Archiving Phage samples
Date Started: Nov. 12, 2019 Redo? no
Purpose: prepare a high lysate for long term storage
Notes:
1. Prior to starting the procedure, we cleaned our work station using aseptic techniques and we gathered the needed supplies; Barcoded tubes, DMSO mixture, Sterile beads, Lysate (at least 5 x 10⁹pfu/ml).
2. Instructor label two barcoded tubes for storage at the University of pittsburge and a third tube for storage at Tarleton institution.
3. Fill each tube with with sterile beads to 1.5 cm from the top of the tube making sure that the flame is on.
4. Prepared a DMSO/lysate by dispensing 2.8 ml of our high lysate titer into a sterile 15 ml conical tube. Then added 200 ul DMSO to the tube. After closing the tube, we vortex the mixture.
5. We Aliquot the mixture into the storage tubes by pipetting the lysate/DMSO mixture into each of the label tubes and making sure that beads are just covered enough avoiding overfilling or underfilling.
6. Properly close the tubes and store them according to the instructor.
Results:
n/a
Conclusions and Next Steps:
Continue with DNA extraction
DNA Extraction
DNA Extraction Protocol – Alternate 3.5
Date Started: Oct. 29, 2019 Redo? No
Purpose: To isolate genomic DNA from phage
Notes:
(Lysate A)
1. We started by aliquoting 5mL of our high volume lysate into a 15mL conical tube, we then gave that tube to our instructor, who added 20uL of nuclease mix.
2. We mixed the nuclease and lysate, gently inverting, then we incubated the tube at 37-degrees Celsius for 10 minutes. We then aliquoted the lysate into 5 microfuge tubes; 1mL in each tube.
3. Added 20uL of ZnCl2, gently inverted, and incubated at 37-degrees Celsius for 5 minutes. Centrifuged at 10,000rpm for 1 minutes after.
4. Removed supernatant by aspiration, without disturbing the pellet. Resuspended the pellet, in each tube, in 500uL of TES buffer and incubated at 60-degrees Celsius for 15 minutes. After, added 1uL of Proteinase K to each tube, gently inverted, and incubated at 37-degrees Celsius for 10 minutes.
5. Added 60uL of Potassium Acetate to each tube, mixed, and left on ice for 15 minutes. Centrifuged at 4-degree Celsius for 1 minute at 12,000rpm. Removed supernatant and placed each into new microfuge tubes; discarded tubes with pellets.
6. Added 500uL of 100% isopropanol to each tube and left on ice overnight.
7. Centrifuged at top speed for 10 minutes and removed supernatant into a waste tube. Then placed tube open and upside down on paper towels to dry for about an hour. Then incubated at 60-degree celsius for 30 minutes to remove as much moisture as possible.
8. Resuspended the first pellet in 50uL of nuclease-free water. Used that solution to resuspend the next pellet; repeated process for all five pellets. (Pellets contained too much salt, nuclease-free water was added as needed to allow pellet to dissolve into water; 250uL of nuclease-free water was used)
9. Ran the solution through the Nanodrop.
Results:
DNA extraction failed as there was too much salt in our final result.
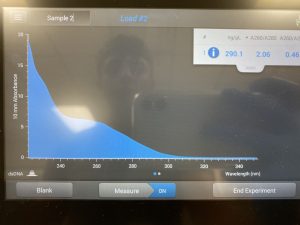
Conclusions and Next Steps:
Using the Same high volume lysate, we attempted another DNA Extraction.
DNA Extraction Protocol – Alternate 3.5
Date Started: Oct. 30, 2019 Redo? Yes
Purpose: To isolate genomic DNA from phage
Notes:
(Lysate B)
1. We started by aliquoting 5mL of our high volume lysate into a 15mL conical tube, we then gave that tube to our instructor, who added 20uL of nuclease mix.
2. We mixed the nuclease and lysate, gently inverting, then we incubated the tube at 37-degrees Celsius for 10 minutes. We then aliquoted the lysate into 5 microfuge tubes; 1mL in each tube.
3. Added 20uL of ZnCl2, gently inverted, and incubated at 37-degrees Celsius for 5 minutes. Centrifuged at 10,000rpm for 1 minutes after.
4. Removed supernatant by aspiration, without disturbing the pellet. Resuspended the pellet, in each tube, in 500uL of TES buffer and incubated at 60-degrees Celsius for 15 minutes. After, added 1uL of Proteinase K to each tube, gently inverted, and incubated at 37-degrees Celsius for 10 minutes.
5. Added 60uL of Potassium Acetate to each tube, mixed, and left on ice for 15 minutes. Centrifuged at 4-degree Celsius for 1 minute at 12,000rpm. Removed supernatant and placed each into new microfuge tubes; discarded tubes with pellets.
6. Added 500uL of 100% isopropanol to each tube and left on ice overnight.
7. Centrifuged at top speed for 10 minutes and removed supernatant into a waste tube. Then placed tube open and upside down on paper towels to dry for about an hour. Then incubated at 60-degree celsius for 30 minutes to remove as much moisture as possible.
8. Resuspended the first pellet in 50uL of nuclease-free water. Used that solution to resuspend the next pellet; repeated process for all five pellets. (Pellets contained too much salt, nuclease-free water was added as needed to allow pellet to dissolve into water; 250uL of nuclease-free water was used)
9. Ran the solution through the Nanodrop.
Results:
DNA extraction failed as there was too much salt in our final result. Ran through Nanodrop twice.
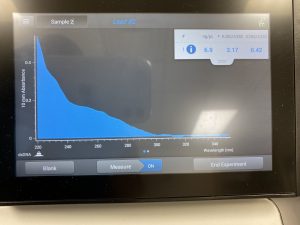

Conclusions and Next Steps:
Using the Same high volume lysate, we attempted another DNA Extraction.
DNA Extraction Protocol – Alternate 3.5
Date Started: Oct. 31, 2019 Redo? Yes
Purpose: To isolate genomic DNA from phage
Notes:
(Lysate C)
1. We started by aliquoting 5mL of our high volume lysate into a 15mL conical tube, we then gave that tube to our instructor, who added 20uL of nuclease mix.
2. We mixed the nuclease and lysate, gently inverting, then we incubated the tube at 37-degrees Celsius for 10 minutes. We then aliquoted the lysate into 5 microfuge tubes; 1mL in each tube.
3. Added 20uL of ZnCl2, gently inverted, and incubated at 37-degrees Celsius for 5 minutes. Centrifuged at 10,000rpm for 1 minutes after.
4. Removed supernatant by aspiration, without disturbing the pellet. Resuspended the pellet, in each tube, in 500uL of TES buffer and incubated at 60-degrees Celsius for 15 minutes. After, added 1uL of Proteinase K to each tube, gently inverted, and incubated at 37-degrees Celsius for 10 minutes.
5. Added 60uL of Potassium Acetate to each tube, mixed, and left on ice for 15 minutes. Centrifuged at 4-degree Celsius for 1 minute at 12,000rpm. Removed supernatant and placed each into new microfuge tubes; discarded tubes with pellets.
6. Added 500uL of 80% isopropanol to each tube and left on ice overnight.
7. Centrifuged at top speed for 10 minutes and removed supernatant into a waste tube. Then placed tube open and upside down on paper towels to dry for about an hour. Then incubated at 60-degree celsius for 30 minutes to remove as much moisture as possible.
8. Resuspended the first pellet in 50uL of nuclease-free water. Used that solution to resuspend the next pellet; repeated process for all five pellets. (Pellets contained too much salt, nuclease-free water was added as needed to allow pellet to dissolve into water; 250uL of nuclease-free water was used)
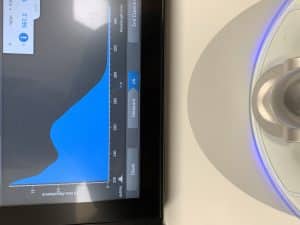
9. Ran the solution through the Nanodrop.
Results:
DNA extraction failed as there was too much salt in our final result.

Conclusions and Next Steps:
Using the Same high volume lysate, we attempted another DNA Extraction.
DNA Extraction Protocol – Alternate 3.5
Date Started: Oct. 31, 2019 Redo? Yes
Purpose: To isolate genomic DNA from phage
Notes:
(Lysate F)
1. We started by aliquoting 5mL of our high volume lysate into a 15mL conical tube, we then gave that tube to our instructor, who added 20uL of nuclease mix.
2. We mixed the nuclease and lysate, gently inverting, then we incubated the tube at 37-degrees Celsius for 10 minutes. We then aliquoted the lysate into 5 microfuge tubes; 1mL in each tube.
3. Added 20uL of ZnCl2, gently inverted, and incubated at 37-degrees Celsius for 5 minutes. Centrifuged at 10,000rpm for 1 minutes after.
4. Removed supernatant by aspiration, without disturbing the pellet. Resuspended the pellet, in each tube, in 500uL of TES buffer and incubated at 60-degrees Celsius for 15 minutes. After, added 1uL of Proteinase K to each tube, gently inverted, and incubated at 37-degrees Celsius for 10 minutes.
5. Added 60uL of Potassium Acetate to each tube, mixed, and left on ice for 15 minutes. Centrifuged at 4-degree Celsius for 1 minute at 12,000rpm. Removed supernatant and placed each into new microfuge tubes; discarded tubes with pellets.
6. Added 500uL of 80% isopropanol to each tube and left on ice overnight.
7. Centrifuged at top speed for 10 minutes and removed supernatant into a waste tube. Then placed tube open and upside down on paper towels to dry for about an hour. Then incubated at 60-degree celsius for 30 minutes to remove as much moisture as possible.
8. Resuspended the first pellet in 50uL of nuclease-free water. Used that solution to resuspend the next pellet; repeated process for all five pellets. (Pellets contained too much salt, nuclease-free water was added as needed to allow pellet to dissolve into water; 250uL of nuclease-free water was used)
9. Ran the solution through the Nanodrop.
Results:
DNA extraction failed as there was too much salt in our final result.
Conclusions and Next Steps:
Using the Same high volume lysate, we attempted another DNA Extraction.
DNA Extraction Protocol – Alternate 3.5
Date Started: Oct. 31, 2019 Redo? Yes
Purpose: To isolate genomic DNA from phage
Notes:
(Lysate D)
1. We started by aliquoting 5mL of our high volume lysate into a 15mL conical tube, we then gave that tube to our instructor, who added 20uL of nuclease mix.
2. We mixed the nuclease and lysate, gently inverting, then we incubated the tube at 37-degrees Celsius for 10 minutes. We then aliquoted the lysate into 5 microfuge tubes; 1mL in each tube.
3. Added 20uL of ZnCl2, gently inverted, and incubated at 37-degrees Celsius for 5 minutes. Centrifuged at 10,000rpm for 1 minutes after.
4. Removed supernatant by aspiration, without disturbing the pellet. Resuspended the pellet, in each tube, in 500uL of TES buffer and incubated at 60-degrees Celsius for 15 minutes. After, added 1uL of Proteinase K to each tube, gently inverted, and incubated at 37-degrees Celsius for 10 minutes.
5. Added 60uL of Potassium Acetate to each tube, mixed, and left on ice for 15 minutes. Centrifuged at 4-degree Celsius for 1 minute at 12,000rpm. Removed supernatant and placed each into new microfuge tubes; discarded tubes with pellets.
6. Added 500uL of 80% isopropanol to each tube and left on ice overnight.
7. Centrifuged at top speed for 10 minutes and removed supernatant into a waste tube. Then placed tube open and upside down on paper towels to dry for about an hour. Then incubated at 60-degree celsius for 30 minutes to remove as much moisture as possible.
8. Resuspended the first pellet in 50uL of nuclease-free water. Used that solution to resuspend the next pellet; repeated process for all five pellets. (Pellets contained too much salt, nuclease-free water was added as needed to allow pellet to dissolve into water; 250uL of nuclease-free water was used)
9. Ran the solution through the Nanodrop.
Results:
DNA extraction failed as there was too much salt in our final result.
Conclusions and Next Steps:
Using the Same high volume lysate, we attempted another DNA Extraction.
DNA Extraction Protocol – Alternate 3.5
Date Started: Oct. 31, 2019 Redo? Yes
Purpose: To isolate genomic DNA from phage
Notes:
(Lysate E)
1. We started by aliquoting 5mL of our high volume lysate into a 15mL conical tube, we then gave that tube to our instructor, who added 20uL of nuclease mix.
2. We mixed the nuclease and lysate, gently inverting, then we incubated the tube at 37-degrees Celsius for 10 minutes. We then aliquoted the lysate into 5 microfuge tubes; 1mL in each tube.
3. Added 20uL of ZnCl2, gently inverted, and incubated at 37-degrees Celsius for 5 minutes. Centrifuged at 10,000rpm for 1 minutes after.
4. Removed supernatant by aspiration, without disturbing the pellet. Resuspended the pellet, in each tube, in 500uL of TES buffer and incubated at 60-degrees Celsius for 15 minutes. After, added 1uL of Proteinase K to each tube, gently inverted, and incubated at 37-degrees Celsius for 10 minutes.
5. Added 60uL of Potassium Acetate to each tube, mixed, and left on ice for 15 minutes. Centrifuged at 4-degree Celsius for 1 minute at 12,000rpm. Removed supernatant and placed each into new microfuge tubes; discarded tubes with pellets.
6. Added 500uL of 80% isopropanol to each tube and left on ice overnight.
7. Centrifuged at top speed for 10 minutes and removed supernatant into a waste tube. Then placed tube open and upside down on paper towels to dry for about an hour. Then incubated at 60-degree celsius for 30 minutes to remove as much moisture as possible.
8. Resuspended the first pellet in 50uL of nuclease-free water. Used that solution to resuspend the next pellet; repeated process for all five pellets. (Pellets contained too much salt, nuclease-free water was added as needed to allow pellet to dissolve into water; 250uL of nuclease-free water was used)
9. Ran the solution through the Nanodrop.
Results:
DNA extraction failed as there was too much salt in our final result.
Conclusions and Next Steps:
Using the Same high volume lysate, we attempted another DNA Extraction.
Characterization
Title: Procedure
Date Started:Sep. 04, 2019 Redo? yes/no
Purpose: State in a couple of sentences what you are trying to do and why you are doing it.
Notes:
What did you do? Type out the protocols that you are doing, how you did them, and when you did them. Make notes to remind you of what you did, or what you need to do. If you did something different than normal, it is important to write that down.
Results:
Add the date(s) that the results were obtained. Describe the results and make a table, create a figure, or add an image. This is important because this is your data.
Conclusions and Next Steps:
What can be determined from your data? What should you do next?