Discovery of Trelle
Collecting Environmental Samples
Date: 09/01/2017
Purpose:
To collect enivornmental samples rich in bacteria with the possiblitiy of collecting bacteriophages infecting the bacterial soil speices. The samples obtained will be utilized for futher procedures to acquire a bacteriophage.
Methods:
Samples were procured from a variety of environments and diverse soil types. Specimens were taken beneath topsoil to find condition sustainable for bacterial host species. Depths ranged from two to five inches from the top existing soil surface. Excavation magnitudes were measured and recorded. Each obtained sample was collected in a sterile 50 mL tube. Individual soil samples were labeled for identification. Additional data collected for each sample include: GPS coordinates, sample type, detailed description of location, general location of each sample collection site, and ambient temperature.
Environmental Sample Data
Sample Number
2
3
Collector Name:
Heidi O. Spann Aided by Mike Spann
Heidi O. Spann Aided by Mike Spann
Heidi O. Spann Aided by Mike Spann
Sample type
- Sandy soil
- Contains organic matter
- Damp soil
- Rich in deposit
- Tight land
- Moist
- Clay-based soil
- Recycled wheat feild
Location Description
Under oak tree in working cow lot
Dry creek bottom
Plowed wheat feild
General Location
Rural environment at the TR Ranch
Basin of tributary between two ponds in middle cow pasture of TR Ranch
Sandy feild at Lazy E Ranch
GPS Coordinates
N 33 19′ 40.39″ W 98 6′ 56.056″
N 33 20′ 16.09″ W 98 6′ 58.157″
N 33 19′ 20.74″ W 98 9′ 11.518″
Sample Depth
2 1/2 ”
3″
4 1/2″
Ambient Temperature
84°F
84°F
84°F
Analysis & Interpretation:
Each environmental sample was unique in composition and location. The temperature for all of the samples was the same.
Future Directions:
Direct and Enriched Isolation procedures will be conducted to the extract any bacteriophage existing in the environmental samples. The products of the isolations will be followed by a Plaque Assay Test to detect the prescence of bacteriophage in the samples.
September 06, 2017
Direct Isolation
Purpose:
To extract any phages from an environmental sample and offer an idea of all the possible present in the environmental sample that may infect your host.
Procedure:
- Prepare your bench for aseptic work and assemble your supplies. Extract phage from solid environmental samples, such as soil or compost.
- Using a 15 ml conical tube, fill it approximately one-third to one-half full with soil.
- Add enrichment broth until the sample is submerged beneath 2–3 ml of liquid.
- Cap the tube and invert several times to mix thoroughly.
- Incubate the tube while shaking vigorously in a shaking incubator at 250 rpm for 1– 2 hours.
- Sample was place in at 11:45am, removed at 1:45pm
- Allow the sample to sit until particulate matter has mostly settled.
- Centrifuge at 2000 rpm for 10 minutes to settle the particulates.
- Prepare a phage filtrate using aseptic technique:
- Open the package of a syringe filter (0.22 μm), leaving the filter in the packaging.
- Using a syringe, remove approximately 2 ml of liquid from the top of the flooded sample. (Avoid withdrawing any solid material from the bottom of the tube to prevent clogging the filter during filtration.)
- Attach the syringe to the top of the filter, and then remove the filter from the package making sure to not contaminate the filter in the process. (Make sure the filter is screwed firmly into place.)
- Depressing the syringe plunger, dispense a minimum of 0.5 ml of filtrate into a labeled microcentrifuge tube.
- If your filter clogs, remove the clogged filter, replace it with a new one, and continue filtering.
- Cap the tube immediately and discard the syringe and filter.
Notes:
My environmental sample 1 was used for the direct isolation procedure. After incubation the solution looked cloudy and tan. Upon filtration the filtrate was yellowish in color, but clear. I incubate my sample for two hours.
Enriched Isolation
Purpose:
Procedure:
- Prepare your bench for aseptic work and assemble your supplies.
- Extract phages from a soil sample by filling a 50 ml conical tube with your sample to the 15 ml mark.
- Add enrichment broth to the 35 ml mark and vortex.
- Shake the sample at ~250 rpm for 1–2 hours.
- Placed in at 12:05pm, removed at 2:05pm
- Balance the tubes and centrifuge at 2,000xg for 10 minutes to pellet.
- Filter the supernatant through a 0.22 µm filter to remove unwanted bacteria and soil particles.
- Collect the flow through in a sterile 50 ml sterile conical tube.
- Recovered volumes will range between 20 and 25 ml.
- Seed the culture with host bacteria by adding 0.5 ml of bacterial host culture to the conical tube.
- Incubate the conical tube at the proper temperature, shaking at 220 rpm for 2–5 days.
- Put in incubator at 17.20pm then put in fridge
- Using a 50 ml conical tube, you must ensure that the culture will be properly aerated:
- The cap on one-quarter of a turn so that the conical tube is only loosely capped, and then secure the cap with a short piece of lab tape to ensure it does not fall off.
Notes:
My enivornmental sample 3 was used for the enriched isolation. The solution was partially cloudy after incubation. Once allowed to settle the solution was crystal clear. Filtration caused any remaining particulates to be removed and the filtrate was clear. The incubation period was 48 hours.
Plaque Assay of Direct Isolation
Procedure:
- Prepare your bench for aseptic work and assemble your supplies
- Assemble the samples you want to assay.
- Inoculate the host bacteria with your phage sample.
- Obtain an aliquots of 250 μl host bacterial cultures, one for a positive control and one for a negative control.
- Label the culture tubes accordingly.
- Use a micropipettor and aseptic technique to:
- Dispense each phage sample into the appropriate culture tube containing 250 μL
- Let your sample sit undisturbed for 10 minutes to allow for attachment.
- For each sample, including controls accordingly.
- Dispense each phage sample into the appropriate culture tube containing 250 μl of host bacteria
- Mix each inoculated host culture by gently tapping the tube. Important: Make sure your sample makes contact with the bacteria. When you pipette a volume as small as 10 μl sometimes your sample may stick to the side of the tube.
- Let your sample sit undisturbed for 10 minutes to allow for attachment.
- Plate the samples with top agar.
- Use 3 ml of molten top agar per sample.
- Obtain two agar plates for samples of positive and negative controls. Label these plates accordingly.
- Remove a bottle of top agar from the 55 °C bath.
- For each sample, including controls
- Aseptically transfer 3 ml of top agar to an inoculated host tube
- Immediately aspirate the mixture back into the pipette and transfer it to the appropriate plate and discard the pipette.
- Gently, but quickly, tilt the plate in multiple directions until the top agar mixture evenly coats the agar plate.
- Repeat this process for each of your samples.
- Incubate plates to allow bacterial growth and phage infection.
- Let the plates sit undisturbed for 23 minutes until the top agar solidifies.
- After the top agar has solidified, gently invert the plates and place in the proper incubator.
- Incubate the plates at the specified temperature for 24–48 hours.
Notes & Results:
September 11, 2017
Enriched Isolation continued
Procedure:
- Prepare your bench for aseptic work and assemble your supplies.
- Filter the enriched culture.
- Using a micropipette, transfer 1.4 ml of your enriched culture to a microcentrifuge tube.
- Repeat this procedure so that you have two microcentrifuge tubes, each with 1.4 ml of enriched culture.
- Spin the tubes at high speed in the microcentrifuge for 1 minute to pellet the bacteria.
- Filter the supernatant through a 0.22 µm filter:
- Remove the plunger from a syringe.
- Open a sterile filter and attach it to the barrel of the syringe.
- Pipette 1 ml of supernatant from each microcentrifuge tube into the syringe barrel (for a total of 2 ml).
- Place the tip of the filter/syring over a sterile microcentrifuge tube and insert the plunger into the syringe.
- Depress the plunger and collect the sterile filtrate.
- Transfer the supernatant into a clean microcentrifuge tube, avoiding the bacterial pellet.
- Immediately cap the microfuge tube containing your supernatant or filtrate and label it appropriately. It was stored at 4 °C.
Notes & Results:
Spot Test for Enriched Isolation
Procedure:
- Prepare your bench for aseptic work and assemble your supplies.
- Collect the liquid phage samples that need testing.
- Prepare a bacterial lawn by using aseptic technique.
- Label the bottom of an agar plate.
- Divide the plate into as many sections as you have samples by drawing on the bottom of the plate and Label each section according to your samples.
- Obtain a 250 μl culture of host bacteria.
- Using a sterile 5 ml pipette, transfer 3 ml of molten top agar to a culture tube containing host bacteria and then immediately draw the solution back into the same pipette.
- Dispense the top agar-bacteria mixture onto an agar plate.
- Allow the plate and to sit undisturbed for 20 minutes or until the top agar solidifies completely.
- Spot the liquid phage samples and controls on the prepared bacterial lawn.
- Aseptically transfer 5 μl of each sample, one at a time, onto the corresponding location on the lawn, 1 inch apart.
- Spot 5 μl of sterile phage buffer on the plate as a negative control.
- Allow the liquid from the spots to absorb into the agar for 25 minutes
- Without inverting the plates, incubate them at the proper temperature for 48 hours.
Notes & Results:
I only used my enriched isolation sample for this spot test. I spotted the plate with my sample three times. My spot test was not conclusive. No phages were present in my enriched sample and the plate lacked success.
September 15, 2017
Picked a plaque
Adopted a Plaque from the Direct Isolation Plaque Assay
Procedure:
- Prepare your bench for aseptic work and assemble your supplies.
- Using a labeling pen, mark the plaques you intend to pick by drawing a small circle around the plaque on the bottom of the plate.
- Label and prepare microcentrifuge tubes.
- Obtain as many tubes as the number of plaques you intend to pick.
- Label each tube according to the identifier you used for each plaque.
- Using aseptic technique, aliquot 100 μl of phage buffer into each microcentrifuge tube.
- “Pick” a plaque.
- Place a sterile tip onto a p200 micropipettor.
- Holding the pipettor perpendicular to the agar surface, gently stab the top agar in the center of the plaque.
- Avoid touching the bacteria surrounding the plaque.
- Place the end of the tip into the phage buffer in the corresponding microcentrifuge tube.
- Then tap the tip on the wall of the tube and pipette up and down to dislodge phage particles. Discard the tip.
- Mix well by vortexing
Notes:
The plaque I picked was an irregular oval-shape.The plaque was clear in complextion and slightly above average size compared to the others. The plaque originated from the Brittany Stewart’s direct isolation plaque assay conducted on a soil sample collected fromBluff Dale Community Garden. Her sample was collected on September, 03, 2017 at 32°19’08.0″N 98°01’15.0″W (32.318891, -98.020827).
Spot Test of Adopted Phage
Procedure:
- Prepare your bench for aseptic work and assemble your supplies.
- Collect the liquid phage samples that need testing.
- Prepare a bacterial lawn by using aseptic technique.
- Label the bottom of an agar plate.
- Divide the plate into as many sections as you have samples by drawing on the bottom of the plate and Label each section according to your samples.
- Obtain a 250 μl culture of host bacteria.
- Using a sterile 5 ml pipette, transfer 3 ml of molten top agar to a culture tube containing host bacteria and then immediately draw the solution back into the same pipette.
- Dispense the top agar-bacteria mixture onto an agar plate.
- Allow the plate and to sit undisturbed for 20 minutes or until the top agar solidifies completely.
- Spot the liquid phage samples and controls on the prepared bacterial lawn.
- Aseptically transfer 10 μl of each sample, one at a time, onto the corresponding location on the lawn, 1 inch apart.
- Spot 10 μl of sterile phage buffer on the plate as a negative control.
- Allow the liquid from the spots to absorb into the agar (generally 10–15 minutes).
- Without inverting the plates, incubate them at the proper temperature for 24–48 hours.
Notes & Results:
The spot test of adopted phage was conclusive. Spot 1 and 2 had clear plaques. I allowed my platte to solidify for 30 minutes. For the host bacteria I had to transfer 250μl out of a 500μl culture tube. The spots were were allowed to absorb into the plate for 24 minutes. Only 5 μl of each sample was added to spot. The plate was allowed to sit for 23 minutes.
Plaque Assay for Purification
Picking a Plaque
Purpose: to obtain a phage for purification
Procedure:
- Prepare your bench for aseptic work and assemble your supplies.
- Gather your phage samples.
- Label and prepare microcentrifuge tubes.
- Obtain as many tubes as the number of plaques you intend to pick.
- Label each tube according to the identifier you used for each plaque.
- Using aseptic technique, aliquot 100 μl of phage buffer into each microcentrifuge tube.
- Obtain the adopted plaque from the prior experiment.
- Place a sterile tip onto a p200 micropipettor.
- Holding the pipettor perpendicular to the agar surface, gently stab the top agar in the center of the plaque.
- Avoid touching the bacteria surrounding the plaque.
- Place the end of the tip into the phage buffer in the corresponding microcentrifuge tube.
- Then tap the tip on the wall of the tube and pipette up and down to dislodge phage particles. Discard the tip.
- Mix well by vortexing
Serial Dilution
Purpose: To dilute the liquid phage sample in order to influence the number of phage present in a sample by reducing the concentration.
- Prepare your bench for aseptic work and assemble your supplies.
- Set up 10-fold serial dilutions:
- Arrange the proper number of microcentrifuge tubes in a rack and label them 10-1, 10-2, 10-3,….10-6.
- Add 90 μl of phage buffer to each of the tubes.
- Add 10 μl of your undiluted phage sample to the “10-1” tube and vortex well, exchange tips between each, and vortex well before making each dilution.
- Transfer 10 μl of the “10 -1” sample to the “10-2” tube and vortex well.
- Continue each successive dilution until you get to your last tube.
Plaque Assay for Purification
Purpose: To generate well-isolated plaques existing in self contained clonal phage populations
Procedure:
- Assemble the samples you want to assay.
- Inoculate the host bacteria with your phage sample.
- Obtain the same number of aliquots of 250 μl host bacterial cultures as you have phage samples
- Label the culture tubes accordingly,
- Six will be required, one for each corresponding dilution
- Use a micropipettor and aseptic technique to:
- Dispense each phage sample into the appropriate culture tube containing 250 μL, making sure the two interact
- Let your sample sit undisturbed for 5–10 minutes to allow for attachment.
- Plate the samples with top agar.
- Obtain the same number of agar plates as you have dilutions, label these plates accordingly.
- Remove a bottle of top agar from the 55 °C bath
- For each sample, including controls:
- Aseptically transfer 3 ml of top agar to an inoculated host tube (i.e., the tube containing bacterial host and phage sample).
- Immediately aspirate the mixture back into the pipette and transfer it to the appropriate plate and discard the pipette.
- Make sure mixture evenly coats the plate and avoid making bubbles
- Repeat this process for each of your samples.
- Let the plates sit undisturbed for 20 minutes or longer until the top agar solidifies.
- After the top agar has solidified, gently invert the plates, tape the stack of six together, and place in the proper incubator.
- Incubate the plates at the specified temperature for 24–48 hours to allow bacterial growth and phage infection.
Notes and Results:
The plaque I picked for the purification was the one I had adopted from the Direct Isolation plaque assay conducted by Brittany Stewart. The plates were incubated for 48 hours.
The results of the assay include:
On plate with dilution 10-1, more than 500 plaques were visible.
On plate with dilution 10-2, about 21 plaques were identified.
On plate with dilution 10-3, fewer than four plaques were seen.
No plaques were noted on dilutions 10-4, 10-5, and 10-6.
September 22, 2017
Plaque Assay for Secondary Purification
Purpose: To isolate a seperate plaque containing a colonal population of greater purified phage
Procedure:
Picking a Plaque
Purpose: to obtain a phage for secondary purification
Procedure:
- Prepare your bench for aseptic work and assemble your supplies.
- Gather your phage samples.
- Label and prepare microcentrifuge tubes.
- Obtain as many tubes as the number of plaques you intend to pick.
- Label each tube according to the identifier you used for each plaque.
- Using aseptic technique, aliquot 100 μl of phage buffer into each microcentrifuge tube.
- Obtain the adopted plaque from the prior experiment.
- Place a sterile tip onto a p200 micropipettor.
- Holding the pipettor perpendicular to the agar surface, gently stab the top agar in the center of the plaque.
- Avoid touching the bacteria surrounding the plaque.
- Place the end of the tip into the phage buffer in the corresponding microcentrifuge tube.
- Then tap the tip on the wall of the tube and pipette up and down to dislodge phage particles. Discard the tip.
- Mix well by vortexing
Secondary Serial Dilution
Purpose: To dilute the liquid phage sample in order to influence the number of phage present in a sample by reducing the concentration.
- Prepare your bench for aseptic work and assemble your supplies.
- Set up 10-fold serial dilutions:
- Arrange the proper number of microcentrifuge tubes in a rack and label them 10-1, 10-2, 10-3,….10-6.
- Add 90 μl of phage buffer to each of the tubes.
- Add 10 μl of your undiluted phage sample to the “10-1” tube and vortex well, exchange tips between each, and vortex well before making each dilution.
- Transfer 10 μl of the “10 -1” sample to the “10-2” tube and vortex well.
- Continue each successive dilution until you get to your last tube.
Plaque Assay for Purification
Purpose: To generate well-isolated plaques existing in self contained clonal phage populations
Procedure:
- Assemble the samples you want to assay.
- Inoculate the host bacteria with your phage sample.
- Obtain the same number of aliquots of 250 μl host bacterial cultures as you have phage samples
- Label the culture tubes accordingly,
- Six will be required, one for each corresponding dilution
- Use a micropipettor and aseptic technique to:
- Dispense each phage sample into the appropriate culture tube containing 250 μL, making sure the two interact
- Let your sample sit undisturbed for 5–10 minutes to allow for attachment.
- Plate the samples with top agar.
- Obtain the same number of agar plates as you have dilutions, label these plates accordingly.
- Remove a bottle of top agar from the 55 °C bath
- For each sample, including controls:
- Aseptically transfer 3 ml of top agar to an inoculated host tube (i.e., the tube containing bacterial host and phage sample).
- Immediately aspirate the mixture back into the pipette and transfer it to the appropriate plate and discard the pipette.
- Make sure mixture evenly coats the plate and avoid making bubbles
- Repeat this process for each of your samples.
- Let the plates sit undisturbed for 20 minutes or longer until the top agar solidifies.
- After the top agar has solidified, gently invert the plates, tape the stack of six together, and place in the proper incubator.
- Incubate the plates at the specified temperature for 24–48 hours to allow bacterial growth and phage infection
Notes:
The plaque for the second round of purification was chosen from the plaque assay of my first serial dilution from the plate of the 10-3 dilution because this plate had the fewest visible plaques. The plaque was clear, circular in shape (round), and somewhat larger in size than the other three. The plates were incubated for 48 hours then placed in the fridge. The dilution was ineffective due to the poor choice in plaque; on closer examination the plaque chosen frome the 10-3 plate was most likely a bubble. The plates of 10-4 and 10-1 had condensation.
Purpose:
Notes & Results:
The process of the secondary dilution had to repeated. This time the plaque I picked was from the 10-2 dilution plate of the first serial dilution instead of the 10-3 diluted plate. The new plaque was oval-shaped with irregular edges and clear in color. The incubation time was 48 hours. The combination of bacterial host and phage dilution sample was vortexed then allowed ten minutes to adhere to one another. Plate 10-3 had condesation on the agar. The phages that resulted were small, oval-shaped and oblong.
September 27, 2017
Collecting Plate Lysates
Purpose:
- Prepare your bench for aseptic work and assemble your supplies.
- Identify one or more plates for lysate collection.
- Flood the webbed plate(s) by applying 8 ml of sterile phage buffer to the webbed plate.
- Let the plate sit at room temperature for 2–4 hours or store the plates overnight (12–14 hours) at 4°C.
- Swirl the phage buffer gently, taking care not to splash.
- Harvest a plate lysate. 2)
- Filter by preparing a 0.22 μm filter.
- Using a 5 ml syringe aspirate the lysate from the plate. 6) Label the tube appropriately.
- Pool the lysates.
- Combine all of the filtered lysates into the same sterile conical tube and record the final volume of lysate collected.
- Store the lysates at 4 °C.
Notes and Results:
September 29, 2017
Spot Titer
Purpose:
To determine the concentration, titer, of phage particles in a lysate using a modified spot test
Procedure:
- Prepare your bench for aseptic work and assemble your supplies.
- Label one agar plate for a spot titer.
- Label the bottom of an agar plate with your name, the date, and the notation “spot titer.”
- Using a labeling pen, divide the plate into as many sections as you have samples.
- Prepare a bacterial lawn using aseptic technique.
- Using a sterile 5 ml pipette, transfer 3 ml of molten top agar into a 5 ml sterile pipette.
- Transfer the top agar to a culture tube containing 250 μl of host bacteria and immediately draw the solution back into the same pipette.
- Dispense the top agar-bacteria mixture onto an agar plate.
- Allow the plate to sit undisturbed until it solidifies completely.
- Lysates should be diluted to 10-1, 10-2, 10-3, 10-4, 10-5, and 10-6, in phage buffer.
- Spot the dilutions and controls on the prepared bacterial lawn.
- Aseptically transfer 3 μl of all samples onto the proper location on the bacterial lawn.
- Use 3 μl of sterile phage buffer as the negative control.
- Allow the liquid from the spots to absorb into the agar for 68 minutes.
- Put in at 12:42am on 09/29 and removed on 8:57am on 10/02
- Incubate plates (right-side up, not inverted) at 4°C.
- After incubating the plates, count the number of plaques.
- After 16 hours, checked each spot on the agar plate, and was returned to incubator then checked after an additional 6 hours was removed and placed in fridge.
- Calculate the titer in pfu/ml using the formula:
Titer (pfu/ml) = (# pfu/ volume used in μl) x (103 μl/ml) x dilution factor
Notes and Results:
October 2, 2017
Full Plate Titer
Purpose:
To determine the concentration of phage particles in a lysate by using a plaque assay
Procedure:
- Prepare your bench for aseptic work and assemble your supplies.
- Perform the Serial Dilutions protocol on the lysate sample from the 10-1 plate from the second dilution trial on 09/25/2017
- Dilute plate the by the following: 10-1, 10-2, 10-3, 10-4, 10-5, and 10-6
- Plate only the 10-5 dilution predicted to yield a countable number of plaques
- Incubate for 48 hours
- Placed in at 11:05am and checked in 15:12pm
- Calculate the titer in pfu/ml using the formula:
Titer (pfu/ml) = (# pfu/ volume used in μl) x (103 μl/ml) x dilution factor
Notes and Results:
October 4, 2017
Making Webbed Plates from a Lysate of Known Titer
Purpose:
To create a high concentrated liquid sample of phage from a full plate titer
Procedure:
- Prepare your bench for aseptic work and assemble your supplies.
- Obtain a lysate from the full titer sample plate.
- Flood full titer plate with 8ml of sterile phage buffer
- Let plate set for 13 hours at 4 °C
- Placed in at 9:54am on 10/04, removed on 10/05 at 11:54am
October 5, 2017
Making Webbed Plates from a Lysate of Known Titer
- Prepare your bench for aspetic work and assemble your supplies
- Estimate the number of plaques you need and calculate the volume of lysate necessary to generate a webbed plate.
- Using data from a previous plaque assay, estimate how many plaques fill a plate.
- Calculate how many phage were on the webbed plate used to make the lysate.
- Estimate how many more plaques you need to make a webbed plate.
- Estimated that the 2.5 x 10^3 pfu were needed
- Calculate the volume of lysate needed to generate a webbed plate. Volume needed (ml)lysate = # of estimated phage needed / the full titer calculations from 10/02/2017
- Perform the dilutions according to the protocols for Serial Dilution used prior
- Retrieve an agar plate and one host bacterial cultures needed to plate your dilutions
- Infect the bacterial host cells with the appropriate volume and dilutions of your lysate and and incubate the mixture for 5–10 minutes for phage attachment.
- Add 3 ml of molten top agar to the mixture and plate.
- Incubate (without inverting) for at least 24 hours at the proper temperature.
Notes and Results:
I collected 4.8 mL of lysate from the full titer plate. I calculated 96 μl from the 10^4 dilution was the volume of lysate needed. I was only able to plate 90μl of the lysate. I only conducted a serial dilution to the 10^-5 dilution. I incubated the virus and bacterial host in the incubator for 6 minutes prior to plating.
October 10, 2017
Making Webbed Plates from a Lysate of Known Titer: Calculations
Calculations:
To determine the pfu/mL:
number of phage/ volume of lysate added =
26/0.01mL = 1/dilution factors = 26/0.01×10^-5 = 2.6×10^8 pfu/mL
To determine the number of µL of lysate will be needed to make webbed plates:
Dilution factor converted to µl: (1×10^-5 mL) x (1000µl/mL) = 0.01µl
This will be the estimated concentration to create an effective webbed plate.
For sake of confirmation 3 different volumes were tested: a value smaller than the estimate (0.001µl), the estimate (0.01µl), and one greater than the estimate’s value (0.1µl)
October 12, 2017
Purpose: To determine proper concentration for creation of webbed plates.
Procedure:
1. Conduct serial diulitons for the following ratios: 1:1000, 1:100, 1:10, µL of lysate to µL of phage buffer. Place each dilution into properly labeled 1.5mL tubes and vortex.
2. Transfer 10µl of each dilution to thier own 250µl of host bacteria. Vortex and allow phage to inoculate for 5.5 minutes.
3. Obtain and label three culture plates.
4.For each sample: Using a sterile 5 ml pipette, aseptically transfer 3 ml of top agar to an inoculated host tube.
- Immediately aspirate (suck-up) the mixture back into the pipette and transfer it to the appropriate plate.
5. Let the plates sit undisturbed for 22 hours.
6.After the top agar has solidified, place in the incubator. Incubate the plates at the specified temperature for 72 hours.
Notes:
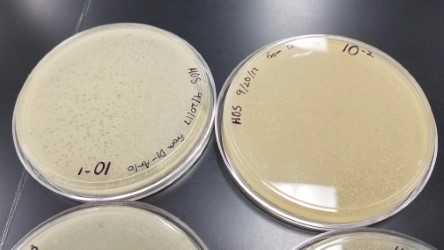
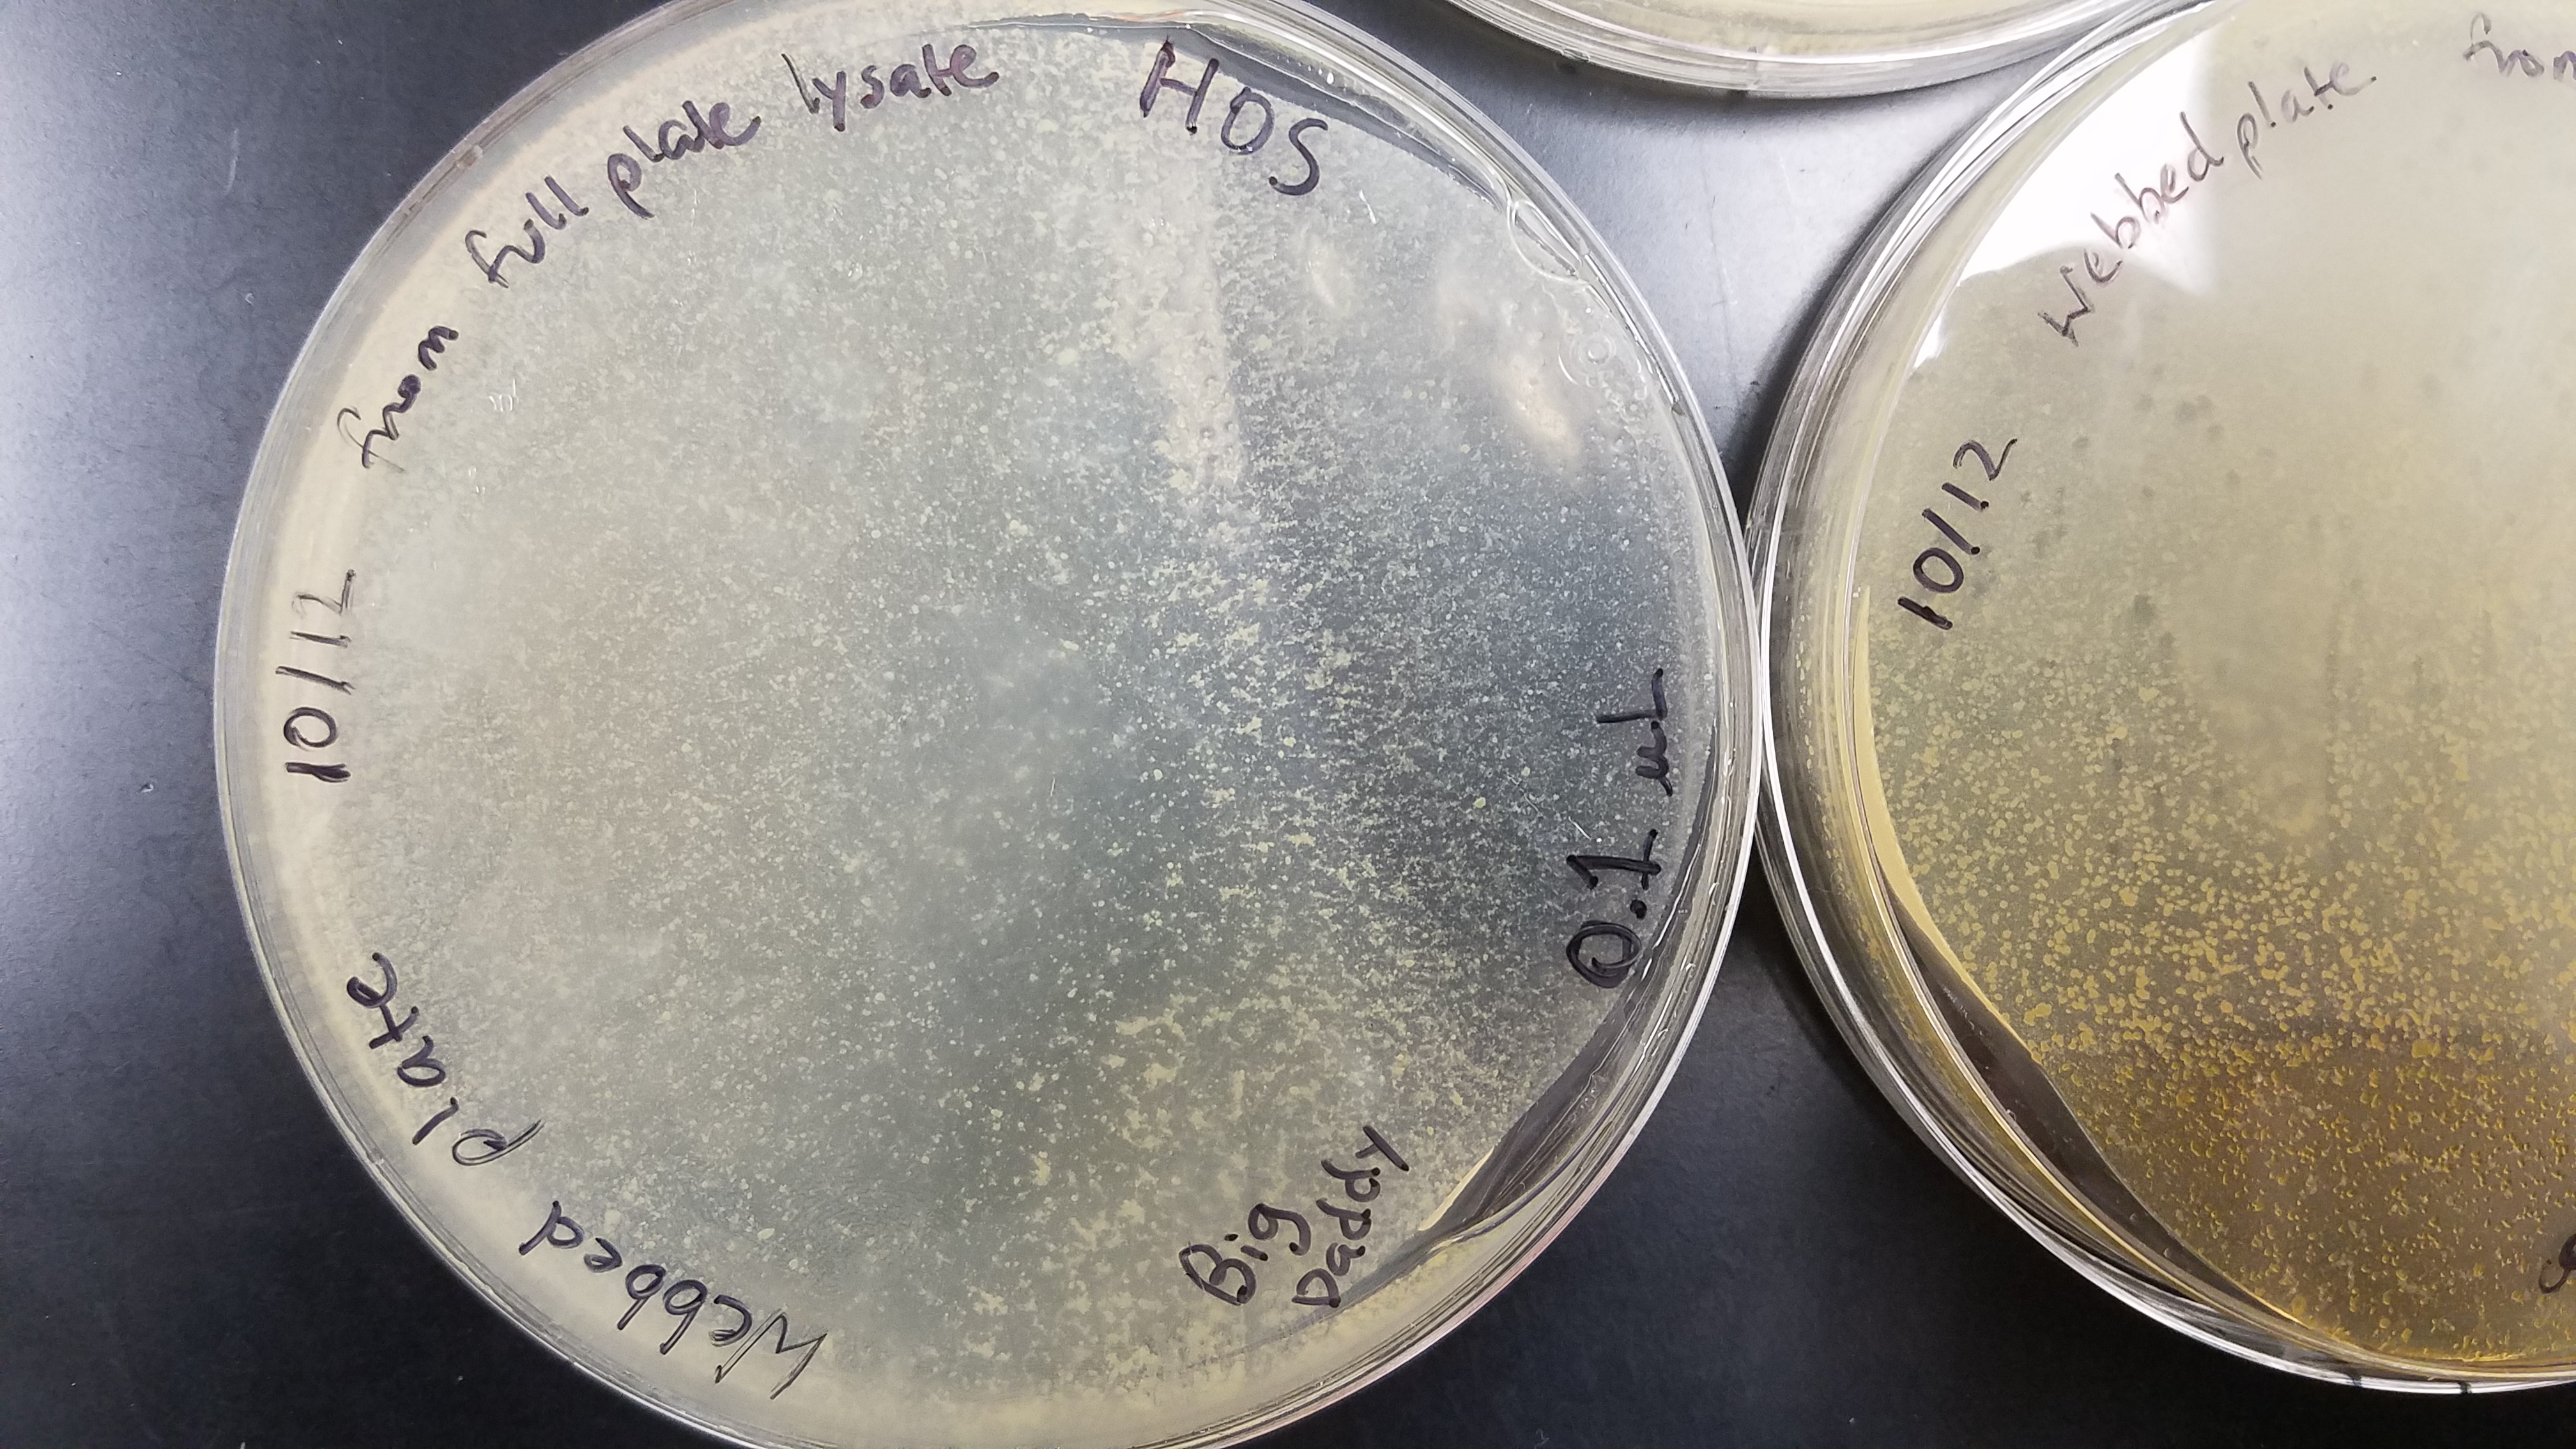
Removed plates from incubator on October 16, 2017 at 9:05am. Plate 0.1µL, 1:10, was selected.
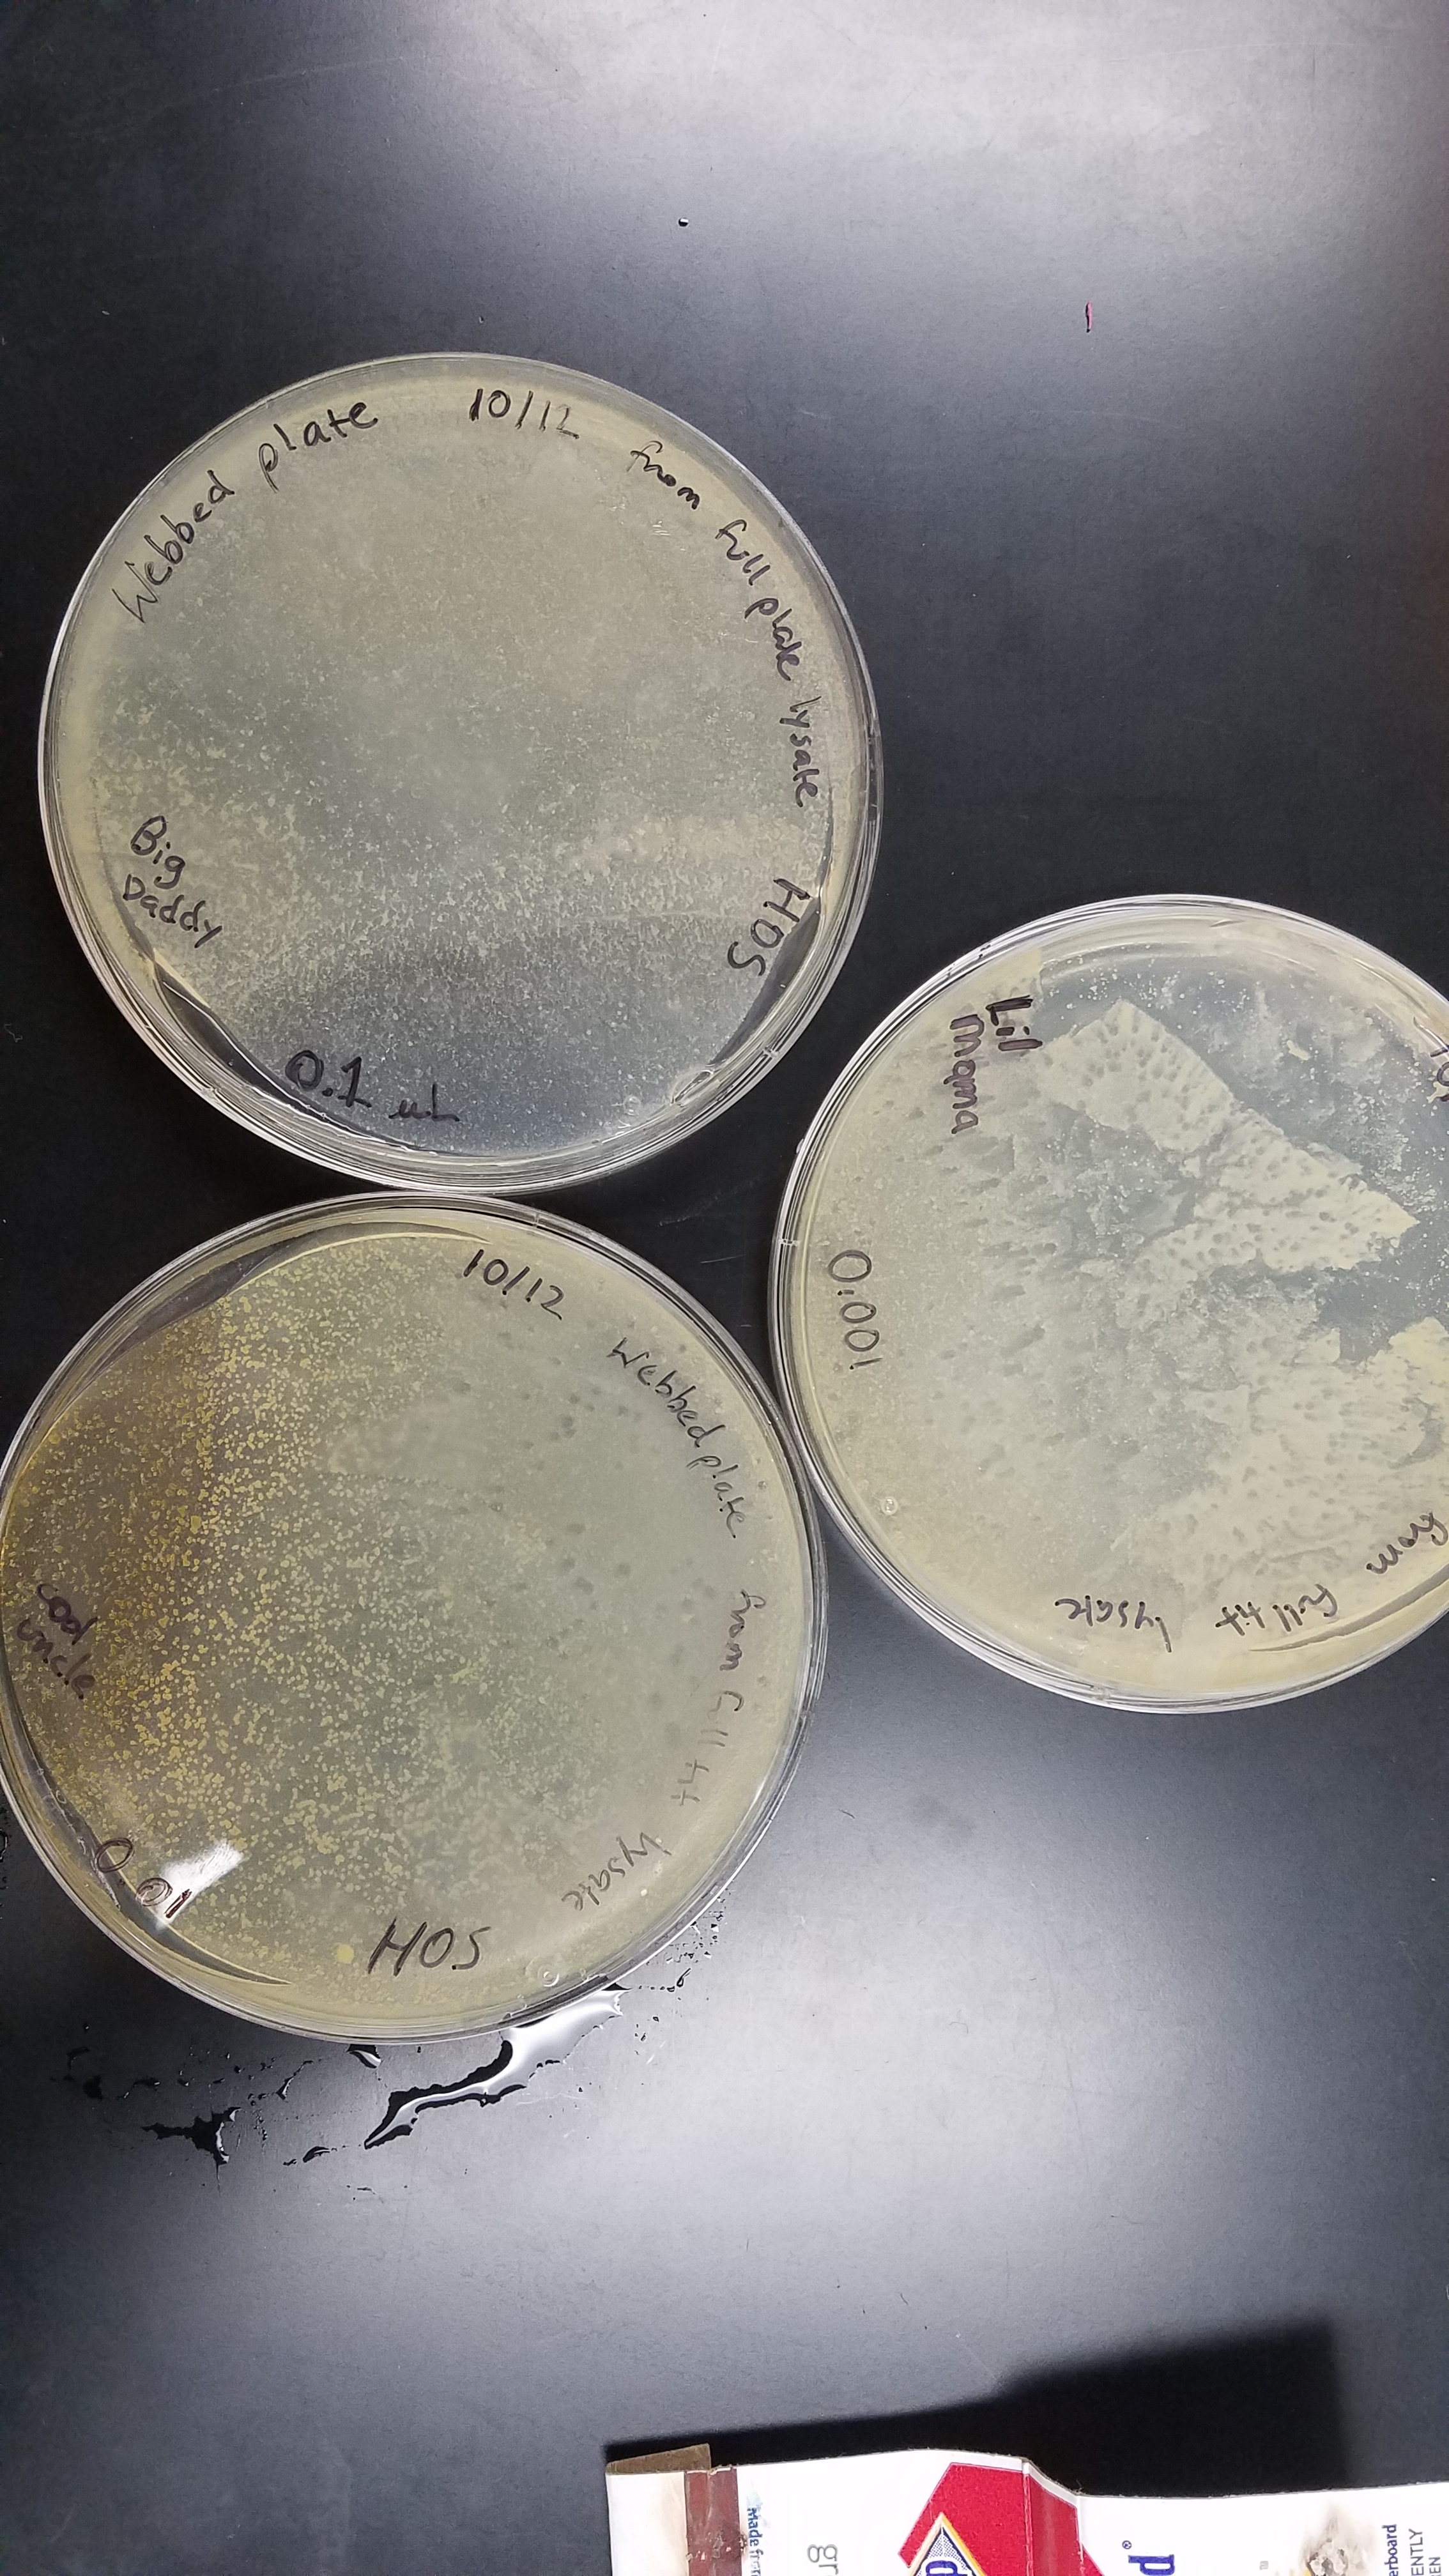
Collecting Lysate from Webbed plate
Procedure:
1. Flood plates: Apply 8 mL of sterile phage buffer to the webbed plate from 10/12/17.
2. Store the plates for 48 hours at 27°C.
Notes:
Lysate was collected on 10/18/17 at 9:09am from 0.01 µL dilution plate. Lysate was stored in 27°C. Titer was calculated at 2.6 x 10^8 pfu. Pictures of plates included:
Purpose: Create multiple webbed plates for the collection of a high titer lysate
Procedure:
1. Obtained three agar plates and labeled them.
2. Retrieve 10/18/2017 lysate from fridge and three bacterial host tubes.
3. Aspectically transfer 10μL of lysate to each of the bacterial host tubes.
4. Allow the bacteria and phage to inoculate for 7 minutes.
5. For each of the samples using a steril 5 mL pipette asceptically transfer 3mL of top agar to an inoculated host tubes.
6. Aspirate the mixture back into the pipette and transfer it to the appropriate plate and discard the pipette. Repeat for the other two additonal samples.
7. Allow plates to solidify at room temperature overnight
Notes:
Plates were placed in incubator on 10/24/17. Plates were taken out of the incubator on 10/26/2017 and placed in fridge.
Purpose: Questioned the integrity of plates in 10/26/17 and created more options
Procedure:
1. Repeated process of 10/26/17 and was unsuccessful.
Purpose: To collect a high titer lysate
Procedure:
1. Flood each plate from with 8 mL of phage buffer
2. Allow plates to solidify at room temperature for 2 hours
3. Collected all lysate and aspectically transferred to 15 mL conical tube and placed in fridge.
Notes:
Phage DNA Extraction
Purpose: To isolate genomic DNA from phage
Procedure:
Follow protocol 9.1
Notes:
Phage DNA extraction
Purpose: to isolate genomic DNA at a higher concentration
Procedure:
Followed protocol 9.1
Notes:
In this reaction 7μL of nuclease was added. Samples were incubated at 37°C for 10 minutes. The isopropanol washes were conducted 3 times. The Quibit 3.0 protocol was followed to quantify phage DNA. For samples were used in calculations. The DNA concentration was calculated at 34.0 ng/μL.
Procedure:
Purpose: to obtain a higher concentration of phage DNA
Followed protocol 9.1 according to Phage Discovery Guide
Notes:
For this experiment 10μL of nuclease was added. Sample was allowed to incubate for 20 minutes at 37°C. Isoporonal wash was condcuted three times. Quibit3.0 protocol was utilized again. DNA concentration was measured at 38.4 ng/μL.
Mounting Phage Samples for TEM and Staining with Uranyl Acetate
Purpose: to prepare phage sample for viewing with a transmission electron microscope
Procedure:
Followed protocol 8.1b according to Phage Discovery Guide
Notes:
Purpose: collect more phage lysate for other experiments
Procedure:
1. Added 10 μL of lysate from 10/30/2017 of webbed plate 0.1 μM to 250μL host bacteria.
2. Mixtures were swirled together and allowed to inoculate for 6 minutes.
3. For each of the samples using a sterile 5 mL pipette asceptically transfer 3mL of top agar to an inoculated host tubes.
4. Aspirate the mixture back into the pipette and transfer it to the appropriate plate and discard the pipette.
5. Allow plates to solidify for 20 minutes.
6. Place plates into incubator.
Notes:
Procedure: Phage DNA Extraction
Purpose: Attmepting to gain higher concentration of DNA
Procedure: Phage DNA Extraction Protocol from Baylor
Notes:
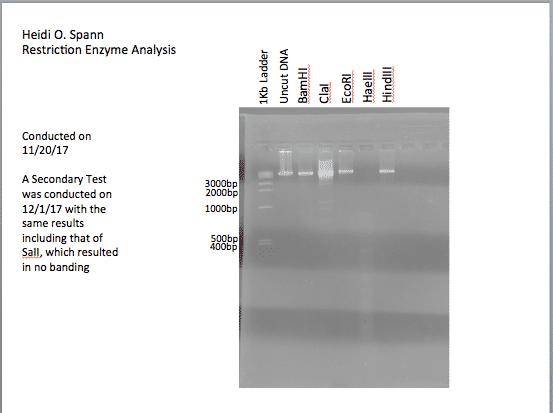
Restriction Enzyme Digest
Purpose: to cut your phage genome into multiple fragments based on its DNA sequence
Procedure:
Follow protocol 10.1
Notes:
For the negative control: 8μL of uncut phage DNA to 2μL of DDH20
For each of the restriction enzyme digests: 8μL of DNA, 1μL of corresponding restriction enzyme buffer, 1μL Restriction enzyme. Enzyme: SaII was not used.
Gel Electrophoresis
Procedure:
Notes:
The gel was 0.02%, using 0.6grams agrose to 30mL TBE buffer. The DNA ladder was: 9μL of DDH20, 1μL of Ladder, and 1μL of 6X Loading Dye. Each well had 12μL of each sample loaded as follows: Ladder, Uncut DNA, BamHI, ClaI, EcoRI, HaeIII, HindIII. Picture included:
Entering Phage into the Actinobacteriophage Database
Purpose: To register your phage into the Actinobacteriophage Database to make it available for other scientists
Procedure:
Follow Protocol 7.2
Notes:
Archiving DNA
Purpose: for later collection and analysis of phage DNA
Procedure:
Follow protocol
Notes:
Restriction Enzyme Digest, Gel Electrophoresis
Notes:
For each sample of the restriction enzyme digest: 10μL of phage DNA from 11/20/17, 1.5μL of corresponding phage buffer, 1μL of Restriction enzyme, 2.5μL of H20; an additional 2μL of 6X Loading Dye was added to each of these samples; loaded 17μL. For the negative control: 8μL of Uncut Phage DNA, 2μL DDH20; loaded 10μL. The ladder had 9μL DDH20, 1μL 1KB ladder, and 2μL 6X Loading dye; Loaded 12μL. Enzymes used for digests were: BamHI, ClaI, EcoRI, HaeIII, HindIII, and SaII. Results were similar to that recorded on 11/20/2017 aside from the SaII which should no banding.