Discovery of CutiePie
CutiePie Information
Morphology: Siphoviridae

Sample Collection
| Collector Name |
Katelyn Fitzgerald | Caressa Smith | Caressa Smith | Caressa Smith | Katelyn Fitzgerald |
| Sample No. | KF1 | CS1 | CS2 | CS3 | KF2 |
| Date of Collection | 08/28/2022 | 08/27/2022 | 08/27/2022 | 09/04/2022 | 09/06/2022 |
| Sample Type | Soil | Soil | Soil | soil | Soil |
| General Location | Ant pile under a tree | Next to a flower bed | Open grass area in a park | An ant pile near a flower bed | Ant pile |
| Location Description | The soil sample was found at Optimist Jaycee Park. | The soil sample was obtained from Fireside Aprartment District. | The soil sample was obtained from Stephenville City Park. | The soil sample was found near a flower bed in Weatherford. | The soil sample was found at Stephenville City Park. |
| GPS Coordinates | 32.22436 N, 98.23015 W | 32.21213 N, 98.22671 W | 32.21488 N, 98.20226 W | 32.74906 N, 97.68911 W | 32.21354 N, -98.20024 W |
| Sample Depth | Surface Level | Surace level | About 2 cm | Surface Level | Surface Level |
| Ambient Temperature | 36ºC | 34ºC | 34ºC | 22ºC | 33.9ºC |
Isolation/Purification
Title: Direct Isolation and Plaque Assay
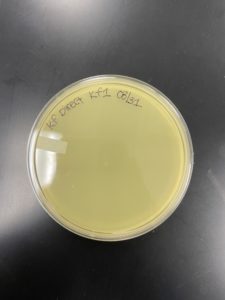
Date: 08/31/2022 Redo: No Sample: KF1
Purpose: This procedure is to isolate bacteriophages from an environmental sample in order to grow and infect host bacteria using plaque assay.
Notes:
1.) We put gloves on, and to create an aseptic environment, we sprayed 70% Ethanol on the counter top then wiped it down with paper towels after letting it sit for 30 seconds. After the workspace was sanitized, gloves were removed and lit a gas canister.
2.) Liquid media was added to the soil sample, in the conical tude, until it was submerged beneath 2-3 mL of liquid. The sample was then inverted several times to make sure the sample was thoroughly mixed.
3.) The tube was then put in a incubator ~250 rmp shaking incubator for 1 hour.
4.) The soil sample was taken out of the incubator, but it still was not separated to our liking, so we placed the tube in a centrifuge at 2,000 x g for 10 minutes.
5.) We opened the package of a 0.22 μm syringe filter, the filter was left in the package.
6.) Then 2 mL of liquid from the top of the soil sample was collected using a syringe. Then the filter was attached to the tip of the syringe.
7.) The liquid was the depressed into a microcentrifuge tube.
This is where we proceeded on to create the plaque assay
8.) We gathered our phage samples which were a result from the direct isolation. As well as gathered the materials we would need to carry out the plaque assay.
9.) We obtained equal amounts of 250 μl host bacteria cultures for each of our phage samples.
10.) A 100μl micropipettor was then used while continuing aspeptic technique to dispense 500 microliters of KF1 into one of the culture tubes which had 250 μl of host bacteria.
11.) The host bacteria and phage smaple were mixed together by gentely tapping on the tube.
12.) The sample then went undistured for 8 minutes to allow for attachment.
13.) We then grabbed 3 aggar plates ( one for each of our smaples) and labeld them with our intials, direct (for direct isolation), the sample number, and the date.
14.) Once the plates were labeled we grabbed the top agar from a small incubator. We waited to remove it from the incubator until we were ready for this step to prevent it form solidifying on our work bench.
15.) A sterile 5 ml pipette was used for each sample to aseptically put 3ml of top agar into the tube containg the mixture of the host bacteria and pahge sample. Immediatlety after putting the top agar into the tube, we aspirated it back up into the pipette and slowly but quickly transfered it onto the agar plate. Then quickly but cautiously tilted the plate in different directions to spread the top agar mixture evenly around the plate.
16.) The plates sat undisturbed for about 20 mins to let the top agar solidify. We inverted the plate and it was set in the incubator at 5:08 pm. The sample set for 36 hours.
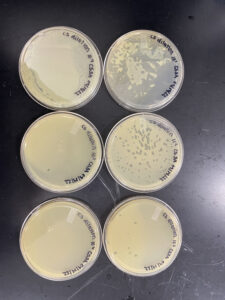
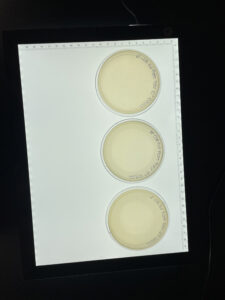
Results:
Negative Results
The sample was removed from the incubator to observe the progress of phage development at 4:09 pm on 09/01/2022. It was also removed from the incubator to check the status once again at 9:15 am on 09/02/2022.
Conclusions and Next Steps:
09/02/2022 we will go recollect soil samples to attempt to find a bacteriophage.
Title: Direct Isolation and Plaque Assay
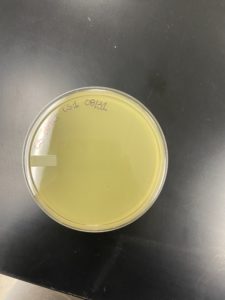
Date: 08/31/2022 Redo: No Sample: CS1
Purpose: This procedure is to isolate bacteriophages from an environmental sample in order to grow and infect host bacteria using plaque assay.
Notes:
1.) We put gloves on, and to create an aseptic environment, we sprayed 70% Ethanol on the counter top then wiped it down with paper towels after letting it sit for 30 seconds. After the workspace was sanitized, gloves were removed and lit a gas canister.
2.) Liquid media was added to the soil sample, in the conical tude, until it was submerged beneath 2-3 mL of liquid. The sample was then inverted several times to make sure the sample was thoroughly mixed.
3.) The tube was then put in a incubator ~250 rmp shaking incubator for 1 hour.
4.) The soil sample was taken out of the incubator, but it still was not separated to our liking, so we placed the tube in a centrifuge at 2,000 x g for 10 minutes.
5.) We opened the package of a 0.22 μm syringe filter, the filter was left in the package.
6.) Then 2 mL of liquid from the top of the soil sample was collected using a syringe. Then the filter was attached to the tip of the syringe.
7.) The liquid was the depressed into a microcentrifuge tube.
This is where we proceeded on to create the plaque assay
8.) We gathered our phage samples which were a result from the direct isolation. As well as gathered the materials we would need to carry out the plaque assay.
9.) We obtained equal amounts of 250 μl host bacteria cultures for each of our phage samples.
10.) A 100μl micropipettor was then used while continuing aspeptic technique to dispense 500 microliters of CS1 into one of the culture tubes which had 250 μl of host bacteria.
11.) The host bacteria and phage smaple were mixed together by gentely tapping on the tube.
12.) The sample then went undistured for 8 minutes to allow for attachment.
13.) We then grabbed 3 aggar plates ( one for each of our smaples) and labeld them with our intials, direct (for direct isolation), the sample number, and the date.
14.) Once the plates were labeled we grabbed the top agar from a small incubator. We waited to remove it from the incubator until we were ready for this step to prevent it form solidifying on our work bench.
15.) A sterile 5 ml pipette was used for each sample to aseptically put 3ml of top agar into the tube containg the mixture of the host bacteria and phage sample. Immediatlety after putting the top agar into the tube, we aspirated it back up into the pipette and slowly but quickly transfered it onto the agar plate. Then quickly but cautiously tilted the plate in different directions to spread the top agar mixture evenly around the plate.
16.) The plates sat undisturbed for about 20 mins to let the top agar solidify. We inverted the plate and it was set in the incubator at 5:08 pm. The sample set for 36 hours.
Results:
Negative Results
The sample was removed from the incubator to observe the progress of phage development at 4:08 pm on 09/01/2022. It was also removed from the incubator to check the status once again at 9:15 am on 09/02/2022.

Conclusions and Next Steps:
09/02/2022 we will go recollect soil samples to attempt to find a bacteriophage.
Title: Direct Isolation and Plaque Assay
Date: 08/31/2022 Redo: No Sample: CS2
Purpose: This procedure is to isolate bacteriophages from an environmental sample in order to grow and infect host bacteria using plaque assay.
Notes:
1.) We put gloves on, and to create an aseptic environment, we sprayed 70% Ethanol on the counter top then wiped it down with paper towels after letting it sit for 30 seconds. After the workspace was sanitized, gloves were removed and lit a gas canister.
2.) Liquid media was added to the soil sample, in the conical tude, until it was submerged beneath 2-3 mL of liquid. The sample was then inverted several times to make sure the sample was thoroughly mixed.
3.) The tube was then put in a incubator ~250 rmp shaking incubator for 1 hour.
4.) The soil sample was taken out of the incubator, but it still was not separated to our liking, so we placed the tube in a centrifuge at 2,000 x g for 10 minutes.
5.) We opened the package of a 0.22 μm syringe filter, the filter was left in the package.
6.) Then 2 mL of liquid from the top of the soil sample was collected using a syringe. Then the filter was attached to the tip of the syringe.
7.) The liquid was the depressed into a microcentrifuge tube.
This is where we proceeded on to create the plaque assay
8.) We gathered our phage samples which were a result from the direct isolation. As well as gathered the materials we would need to carry out the plaque assay.
9.) We obtained equal amounts of 250 μl host bacteria cultures for each of our phage samples.
10.) A 100μl micropipettor was then used while continuing aspeptic technique to dispense 500 microliters of CS2 into one of the culture tubes which had 250 μl of host bacteria.
11.) The host bacteria and phage smaple were mixed together by gentely tapping on the tube.
12.) The sample then went undistured for 8 minutes to allow for attachment.
13.) We then grabbed 3 aggar plates ( one for each of our smaples) and labeld them with our intials, direct (for direct isolation), the sample number, and the date.
14.) Once the plates were labeled we grabbed the top agar from a small incubator. We waited to remove it from the incubator until we were ready for this step to prevent it form solidifying on our work bench.
15.) A sterile 5 ml pipette was used for each sample to aseptically put 3ml of top agar into the tube containg the mixture of the host bacteria and pahge sample. Immediatlety after putting the top agar into the tube, we aspirated it back up into the pipette and slowly but quickly transfered it onto the agar plate. Then quickly but cautiously tilted the plate in different directions to spread the top agar mixture evenly around the plate.
16.) The plates sat undisturbed for about 20 mins to let the top agar solidify. We inverted the plate and it was set in the incubator at 5:08 pm. The sample set for 36 hours.
Results:
Negative Results
The sample was removed from the incubator to observe the progress of phage development at 4:09 pm on 09/01/2022. It was also removed from the incubator to check the status once again at 9:15 am on 09/02/2022.

Conclusions and Next Steps:
09/02/2022 we will go recollect soil samples to attmept to find a bacteriophage.
Title: Direct Isolation and Plaque Assay
Date: 09/07/2022 Redo: Sample: KF2
Purpose: This procedure is to isolate bacteriophages from an environmental sample in order to grow and infect host bacteria using plaque assay.
Notes:
1.) We put gloves on, and to create an aseptic environment, we sprayed 70% Ethanol on the counter top then wiped it down with paper towels after letting it sit for 30 seconds. After the workspace was sanitized, gloves were removed and lit a gas canister.
2.) Liquid media was added to the soil sample, in the conical tude, until it was submerged beneath 2-3 mL of liquid. The sample was then inverted several times to make sure the sample was thoroughly mixed.
3.) The tube was then put in a incubator ~250 rmp shaking incubator for 4 hours.
4.) We opened the package of a 0.22 μm syringe filter, the filter was left in the package.
5.) Then 2 mL of liquid from the top of the soil sample was collected using a syringe. Then the filter was attached to the tip of the syringe.
6.) The liquid was the depressed into a microcentrifuge tube.
This is where we proceeded on to create the plaque assay
8.) We gathered our phage samples which were a result from the direct isolation. As well as gathered the materials we would need to carry out the plaque assay.
9.) We obtained equal amounts of 250 μl host bacteria cultures for each of our phage samples.
10.) A 100μl micropipettor was then used while continuing aspeptic technique to dispense 500 microliters of KF2 into one of the culture tubes which had 250 μl of host bacteria.
11.) The host bacteria and phage smaple were mixed together by gentely tapping on the tube.
12.) The sample then went undistured for 8 minutes to allow for attachment.
13.) We then grabbed 2 aggar plates ( one for each of our smaples) and labeld them with our intials, direct (for direct isolation), the sample number, and the date.
14.) Once the plates were labeled we grabbed the top agar from a small incubator. We waited to remove it from the incubator until we were ready for this step to prevent it form solidifying on our work bench.
15.) A sterile 5 ml pipette was used for each sample to aseptically put 3ml of top agar into the tube containg the mixture of the host bacteria and pahge sample. Immediatlety after putting the top agar into the tube, we aspirated it back up into the pipette and slowly but quickly transfered it onto the agar plate. Then quickly but cautiously tilted the plate in different directions to spread the top agar mixture evenly around the plate.
16.) The plates sat undisturbed for about 20 mins to let the top agar solidify. We inverted the plate and it was set in the incubator at 3:02 pm. The sample set for 36 hours.
Results:
Negative Results
The sample was removed from the incubator to observe the progress of phage development at 3:09 pm on 09/08/2022.

Conclusions and Next Steps:
09.08.2022 This sample was discarded and we will carry on our research with sample CS4.
Title: Direct Isolation and Plaque Assay
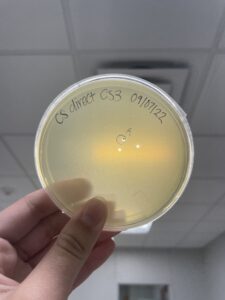
Date: 09/07/2022 Redo: Yes Sample: CS3
Purpose: This procedure is to isolate bacteriophages from an environmental sample in order to grow and infect host bacteria using plaque assay.
Notes:
1.) We put gloves on, and to create an aseptic environment, we sprayed 70% Ethanol on the counter top then wiped it down with paper towels after letting it sit for 30 seconds. After the workspace was sanitized, gloves were removed and lit a gas canister.
2.) Liquid media was added to the soil sample, in the conical tude, until it was submerged beneath 2-3 mL of liquid. The sample was then inverted several times to make sure the sample was thoroughly mixed.
3.) The tube was then put in a incubator ~250 rmp shaking incubator for 4 hours.
4.) We opened the package of a 0.22 μm syringe filter, the filter was left in the package.
5.) Then 2 mL of liquid from the top of the soil sample was collected using a syringe. Then the filter was attached to the tip of the syringe.
6.) The liquid was the depressed into a microcentrifuge tube.
This is where we proceeded on to create the plaque assay
8.) We gathered our phage samples which were a result from the direct isolation. As well as gathered the materials we would need to carry out the plaque assay.
9.) We obtained equal amounts of 250 μl host bacteria cultures for each of our phage samples.
10.) A 100μl micropipettor was then used while continuing aspeptic technique to dispense 500 microliters of CS3 into one of the culture tubes which had 250 μl of host bacteria.
11.) The host bacteria and phage smaple were mixed together by gentely tapping on the tube.
12.) The sample then went undistured for 8 minutes to allow for attachment.
13.) We then grabbed 2 aggar plates ( one for each of our smaples) and labeld them with our intials, direct (for direct isolation), the sample number, and the date.
14.) Once the plates were labeled we grabbed the top agar from a small incubator. We waited to remove it from the incubator until we were ready for this step to prevent it form solidifying on our work bench.
15.) A sterile 5 ml pipette was used for each sample to aseptically put 3ml of top agar into the tube containg the mixture of the host bacteria and pahge sample. Immediatlety after putting the top agar into the tube, we aspirated it back up into the pipette and slowly but quickly transfered it onto the agar plate. Then quickly but cautiously tilted the plate in different directions to spread the top agar mixture evenly around the plate.
16.) The plates sat undisturbed for about 20 mins to let the top agar solidify. We inverted the plate and it was set in the incubator at 3:02 pm. The sample set for 36 hours.
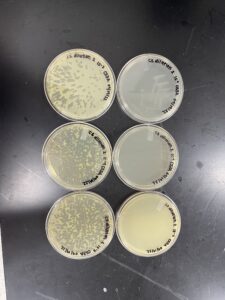
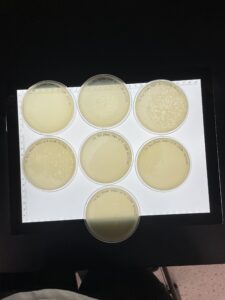
Results:
Positive results
The plate was removed from the incubator at 3:05pm 09/08/22. Then parafilmed and placed in the fridge.
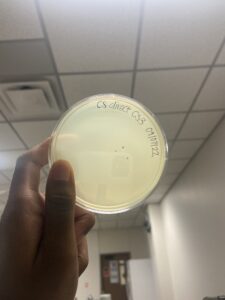
The plaque circled is the first plaque we chose and we labeled it A.
Conclusions and Next Steps:
09/08/22 We will continue on to pick a plaque then start our serial dilutions.
Title: Picking a Plaque
Date: 09/12/22 Redo: No Sample: CS3
Purpose: To gather phage particles from a plaque and make a liquid sample
Notes:
1.) We put gloves on, and to create an aseptic environment, we sprayed 70% Ethanol on the counter top then wiped it down with paper towels after letting it sit for 30 seconds. After the workspace was sanitized, gloves were removed and lit a gas canister.
2.) We labeled the plaques by using a sharpie to put a circle around which plaque we wanted to pick. Then we labeled this plaque A.
3.) The morphology of the plaque: somewhat circular, clear, and tiny.
4.) We then grabed a microcentrifuge tube and labled it according to the plaque. ( CS 3A) Then using aseptic technique the put 100 ul of phage buffer into the microcentrifuge tube.
5.) Next we picked a plaque. To do that we placed a sterile tip onto a p200 micropipettor. Then holding the pipettor perpendicular to the agar plate, we gently stabbed the top agar in the center of the plaque that we chose.
6.) We placed the the tip of the pipetter into the phage buffer that was in the corresponding microcentrifuge tube and taped in on the wall of the tube as well as pipetting up and down to remove the phage particles. Then discarded the tip.
7.) Lastly we mixed it by vortexing it.
Results:
Conclusions and Next Steps:
We picked the plaque and we are going to use that plaque to carry out a spot test.
Title: Spot Test
Date: 09/12/22 Redo: No Sample: CS3
Purpose: To test a smaple to see if it contains a phage.
Notes:
1.) We put gloves on, and to create an aseptic environment, we sprayed 70% Ethanol on the counter top then wiped it down with paper towels after letting it sit for 30 seconds. After the workspace was sanitized, gloves were removed and lit a gas canister.
2.) We collected sample CS3 A that was in the microcentrifuge tube.
3.) We labeled our plate (Kf CS3 A Spot Test 09/12/22) but didn’t divide it up becuase we were only testing one sample.
4.) We then obtained 250 ul culture of host bacteria.
5.) Then we grabbed our top agar out of the incubator. We grabbed a 5ml pipette and opended it using aseptic technique. Then transfered 3ml of top agar and put it in the tube containing the host bacteria. Immediately after we aspirated it back into the pipette and placed it on the plate.
6.) The plate was rotated in different directions to allow the mixture to evenly spread over the plate.
7.) Then we let it sit undistured for 20 mins.
8.) Next we spotted the liquid phage smaple on the the prepared bacterial lawn. We did this by aseptically transfering 10 ul of our sample onto the plate. We held the pipette close but slilghly above the agar and released the drop slowly to prevent splattering.
9.) We allowed the liqid from the spot to absorb into the agar which took about 15 minutes.
10.) Then we set the plate in the incubator without inverting it and left it in the incubator for 24 hours.
Results:
Positive results
The plate was removed from the incubator at 10:46am 09/13/22. Then parafilmed and placed in the fridge.

Conclusions and Next Steps:
09/13/22 We are going to continue to the serial dilutions with the results from the spot test.
Title: Serial Dilutions
Date: 09/14/22 Redo: No Sample: CS3
Purpose: This procedure is to manipulate the number of phages in the sample. Serial dilutions are used to purify, amplify, and tilter the phage.
Notes:
1.) We put gloves on, and to create an aseptic environment, we sprayed 70% Ethanol on the counter top then wiped it down with paper towels after letting it sit for 30 seconds. After the workspace was sanitized, gloves were removed and lit a gas canister.
2.) We obtained one microcentrifuge tube and labeled it as our original sample.
3.) Using aseptic technique, 100 μL of phage buffer was collected and put into the microcentrifuge tube.
4.) Using our plate from our spot test, we picked the plaque by using a sterile tip on a p200 micropipettor.
5.) The pipetter was held perpendicular to the agar surface, and gently stabbed the top agar in the center of a small crevace of our plaque.
6.) The end of the tip was then placed into the microcentrifuge tube that contained the phage buffer. The tip of the pipetter was tapped on the wall of the tube and we pipetted up and down to dislodge the phage particles.
7.) Then the microcentrifuge tube was mixed well by vortexing.
8.) We arranged six microcentrifuge tubes and labeled them 10-1, 10-2, 10-3,….10-6. Then 90 μL of phage buffer was added to each tube.
9.) Then we performed 10-fold serial dilutions. It started by taking 10 μL of the undiluted phage sample and adding it to the 10-1 tube and the vortexing it. This process continued through the 10-6 tube and making sure to vortex and change pipette tips after each dilution.
10.) The 10-1 through 10-6 dilutions had to be plated just like the plaque assay. 10 μL of phage solution was micropipetted into 250 μL of host bacteria, the diluted phage and bacteria set for 8 minutes.
11.) Once the phage and bacteria bound together, a seriological syringe was used to collect 3 mL of top agar to dispense into the solution, then it was immediately aspirated back into the syringe.
12.) The agar was then dispersed onto agar plates and the plate was moved around to insure it covered the whole top surface of the plate.
Steps 10-12 were repeated six times, for each solution.
13.) All six plates set for 15 minutes before being placed into the incubator at 10:04 am, and they stay in the incubator for 24-48 hours.
Results:
Positive results
The plates were removed from the incubator at 3:22pm 09/15/22. Then parafilmed and placed in the fridge. Due to condinsation on our 10-1 and 10-4 plates, they were placed in the incubator without turning them over because the phage dilution was watery. The results of those plates grew in an odd way.
Conclusions and Next Steps:
09/15/22 We are going to continue with the second serial dilution with the results from plate 10-5.
09/08/22 We will continue on to pick a plaque then start our serial dilutions.
Title: Serial Dilutions (2nd round)
Date: 09/19/22 Redo: No Sample: CS3
Purpose: This procedure is to manipulate the number of phages in the sample. Serial dilutions are used to purify, amplify, and tilter the phage.
Notes:
1.) We put gloves on, and to create an aseptic environment, we sprayed 70% Ethanol on the counter top then wiped it down with paper towels after letting it sit for 30 seconds. After the workspace was sanitized, gloves were removed and lit a gas canister.
2.) We obtained one microcentrifuge tube and labeled it as our original sample.
3.) Using aseptic technique, 100 μL of phage buffer was collected and put into the microcentrifuge tube.
4.) Using our plate ( 10-5 ) from the first round of serial dilutions, we picked the plaque by using a sterile tip on a p200 micropipettor.
5.) The pipetter was held perpendicular to the agar surface, and gently stabbed the top agar in the center of a small crevace of our plaque.
6.) The end of the tip was then placed into the microcentrifuge tube that contained the phage buffer which we labeled as 100. The tip of the pipetter was tapped on the wall of the tube and we pipetted up and down to dislodge the phage particles.
7.) Then the microcentrifuge tube was mixed well by vortexing.
8.) We arranged five microcentrifuge tubes and labeled them 10-1, 10-2,10-3….10-5. Then 90 μL of phage buffer was added to every tube.
9.) Then we performed 10-fold serial dilutions. It started by taking 10 μL of the undiluted phage sample and adding it to the 10-1 tube and the vortexing it. This process continued through the 10-5 tube and making sure to vortex and change pipette tips after each dilution.
10.) The 100 through 10-5 dilutions had to be plated just like the plaque assay. 10 μL of phage solution was micropipetted into 250 μL of host bacteria, the diluted phage and bacteria set for 8 minutes.
11.) Once the phage and bacteria bound together, a seriological syringe was used to collect 3 mL of top agar to dispense into the solution, then it was immediately aspirated back into the syringe.
12.) The agar was then dispersed onto agar plates and the plate was moved around to insure it covered the whole top surface of the plate.
Steps 10-12 were repeated six times, for each solution.
13.) All six plates set for 15 minutes before being placed into the incubator at 10:18 am, and they stay in the incubator for 24-48 hours.
Results:
Positive results but may have mislabled the plates or rearanged them wrong. The plates were removed from the incubator at 11:05 am 09/20/22 and parafilmed and put in the fridge.
Conclusions and Next Steps:
9/21/22: We will redo our second round of dilutions but start plating at 10-3 and go to 10-8
Title: Serial Dilutions (2nd round) Pt. 2
Date: 09/21/22 Redo: yes Sample: CS3
Purpose: This procedure is to manipulate the number of phages in the sample. Serial dilutions are used to purify, amplify, and tilter the phage.
Notes:
1.) We put gloves on, and to create an aseptic environment, we sprayed 70% Ethanol on the counter top then wiped it down with paper towels after letting it sit for 30 seconds. After the workspace was sanitized, gloves were removed and lit a gas canister.
2.) We obtained the microcentrifuge tube that contained the picked plaque from the the 10-5 plate from first round of our serial dilution
3.) We arranged six microcentrifuge tubes and labeled them staring at 10-3 to 10-8. Then 90 μL of phage buffer was added to every tube.
4.) Then we performed 10-fold serial dilutions. It started by taking 10 μL of the undiluted phage sample and adding it to the 10-3 tube and the vortexing it. This process continued through the 10-8 tube and making sure to vortex and change pipette tips after each dilution.
5.) The 10-3 through 10-8 dilutions had to be plated just like the plaque assay. 10 μL of phage solution was micropipetted into 250 μL of host bacteria, the diluted phage and bacteria set for 8 minutes.
6.) Once the phage and bacteria bound together, a seriological syringe was used to collect 3 mL of top agar to dispense into the solution, then it was immediately aspirated back into the syringe.
7.) The agar was then dispersed onto agar plates and the plate was moved around to insure it covered the whole top surface of the plate.
Steps 10-12 were repeated six times, for each solution.
13.) All six plates set for 15 minutes before being placed into the incubator at 10:20 am, and they stay in the incubator for 24-48 hours.
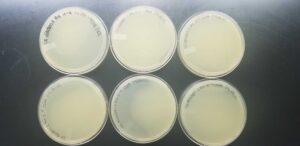
Results:
Negative Results
The plates were removed from the incubator at 2:15 pm on 09/22/22 and were parafilmed and put in the fridge.

Conclusions and Next Steps:
9/23/22: We will redo our second round of dilutions but pick a plaque again instead of using the diluted sample. As well as plate 10-2 to 10-7
Title: Serial Dilutions (2nd round) Pt. 3
Date: 09/26/22 Redo: yes Sample: CS3
Purpose: This procedure is to manipulate the number of phages in the sample. Serial dilutions are used to purify, amplify, and tilter the phage.
Notes:
1.) We put gloves on, and to create an aseptic environment, we sprayed 70% Ethanol on the counter top then wiped it down with paper towels after letting it sit for 30 seconds. After the workspace was sanitized, gloves were removed and lit a gas canister.
2.) We obtained one microcentrifuge tube and labeled it as our original sample.
3.) Using aseptic technique, 100 μL of phage buffer was collected and put into the microcentrifuge tube.
4.) Using our plate ( 10-5 ) from the first round of serial dilutions, we picked the plaque again by using a sterile tip on a p200 micropipettor.
5.) The pipetter was held perpendicular to the agar surface, and gently stabbed the top agar in the center of a small crevace of our plaque.
6.) The end of the tip was then placed into the microcentrifuge tube that contained the phage buffer which we labeled as 100. The tip of the pipetter was tapped on the wall of the tube and we pipetted up and down to dislodge the phage particles.
7.) Then the microcentrifuge tube was mixed well by vortexing.
8.) We arranged five microcentrifuge tubes and labeled them 10-2, 10-3,10-4….10-7. Then 90 μL of phage buffer was added to every tube.
9.) Then we performed 10-fold serial dilutions. It started by taking 10 μL of the undiluted phage sample and adding it to the 10-2 tube and the vortexing it. This process continued through the 10-7 tube and making sure to vortex and change pipette tips after each dilution.
10.) The 10-2 through 10-7 dilutions had to be plated just like the plaque assay. 10 μL of phage solution was micropipetted into 250 μL of host bacteria, the diluted phage and bacteria set for 8 minutes.
11.) Once the phage and bacteria bound together, a seriological syringe was used to collect 3 mL of top agar to dispense into the solution, then it was immediately aspirated back into the syringe.
12.) The agar was then dispersed onto agar plates and the plate was moved around to insure it covered the whole top surface of the plate.
Steps 10-12 were repeated six times, for each solution.
13.) All six plates set for 15 minutes before being placed into the incubator at 10:15 am, and they stay in the incubator for 24-48 hours.
Results:
Negative Results
The plates were removed from the incubator at 11:53 pm on 09/27/22 and parafilmed and put in the fridge.

Conclusions and Next Steps:
09/28/22 We will do the second dilution again for the fourth time, but this time we will pick a plaque from the plate 10-3 from the first round of the second dilution.
Title: Serial Dilutions (Round 2) Pt.4
Date: 09/28/22 Redo: yes Sample: CS3
Purpose: This procedure is to manipulate the number of phages in the sample. Serial dilutions are used to purify, amplify, and tilter the phage.
Notes:
1.) We put gloves on, and to create an aseptic environment, we sprayed 70% Ethanol on the counter top then wiped it down with paper towels after letting it sit for 30 seconds. After the workspace was sanitized, gloves were removed and lit a gas canister.
2.) We obtained one microcentrifuge tube and labeled it as our original sample.
3.) Using aseptic technique, 100 μL of phage buffer was collected and put into the microcentrifuge tube.
4.) Using our plate 10-3 from the first round of the 2nd round of dilution, we picked the plaque by using a sterile tip on a p200 micropipettor.
5.) The pipetter was held perpendicular to the agar surface, and gently stabbed the top agar in the center of a small crevace of our plaque.
6.) The end of the tip was then placed into the microcentrifuge tube that contained the phage buffer. The tip of the pipetter was tapped on the wall of the tube and we pipetted up and down to dislodge the phage particles.
7.) Then the microcentrifuge tube was mixed well by vortexing.
8.) We arranged six microcentrifuge tubes and labeled them 10-1, 10-2, 10-3,….10-7. Then 90 μL of phage buffer was added to each tube.
9.) Then we performed 10-fold serial dilutions. It started by taking 10 μL of the undiluted phage sample and adding it to the 10-1 tube and the vortexing it. This process continued through the 10-7 tube and making sure to vortex and change pipette tips after each dilution.
10.) The 10-2 through 10-7 dilutions had to be plated just like the plaque assay. 10 μL of phage solution was micropipetted into 250 μL of host bacteria, the diluted phage and bacteria set for 8 minutes.
11.) Once the phage and bacteria bound together, a seriological syringe was used to collect 3 mL of top agar to dispense into the solution, then it was immediately aspirated back into the syringe.
12.) The agar was then dispersed onto agar plates and the plate was moved around to insure it covered the whole top surface of the plate.
Steps 10-12 were repeated six times, for each solution.
13.) All six plates set for 15 minutes before being placed into the incubator at 10:04 am, and they stay in the incubator for 24-48 hours.
Results:
Positive results, we had growth on plates10-2 -10-4
Conclusions and Next Steps:
10/03/22 We will do the second dilution again for the fifth time, but this time we will plate from 10-0-10-2 in hopes that we get a webbed plate
Title: Serial Dilutions (Round 2) Pt.5
Date: 10/03/22 Redo: yes Sample: CS3
Purpose: This procedure is to manipulate the number of phages in the sample. Serial dilutions are used to purify, amplify, and tilter the phage.
Notes:
1.) We put gloves on, and to create an aseptic environment, we sprayed 70% Ethanol on the counter top then wiped it down with paper towels after letting it sit for 30 seconds. After the workspace was sanitized, gloves were removed and lit a gas canister.
2.) We obtained one microcentrifuge tube and labeled it as our original sample.
3.) Using aseptic technique, 100 μL of phage buffer was collected and put into the microcentrifuge tube.
4.) Using our plate 10-3 from the first round of the 2nd round of dilution, we picked the plaque by using a sterile tip on a p200 micropipettor.
5.) The pipetter was held perpendicular to the agar surface, and gently stabbed the top agar in the center of a small crevace of our plaque.
6.) The end of the tip was then placed into the microcentrifuge tube that contained the phage buffer. The tip of the pipetter was tapped on the wall of the tube and we pipetted up and down to dislodge the phage particles.
7.) Then the microcentrifuge tube was mixed well by vortexing.
8.) We arranged three microcentrifuge tubes and labeled them 100, 10-1, 10-2. Then 90 μL of phage buffer was added to each tube.
9.) Then we performed 10-fold serial dilutions. It started by taking 10 μL of the undiluted phage sample and adding it to the 10-1 tube and the vortexing it. This process continued through the 10-2 tube and making sure to vortex and change pipette tips after each dilution.
10.) The 100 through 10-2 dilutions had to be plated just like the plaque assay. 10 μL of phage solution was micropipetted into 250 μL of host bacteria, the diluted phage and bacteria set for 8 minutes.
11.) Once the phage and bacteria bound together, a seriological syringe was used to collect 3 mL of top agar to dispense into the solution, then it was immediately aspirated back into the syringe.
12.) The agar was then dispersed onto agar plates and the plate was moved around to insure it covered the whole top surface of the plate.
Steps 10-12 were repeated 3 times, for each solution.
13.) All three plates set for 15 minutes before being placed into the incubator at 10:00 am, and they stay in the incubator for 24-48 hours.
Results:
Positive Results. There was growth on all three plates but the 100 plate was the most webbed.
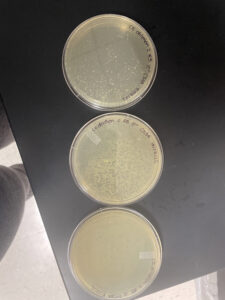
The plates were taken out of the incubator on 10/04/22 at 12:57 pm.
Conclusion and Next Steps:
10/04/22 We will continue with collecting the plate lysates from the 100 plate and make several full plate titers with different dilutions.
Amplification
Title: Collecting Plate Lysates and Full Plate Titer
Date: 10/05/2022 Redo: NoSample: CS3
Purpose: The purpose of this procedure is to calculate the phage concentration, titer, of our phage lysate. The full plate titer is the most accurate method to determine the number of infectious phage in our lysate.
Notes:
1.) 8 ml of sterile phage buffer was applied to our webbed plate (100 from our second serial dilution).
2.)The plate was left to sit at room temperature for about 4 and a half hours.
3.) The phage bufffer was then swirled around gently.
4.) After the incubation was complete, the lid was removed. On the bench, the plate was tilted by placing it on the edge of the lid to allow the lysate to pool to one side.
5.) A 0.22 μm filter was perpared by opening the package, leaving the filter inside, but not removing the filter and set to the side.
6.) Using a 5 mL syringe to aspirate the lysate from the plate. Then the syringe was attached to the filter and the filtrate was collected in a 15 mL sterile conical tube.
7.) The tube was then labeled with “Low Volume Lysate”, the date, and our initials.
Then we proceded to the full plate titer procedure.
8.) We got six microcentrifuge tubes and labeled them 10-1 to 10-6. Then each tube was filled with 90 μL.
9.) Then we performed 10-fold serial dilutions. It started by taking 10 μL of the undiluted lysate and added it to the 10-1 tube and then vortexing it. This process continued through the 10-6 tube and making sure to vortex and change pipette tips after each dilution.
10.) The lysate and the 10-1 through 10-6 dilutions had to be plated just like the plaque assay. 10 μL of phage solution was micropipetted into 250 μL of host bacteria, the diluted phage and bacteria set for 8 minutes.
11.) Once the phage and bacteria bound together, a seriological syringe was used to collect 3 mL of top agar to dispense into the solution, then it was immediately aspirated back into the syringe.
12.) The agar was then dispersed onto agar plates and the plate was moved around to insure it covered the whole top surface of the plate.
Steps 10-12 were repeated 3 times, for each solution.
13.) All three plates set for 15 minutes before being placed into the incubator at 2:56 pm, and they stay in the incubator for 24-48 hours.
Results:
Positive results. Our 10-3 plate was the webbed plate from our dilutions.

Titer=
Titer (pfu/ml) = (74 pfu/10 μl) x (103 μl/ ml) x (105)
= (7.4 x 103 x 105) pfu/ml
= 7.4 1011 pfu/ml
Conclusions and Next Steps:
10/06/22 We will be creating 6 more plates of our 103 dilution from the lysate.
Title: Making more webbed plates
Date: 10/10/22 Redo: no Sample: CS3
Purpose: This procedure is to manipulate the number of phages in the sample. Serial dilutions are used to purify, amplify, and tilter the phage.
Notes:
1.) We put gloves on, and to create an aseptic environment, we sprayed 70% Ethanol on the counter top then wiped it down with paper towels after letting it sit for 30 seconds. After the workspace was sanitized, gloves were removed and lit a gas canister.
2.) We obtained one microcentrifuge tube and labeled it as our original sample.
3.) We grabbed the 15 ml conical tube that contained our low volume lysate and drew up 10 μL and put it in the microcentrifuge tube that was labeled for our original sample.
4.) We arranged three microcentrifuge tubes and labeled them 100, 10-1….10-3. Then 90 μL of phage buffer was added to each tube except for the one containig the original sample.
9.) Then we performed 10-fold serial dilutions. It started by taking 10 μL of the undiluted phage sample and adding it to the 10-1 tube and the vortexing it. This process continued through the 10-3 tube and making sure to vortex and change pipette tips after each dilution.
10.) The 10-3 dilutions had to be plated just like the plaque assay only since this plate was webbed in our Full plate titer. 10 μL of phage solution was micropipetted into 250 μL of host bacteria, the diluted phage and bacteria set for 8 minutes.
11.) Once the phage and bacteria bound together, a seriological syringe was used to collect 3 mL of top agar to dispense into the solution, then it was immediately aspirated back into the syringe.
12.) The agar was then dispersed onto agar plates and the plate was moved around to insure it covered the whole top surface of the plate.
Steps 10-12 were repeated 6 times (once for each plate).
13.) All six plates set for 15 minutes before being placed into the incubator at 2:10 pm and they stay in the incubator for 24-48 hours.
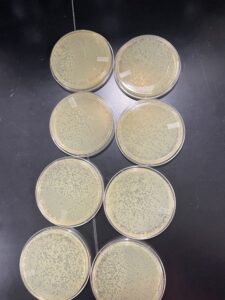
Results:
Positive results all of the plates are webbed.

The plates were removed from the incubator around 2:05 10/11/22
Conclusions and Next Steps:
10/11/12: We will be colleecting plate lysates from these plates for our high volume titer.
Title: Collecting plate lysates and full plate titer (High volume)
Date: 10/12/2022 Redo: No Sample: CS3
Purpose: The purpose of this procedure is to calculate the phage concentration, titer, of our phage lysate. The full plate titer is the most accurate method to determine the number of infectious phage in our lysate.
Notes:
1.) 8 ml of sterile phage buffer was applied to our webbed plates (All six plates)
2.)The plate was left to sit at room temperature for about 4 and a half hours.
3.) The phage bufffer was then swirled around gently.
4.) After the incubation was complete, the lid was removed. On the bench, the plate was tilted by placing it on the edge of the lid to allow the lysate to pool to one side.
5.) A 0.22 μm filter was perpared by opening the package, leaving the filter inside, but not removing the filter and set to the side.
6.) Using a 5 mL syringe to aspirate the lysate from the plate. Then the syringe was attached to the filter and the filtrate was collected in a 15 mL sterile conical tube.
Note: Not all of our lysate solution was abled to be filtered, because we kept having problems with the filter. We continued on with what we were able to get filtered.
7.) The tube was then labeled with “High Volume Lysate”, the date, and our initials.
Then we proceded to the full plate titer procedure.
8.) We got seven microcentrifuge tubes and labeled them 100 to 10-6. Then each tube was filled with 90 μ besides the tube labeled 100
9.) Then we performed 10-fold serial dilutions. It started by taking 10 μL of the undiluted lysate and added it to the 10-1 tube and then vortexing it. This process continued through the 10-6 tube and making sure to vortex and change pipette tips after each dilution.
10.) The lysate and the 10-1 through 10-6 dilutions had to be plated just like the plaque assay. 10 μL of phage solution was micropipetted into 250 μL of host bacteria, the diluted phage and bacteria set for 8 minutes.
11.) Once the phage and bacteria bound together, a seriological syringe was used to collect 3 mL of top agar to dispense into the solution, then it was immediately aspirated back into the syringe.
12.) The agar was then dispersed onto agar plates and the plate was moved around to insure it covered the whole top surface of the plate.
Steps 10-12 were repeated 6 times, for each solution.
13.) All seven plates set for 15 minutes before being placed into the incubator at 4:47 pm, and they stay in the incubator for 24-48 hours.
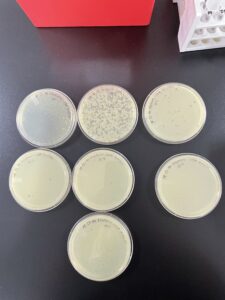
Results:
Positive results, the plates were taken out of the incubator around 3:45 pm 10/14/22.

Titer=
Titer (pfu/ml) = (81 pfu/10 μl) x (103 μl/ ml) x (103)
= (8.1 x 103 x 103) pfu/ml
= 8.1 106 pfu/ml
Conclusions and Next Steps:
10/13/22: We will be redoing the step again, but filter the rest of our lysates then plate from there. The titer calculated from this round could be low due to the fact that we continued on without filtering all of our lysate solution.
Title: Full plate titer (High volume)
Date: 10/17/2022 Redo: Yes Sample: CS3
Purpose: The purpose of this procedure is to calculate the phage concentration, titer, of our phage lysate. The full plate titer is the most accurate method to determine the number of infectious phage in our lysate.
Notes:
1.) We put gloves on, and to create an aseptic environment, we sprayed 70% Ethanol on the counter top then wiped it down with paper towels after letting it sit for 30 seconds. After the workspace was sanitized, gloves were removed and lit a gas canister.
2.) We obtained the tube that was labeled with “High Volume Lysate”
3.) We got seven microcentrifuge tubes and labeled them 100 to 10-6. Then each tube was filled with 90 μ besides the tube labeled 100
4.) Then we performed 10-fold serial dilutions. It started by taking 10 μL of the undiluted lysate and added it to the 10-1 tube and then vortexing it. This process continued through the 10-6 tube and making sure to vortex and change pipette tips after each dilution.
5.) The lysate and the 10-1 through 10-6 dilutions had to be plated just like the plaque assay. 10 μL of phage solution was micropipetted into 250 μL of host bacteria, the diluted phage and bacteria set for 8 minutes.
6.) Once the phage and bacteria bound together, a seriological syringe was used to collect 3 mL of top agar to dispense into the solution, then it was immediately aspirated back into the syringe.
7.) The agar was then dispersed onto agar plates and the plate was moved around to insure it covered the whole top surface of the plate.
Steps 5-7 were repeated 6 times, for each solution.
8.) All seven plates set for 15 minutes before being placed into the incubator at 4:47 pm, and they stay in the incubator for 24-48 hours.
Results:
Titer=
Titer (pfu/ml) = (103 pfu/10 μl) x (103 μl/ ml) x (103)
= (1.03 x 103 x 103) pfu/ml
= 1.03 107 pfu/ml
Conclusions and Next Steps:
10/18/22: We will be making more webbed plates to try and get a higher lysate volume since it was still lower than we were wanting.
Title: Making more webbed plates
Date: 10/24/22 Redo: yes Sample: CS3
Purpose: This procedure is to manipulate the number of phages in the sample. Serial dilutions are used to purify, amplify, and tilter the phage.
Notes:
1.) We put gloves on, and to create an aseptic environment, we sprayed 70% Ethanol on the counter top then wiped it down with paper towels after letting it sit for 30 seconds. After the workspace was sanitized, gloves were removed and lit a gas canister.
2.) We obtained one microcentrifuge tube and labeled it as our original sample.
3.) We grabbed the 15 ml conical tube that contained our low volume lysate and drew up 10 μL and put it in the microcentrifuge tube that was labeled for our original sample.
4.) We arranged three microcentrifuge tubes and labeled them 100, 10-1….10-3. Then 90 μL of phage buffer was added to each tube except for the one containig the original sample.
5) Then we performed 10-fold serial dilutions. It started by taking 10 μL of the undiluted phage sample and adding it to the 10-1 tube and the vortexing it. This process continued through the 10-3 tube and making sure to vortex and change pipette tips after each dilution.
6.) The 10-3 dilutions had to be plated just like the plaque assay only since this plate was webbed in our Full plate titer. 10 μL of phage solution was micropipetted into 250 μL of host bacteria, the diluted phage and bacteria set for 8 minutes.
7.) Once the phage and bacteria bound together, a seriological syringe was used to collect 3 mL of top agar to dispense into the solution, then it was immediately aspirated back into the syringe.
8.) The agar was then dispersed onto agar plates and the plate was moved around to insure it covered the whole top surface of the plate.
Steps 6-8 were repeated 7 times (once for each plate).
9.) All six plates set for 15 minutes before being placed into the incubator at 2:10 pm and they stay in the incubator for 24-48 hours.
Results:
Plattes were checked on around 2:00 pm 10/25/22 and weren’t close to being webbed so they were left in overnigh and taken out 10/26/22.
Conclusions and Next Steps:
10/26/22: We will be collecting lysates from half of the plates and then puttinng the flooded plate contents directly on the other half and plating from what is gathered from that to try and increase our titer volume.
Title: Collecting Plate Lysates and Full Plate Titer
Date: 10/28/22 Redo: yes Sample: CS3
Purpose: The purpose of this procedure is to calculate the phage concentration, titer, of our phage lysate. The full plate titer is the most accurate method to determine the number of infectious phage in our lysate.
Notes:
1.) 8 ml of sterile phage buffer was applied to half of our webbed plates.
2.)The plate was left to sit at room temperature for about 2 hours.
3.) The phage bufffer was then swirled around gently.
4.) After the incubation was complete, the lid was removed. On the bench, the plate was tilted by placing it on the edge of the lid to allow the lysate to pool to one side.
5.) Using a 5 mL syringe to aspirate the lysate from the plate, and put it directly on one of the plates that hadn’t been flooded yet, so this step was repeated four times.
6.) The last four plates were left the sit overnight so they were put in the fridge.
7.) After sitting overnight, they were taken out of the fridge and the phage buffer was gentely swirled around.
8.) Using a 5 mL syringe to aspirate the lysate from the plate and we collected this and put it in a colonical tube without filtering it.
Then we proceded to the full plate titer procedure.
9.) We got seven microcentrifuge tubes and labeled them 100 to 10-6. Then each tube was filled with 90 μ besides the tube labeled 100
10.) Then we performed 10-fold serial dilutions. It started by taking 10 μL of the undiluted lysate and added it to the 10-1 tube and then vortexing it. This process continued through the 10-6 tube and making sure to vortex and change pipette tips after each dilution.
11.) The lysate and the 10-1 through 10-6 dilutions had to be plated just like the plaque assay. 10 μL of phage solution was micropipetted into 250 μL of host bacteria, the diluted phage and bacteria set for 8 minutes.
12.) Once the phage and bacteria bound together, a seriological syringe was used to collect 3 mL of top agar to dispense into the solution, then it was immediately aspirated back into the syringe.
13.) The agar was then dispersed onto agar plates and the plate was moved around to insure it covered the whole top surface of the plate.
Steps 11-13 were repeated 6 times, for each solution.
14.) All seven plates set for 15 minutes before being placed into the incubator at 11:30 am, and they stay in the incubator for 24-48 hours.
Results:
Our titer seems even lower than what we had before but we still calculated it anyways. We counted the same number of plaques as we did the first time we tried to get our high volume lysate.
Titer=
Titer (pfu/ml) = (81 pfu/10 μl) x (103 μl/ ml) x (103)
= (8.1 x 103 x 103) pfu/ml
= 8.1 106 pfu/ml
Conclusions and Next Steps:
10/28/22: We will still continue on to our TEM even though out lysate volume is low.
Title: Archiving our phage sample
Date: 11/2/22 Redo: No Sample: CS3A
Purpose: To have a high-titer lysate for long-term storage
Notes:
1.) We put gloves on, and to create an aseptic environment, we sprayed 70% Ethanol on the counter top then wiped it down with paper towels after letting it sit for 30 seconds. After the workspace was sanitized, gloves were removed and lit a gas canister.
2.) Before continuing we made sure that our phage was on Phagesdb.org and made sure that all of the information was correct and up to date.
3.) Next we obtained three barcoded tubes that had a label with our phage name, and our titer.
4.) Next we obtained 4ml of our high-titer lysate and put it in a 15 ml colonical tube.
5.) Then we moved to the fume hood to finish the rest of the steps.
6.) The DMSO we needed was locted in the hood. We added 280 μl of DMSO to the colonical tube containing the high-titer lysate. Then the tube was capped and inverted to mix it up.
7.) Next we pipetted 1ml of the DMSO/lysate mixture into each of the tubes using a 2ml serelogical pipette.
8.) Then we put them into the storage box provided.
Results:
Conclusions and Next Steps:
DNA Extraction
Title: DNA Isolation using ZnCl2
Date: 11/02/22 Redo: No Sample: CS3A
Purpose: To concentrate liquid phge samples prior to extracting DNA
Notes:
1.) We put gloves on, and to create an aseptic environment, we sprayed 70% Ethanol on the counter top then wiped it down with paper towels after letting it sit for 30 seconds. After the workspace was sanitized, we put a new pair of gloves on.
2.) We gently mixed our High Volume Lysate, then aliquoted 5ml of our lysate into a 15 ml colonical tube. Next we gave it to Marlee who added 20uL of nuclease mix to the colonical tube.
3.) Once the nuclease had been added, we gently inverted the tube then incubated it at 37°C for 10 minutes.
4.) Then we obtained 5 microcentrifuge tubes and aliquotted lysate into each tube, 1 mL each.
5.) To each tube we then added 20 uL of ZnCl2, then mixed gently by inversion, then incubated the tubes at 37°C for 5 minutes. This process “precipitates” the phage.
6.) Then we put it in the centrifuge to spin at 10,000rpm for 1 minute to peller the phage.
– Steps 7 and 8 had to be done quickly and efficiently.
7.) we kept the pellet but removed supernants by aspiration, without trying not to disturb the pellet. We discarded the liquid filled pipette tips in the sharps container.
8.) Next we resuspend the pellets in 500 uL TES buffer per tube, and incubated them for 15 minutes at 60°C. This will denature the capsids, exposing the DNA, while protecting it from the nuclease activity.
9.) Then we added 1uL of Proteinase K and mixed it gently. Then we incubated it at 37°C for 10 minutes to completely eliminate any residual nuclease activity.
10.) Next, we added 60uL of potassium acetate to each tube. Then mixed well and left itt on ice for 15 minutes. After this a white dense precipitate will form. This represents your capsid.
11.) Then we put it in the centrifuge at 4°C for 1 minute at 12,00rpm to pellet the capsids. We kept the supernants containing your DNA, and place into new microcentrifuge tubes. THen we threw away the tubes with the pellets.
12.) After that we added 500uL of isopropanol to each of the tubes with the supernatant, mixed, tthen left on ice overnight.
DAY TWO
13.) We put gloves on, and to create an aseptic environment, we sprayed 70% Ethanol on the counter top then wiped it down with paper towels after letting it sit for 30 seconds. After the workspace was sanitized, we put a new pair of gloves on.
14.) We centrifuged at top speed for 10 minutes to pellet DNA, and then discarded the supernatant into a waste tube.
15.) We added 250uL of 70% ethanol in each tube, and spun it again for 1 minute at top speed. This process washes your DNA pellet. Then we discarded the supernatants into a waster tube.
16.) We dried the DNA pellets at room temperature by turning the tubes upside-down onto paper towels, tapping out excess liquid, and leaving them upside-down until pellets begin to turn clear. The tubes can also be placed in a fume hood or 30⁰C in an incubator to helo with drying.
17.) We resuspended the first pellet in 50uL nuclease-free water. Them used that solution to resuspend the next pellet. We continued until all 5 pellets have been resuspended in the same 50uL of water.
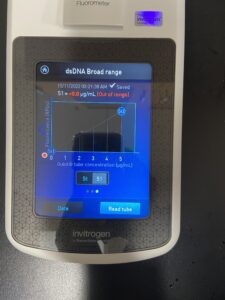
18.) Next we checked the DNA concentration and quality with the Nanodrop.
Results:
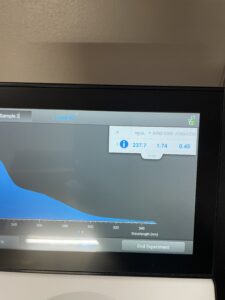
Conclusions and Next Steps: 11/03/22 Our levels were lower than we were wanting so we will redo the DNA extraction.
Title:DNA Isolation using ZnCl2
Date: 11/07/22 Redo: Yes Sample: CS3A
Purpose: To concentrate liquid phge samples prior to extracting DNA
Notes:
1.) We put gloves on, and to create an aseptic environment, we sprayed 70% Ethanol on the counter top then wiped it down with paper towels after letting it sit for 30 seconds. After the workspace was sanitized, we put a new pair of gloves on.
2.) We gently mixed our High Volume Lysate, then aliquoted 5ml of our lysate into a 15 ml colonical tube. Next we gave it to Marlee who added 20uL of nuclease mix to the colonical tube.
3.) Once the nuclease had been added, we gently inverted the tube then incubated it at 37°C for 10 minutes.
4.) Then we obtained 5 microcentrifuge tubes and aliquotted lysate into each tube, 1 mL each.
5.) To each tube we then added 20 uL of ZnCl2, then mixed gently by inversion, then incubated the tubes at 37°C for 5 minutes. This process “precipitates” the phage.
6.) Then we put it in the centrifuge to spin at 10,000rpm for 1 minute to peller the phage.
– Steps 7 and 8 had to be done quickly and efficiently.
7.) we kept the pellet but removed supernants by aspiration, without trying not to disturb the pellet. We discarded the liquid filled pipette tips in the sharps container.
8.) Next we resuspend the pellets in 500 uL TES buffer per tube, and incubated them for 15 minutes at 60°C. This will denature the capsids, exposing the DNA, while protecting it from the nuclease activity.
9.) Then we added 1uL of Proteinase K and mixed it gently. Then we incubated it at 37°C for 10 minutes to completely eliminate any residual nuclease activity.
10.) Next, we added 60uL of potassium acetate to each tube. Then mixed well and left itt on ice for 15 minutes. After this a white dense precipitate will form. This represents your capsid.
11.) Then we put it in the centrifuge at 4°C for 1 minute at 12,00rpm to pellet the capsids. We kept the supernants containing your DNA, and place into new microcentrifuge tubes. THen we threw away the tubes with the pellets.
12.) After that we added 500uL of isopropanol to each of the tubes with the supernatant, mixed, tthen left on ice overnight.
DAY TWO
13.) We put gloves on, and to create an aseptic environment, we sprayed 70% Ethanol on the counter top then wiped it down with paper towels after letting it sit for 30 seconds. After the workspace was sanitized, we put a new pair of gloves on.
14.) We centrifuged at top speed for 10 minutes to pellet DNA, and then discarded the supernatant into a waste tube.
15.) We added 250uL of 70% ethanol in each tube, and spun it again for 1 minute at top speed. This process washes your DNA pellet. Then we discarded the supernatants into a waster tube.
16.) We dried the DNA pellets at room temperature by turning the tubes upside-down onto paper towels, tapping out excess liquid, and leaving them upside-down until pellets begin to turn clear. The tubes can also be placed in a fume hood or 30⁰C in an incubator to helo with drying.
17.) We resuspended the first pellet in 50uL nuclease-free water. Them used that solution to resuspend the next pellet. We continued until all 5 pellets have been resuspended in the same 50uL of water.
18.) Next we checked the DNA concentration and quality with the Nanodrop.
Results:
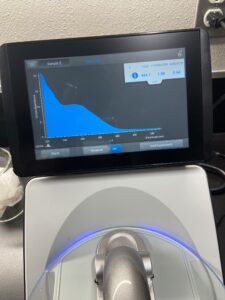
Conclusions and Next Steps: Our levels are lower than we were wanting so once again we will redo our DNA extracrtion except this time we will do the prtocol 3 seperate times at one time in hopes to raise our levels.
Title:DNA Isolation using ZnCl2
Date: 11/14/22 Redo: Yes Sample: CS3A
Purpose: To concentrate liquid phge samples prior to extracting DNA
Notes:
1.) We put gloves on, and to create an aseptic environment, we sprayed 70% Ethanol on the counter top then wiped it down with paper towels after letting it sit for 30 seconds. After the workspace was sanitized, we put a new pair of gloves on.
2.) We gently mixed our High Volume Lysate, then aliquoted 5ml of our lysate into a 15 ml colonical tube. Next we gave it to Marlee who added 20uL of nuclease mix to the colonical tube.
3.) Once the nuclease had been added, we gently inverted the tube then incubated it at 37°C for 10 minutes.
4.) Then we obtained 5 microcentrifuge tubes and aliquotted lysate into each tube, 1 mL each.
5.) To each tube we then added 20 uL of ZnCl2, then mixed gently by inversion, then incubated the tubes at 37°C for 5 minutes. This process “precipitates” the phage.
6.) Then we put it in the centrifuge to spin at 10,000rpm for 1 minute to peller the phage.
– Steps 7 and 8 had to be done quickly and efficiently.
7.) we kept the pellet but removed supernants by aspiration, without trying not to disturb the pellet. We discarded the liquid filled pipette tips in the sharps container.
8.) Next we resuspend the pellets in 500 uL TES buffer per tube, and incubated them for 15 minutes at 60°C. This will denature the capsids, exposing the DNA, while protecting it from the nuclease activity.
9.) Then we added 1uL of Proteinase K and mixed it gently. Then we incubated it at 37°C for 10 minutes to completely eliminate any residual nuclease activity.
10.) Next, we added 60uL of potassium acetate to each tube. Then mixed well and left itt on ice for 15 minutes. After this a white dense precipitate will form. This represents your capsid.
11.) Then we put it in the centrifuge at 4°C for 1 minute at 12,00rpm to pellet the capsids. We kept the supernants containing your DNA, and place into new microcentrifuge tubes. THen we threw away the tubes with the pellets.
12.) After that we added 500uL of isopropanol to each of the tubes with the supernatant, mixed, tthen left on ice overnight.
– Steps 2-12 were repeated 3 times so we had a total of 15 microcentrifuge tubes.
DAY TWO
13.) We put gloves on, and to create an aseptic environment, we sprayed 70% Ethanol on the counter top then wiped it down with paper towels after letting it sit for 30 seconds. After the workspace was sanitized, we put a new pair of gloves on.
14.) We centrifuged at top speed for 10 minutes to pellet DNA, and then discarded the supernatant into a waste tube.
15.) We added 250uL of 70% ethanol in each tube, and spun it again for 1 minute at top speed. This process washes your DNA pellet. Then we discarded the supernatants into a waster tube.
16.) We dried the DNA pellets at room temperature by turning the tubes upside-down onto paper towels, tapping out excess liquid, and leaving them upside-down until pellets begin to turn clear. The tubes can also be placed in a fume hood or 30⁰C in an incubator to helo with drying.
17.) We resuspended the first pellet in 50uL nuclease-free water. Them used that solution to resuspend the next pellet. We continued until all 5 pellets have been resuspended in the same 50uL of water.
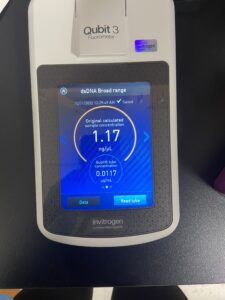
18.) Next we checked the DNA concentration and quality with the Nanodrop.
Results:
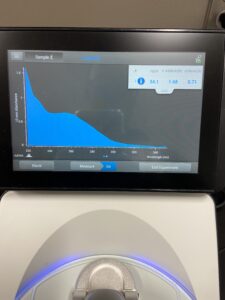
Conclusions and Next Steps:
Characterization
Title: Setting Up Restriction Enzyme Digests
Date: 11/14/22 Redo: No Sample: CS3A
Purpose: To cut your phage genome into multiple fragments based on its DNA sequence
Notes:
1.) We put gloves on, and to create an aseptic environment, we sprayed 70% Ethanol on the counter top then wiped it down with paper towels after letting it sit for 30 seconds. After the workspace was sanitized, we put a new pair of gloves on.
2.) We then prepared our genomic DNA by gently mixing your DNA sample by flicking the closed tube with our finger.
3.) Next we incubated the tubes at 65°C for 10 minutes, and then we quicckly placed it on ice. After we spun the tubes in the microcentrifuge for less than 1 minute to move all of the liquid to the botttom of the tube.
4.) Using the concentraion of our DNA smaple, we calaculated the volume of DNA smaple needed to obtain 0.5 µg of DNA.
Next we set up restriction enzyme digest reactions.
5.) We set up a reaction in a microcentrifugr tube for each enzyme according to the table that was given
|
Solution |
Volume |
|
Sterile ddH2O |
To final volume of 25 µl |
|
10X Reaction Buffer |
2.5 µl |
|
Restriction Enzyme |
0.5 µl |
|
Phage Genomic DNA |
Equivalent to 0.5 µg |
Conclusions and Next Steps:Everything went as planned so we will continue on the the gel tomorrow (11/15/22)
Title: Casting Agarose Gels
Date: 11.15.22 Redo: No Sample: CS3A
Purpose: To prepare an agarose gel for electrophoresis
Notes:
1.)We put gloves on, and to create an aseptic environment, we sprayed 70% Ethanol on the counter top then wiped it down with paper towels after letting it sit for 30 seconds. After the workspace was sanitized, we put a new pair of gloves on.
2.) We poured 0.8% (w/v) agarose gel.
– We set up the gel apparatus according to your incrustor’s directions
– Then we prepared enpugh 0.8% agarose gel to cover the tips of the gel combs by about 2-3mm.
– We weighed out the appropriate mass of the agarose powder, and then transfered it to an Erlenermyer flask.
– Then we added the appropriate volume of 1X TBE buffer to the agarose powder. Then we swirled it to gently mix it.
– Then we heated the mixture in the microwave just until it boils which took about 1 minute. As soon as it boiled we took it out.
– Using some heat resistant glove we carefully removed the flask from the microwave.
– Next we gently, swirled it to mix and then examined the solution for small transparent clumps.
– We chhecked the volume of the solution. Since it didn’t decrease at all we didn’t have to add any ddH2O to bring the level of the solution back up.
– We allowed the solution to cool between 50 °C and 60 °C which means it was very warm but not warm enough to burn. This took about 10 mins.
3.) Once the solution is sufficiently cool, we put on latex gloves and added the gel dye which was ethidium bromide.
– Since we were using ethidium bromide as a DNA dye, we had to add enough to achieve a final concentration of 0.5 μg/ml in the agarose solution. Then we swirled it to mix it.
4.) We poured the agarose/ EtBr mixture into the prepared gel apparatus, being careful not to introduce any bubbles. We inserted the comb to cast the wells.
5.) Then we allowed the gel to cool for 20-30 minutes
6.) Once the gel had solidified, we very carefully removed the comb by pulling it slowly straight up. Once the comb is removed we gently lifted the gel platform out of the casting tray.
7.) We placed the platform with the solidified gel into the box. We put the wells at the (-) cathode end of the box, where the black lead is connected.
8.) Lastly, we poured the 1X TBE buffer into the gek apparatus until your gel is sumberged by about 1/4 inch of buffer.
Results: N/A
Conclusions and Next Steps: We load thhe wells and continue on to competing the gel
Title: Gel Electrophoresis of Restriction Enzyme Digests
Date: 11/15/2022 Redo: No Sample: CS3A
Purpose: The purpose of this procedure is to separate the DNA fragments via agrose gel electrophoresis.
Notes:
1.) The restriction enzyme digest smaples were prepared for electrophoresis by adding 5 μl of concentrated 6x loading dye to each 25 μl restriction enzyme sample.
2.) The samples were then placed in a heat block set at 65°C for 5 minutes. Then immediately placed in ice to cool. Once the samples were cool, the were placed in a microcentrifudge for about 15 seconds at 10,000 rpm.
3.) The gel was loaded in the following order: Ladder, uncut, SacII, SalI, NSPI, MSEI, HaeIII.
4.) The ladder was made with 1 μl of the ladder DNA and 24 μl of nuclease free water.
5.) Using a fresh micropipette tip for each sample, 20 μl of each restriction enzyme sample was pipetted into the wells in the order above.
a.) The pipette was help in both hands, and both elbows were placed on either side of the gel apparatus.
b.)The eyes were situated directly above the wells to make it easier to see them.
c.) The pipette was placed directly above the well, just below the surface of the buffer.
d.) The pipette plunger was slowly depressed, allowing the solution to slowly sink into the wells.
e.) The pipette was removed from the gel before releasing the plunger.
6.) The electrodes were plugged into the appropriate locations on the power supply. The the power supply was turned on and the voltage was set to 100 V.
7.) The gel was ran until the blue dye front has migrated at least 3.5 inches from the well. The gel was ran for about an hour and 15 minutes.
8.) Then the power supply was turned off.
9.) To photograph the gel, we put on gloves to remove the gel from the electrophoresis champer.
10.) Then we placed the gel under a UV light in a dark room to observe the bands.
Results:
Positive Results
Results of the gel were viewed at 4:50 0n 11/15/2022
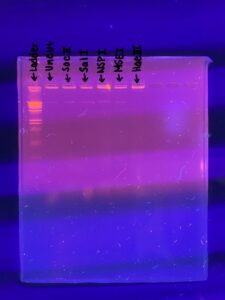
Conclusions and Next Steps:
The next steps are to vote on three phage samples based on DNA concentration and gel results to send off for sequencing.