Discovery of Fizzles
Fizzles Information
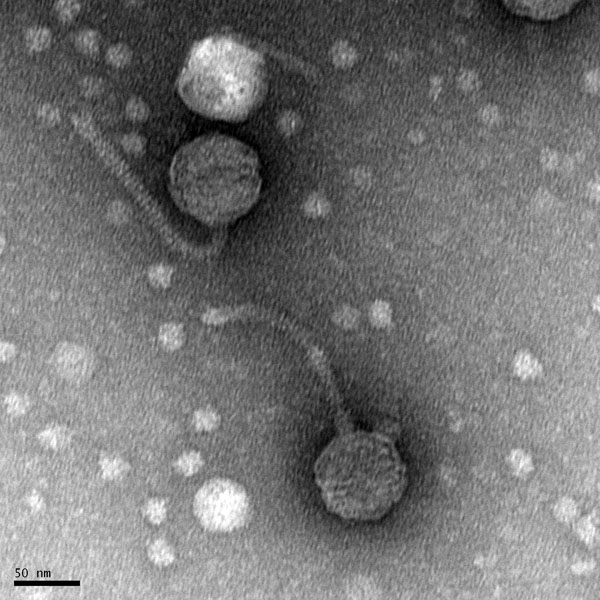
Morphology: Siphovirus
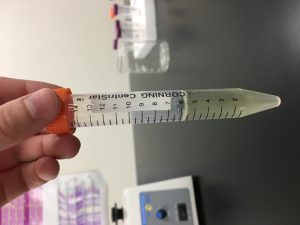
Sample Collection
| Collector Name |
Gabrielle Spotz | Gabrielle Spotz | Skyler Adams | Skyler Adams | Gabrielle Spotz | Gabrielle Spotz |
| Sample No. | 1 | 2 | 3 | 4 | 5 | 6 |
| Date of Collection | 8/31/2019 | 9/2/2019 | 9/2/2019 | 9/8/2019 | 9/8/2019 | 9/15/2019 |
| Sample Type | Soil (horse poop) | Wet soil | Damp soil | Water | Wet Soil | Dry Soil |
| General Location | Horse pasture | Forest or park (very dirty water) | Subdivision | Park | Park | Subdivision |
| Location Description | Horse pasture | Boski riverbed | Pecan Creek bed | Boski River (dirty slowly flowing water) | Boski riverbed | Plant bed |
| GPS Coordinates | 32.3872, -98.3370 | 32.2160, -98.2017 | 33.6136954, -97.138279 | 32.2160, -98.2017 | 32.2159, -98.1989 | 32.2197, -98.1989 |
| Sample Depth | Surface level | 18 cm below ground | 5 cm below ground | Surface of Water | 12.5 cm below ground | 6.3 cm below ground |
| Ambient Temperature | 27.8°C | 33.3°C | 32.8°C | 34.0°C | 34.0°C | 34.0°C |
| Collector Name | Gabrielle Spotz | Skyler Adams | ||||
| Sample No. | 7 | 8 | ||||
| Date of Collection | 9/15/2019 | 9/15/2019 | ||||
| Sample Type | Dry Soil | Slightly Damp Soil | ||||
| General Location | Subdivision | Park | ||||
| Location Description | Small Ant Hill | Under Bush with Ants | ||||
| GPS Coordinates | 32.2197, -98.1989 | 32.2174489, -98.2148324 | ||||
| Sample Depth | Surface of Ant Hill | 3 cm below ground | ||||
| Ambient Temperature | 34.0°C | 32.8°C |
Isolation/Purification
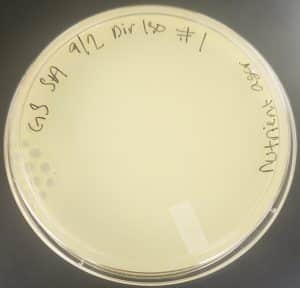
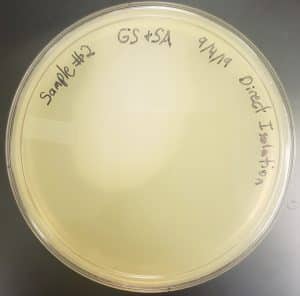
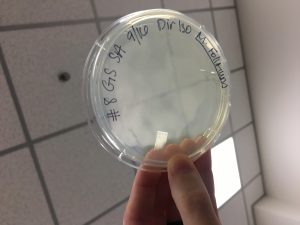
Title: Direct Isolation
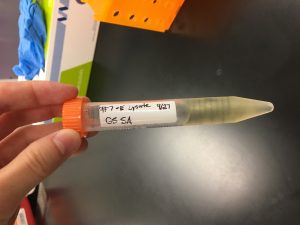
Date Started: 9/4/2019 Redo? Yes Sample: 1 and 2
Purpose: This procedure is to extract phages from the environmental sample and infect the host bacteria using a plaque assay.
Notes:
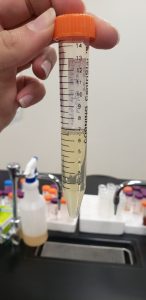
1) For direct isolation, sample number 1 was used. The tube sample had too much volume, so it was exposed to air for an extended period of time while the excess sample was removed from the original tube. There was some difficulty in the beginning with staying near the flame of the bunsen burner in the beginning.
2) Liquid media was serologically pipetted into the 15 ml conical tube of sample until it was submerged in 2-3 ml of liquid.
3) Tube was inverted to mix.
4) The tube was then incubated in a ~250 rpm shaking incubator at 10:30 am.
5) Next, the soil sample was taken out of the incubator at 12:30 pm to sit and separate for the the plaque assay. (This component had to be redone 2 times, because the first time the top agar solidified before spreading throughout the plate.)
6) After the fluid separated from the soil, ~2 ml fluid was removed from the top of the soil sample tube via a syringe.
7) The syringe was then attached to the top of the the 0.22 micrometer filter and about 1.0 ml of filtered fluid was added to the microcentrifuge tube.
8) Next, 500 microliters was pipetted from the microcentrifuge tube into the 250 microliters of host bacteria. Then the filtered phage and bacteria were left to sit for 10 minutes.
9) After the host bacteria and phage joined, 3 ml of top agar was added to the mixture and then immediately distributed across the agar plate and moved around slightly for equal distribution. It should be noted that there might have been the wrong pipetted amount of top agar (should have been 3 ml but might have been slightly over that amount).
10) Finally, the agar plate with host bacteria and phage was placed in the incubator at 2:22 pm at 23-30 degrees celsius.
The entire procedure had to be redone, because the wrong agar plate was used (nutrient agar which will not permit growth). However, another mistake was made and sample 1 was used again when sample 2 was supposed to be used. Here is the 2nd redo:
1) Sample 1 was mistakenly used again for the 2nd redo.
2) Liquid media was serologically pipetted into the 15 ml conical tube of sample until it was submerged in 2-3 ml of liquid.
3) Tube was inverted to mix.
4) The tube was then incubated in a ~250 rpm shaking incubator at ~2:45 pm.
5) When the tube was retrieved at ~ 4:30 pm, it was then discovered that the wrong sample had been used.
Thus, the entire procedure was repeated for a 3rd time due to mistake in the first step above:
1) This time, the correct sample 2 was use.
2) Liquid media was serologically pipetted into the 15 ml conical tube of sample until it was submerged in 2-3 ml of liquid.
3) Tube was inverted to mix.
4) The tube was then incubated in a ~250 rpm shaking incubator at 4:45 pm.
5) Next, the soil sample was taken out of the incubator at 6:00 pm to sit and separate for the the plaque assay.
6) After the fluid separated from the soil, ~2.5 ml fluid was removed from the top of the soil sample tube via a syringe.
7) The syringe was then attached to the top of the the 0.22 micrometer filter and about 2.0 ml of filtered fluid was added to a 15 ml conical tube.
8) Next, 500 microliters of filtrate was pipetted from the conical tube tube into the 250 microliters of host bacteria. Then the filtered phage and bacteria were left to sit for 10 minutes.
9) After the host bacteria and phage joined, 3 ml of top agar was added to the mixture and then immediately distributed across the agar plate and moved around slightly for equal distribution. Some top agar got on the lid.
10) Finally, the agar plate with host bacteria and phage was placed in the incubator at ~7:30 pm at 23-30 degrees celsius.
Results:
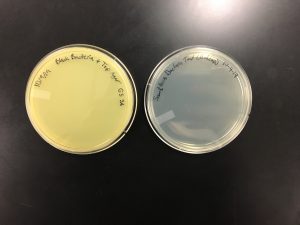
Negative results from nutrient agar plate 9/6/2019:
Unfortunately, on 9/6/2019 when the plaque assay of sample 2 was checked, it was contaminated. Results were negative, and the procedure could not be completely finished due to contamination:
Conclusions and Next Steps:
9/8/2019 The next step will be to obtain 2 other soil samples, because all 3 original samples have been used. The entire procedure will be repeated to hopefully discover the presence of phages so that a plaque may be picked.
Title: Direct Isolation
Date: 9/13/2019 Redo: No Sample: 4
Purpose: This procedure is to extract phages from the environmental sample and infect the host bacteria using a plaque assay.
Notes:
1) Sample number 4 was used (liquid sample). The tube sample had too much volume, so it was exposed to air for an extended period of time while the excess sample was transferred to a second 15 ml conical tube. This tube was labeled sample 4-T.
2) ~2 ml fluid was removed from the top of the sample tube via a syringe. This step was repeated 3 different times due to mistakes made. This is why sample 4 and 4-T were used.
3) A syringe was then attached to the top of a 0.22 micrometer filter for sample 4 and about 0.5 ml of filtered fluid was added to a microcentrifuge tube. Another syringe was attached to the top of a 0.22 micrometer filter for sample 4-T and about 1.0 ml of filtered fluid was added to a microcentrifuge tube.
4) Next, 0.5 ml (500 microliters) was pipetted from the microcentrifuge tubes of sample 4 and sample 4-T into two separate 250 microliters of host bacteria tubes. The bacterial tubes were made sure to be mixed first. Then the filtered phage and bacteria were left to sit for 5 minutes.
5) After the host bacteria and phage joined, 3 ml of top agar was added to both of the mixtures individually and then immediately distributed across the two labeled agar plates and moved around slightly for equal distribution. Both plates were then left to sit for 20 minutes.
6) Finally, both agar plates with host bacteria and phage sample 4 and 4-T were placed in the incubator at 11:10 am at 23-30 degrees celsius.
Results:
9/16/2019 Negative Results Sample 4:
9/16/2019 Negative Results Sample 4-T:

Conclusion and Next Steps:
For Monday, 9/16/2019, the next steps will be to look for phages and hopefully move on to the purification process. Otherwise, another sample will be isolated.
Title: Direct Isolation
Date: 9/13/2019 Redo: No Sample: 5
Purpose: This procedure is to extract phages from the environmental sample and infect the host bacteria using a plaque assay.
Notes:
1) Sample 5 was used (soil sample).
2) Liquid media was serologically pipetted into the 15 ml conical tube of sample until it was submerged in 2-3 ml of liquid.
3) Tube was inverted to mix. While mixing, the tube cracked and begin to leak so the sample with liquid media was transferred to another sterile 15 ml conical tube and labeled accordingly.
4) The tube was then incubated in a ~250 rpm shaking incubator at 9:45 am.
5) Next, the soil sample was taken out of the incubator at 10:45 am.
6) After the fluid separated from the soil, ~2 ml fluid was removed from the top of the soil sample tube via a syringe.
7) The syringe was then attached to the top of the the 0.22 micrometer filter and about 0.5 ml of filtered fluid was added to the microcentrifuge tube.
8) Next, 0.5 ml (500 microliters) was pipetted from the microcentrifuge tube into the 250 microliters of host bacteria. Then the filtered phage and bacteria were left to sit for 5 minutes.
9) After the host bacteria and phage joined, 3 ml of top agar was added to the mixture and then immediately distributed across the agar plate and moved around slightly for equal distribution. The plate was left undisturbed for 20 minutes.
10) Finally, the agar plate with host bacteria and phage was placed in the incubator at 11:30 am at 23-30 degrees celsius.
Results:
9/16/2019 Negative Results Sample 5:

Conclusion and Next Steps:
For Monday, 9/16/2019, the next steps will be to check for phages and hopefully move on to the purification process. Otherwise, another sample will be isolated.
Title: Direct Isolation
Date: 9/16/2019 Redo? No Sample: 8
Purpose: This procedure is to extract phages from the environmental sample and infect the host bacteria using a plaque assay.
Notes:
1) Sample number 8 was used (solid sample).
2) Liquid media was serologically pipetted into the 15 ml conical tube of sample until it was submerged in 2-3 ml of liquid.
3) Tube was inverted to mix.
4) The tube was then incubated in a ~250 rpm shaking incubator at 9:45 am.
5) Next, the soil sample was taken out of the incubator at 10:45 am to sit.
6) ~2 ml fluid was removed from the top of the soil sample tube via a syringe.
7) The syringe was then attached to the top of the the 0.22 micrometer filter and about 1.0 ml of filtered fluid was added to the microcentrifuge tube. This step was repeated to re-filter the phage supernatant into another sterile microcentrifuge.
8) Next, 0.5 ml (500 microliters) was pipetted from the microcentrifuge tube into the 250 microliters of host bacteria. Then the filtered phage and bacteria were left to sit for 5 minutes.
9) After the host bacteria and phage joined, 3 ml of top agar was added to the mixture and then immediately distributed across the agar plate and moved around slightly for equal distribution. The agar plate was left to sit for 20 minutes, but did not solidify. Thus, it had to be thrown out.
Results:
9/16/2019 Negative Results Sample 8 (top agar did not solidify):
Conclusion and Next Steps:
Next steps will be to do a direct isolation on sample 6 and 7.
Title: Direct Isolation
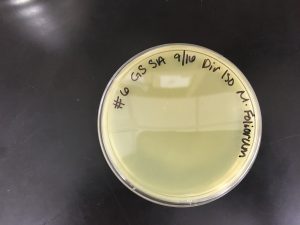
Date: 9/16/2019 Redo? No Sample: 6
Purpose: This procedure is to extract phages from the environmental sample and infect the host bacteria using a plaque assay.
Notes:
1) Sample number 6 was used (solid sample).
2) Liquid media was serologically pipetted into the 15 ml conical tube of sample until it was submerged in 2-3 ml of liquid.
3) Tube was inverted to mix.
4) The tube was then incubated in a ~250 rpm shaking incubator at 4:30 pm.
5) Next, the soil sample was taken out of the incubator at 6:00 pm to settle.
6) ~3 ml fluid was removed from the top of the soil sample tube via a syringe.
7) The syringe was then attached to the top of the the 0.22 micrometer filter and about 1.0 ml of filtered fluid was added to each of 2 microcentrifuge tubes.
8) Next, 0.5 ml (500 microliters) was pipetted from the microcentrifuge tube into the 250 microliters of host bacteria. Then the filtered phage and bacteria were left to sit for 5 minutes.
9) After the host bacteria and phage joined, 3 ml of top agar was added to the mixture and then immediately distributed across the agar plate and moved around slightly for equal distribution. The agar plate was left to sit for 20 minutes. It was then inverted and placed in an incubator at 7:00 pm.
Results:
9/16/2019 Negative Results of Sample 6.
Conclusion and Next Steps:
This is a negative sample, so the positive sample 7 and an adopted sample will be used in the purification process and serial dilutions.
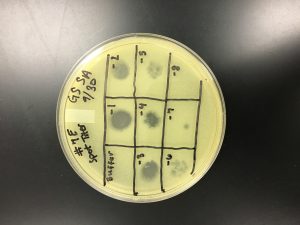
Title: Direct Isolation
Date: 9/16/2019 Redo? No Sample: 7
Purpose: This procedure is to extract phages from the environmental sample and infect the host bacteria using a plaque assay.
Notes:
1) Sample number 7 was used (solid sample).
2) Liquid media was serologically pipetted into the 15 ml conical tube of sample until it was submerged in 2-3 ml of liquid.
3) Tube was inverted to mix.
4) The tube was then incubated in a ~250 rpm shaking incubator at 4:30 pm.
5) Next, the soil sample was taken out of the incubator at 6:00 pm to settle.
6) ~3 ml fluid was removed from the top of the soil sample tube via a syringe.
7) The syringe was then attached to the top of the the 0.22 micrometer filter and about 1.0 ml of filtered fluid was added to each of 2 microcentrifuge tubes.
8) Next, 0.5 ml (500 microliters) was pipetted from the microcentrifuge tube into the 250 microliters of host bacteria. Then the filtered phage and bacteria were left to sit for 5 minutes.
9) After the host bacteria and phage joined, 3 ml of top agar was added to the mixture and then immediately distributed across the agar plate and moved around slightly for equal distribution. The agar plate was left to sit for 20 minutes. It was then inverted and placed in an incubator at 7:00 pm.
Results:

Conclusion and Next Steps:
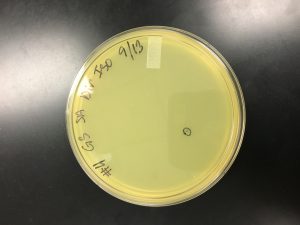
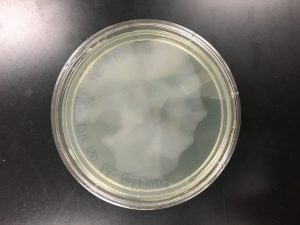
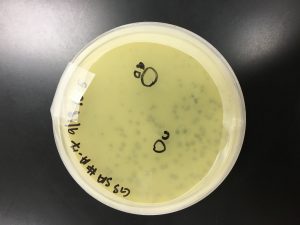
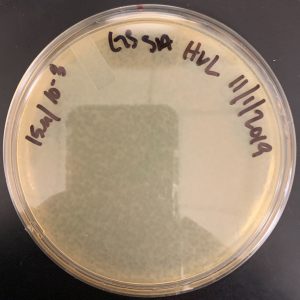
Because sample 7 was positive with two zones of clearing, or plaques, this sample will be used during the purification process. The bigger zone of clearing was chosen and labeled “Plaque A.” It was turbid, medium in size with a distinct edge, and it had a light, small circle in the center.
Title: Enriched Isolation
Date Started: Sep. 04, 2019 Redo? No Sample: 3
Purpose: To amplify and isolate phages present in the environmental sample and infect the host bacteria.
Notes:
1) In the enrichment isolation, sample number 3 was used.
2) The sample was distributed in to a 50 ml conical tube.
3) Liquid media was poured into the 50 ml tube of sample to the 35 ml mark.
4) The sample was then placed in the vortex for about a minute.
5) The sample was put into a shaking incubator at ~250 rpm at 11:00 am.
6) The sample was taken out of the incubator at ~3:00 pm, so it may have been shaken too long.
7) Next, the tubes were balanced and centrifuged at 2000 x g for 10 minutes to pellet most of the soil.
8) The supernatant was filtered through a 0.22 micrometer filter to remove any unwanted bacteria or soil and the filtrate was collected into a 50 ml sterile conical tube (~ 22 ml was collected).
9) 0.5 ml of bacterial host was then poured into the conical tube of filtered supernatant.
10) The conical tube was then placed in the incubator again at ~220 rpm at ~3:30 pm for 5 days. The tube was properly aerated by leaving the cap loose with tape.
Date: 9/9/2019 (Day 2)
11) Next, the culture was filtered for the spot test.
12) 1.4 ml of the enriched culture from the 50 ml conical tube was transferred to a microcentrifuge tube.
13) This procedure was repeated so that there were two microcentrifuge tubes, each with 1.4 ml of enriched culture.
14) Next, the tubes were spun at high speed in the microcentrifuge for 1 minute to pellet the bacteria.
15) The supernatant was transferred into two clean microcentrifuge tubes, avoiding the bacterial pellet.
It should be noted that the second transfer to a clean microcentrifuge was contaminated by accidentally touching the pipette tip, thus steps 11-15 were repeated for the second transfer of supernatant into a clean microcentrifuge.
16) The spot test was then performed for the two filtered supernatants for sample 3.
17) The bottom of an agar plate was then labeled accordingly. The plate was divided into two sections for the two samples.
18) 250 μl culture of host bacteria were obtained. Using a sterile 5 ml pipette, 3 ml of molten top agar was transferred to the culture tube containing host bacteria and then immediately the solution was drawn back into the same pipette. Bubbles were avoided.
19) The top agar-bacteria mixture in the pipette was immediately transferred onto an agar plate and then gently moved around to evenly coat the mixture. The plate was accidentally turned upside down briefly.
20) Next, the plate sat undisturbed for 20 minutes to wait for the agar to solidify.
To be noted: this agar plate had to be tossed and steps 17-20 must be repeated. The microcentrifuge tubes of supernatant were placed in a 4 degrees celsius fridge until the spot test could be completed.
Date: 9/11/2019
Steps 17-18 were repeated.
17) The bottom of an agar plate was then labeled accordingly. The plate was divided into two sections for the two samples.
18) 250 μl culture of host bacteria were obtained. Using a sterile 5 ml pipette, 3 ml of molten top agar (shaken first) was transferred to the culture tube containing host bacteria and then immediately the solution was drawn back into the same pipette. Bubbles were avoided.
19) The top agar-bacteria mixture in the pipette was immediately transferred onto an agar plate and then gently moved around to evenly coat the mixture. The plate was accidentally turned upside down briefly.
20) Next, the plate sat undisturbed for 20 minutes to wait for the agar to solidify.
21) Phage samples were spotted on to the prepared bacterial lawn by transferring 10 μl of each sample, onto the proper location on the bacterial lawn.
22) Agar plate was immediately placed into incubator at 10 am on 9/11/2019. It was not allowed to sit for 10-15 minutes to absorb as directed in the lab manual. The plate was put into the incubator agar side down without inverting it.
23) After 24 hours the spot plates were checked for clearings and phages on 9/13/2019. This is yet to be determined.
Results:
9/13/2019 Negative, contaminated results:

Conclusions and Next Steps:
9/9/2019 Due to negative results, multiple direct isolations will be performed to speed up the process of finding a plaque.
Phage Purification
Title: Plaque Assay for Purification
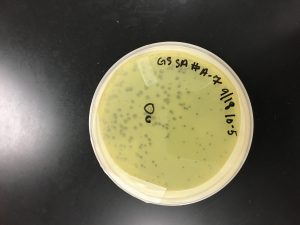
Date Started: 9/18/2019 Redo? No Sample: 7 Plaque: A
Purpose: To generate well-isolated plaques and to ensure a clonal phage population is obtained. The process involves serially diluting a picked plaque, and then performing a plaque assay with the diluted samples. This process will be repeated two times.
Notes:
1) A circle was drawn around the plaque of interest on the bottom the bottom of the plate and labeled Plaque A. The picking a plaque protocol was followed to retrieve phage particles from a plaque and create a liquid sample. The details of the plaque morphology were recorded.
Plaque A – turbid; small to medium in size; distinct edge with a light, small circle in the center:

a. A microcentrifuge tubes was labeled “A.” 100 microliters of phage buffer was aliquoted into the microcentrifuge tube.
b. A plaque was picked that was far away from other plaques (1.5 cm apart) from a fresh sample.
c. A sterile tip on a micropipettor was perpendicular to the agar surface when it was gently stabbed onto the top agar in the center of the plaque. The surrounding bacteria was avoided.
d. The end of the tip was then placed into the phage buffer of microcentrifuge tube A and tapped along the wall to dislodge phage. The tip was discarded and the tube was mixed by vortexing.
2) Next, this liquid phage sample was diluted according to the serial dilutions protocol.
a. 10-fold serial dilutions were then set up. The proper number of microcentrifuge tubes were arranged in a rack and labeled 10-1 through 10-8.
b. 90 microliters of phage buffer was added to each of the tubes.
c. The 10-fold serial dilutions were then performed. 10 microliters of undiluted phage sample was added to the 10-1 tube and vortexed. This was done all the way through the 10-8 tube. A clean pipette tip was used each time and the tube was vortexed before making each dilution.
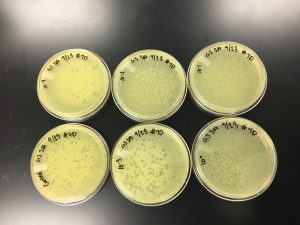
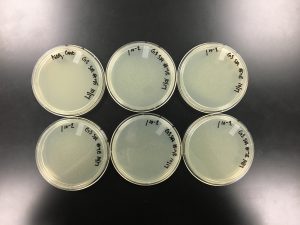
3) Next, the serial dilutions of plaque A had to be plated according to the plaque assay protocol. Nine agar plates were obtained and labeled on the bottom with our names, the date, and a reference to the sample. Each of the plates was done according to the protocol below.
a. 10 microliters was pipetted from the microcentrifuge tube into the 250 microliters of host bacteria. Then the filtered phage and bacteria were left to sit for 5 minutes.
To be noted: 10-6 tube had to be redone.
b. After the host bacteria and phage joined, 3 ml of top agar was added to the mixture and then immediately distributed across the agar plate and moved around slightly for equal distribution. The agar plate was left to sit for 20 minutes.
c. All of the nine agar plates with the plated phage were then placed into the incubator at 11:50 am.
Results:
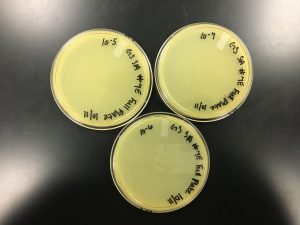
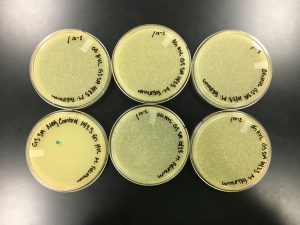
9/20/2019 Positive from this set of serial dilutions. The morphology of each plate differs in size. The plaques seemed to be along one side only. A few plates did not appear to have any plaques. Some plates had many plaques and others had a few. Some plaques were large and turbid while others were small and clear.
10^0 had an uncountable number of plaques.
10^-1 had an uncountable number of plaques.
10^-2 had an uncountable number of plaques.
10^-3 had ~5 plaques.
10^-4 had ~200 plaques.
10^-5 had ~200 plaques.
10^-6 had no plaques.
10^-7 had ~1 plaque.
10^-8 had no plaques.

Conclusion and Next Steps:
For the next experiment, the 10-5 dilution was chosen for the second set of serial dilutions. The rest of the plates were para-filmed and refrigerated. After the second set of serial dilutions of Plaque C, the next experiment will be to hopefully collect plate lysates. There may have been error when diluting because the number of plaques on each plate does not follow the expected pattern of the serial dilutions. Considering that there are different morphologies represented on the plates, there are likely multiple different phages.
How many plaques are on each plate? Do the number of plaques on your plates follow the expected pattern of your serial dilutions. Do all your plaques share the same morphology? If you have more than one morphology, how do they differ? If you think you still have more than one kind of phage in your sample, what should you do next?
Title: Plaque Assay for Purification
Date Started: 9/18/2019 Redo? No Sample: Adopted sample 8 from Kristin Sefcik; see Kristin Sefcik’s lab notebook for the direct isolation process. Plaque: B
Purpose: To generate well-isolated plaques and to ensure a clonal phage population is obtained. The process involves serially diluting a picked plaque, and then performing a plaque assay with the diluted samples. This process will be repeated two times.
Notes:
1) A circle was drawn around the plaque of interest on the bottom the bottom of the plate and labeled Plaque A. The picking a plaque protocol was followed to retrieve phage particles from a plaque and create a liquid sample. The details of the plaque morphology were recorded.
Plaque B – clear; small; well-defined edges; small:

a. A microcentrifuge tubes was labeled “B.” 100 microliters of phage buffer was aliquoted into the microcentrifuge tube.
b. A plaque was picked that was far away from other plaques (1.5 cm apart) from a fresh sample.
c. A sterile tip on a micropipettor was perpendicular to the agar surface when it was gently stabbed onto the top agar in the center of the plaque. The surrounding bacteria was avoided.
d. The end of the tip was then placed into the phage buffer of microcentrifuge tube A and tapped along the wall to dislodge phage. The tip was discarded and the tube was mixed by vortexing.
2) Next, this liquid phage sample was diluted according to the serial dilutions protocol.
a. 10-fold serial dilutions were then set up. The proper number of microcentrifuge tubes were arranged in a rack and labeled 10-0 through 10-8.
b. 90 microliters of phage buffer was added to each of the tubes.
c. The 10-fold serial dilutions were then performed. 10 microliters of undiluted phage sample was added to the 10-1 tube and vortexed. This was done all the way through the 10-8 tube. A clean pipette tip was used each time and the tube was vortexed before making each dilution.
3) Next, the serial dilutions of plaque A had to be plated according to the plaque assay protocol. Nine agar plates were obtained and labeled on the bottom with our names, the date, and a reference to the sample. Each of the plates was done according to the protocol below.
a. 10 microliters was pipetted from the microcentrifuge tube into the 250 microliters of host bacteria. Then the filtered phage and bacteria were left to sit for 5 minutes.
b. After the host bacteria and phage joined, 3 ml of top agar was added to the mixture and then immediately distributed across the agar plate and moved around slightly for equal distribution. The agar plate was left to sit for 20 minutes.
To be noted: 10-1 did not cover fully with top agar all of the way. A small portion was left uncovered.
c. All of the nine agar plates with the plated phage were then placed into the incubator at 12:10 pm.
Results:
9/20/2019 Positive results from Kristin’s adopted phage were not used for the next experiment. They were para-filmed and refrigerated. The morphology was not uniform throughout all of the plates. These plaques appeared to be both large and small in size and both clear and turbid. Every plate had plaques.
10^0 had an uncountable number of plaques.
10^-1 had ~400 plaques.
10^-2 had ~200 plaques.
10^-3 had ~60 plaques.
10^-4 had ~60 plaques.
10^-5 had ~60 plaques.
10^-6 had ~40 plaques.
10^-7 had ~50 plaques.
10^-8 had ~30 plaques.

Conclusion and Next Steps:
While these phages grew well, the original sample 7 was used instead. There may have been error when diluting because the number of plaques on each plate does not follow the expected pattern of the serial dilutions. Considering that there are different morphologies represented on the plates, there are likely multiple different phages.
How many plaques are on each plate? Do the number of plaques on your plates follow the expected pattern of your serial dilutions. Do all your plaques share the same morphology? If you have more than one morphology, how do they differ? If you think you still have more than one kind of phage in your sample, what should you do next?
Title: Plaque Assay for Purification
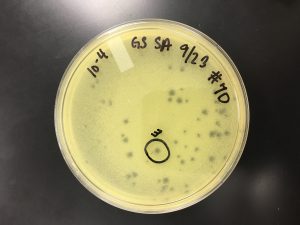
Date Started: 9/20/2019 Redo? No Sample: 7 Plaque: C (from plaque A; 10-5)
Purpose: To generate well-isolated plaques and to ensure a clonal phage population is obtained. The process involves serially diluting a picked plaque, and then performing a plaque assay with the diluted samples. This process will be repeated two times.
Notes:
The serial dilutions were taken out of the incubator at 9:30 am, para-filmed, and placed into the fridge. Then a plaque was chosen from 10^-5 of sample 7 plaque A.
1) A circle was drawn around the plaque of interest on the bottom the bottom of the plate and labeled Plaque C. The picking a plaque protocol was followed to retrieve phage particles from a plaque and create a liquid sample. The details of the plaque morphology were recorded.
Plaque C – small; turbid; not as far away from other phages as hoped; distinct edges:
a. A microcentrifuge tubes was labeled “C.” 100 microliters of phage buffer was aliquoted into the microcentrifuge tube.
b. A plaque was picked that was fairly far away from other plaques (as close to 1.5 cm apart as possible) from a fresh sample.
c. A sterile tip on a micropipettor was perpendicular to the agar surface when it was gently stabbed onto the top agar in the center of the plaque. The surrounding bacteria was avoided.
d. The end of the tip was then placed into the phage buffer of microcentrifuge tube C and tapped along the wall to dislodge phage. The tip was discarded and the tube was mixed by vortexing.
2) Next, this liquid phage sample was diluted according to the serial dilutions protocol.
a. 10-fold serial dilutions were then set up. The proper number of microcentrifuge tubes were arranged in a rack and labeled 10-0 through 10-8.
b. 90 microliters of phage buffer was added to each of the tubes.
c. The 10-fold serial dilutions were then performed. 10 microliters of undiluted phage sample was added to the 10-1 tube and vortexed. This was done all the way through the 10-8 tube. A clean pipette tip was used each time and the tube was vortexed before making each dilution.
3) Next, the serial dilutions of plaque C had to be plated according to the plaque assay protocol. Nine agar plates were obtained and labeled on the bottom with our names, the date, and a reference to the sample. Each of the plates was done according to the protocol below.
a. 10 microliters was pipetted from the microcentrifuge tube into the 250 microliters of host bacteria. Then the filtered phage and bacteria were left to sit for 5 minutes.
b. After the host bacteria and phage joined, 3 ml of top agar was added to the mixture and then immediately distributed across the agar plate and moved around slightly for equal distribution. The agar plate was left to sit for 20 minutes.
c. All of the nine agar plates with the plated phage were then placed into the incubator at 11:05 am.
Results:
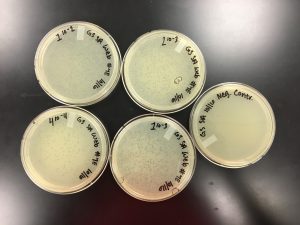
9/20/2019 Positive results, but the results were inconsistent with the expected pattern (each plate containing ~10% of the number of plaques on the previous plate due to dilutions). The plaques had differing morphologies (small, large, turbid, clear).
10^0 had an uncountable number of plaques.
10^-1 had an uncountable number of plaques.
10^-2 had ~400 plaques.
10^-3 had ~200 plaques.
10^-4 had ~200 plaques.
10^-5 had ~200 plaques.
10^-6 had ~150 plaques.
10^-7 had ~70 plaques.
10^-8 had ~150 plaques.

Conclusion and Next Steps:
The number of plaques not following the expected pattern indicates that there may be contamination or mistakes being made.
Another serial dilution as well as a control experiment will be performed to detect whether the phage buffer was contaminated.
How many plaques are on each plate? Do the number of plaques on your plates follow the expected pattern of your serial dilutions. Do all your plaques share the same morphology? If you have more than one morphology, how do they differ? If you think you still have more than one kind of phage in your sample, what should you do next?
Title: Plaque Assay for Purification
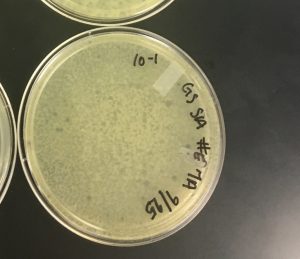
Date Started: 9/23/2019 Redo? No Sample: Control experiment taken from sample 7A Plaque: D
Purpose: To generate well-isolated plaques and to ensure a clonal phage population is obtained. The process involves serially diluting a picked plaque, and then performing a plaque assay with the diluted samples. This process will be repeated two times.
To be noted: This set of serial dilutions was taken from the first set of serial dilutions’ plate #7A and a negative control was performed to test whether or not the phage buffer was contaminated.
Notes:
1) A circle was drawn around the plaque of interest on the bottom the bottom of the plate and labeled Plaque D. The picking a plaque protocol was followed to retrieve phage particles from a plaque and create a liquid sample. The details of the plaque morphology were recorded.
Plaque D – turbid; small sized; distinct edges:
a. A microcentrifuge tubes was labeled “D.” 100 microliters of phage buffer was aliquoted into the microcentrifuge tube.
b. A plaque was picked that was fairly far away from other plaques (as close to 1.5 cm apart as possible) from a fresh sample.
c. A sterile tip on a micropipettor was perpendicular to the agar surface when it was gently stabbed onto the top agar in the center of the plaque. The surrounding bacteria was avoided.
d. The end of the tip was then placed into the phage buffer of microcentrifuge tube D and tapped along the wall to dislodge phage. The tip was discarded and the tube was mixed by vortexing.
2) Next, this liquid phage sample was diluted according to the serial dilutions protocol.
a. 10-fold serial dilutions were then set up. The proper number of microcentrifuge tubes were arranged in a rack and labeled 10-0 through 10-4. Another microcentrifuge was aliquoted 100 microliters of phage buffer and labeled the “Control.”
b. 90 microliters of phage buffer was added to each of the tubes except the control tube, which had 100 microliters.
c. The 10-fold serial dilutions were then performed. 10 microliters of undiluted phage sample was added to the 10-1 tube and vortexed. This was done all the way through the 10-4 tube. A clean pipette tip was used each time and the tube was vortexed before making each dilution. The control tube was left undisturbed.
3) Next, the serial dilutions of plaque D had to be plated according to the plaque assay protocol. Six agar plates were obtained and labeled on the bottom with our names, the date, and a reference to the sample. Each of the plates was done according to the protocol below.
a. 10 microliters was pipetted from each microcentrifuge tube into the 250 microliters of host bacteria. Then the filtered phage and bacteria were left to sit for 5 minutes.
b. After the host bacteria and phage joined, 3 ml of top agar was added to the mixture and then immediately distributed across the agar plate and moved around slightly for equal distribution. The agar plate was left to sit for 20 minutes.
c. All of the six agar plates with the plated phage and the one control plate were then placed into the incubator at 10:40 am.
Results:
9/25/2019 The control experiment indicated that the phage buffer was contaminated.
Conclusion and Next Steps:
The next step will be to pick a plaque from this control experiment and perform another set of serial dilutions. Sterile phage buffer will be obtained.
How many plaques are on each plate? Do the number of plaques on your plates follow the expected pattern of your serial dilutions. Do all your plaques share the same morphology? If you have more than one morphology, how do they differ? If you think you still have more than one kind of phage in your sample, what should you do next?
Title: Plaque Assay for Purification
Date Started: 9/25/2019 Redo? No Sample: Taken from the control experiment 7D Plaque: E
Purpose: To generate well-isolated plaques and to ensure a clonal phage population is obtained. The process involves serially diluting a picked plaque, and then performing a plaque assay with the diluted samples. This process will be repeated two times.
To be noted: in the previous control experiment it was discovered that the phage buffer was contaminated. Thus, this problem was resolved with fresh, sterile phage buffer. This experiment was continued using plaque E from the control set of dilutions and substituted as our second set of serial dilutions.
Notes:
1) A circle was drawn around the plaque of interest on the bottom the bottom of the plate and labeled Plaque E. The picking a plaque protocol was followed to retrieve phage particles from a plaque and create a liquid sample. The details of the plaque morphology were recorded.
Plaque E – turbid; medium sized; distinct edges:
a. A microcentrifuge tubes was labeled “E.” 100 microliters of phage buffer was aliquoted into the microcentrifuge tube.
b. A plaque was picked that was fairly far away from other plaques (as close to 1.5 cm apart as possible) from a fresh sample.
c. A sterile tip on a micropipettor was perpendicular to the agar surface when it was gently stabbed onto the top agar in the center of the plaque. The surrounding bacteria was avoided.
d. The end of the tip was then placed into the phage buffer of microcentrifuge tube E and tapped along the wall to dislodge phage. The tip was discarded and the tube was mixed by vortexing.
2) Next, this liquid phage sample was diluted according to the serial dilutions protocol.
a. 10-fold serial dilutions were then set up. The proper number of microcentrifuge tubes were arranged in a rack and labeled 10-0 through 10-5.
b. 90 microliters of phage buffer was added to each of the tubes.
c. The 10-fold serial dilutions were then performed. 10 microliters of undiluted phage sample was added to the 10-1 tube and vortexed. This was done all the way through the 10-5 tube. A clean pipette tip was used each time and the tube was vortexed before making each dilution.
3) Next, the serial dilutions of plaque E had to be plated according to the plaque assay protocol. Six agar plates were obtained and labeled on the bottom with our names, the date, and a reference to the sample. Each of the plates was done according to the protocol below.
a. 10 microliters was pipetted from the microcentrifuge tube into the 250 microliters of host bacteria. Then the filtered phage and bacteria were left to sit for 5 minutes.
b. After the host bacteria and phage joined, 3 ml of top agar was added to the mixture and then immediately distributed across the agar plate and moved around slightly for equal distribution. The agar plate was left to sit for 20 minutes.
c. All of the five agar plates with the plated phage were then placed into the incubator at 10:20 am.
Results:
9/27/2019

Conclusion and Next Steps:
There may still be something off with the serial dilutions from the controlled serial dilutions experiment due to 10-0 having less plaques than all of the rest. After 10-0 the serial dilutions appear normal. The next still will be to proceed regardless with the 10-1 serially diluted plate to collect its plate lysate in high concentration.
How many plaques are on each plate? Do the number of plaques on your plates follow the expected pattern of your serial dilutions. Do all your plaques share the same morphology? If you have more than one morphology, how do they differ? If you think you still have more than one kind of phage in your sample, what should you do next?
Title: Collecting Plate Lysates
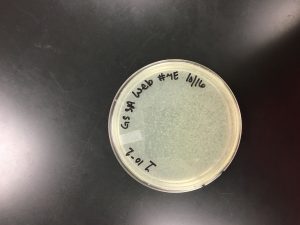
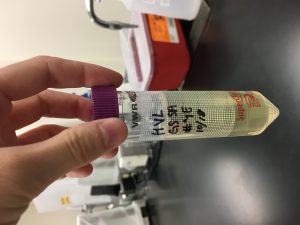
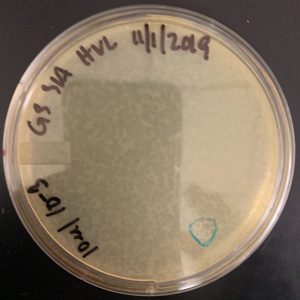
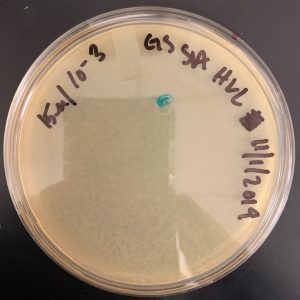
Date Started: 9/27/2019 Redo? No Sample: 7 plaque E Plate Used: 10-1
Purpose: To generate a highly concentrated liquid phage sample.
To be noted: there may still be something off with the serial dilutions from the controlled serial dilutions experiment due to 10-0 having less plaques than all of the rest. After 10-0 the serial dilutions appeared normal.
Notes:
1) 10-1 serially diluted plate was identified for plate lysate collection from the last round of recent serial dilutions.
2) The plate was flooded with 8 ml of sterile phage buffer. The plate was then left to sit at room temperature for 2-4 hours.
3) A plate lysate was then harvested by removing the lid from the plate and placing it on the bench. The plate was tilted slightly by placing one edge of the plate on the lid, allowing the lysate to pool to one side.
4) A 0.22 micrometer filter was prepared. A 5 ml syringe was used to aspirate the lysate from the plate. The syringe was then attached to the filter and the syringe plunger was depressed to collect the filtrate in a 15 ml sterile conical tube. The tube was then labeled accordingly.
5) 5.5 mL of lysate was collected.
6) The lysate was stored at 4 degrees celsius.
Results:
9/27/2019 Collected lysate from sample 7E.
Conclusion and Next Steps:
The next step will be to calculate the titer of our lysate using the spot titer protocol and then the full plate titer protocol.
Title: Spot Titer
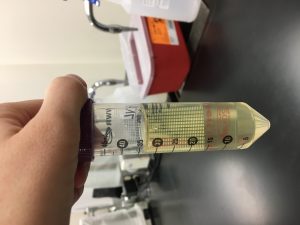
Date Started: 9/30/2019 Redo? No Sample: 7E Lysate
Purpose: To determine the concentration of phage particles in the small volume lysate using a spot test.
Notes:
1) An agar plate was labeled for a spot titer.
2) A bacterial lawn was prepared using aseptic technique. Using a sterile 5 ml pipette, 3 ml of molten agar was transferred into a 5 ml sterile pipette. Then the top agar was transferred to a culture tube of 250 microliters of host bacteria and immediately drawn back into the same pipette. The top agar-bacteria mixture was then dispensed onto the labeled agar plate and tilted in multiple directions to ensure an even distribution. The plate was left to sit undisturbed for about 20 minutes so it could solidify.
3) Next, the serial dilutions protocol was performed on sample 7E of lysate to titer. The lysates were diluted 10-1, 10-2, 10-3, 10-4, 10-5, 10-6, 10-7, and 10-8 in phage buffer. The microcentrifuges with phage buffer were vortexed in between dilutions. There was one control tube of phage buffer.
4) The dilutions and control were then spotted onto the prepared bacterial lawn. This was done one at a time, by aseptically transferring 3 μl of all samples onto the proper location on the bacterial lawn. 3 μl of sterile phage buffer was used as the negative control. The liquid from the spots was then allowed to absorb into the agar for 30 minutes.
5) The inverted agar plate with the serial dilutions was then incubated at 10:40 am for 2 days.
6) After incubating the plates, the number of plaques were counted. The number of plaques in each spot made sense, and there was a 10-fold reduction in the number of plaques from spot to spot. 10-5, 10-6, and 10-7 were chosen as countable plaques.
Results:
10/2/2019 The titer from 10-6 was calculated in pfu/ml using the formula:
Titer (pfu/ml) = (# pfu/ volume used in μl) x (10^3 μl/ml) x dilution factor
(The dilution factor is the reciprocal of the dilution used. For the 10-6 dilution, the dilution factor is 10 to 6th.)
(18 pfu/3 microliter) x (10^3 microliters/ml) x 10^6 =
6.0 x 10^9 pfu/ml
This calculated answer works because a high-titer lysate has a titer of at least 5 x 10 to the 9th pfu/ml. There appeared to only be one plaque in the 10-7 spot.
Conclusion and Next Steps:
The next step will be to use the calculated titer from 10-6 to perform a full plate titer on 10-5, 10-6, and 10-7.
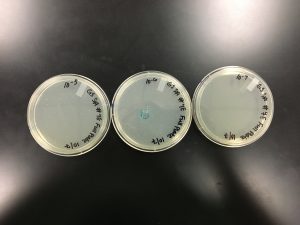
Title: Full Plate Titer
Date Started: 10/2/2019 Redo? No Sample: 7E from spot titer
Purpose: To determine the concentration of phage particles in the small volume lysate by using a plaque assay.
Notes:
1) The plaque assay protocol was performed on sample 7E from the serial dilutions of 10-5, 10-6, and 10-7. These dilutions were plated because they were predicted to yield a countable number of plaques from the calculations in the previous spot titer (20-200 plaques).
2) Thus, the plaque assay was performed on 10-5, 10-6, and 10-7 spot titer. Taken from the previous serial dilutions of the spot titer protocol, 10 microliters was pipetted from these into 250 microliters of host bacteria and left to sit for 5 minutes.
3) Next, 3 ml of top agar was added to the host bacteria and lysate sample for each of the 3 tubes and then immediately sucked back to be plated on the correctly labeled agar plates. The three agar plates were then left to sit for 20 minutes to solidify. However, the plates appeared to have many bumps and were not expected to grow anything. The plates were still incubated, nevertheless.
4) The plates were incubated for 2 days at 10:30 am.
Results:
10/4/2019 Negative Results due to incorrect agar plates or contaminated top agar.

Conclusion and Next Steps:
The next step will be to redo the full plate titer for 10-5, 10-6, and 10-7 spot titer dilutions from the 7E sample lysate.
Title: Full Plate Titer
Date Started: 10/4/2019 Redo? Yes Sample: 7E from spot titer
Purpose: To determine the concentration of phage particles in a lysate by using a plaque assay.
Notes:
1) The plaque assay protocol was performed again on sample 7E from the serial dilutions of 10-5, 10-6, and 10-7. These dilutions were plated because they were predicted to yield a countable number of plaques from the calculations in the previous spot titer (20-200 plaques).
2) Thus, the plaque assay was performed on 10-5, 10-6, and 10-7 spot titer. Taken from the previous serial dilutions of the spot titer protocol, 10 microliters was pipetted from these into 250 microliters of host bacteria and left to sit for 5 minutes.
3) Next, 3 ml of top agar was added to the host bacteria and lysate sample for each of the 3 tubes and then immediately sucked back to be plated on the correctly labeled agar plates. The three agar plates were then left to sit for 20 minutes to solidify.
4) The plates were incubated for 2 days at 9:50 am.
Results:
10/7/2019 Negative results due to incorrect agar plates or contaminated top agar.

Conclusion and Next Steps:
The next step will be to redo the full plate titer for 10-5, 10-6, and 10-7 spot titer dilutions from the 7E sample lysate.
Title: Full Plate Titer
Date Started: 10/7/2019 Redo? Yes Sample: 7E from spot titer
Blue plates and red host bacteria were used.
Purpose: To determine the concentration of phage particles in a lysate by using a plaque assay.
Notes:
1) The plaque assay protocol was performed again on sample 7E from the serial dilutions of 10-5, 10-6, and 10-7. These dilutions were plated because they were predicted to yield a countable number of plaques from the calculations in the previous spot titer (20-200 plaques).
2) Thus, the plaque assay was performed on 10-5, 10-6, and 10-7 spot titer. Taken from the previous serial dilutions of the spot titer protocol, 10 microliters was pipetted from these into 250 microliters of host bacteria and left to sit for 5 minutes.
3) Next, 3 ml of top agar was added to the host bacteria and lysate sample for each of the 3 tubes and then immediately sucked back to be plated on the correctly labeled agar plates. The three agar plates were then left to sit for 20 minutes to solidify.
4) The plates were incubated for 2 days at 9:56 am.
Results:
10/9/2019 Negative results due to incorrect agar plates or contaminated top agar.
Conclusion and Next Steps:
The next steps will be to test what is causing the contamination or lack of growth.
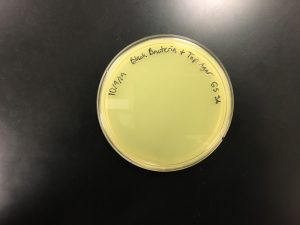
Title: Trouble Shooting for Full Plate Titer
Date Started: 10/9/2019 Redo? No, this is a troubleshoot experiment Sample: No sample was used
Purpose: To determine if the host bacteria is dying or causing contamination.
Notes:
1) Only the freshly made, black-striped host bacteria and top agar were plated. 3 ml of top agar was added to the 250 microliters of host bacteria and then immediately sucked back up to be plated on the black-striped agar plate. The agar plate was then left to sit for 20 minutes to solidify.
2) The plate was incubated for 2 days at 10:10 am.
Results:
10/11/2019 The results indicated that the old host bacteria was dying, since the freshly made, black-striped bacteria caused growth again. The other red-striped host bacteria did not grow anything from Gus and Sam’s experiment.
Conclusion and Next Steps:
The next steps will be to re-plate the full plate titer with freshly made host bacteria.
Title: Full Plate Titer
Date Started: 10/11/2019 Redo? Yes Sample: 7E from spot titer
3 black stripes on agar plate 10/1/2019.
Purpose: To determine the concentration of phage particles in a lysate by using a plaque assay.
Notes:
1) The plaque assay protocol was performed again on sample 7E from the serial dilutions of 10-5, 10-6, and 10-7. These dilutions were plated because they were predicted to yield a countable number of plaques from the calculations in the previous spot titer (20-200 plaques).
2) Thus, the plaque assay was performed on 10-5, 10-6, and 10-7 spot titer. Taken from the previous serial dilutions of the spot titer protocol, 10 microliters was pipetted from these into 250 microliters of host bacteria and left to sit for 5 minutes.
3) Next, 3 ml of top agar was added to the host bacteria and lysate sample for each of the 3 tubes and then immediately sucked back to be plated on the correctly labeled agar plates. The three agar plates were then left to sit for 20 minutes to solidify.
4) The plates were incubated for 2 days at 11:04 am.
Results:
10/14/2019 Negative results due to the phage sample having died from the stored serial dilutions.
Conclusion and Next Steps:
More serial dilutions will need to be made.
Title: Spot Titer
Date Started: 10/14/2019 Redo? Yes, since the phage sample died in the previous serial dilutions. Sample: 7E Lysate
Purpose: To determine the concentration of phage particles in the small volume lysate using a spot test.
Notes:
1) An agar plate was labeled for a spot titer.
2) A bacterial lawn was prepared using aseptic technique. Using a sterile 5 ml pipette, 3 ml of molten agar was transferred into a 5 ml sterile pipette. Then the top agar was transferred to a culture tube of 250 microliters of host bacteria and immediately drawn back into the same pipette. The top agar-bacteria mixture was then dispensed onto the labeled agar plate and tilted in multiple directions to ensure an even distribution. The plate was left to sit undisturbed for about 20 minutes so it could solidify.
3) Next, the serial dilutions protocol was performed on sample 7E of lysate to titer. The lysates were diluted 10-1, 10-2, 10-3, 10-4, 10-5, 10-6, 10-7, and 10-8 in phage buffer. The microcentrifuges with phage buffer were vortexed in between dilutions. There was one control tube of phage buffer.
4) The dilutions and control were then spotted onto the prepared bacterial lawn. This was done one at a time, by aseptically transferring 3 μl of all samples onto the proper location on the bacterial lawn. 3 μl of sterile phage buffer was used as the negative control. The liquid from the spots was then allowed to absorb into the agar for 30 minutes.
5) The inverted agar plate with the serial dilutions was then incubated at 10:35 am for 2 days.
6) After incubating the plates, the number of plaques were counted. The number of plaques in each spot made sense, and there was a 10-fold reduction in the number of plaques from spot to spot. 10-5, 10-6, and 10-7 were chosen as countable plaques.
Results:
10/16/2019 The titer from 10-6 was calculated in pfu/ml using the formula:
Titer (pfu/ml) = (30 pfu/10 μl) x (10^3 μl/ml) x 10^6 =
3.0 x 10^9 pfu/ml
This calculated answer works because a high-titer lysate has a titer of at least 5 x 10 to the 9th pfu/ml. There appeared to only be one plaque in the 10-7 spot.

Conclusion and Next Steps:
The next step will be to do a full plate titer redo.
Title: Full Plate Titer
Date Started: 10/14/2019 Redo? Yes Sample: 7E from spot titer
Purpose: To determine the concentration of phage particles in a lysate by using a plaque assay.
Notes:
1) The plaque assay protocol was performed again on sample 7E from the serial dilutions of 10-5, 10-6, and 10-7. These dilutions were plated because they were predicted to yield a countable number of plaques from the calculations in the previous spot titer (20-200 plaques).
2) Thus, the plaque assay was performed on 10-5, 10-6, and 10-7 spot titer. Taken from the previous serial dilutions of the spot titer protocol, 10 microliters was pipetted from these into 250 microliters of host bacteria and left to sit for 5 minutes.
3) Next, 3 ml of top agar was added to the host bacteria and lysate sample for each of the 3 tubes and then immediately sucked back to be plated on the correctly labeled agar plates. The three agar plates were then left to sit for 20 minutes to solidify.
4) The plates were incubated for 2 days at 10:35 am.
Results:
10/16/2019 Positive results were yielded of a countable number of plaques (20-200), and calculations were able to made to make webbed plates.
A) 30 plaques on 10^-6:
Titer (pfu/ml) = (30 pfu/10 ml) x (10^3 μl/ml) x 10^6 = 3.0 x 10^9 pfu/ml
(3.0 x 10^9 pfu/ml was our low volume lysate for the amplification process.)
B) 1 plaque 10^-7:
Titer (pfu/ml) = (1 pfu/10 ml) x (10^3 μl/ml) x 10^7 = 1.0 x 10^9 pfu/ml
C) 6 plaques on 10^-6:
Titer (pfu/ml) = (6 pfu/3 ml) x (10^3 μl/ml) x 10^6 = 2.0 x 10^9 pfu/ml
D) 1,088 plaques on 10^-5:
Titer (pfu/ml) = (1,088 pfu/10 ml) x (10^3 μl/ml) x 10^5 = 1.088 x 10^10 pfu/ml
Conclusion and Next Steps:
To move on to the amplification process to make webbed plates.
Amplification
Title: Webbed Plates
Date Started: 10/16/2019 Redo? No Sample Used: 7E
Purpose: To create a plate with a very high density of plaques from a lysate of known titer.
Notes:
1) Calculations were performed to estimate how many plaques and lysate volume is needed to generate a webbed plate:
[(6.0 x 10^3 pfu)/(3.0 x 10^9 pfu/ml)] x 1000 μl/ml = 2.0 x 10^-3 μl
2) 4 full plates using the plaque assay protocol were plated with different concentrations in order to get a high enough concentration and one negative control was plated:
4 μl at 10^-4
2 μl at 10^-3
1 μl at 10^-2
1 μl at 10^-3
Negative Control
3) The plaque assay protocol was performed again on sample 7E from the serial dilutions shown above. The different amounts of phage sample were added into the 250 microliters of host bacteria and left to sit for 5 minutes.
4) Next, 3 ml of top agar was added to the host bacteria and lysate sample for each of the 5 tubes and then immediately sucked back up to be plated on the correctly labeled agar plates. The five agar plates were then left to sit for 20 minutes to solidify.
5) The plates were incubated for 2 days at 10:50 am.
Results:
10/17/2019 Positive results were yielded. 1.0 x 10^-2 was a webbed plate with a high enough concentration.
Conclusions and Next Steps:
The next steps will be to flood 1.0 x 10^-2 and plate 5 more plates of the same concentration.
Title: Webbed Plates
Date Started: 10/17/2019 Redo? No Sample Used: 7E
Purpose: To create a plate with a very high density of plaques from a lysate of known titer.
Notes:
1) The plate 1.0 x 10^-2 was flooded with 8 ml of sterile phage buffer. The plate was then left to sit at room temperature for 2-4 hours.
2) A plate lysate was then harvested by removing the lid from the plate and placing it on the bench. The plate was tilted slightly by placing one edge of the plate on the lid, allowing the lysate to pool to one side.
3) A 0.22 micrometer filter was prepared. A 5 ml syringe was used to aspirate the lysate from the plate. The syringe was then attached to the filter and the syringe plunger was depressed to collect the filtrate in a 15 ml sterile conical tube. The tube was then labeled accordingly.
4) 6.5 ml of lysate was collected.
5) The lysate was stored at 4 degrees celsius.
6) Next, the serial dilutions protocol was performed on the lysate to create a high volume lysate.
Results:
10/17/2019 Collected Lysate:
10/21/2019 Positive results were yielded.

Conclusions and Next Steps:
To create more of the 1.0 x 10^-2 concentration.
Title: Webbed Plates
Date Started: 10/17/2019 Redo? No Sample Used: 7E
Purpose: To create a plate with a very high density of plaques from a lysate of known titer.
Notes:
1) The concentration of 1.0 x 10^-2 was plated 5 more times along with a negative control.
2) The plaque assay protocol was performed again on sample 7E concentration 1.0 x 10^-2 five times. The phage samples and negative control were added into the 250 microliters of host bacteria and left to sit for 5 minutes.
3) Next, 3 ml of top agar was added to the host bacteria and lysate sample for each of the 6 tubes and then immediately sucked back up to be plated on the correctly labeled agar plates. The six agar plates were then left to sit for 20 minutes to solidify.
4) The plates were incubated for 1 day at 12:23 pm.
Results:
10/18/2019 Positive results were yielded.
Conclusions and Next Steps:
To flood these plates.
Title: Webbed Plates
Date Started: 10/18/2019 Redo? No Sample Used: 7E
Purpose: To create a plate with a very high density of plaques from a lysate of known titer.
Notes:
1) The 5 more created 1.0 x 10^-2 plates were each flooded with 8 ml of sterile phage buffer to create a more concentrated lysate. The plates were left to sit at room temperature for 2-4 hours.
2) Plate lysates were then harvested by removing the lids from the plates and placing them on the table. The plates were tilted slightly by placing the edges of the plates on the lids, allowing the lysate to pool to one side.
3) A 0.22 micrometer filter was prepared. A 5 ml syringe was used to aspirate the lysate from the plates. The syringe was then attached to the filter and the syringe plunger was depressed to collect the filtrate in a 15 ml sterile conical tube. The tube was then labeled accordingly.
4) 32.5 ml of lysate was collected.
5) The lysate was stored at 4 degrees celsius.
Results:
10/18/2019
Conclusion and Next Steps:
To perform serial dilutions on the collected lysate.
Title: Webbed Plates
Date Started: 10/21/2019 Redo? Yes, to try and get a higher concentration. Sample Used: 7E
Purpose: To create a plate with a very high density of plaques from a lysate of known titer.
Notes:
1) The plate 1.0 x 10^-3 was flooded with 8 ml of sterile phage buffer. The plate was then left to sit at room temperature for 2-4 hours.
2) A plate lysate was then harvested by removing the lid from the plate and placing it on the bench. The plate was tilted slightly by placing one edge of the plate on the lid, allowing the lysate to pool to one side.
3) A 0.22 micrometer filter was prepared. A 5 ml syringe was used to aspirate the lysate from the plate. The syringe was then attached to the filter and the syringe plunger was depressed to collect the filtrate in a 15 ml sterile conical tube. The tube was then labeled accordingly.
4) 5.5 ml of lysate was collected.
5) The lysate was stored at 4 degrees celsius.
Results:
10/21/2019
Conclusion and Next Steps:
To perform serial dilutions, plate them, and then flood those plates.
Title: Webbed Plates
Date Started: 10/23/2019 Redo? Yes, to try and get a higher concentration. Sample Used: 7E
Purpose: To create a plate with a very high density of plaques from a lysate of known titer.
Notes:
1) Serial dilutions protocol was performed on the 10-1 and 10-2 concentration from the lysate above. A negative control was used.
2) The plaque assay protocol was performed again on sample 7E concentration 1.0 x 10^-2 five times. The phage samples and negative control were added into the 250 microliters of host bacteria and left to sit for 5 minutes.
3) Next, 3 ml of top agar was added to the host bacteria and lysate sample for each of the 6 tubes and then immediately sucked back up to be plated on the correctly labeled agar plates. The six agar plates were then left to sit for 20 minutes to solidify.
4) The plates were incubated for 1 day at 11:05 am.
Results:
10/25/2019
Conclusion and Next Steps:
To flood these plates.
Title: Webbed Plates
Date Started: 10/25/2019 Redo? Yes, to try and get a higher concentration. Sample Used: 7E
Purpose: To create a plate with a very high density of plaques from a lysate of known titer.
Notes:
1) The 5 more created 1.0 x 10^-2 plates were each flooded with 8 ml of sterile phage buffer to create a more concentrated lysate. The plates were left to sit at room temperature for 2-4 hours.
2) Plate lysates were then harvested by removing the lids from the plates and placing them on the table. The plates were tilted slightly by placing the edges of the plates on the lids, allowing the lysate to pool to one side.
3) A 0.22 micrometer filter was prepared. A 5 ml syringe was used to aspirate the lysate from the plates. The syringe was then attached to the filter and the syringe plunger was depressed to collect the filtrate in a 15 ml sterile conical tube. The tube was then labeled accordingly.
4) 22 ml of lysate was collected.
5) The lysate was stored at 4 degrees celsius.
Results:
10/25/2019


Conclusion and Next Steps:
Continue with electron microscopy and DNA extraction.
Title: Preparation Electron Microscopy (Mounting Phage Samples for TEM and Staining with Uranyl Acetate (Classic Protocol Using Pelco Tabs)
Date Started: 10/21/2019 Redo: No
Purpose: To prepare the phage sample for viewing with a transmission electron microscope.
Notes:
1) The phage sample was prepared.
a. 1 ml of the high-titer lysate was transferred into a sterile microcentrifuge tube.
b. The sample was centrifuge for 1 hour at 4 °C at top speed to concentrate the phage particles at the bottom of the tube.
c. Using a micropipettor, the supernatant was removed.
d. 100 μl of phage buffer were added it was left to re-suspend at 25 °C for 40 minutes and then at at 4 °C for 20 minutes.
2) The grid was set up.
a. A fresh pair of gloves were put on, disinfected with ethanol, and allowed to dry.
b. In the previously prepared work space, the cover was removed from a 5 x 5 cm piece of parafilm, and the parafilm was placed into the lid of a Petri dish.
c. A PELCO Tab was placed onto the parafilm in the lid of the Petri dish and then exposed.
d. Using EM forceps, a fresh grid was removed from a box of unused grids.
e. The grid was placed dark-and-shiny side UP, on the edge of the tab so that only the very edge of the grid was touching the adhesive.
3) The phage was mounted and stained.
a. Using a micropipettor,10 μl of lysate was transferred onto the grid without touching the tip to the grid itself.
b. The phage was allowed to settle and attach onto the grid for 2 minutes.
c. Using a small wedge of filter paper, the excess fluid was wicked off.
d. The grid was rinsed times by pipetting 10 μl of sterile water onto the grid, allowing it to sit for 2 minutes, and wicking off the water using a fresh wedge of filter paper.
e. 10 μl of 1 % uranyl acetate was added to the grid.
f. It sat for 2 minutes.
g. Excess stain was wicked off with a wedge of filter paper, and the was allowed to air dry for less than 1 minute before putting it safely back into the grid box.
4) The phage was observed.
a. The grid box was placed in the desiccator for storage.
b. The sample was transported to the EM facility for imaging on 11/1/2019.
5) Calculate the capsid diameter and tail length relative to the size bar.
a. Using a ruler, measure the widest point (edge-to-edge, not vertex-to-vertex) of the capsid and the length of the tail (excluding the capsid and the tail tip). If possible, measure multiple phage heads and tails and average their respective values.
b. Measure the length of the size bar with the ruler.
c. Using the known and relative lengths of the size bar, calculate the length of the capsid and tail. Example: The phage in the electron micrograph below has an average capsid diameter of 1.6 cm (16 mm) and a tail length of 4.8 cm (48 mm). The 100 nm size bar is measured to be 2.4 cm long.
 |
To find the scaled (actual) size of the tail set up a simple ratio and solve for the unknown scaled size:
(scaled size bar) / (measured size bar) = (unknown scaled sized) / (measured size)
(100 nm) / (24 mm) = (unknown scaled tail size) / 48 mm
unknown scaled tail size = (100 nm)(48 nm) / (24 mm)
unknown scaled tail size = 200 nm
d. Compare your capsid and tail lengths with those of your classmates.
e. Record your findings for entry in Phagesdb according to the protocol Entering Phage into the Actinobacteriophage Database (7.2).
Results:
11/1/2019 Positive results were yielded. Virus is a siphovirus.

Created by Digital Micrograph, Gatan Inc.
Conclusion and Next Steps:
To continue with DNA extraction.
Title: Webbed Plates
Date Started: 11/1/2019 Redo? Yes, to try and get a higher concentration. Sample Used: 7E
This experiment can be negated due to the fact that the low volume lysate from 9/27/2018 was used by accident.

Purpose: To create a plate with a very high density of plaques from a lysate of known titer.
Notes:
1) Serial dilutions protocol was performed on the 10-1, 10-2, and 10-3 concentrations from the 9/27/2019 low volume lysate.
2) The plaque assay protocol was performed on concentration 1.0 x 10^-3 six times; 3 plates used 10 microliters of lysate and the other 3 plates used 15 microliters of lysate. The phage lysate was added into the 250 microliters of host bacteria and left to sit for 5 minutes.
3) Next, 3 ml of top agar was added to the host bacteria and lysate sample for each of the 6 tubes and then immediately sucked back up to be plated on the correctly labeled agar plates. The six agar plates were then left to sit for 20 minutes to solidify.
4) The plates were incubated for 2 days at 1:00 pm.
Results:
11/4/2019 The plates are not webbed due to the incorrect lysate being used.


Conclusion and Next Steps:
To redo this again using a high volume lysate from 10/17/2019. This did not get redone, because we have enough high volume lysate.
Title: Archiving Phage Sample
Date Started: 11/8/2019 Redo? No
Purpose: To prepare a high-titer lysate for long-term storage.
Notes:
A) Prepared archiving tubes.
1. Retrieved two barcoded tubes for storage at the University of Pittsburgh and a third tube for storage at your institution. This third tube did not need to be barcoded.
2. Properly labeled each tube with our phage’s name Fizzles.
3. Using aseptic technique, we carefully filled each tube with sterile beads to 1.5 cm from the top of the tube.
B) Prepared DMSO/lysate mixture.
Important: Turned off our flame, as DMSO and its vapors are flammable.
1. Dispensed 2.8 ml of our high-titer lysate into a sterile 15 ml conical tube.
2. Added 200 μl DMSO to the tube, capped the tube, and then vortexed the mixture.
Important: Dimethyl sulfoxide (DMSO) is a cryoprotectant that prevents ice crystals from forming.
C) Aliquoted the mixture into the storage tubes.
1. Pipetted the lysate/DMSO mixture into each of the labeled tubes so that the beads were just covered.
2. Avoided overfilling and underfilling the tubes.
3. We took care to close the tubes properly.
D) Prepared the tubes for storage.
1. Placed the barcoded tubes in the storage box provided in the same order as shown on the archive list.
2. Stored samples for shipment to University of Pittsburgh at 4 °C.
3. Samples stored at our institution were frozen immediately.
DNA Extraction
Title: Phage DNA Extraction Procedure (Baylor Protocol)
Date Started: 10/25/2019 Redo? No To Be Noted: All steps requiring specific temperatures were set before the protocol was started. This was important.
Purpose: The goal of this procedure is to obtain high quality DNA from the concentrated phage lysate.
Notes:
1) Degrade bacterial DNA:
a. 10mL of filter-sterilized phage lysate was transferred into a 50mL conical vial.
b. 40µL of Nuclease Mix was added and the tube was inverted several times to gently mix.
2) Precipitate phage particles:
a. 4mL of phage precipitant solution was added to the nuclease-treated lysate and the tube was inverted several times to gently mix .
b. The tube as incubated at 37°C for 30 minutes.
c. The tube was incubated at room temperature for 45 minutes- 1 hour.
d. The tube was placed in a swinging bucket centrifuge and spun at 10,000 x g for 20 minutes. However, a problem occurred with the centrifuge machine. Thus, the entire mixture had to be re-distributed into 12 small microcentrifuge tubes to be placed in a smaller machine. This altered the process slightly. The supernatant was decanted from each of the 12 tubes into the sink. The excess liquid was drained from the pellet by inverting each tube for 2-3 minutes on a paper towel and tapped lightly.
3) Re-suspend the phage pellet:
a. 0.5 mL of sterile water was added to one of the 12 microcentrifuge tubes and pipetted into the rest of them to re-suspend the pellet. Then, all of the mixture from the 12 tubes was consolidated into one 50 mL conical tube.
b. The pellet was re-suspended by gently pipetting up and down, avoiding bubbles.
4) Uncoat the phage genomic DNA:
a. 2mL of 37˚C DNA Clean Up Resin was added directly to the re-suspended pellet. The tube was mixed before pipetting.
b. The phage particles were uncoated by gently pipetting up and down. It was gently swirled to mix.
5) Isolate the phage genomic DNA:
a. The re-suspended pellet with the resin was distributed into 2 microfuge tubes of about 1.0 mL per tube. As much resin as possible was removed.
b. Each tube was spun at high speed at 12-13k x g for 3 minutes.
c. The supernatant was pulled out with a serological pipette and then smaller pipette.
d. The salts and proteins were washed off of the DNA sample:
1) 1mL of freshly made 80% isopropanol was aded to each microfuge tube. 2) The pellet was washed by gently flicking the tube to mix (this step was not done until the repeated time doing this step). 3) The was spun tube at 12-13k x g for 3 minutes. 4) The supernatant was pull off with a serological pipette and then a smaller pipette. 5) Steps 1-4 were repeated. 6) 1 ml of fresh 80% isopropanol was added to each pellet and resin/DNA was re-suspended. 7) The contents of both microfuge tubes were combined to one column-syringe. 8) The liquid was pulled through the column. Our clean DNA/resin is now trapped on the column’s filter.
e. Each column was dried: This step was messed up, because the column accidentally was thrown away and had to be retrieved from the autoclave. Thus, contamination may have occurred.
1) The column was removed. 2) The column was added to a clean microfuge tube with the lid cut off. 3) The column was centrifuged for 5 minutes at 12,000 x g to remove any excess isopropanol.
f. The phage genomic DNA was eluted from each column:
1) The column was transferred to a clean microfuge tube. 2) 100µL of 80˚C Elution Buffer was quickly applied (found in the dry heatbath) to the column. 3) The column sat with Elution Buffer sit for 1 minute to free the DNA from the resin. 4) The column was centrifuged for 1 minute at 12,000 x g to elute the purified phage genomic DNA into a clean µfuge tube.
g. The DNA was stored at 4˚C until we are ready to quantify (nanodrop) and analyze (restriction digest and gel).
Results:
10/25/2019
10/28/2019 Negative Results:
Conclusions and Next Steps:
Quantify the DNA on the Nanodrop in the MBC, using the Elution Buffer as a blank. Make sure concentration is between 300 ng/µl and 1 µg/µl. Next, continue using different protocols if this entire protocol does not work.
Title: Phage DNA Extraction Alternate 3.5 M. Foliorum Protocol
Date Started: 10/28/2019 Redo? No To be noted: All steps requiring set temperatures were set before protocol started.
Purpose: The goal of this procedure is to obtain high quality DNA from the concentrated phage lysate.
Notes:
Morning
- HVL was gently mixed, and then 5mL of our lysate was aliquoted into a 15 mL conical tube. That tube was given to a GSI or TA who added 20uL of nuclease mix for us.
- Once nuclease was added, the tube was gently inverted and incubated at 37°C for 10min.
- Lysate was aliquoted into 5 microfuge tubes, 1mL each.
- To each tube, 20uL of ZnCl2 was added, mixed gently by inversion, and incubated at 37°C for 5min. This “precipitated” the phage.
- Centrifuged at 10,000rpm for 1min to pellet the phage.
STEPS 6 and 7 MUST BE DONE QUICKLY AND EFFICIENTLY
- THE PELLET WAS KEPT. Supernatants were removed by aspiration, while trying not to disturb the pellet. The liquid filled pipette tips were discarded in the sharps trash.
- Pellets were resuspended in 500uL TES buffer per tube, and incubated at 60°C for 15min. This denatured the capsids, exposing the DNA, while protecting it from the nuclease activity.
- 1uL of Proteinase K was added and mixed gently. Incubated at 37°C for 10min to completely eliminate any residual nuclease activity.
- 60uL of potassium acetate was added to each tube. Mixed well and left on ice for 15min. A white, dense precipitate formed. This represents our capsids.
- Centrifuged at 4°C for 1min at 12,000rpm to pellet the capsids. SUPERNATANS containing our DNA WERE KEPT, and placed into new microfuge tubes. Tubes with the pellets were thrown away.
- 500uL of isopropanol was added to each of the tubes with the supernatant, mix, and left on ice until next lab later in the afternoon.
Afternoon
- Centrifuged at top speed for 10min to pellet DNA, and discarded the supernatant into a WASTE tube. We were able to see the pellet.
- 250uL of 70% ethanol was added in each tube, and spun again for 1min, at top speed. This washed our DNA pellet. Supernatants were discarded into a WASTE tube.
- DNA pellets were dried at room temperature by turning upside-down onto paper towels, tapping out excess liquid, and slightly sucked up with a pipette. The tubes were placed in a 60 degrees celsius heat block with the lid open for about 15-20 minutes. This step was not rushed.
- The first pellet was resuspended in 50uL nuclease-free water. Then that solution was used to resuspend the next pellet. This was continued until all 5 pellets were resuspended in the same 50uL of water.
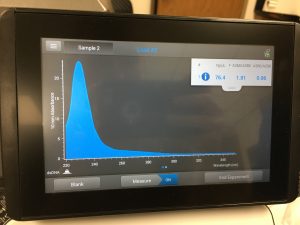
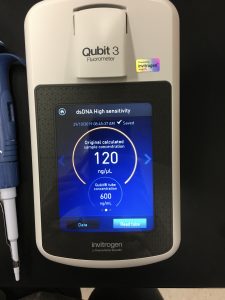
- DNA concentration was then determined via the Nanodrop and Qubit devices.
- Nanodrop machine was used and wiped clean.
- Quibt device was then used, which required a few more steps.
-
- Master mix; 800uL of HS buffer; 4uL of HS reagent; vortex
- Standard 1; 10ul of HS 1; 190ul master mix
- Standard 2; 10uL of HS 2; 190uL master mix
- Sample ; 199uL master mix; 1uL of DNA
- Diluted sample ; 1uL DNA; 20uL of ddwater
- Set up two Assay Tubes for the standardsQubit device required a few more steps.(three for the protein assay) and one Assay Tube for each user sample.
- Prepare the Qubit® Working Solution by diluting the Qubit® reagent 1:200 in Qubit® buffer. Prepare 200 μL of Working Solution for each standard and sample.
- Prepare the Assay Tubes* according to the above amounts.
- Vortex all tubes for 2–3 seconds.
- Incubate the tubes for 2 minutes at room temperature (15 minutes for the Qubit® protein assay).
- Insert the tubes in the Qubit® Fluorometer and take readings.
Results:
10/28/2019 Positive results were yielded.

Conclusion and Next Steps:
To continue with the characterization process.
Characterization
Title: Setting Up Restriction Enzyme Digests
Date Started: 10/30/2019 Redo? No
Purpose: To cut your phage genome into multiple fragments based on its DNA sequence.
Notes:
1) Prepare genomic DNA.
Nsp1, HindIII, HaeIII, SaII, and SacII were used as restriction enzymes.
a. DNA sample was gently mixed by flicking the closed tube with a finger.
b. Incubated the tube at 65 °C for 10 minutes, and then quickly placed it on ice. The tube was quickly spun in a microcentrifuge for less than 1 minute to move all of the liquid to the bottom of the tube.
c. Using the concentration of our DNA sample, the volume of DNA sample was calculated in order to obtain 0.5 µg of DNA. We had 120 ng/uL of DNA.
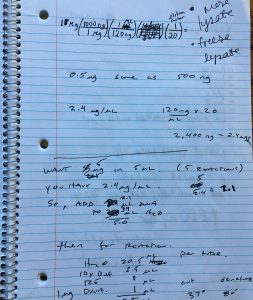
Water – 20.5 microliters
10X Buffer – 2.5 microliters
1 microgram of DNA – 1 microliter
Restriction Enzyme – 1 microliter
B) Set up restriction enzyme digest reactions.
a. Reaction was set up in a microcentrifuge tube for each enzyme according to the above amounts. Contents were added in the above order and restriction enzymes remained in their ice box until needed.
b. Contents of each tube were mixed gently and the tube was quickly spun in a microcentrifuge for less than 1 minute to move all of the liquid to the bottom of the tube.
c. Incubated at 37 °C for 15 minutes.
d. Tube was quickly spun in a microcentrifuge for less than 1 minute to move all of the liquid to the bottom of the tube.
e. Incubated at 80 degrees celsius for 20 minutes.
d. Tube was quickly spun again in a microcentrifuge for less than 1 minute to move all of the liquid to the bottom of the tube.
C) Stored at -20 °C until ready to use again.
Results:
Not obtained until 11/1/2019.
Conclusions and Next Steps:
To continue onto gel electrophoresis.
Title: Casting Agarose Gels and Gel Electrophoresis of Restriction Enzyme Digests
Date Started: 11/1/2019 Redo? No
Purpose: To prepare an agarose gel for electrophoresis and to separate DNA fragments via agarose gel electrophoresis.
Notes:
PART I Casting Agarose Gels
1) Poured a 0.9 % (w/v) agarose gel.
a. Set up gel apparatus according to your instructor’s directions.
b. Prepared enough 0.9 % agarose gel to cover the tips of the gel combs by 2–3 mm. 30 ml of 0.9 % agarose was prepared, and 0.27 g of powdered agarose was added.
c. Weighed out the appropriate mass of agarose powder, and then transferred the powder to an Erlenmeyer flask.
d. Added the appropriate volume of 1X TBE buffer to the agarose powder. Swirled gently to mix.
e. Heated the mixture in the microwave until it boiled (1–2 minutes). As soon as it boiled, heating was stopped.
f. Using a heat-resistant glove or mitt, the flask was carefully removed from the microwave.
g. Very gently, swirled to mix and then examined the solution for small transparent clumps. No clumps were visible
h. Checked the volume of the solution. Volume was the same.
i. Allowed the solution to cool to between 50 °C and 60 °C (very warm to the touch but not hot enough to burn). This took about 10–15 minutes.
2) Once the solution was sufficiently cool, latex gloves were put on to add the gel dye of our choice. – We used ethidium bromide (EtBr) as a DNA dye of 0.5 micrograms.
3) Poured the agarose/EtBr mixture into the prepared gel apparatus, while being careful not to introduce any bubbles. Inserted the comb to cast the wells.
4) Allowed the gel to cool for 20–30 minutes.
5) Once the gel had solidified, carefully removed the comb by pulling it slowly straight up. Once the comb was removed, the gel platform was gently lifted out of the casting tray.
6) Placed the platform with the solidified gel into the gel box. The wells were at the (-) cathode end of the box, where the black lead was connected.
7) Poured 1X TBE buffer into the gel apparatus until our gel was submerged by ~ 1/4 inch of buffer.
8) Next, was to load our samples and run the gel according to our instructor’s directions.
PART II Gel Electrophoresis
1) Wearing gloves, oriented the gel in such a way that the wells were closest to the cathode (black electrode).
2) Prepare your restriction enzyme digest samples for electrophoresis.
a. Added 5 μl of concentrated 6x loading dye to each 25 µl restriction enzyme sample.
b. Placed samples at 65 °C in a heat block for 5 minutes. Immediately placed the samples on ice to cool, and then spun them in a microcentrifuge for ~ 15 seconds at 10,000 rpm. This step prevented annealing of the cohesive ends of phage DNA.
3) Loaded the gel in the following order:
Ladder Uncut DNA Enzyme-1 Enzyme-2 Enzyme-3 Enzyme-n
a. Carefully loaded the gel with the proper volume of DNA ladder.
b. Used a fresh tip on our micropipettor for each sample to pipette 20 μl of each RE reaction into the wells in the order suggested above. Some of the wells may have been punctured. For next time: Place the pipette tip directly above the well, just below the surface of the buffer. Do not try to get the pipette tip into the well, or you might puncture the bottom of the gel. Slowly depress the pipette plunger, allowing the solution to slowly sink into the well. Remove the pipette from the gel before releasing the plunger. Make sure you are at eye level.
c. A picture of the gel was drawn in our lab notebook, making note of where our samples were.
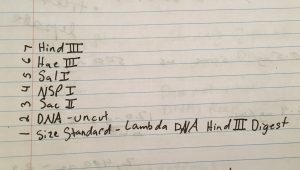
d. Plugged the electrodes into the appropriate locations on the power supply. Turned on the power supply and set the voltage to 100 V. (DNA runs toward the RED electrode.)
e. Ran the gel until the blue dye front migrated at least 3.5 inches from the well. This took about 1 hour.
f. Turned off the power supply.
4) Photographed the gel.
5) Cleaned up our work area.
Results:
11/1/2019 Positive results were yielded. Our restriction enzymes may have been slightly overloaded.
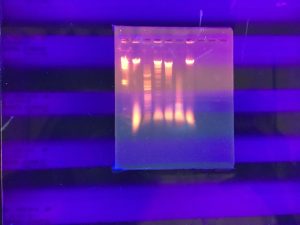
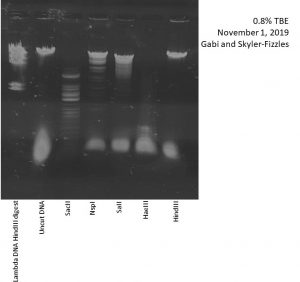
Conclusions and Next Steps:
To analyze restriction enzyme gels.
Title: Casting Agarose Gels and Gel Electrophoresis of Restriction Enzyme Digests
Date Started: 11/6/2019 Redo? Yes
Purpose: To prepare an agarose gel for electrophoresis and to separate DNA fragments via agarose gel electrophoresis.
Notes:
PART I Casting Agarose Gels
1) Poured a 0.9 % (w/v) agarose gel.
a. Set up gel apparatus according to your instructor’s directions.
b. Prepared enough 0.9 % agarose gel to cover the tips of the gel combs by 2–3 mm. 40 ml of 0.9 % agarose was prepared, and 0.32 g of powdered agarose was added.
c. Weighed out the appropriate mass of agarose powder, and then transferred the powder to an Erlenmeyer flask.
d. Added the appropriate volume of 1X TBE buffer to the agarose powder. Swirled gently to mix.
e. Heated the mixture in the microwave until it boiled (1–2 minutes). As soon as it boiled, heating was stopped.
f. Using a heat-resistant glove or mitt, the flask was carefully removed from the microwave.
g. Very gently, swirled to mix and then examined the solution for small transparent clumps. No clumps were visible
h. Checked the volume of the solution. Volume was the same.
i. Allowed the solution to cool to between 50 °C and 60 °C (very warm to the touch but not hot enough to burn). This took about 10–15 minutes.
2) Once the solution was sufficiently cool, latex gloves were put on to add the gel dye of our choice. – We used ethidium bromide (EtBr) as a DNA dye of 0.5 micrograms.
3) Poured the agarose/EtBr mixture into the prepared gel apparatus, while being careful not to introduce any bubbles. Inserted the comb to cast the wells.
4) Allowed the gel to cool for 20–30 minutes.
5) Once the gel had solidified, carefully removed the comb by pulling it slowly straight up. Once the comb was removed, the gel platform was gently lifted out of the casting tray.
6) Placed the platform with the solidified gel into the gel box. The wells were at the (-) cathode end of the box, where the black lead was connected.
7) Poured 1X TBE buffer into the gel apparatus until our gel was submerged by ~ 1/4 inch of buffer.
8) Next, was to load our samples and run the gel according to our instructor’s directions.
PART II Gel Electrophoresis
1) Wearing gloves, oriented the gel in such a way that the wells were closest to the cathode (black electrode).
2) Prepare your restriction enzyme digest samples for electrophoresis.
a. Added 5 μl of concentrated 6x loading dye to each 25 µl restriction enzyme sample.
b. Placed samples at 65 °C in a heat block for 5 minutes. Immediately placed the samples on ice to cool, and then spun them in a microcentrifuge for ~ 15 seconds at 10,000 rpm. This step prevented annealing of the cohesive ends of phage DNA.
3) Loaded the gel in the following order:
Ladder Uncut DNA Enzyme-1 Enzyme-2 Enzyme-3 Enzyme-n
a. Carefully loaded the gel with the proper volume of DNA ladder.
b. Used a fresh tip on our micropipettor for each sample to pipette 20 μl of each RE reaction into the wells in the order suggested above. Some of the wells may have been punctured. For next time: Place the pipette tip directly above the well, just below the surface of the buffer. Do not try to get the pipette tip into the well, or you might puncture the bottom of the gel. Slowly depress the pipette plunger, allowing the solution to slowly sink into the well. Remove the pipette from the gel before releasing the plunger. Make sure you are at eye level.
c. A picture of the gel was drawn in our lab notebook, making note of where our samples were.
d. Plugged the electrodes into the appropriate locations on the power supply. Turned on the power supply and set the voltage to 100 V. (DNA runs toward the RED electrode.)
e. Ran the gel until the blue dye front migrated at least 3.5 inches from the well. This took about 1 hour.
f. Turned off the power supply.
4) Photographed the gel.
5) Cleaned up our work area.
Results:
11/6/2019 Positive results were yielded.
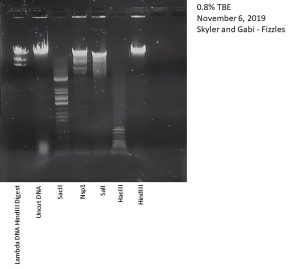

Conclusions and Next Steps:
To analyze restriction enzyme gels.