Discovery of Texx
Date: September 4, 2017
Title: Phage Isolation: Collecting Environmental Samples
Aim and Purpose: The purpose and goals of this section of our research is to accquire environmental samples containing bacteriophage that can infect our host bacteria.
Procedures and Protocols:
- Collect a specific number of samples that you will be testing later
- For solid samples, use a plastic bag to collect samples
- Place plastic bag inside out around your hand like a glove to collect a handful of soil.
- Remove hand from the bag so that the soil sample is inside and seal the bag
- Label the specific samples so they are easily identify for later
- Once samples are collected and correctly labeled, you can proceed to direct or enriched isolation
Results:
I tried to chose 3 different places in order to create the most diversity in bacteriophages.
Analysis and Interpretation:
Sample 1 was collected at the San Marcos River. This sample was from a part of the river with lots of animals, very muddy, and uniform throughout. Sample 2 was collected at Cibolo Creek. This sample was found in a place that was very dirty with trash and sandy. It was still uniform throughout. Sample 3 was collected from my grandmother’s compost. This sample was clumpy and full of leaves.
| Sample | 1 | 2 | 3 |
| Date of Collection | 9/3/2017 | 9/4/2017 | 9/4/2017 |
| Sample Type | soil | soil | soil |
| Location Description | river bed | creek bed | compost bed |
| General Location | San Marcos River | Cibolo Creek | Subdivison |
| Specific Location | 29° 53′ 40.560″ N, 97° 53′ 59.640″ W | 29° 33′ 4.680″ N, 98° 16′ 28.200″ W | 29° 34′ 36.480″ N, 98° 15′ 54.360″ W |
| Sample Depth | 1 inch | 2 inches | 1.5 inches |
| Ambient Temperature | 90°F | 82°F | 82°F |
Direct Isolation
Date: September 5, 2017
Aims and Purposes: The purpose of this step is to extract phages from the bacteria in our environment samples
Procedures and Protocol: This produce extracts phages from the microbes and matter in the solid soil samples. The phages will then be used to infect our host bacteria by using a plaque assay by offering a screenshot of all of the phages in our samples that could infect our host bacteria.
- Clean bench and gather supplies, including soil samples
- Extract phage from soil sample
- Fill a 15mL conical tube one-third to one-half with soil sample
- Add enrichment broth to soil sample until the sample is submerged 2-3 mL
- Seal tube and invert tube multiple times
- Incubate tube in a shaking incubator at 250 rpm for 1-2 hours. I incubated mine for one hour
- Set sample out until particulate matter has settled. We put mine in the centerfuge after letting samples sit for 10 minutes without settling out.
- Phage filtrate
- Use a 0.22 um syringe to remove about 2 mL of the liquid from top of the sample, avoiding solid material
- Attach syringe to the top of the filter firmly
- Dispense 0.5mL of filtrate into microcenterfuged tube and cape tube
- Procede to plaque assay
Results:
I only did direct isolation becuase I had to miss the actual lab time. I chose sample 1 and 3 to do the direct isolation because they were the two most contrasting samples. I hoped that both samples would grow very different phage.
Analysis and Interpretation:
Direct Isolation was a long process that required precision with aseptic technique and time management as there was a lot of times in this step to choose how long to let some steps go. I tried to create the best situation possible for phage growth.
Date: September 5, 2017
Plaque Assay
Aims and Purpose: The purpose of this step is be able to visually detect the presence of phages on a bacterial plate.
Procedure and Protocol: Host bacteria is mixed with a phage sample and grown on agar in a plate. If the phage is infected, it will replicate within the bacterial host which kills the bacteria. The phage will continue to infect and replicate host bacteria which leaves visably clear zones on the agar.
Clean bench and gather supplies, including your direct isolation, enriched isolation or a picked plaque. I used my direct isolation.
- Innoculate the host bacteria with phage samples
- Gather 250 uL of host bacterial cultures for each phage sample, one for postive control and negative control. In my case that is 2 for each of my direct isolation samples, one for the negative control, and we did not test the postive control.
- Use a micropipettor to
- Dispense 500 uL of phage samples into the host bacterial cultures and gently tap tube to mix, then let sample sit for 10 minutes to attach
- Plate samples with top agar
- Gather plates for each phage sample
- Use a sterile 5 mL pipette to transfer 3 mL of top agar to phage sample
- Once added to phage sample, apirate and place in the plate
- Tilt the plate and let settle until the top agar mixture solidifies
- Once solid, place plate in incubator for 24-48 hours. I placed mine in the incubator for 48 hours at 37.7 degrees C.
Results:
Sample 3 grew plaques. The plaques grown were numerous with most of them being circular. Some were as big as .25 inches and as small as a grain of salt.
Analysis and Intrepretations:
Because only the direct isolation from sample 3 grew the most phages, sample 3 will be the sample I will use for the rest of the research lab. The plate grew many phages, but also looked like it had some bacterial contamination, but it was not bad enough to affect the phage results
Date: 9/11/2017-9/13/2017
Spot Test
Aims and Purpose: To test a sample for the presence of phage
Procedure and Protocol:
- Clean bench and gather supplies
- Prepare a plate
- Label the bottom of the plate by dividing plate for as many smaples as you have
- Obtain 250 uL of host bacteria
- Distribute 3 mL of top agar per plate
- Allow plate to sit for at least 20 minutes for the plate to settle
- Find phage samples on plate or use liquid phage samples
- Transfer 10 uL of each sample into proper location on plate
- Transfer 10 uL of phage buffer into the negative spot on plate
- Let plate sit for 10-15 minutes to allow spots to solidify and place in incubator for 24-48 hours
- Check for clearing on plate
- Make sure negative control does NOT have any phage
Results:
The first spot test attempt was not successful because the top agar solidified too fast for anything to grow. It seemed that the plates were shifted during the settling period or placed on uneven surface while in the incubator so this sample was thrown out and the experiment was redone. The second attempt was successful and was left out longer before incubation in order to prevent shifting. This sample was pulled out two days later and there were signs of contamination from being out too long the first time it was pulled.
Analysis and Interpretations:
This part of the research proved that contamination is a thing. Most people could not see their phages because the contamination was so bad. We learned that we must work on doing all experiments around our flame and keeping our work space clean in order to get the best results.
Date: 9/20/2017-9/22/2017
Serial Dillutions
Aims and Purposes: Preparing decreasing phage sample concentrations
Procedure and Protocol: This step is used to manipulate the number of phages in a sample by purifying, amplifying, and titering phage
- Clean bench and gather supplies
- 10-fold serial dilutions
- Label microcentrifuge tubes for dilution
- Put 90 uL in each microcentrifuge tube
- Add 10 uL of undiluted phage sample to first tube and mix well
- Use a clean pipette after every dilution
- Transfer 10 uL from the first tube to the second tube
- Continue until diluting last tube
- Label bottom of plates just like the microcentrifuge tubes
- Inoculate host bacteria (250 uL) with diluted phage sample (10 uL)
- Let sample sit for 10-15 minutes for contact between bacteria and phage
- Add 3 mL of top agar to mixture and set in plate according to matching number on tube
- Let plate sit for 20 minutes to solidify and once solid place in incubator for 24- 48 hours
Results:
We did two serial dilutions over the course of 4 days. The first dilution came directly from the direct isolation on my plate and was very successful. Phages appeared on the first 4 dilutions. There was one spot on both of the 5th and 6th plate, but they were small so they could be air bubbles soI chose the 4th dilution to start my second set of dilutions.
Date:
Picking a Plaque
Aims and Purposes: to retrieve phage particles from a plaque and create a liquid sample
Procedure and Protocol:
- The bench was prepared for aseptic work and supplies were gathered.
- The plaques were labeled by drawing a circle at the bottom of the plate.
- Tubes were gathered for each of the plaques that were going to be picked
- 100ul of phage buffer was placed in each tube
- A plaque was picked
- A p200 micropipettor with a sterile tip was perpendicularlly stabbed into the top agar in the center of the plaque in the plate
- The tip was placed into the phage buffer in the microcentrifuge tube.
- The mixture was vortexed
Results:
The plaque picking was done for one spot on the best plate from the previous serial dilution. Then another set of serial dilutions was performed on the plaque that was picked and a plaque assay was performed on each serial dilution. The best webbed plate was then chosen for flooding.
Collecting Plate Lysates
Aims and Purposes: to generate a highly concentrated liquid phage samples
Procedure and Protocol:
- Prepare the bench for work
- Flood the best webbed plates
- 8ml of sterile phage buffer was added to the webbed plate and swirl. Let the plate sit overnight in the fridge.
- After incubation time, remove plate lid and tilt plate slightly by placing one edge of the lid on the plate so the lysate can pool to one side.
- Use 0.22 um filter and 5 ml syringe to aspirate the lysate from the plate
- Store the lysate at 4 degrees C.
Results

Plate used for flooding
Lysate was collected from the best webbed plate of the 2nd series of dilutions
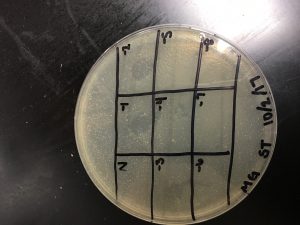
Spot Titer
Aims and Purposes: to determine the concentration of phage particles in a lysate using a spot test
Procedure and Protocol:
- Prepare bench for work
- Prepare one plate for the spot titer
- Label the bottom of the plate with name, date, and “Spot Titer”
- Divide the plate into as many sections as there are samples
- Transfer 3 ml of top agar into culture tube of 250 ul of host bacteria and dispense onto the agar plate
- Tilt the plate so that the mixture is evenly distributed
- Preform another serial dilution
- Spot each serial dilution on bacterial lawn
- Transfer 3 ul of all samples into designated location
- Allow the mixture to sit for 30 minutes or longer
- Incubate plates for 24-48 hours
- After incubation, count the plaques
Results:
The spot titer appears to have shifted during incubation.
Morgan’s Spot Titer
Unfortunately, I never was able to move past this part because the webbed plates that came from this spot titer never worked to make another webbed plate.