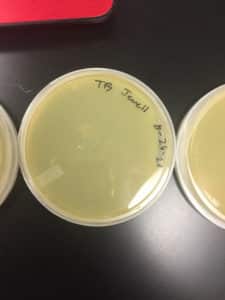
Discovery of Jewell
Jewell Information
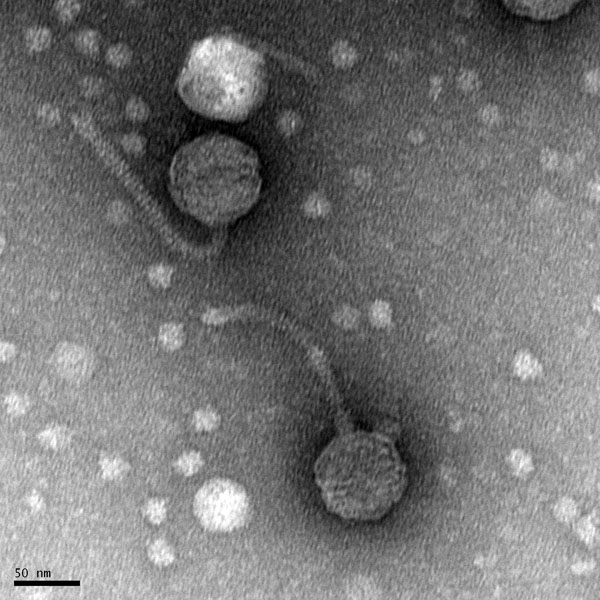
Morphology: Siphoviridae
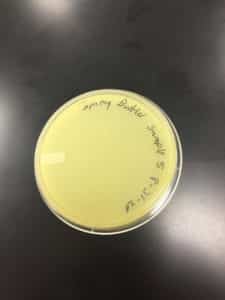
Sample Collection
| Collector Name |
Tommy | Tommy | Tommy | Tommy | Matthew | Matthew | Tommy | Selina Alvarado |
| Sample No. | 1 | 2 | 3 | 4 | 5 | 6 | 7 | 8 |
| Sample Type | Water | Water | Soil (horse feces) | Soil | Water | Soil | Soil | Soil (sheep feces) |
| General Location | Outside in the country | Under cottonwood trees | In a barn | Outside in grass with no shade | Stream | Barditch | Under cottonwood trees | Barn |
| Location Description | Inside an animal stock tank | In a pond where leaves fall with algae growing | In a stall with rubber mats and wood chips | Anthill after a light shower the night before | Stream from the city park | Side of the road on 389 | Moist dirt beside the pond from sample 2 | Barn |
| GPS Coordinates | 32.2857775, -98.5383762 | 32.1774, -98.2296 | 32.1761, -98.2277 | 32.1762, -982275 | 32.2138, -98.2048 | 32.2289, -98.3070 | 32.1774, -98.2296 | 32.2351009, -98.3182829 |
| Sample Depth | less than 3 cm | less than 3 cm | surface | surface | less than 3 cm | surface | surface | surface |
| Ambient Temperature | 35ºC | 23.3ºC | 23.3ºC | 23.3ºC | 35ºC | 36ºC | 36.1ºC | 28ºC |
Isolation/Purification
Title: Direct Isolation
Date: 08/26/2020 Redo: No Sample: 1
Purpose: This procedure is to extract phages from the environmental sample and infect the host bacteria using a plaque assay.
Notes:
- The area was cleaned aseptically
- Sample 1 was used (liquid)
- 2 ml was drawn put of the sample collection tube using a syringe
- The syringe was then connected to a .22 micron filter and filtered into a microcentrifuge tube with 2 ml of the filtered water going into the tube.
- Next 500 microliters of the filtered liquid were pipetted into a test tube that contained 250 microliters of the host bacteria. Before putting the liquid in the bacteria was well mixed.
- After mixing the two together they were left to sit for 10 minutes. After sitting 3 ml of top agar was added to the mixture and immediately drawn out and put on the plate with the host bacteria.
- Top agar was allowed to sit for 20 minutes to allow complete solidification.
- The plate was put in the incubator which stays between 23ºC-30ºC plate was put in at 10:30 AM
- The plate was removed after 48 hr
Results:
results 8/28/2020 were negative
There were no signs of any plaques
Conclusions and Next Steps:
This sample was too clean and more samples will be collected and isolated.
Title: Direct Isolation
Date: 08/27/2020 Redo: No Sample: 2
Purpose: This procedure is to extract phages from the environmental sample and infect the host bacteria using a plaque assay.
Notes:
- The area was cleaned aseptically
- Sample 2 was used (liquid)
- 2 ml was drawn put of the sample collection tube using a syringe
- The syringe was then connected to a .22 micron filter and filtered into a microcentrifuge tube with 2 ml of the filtered water going into the tube.
- Next 500 microliters of the filtered liquid were pipetted into a test tube that contained 250 microliters of the host bacteria. Before putting the liquid in the bacteria was well mixed.
- After mixing the two together they were left to sit for 10 minutes. After sitting 3 ml of top agar was added to the mixture and immediately drawn out and put on the plate with the host bacteria.
- Top agar was allowed to sit for 20 minutes to allow complete solidification.
- The plate was put in the incubator which stays between 23ºC-30ºC plate was put in at 10:43 AM
- The plate was removed after 48 hr
Results:
results 8/30/2020 were negative

There are no signs of any plaques
Conclusions and Next Steps:
This sample was too clean and more samples will be collected and isolated.
Title: Direct Isolation
Date: 08/27/2020 Redo: No Sample: 3
Purpose: This procedure is to extract phages from the environmental sample and infect the host bacteria using a plaque assay.
Notes:
- The work area was cleaned aseptically
- Sample 3 was used (poop)
- 5 ml of liquid media was added to the collection tube
- The tube was mixed thoroughly and placed in a shaking incubator set at 250 rpm for 2 hours
- The tube was removed and the liquid on the top was removed with a micropipette with 500 microliters put into each of the two microcentrifuge tubes
- The two tubes were then put into a centrifuge and were spun for 10 minutes.
- Next .25 ml fluid was removed from each microcentrifuge tube and placed into a syringe connected to a .22 micron filter
- The fluid was filtered with a .22 micron filter and put into a clean microcentrifuge tube
- Next 500 microliters of the filtered liquid were pipetted into a test tube that contained 250 microliters of the host bacteria. Before putting the liquid in the bacteria was well mixed.
- After mixing the two together they were left to sit for 10 minutes. After sitting 3 ml of top agar was added to the mixture and immediately drawn out and put on the plate with the host bacteria.
- Top agar was allowed to sit for 20 minutes to allow complete solidification.
- The plate was put in the incubator which stays between 23ºC-30ºC plate was put in at 5:12 pm
- The plate was removed after 48 hr
Results:
Results 8/30/20

The sample was contaminated due to improper sterile techniques
Conclusions and Next Steps:
This sample was a good learning experience in that I need to reexamine how well I am keeping the isolation area sterile. I will reread protocol 2.1 to review the aseptic technique.
New samples will be collected and isolated
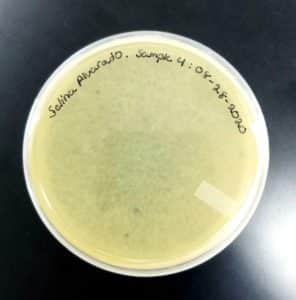
Title: Direct Isolation
Date: 08/27/2020 Redo: No Sample: 4
Purpose: This procedure is to extract phages from the environmental sample and infect the host bacteria using a plaque assay.
Notes:
- The work area was cleaned aseptically
- Sample 4 was used (Dirt)
- 5 ml of liquid media was added to the collection tube
- The tube was mixed thoroughly and placed in a shaking incubator set at 250 rpm for 2 hours
- The tube was removed and 2 ml of the liquid on the top was removed with a syringe
- 1 ml was filtered through a .22 micron filter into a microcentrifuge tube
- Next 500 microliters of the filtered liquid were pipetted into a test tube that contained 250 microliters of the host bacteria. Before putting the liquid in the bacteria was well mixed.
- After mixing the two together they were left to sit for 10 minutes. After sitting 3 ml of top agar was added to the mixture and immediately drawn out and put on the plate with the host bacteria.
- Top agar was allowed to sit for 20 minutes to allow complete solidification.
- The plate was put in the incubator which stays between 23ºC-30ºC plate was put in at 5:12 pm
- The plate was removed after 48 hr
Results:
Results 8/30/20

There are no signs of any plaques
Conclusions and Next Steps:
This sample did not produce any plaques and more samples will be collected and isolated
Title: Direct Isolation
Date: 08/26/2020 Redo: No Sample: 5
Purpose: This procedure is to extract phages from the environmental sample and infect the host bacteria using a plaque assay.
Notes:
- The area was cleaned aseptically
- Sample 5 was used (liquid)
- 2 ml was drawn put of the sample collection tube using a syringe
- The syringe was then connected to a .22 micron filter and filtered into a microcentrifuge tube with 2 ml of the filtered water going into the tube.
- Next 500 microliters of the filtered liquid were pipetted into a test tube that contained 250 microliters of the host bacteria. Before putting the liquid in the bacteria was well mixed.
- After mixing the two together they were left to sit for 10 minutes. After sitting 3 ml of top agar was added to the mixture and immediately drawn out and put on the plate with the host bacteria.
- Top agar was allowed to sit for 20 minutes to allow complete solidification.
- The plate was put in the incubator which stays between 23ºC-30ºC plate was put in at 10:30 AM
- The plate was removed after 48 hr
Results:
results 8/28/2020 were negative
There were no signs of any plaques
Conclusions and Next Steps:
This sample was too clean and more samples will be collected and isolated.
Title: Direct Isolation
Date: 08/27/2020 Redo: No Sample: 6
Purpose: This procedure is to extract phages from the environmental sample and infect the host bacteria using a plaque assay.
Notes:
- The work area was cleaned aseptically
- Sample 6 was used (Dirt)
- 5 ml of liquid media was added to the collection tube
- The tube was mixed thoroughly and placed in a shaking incubator set at 250 rpm for 2 hours
- The tube was removed and 2 ml of the liquid on the top was removed with a syringe
- 1 ml was filtered through a .22 micron filter into a microcentrifuge tube
- Next 500 microliters of the filtered liquid were pipetted into a test tube that contained 250 microliters of the host bacteria. Before putting the liquid in the bacteria was well mixed.
- After mixing the two together they were left to sit for 10 minutes. After sitting 3 ml of top agar was added to the mixture and immediately drawn out and put on the plate with the host bacteria.
- Top agar was allowed to sit for 20 minutes to allow complete solidification.
- The plate was put in the incubator which stays between 23ºC-30ºC plate was put in at 5:12 pm
- The plate was removed after 48 hr
Results:
Results 8/30/20

There are no signs of any plaques
Conclusions and Next Steps:
This sample did not produce any plaques and more samples will be collected and isolated
Title: Direct Isolation
Date: 08/31/2020 Redo: No Sample: 7
Purpose: This procedure is to extract phages from the environmental sample and infect the host bacteria using a plaque assay.
Notes:
- The work area was cleaned aseptically
- Sample 7 was used (dirt)
- 58ml of liquid media was added to the collection tube
- The tube was mixed thoroughly and placed in a shaking incubator set at 250 rpm for 2 hours
- The tube was removed and placed into a centrifuge which spun at 2000 rpm for 10 minutes
- Next 1 ml of liquid was removed from the top with a syringe
- The fluid was filtered with a .22 micron filter and put into a clean microcentrifuge tube
- Next 500 microliters of the filtered liquid were pipetted into a test tube that contained 250 microliters of the host bacteria. Before putting the liquid in the bacteria was well mixed.
- After mixing the two together they were left to sit for 10 minutes. After sitting 3 ml of top agar was added to the mixture and immediately drawn out and put on the plate with the host bacteria.
- Top agar was allowed to sit for 20 minutes to allow complete solidification.
- The plate was put in the incubator which stays between 23ºC-30ºC plate was put in at 10:17 AM
- The plate was removed after 48 hr
Results:
Results 9/2/20
There are no signs of any plaques
Conclusions and Next Steps:
This sample did not produce any plaques and more samples will be collected and isolated
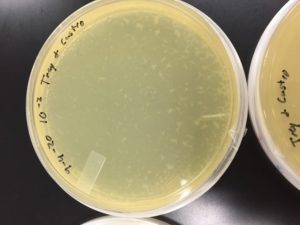
Title: Direct Isolation
Date: 08/28/2020 Redo: No Sample: number 8.
Purpose: This procedure is to extract phages from the environmental sample and infect the host bacteria using a plaque assay.
Notes:
Phage was adopted from Selina Alvarado it was her sample 4
This was the first soil sample. Some trouble was encountered due to the components in the soil.
- Work area was prepared for aseptic work using CiDecon and Ethyl Alcohol.
- 5ml of liquid media were pipetted into the tube with the sample and mixed thoroughly.
- The sample was placed in a shaking incubator and was left there for an hours and 15 minutes.
- The sample was distributed evently between 6 microcentrifuge tubes with a 100ul micropipette.
- The 6 microcentrifuge tubes were placed in the microcentrifuge for about 5 minutes.
- About 2ml of sample were pipetted into the syringe tube with the filter already attached.
- The sample was filtered carefully into another labeled microcentrifuge tube.
- 500ul of the filtered sample were pipetted into the tube with the host bacteria.
- The inoculated bacteria was left to sit for 10 minutes to allow for attachment.
- 3ml of top agar were pipetted into the inoculated bacteria tube and quicky pipetted back up.
- Top agar and inoculated bacteria were pipetted onto an agar plate, bubbles (if any) were quickly removed.
- Agar plate was left undisturbed for 20 minutes.
- Sample 4 plate was inverted and incubated at 4:50pm at 23-30 degrees celsius.
- The plate was left in the incubator for 48 hours before removal.
Results:
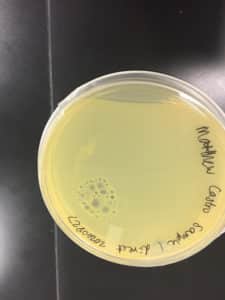
Some positive results: 08/31/2020
The plate was contaminated though some small plaques were visible.
Conclusion and Next Steps:
Other bacteria could have gotten into the sample. The filtration process was longer and there was a lot of handling. This sample was parafilmed and stored. It was a candidate for the nexts steps.
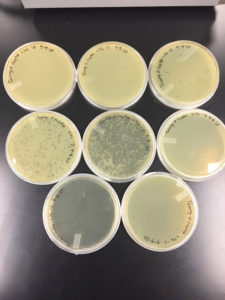
Title: Purification (Serial Dilution)
Date: 09/02/20 Redo: No Sample: 8.a
Purpose: To prepare liquid phage samples of decreasing concentrations.
Notes:
- Area was cleaned aseptically
- Sample 8, an adopted phage from Selina Alvarado, was used
- Started with protocol 5.4 picking a phage
- Plaque was labeled

- Plaque was clear and round diamiter was between 3 and 4 mm
- 100 microliters were placed in a microcentrifuge tube
- Micropipette tip was inserted perpinducularlay into the center of the plaque
- Tip was then removed and put into the tube knocking the inside to dislodge any phages sticking to the tip
- Tip was then vortexed quickly
- 8 microcentrifuge tubes were label 10^-1, 10^-2 … 10^8
- 90 microliters were placed into each of the labeled microcentrifuge tubes
- 10 microliters were transferred from the tube containing the picked plaque and put into the tube labeled 10^-1 then vortexed quickly
- 10 microliters were transferred from the tube labeled 10^-1 into the tube labeled 10^-2 then vortexed quickly
- 10 microliters were transferred from the tube labeled 10^-2 into the tube labeled 10^-3 then vortexed quickly
- 10 microliters were transferred from the tube labeled 10^-3 into the tube labeled 10^-4 then vortexed quickly
- 10 microliters were transferred from the tube labeled 10^-4 into the tube labeled 10^-5 then vortexed quickly
- 10 microliters were transferred from the tube labeled 10^-5 into the tube labeled 10^-6 then vortexed quickly
- 10 microliters were transferred from the tube labeled 10^-6 into the tube labeled 10^-7 then vortexed quickly
- 10 microliters were transferred from the tube labeled 10^-7 into the tube labeled 10^-8 then vortexed quickly
- 10 microliters were transferred from the tube labeled 10^-1 into a test tube with 250 microliters of the host bacteria and left to sit for 10 minutes
- 10 microliters were transferred from the tube labeled 10^-2 into a test tube with 250 microliters of the host bacteria and left to sit for 10 minutes
- 10 microliters were transferred from the tube labeled 10^-3 into a test tube with 250 microliters of the host bacteria and left to sit for 10 minutes
- 10 microliters were transferred from the tube labeled 10^-4 into a test tube with 250 microliters of the host bacteria and left to sit for 10 minutes
- 10 microliters were transferred from the tube labeled 10^-5 into a test tube with 250 microliters of the host bacteria and left to sit for 10 minutes
- 10 microliters were transferred from the tube labeled 10^-6into a test tube with 250 microliters of the host bacteria and left to sit for 10 minutes
- 10 microliters were transferred from the tube labeled 10^-7 into a test tube with 250 microliters of the host bacteria and left to sit for 10 minutes
- 10 microliters were transferred from the tube labeled 10^-8 into a test tube with 250 microliters of the host bacteria and left to sit for 10 minutes
- 3 ml of molten top agar was added with a pipette to the test tube with the host bacteria with the liquid from microcentrifuge tube 10^-1 and sucked out after putting in the top agar in and plated on the host bacteria labeled 10^-1
- 3 ml of molten top agar was added with a pipette to the test tube with the host bacteria with the liquid from microcentrifuge tube 10^-2 and sucked out after putting in the top agar in and plated on the host bacteria labeled 10^-2
- 3 ml of molten top agar was added with a pipette to the test tube with the host bacteria with the liquid from microcentrifuge tube 10^-3 and sucked out after putting in the top agar in and plated on the host bacteria labeled 10^-3
- 3 ml of molten top agar was added with a pipette to the test tube with the host bacteria with the liquid from microcentrifuge tube 10^-4 and sucked out after putting in the top agar in and plated on the host bacteria labeled 10^-4
- 3 ml of molten top agar was added with a pipette to the test tube with the host bacteria with the liquid from microcentrifuge tube 10^-5 and sucked out after putting in the top agar in and plated on the host bacteria labeled 10^-5
- 3 ml of molten top agar was added with a pipette to the test tube with the host bacteria with the liquid from microcentrifuge tube 10^-6 and sucked out after putting in the top agar in and plated on the host bacteria labeled 10^-6
- 3 ml of molten top agar was added with a pipette to the test tube with the host bacteria with the liquid from microcentrifuge tube 10^-7 and sucked out after putting in the top agar in and plated on the host bacteria labeled 10^-7
- 3 ml of molten top agar was added with a pipette to the test tube with the host bacteria with the liquid from microcentrifuge tube 10^-8 and sucked out after putting in the top agar in and plated on the host bacteria labeled 10^-8
- All samples were left out for 20 minutes for the top agar to set up
- All samples were inverted and put in an incubator set between 23 and 30 degrees Celsius for 48 hours
Results:
Results were positive 9/4/20

There were plaques grown on 1, 2, 3, 4, and 8
1 was webbed
2 was partially webbed
3 was spotted
4 was spotted
8 had one plaque
(better pictures will be taken)
Conclusions and Next Steps:
Dilution was successful plate 4 will be used in the next step
Title: Purification (Serial Dilution)
Date: 09/02/20 Redo: No Sample: 8.b
Purpose: To prepare liquid phage samples of decreasing concentrations.
Notes:
- The area was cleaned aseptically
- The plaque was chosen from plate 4 from the previous dilution
- Started with protocol 5.4 picking a phage
- Plaque was labeled
- The plaque was clear and round diameter was between 3 and 4 mm
- 100 microliters were placed in a microcentrifuge tube
- The micropipette tip was inserted perpendicularly into the center of the plaque
- The tip was then removed and put into the tube knocking the inside to dislodge any phages sticking to the tip
- The tip was then vortexed quickly
- 8 microcentrifuge tubes were label 10^-1, 10^-2 … 10^8
- 90 microliters were placed into each of the labeled microcentrifuge tubes
- 10 microliters were transferred from the tube containing the picked plaque and put into the tube labeled 10^-1 then vortexed quickly
- 10 microliters were transferred from the tube labeled 10^-1 into the tube labeled 10^-2 then vortexed quickly
- 10 microliters were transferred from the tube labeled 10^-2 into the tube labeled 10^-3 then vortexed quickly
- 10 microliters were transferred from the tube labeled 10^-3 into the tube labeled 10^-4 then vortexed quickly
- 10 microliters were transferred from the tube labeled 10^-4 into the tube labeled 10^-5 then vortexed quickly
- 10 microliters were transferred from the tube labeled 10^-5 into the tube labeled 10^-6 then vortexed quickly
- 10 microliters were transferred from the tube labeled 10^-6 into the tube labeled 10^-7 then vortexed quickly
- 10 microliters were transferred from the tube labeled 10^-7 into the tube labeled 10^-8 then vortexed quickly
- 10 microliters were transferred from the undiluted sample into a test tube with 250 microliters of the host bacteria and left to sit for 10 minutes
- 10 microliters were transferred from the tube labeled 10^-1 into a test tube with 250 microliters of the host bacteria and left to sit for 10 minutes
- 10 microliters were transferred from the tube labeled 10^-2 into a test tube with 250 microliters of the host bacteria and left to sit for 10 minutes
- 10 microliters were transferred from the tube labeled 10^-3 into a test tube with 250 microliters of the host bacteria and left to sit for 10 minutes
- 10 microliters were transferred from the tube labeled 10^-4 into a test tube with 250 microliters of the host bacteria and left to sit for 10 minutes
- 10 microliters were transferred from the tube labeled 10^-5 into a test tube with 250 microliters of the host bacteria and left to sit for 10 minutes
- 10 microliters were transferred from the tube labeled 10^-6into a test tube with 250 microliters of the host bacteria and left to sit for 10 minutes
- 10 microliters were transferred from the tube labeled 10^-7 into a test tube with 250 microliters of the host bacteria and left to sit for 10 minutes
- 10 microliters were transferred from the tube labeled 10^-8 into a test tube with 250 microliters of the host bacteria and left to sit for 10 minutes
- 3 ml of molten top agar was added with a pipette to the test tube with the host bacteria with the liquid from the undiluted sample and sucked out after putting in the top agar in and plated on the host bacteria labeled undiluted
- 3 ml of molten top agar was added with a pipette to the test tube with the host bacteria with the liquid from microcentrifuge tube 10^-1 and sucked out after putting in the top agar in and plated on the host bacteria labeled 10^-1
- 3 ml of molten top agar was added with a pipette to the test tube with the host bacteria with the liquid from microcentrifuge tube 10^-2 and sucked out after putting in the top agar in and plated on the host bacteria labeled 10^-2
- 3 ml of molten top agar was added with a pipette to the test tube with the host bacteria with the liquid from microcentrifuge tube 10^-3 and sucked out after putting in the top agar in and plated on the host bacteria labeled 10^-3
- 3 ml of molten top agar was added with a pipette to the test tube with the host bacteria with the liquid from microcentrifuge tube 10^-4 and sucked out after putting in the top agar in and plated on the host bacteria labeled 10^-4
- 3 ml of molten top agar was added with a pipette to the test tube with the host bacteria with the liquid from microcentrifuge tube 10^-5 and sucked out after putting in the top agar in and plated on the host bacteria labeled 10^-5
- 3 ml of molten top agar was added with a pipette to the test tube with the host bacteria with the liquid from microcentrifuge tube 10^-6 and sucked out after putting in the top agar in and plated on the host bacteria labeled 10^-6
- 3 ml of molten top agar was added with a pipette to the test tube with the host bacteria with the liquid from microcentrifuge tube 10^-7 and sucked out after putting in the top agar in and plated on the host bacteria labeled 10^-7
- 3 ml of molten top agar was added with a pipette to the test tube with the host bacteria with the liquid from microcentrifuge tube 10^-8 and sucked out after putting in the top agar in and plated on the host bacteria labeled 10^-8
- All samples were left out for 20 minutes for the top agar to set up
- All samples were inverted and put in an incubator set between 23 and 30 degrees Celsius for 48 hours

Results:
9/9/20 results were positive

Conclusions and Next Steps:
Plates undiluted, 1, 2, 3, 4, and 5 were positive
undiluted and 1 had litle to no bacteria left on them
2 was webbed
3 had many plaques
4 had less than 100 plaques
5 had 1 plaque
plate 2 will be used to collect a low titer and to amplify the phage
Amplification
Title: Low volume lysate and full plate titer
Date: 09/09/2020 Redo: No
Purpose: This procedure is to extract phages from a webbed plate in order to collect a low volume lysate and To determine the concentration of phage particles in a lysate by using a plaque assay
Notes:
- The lab area was cleaned aseptically
- Plate labeled -2 was taken from the 2nd serial dilution

- The plate was flooded with 8ml of phage buffer and was allowed to sit at room temp for 2hr
- The plate was tilted and a syringe was used to collect the top liquid from the plate
- The liquid was filtered through a .22 micron filter into a 15ml sterile conical tube
- Next, we performed another serial dilution
- 8 microcentrifuge tubes were label 10^-1, 10^-2 … 10^8
- 90 microliters were placed into each of the labeled microcentrifuge tubes
- 10 microliters were transferred from the conical tube and put into the tube labeled 10^-1 then vortexed quickly
- 10 microliters were transferred from the tube labeled 10^-1 into the tube labeled 10^-2 then vortexed quickly
- 10 microliters were transferred from the tube labeled 10^-2 into the tube labeled 10^-3 then vortexed quickly
- 10 microliters were transferred from the tube labeled 10^-3 into the tube labeled 10^-4 then vortexed quickly
- 10 microliters were transferred from the tube labeled 10^-4 into the tube labeled 10^-5 then vortexed quickly
- 10 microliters were transferred from the tube labeled 10^-5 into the tube labeled 10^-6 then vortexed quickly
- 10 microliters were transferred from the tube labeled 10^-6 into the tube labeled 10^-7 then vortexed quickly
- 10 microliters were transferred from the tube labeled 10^-7 into the tube labeled 10^-8 then vortexed quickly
- 10 microliters were transferred from the undiluted sample into a test tube with 250 microliters of the host bacteria and left to sit for 10 minutes
- 10 microliters were transferred from the tube labeled 10^-1 into a test tube with 250 microliters of the host bacteria and left to sit for 10 minutes
- 10 microliters were transferred from the tube labeled 10^-2 into a test tube with 250 microliters of the host bacteria and left to sit for 10 minutes
- 10 microliters were transferred from the tube labeled 10^-3 into a test tube with 250 microliters of the host bacteria and left to sit for 10 minutes
- 10 microliters were transferred from the tube labeled 10^-4 into a test tube with 250 microliters of the host bacteria and left to sit for 10 minutes
- 10 microliters were transferred from the tube labeled 10^-5 into a test tube with 250 microliters of the host bacteria and left to sit for 10 minutes
- 10 microliters were transferred from the tube labeled 10^-6into a test tube with 250 microliters of the host bacteria and left to sit for 10 minutes
- 10 microliters were transferred from the tube labeled 10^-7 into a test tube with 250 microliters of the host bacteria and left to sit for 10 minutes
- 10 microliters were transferred from the tube labeled 10^-8 into a test tube with 250 microliters of the host bacteria and left to sit for 10 minutes
- 3 ml of molten top agar was added with a pipette to the test tube with the host bacteria with the liquid from the undiluted sample and sucked out after putting in the top agar in and plated on the host bacteria labeled undiluted
- 3 ml of molten top agar was added with a pipette to the test tube with the host bacteria with the liquid from microcentrifuge tube 10^-1 and sucked out after putting in the top agar in and plated on the host bacteria labeled 10^-1
- 3 ml of molten top agar was added with a pipette to the test tube with the host bacteria with the liquid from microcentrifuge tube 10^-2 and sucked out after putting in the top agar in and plated on the host bacteria labeled 10^-2
- 3 ml of molten top agar was added with a pipette to the test tube with the host bacteria with the liquid from microcentrifuge tube 10^-3 and sucked out after putting in the top agar in and plated on the host bacteria labeled 10^-3
- 3 ml of molten top agar was added with a pipette to the test tube with the host bacteria with the liquid from microcentrifuge tube 10^-4 and sucked out after putting in the top agar in and plated on the host bacteria labeled 10^-4
- 3 ml of molten top agar was added with a pipette to the test tube with the host bacteria with the liquid from microcentrifuge tube 10^-5 and sucked out after putting in the top agar in and plated on the host bacteria labeled 10^-5
- 3 ml of molten top agar was added with a pipette to the test tube with the host bacteria with the liquid from microcentrifuge tube 10^-6 and sucked out after putting in the top agar in and plated on the host bacteria labeled 10^-6
- 3 ml of molten top agar was added with a pipette to the test tube with the host bacteria with the liquid from microcentrifuge tube 10^-7 and sucked out after putting in the top agar in and plated on the host bacteria labeled 10^-7
- 3 ml of molten top agar was added with a pipette to the test tube with the host bacteria with the liquid from microcentrifuge tube 10^-8 and sucked out after putting in the top agar in and plated on the host bacteria labeled 10^-8
- All samples were left out for 20 minutes for the top agar to set up
- All samples were inverted and put in an incubator set between 23 and 30 degrees Celsius for 48 hours.
Results:
9/14/20 Results were positive on all plates but -8
Conclusions and Next Steps:
We will calculate our titer and make webbed plates to harvest our high volume lysate

Title: Making Webbed Plates from a Lysate of Known Titer
Date: 9/14/20
Redo: No
Purpose: To create a plate with a very high density of plaques from a lysate of known titer
Notes:
- The lab area was cleaned aseptically
- Titered lysate was collected from the previous step
- We estimated around 15000 plaques needed to make a webbed plate
- Math to determine the volume of lysate needed

- 7.41 microliters were micropipetted into a test tube containing 250 microliters containing the host bacteria this was repeated six times
- This was left for 10 minutes
- Next 3 mL of molten agar was pipetted into the test tube then aspirated out and put onto the plates
- Plates were left for 20 minutes to sit up
- Three of the plates did not set up three did
- The three that did were inverted and put in the incubator
- The three that did not were put in the incubator without being inverted
- Plates were left for 24 hours
Results:
Results had growth but not enough to make a webbed plate


Conclusions and Next Steps:
The amount of the sample was not high enough. In the next step, we will increase the sample to 8.5 microliters.
Title: Making Webbed Plates from a Lysate of Known Titer
Date: 9/14/20
Redo: Yes from the plates not sitting up
Purpose: To create a plate with a very high density of plaques from a lysate of known titer
Notes:
- The lab area was cleaned aseptically
- Titered lysate was used
- 7.41 microliters were micropipetted into a test tube containing 250 microliters containing the host bacteria this was repeated three times
- This was left for 10 minutes
- Next 3 mL of molten agar was pipetted into the test tube then aspirated out and put onto the plates
- Plates were left for 20 minutes to sit up
- The plates were inverted and placed in the incubator
- Plates were left for 24 hours
Results:
Results had growth but not enough to make a webbed plate
Conclusions and Next Steps:
The amount of the sample was not high enough. In the next step, we will increase the sample to 8.5 microliters.
Title: Making Webbed Plates from a Lysate of Known Titer
Date: 9/16/20
Redo: Yes
Purpose: To create a plate with a very high density of plaques from a lysate of known titer
Notes:
- The lab area was cleaned aseptically
- Titered lysate was used
- Next, we performed another serial dilution
- 8 microcentrifuge tubes were label 10^-1, 10^-2, 10^-3
- 90 microliters were placed into each of the labeled microcentrifuge tubes
- 10 microliters were transferred from the conical tube and put into the tube labeled 10^-1 then vortexed quickly
- 10 microliters were transferred from the tube labeled 10^-1 into the tube labeled 10^-2 then vortexed quickly
- 10 microliters were transferred from the tube labeled 10^-2 into the tube labeled 10^-3 then vortexed quickly
- 8.5 microliters from the tube labeled 10^-3 were micropipetted into a test tube containing 250 microliters containing the host bacteria this was repeated six times
- This was left for 10 minutes
- Next 3 mL of molten agar was pipetted into the test tube then aspirated out and put onto the plates
- Plates were left for 20 minutes to sit up
- The plates were inverted and placed in the incubator
- Plates were left for 24 hours
Results:
Results had growth but not enough to make a webbed plate
Conclusions and Next Steps:
Agar was too hot it had set up and we had to microwave it and did not cool off enough we will repeat with agar at the correct temerature

Title: Making Webbed Plates from a Lysate of Known Titer
Date: 9/18/20
Redo: Yes
Purpose: To create a plate with a very high density of plaques from a lysate of known titer
Notes:
- The lab area was cleaned aseptically
- Titered lysate was used
- Next, we performed another serial dilution
- 8.5 microliters from the tube labeled 10^-3 were micropipetted into a test tube containing 250 microliters containing the host bacteria this was repeated six times
- This was left for 10 minutes
- Next 3 mL of molten agar was pipetted into the test tube then aspirated out and put onto the plates
- Plates were left for 20 minutes to sit up
- The plates were inverted and placed in the incubator
- Plates were left for 36 hours and put in the fridge then returned to the incubator for another 14 hours
Results:
Results were webbed enough to flood

Conclusions and Next Steps:
The plates will be flooded, collected, and re-titered.
Title: Low volume lysate and full plate titer
Date: 09/22-24/2020 Redo: No
Purpose: This procedure is to extract phages from a webbed plate in order to collect a low volume lysate and To determine the concentration of phage particles in a lysate by using a plaque assay
Notes:
- The lab area was cleaned aseptically
- Plates from above were used
- The plates were flooded with 8ml of phage buffer and were allowed to sit at room temp for 2hr
- The plate was tilted and a syringe was used to collect the top liquid from the plate
- The liquid was filtered through a .22 micron filter into a 15ml sterile conical tube
- Next, we performed another serial dilution
- 8 microcentrifuge tubes were label 10^-1, 10^-2 … 10^8
- 90 microliters were placed into each of the labeled microcentrifuge tubes
- 10 microliters were transferred from the conical tube and put into the tube labeled 10^-1 then vortexed quickly
- 10 microliters were transferred from the tube labeled 10^-1 into the tube labeled 10^-2 then vortexed quickly
- 10 microliters were transferred from the tube labeled 10^-2 into the tube labeled 10^-3 then vortexed quickly
- 10 microliters were transferred from the tube labeled 10^-3 into the tube labeled 10^-4 then vortexed quickly
- 10 microliters were transferred from the tube labeled 10^-4 into the tube labeled 10^-5 then vortexed quickly
- 10 microliters were transferred from the tube labeled 10^-5 into the tube labeled 10^-6 then vortexed quickly
- 10 microliters were transferred from the tube labeled 10^-6 into the tube labeled 10^-7 then vortexed quickly
- 10 microliters were transferred from the tube labeled 10^-7 into the tube labeled 10^-8 then vortexed quickly
- 10 microliters were transferred from the undiluted sample into a test tube with 250 microliters of the host bacteria and left to sit for 10 minutes
- 10 microliters were transferred from the tube labeled 10^-1 into a test tube with 250 microliters of the host bacteria and left to sit for 10 minutes
- 10 microliters were transferred from the tube labeled 10^-2 into a test tube with 250 microliters of the host bacteria and left to sit for 10 minutes
- 10 microliters were transferred from the tube labeled 10^-3 into a test tube with 250 microliters of the host bacteria and left to sit for 10 minutes
- 10 microliters were transferred from the tube labeled 10^-4 into a test tube with 250 microliters of the host bacteria and left to sit for 10 minutes
- 10 microliters were transferred from the tube labeled 10^-5 into a test tube with 250 microliters of the host bacteria and left to sit for 10 minutes
- 10 microliters were transferred from the tube labeled 10^-6into a test tube with 250 microliters of the host bacteria and left to sit for 10 minutes
- 10 microliters were transferred from the tube labeled 10^-7 into a test tube with 250 microliters of the host bacteria and left to sit for 10 minutes
- 10 microliters were transferred from the tube labeled 10^-8 into a test tube with 250 microliters of the host bacteria and left to sit for 10 minutes
- 3 ml of molten top agar was added with a pipette to the test tube with the host bacteria with the liquid from the undiluted sample and sucked out after putting in the top agar in and plated on the host bacteria labeled undiluted
- 3 ml of molten top agar was added with a pipette to the test tube with the host bacteria with the liquid from microcentrifuge tube 10^-1 and sucked out after putting in the top agar in and plated on the host bacteria labeled 10^-1
- 3 ml of molten top agar was added with a pipette to the test tube with the host bacteria with the liquid from microcentrifuge tube 10^-2 and sucked out after putting in the top agar in and plated on the host bacteria labeled 10^-2
- 3 ml of molten top agar was added with a pipette to the test tube with the host bacteria with the liquid from microcentrifuge tube 10^-3 and sucked out after putting in the top agar in and plated on the host bacteria labeled 10^-3
- 3 ml of molten top agar was added with a pipette to the test tube with the host bacteria with the liquid from microcentrifuge tube 10^-4 and sucked out after putting in the top agar in and plated on the host bacteria labeled 10^-4
- 3 ml of molten top agar was added with a pipette to the test tube with the host bacteria with the liquid from microcentrifuge tube 10^-5 and sucked out after putting in the top agar in and plated on the host bacteria labeled 10^-5
- 3 ml of molten top agar was added with a pipette to the test tube with the host bacteria with the liquid from microcentrifuge tube 10^-6 and sucked out after putting in the top agar in and plated on the host bacteria labeled 10^-6
- 3 ml of molten top agar was added with a pipette to the test tube with the host bacteria with the liquid from microcentrifuge tube 10^-7 and sucked out after putting in the top agar in and plated on the host bacteria labeled 10^-7
- 3 ml of molten top agar was added with a pipette to the test tube with the host bacteria with the liquid from microcentrifuge tube 10^-8 and sucked out after putting in the top agar in and plated on the host bacteria labeled 10^-8
- All samples were left out for 20 minutes for the top agar to set up
- All samples were inverted and put in an incubator set between 23 and 30 degrees Celsius for 22 hours.
Results:
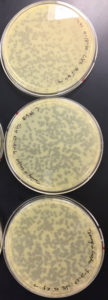
9/24/20 undiluted and -1 were completely gone, -2 and -3 were webbed, -4, -5, and -6 had a few spots -7 and -8 were negative.


Conclusions and Next Steps
Our titer prior to this was off this is due to an inaccurate counting of the plaques this count was more accurate because the light plate was used. The same dilution that was used on the -2 plate will be used to make more webbed plates
The titer is 7.4e7

Title: Making Webbed Plates from a Lysate of Known Titer
Date: 9/28/20
Redo: Yes
Purpose: To create a plate with a very high density of plaques from a lysate of known titer
Notes:
- The lab area was cleaned aseptically
- Titered lysate was used
- Next, we performed another serial dilution
- 10 microliters from the tube labeled 10^-2 were micropipetted into a test tube containing 250 microliters containing the host bacteria this was repeated eight times
- This was left for 10 minutes
- Next 3 mL of molten agar was pipetted into the test tube then aspirated out and put onto the plates
- Plates were left for 20 minutes to sit up
- The plates were inverted and placed in the incubator
- Plates were left for 24 hours
Results:
Results were webbed enough to flood
Conclusions and Next Steps:
The plates will be flooded, collected, and re-titered.
Title: High volume lysate and full plate titer
Date: 09/29/2020 Redo: No
Purpose: This procedure is to extract phages from a webbed plate in order to collect a high volume lysate and To determine the concentration of phage particles in a lysate by using a plaque assay
Notes:
- The lab area was cleaned aseptically
- Plates from above were used
- The plates were flooded with 8ml of phage buffer and were allowed to sit at room temp for 2hr
- The plate was tilted and a syringe was used to collect the top liquid from the plate
- The liquid was filtered through a .22 micron filter into a 15ml sterile conical tube
- Next, we performed another serial dilution
- 8 microcentrifuge tubes were label 10^-1, 10^-2 … 10^8
- 90 microliters were placed into each of the labeled microcentrifuge tubes
- 10 microliters were transferred from the conical tube and put into the tube labeled 10^-1 then vortexed quickly
- 10 microliters were transferred from the tube labeled 10^-1 into the tube labeled 10^-2 then vortexed quickly
- 10 microliters were transferred from the tube labeled 10^-2 into the tube labeled 10^-3 then vortexed quickly
- 10 microliters were transferred from the tube labeled 10^-3 into the tube labeled 10^-4 then vortexed quickly
- 10 microliters were transferred from the tube labeled 10^-4 into the tube labeled 10^-5 then vortexed quickly
- 10 microliters were transferred from the tube labeled 10^-5 into the tube labeled 10^-6 then vortexed quickly
- 10 microliters were transferred from the tube labeled 10^-6 into the tube labeled 10^-7 then vortexed quickly
- 10 microliters were transferred from the tube labeled 10^-7 into the tube labeled 10^-8 then vortexed quickly
- 10 microliters were transferred from the undiluted sample into a test tube with 250 microliters of the host bacteria and left to sit for 10 minutes
- 10 microliters were transferred from the tube labeled 10^-1 into a test tube with 250 microliters of the host bacteria and left to sit for 10 minutes
- 10 microliters were transferred from the tube labeled 10^-2 into a test tube with 250 microliters of the host bacteria and left to sit for 10 minutes
- 10 microliters were transferred from the tube labeled 10^-3 into a test tube with 250 microliters of the host bacteria and left to sit for 10 minutes
- 10 microliters were transferred from the tube labeled 10^-4 into a test tube with 250 microliters of the host bacteria and left to sit for 10 minutes
- 10 microliters were transferred from the tube labeled 10^-5 into a test tube with 250 microliters of the host bacteria and left to sit for 10 minutes
- 10 microliters were transferred from the tube labeled 10^-6into a test tube with 250 microliters of the host bacteria and left to sit for 10 minutes
- 10 microliters were transferred from the tube labeled 10^-7 into a test tube with 250 microliters of the host bacteria and left to sit for 10 minutes
- 10 microliters were transferred from the tube labeled 10^-8 into a test tube with 250 microliters of the host bacteria and left to sit for 10 minutes
- 3 ml of molten top agar was added with a pipette to the test tube with the host bacteria with the liquid from the undiluted sample and sucked out after putting in the top agar in and plated on the host bacteria labeled undiluted
- 3 ml of molten top agar was added with a pipette to the test tube with the host bacteria with the liquid from microcentrifuge tube 10^-1 and sucked out after putting in the top agar in and plated on the host bacteria labeled 10^-1
- 3 ml of molten top agar was added with a pipette to the test tube with the host bacteria with the liquid from microcentrifuge tube 10^-2 and sucked out after putting in the top agar in and plated on the host bacteria labeled 10^-2
- 3 ml of molten top agar was added with a pipette to the test tube with the host bacteria with the liquid from microcentrifuge tube 10^-3 and sucked out after putting in the top agar in and plated on the host bacteria labeled 10^-3
- 3 ml of molten top agar was added with a pipette to the test tube with the host bacteria with the liquid from microcentrifuge tube 10^-4 and sucked out after putting in the top agar in and plated on the host bacteria labeled 10^-4
- 3 ml of molten top agar was added with a pipette to the test tube with the host bacteria with the liquid from microcentrifuge tube 10^-5 and sucked out after putting in the top agar in and plated on the host bacteria labeled 10^-5
- 3 ml of molten top agar was added with a pipette to the test tube with the host bacteria with the liquid from microcentrifuge tube 10^-6 and sucked out after putting in the top agar in and plated on the host bacteria labeled 10^-6
- 3 ml of molten top agar was added with a pipette to the test tube with the host bacteria with the liquid from microcentrifuge tube 10^-7 and sucked out after putting in the top agar in and plated on the host bacteria labeled 10^-7
- 3 ml of molten top agar was added with a pipette to the test tube with the host bacteria with the liquid from microcentrifuge tube 10^-8 and sucked out after putting in the top agar in and plated on the host bacteria labeled 10^-8
- All samples were left out for 20 minutes for the top agar to set up
- All samples were inverted and put in an incubator set between 23 and 30 degrees Celsius for 22 hours.
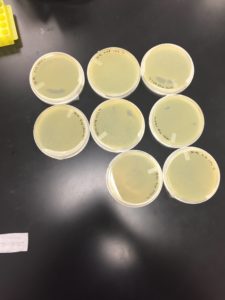
Results: all but -8 had plaques

Conclusions and Next Steps
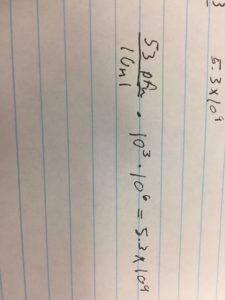
Titer was calculated and was 5.3e9
Next is the DNA extraction process
Title: Archiving Phage Sample
Date Started: 10/5/2020 Redo? No
Purpose: To prepare a high-titer lysate for long-term storage.
Notes:
Prepared archiving tubes.
1. Retrieved two barcoded tubes for storage at the University of Pittsburgh and a third tube for storage at your institution. This third tube did not need to be barcoded.
2. Properly labeled each tube with our phage’s name Fizzles.
3. Using aseptic technique, we carefully filled each tube with sterile beads to 1.5 cm from the top of the tube.
4. Prepared DMSO/lysate mixture.
Turned off our flame, as DMSO and its vapors are flammable.
5. Dispensed 2.8 ml of our high-titer lysate into a sterile 15 ml conical tube.
6. Added 200 μl DMSO to the tube, capped the tube, and then vortexed the mixture.
7. Aliquoted the mixture into the storage tubes.
8. Pipetted the lysate/DMSO mixture into each of the labeled tubes so that the beads were just covered.
9. Avoided overfilling and underfilling the tubes.
12. Samples stored at our institution were frozen immediately.
Title: Preparation Electron Microscopy
Date Started: 10/5/2020 Redo: No
Purpose: To prepare the phage sample for viewing with a transmission electron microscope.
Notes:
- The phage sample was prepared.
- 1 ml of the high-titer lysate was transferred into a sterile microcentrifuge tube.
- The sample was centrifuged for 1 hour at 4 °C at top speed to concentrate the phage particles at the bottom of the tube.
- Using a micropipette, the supernatant was removed.
- 100 μl of phage buffer were added it was left to re-suspend at 4 °C for 60 minutes.
- The grid was set up.
- A fresh pair of gloves were put on, disinfected with ethanol, and allowed to dry.
- In the previously prepared workspace, the cover was removed from a 5 x 5 cm piece of parafilm, and the parafilm was placed into the lid of a Petri dish.
- A PELCO Tab was placed onto the parafilm in the lid of the Petri dish and then exposed.
- Using EM forceps, a fresh grid was removed from a box of unused grids.
- The grid was placed dark-and-shiny side up, on the edge of the tab so that only the very edge of the grid was touching the adhesive.
- The phage was mounted and stained.
- Using a micropipette,10 μl of lysate was transferred onto the grid without touching the tip to the grid itself.
- The phage was allowed to settle and attach onto the grid for 2 minutes.
- Using a small wedge of filter paper, the excess fluid was wicked off.
- The grid was rinsed two times by pipetting 10 μl of sterile water onto the grid, allowing it to sit for 2 minutes, and wicking off the water using a fresh wedge of filter paper.
- 10 μl of 1 % uranyl acetate was added to the grid.
- It sat for 2 minutes.
- The excess stain was wicked off with a wedge of filter paper, and the was allowed to air dry for less than 1 minute before putting it safely back into the grid box.
- The grid box was placed in the desiccator for storage.
- The sample will be transported to the EM facility for imaging
Results
Pending
Conclusion and Next Steps:
Continue with DNA extraction.
DNA Extraction
Title: DNA Extraction
Date: 10/7-8/2020 Redo: No
Purpose: The goal of this procedure is to obtain high-quality DNA from the concentrated phage lysate.
Notes:
Day One
1. Gently mixed the HVL, then aliquoted 5mL of lysate into a 15 mL conical tube. Give that tube added 20uL of nuclease
2. Gently inverted the tube and incubate at 37°C for 10min.
3. Aliquoted lysate into 5 microfuge tubes, 1mL each.
4. To each tube, add 20uL of ZnCl2, mixed gently by inversion, and incubated at 37°C for 5min.
5. Centrifuged at 10,000rpm for 1min to pellet the phage.
STEPS 6 and 7 MUST BE DONE QUICKLY AND EFFICIENTLY
6. KEPT THE PELLET. Removed supernatants by aspiration
7. Resuspend pellets in 500uL TES buffer per tube and incubated at 60°C for 15min.
8. Add 1uL of Proteinase K and mix gently. Incubated at 37°C for 10min
9. Added 60uL of potassium acetate to each tube. Mixed well and left on ice for 15min.
10. Centrifuged at 4°C for 1min at 12,000rpm to pellet the capsids. KEPT THE SUPERNATANTS
11. Added 500uL of isopropanol to each of the tubes with the supernatant, mix, and left on ice overnight
Day Two
12. Centrifuged at top speed for 10min to pellet DNA and discarded the supernatant into a WASTE
13. Added 250uL of 70% ethanol in each tube, and spun again for 1min, at top speed.
14. Dried the DNA pellets at room temperature by turning upside-down onto paper towels, tapped out excess liquid, and left upside-down until pellets appeared dry
15. Resuspended the first pellet in 50uL nuclease-free water. Then used that solution to resuspend the next pellet. Continued until all 5 pellets have been resuspended in the same 50uL of water.
16. Used nanodrop to check DNA concentration
Results:
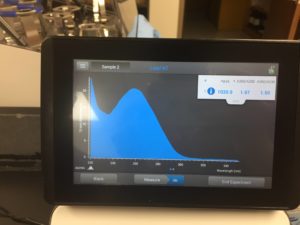
concentration was 1030.9 ng/μL
A260/A280 was 1.97
A260/A230 was 1.50
Conclusions and Next Steps:
DNA was pure enough now moving onto gel electrophoresis
Title: resuspended Pellets from above
Date: 10/15/2020 Redo: No
Purpose: Collect DNA
Notes:
- 1. Resuspended the first pellet in 50uL nuclease-free water. Then used that solution to resuspend the next pellet. Continued until all 5 pellets have been resuspended in the same 50uL of water.
- Used nanodrop to check DNA concentration
Results:
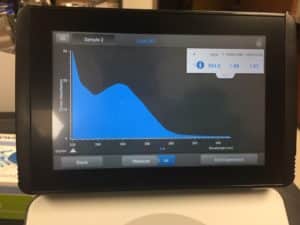
concentration was 934.0 ng/μL
A260/A280 was 1.88
A260/A230 was 1.07
Conclusions and Next Steps:
DNA was pure enough now moving onto gel electrophoresis
Title: DNA Extraction
Date: 10/19/2020 Redo: yes
Purpose: The goal of this procedure is to obtain high-quality DNA from the concentrated phage lysate.
Notes:
Day One
1. Gently mixed the HVL, then aliquoted 5mL of lysate into a 15 mL conical tube. Give that tube added 20uL of nuclease
2. Gently inverted the tube and incubate at 37°C for 10min.
3. Aliquoted lysate into 5 microfuge tubes, 1mL each.
4. To each tube, add 20uL of ZnCl2, mixed gently by inversion, and incubated at 37°C for 5min.
5. Centrifuged at 10,000rpm for 1min to pellet the phage.
STEPS 6 and 7 MUST BE DONE QUICKLY AND EFFICIENTLY
6. KEPT THE PELLET. Removed supernatants by aspiration
7. Resuspend pellets in 500uL TES buffer per tube and incubated at 60°C for 15min.
8. Add 1uL of Proteinase K and mix gently. Incubated at 37°C for 10min
9. Added 60uL of potassium acetate to each tube. Mixed well and left on ice for 15min.
10. Centrifuged at 4°C for 1min at 12,000rpm to pellet the capsids. KEPT THE SUPERNATANTS
11. Added 500uL of isopropanol to each of the tubes with the supernatant, mix, and left on ice overnight
Day Two
12. Centrifuged at top speed for 10min to pellet DNA and discarded the supernatant into a WASTE
13. Added 250uL of 70% ethanol in each tube, and spun again for 1min, at top speed.
14. Dried the DNA pellets at room temperature by turning upside-down onto paper towels, tapped out excess liquid, and left upside-down until pellets appeared dry
15. Resuspended the first pellet in 50uL nuclease-free water. Then used that solution to resuspend the next pellet. Continued until all 5 pellets have been resuspended in the same 50uL of water.
16. Used nanodrop to check DNA concentration
Results:

concentration was 1803.2 ng/μL
A260/A280 was 2.08
A260/A230 was 1.44
Conclusions and Next Steps:
DNA was pure enough now moving onto gel electrophoresis
Characterization
Title: Setting Up Restriction Enzyme Digests
Date: 10/9/2020 Redo: No
Purpose: To cut your phage genome into multiple fragments based on its DNA sequence
Notes:
- Gently mixed DNA
- Incubated at 65 degrees Celcius for 10 minutes and then placed it on ice
- Spun in a microcentrifuge for less than 1 minute
- Calculated how much DNA was needed
- µl DNA = 0.5 µg (ml/1030.9 µg)(1000 µl/1 ml) = .49 µl
- Next labeled 6 tubes: NSPI, SACII, HAEIII, SALI, Uncut, Ladder
- Put .5 µl of NSPI into the NSPI tube
- Put .5 µl of SACII into the SACII tube
- Put .5 µl of HAEIII into the HAEIII tube
- Put .5 µl of SALI into the SALI tube
- Put 2.5 µl SmartCut into the NSPI Tube
- Put 2.5 µl SmartCut into the SACII Tube
- Put 2.5 µl SmartCut into the HAEIII Tube
- Put 2.5 µl of 3.1 into the SALI Tube
- Put .49 µl of DNA into all four tubes
- Put 21.51 µl of nuclease-free water into all four tubes
- mixed gently and centrifuged for less than 1 min
- Incubated for 1 hr at 37 degrees Celcius
- stored in the freezer until later use
Results:
All looked good
Conclusions and Next Steps:
Next dye will be added for gel electrophoresis
Title: Casting Agarose Gels
Date: 10/14/2020 Redo: No
Purpose: To prepare an agarose gel for electrophoresis
Notes:
- set up a gel apparatus
- calculated that we need 2.4 g of agarose
- transferred the powder to an Erlenmeyer flask
- added 30 mL of 1x TBE buffer to the flask and swirled
- microwaved until it boiled and checked for clumps
- microwaved until clumps were gone
- Allowed to cool for 15 minutes
- added 1.5 μl of EtBr and swirled
- Poured into the apparatus
- allowed to cool for 30 minutes
- carefully removed the comb
- lifted the platform out and rotated
- poured the 1x TBE buffer until the gel was submerged and it reached halfway up the electrodes
Results:
Gel set up good
Conclusions and Next Steps:
Next will add DNA to run gel electrophoresis
Title: Gel Electrophoresis of Restriction Enzyme Digests
Date: 10/14/2020 Redo: No
Purpose: To separate DNA fragments via agarose gel electrophoresis
Notes:
- Added 5 μl of loading dye to each 25 μl tube that had the restriction enzymes
- put .49 μl of DNA and 24.51 nuclease-free water and 5 μl dye in a tube labeled uncut DNA
- Put all five tubes in a heat block that was 65 degrees Celcius for 5 minutes
- immediately put on ice to cool
- Then spun for about 15 sec at 10000 rpm
- Put 1 μl of Hindi digest, 2 μl dye, 7 μl of nuclease-free water into a tube labeled ladder
- Put the sample into the gel in the following order
- Ladder, Uncut, NSPI, SACII, HAEIII, SALI
- Plugged electrodes in and let run for 1 hour
Results:
negative

Conclusions and Next Steps:
Possibly messed up digestive enzymes will resuspend from DNA extraction and try again.
Title: Setting Up Restriction Enzyme Digests
Date: 10/15/2020 Redo: yes
Purpose: To cut your phage genome into multiple fragments based on its DNA sequence
Notes:
- Gently mixed DNA
- Incubated at 65 degrees Celcius for 10 minutes and then placed it on ice
- Spun in a microcentrifuge for less than 1 minute
- Calculated how much DNA was needed
- µl DNA = 0.5 µg (ml/1030.9 µg)(1000 µl/1 ml) = .49 µl
- Next labeled 6 tubes: NSPI, SACII, HAEIII, SALI, Uncut, Ladder
- Put .5 µl of NSPI into the NSPI tube
- Put .5 µl of SACII into the SACII tube
- Put .5 µl of HAEIII into the HAEIII tube
- Put .5 µl of SALI into the SALI tube
- Put 2.5 µl SmartCut into the NSPI Tube
- Put 2.5 µl SmartCut into the SACII Tube
- Put 2.5 µl SmartCut into the HAEIII Tube
- Put 2.5 µl of 3.1 into the SALI Tube
- Put .54 µl of DNA into all four tubes
- Put 21.46 µl of nuclease-free water into all four tubes
- mixed gently and centrifuged for less than 1 min
- Incubated for 1 hr at 37 degrees Celcius
- stored in the freezer until later use
Results:
All looked good
Conclusions and Next Steps:
Next dye will be added for gel electrophoresis
Title: Casting Agarose Gels
Date: 10/16/2020 Redo: yes
Purpose: To prepare an agarose gel for electrophoresis
Notes:
- set up a gel apparatus
- calculated that we need 2.4 g of agarose
- transferred the powder to an Erlenmeyer flask
- added 30 mL of 1x TBE buffer to the flask and swirled
- microwaved until it boiled and checked for clumps
- microwaved until clumps were gone
- Allowed to cool for 15 minutes
- added 1.5 μl of EtBr and swirled
- Poured into the apparatus
- allowed to cool for 30 minutes
- carefully removed the comb
- lifted the platform out and rotated
- poured the 1x TBE buffer until the gel was submerged and it reached halfway up the electrodes
Results:
Gel set up good
Conclusions and Next Steps:
Next will add DNA to run gel electrophoresis
Title: Gel Electrophoresis of Restriction Enzyme Digests
Date: 10/16/2020 Redo: yes
Purpose: To separate DNA fragments via agarose gel electrophoresis
Notes:
- Added 5 μl of loading dye to each 25 μl tube that had the restriction enzymes
- put .54 μl of DNA and 24.46 nuclease-free water and 5 μl dye in a tube labeled uncut DNA
- Put all five tubes in a heat block that was 65 degrees Celcius for 5 minutes
- immediately put on ice to cool
- Then spun for about 15 sec at 10000 rpm
- Put 1 μl of Hindi digest, 2 μl dye, 7 μl of nuclease-free water into a tube labeled ladder
- Put the sample into the gel in the following order
- Ladder, Uncut, NSPI, SACII, HAEIII, SALI
- Plugged electrodes in and let run for 1 hour
Results:
negative
Conclusions and Next Steps:
Not enough DNA will multiply x5 and use 2.7 μl next
Title: Setting Up Restriction Enzyme Digests
Date: 10/16/2020 Redo: yes
Purpose: To cut your phage genome into multiple fragments based on its DNA sequence
Notes:
- Gently mixed DNA
- Incubated at 65 degrees Celcius for 10 minutes and then placed it on ice
- Spun in a microcentrifuge for less than 1 minute
- Calculated how much DNA was needed
- µl DNA = 0.5 µg (ml/1030.9 µg)(1000 µl/1 ml) = .49 µl
- Next labeled 6 tubes: NSPI, SACII, HAEIII, SALI, Uncut, Ladder
- Put .5 µl of NSPI into the NSPI tube
- Put .5 µl of SACII into the SACII tube
- Put .5 µl of HAEIII into the HAEIII tube
- Put .5 µl of SALI into the SALI tube
- Put 2.5 µl SmartCut into the NSPI Tube
- Put 2.5 µl SmartCut into the SACII Tube
- Put 2.5 µl SmartCut into the HAEIII Tube
- Put 2.5 µl of 3.1 into the SALI Tube
- Put 2.7 µl of DNA into all four tubes
- Put 21.46 µl of nuclease-free water into all four tubes
- mixed gently and centrifuged for less than 1 min
- Incubated for 1 hr at 37 degrees Celcius
- stored in the freezer until later use
Results:
All looked good
Conclusions and Next Steps:
Next dye will be added for gel electrophoresis
Title: Casting Agarose Gels
Date: 10/19/2020 Redo: yes
Purpose: To prepare an agarose gel for electrophoresis
Notes:
- set up a gel apparatus
- calculated that we need 2.4 g of agarose
- transferred the powder to an Erlenmeyer flask
- added 30 mL of 1x TBE buffer to the flask and swirled
- microwaved until it boiled and checked for clumps
- microwaved until clumps were gone
- Allowed to cool for 15 minutes
- added 1.5 μl of EtBr and swirled
- Poured into the apparatus
- allowed to cool for 30 minutes
- carefully removed the comb
- lifted the platform out and rotated
- poured the 1x TBE buffer until the gel was submerged and it reached halfway up the electrodes
Results:
Gel set up good
Conclusions and Next Steps:
Next will add DNA to run gel electrophoresis
Title: Gel Electrophoresis of Restriction Enzyme Digests
Date: 10/19/2020 Redo: yes
Purpose: To separate DNA fragments via agarose gel electrophoresis
Notes:
- Added 5 μl of loading dye to each 25 μl tube that had the restriction enzymes
- put 2.7 μl of DNA and 22.3 nuclease-free water and 5 μl dye in a tube labeled uncut DNA
- Put all five tubes in a heat block that was 65 degrees Celcius for 5 minutes
- immediately put on ice to cool
- Then spun for about 15 sec at 10000 rpm
- Put 1 μl of Hindi digest, 2 μl dye, 7 μl of nuclease-free water into a tube labeled ladder
- Put the sample into the gel in the following order
- Ladder, Uncut, NSPI, SACII, HAEIII, SALI
- Plugged electrodes in and let run for 1 hour
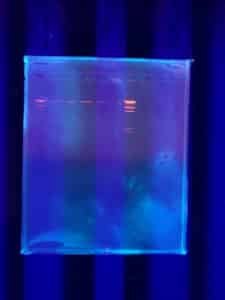
Results:
Positive. The enzymes did not cut the DNA but lines are sharp and bright
Conclusions and Next Steps:
During the final steps, DNA was being extracted test will be run again with DNA with a higher concentration.
Title: Setting Up Restriction Enzyme Digests
Date: 10/26/2020 Redo: yes
Purpose: To cut your phage genome into multiple fragments based on its DNA sequence
Notes:
- Gently mixed DNA
- Incubated at 65 degrees Celcius for 10 minutes and then placed it on ice
- Spun in a microcentrifuge for less than 1 minute
- Calculated how much DNA was needed
- µl DNA = 2.5 µg (ml/1803.2 µg)(1000 µl/1 ml) = 1.4 µl
- Next labeled 6 tubes: NSPI, SACII, HAEIII, SALI, HINDI III, Uncut, Ladder
- Put .5 µl of NSPI into the NSPI tube
- Put .5 µl of SACII into the SACII tube
- Put .5 µl of HAEIII into the HAEIII tube
- Put .5 µl of SALI into the SALI tube
- Put .5 µl of HINDI III into the HINDI III tube
- Put 2.5 µl SmartCut into the NSPI Tube
- Put 2.5 µl SmartCut into the SACII Tube
- Put 2.5 µl SmartCut into the HAEIII Tube
- Put 2.5 µl of 3.1 into the SALI Tube
- Put 2.5 µl of 2.1 into the HINDI IIITube
- Put 1.4 µl of DNA into all five tubes
- Put 20.6 µl of nuclease-free water into all five tubes
- mixed gently and centrifuged for less than 1 min
- Incubated for 1 hr at 37 degrees Celcius
- stored in the freezer until later use
Results:
All looked good
Conclusions and Next Steps:
Next dye will be added for gel electrophoresis
Title: Casting Agarose Gels
Date: 10/28/2020 Redo: yes
Purpose: To prepare an agarose gel for electrophoresis
Notes
- set up a gel apparatus
- calculated that we need 2.4 g of agarose
- transferred the powder to an Erlenmeyer flask
- added 30 mL of 1x TBE buffer to the flask and swirled
- microwaved until it boiled and checked for clumps
- microwaved until clumps were gone
- Allowed to cool for 15 minutes
- added 1.5 μl of EtBr and swirled
- Poured into the apparatus
- allowed to cool for 30 minutes
- carefully removed the comb
- lifted the platform out and rotated
- poured the 1x TBE buffer until the gel was submerged and it reached halfway up the electrodes
Results:
Gel set up good
Conclusions and Next Steps:
Next will add DNA to run gel electrophoresis
Title: Gel Electrophoresis of Restriction Enzyme Digests
Date: 10/19/2020 Redo: yes
Purpose: To separate DNA fragments via agarose gel electrophoresis
Notes:
- Added 5 μl of loading dye to each 25 μl tube that had the restriction enzymes
- put 1.4 μl of DNA and 23.6 nuclease-free water and 5 μl dye in a tube labeled uncut DNA
- Put all six tubes in a heat block that was 65 degrees Celcius for 5 minutes
- immediately put on ice to cool
- Then spun for about 15 sec at 10000 rpm
- Put 1 μl of Hindi digest, 2 μl dye, 7 μl of nuclease-free water into a tube labeled ladder
- Put the sample into the gel in the following order
- Ladder, Uncut, HAEIII, HINDI III, NSPI, SACII, SALI
- Plugged electrodes in and let run for 1 hour
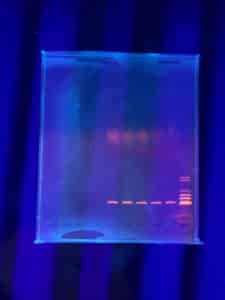
Results:
Negative. The enzymes did not cut the DNA and the lines were not sharp and bright
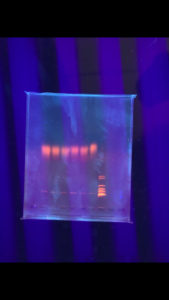
Conclusions and Next Steps:
During the final steps, DNA was being extracted test will be run again with DNA with a higher concentration.