Discovery of BlueJean
BlueJean Information
Morphology: Siphoviridae

Sample Collection
| Collector Name |
Alexis Gastin | Kara Wiggam | Alexis Gastin | Kara Wiggam | Alexis Gastin | Kara Wiggam |
| Sample No. | A1 | K1 | A2 | K2 | A3 | K3 |
| Date of Collection | 8/29/2021 | 8/29/2021 | 9/01/2021 | 9/01/2021 | 9/08/2021 | 9/08/2021 |
| Sample Type | Soil | Soil | Soil | Soil | Soil | Soil |
| General Location | Stephenville, TX | Granbury, TX | Stephenville, TX | Stephenville, TX | Stephenville, TX | Stephenville, TX |
| Location Description | Backyard soil | Shore of lake | Ant pile from Heritage Park | Mud from Heritage Park | Mud from a dog park at Tarleton State | Wet sand from the dog park |
| GPS Coordinates |
32.218186 -98.213436 |
32.381089 -97.701443 |
32.217059 -98.215454 |
32.217333 -98.215279
|
32.218785 -98.218499 |
32.218922 -98.218393
|
| Sample Depth | 1 in. | 2 in. | 1 in. | 2 in. | 2 in. | 2 in. |
| Ambient Temperature | 24°C | 28°C | 29°C | 29°C | 26°C | 27°C |
Isolation/Purification
 Title: Direct Isolation

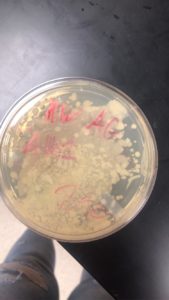
Date: 08/30/2021 Redo: No Sample: #A1
Purpose: This procedure is to isolate and discover any bacteriophages within envormental sample and grow host utilizing plague assay.
Notes:
- After disinfecting and the lab bench we continued on with the experiment by getting out the liquid media and submerging sample 1, gathered by both partners, beneath 2-3ml in the pika. After shaking each tube to ensure the mixture of liquid media with environmental samples 1, each were incubated at 28.7 Celsius and shaken at 220 rpm from 10:20am-12pm.
- Using a syringe we drew up our sample
- We attached a filter and put the sample into a microcentrifuge tube
- Using the yellow micropipette and a yellow tip we drew up 250 micrometers of our sample and put it into our bacteria (250 micrometers)
- Gently mix the sample and let sit for 5-10 minutes
- Using a pipette (blue one) draw up 3 mL of molten agar
- Put agar into bacteria and sample tube and immediately draw back up into pipette
- Dispense into petri dish and gently move around until entire plate is covered
- Let set until agar solidifies (20 minutes)
- Put into incubator for 24 hours
Results:
Due to air bubbles formation during plating the plate was insufficent and there was no indication of a phage. Sample A1 was unsuccessful.
Conclusions and Next Steps:
With the unsuccess in direct isolation we decided to collect samples A2 and K2 and utilize enrichment isolation.
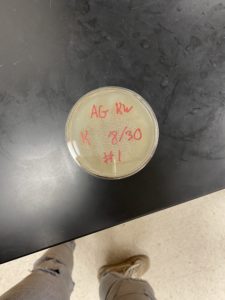
Title: Direct Isolation
Date: August/30/2021 Redo: No Sample: #K1
Purpose: This procedure is to isolate and discover any bacteriophages within envormental sample and grow host utilizing plague assay.
Notes:
- First, we cleaned the work station to prevent contamination.
- We drew the liquid media up using a pipette.
- We transferred the liquid media into our test tubes until the sample was submerged under 2mL of liquid media.
- Tubes were then placed in shaking incubator at 220 rpm and 28.7℃ for an hour and forty minutes.
After incubation period:
- Using a syringe, we drew up our sample.
- We attached a filter and put the sample into a microcentrifuge tube.
- Using the yellow micropipette and a yellow tip we drew up 250 micrometers of our sample and put it into our bacteria (also 250 micrometers).
- We gently mixed the sample and let sit for 5-10 minutes.
- Using a pipette, we drew up 3 mL of warm agar.
- We put agar into the tube containing our bacteria and sample and immediately drew it back up into the pipette.
- We dispensed the sample into a petri dish and gently moveed it around until entire plate was covered.
- We let the petri dish sit until agar solidifies (20 minutes).
- Sample was then placed in incubator for 24 hours.
Results:
Sample #K1 had not grown any plaques after 24 hours in the incubator and was unsuccessful.
Conclusions and Next Steps:
We will move collect another sample and see if it is successful.
Title: Enrichment Isolation
Date: 09/01/2021 – 09/07/2021 Redo: No Sample: #A2
Purpose: This procedure is to isolate and discover any bacteriophages within envormental sample and grow host.
Notes:
09/01/2021
After being unsuccessful with direct isolation we decided to continue on with utilizing enrichment isolation with entirely new samples (samples A2 and K2).
- 10mL of sample A2 was transferred into a 50mL conical tube and 17mL of liquid media was added.
- After ten minutes of isolation we realized that our group had a happy little accident and forgot to vortex. We pulled our sample from the incubator at 10:18AM and shook our sample for 2 minutes.
- The sample was put back into the incubator at 10:20AM to be left for 1-2 hours
- At 12:18PM sample 2A was retrieved from the incubator and weighted (34.42g). Water was weighed (35.12g) to act as a balance while sample 2A is centrifuged at 3110 RPM for 10 minutes as 22°C.
- 250 microliters of bacteria (M. follorium) were added to the sample
- Sample A1 was then placed back in the shaking incubator at 220 rpm and 29℃ on 9/1 at 1:00 PM
09/03/2021
- On 9/3 sample A2 was removed from the incubator at 2:32pm.
- Using a pipette, 2.8 mL of sample A2 was transferred and divided into 2 microcentrifuge tubes and centrifuged for 1 minute at 10X speed.
- The rest of sample A2 (not transferred into microcentrifuge tubes) was put back into the incubator to be pulled out on day 5.5.
- The microcentrifuge tubes were put into the incubator at 3:00pm at 4°C
09/07/2021
- The lab bench was disinfected using aseptic techniques.
- A CiDecon was sprayed and then wiped with KimWipes to spread the solution
- Ethanol alcohol was sprayed and wiped with KimWipes to spread and help the CiDecon to dry.
- The rest of A2 that was not centrifuged last friday (day 2 of shaking) was pulled this morning at 10:00AM from the shaking incubator on day 5.5.
- After being centrifuged at a high rate (10X) for 1 minute, the tube was again stored in the incubator at 4°C because we ran out of time in the lab.
- At 4:30PM, the centrifuged tubes (pulled on day 5.5 were pulled) and filtered
- Sample A2 (pulled on day 5.5) was then put in the incubator at 4°C
- This part of sample A2 that was pulled on a later day is meant to be a backup in case that part of sample A2 that was pulled on day 2 was unsuccessful.
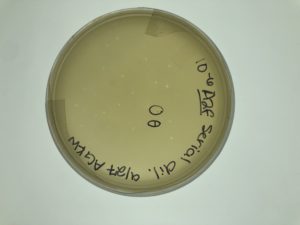
Spot Test for Sample A2 (pulled on day 2)
09/07/2021
- Sample A2(that was pulled on day 2 (9/3)) was pulled from the incubator at 5:00PM
- Sample A2 was drawn up be a serological pipette and dispensed into the host bacteria
- 3mL of molten agar was drawn up by a serological pipette and added to the tube containing both sample A2 and host bacteria
- Immediately the contents(molten agar, sample A2, and host bacteria) within the tube were drawn up by a serological pipette and dispensed into a plate
- The plate sat undisturbed for 20 minutes
- The plate was placed in the incubator at 5:55PM at a temperature of 28.7°C.
- Intended to sit for 24-48 hours
Results:
On 09/09/2021 at 12:05 PM, the plate made for A2 was checked and plaques had formed.

 Conclusions and Next Steps:
A2 was placed in the fridge to be checked for further plaque growth after 24 hours.
Title: Enrichment Isolation
Date: 09/08/2021 – 09/13/2021 Redo: No Sample: #K2
Purpose: This procedure is to isolate and discover any bacteriophages within envormental sample and grow host.
Notes:
- The lab bench was disinfected using aseptic techniques.
- A CiDecon was sprayed and then wiped with KimWipes to spread the solution
- Ethanol alcohol was sprayed and wiped with KimWipes to spread and help the CiDecon to dry.
- 10mL of sample K2 was transferred into a 50mL conical tube.
- 25mL of PYCa (liquid media) were dispensed into the same 50mL tube containing the environmental sample.
- PYCa was transferred by utilizing a serological pipette.
- The 50mL tube was filled to the 35mL mark.
- The 50mL tube (containing PYCa and sample K2) was vortexed for 1 minute.
- K2 was put into the shaking incubator at 9:20AM at a temperature of 29.0°C at 250 RPM.
- After 2 hours, sample K2 was pulled from the shaking incubator.
- A balance of water weighing 39.12g was made to be centrifuged with sample K2 for 10 minutes at 3110 RPM in 4°C.
- For an unknown amount of time the centrifuge had stopped because another sample from another group was off balance
- The centrifuge was restarted with K2 and its balance for 10 minutes to ensure it was fully spun for the correct amount of time.
- After removing K2 from the centrifuge, using a serological pipette the supernatant was removed from the 50mL conical tube.
- The supernatant was immediately transferred into a serological syringe.
- Using the syringe, K2 was filtered with a 0.22um filter into a new sterile 50mL conical tube.
- 250um of bacteria was drawn up with a serological pipette and transferred into the K2 superantant.
- The combined bacteria and K2 mixture in the 50mL conical tube was closed only a quarter of a turn and lab tape was applied to it to let the sample aerate.
- Sample K2 was placed into the shaking incubator at 250 rpm and 28.5℃ at 1 PM.
- Intended to incubate for 2-5 days
09/13/2021
- The lab bench was disinfected using aseptic techniques.
- A CiDecon was sprayed and then wiped with KimWipes to spread the solution
- Ethanol alcohol was sprayed and wiped with KimWipes to spread and help the CiDecon to dry.
- After 5 days the K2 sample was removed from the shaking incubator on 9/13 at 9:10AM
- K2 was drawn up by a serological pipette and 2.8 mL was dispensed into two 1.4mL microcentrifuge tubes.
- Each tube containing K2 acted as balance to each other when centrifuged for 1 minute at 10X speed.
- Since the supernatant of K2 was not as clear as desired, the decision was made to filter the supernatant using a serological syringe and a 0.22um filter.
- Using a serological pipette the supernatant of each tube was drawn up and dispensed into a serological syringe.
- K2 in from one of the microcentrifuge tubes was contaminated when trying to transfer into the serological syringe.
- After getting a new sterile syringe the second K2 microtube was transferred into the serological syringe successfully.
- K2 was filtered using a serological syringe and a 0.22um filter into a new sterile microcentrifuge tube.
- The K2 filtrate was moved into an incubator at 4℃ at 9:30AM
- Intended to sit for 48 hours
Results:
The K2 sample was lost.
Conclusions and Next Steps:
We will move on with picking a plaque for A2.
Title: Picking a Plaque
Date: 09/13/2021 Redo: No Sample: #A2
Purpose: This procedure is to pick plaques that are good candidates for serial dilution.
Notes:
- There were 3 plagues picked to be candidates for serial dilution.
- Each plague was marked either “a”, “b”, or “c”.
- Three microcentrifuge tubes were filled with 100uL of PYCa (liquid media) using a micropipette and a 200uL tip.
- Using a 0.2-200uL tip attached to a micropipette, the device was stabbed into plague a from the plate
- Immediately after the same tip that was stabbed into plague “a” and was placed into microcentrifuge tube “a”.
- Processes from 4 and 5 were repeated for plagues “b” and “c” into microcentrifuge tubes “b” and “c”.
- All 3 microcentrifuge tubes were placed into the incubator at 4℃ at 10:33AM
Plaque Description
“a”- very small, clear toward center of plate, isolated
“b”- very small, clear, ~0.75in from edge of plate, somewhat isolated
“c”- small, clear, ~0.2 in form edge of plate, isolated
Results:
All three spots were diluted.
Conclusions and Next Steps:
We moved on with serial dilution and plaque assay.
Title: Serial Dilution for Spot “a”
Date: 09/15/2021 Redo: No Sample: A2
Purpose: This procedure is to further isolate the phage.
Notes:
- The lab bench was disinfected using aseptic techniques.
- A CiDecon was sprayed and then wiped with KimWipes to spread the solution
- Ethanol alcohol was sprayed and wiped with KimWipes to spread and help the CiDecon to dry.
- Six microcentrifuge tubes were labeled 10^-1-…10^6 to represent how diluted each part of “a” is in each tube.
- Using a 10/100uL micropipette with a 200uL tip, 90uL of phage buffer was added to microcentrifuge tube 10^-1.
- After replacing the 200uL tip on the same micropipette, 10uL of “a” was drawn up and dispensed into microcentrifuge tube 10^-1.
- Microcentrifuge tube 10^-1 was vortexed to ensure mixture of phage buffer and the phage
- Steps 3 and 4 were repeated for microcentrifuge tubes 10^-2 but instead of drawing the phage from tube “a”, the phage came from 10^1 (this will help further dilute the sample)
- This continued with 10^3 getting its phage from 10^2 and so on for microcentrifuge tubes 10^4, 10^5, and 10^6.
- Tips during this process between each tube was not switched out
- Using 0.1-10uL tip on the micropipette, 10uL of the host bacteria (M. follorum), from a 250uL sample, was added to microcentrifuge tube 10^1
- To ensure mixture of bacteria a phage the tube was gently tapped on the table
- This was repeated for microcentrifuge tubes 10^-2 through 10^–6
- The micropipette tips were change between each tube
- A mistake was made when M. follorium was added into the phage tube rather than vice versa (having 6-7 separate 250uL test tubes of M. follorium with a diluted phage in each)
- The microcentrifuge tubes 10^-1 through 10^-6 were autoclaved :,(
Results:
Spot a was unusable due to an error.
Conclusions and Next Steps:
We moved on to serial dilution for our other plaques.
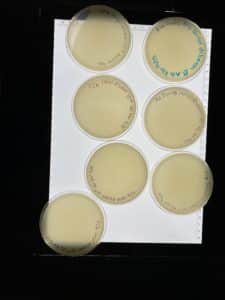
Title: Serial Dilution for Spot “b”
Date: 09/15/2021 Redo: No Sample: A2
Purpose: This procedure is to further isolate the phage.
Notes:
- Six microcentrifuge tubes were labeled 10^-1…10^-6 to represent how diluted each part of “b” is in each tube.
- Using a 10/100uL micropipette with a 200uL tip, 90uL of phage buffer was added to microcentrifuge tube 10^-1.
- After replacing the 200uL tip on the same micropipette, 10uL of “a” was drawn up and dispensed into microcentrifuge tube 10^-1.
- BUT 10^-2 received its phage from 10^-1(this ensures further phage dilution) and 10^-3 received from 10^-2
- And so forth for 10-4, 10^-5, 10^-6
- Microcentrifuge tube 10^-1 was vortexed to ensure mixture of phage buffer and the phage
- Steps 3 and 4 were repeated for microcentrifuge tubes 10^-2 through 10^-6
- Tips during this process between each tube were switched out to ensure no contamination
- Seven tubes filled with 250uL of the host bacteria(M. follorium) were gathered and labelled 0,-1,-2…-6.
- Using a micropipette with a 0.2-200uL tip each dilution was drawn up and dispensed into it corresponding bacteria test tube
- The tube sat for ~10 minutes
- After the wait, 3mL of molten agar was drawn up into a serological and dispensed into test tube containing the 10^1 diluted phage and bacteria
- Immediately after the mixture of agar and 10^-1 was drawn back up by the serological pipette and dispensed into a top agar plate
- This process was repeated for test tubes containing 10^-2 through 10^-6 into separated agar plates
- The plates sat undisturbed for 20 minutes
- Plates containing 10^-3 and 10^-6 had minimal air bubbles towards the edge of the plate
- Once the plates solidified they were inverted and placed in the incubator at ℃ at PM
- Intended to be checked after 24 and 48 hours
Results:
Some phages were present in the plates but they were not formed completely correctly.
Conclusions and Next Steps:
We will pick a new plaque and perform serial dilution again.
Title: Serial Dilution for Spot “c”
Date: 09/15/2021 Redo: No Sample: A2
Purpose: This procedure is to further isolate the phage.
Notes:
- The processes from “Serial Dilution (A2- Spot “b”)” were repeated for spot “c.”
- When the dilutions for “c” were plated the agar plates had been made that morning so the plates could not properly solidify.
- The plates for “c” had to be autoclave and 2 hours of work was ultimately wasted :’)
Results:
The plates had to be autoclaved due to an error with the agar.
Conclusions and Next Steps:
We will pick another plaque and perform serial dilution on it.
Title: Serial Dilution for spot “d”
Date: 09/20/2021 Redo:No Sample: A2
Purpose: This procedure is to further isolate the phage for sample A2
Notes:
- Six microcentrifuge tubes were gathered and each marked 10^-1 through 10^-6
- Using a micropipette with a 0.2-200uL tip 90uL of phage buffer was dispensed into each tube.
- Using the micropipette with a new 0.2-200uL tip, 10uL of the phage and phage buffer mixture in centrifuge tube “d” was siphoned and dispensed into the microcentrifuge tube marked 10^-1.
- Microcentrifuge tube 10^-1 was closed and gently tapped on the table.
- Using the micropipette with a new 0.2-200uL tip, 10uL of the phage and phage buffer mixture in centrifuge tube 10^-1 was siphoned and dispensed into the microcentrifuge tube marked 10^-2.
- Microcentrifuge tube 10^-2 was closed and gently tapped on the table.
- Steps 3 and 4 were repeated for microcentrifuge tubes 10^-3 to 10^-6.
- With 10^-2 into 10^-3, 10^-3 into 10^-4, 10^-4 into 10^-5, and 10^-5 into 10^-6.
- This further diluted the phage in order to isolate the phage when it is later plated
- Seven tubes each filled with 250uL of M. follorium (host bacteria) were gathered and marked “e”, for the first, and 10^-1 through 10^-6, for the last six.
- Using a micropipette with a 0.2-200uL tip 10uL of the dilution in microcentrifuge tube “e” was drawn up and dispensed into its corresponding bacteria test tube
- This process was repeated for each dilution and the 0.2-200uL tips of the micropipette were changed between each microcentrifuge tube.
- The test tubes containing both the bacteria and phage dilution were gently tapped on the table.
- The tube sat for ~10 minutes
- Seven agar plates were gathered and set out to allow them to get to room temperature.
- After getting to room temp each plate was labeled “e”, for the first, and 10^1 through 10^6 for the last six.
- After the wait, 3mL of molten agar was drawn up into a serological and dispensed into test tube containing the “e” diluted phage and bacteria
- Immediately after the mixture of agar and “e” was drawn back up by the serological pipette and dispensed into the agar plate marked “e”
- This process was repeated for test tubes containing 10^-1 through 10^-6 into separated agar plates using new serological pipettes between each test tube.
- The plates sat undisturbed for 20 minutes
- Once the plates solidified they were inverted and placed in the incubator at 29℃ at 10:38AM
- Intended to be checked after ~48 hours.
Results:
At 9:10AM the plates for the first dilution of spot “d” were mostly favorable except for plates 10^-1 and 10^-3 which were coagulated.
Conclusions and Next Steps:
Since the latter half of this batch looked good it was decided to pick plague from plate 10^-6 and move on with a second serial dilution to isolate the phage even further.
Title: Serial Dilution for spot “e”
Date: 09/20/2021 Redo: No Sample: A2
Purpose: This procedure is to further isolate the phage for sample A2.
Notes:
- The same processes for spot “d” were followed for spot “e”
- Once plated and after the wait time the plates for spot “e” were not solidifying, so the plates were placed into the incubator at 29℃ without being inverted.
- Intended to be checked after ~48 hours.
Results:
At 9:10AM the plates for this first dilution of spot “e” were coagulated from disturbing the plates before they were fully solidified. This made it difficult to see if formation of plaques on the plates.
Conclusions and Next Steps:
The plates made from spot “e” was autoclaved.
Title: Picking a Plague from A2 spot “d”
Date: 09/22/2021-9/24/2021 Redo: No Sample: A2
Purpose: This procedure is to pick plaques that are good candidates for serial dilution.
Notes:
- The lab bench was disinfected using aseptic techniques.
- A CiDecon was sprayed and then wiped with KimWipes to spread the solution
- Ethanol alcohol was sprayed and wiped with KimWipes to spread and help the CiDecon to dry.
- Three plagues were picked and marked 𝛼, β, and 𝛳
- Plaque A2d𝛼 – very small, partially isolated but was picked because of size, ~1 in. from edge
- Plaque A2dβ – very small, isolated, ~0.75 in. from edge
- Plaque A2dὨ – very very small, isolated, ~0.2 in. from edge
- 𝛳 was later changed to Ὡ to alleviate possible future confusion with name similarities
- Plague Description:
- Using a micropipette with a 0.2-200uL tip, 100uL of phage buffer were dispensed into three microcentrifuge tubes marked as either 𝛼, β, and Ὠ .
- The tip of the micropipette was not changed between each tube because no phage or bacteria have been introduced yet. Only the phage buffer.
- A micropipette with a 0.1-100uL tip was used to stab plague 𝛼 on plate A2d 10^-6
- Immediately the same micropipette with the same tip was dipped into the microcentrifuge tube marked “𝛼” containing 100uL of phage buffer.
- The micropipette tip tapped the sides and repeatedly siphoned and dispensed the phage buffer in order to ensure mixture of the phage with the buffer.
- This same process was repeated for plagues β and Ὠ.
Conclusions and Next Steps:
Spot 𝛼 was then diluted. Spots β and Ὠ were moved into the incubator at 4℃ to be diluted at a later time.
Title: Second Serial Dilution for A2d
Date: 09/22/2021 Redo: No Sample: A2
Purpose: The purpose of this procedure is to further isolate a single phage.
Notes:
-
- Six microcentrifuge tubes were gathered and each marked 10^-1 through 10^-6
- Using a micropipette with a 0.2-200uL tip 90uL of phage buffer was dispensed into each tube.
- Using the micropipette with a new 0.2-200uL tip, 10uL of the phage and phage buffer mixture in the microcentrifuge tube “𝛼” was siphoned and dispensed into the microcentrifuge tube marked 10^-1.
- Microcentrifuge tube 10^-1 was closed and gently tapped on the table.
- Using the micropipette with a new 0.2-200uL tip, 10uL of the phage and phage buffer mixture in centrifuge tube 10^-1 was siphoned and dispensed into the microcentrifuge tube marked 10^-2.
- Microcentrifuge tube 10^-2 was closed and gently tapped on the table.
- Steps 3 and 4 were repeated for microcentrifuge tubes 10^-3 to 10^-6.
- With 10^-2 into 10^-3, 10^-3 into 10^-4, 10^-4 into 10^-5, and 10^-5 into 10^-6.
- This further diluted the phage in order to isolate the phage when it is later plated
- Seven test tubes each filled with 250uL of M. follorium (host bacteria) were gathered and marked 0 through -6.
- These numbers pertain to which dilution goes into which test tube of bacteria.
- Using a micropipette with a 0.2-200uL tip, 10uL of the dilution in microcentrifuge tube “𝛼” was drawn up and dispensed into its corresponding bacteria test tube
- This process was repeated for each dilution and the 0.2-200uL tips of the micropipette were changed between each microcentrifuge tube to ensure that no contamination between plates.
- The test tubes containing both the bacteria and phage dilution were gently tapped on the table to ensure better mixture.
- The tube sat for ~10 minutes.
- Seven agar plates were gathered and set out to allow them to get to room temperature.
- After getting to room temp each plate was labeled 10^0 through 10^-6.
- After the wait, 3mL of molten agar was drawn up into a serological pipette and dispensed into test tube containing the 𝛼 diluted phage and bacteria marked 0.
- Immediately after the mixture of agar and 𝛼 was drawn back up by the serological pipette and dispensed into the agar plate marked 10^0.
- 10^-2 had a small bubble.
- This process was repeated for test tubes containing 10^-1 through 10^-6 into separated agar plates using new serological pipettes between each test tube.
- The plates sat undisturbed for 20 minutes to allow each to solidify.
- Once the plates solidified they were inverted and placed in the incubator at 29℃ at 10:28AM.
- Intended to be checked after ~48 hours.
- Microcentrifuge tubes marked β and Ὠ were moved into the incubator at 4℃ to be diluted that evening.
- At 4:30PM steps 1-5 were repeated for Ὠ.
- This was done due to scheduling conflicts.
- Microcentrifuge tubes and dilution for Ὠ were moved into the incubator again at 4℃ so they can be plated after 24 hours.
- At 4:30PM steps 1-13 were repeated for β.
9/23
- At 4:30 PM the microcentrifuge tubes containing Ὠ were removed from the fridge.
- Seven test tubes each filled with 250uL of M. follorium (host bacteria) were gathered and marked 0 through -6.
- These numbers pertain to which dilution goes into which test tube of bacteria.
- Using a micropipette with a 0.2-200uL tip, 10uL of the dilution in microcentrifuge tube “Ὠ” was drawn up and dispensed into its corresponding bacteria test tube
- A new tip was attached and what was left of 10^-3 was dispensed into the bacteria.
- This process was repeated for each dilution and the 0.2-200uL tips of the micropipette were changed between each microcentrifuge tube to ensure that no contamination between plates.
- When attempting to dispense 10^-3 phage into the bacteria the tip to the pipette was accidentally ejected into the beaker for the tips to be autoclaved
- The test tubes containing both the bacteria and phage dilution were gently tapped on the table to ensure better mixture.
- The tube sat for ~5 minutes.
- Seven agar plates were gathered and set out to allow them to get to room temperature.
- After getting to room temp each plate was labeled 10^0 through 10^-6.
- After the wait, 3mL of molten agar was drawn up into a 5mL serological pipette and dispensed into test tube containing the Ὠ diluted phage and bacteria marked 0.
- Immediately after the mixture of agar and Ὠ was drawn back up by the serological pipette and dispensed into the agar plate marked 10^0.
- A new 5mL pipette was used with another 3mL of agar to dispense into test tube -3 and then on to the plate before the agar without the phage solidified.
- This process was repeated for test tubes containing 10^-1 through 10^-6 into separated agar plates using new serological pipettes between each test tube.
- When doing plate 10^-3 agar without the phage was dispensed on to the plate.
- The plates sat undisturbed for ~20 minutes to allow each to solidify.
- Once the plates solidified they were inverted and placed in the incubator at 29℃ at 10:28AM.
- Intended to be checked after 24 hours.
9/24
- Plates from each second serial dilution were checked at 10:10AM
- No spots were visible on any set of plates.
- Alpha and beta were autoclaved and omega was put back into the incubator to be checked later that day.
- At 1:00PM Ὠ was checked again and then moved into the fridge to reassess on Monday(9/27).
9/27
- Reviewing the plates from Ὠ, there were no spots present.
- It was decided to autoclave them and start over with first serial dilution.
Results:
No plagues appeared on and plates from each spot were autoclaved.
Conclusions and Next Steps:
Since no plagues appeared it was decided to start over with the first serial dilution and pick a new plague.
Title: Picking a Plague
Date: 09/27/2021 Redo: Yes Sample: A2
Purpose: This procedure is to pick plaques that are good candidates for serial dilution.
Notes:
- Plagues Description:
- f: small, isolated, ~0.4in from edge of plate
- After deciding on the next set of plagues, the lab bench was disinfected using aseptic techniques.
- A CiDecon was sprayed and then wiped with KimWipes to spread the solution
- Ethanol alcohol was sprayed and wiped with KimWipes to spread and help the CiDecon to dry.
- Using a micropipette with a 0.2-200uL tip, 100uL of phage buffer were dispensed into a microcentrifuge tube marked “f”.
- A micropipette with a 0.1-100uL tip was used to stab plague “f” on the plate
- Immediately the same micropipette with the same tip was dipped into the microcentrifuge tube marked “d” containing 100uL of phage buffer.
- The micropipette tip tapped the sides and repeatedly siphoned and dispensed the phage buffer in order to ensure mixture of the phage with the buffer.
- Once the microcentrifuge tube was closed the tube was tapped and flicked to ensure mixture and the collection of all fluids to the bottom of the microcentrifuge tube.
Results:
The microcentrifuge tube containing the phage in spot “f” was preped for the next steps.
Conclusions and Next Steps:
This plague is favorable and will go through serial dilution to isolate the phage .
Title: Serial Dilution (A2-Spot “f”)
Date: 9/28/2021 Redo: Yes Sample: A2
Purpose: The purpose of this procedure is to further isolate a single phage.
Notes:
- Six microcentrifuge tubes were gathered and each marked 10^-1 through 10^-6
- Using a micropipette with a 0.2-200uL tip 90uL of phage buffer was dispensed into each tube.
- Using the micropipette with a new 0.2-200uL tip, 10uL of the phage and phage buffer mixture in centrifuge tube “f” was siphoned and dispensed into the microcentrifuge tube marked 10^-1.
- Microcentrifuge tube 10^-1 was closed and gently tapped on the table and flicked.
- Using the micropipette with a new 0.2-200uL tip, 10uL of the phage and phage buffer mixture in centrifuge tube 10^-1 was siphoned and dispensed into the microcentrifuge tube marked 10^-2.
- Microcentrifuge tube 10^-2 was closed and gently tapped on the table.
- Steps 3 and 4 were repeated for microcentrifuge tubes 10^-3 to 10^-6.
- With 10^-2 into 10^-3, 10^-3 into 10^-4, 10^-4 into 10^-5, and 10^-5 into 10^-6.
- This further diluted the phage in order to isolate the phage when it is later plated
- Seven tubes each filled with 250uL of M. follorium (host bacteria) were gathered and marked 10^0 through 10^-6.
- The test tubes containing both the bacteria and phage dilution were gently tapped on the table.
- The tube sat for ~10 minutes
- Seven agar plates were gathered and set out to allow them to get to room temperature.
- After getting to room temp each plate was labeled 10^0 through 10^-6.
- After the wait, 3mL of molten agar was drawn up into a 5mL serological and dispensed into test tube containing the “f” diluted phage and bacteria
- Immediately after the mixture of agar and “f” was drawn back up by the 5mL serological pipette and dispensed into the agar plate marked “f”
- This process was repeated for test tubes containing 10^-1 through 10^-6 into separated agar plates using new serological pipettes between each test tube.
- The plates sat undisturbed for 20 minutes
- Once the plates solidified they were inverted and placed in the incubator at 29℃ at 10:38AM
- Intended to be checked after ~24-48 hours.
Results:

This dilution was successful.
Conclusions and Next Steps:
We will move onto the second serial dilution using plaque 𝛳 picked from A2F 10^-6.
Title: Second Serial Dilution (A2f Spot “𝚹”)
Date: 9/29/2021 Redo: Yes Sample: A2
Purpose: The purpose of this procedure is to further isolate phage in order to move on to collecting the lysates.
Notes:
- Six microcentrifuge tubes were gathered and each marked 10^-1 through 10^-6
- Using a micropipette with a 0.2-200uL tip 90uL of phage buffer was dispensed into each tube.
- Using the micropipette with a new 0.2-200uL tip, 10uL of the phage and phage buffer mixture in centrifuge tube “𝚹” was siphoned and dispensed into the microcentrifuge tube marked 10^-1.
- Microcentrifuge tube 10^-1 was closed and gently tapped on the table and flicked.
- Using the micropipette with a new 0.2-200uL tip, 10uL of the phage and phage buffer mixture in centrifuge tube 10^-1 was siphoned and dispensed into the microcentrifuge tube marked 10^-2.
- Microcentrifuge tube 10^-2 was closed and gently tapped on the table.
- Steps 3 and 4 were repeated for microcentrifuge tubes 10^-3 to 10^-6.
- With 10^-2 into 10^-3, 10^-3 into 10^-4, 10^-4 into 10^-5, and 10^-5 into 10^-6.
- This further diluted the phage in order to isolate the phage when it is later plated
- Seven tubes each filled with 250uL of M. follorium (host bacteria) were gathered and marked 10^0 through 10^-6.
- The test tubes containing both the bacteria and phage dilution were gently tapped on the table.
- The tube sat for ~10 minutes
- Seven agar plates were gathered and set out to allow them to get to room temperature.
- After getting to room temp each plate was labeled 10^0 through 10^-6.
- After the wait, 3mL of molten agar was drawn up into a 5mL serological and dispensed into test tube containing the “𝚹” diluted phage and bacteria
- Immediately after the mixture of agar and “”𝚹 was drawn back up by the 5mL serological pipette and dispensed into the agar plate marked “𝚹”
- This process was repeated for test tubes containing 10^-1 through 10^-6 into separated agar plates using new serological pipettes between each test tube.
- The plates sat undisturbed for 20 minutes
- Once the plates solidified they were inverted and placed in the incubator at 29℃ at 10:38AM
- Intended to be checked after ~24-48 hours.
- The plates were taken out of the incubator at 1:00PM.
Results:
The plates were favorable and each plate showed signs of serial dilution with each plate slowly having less and less plagues.
Conclusions and Next Steps:
Plate 10^0 was picked to use to make lysates with.
Title: Collecting Plates Lystates
Date: 10/4/2021 Redo: No Sample: A2
Purpose: The purpose of this procedure is to generate a highly concentrated liquid phage sample.
Notes:
- The lab bench was disinfected using aseptic techniques.
- A CiDecon was sprayed and then wiped with KimWipes to spread the solution
- Ethanol alcohol was sprayed and wiped with KimWipes to spread and help the CiDecon to dry.
- Assessing all the plates from the second serial dilution plate 10^0 was used because it appeared the most webbed.
- 8mL of phage buffer was added into the plate 10^0
- Using a 5mL serological pipette 5mL of phage buffer was flooded into the plate and then
- Again using the same 5mL serological pipette 3mL of phage buffer was added, making a total of 8mL of phage buffer in the plate.
- Plate 10^0 was covered and labeled at 9:17AM
- Intended to sit at room temperature for 2-4 hours
- At 12:00PM the lab bench was disinfected using aseptic techniques.
- The plate with the lysates we intend to harvest was gently swirled.
- The plate was gently tilted allowing the fluid mixture to flood to one side and using a 5mL serological syringe the lysate was sucked up.
- Using a 0.22uL filter the filled sereological syringe was attached and the lysate was filtered into a 15mL conical tube.
- Steps 7 and 8 were repeated until all the lysates in the plate was filtered.
- The filtered lysates was then transferred to an incubator at 4℃ at 12:15PM
Results:
Lysates was properly filtered and stored in the incubator at 4℃.
Conclusions and Next Steps:
With the sucess of our second dilution an d collection of low volume lysates we intend to move on to full titer 10/6.
Title: Full Titer (with low volume lysate)
Date: 10/06/2021 Redo:No Sample: A2
Purpose: The purpose of this procedure is to determine the concentration of the phage utilizing plague assay and serial dilution.
Notes:
10/6
- The lab bench was disinfected using aseptic techniques.
- A CiDecon was sprayed and then wiped with KimWipes to spread the solution
- Ethanol alcohol was sprayed and wiped with KimWipes to spread and help the CiDecon to dry.
- The lysate that was collected on 10/4 went through serial dilution
- Six microcentrifuge tubes were gathered and each marked 10^0 through 10^-6
- Using a micropipette with a 0.2-200uL tip 90uL of phage buffer was dispensed into each tube.
- Using the micropipette with a new 0.2-200uL tip, 10uL of the lysate and phage buffer mixture in centrifuge tube “10^0” was siphoned and dispensed into the microcentrifuge tube marked 10^-1.
- Microcentrifuge tube 10^-1 was closed and gently tapped on the table and flicked.
- Using the micropipette with a new 0.2-200uL tip, 10uL of the lysate and phage buffer mixture in centrifuge tube 10^-1 was siphoned and dispensed into the microcentrifuge tube marked 10^-2.
- Microcentrifuge tube 10^-2 was closed and gently tapped on the table.
- Steps 2.1 and 2.2 were repeated for microcentrifuge tubes 10^-3 to 10^-6.
- With 10^-2 into 10^-3, 10^-3 into 10^-4, 10^-4 into 10^-5, and 10^-5 into 10^-6.
- This further diluted the lysate.
- Seven tubes each filled with 250uL of M. follorium (host bacteria) were gathered and marked 10^0 through 10^-6.
- Using a micropipette with a 0-200uL tip, 10uL of the lysate and phage buffer mixture from microcentrifuge 10^0 were transfer into bacteria test tube 10^0.
- The step 2.7 process was repeated with each microcentrifuge tube into its respective bacteria test tube being sure to change the micropipette tips in between.
- The tube sat for ~10 minutes
- Seven agar plates were gathered, set out to allow them to get to room temperature, and labeled 10^0-10^-6.
- After the wait, 3mL of molten agar was drawn up into a 5mL serological and dispensed into test tube containing the 10^0 lysate and bacteria
- Immediately after the mixture of agar and 10^0 was drawn back up by the 5mL serological pipette and dispensed into the agar plate marked “10^0”
- The process from 2.12 was repeated for test tubes containing 10^-1 through 10^-6 into separated agar plates using new 5 mL serological pipettes between each test tube.
- The plates sat undisturbed for 20 minutes.
- Once the plates solidified they were inverted and placed in the incubator at 29℃ at 10:18AM
- These will be intended to be checked after~24-48 hours.
Results:
- On 10/7 after sitting for 30 hours, the plates were removed from the incubator and inspected.
- It was determined that A2Fθ 10^-6 would be the best plate to use for our titer calculation
- The other 5 plates were autoclaved.

Conclusions and Next Steps:
On 10/11 the next step will be to calulate a known titer and make webbed plates from the known titer in order to collect high volume lysate for DNA extraction.
Amplification
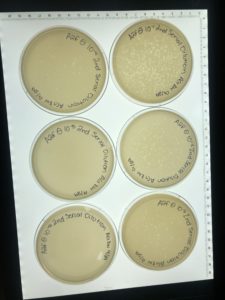
Title: Making Webbed Plates from a Lysate of Known Titer
Date: 10/07/2021 Redo: No Sample: #A2
Purpose: This procedure is to create plate with high density of plagues from a low volume lysate.
Notes:
10/7 Calculating the Titer for A2Fθ
- After sitting for 30 hours, the plates were removed from the incubator and inspected.
- It was determined that A2Fθ 10^-6 would be the best plate to use for our titer calculation
- The other 5 plates were autoclaved.
- We counted the plaques on plate 10^-6 and found 23.
- We used the formula: Titer (pfu/ml) = (# pfu/ volume used in μl) x (103 μl/ml) x dilution factor*
- Filled in with our data this was: (23 pfu/10uL)x(10³ uL/mL)x(10⁶)= 2.3×10⁹ pfu/mL
10/11 Webbed Plates from Known Titer
- We calculated the amount of lysate that was needed to make webbed plates
- (5×10^6 / 2.3×10^9) (1000 mL/mL) = 2 uL of lysate
- With the small number of plagues we got from our full titer we doubled 2.3×10^6 to get 5×10^6.
- The lab bench was disinfected using aseptic techniques.
- A CiDecon was sprayed and then wiped with KimWipes to spread the solution
- Ethanol alcohol was sprayed and wiped with KimWipes to spread and help the CiDecon to dry.
- We got 6 agar plates out to allow them to get to room temperature.
- With such a small amount of lysate being used it was decided to not dilute the low volume lysate with a phage buffer.
- Using a micropipette with a 0.1-10uL tip 2uL of low volume lysate was siphoned up and dispensed to the M.follorium host bacteria.
- This was repeated 5 more times with new tips and bacteria test tubes.
- The test tubes with the lysate and bacteria sat for ~10 minutes
- After the wait, using a 5mL serological pipette 3mL of molten agar was sucked and dispensed into the one test tube containing the lysate and bacteria.
- Immediately after the same 5mL serological pipette siphoned up the lysate, bacteria, and molten agar mixture and then dispensed onto an agar plate.
- The plate was titled and gently shaken in order to ensure even distribution of the top agar.
- Steps 7 and 8 were repeated with the other 5 test tubes.
- After ~20 minutes once the agar plate solidified, the plates were put into the incubator at 29℃ at 10:18AM uninverted.
- Intended to be checked after ~24 hours.
10/12
- The plates were checked and not much had grown so it was decided to continue to incubate for another 24 hours.
10/13
- After another ~24 hour at 8:55AM the plates were removed from the incubator.
Results:
Although there were plagues, the plates were not considered webbed and not favorable.
Conclusions and Next Steps:
It was decided to autoclave the plates and redo this procedure with the same lysate.
Title: Making Webbed Plates from a Lysate of Known Titer
Date: 10/11/2021 Redo: No Sample: #A2
Purpose: This procedure is to create plate with high density of plagues from a low volume lysate.
Notes:
- We calculated the amount of lysate that was needed to make webbed plates
- The lab bench was disinfected using aseptic techniques.
- We got 6 agar plates out to allow them to get to room temperature.
- With such a small amount of lysate being used it was decided to not dilute the low volume lysate with a phage buffer.
- Using a micropipette with a 0.1-10uL tip 2uL of low volume lysate was siphoned up and dispensed to the M.follorium host bacteria.
- The test tubes with the lysate and bacteria sat for ~10 minutes
- After the wait, using a 5mL serological pipette 3mL of molten agar was sucked and dispensed into the one test tube containing the lysate and bacteria.
- Immediately after the same 5mL serological pipette siphoned up the lysate, bacteria, and molten agar mixture and then dispensed it onto an agar plate.
- Steps 7 and 8 were repeated with the other 5 test tubes.
- After ~20 minutes once the agar plate solidified, the plates were put into the incubator at 29℃ at 10:13AM uninverted.
- Intended to sit fo ~48 hours.
Results:
On 10/15 again the plates came out after 48 hours unfavorable so they had to be autoclaved
Conclusions and Next Steps:
With such a small amount of lysate being used and based of the appearance of the plate the assumtion is being made that there are issue in getting the lysate in the bacteria. Another assumption is there may be issues with the mixture of the bacteria and the phage. With all this in mind this procedure will be redone on 10/18.
Title: Making Webbed Plates from a Lysate of Known Titer
Date: 10/18/2021 Redo: Yes Sample: #A2
Purpose: This procedure is to create plate with high density of plagues from a low volume lysate.
Notes:
- We calculated the amount of lysate that was needed to make webbed plates
- (5×10^6 / 2.3×10^9) (1000 mL/mL) = 2 uL of lysate
- With the small number of plagues we got from our full titer we doubled 2.3×10^6 to get 5×10^6.
- The lab bench was disinfected using aseptic techniques.
- A CiDecon was sprayed and then wiped with KimWipes to spread the solution
- Ethanol alcohol was sprayed and wiped with KimWipes to spread and help the CiDecon to dry.
- We got 6 agar plates out to allow them to get to room temperature.
- With such a small amount of lysate being used it was decided to not dilute the low volume lysate with a phage buffer.
- Using a micropipette with a 0.1-10uL tip 2uL of low volume lysate was siphoned up and dispensed on to the side of the test tube of the M.follorium host bacteria, and then the test tube wa tilted in order to ensure the lysate bubble gets into the bacteria.
- This was repeated 5 more times with new tips and bacteria test tubes.
- Each test tube was swirled and tapped on the table to ensure the mixture of the lysate and bacteria.
- The test tubes with the lysate and bacteria sat for 10 minutes
- After the wait, using a 5mL serological pipette 3mL of molten agar was sucked and dispensed into the one test tube containing the lysate and bacteria.
- Immediately after the same 5mL serological pipette siphoned up the lysate, bacteria, and molten agar mixture and then dispensed it onto an agar plate.
- The plate was titled and gently shaken in order to ensure even distribution of the top agar.
- Steps 7 and 8 were repeated with the other 5 test tubes.
- After ~20 minutes once the agar plate solidified, the plates were put into the incubator at 29℃ at 10:13AM inverted.
- Intended to be checked after ~48 hours.
Results:
On 10/20, plates were more webbed than previous attempts but still not webbed enough so the favorables were saved and the rest were autoclaved.

Conclusions and Next Steps:
It was discussed and agreed that 2uL was not enough lysate and the next attempt will be utilizing 10uL. Since the host bacteria needed to make plates was out, the next redo for this procedure will have to start on 10/21.
Title: Making Webbed Plates from a Lysate of Known Titer
Date: 10/21/2021 Redo: Yes Sample: #A2
Purpose: This procedure is to create plate with high density of plagues from a low volume lysate.
Notes:
- The lab bench was disinfected using aseptic techniques.
- A CiDecon was sprayed and then wiped with KimWipes to spread the solution
- Ethanol alcohol was sprayed and wiped with KimWipes to spread and help the CiDecon to dry.
- Since the past attempts with 2uL of low volume lysate have been unsuccessful, it was decided to use 10uL in this redo
- We got 6 agar plates out to allow them to get to room temperature.
- With such a slow growing phage it was decided to not dilute the lysate with a phage buffer.
- Using a micropipette with a 0.1-10uL tip 10uL of low volume lysate was siphoned up and dispensed on to the side of the test tube of the M.follorium host bacteria, and then the test tube wa tilted in order to ensure the lysate bubble gets into the bacteria.
- This was repeated 5 more times with new tips and bacteria test tubes.
- Each test tube was swirled and tapped on the table to ensure the mixture of the lysate and bacteria.
- The test tubes with the lysate and bacteria sat for 10 minutes
- After the wait, using a 10mL serological pipette 3mL of molten agar was sucked and dispensed into the one test tube containing the lysate and bacteria.
- Immediately after the same 10mL serological pipette siphoned up the lysate, bacteria, and molten agar mixture and then dispensed it onto an agar plate.
- The plate was titled and gently shaken in order to ensure even distribution of the top agar.
- Steps 7 and 8 were repeated with the other 5 test tubes.
- After ~10 minutes once the agar plate solidified, the plates were put into the incubator at 29℃ at 10:30AM inverted.
- Intended to be checked after ~24-48 hours
Results:
Plates were not webbed enough.
Conclusions and Next Steps:
Although plates were webbed they were not webbed enough, so theis procedure hed to be repeated.
Title: Making Webbed Plates from a Lysate of Known Titer
Date: 10/22/2021 Redo: No Sample: #A2
Purpose: The purpose of this procedure is to create plate with high density of plagues from a low volume lysate.
Notes:
- The lab bench was disinfected using aseptic techniques.
- A CiDecon was sprayed and then wiped with KimWipes to spread the solution
- Ethanol alcohol was sprayed and wiped with KimWipes to spread and help the CiDecon to dry.
- We got 1 agar plate out to allow them to get to room temperature.
- With such a slow growing ohage it was decided to make one plate with 2uL and see how if got webbed after ~36 hours, considering after 48 hours it typically was not.
- Using a micropipette with a 0.1-10uL tip 2uL of low volume lysate was siphoned up and dispensed on to the side of the test tube of the M.follorium host bacteria, and then the test tube wa tilted in order to ensure the lysate bubble gets into the bacteria.
- The test tube was swirled and tapped on the table to ensure the mixture of the lysate and bacteria.
- The test tubes with the lysate and bacteria sat for ~5-10 minutes
- After the wait, using a 10mL serological pipette 3mL of molten agar was sucked and dispensed into the test tube containing the lysate and bacteria.
- Immediately after the same 10mL serological pipette siphoned up the lysate, bacteria, and molten agar mixture and then dispensed it onto an agar plate.
- The plate was titled and gently shaken in order to ensure even distribution of the top agar.
- After ~10 minutes once the agar plate solidified, the plates were put into the incubator at 29℃ at 12:30 PM inverted.
- Intended to be checked after ~36 hours.
Results:
The plates made on 10/21 with 10uL were accidently over the weekend making their incubation period being ~48 hours, but this turned out to be a blessing in disguise because the plates were finally ready to be flooded and collect high volume lysate. There was discussion on seeing if 20uL would make a more webbed plate any faster so this procedure was also done in order to compare past plates with less lysate to new ones made with 20uL.
Conclusions and Next Steps:
It was decided to autoclave the plates and redo this procedure with the same lysate.
Title: Collecting Plate Lysate
Date: 10/25/2021 Redo: No Sample: #A2
Purpose: The purpose of this procedure is to create plate with high density of plagues from a low volume lysate.
Notes:
- The lab bench was disinfected using aseptic techniques.
- A CiDecon was sprayed and then wiped with KimWipes to spread the solution
- Ethanol alcohol was sprayed and wiped with KimWipes to spread and help the CiDecon to dry.
- Assessing the webbed plates made from the known titer from 10uL of lysate there were two plates that were found to be the most favorable out of the group.
- These two plates each went through steps 13-20.
- Using a 10mL serological pipette 8mL of phage buffer was added into the plate.
- Each plate was covered and labeled at 9:17AM
- Intended to sit at room temperature for ~2-4hours.
- At 12:15PM the lab bench was disinfected using aseptic techniques.
- A CiDecon was sprayed and then wiped with KimWipes to spread the solution
- Ethanol alcohol was sprayed and wiped with KimWipes to spread and help the CiDecon to dry.
- The plate was gently tilted allowing the fluid mixture to flood to one side and using a 5mL serological syringe the lysate was sucked up.
- Using a 0.22uL filter the filled sereological syringe was attached and the lysate was filtered into a 50mL conical tube.
- Steps 7 and 8 were repeated until all the lysates in the plate were filtered.
Results:
The filtered lysates was then transferred to an incubator at 4℃ at 12:30PM
Conclusions and Next Steps:
The new lysate will be used to make webbed plates.
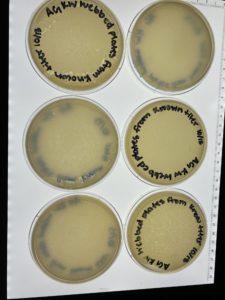
Title: Making Webbed Plates from a Known Titer
Date: 10/25/2021 Redo: No Sample: #A2
Purpose: The purpose of this procedure is to create plate with high density of plagues from a low volume lysate.
Notes:
- The lab bench was disinfected using aseptic techniques.
- A CiDecon was sprayed and then wiped with KimWipes to spread the solution
- Ethanol alcohol was sprayed and wiped with KimWipes to spread and help the CiDecon to dry.
- Since the past attempts with 2uL of low volume lysate have been unsuccessful, it was decided to use 10uL in a redo, but it was also discussed to compare results with 20uL.
- We got 6 agar plates out to allow them to get to room temperature.
- With such a slow growing phage it was decided to not dilute the lysate with a phage buffer.
- Using a micropipette with a 10-100uL tip 20uL of low volume lysate was siphoned up and dispensed into the test tube of the M.follorium host bacteria.
- This was repeated 5 more times with new tips and bacteria test tubes.
- Each test tube was swirled and tapped on the table to ensure the mixture of the lysate and bacteria.
- The test tubes with the lysate and bacteria sat for 10 minutes
- After the wait, using a 10mL serological pipette 3mL of molten agar was sucked and dispensed into the one test tube containing the lysate and bacteria.
- Immediately after the same 10mL serological pipette siphoned up the lysate, bacteria, and molten agar mixture and then dispensed it onto an agar plate.
- The plate was titled and gently shaken in order to ensure even distribution of the top agar.
- Steps 7 and 8 were repeated with the other 5 test tubes.
- After ~10 minutes once the agar plate solidified, the plates were put into the incubator at 29℃ at 10:00AM inverted.
- Intended to be checked after ~24-48 hours.
Results:
On 10/27 plates were checked and found to be favorable so the plates were flooded to make a new more concentrated high volume lysate to use as a back up plan in case our current lysate (made with 10uL) is shown to be inefficient or unsuccessful.
Conclusions and Next Steps:
The more concentrated lysate(made with 20uL) will be collected of 10/26.
Title: Collecting Plate Lysate
Date: 10/26/2021 Redo: No Sample: #A2
Purpose: The purpose of this procedure is to create plate with high density of plagues from a low volume lysate.
Notes:
- The lab bench was disinfected using aseptic techniques.
- A CiDecon was sprayed and then wiped with KimWipes to spread the solution
- Ethanol alcohol was sprayed and wiped with KimWipes to spread and help the CiDecon to dry.
- Assessing the webbed plates made from the known titer from 10uL of lysate there were two plates that were found to be the most favorable out of the group.
- These two plates each went through steps 13-20.
- Using a 10mL serological pipette 8mL of phage buffer was added into the plate.
- Each plate was covered and labeled at 9:17AM
- Intended to sit at room temperature for ~2-4hours.
- At 12:15PM the lab bench was disinfected using aseptic techniques.
- A CiDecon was sprayed and then wiped with KimWipes to spread the solution
- Ethanol alcohol was sprayed and wiped with KimWipes to spread and help the CiDecon to dry.
- The plate was gently tilted allowing the fluid mixture to flood to one side and using a 5mL serological syringe the lysate was sucked up.
- Using a 0.22uL filter the filled sereological syringe was attached and the lysate was filtered into a 50mL conical tube.
- Steps 7 and 8 were repeated until all the lysates in the plate were filtered.
Results:
The filtered lysates was then combined with the lysate made the previous day and transferred to an incubator at 4℃ at 12:30PM
Conclusions and Next Steps:
The high volume lysate will go through a serial dilution to determine its concentration for TEM and archive.
Title: Serial Dilution with High Volume Lysate
Date: 10/26/2021 Redo: No Sample: #A2
Purpose: This procedure is to find the titer of our high volume lysate.
Notes:
- The lab bench was disinfected using aseptic techniques.
- A CiDecon was sprayed and then wiped with KimWipes to spread the solution
- Ethanol alcohol was sprayed and wiped with KimWipes to spread and help the CiDecon to dry.
- Six microcentrifuge tubes were gathered and each marked 10^0 through 10^-8
- Using a micropipette with a 0.2-200uL tip 90uL of phage buffer was dispensed into each tube.
- Using the micropipette with a new 0.2-200uL tip, 10uL of the high volume lysate was added into the microcentrifuge tube (containing phage buffer) marked 10^0.
- The tube was tapped on the table and flicked to ensure proper mixture.
- Using a micropipette with a new 0.2-200uLtip, 10uL of the phage buffer and lysate were siphoned (from the 10^0 microcentrifuge tube) and dispensed into the microcentrifuge tube marked 10^-1.
- Microcentrifuge tube 10^-1 was closed and gently tapped on the table and flicked.
- Using the micropipette with a new 0.2-200uL tip, 10uL of the lysate and phage buffer mixture in centrifuge tube 10^-1 was siphoned and dispensed into the microcentrifuge tube marked 10^-2.
- Microcentrifuge tube 10^-2 was closed and gently tapped on the table.
- Steps 3 and 4 were repeated for microcentrifuge tubes 10^-3 to 10^-6.
- With 10^-2 into 10^-3, 10^-3 into 10^-4, 10^-4 into 10^-5, and 10^-5 into 10^-6.
- This further diluted the lysate in order to find concentration for titer.
- Four tubes each filled with 250uL of M. follorium (host bacteria) were gathered and marked 4 through 8.
- Using a micropipette with a new 0.2-200 tip, 10uL of the mixture in microcentrifuge tube 10^-4 was siphoned and dispensed into one of the test tubes containing the M.follorium bacteria.
- This was repeated for microcentrifuge tubes 10^-5, 10^-6, 10^-7, and 10^-8
- The microcentrifuge tubes 10^0 through 10^-3 were not needed and thus autoclaved.
- The test tubes containing both the bacteria and phage dilution were gently tapped on the table.
- The tube sat for ~10 minutes
- Four agar plates were gathered and set out to allow them to get to room temperature.
- After getting to room temp each plate was labeled 10^-4 through 10^-8.
- After the wait, 3mL of molten agar was drawn up into a 5mL serological and dispensed into test tube containing the diluted lysate and bacteria
- Immediately after the mixture of agar was drawn back up by the same 5mL serological pipette and dispensed into the agar plate marked 10^-4.
- This process was repeated for test tubes containing 10^-5 through 10^-8 into separated agar plates using new serological pipettes between each test tube.
- The plates sat in order to solidify for ~20 minutes
- After the wait the plate were put into the incubator at 5:58PM at 29℃
- Intended to sit for 24-48 hours.
Results:
After incubating for a little over ~48 hours the plates were found to have no signs of growing.
Conclusions and Next Steps:
A new high volume lystae will be made and collected for TEM and archive.
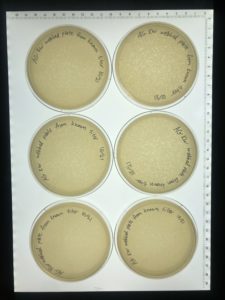
Title: Collecting High Volume Lysate
Date: 10/27/2021 Redo: Yes Sample: #A2
Purpose: This procedure is to generate a highly concentrated liquid phage sample.
Notes:
- The lab bench was disinfected using aseptic techniques.
- A CiDecon was sprayed and then wiped with KimWipes to spread the solution
- Ethanol alcohol was sprayed and wiped with KimWipes to spread and help the CiDecon to dry.
- Assessing the webbed plates made from the known titer from 20uL of lysate were found to be favorable and were all used to collect lysate (steps 3-9).
- Using a 10mL serological pipette 8mL of phage buffer was added into the plate.
- Each plate was parafilmed and put into the incubator at 4℃ at 4:30 PM
- Intended to sit for ~12-14hours.
10/28
- At 5:00PM the lab bench was disinfected using aseptic techniques.
- A CiDecon was sprayed and then wiped with KimWipes to spread the solution
- Ethanol alcohol was sprayed and wiped with KimWipes to spread and help the CiDecon to dry.
- The plate was gently tilted allowing the fluid mixture to flood to one side and using a 5mL serological syringe the lysate was sucked up.
- Using a 0.22uL filter the filled sereological syringe was attached and the lysate was filtered into a 50mL conical tube.
- Steps 7 and 8 were repeated until all the lysates in the plate were filtered.
Results:
Lysate was filitered, parafilmed, and then stored in the fridge.
Conclusions and Next Steps:
Lysate will go through serial dilution to find the concentration.
Title: Archiving
Date: 11/01/2021 Redo: No Sample: #A2
Purpose: The purpose of this procedure is to prepare a high-titer lysate for long-term storage.
Notes:
- Phage was input into the phageDB
- Using a 10mL serological pipette 4mL of lysate was transferred into a 15mL conical tube.
- Using a micropipette 280uL of DMSO were added to the conical tube and vortex to mix
- The barcode tubes were filled with beads
- The rest of the tube was filled with the DMSO/lysate mixture.
Results:
The barcode tube was put into the incubator at 4℃to be stored before it is shipped/transported off.
Conclusions and Next Steps:
The barcode was shipped off.
Title: Collecting Low Volume Lysate
Date: 11/02/2021 Redo: Yes Sample: #A2
Purpose: The purpose is to generate a highly concentrated liquid phage sample.
Notes:
- The lab bench was disinfected using aseptic techniques.
- A CiDecon was sprayed and then wiped with KimWipes to spread the solution
- Ethanol alcohol was sprayed and wiped with KimWipes to spread and help the CiDecon to dry.
- Using a 10mL serological pipette 8mL of phage buffer was added into the plates from the second serial dilution.
- Intended to sit for 2-4hours.
- At 4:30PM the lab bench was disinfected using aseptic techniques.
- A CiDecon was sprayed and then wiped with KimWipes to spread the solution
- Ethanol alcohol was sprayed and wiped with KimWipes to spread and help the CiDecon to dry.
- The plate was gently tilted allowing the fluid mixture to flood to one side and using a 5mL serological syringe the lysate was sucked up.
- Using a 0.22uL filter the filled sereological syringe was attached and the lysate was filtered into a 50mL conical tube.
- Steps 7 and 8 were repeated until all the lysates in the plate were filtered.
- The filtered lysate was then combined with the lysate made the previous day and transferred to an incubator at 4℃ at 4:45PM.
Results:
Enter results here
Conclusions and Next Steps:
Enter conclusions here
Title: Collecting High Volume Lysate
Date: 11/2/2021 Redo: yes Sample: #A2
Purpose: The purpose is to create a plate with a very high density of plaques from a lysate of known titer
Notes:
- The lab bench was disinfected using aseptic techniques.
- A CiDecon was sprayed and then wiped with KimWipes to spread the solution
- Ethanol alcohol was sprayed and wiped with KimWipes to spread and help the CiDecon to dry.
- Using a 10mL serological pipette 8mL of phage buffer was added into the plate.
- Each plate was parafilmed and put into the incubator at 4℃ at 4:30 PM
- Intended to sit for ~12-14hours.
11/3
- At 9:00AM the lab bench was disinfected using aseptic techniques.
- A CiDecon was sprayed and then wiped with KimWipes to spread the solution
- Ethanol alcohol was sprayed and wiped with KimWipes to spread and help the CiDecon to dry.
- The plate was gently tilted allowing the fluid mixture to flood to one side and using a 5mL serological syringe the lysate was sucked up.
- Using a 0.22uL filter the filled sereological syringe was attached and the lysate was filtered into a 50mL conical tube.
- Steps 7 and 8 were repeated until all the lysates in the plate were filtered.
Results:
Lysate was filitered and stored.
Conclusions and Next Steps:
This will go through serail dilution to check that it is still viable for DNA extraction.
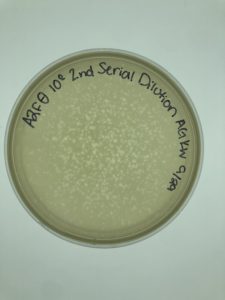
Title: Serial Dilution of Low Volume Lysate
Date: 11/03/2021 Redo: Yes Sample: #A2
Purpose: The purpose is to prepare liquid phage samples of decreasing concentrations.
Notes:
- The lab bench was disinfected using aseptic techniques.
- A CiDecon was sprayed and then wiped with KimWipes to spread the solution
- Ethanol alcohol was sprayed and wiped with KimWipes to spread and help the CiDecon to dry.
- Six microcentrifuge tubes were gathered and each marked 10^0 through 10^-8
- Using a micropipette with a 0.2-200uL tip 90uL of phage buffer was dispensed into each tube.
- Using the micropipette with a new 0.2-200uL tip, 10uL of the low volume lysate was added into the microcentrifuge tube (containing phage buffer) marked 10^0.
- The tube was tapped on the table and flicked to ensure proper mixture.
- Using a micropipette with a new 0.2-200uLtip, 10uL of the phage buffer and lysate were siphoned (from the 10^0 microcentrifuge tube) and dispensed into the microcentrifuge tube marked 10^-1.
- Microcentrifuge tube 10^-1 was closed and gently tapped on the table and flicked.
- Using the micropipette with a new 0.2-200uL tip, 10uL of the lysate and phage buffer mixture in centrifuge tube 10^-1 was siphoned and dispensed into the microcentrifuge tube marked 10^-2.
- Microcentrifuge tube 10^-2 was closed and gently tapped on the table.
- Steps 3 and 4 were repeated for microcentrifuge tubes 10^-3 to 10^-6.
- With 10^-2 into 10^-3, 10^-3 into 10^-4, 10^-4 into 10^-5, and 10^-5 into 10^-6.
- This further diluted the lysate in order to find concentration for titer.
- Seven tubes each filled with 250uL of M. follorium (host bacteria) were gathered and marked 4 through 8.
- Using a micropipette with a new 0.2-200 tip, 90uL of the mixture in microcentrifuge tube 10^0 was siphoned and dispensed into one of the test tubes containing the M.follorium bacteria.
- This was repeated for microcentrifuge tubes 10^-1, 10^-2, 10^-3, 10^-4, 10^-5, and 10^-6.
- The test tubes containing both the bacteria and phage dilution were gently tapped on the table.
- The tube sat for ~10 minutes
- Seven agar plates were gathered and set out to allow them to get to room temperature.
- After getting to room temp each plate was labeled 10^0 through 10^-6.
- After the wait, 3mL of molten agar was drawn up into a 5mL serological and dispensed into test tube containing the diluted lysate and bacteria
- Immediately after the mixture of agar was drawn back up by the same 5mL serological pipette and dispensed into the agar plate marked 10^0.
- This process was repeated for test tubes containing 10^-1 through 10^-6 into separated agar plates using new serological pipettes between each test tube.
- The plates sat in order to solidify for ~20 minutes
- After the wait the plate were put into the incubator at 5:58PM at 29℃
- Intended to sit for 24-48 hours.
- On 11/8 2 plates showed growth so it was decided to move on to DNA extraction with the low volume lysate.
Results:
Plates showed signs of growth.
Conclusions and Next Steps:
The low volume lysate will be used for DNA extraction.
DNA Extraction
Title: DNA Extraction
Date: 11/08/2021 Redo: No Sample: #A2
Purpose: This procedure is meant to extract a high cocentration of DNA in order to gather data on the phage.
Notes:
11/8 Day 1
- 5mL of low volume lysate was transferred into a 15mL conical tube and the TA dispensed 20uL of nuclease into the 15mL conical tube.
- The 15mL tube was gently inverted and incubated at 37°C for 10 minutes.
- The lysate was transferred into 5 microcentrifuge tubes.
- Using a micropipette with a 2-200uL tip, 20uL of ZnCl2 was added into each tube and incubated for 15 minutes at 37°C.
- After the incubation period, the microcentrifuge tubes were centrifuged for 1 minutes at 10,000rpm.
- Being sure to leave the pellets intact. Using a 10mL serological pipette the most supernatant was used to remove from each of the microcentrifuge tube
- Using a micropipette with a 2-200uL tip, more supernatant was removed from the microcentrifuge tubes, but some liquid was left in the tube.
- The liquid filled tips and serological pipette was autoclaved
- The pellets in each microcentrifuge tube were resuspended in 500uL of TES and then incubated at 60°C for 15 minutes.
- 1uL of proteinase K was added into each tube and then incubated for 10 minutes at 37°C
- 60uL of potassium acetate was added to each tube and left on ice for 15 minutes.
- The 5 microcentrifuge tubes were centrifuged at 12,000rpms at 4°C for 1 minute.
- The supernatant was drawn up and transferred into 5 new microcentrifuge tubes.
- The old 5 microcentrifuge tubes containing the pellets were discarded.
- 500uL of isopropanol was added into the supernatant using a micropipette with a 50-1000uL tip.
- The microcentrifuge tubes were put on ice overnight and Day 2 of DNA extraction will be continued on the next day.
11/9 Day 2
- The tubs were removed from the ice and centrifuged at top speed for 10 minutes to pellet DNA at the bottom of the tube.
- The supernatant was siphoned up using a micropipette being sure to avoid the pellet
- 250uL of 70% ethanol into each microcentrifuge tube and centrifuged at top speed for 1 minute
- Supernatant was sucked up with a micropipette but some was left at the bottom of the tube in order to avoid sucking up the pellet.
- In order to dry the DNA pellets, the tubes were turned upside down over a Kem wipe and left in the Fume Hood for ~45minutes.
- About 20 minutes into drying it was noticed there were still large amounts of supernatant in the tubes so while still in the fume hood a corner of a kem wipe was used to absorb excess supernatant (this was done to each tube).
- The first pellet was resuspended using 50uL of nuclease free water, and then this solution was siphoned back up with the same micropipette and dispensed into the next tube
- This was repeated until all the pellets were resuspended into one microcentrifuge tube.
- Using a nanodrop this following information was found:
- 21.5 ng/uL
- 2.62 A260/280
- 0.07 A260/230
Results:

DNA was contaminated with RNA and salt in additon there was not enough DNA obtained.
Conclusions and Next Steps:
THere is still wnough time to do this procedure over one more time.
Title: DNA Extraction
Date: 11/10/2021 Redo: Yes Sample: #A2
Purpose: This procedure is meant to extract a high cocentration of DNA in order to gather data on the phage.
Notes:
11/10 Day 1 (Redo)
- The lab bench was disinfected using aseptic techniques.
- A CiDecon was sprayed and then wiped with KimWipes to spread the solution
- Ethanol alcohol was sprayed and wiped with KimWipes to spread and help the CiDecon to dry.
- It was agreed that this procedure with be done in two batches being made simultaneously
- 5mL of low volume lysate was transferred into a 15mL conical tube and the TA dispensed 20uL of nuclease into the 15mL conical tube.
- The 15mL tube was gently inverted and incubated at 37°C for 10 minutes.
- The lysate was transferred into 5 microcentrifuge tubes.
- Using a micropipette with a 2-200uL tip, 20uL of ZnCl2 was added into each tube and incubated for 15 minutes at 37°C.
- After the incubation period, the microcentrifuge tubes were centrifuged for 1 minutes at 10,000rpm.
- The tubes were put on ice due to the lab hours ending soon.
- At 4:30PM, the tubes were removed from ice and re-centrifuged.
- Being sure to leave the pellets intact. Using a micropipette with 50-1000uL and 2-200uL tips the supernatant was removed from each of the microcentrifuge tube
- The liquid filled tips and serological pipette was autoclaved
- Using a micropipette with a 50-1000uL, the pellets in each microcentrifuge tube were resuspended in 500uL of TES and then incubated at 60°C for 15 minutes.
- Using a micropipette with a 0.1-10uL tip, 1uL of proteinase K was added into each tube and then incubated for 10 minutes at 37°C
- Using a micropipette with a 2-200uL tip, 60uL of potassium acetate was added to each tube and left on ice for 15 minutes.
- The 5 microcentrifuge tubes were centrifuged at 12,000rpms at 4°C for 1 minute.
- The supernatant was drawn up and transferred into 5 new microcentrifuge tubes.
- The old 5 microcentrifuge tubes containing the pellets were discarded.
- Steps 15 was repeated in order to remove all salt content (microcentrifuge tube “h” had it’s supernatant moved to another tube because it had a pellet from the second round of centrifuging at 12,000rpms)
- 500uL of isopropanol was added into the supernatant using a micropipette with a 50-1000uL tip.
- The microcentrifuge tubes were put on ice overnight and Day 2 of DNA extraction will be continued tomorrow.
11/11 Day 2 (redo)
- The lab bench was disinfected using aseptic techniques.
- A CiDecon was sprayed and then wiped with KimWipes to spread the solution
- Ethanol alcohol was sprayed and wiped with KimWipes to spread and help the CiDecon to dry.
- The tubs were removed from the ice and centrifuged at top speed for 10 minutes to pellet DNA at the bottom of the tube.
- The supernatant was siphoned up using a micropipette being sure to avoid the pellet
- Tube d had to be recentrifuged because the pellet was accidently siphoned and broken.
- 250uL of 70% ethanol into each microcentrifuge tube and centrifuged at top speed for 1 minute
- Supernatant was sucked up with a micropipette but some was left at the bottom of the tube in order to avoid sucking up the pellet.
- In order to dry the DNA pellets, the tubes were turned upside down over a Kem wipe and left in the turned off Fume Hood for ~2 hours.
- The first pellet was resuspended using 50uL of nuclease free water, and then this solution was siphoned back up with the same micropipette and dispensed into the next tube
- This was repeated until all the pellets were resuspended into one microcentrifuge tube.
- In the batch of microcentrifuge tubes containing tubes f,g,h,i, and j accidently got 50uL of nuclease free water put into each of them, so the excess nuclease free water carefully sucked up with a micropipette and disposed.
Results:
Using a nanodrop this following information was found:
-
- Batch 1(microcentrifuge tubes a,b,c,d,e)
- 19.8 ng/uL
- 2.76 A260/A280
- 0.07 A260/A230
- Batch 1(microcentrifuge tubes a,b,c,d,e)

- Batch 2 (microcentrifuge tubes f,g,h,i,,j)
- 5.7 ng/uL
- 9.51 A260/A280
- 0.03 A260/280
- Batch 2 (microcentrifuge tubes f,g,h,i,,j)

Conclusions and Next Steps:
Not enough DNA was obtained even after trying the nanodrop for each batch twice.
Characterization
Title: TEM
Date: 11/01/2021 Redo: No Sample: #A2
Purpose: This procedure is to prepare your phage sample for viewing with a transmission electron microscope.
Notes:
- Using a serological pipette 1mL of the low volume lysate was transferred into a microcentrifuge tube and centrifuged for one hour at 4℃ at top speed.
- After the microcentrifuge tube finished spinning, the supernatant was sucked up with a micropipette with a 0.2-200uL tip, being sure to avoid the pellet at the bottom.
- Supernatant was transferred back into the original conical tube of lysate for later future uses.
- Using a micropipette with a new 0.2-200uL tip, 100uL of phage buffer was transferred into the microcentrifuge tube (containing the pellet) to sit for 30 minutes and allow for resuspension.
- These next steps were all accomplished while wearing gloves and under a fume hood.
- A PELCO tab was placed on a square of parafilm on a petri dish.
- With EM forceps an unused grib was removed from the grib box and the edge of the grib was placed on the PELCO tab with the dark and shiny side up
- Using a micropipette with a 0.2-20uL tip, 10uL of lysate were made into a bubble and placed on to the grid to sit for 2 minutes
- After 2 minutes using filter paper the bubble sitting on the grib was wicked off.
- Using a micropipette with a 0.2-20uL tip, 10uL of water was made into a bubble and placed on to the grid to sit for 2 minutes
- After 2 minutes using filter paper the bubble sitting on the grib was wicked off.
- Steps 9 and 10 were repeated
- Using a micropipette with a 0.2-20uL tip, 10uL of uranyl acetate were made into a bubble and placed on to the grid to sit for 2 minutes
- After 2 minutes using filter paper the bubble sitting on the grib was wicked off.
- The grid sat to dry for ~2 minutes and then using EM forceps the grid was placed into the C1 slot of the grid box that was meant to be sent off.
Results:
It was later found that the high volume lysate was not working.
Conclusions and Next Steps:
Due to a time crunch it was decided since our low volume lysate was more concentrated that it would be used for archive and TEM.
Title: Add Protocol Title
Date: Month/Day/Year Redo: Yes or No Sample: #
Purpose: This procedure is to…
Notes:
Enter notes here
Results:
Enter results here
Conclusions and Next Steps:
Enter conclusions here
Title: Add Protocol Title
Date: Month/Day/Year Redo: Yes or No Sample: #
Purpose: This procedure is to…
Notes:
Enter notes here
Results:
Enter results here
Conclusions and Next Steps:
Enter conclusions here