Discovery of Finny
September 2, 2018 – Collection of Environmental Sample
Purpose: Environmental samples were collected to take to the laboratory and test for the presence of bacteriophage. To increase the probability of collecting a sample rich in bacteriophages, a variety of samples were collected from nutrient rich locations.
Procedure:
A.) Collection of Solid Samples
- A 15 mL conical tube was secured and the site of collection was selected.
- A shovel or other object capable of digging (ie. rock, stick, ect.) was used to dig to the desired depth.
- The lid of the conical tube was removed, the solid sample shoveled into the conical tube, and the lid of the conical tube was returned to the tube and secured tightly.
- While at the site, details of the location of the collection were recorded (ie. GPS coordinates, ambient temperature, and soil depth)
- The conical tube was labeled with the initials of the collector, date, and sample number. The conical tube was then stored in a refrigerator until taken to the laboratory.
- This procedure was repeated for each solid sample.
B.) Collection of Liquid Sample:
- A 15mL conical tube was secured and the site of collection was selected.
- The lid of the conical tube was removed, the tube was filled approximately halfway full with the sample, and the lid was returned to the tube and secured. The conical tube was then inverted several times. The ID was then removed and the sample was returned to its source. This process was repeated two times for a total of three washes.
- The conical tube was then filled with the liquid sample and the lid was tightly secured.
- The conical tube was labeled with the initials of the collector, date, and sample number. The conical tube was then stored in a refrigerator until taken to the laboratory.
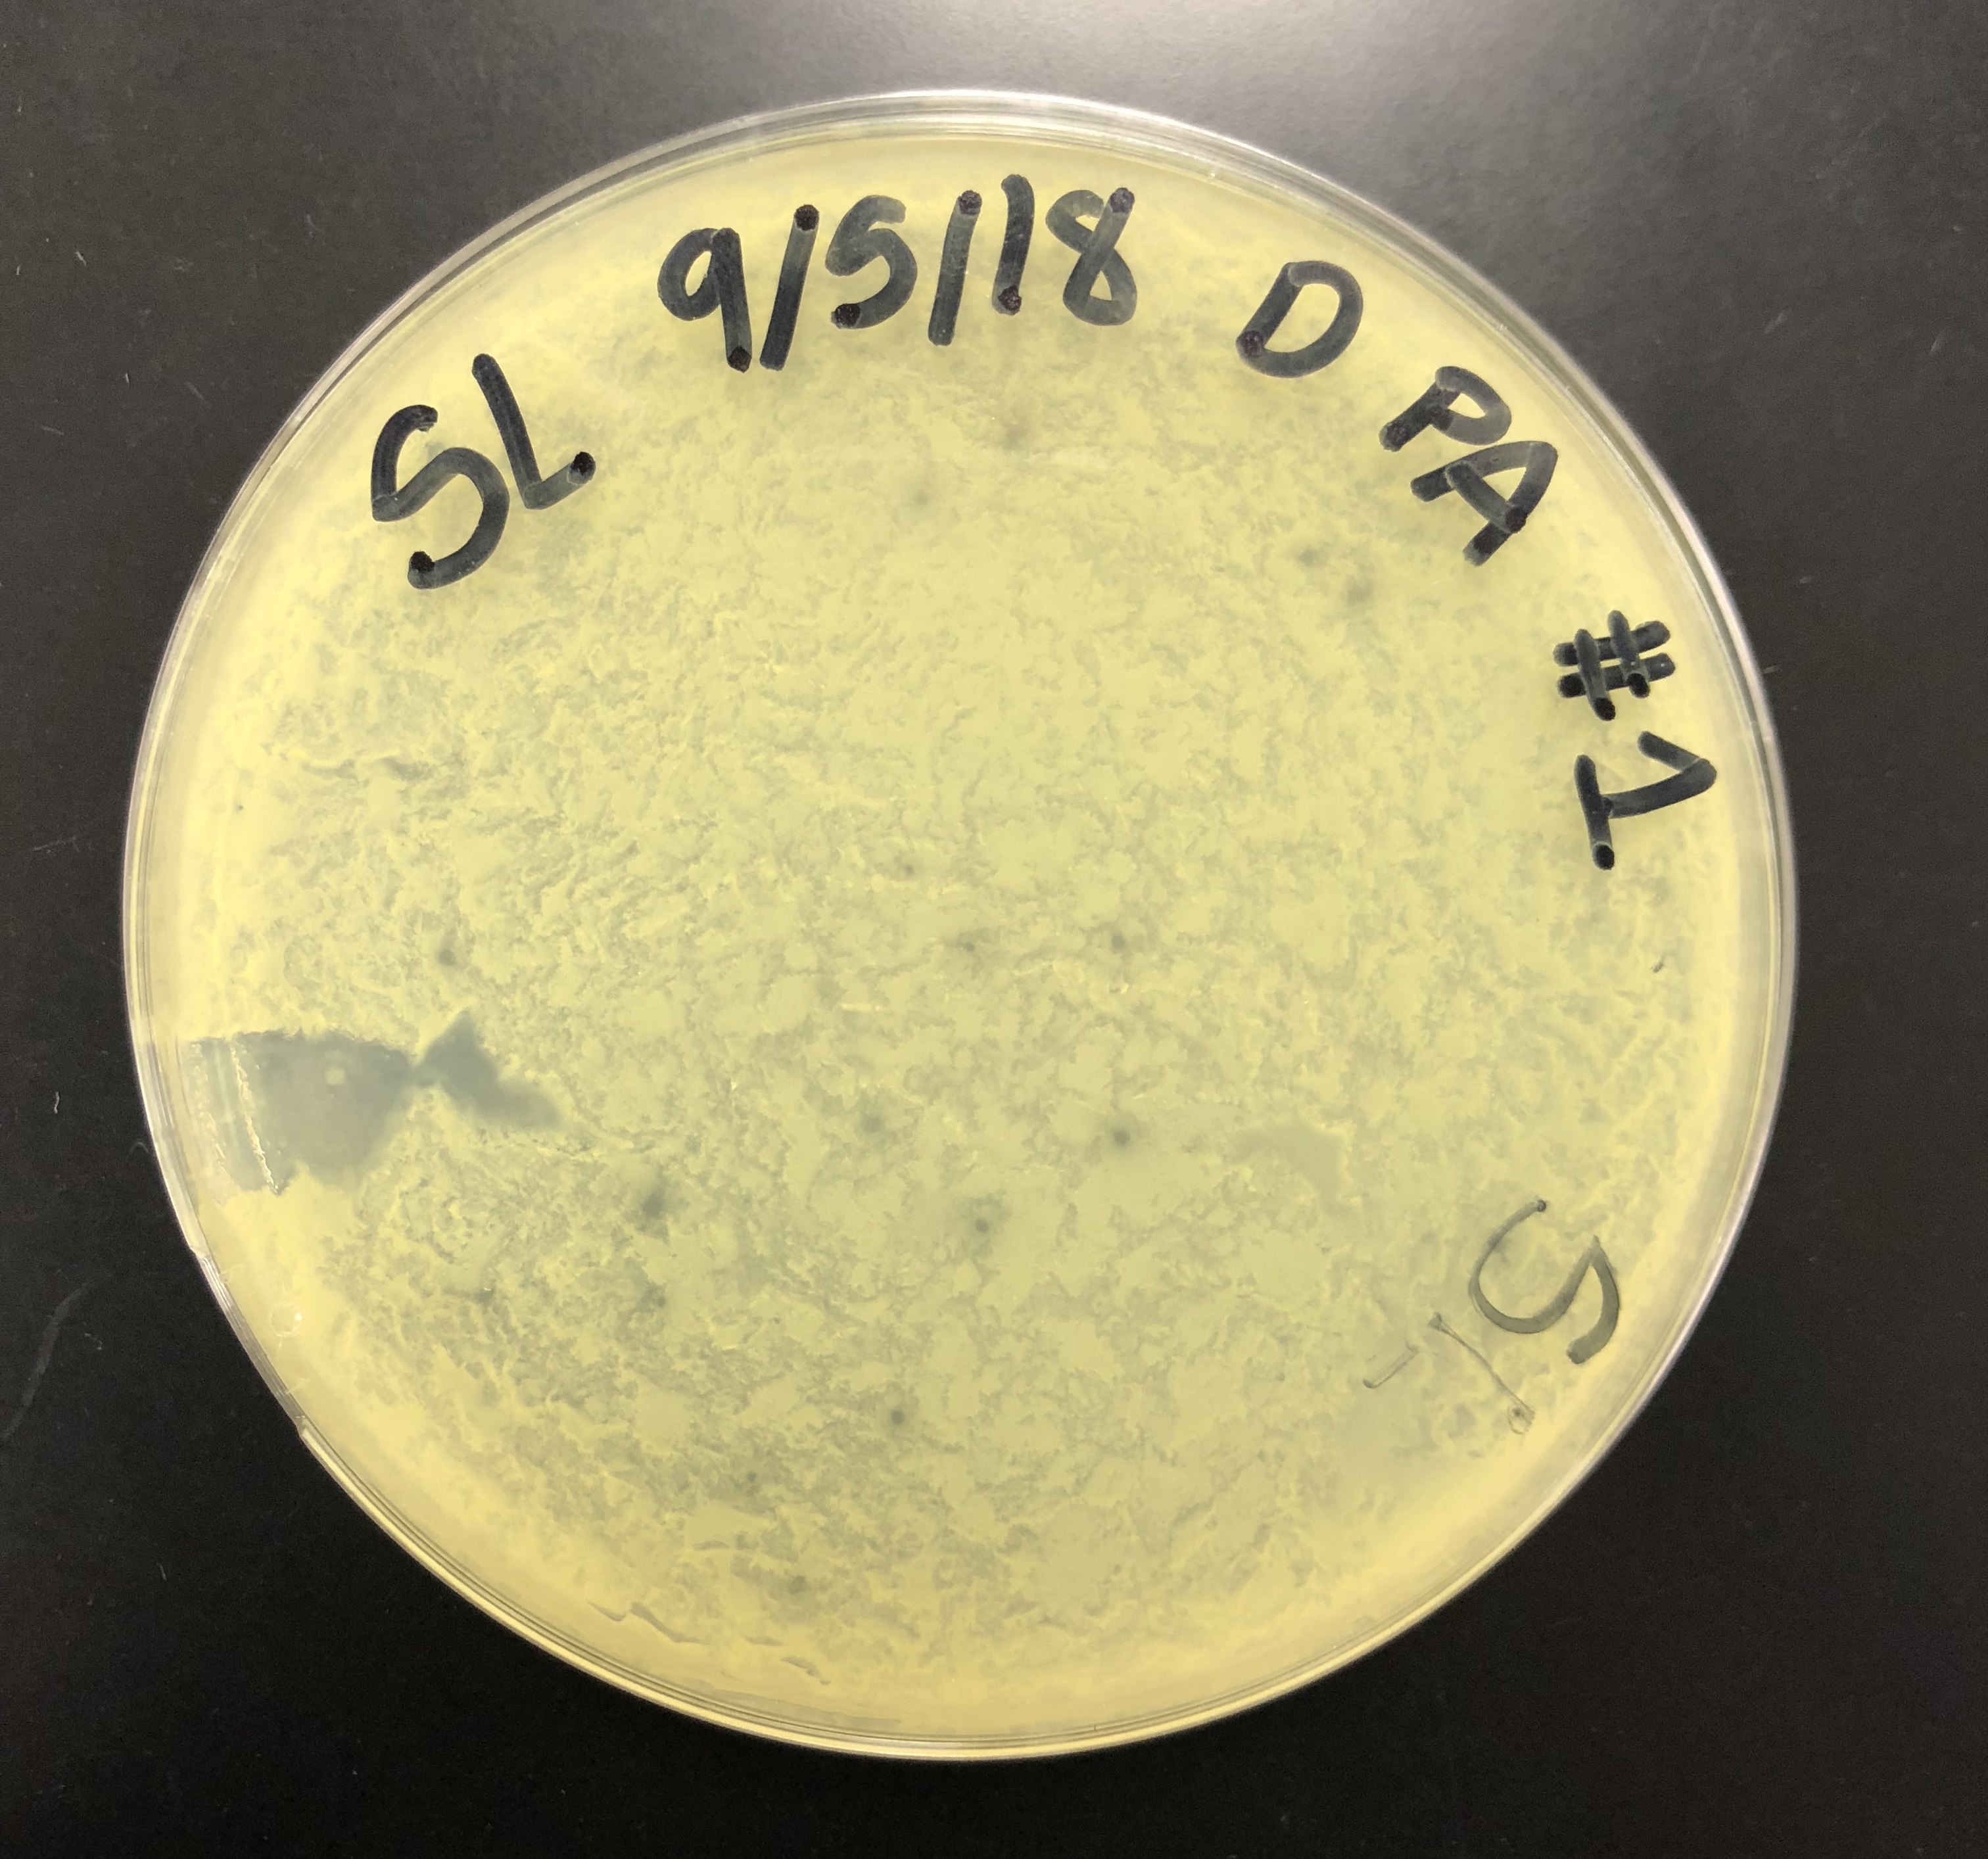
Results: One water sample and five soil samples were collected from different locations. Details of these samples were included in the chart below.
| Collector’s Name | Tiffany Lee | Tiffany Lee |
Tiffany Lee |
Stacy Luka | Stacy Luka | Stacy Luka |
| Sample Number | 1 | 2 | 3 | 1 | 2 | 3 |
| Date of Collection | 9/3/2018 | 9/3/2018 | 9/4/2018 | 9/2/2018 | 9/3/2018 | 9/3/2018 |
| Sample Type | Soil (Wet, dark brown, and organic matter) | Soil (Wet, dark gray, sandy, fish smell) | Soil (Wet, dark brown, and organic matter) | Soil (Wet, dark, organic matter, strong smell) | Soil (Dry, light brown, and sandy) | Water (Clear) |
| General Location | Riverbank | Riverbank | Backyard | Subdivision | Park | River |
| Location Description | Under a tree | Shoreline | Near ant pile | Chicken Coop | Dry Creek Bed | Shoreline |
| Specific Location |
32.7592841 N 97.3381490 W |
32.7594310 N 97.3397047 W |
32.2204593 N 98.2194463 W |
29.782774 N 98.128783 W |
29.562072 N 98.453285 W |
29.853263 N 98.406726 W |
| Sample Depth |
About 1 inch |
About 1.5 inches | About 1 inch | About 2 inches | About 1 inch | Surface Level |
| Ambient Temperature | 27°C | 27°C | 28°C | 27°C | 27°C | 29°C |
Analysis: All six samples were successfully collected and significant data was recorded. The collected samples were diverse, varying both in composition and location.
Future Plans: Following the collection of the environmental samples, a direct isolation or enriched isolation will be performed to isolate bacteriophages from each environmental sample.
Direct Isolation (09/05/2018)
Purpose: The Direct Isolation and Enriched Isolation procedures arewere performed to isolate bacteriophages from the collected environmental samples. Direct Isolation iswas used to just separate the bacteriophages from the environmental samples while Enriched Isolation separatesd the bacteriophages from the environmental sample and encouragesd the growth and replication of the bacteriophages by placing the filtered bacteriophages in bacterial growth media with the bacterial host. The Enriched Isolation seeks was used to amplify the concentration of phages specific to the bacterial host while Direct Isolation only only isolates the bacteriophages from the environmental samples. However, Enriched Isolation may create a bias to certain bacteriophages while Direct Isolation isolates theall bacteriophages regardless of the culture conditions.
Procedure:
A.) Extraction of Bacteriophages From an Environmental Sample Using Direct Isolation:
- After putting on gloves, an aseptic working space was created by spraying CiDecon generously on the lab bench and wiping it with a paper towel until the surface was dry. 70% ethanol was then sprayed in a similar fashion, allowed to sit for a few seconds, then wiped with a paper towel until dry. Following removal of the gloves, a bunsen burner was lighted and a light blue flame was achieved to help prevent contamination.
- The 15mL conical tube containing the soil sample was opened and a pipette was used to aseptically transfer liquid media into the conical tube until the sample was entirely submerged by 2-3 mL of liquid media.
- The 15 ml conical tube was inverted multiple times until the contents were thoroughly mixed.
- The 15 ml conical tube containing the soil sample and the liquid media was placed into a shaking incubator set as 250 rpm and 37 °C for 2 hours.
- After the incubation period, the sample was placed at room temperature in a holder for the large soil particles to settle to the bottom of the 15 ml conical tube.
- A 0.22 μm syringe filter and a 3 ml syringe were collected. The sterile 3 ml syringe was removed from the package and used to remove about 2 ml of the settled sample, avoiding the solid particulate matter.
- The 3 ml syringe was attached to the .22 μm syringe filter while keeping the bottom of the filter in the sterile packaging. Slow constant pressure was applied to the syringe to dispense the filtered liquid into a labeled 1.5 ml centrifuge tube. Forcing the liquid through the filter was avoided to prevent the clogging of the filter.
- This procedure was used in the isolation of bacteriophages from Sample 3 collected by Tiffany Lee and Sample 1 collected by Stacy Luka
B.) Extraction of Bacteriophages From an Environmental Sample Using Enriched:IsolationEnriched Isolation:
- After putting on gloves, an aseptic working space was created by spraying CiDecon generously on the lab bench and wiping it with a paper towel until the surface was dry. 70% ethanol was then sprayed in a similar fashion, allowed to sit for a few seconds, then wiped with a paper towel until dry. Following removal of the gloves, a bunsen burner was lighted and a light blue flame was achieved to help prevent contamination.
- The collected soil sample was carefully transferred to a 50 ml conical tube. A clean and dry spatula was used to help transfer the moist soil sample that was sticking inside of the 15 ml conical tube.
- Enrichment broth was added into the 50 ml conical tube in 1 ml portions with a pipette until the sample reached the 35 ml mark on the conical tube.
- The 50 ml conical tube containing the soil sample and the enrichment broth was placed into a shaking incubator set as 250 rpm and 37 °C for 2 hours.
- After the incubation period, the sample was placed at room temperature in a holder for the large soil particles to settle to the bottom of the 50 ml conical tube.
- A 0.22 μm vacuum filter system was assembled and used to filter the potential bacteriophage from unwanted bacteria and soil particles. About 20 ml of supernatant was collected in a sterile 50 ml conical tube.
- 0.5 ml of the host bacteria culture, Microbacterium foliorum, was added to the 50 ml conical tube with a micropipette.
- After fully securing the lid on the 50 ml conical tube, the lid was unscrewed a quarter of a turn to allow air into the tube and then a piece of tape secured the lid to prevent spillage in the shaking incubator. The 50 ml conical tube containing the filtered bacteriophage and host bacteria culture was placed into a shaking incubator set as 250 rpm and 27 °C for 2 days.
- This procedure was used in the isolation of bacteriophages from Sample 2 collected by Tiffany Lee and Sample 2 collected by Stacy Luka
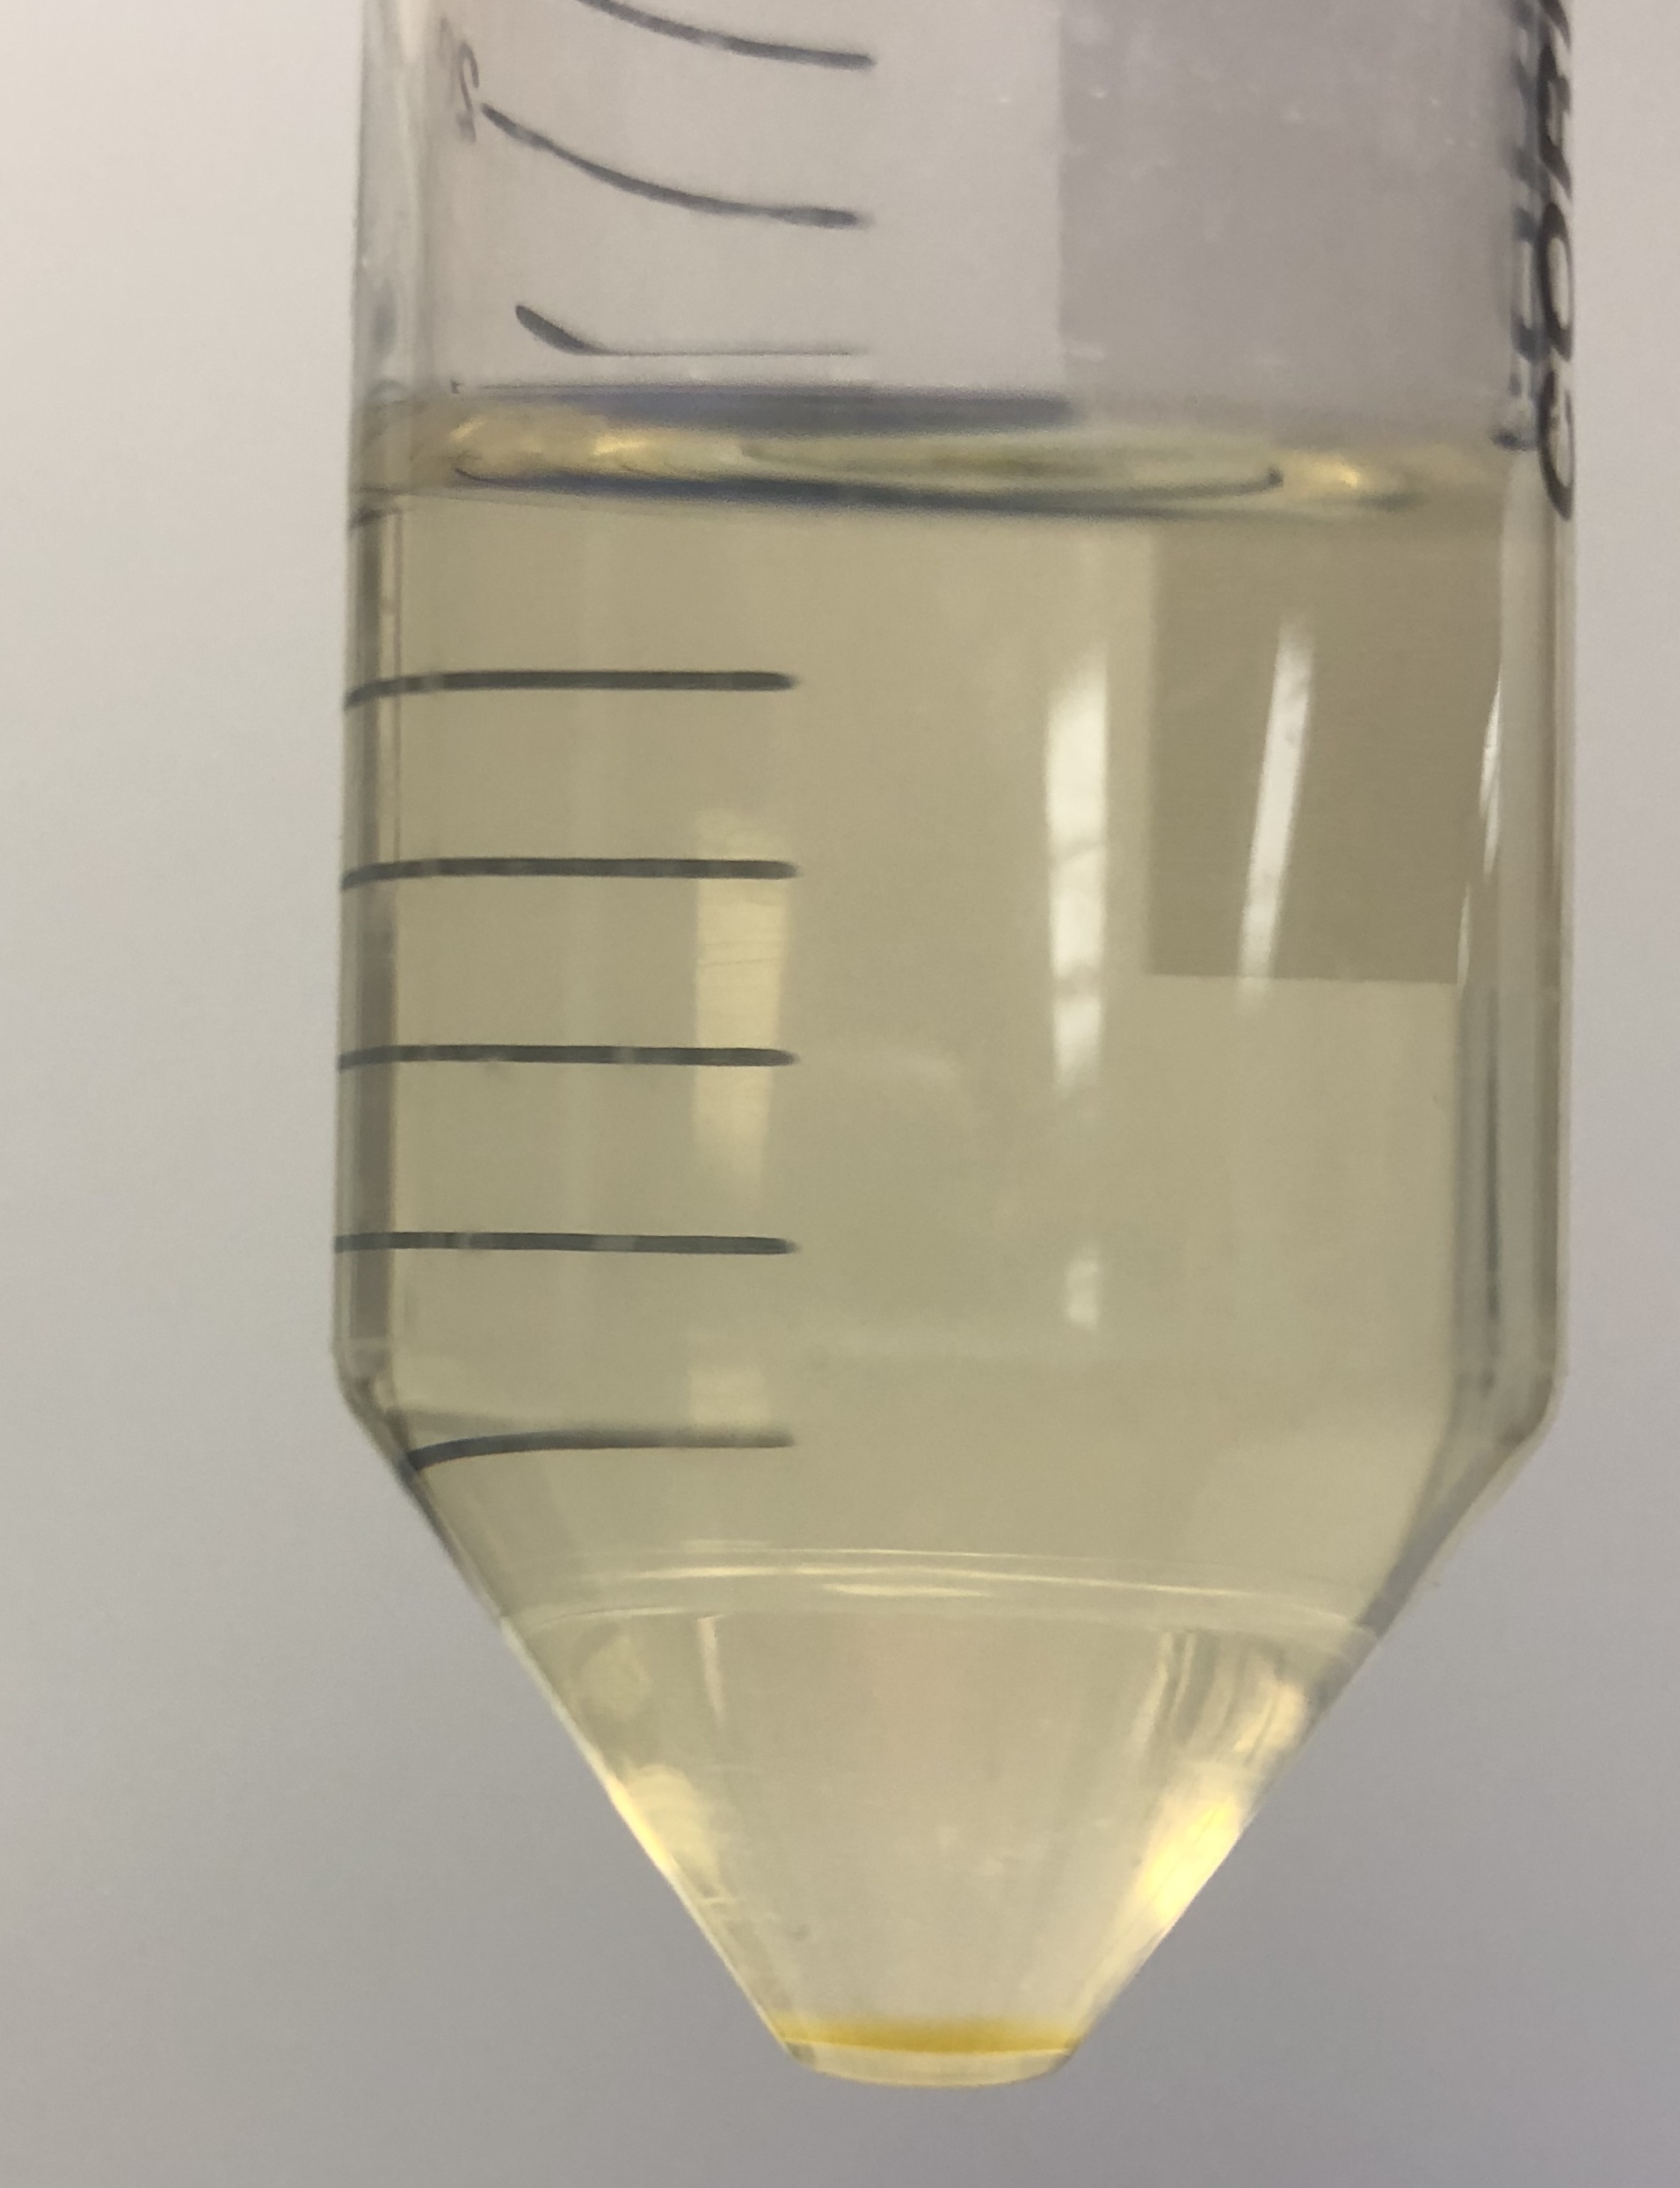
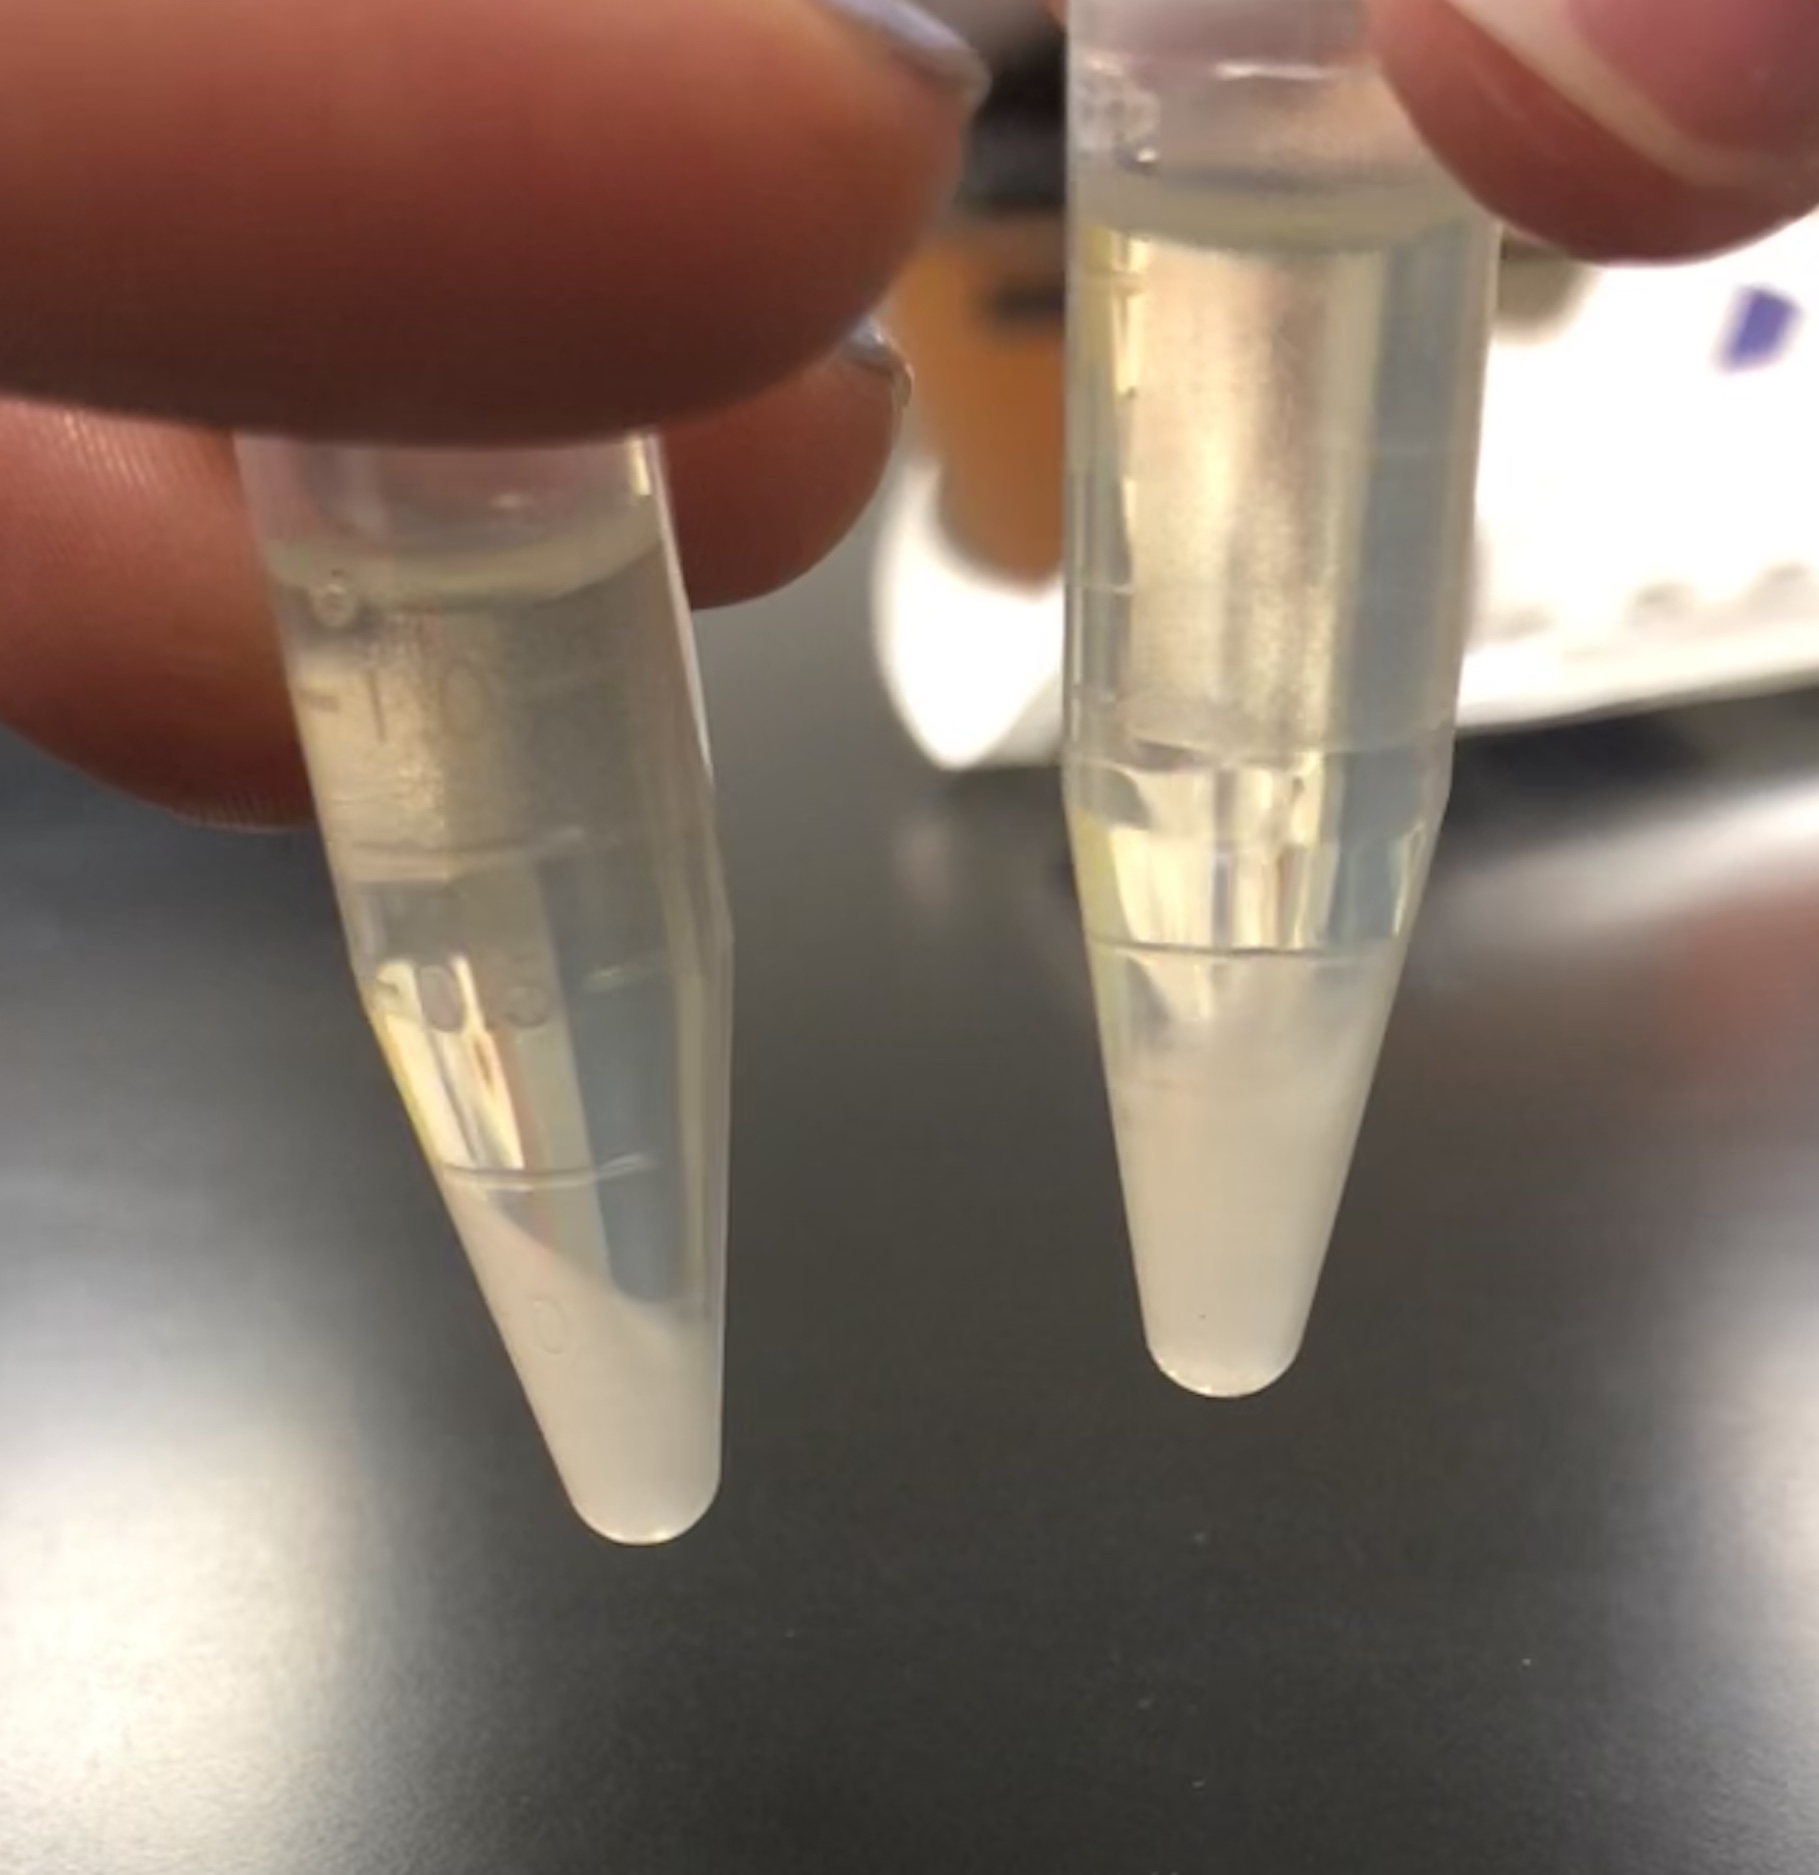
Results: Upon completion of the Direct isolationIsolation protocols , 1 ml liquid samples were collected of each of the 2 samples.The liquid samples that were passed through the syringe filters were foggy and brown in color. The liquid that was collected in the 1.5 ml centrifuge tubes were considerably less foggy and were nearly colorless. The Enriched Isolation protocol will be completed in 2 days.
Analysis:
Future Plans: A plaque assay will be performed on each isolateded sample to confirm the presence of bacteriophage that can infect the selected host bacteria, Microbacterium folirium. The enrichment protocol must be completed and then the plaque assay for each sample will be conducted.
Plaque Assay (09/05/2018)
Purpose: The purpose of a plaque assay is to detect the presence of phages on bacterial lawns.
Procedure:
An agar plate was pulled out of the fridge at 4C and set out to be warmed to room temperature.
500 μl of the direct isolation sample from the micro centrifuge tube was added to a bacteria culture tube of 250 μl of host bacteria.
The tubes were mixed by gently tapping and swirling on the sides if any direct isolation sample was stuck on the sides of the tube.
The sample sat undisturbed for 10 minutes for attachment.
Using a sterile pipette, 3 ml of molten top agar (kept at 55C) was added to the culture tube. The mixture was completely aspirated back up and transferred to the plate.
The plate was gently tilted to spread the agar completely and evenly over the plate. There were a few bubbles on the plates that were sucked back up into the pipette.
The plate sat undisturbed for 15 minutes.
The plate was inverted and incubated at 29.5 C at 5:45 pm.
The plate was pulled out 6:30 pm on 09/06/2018.
To continue with the isolation of a phage, the plaques must be checked and picked.
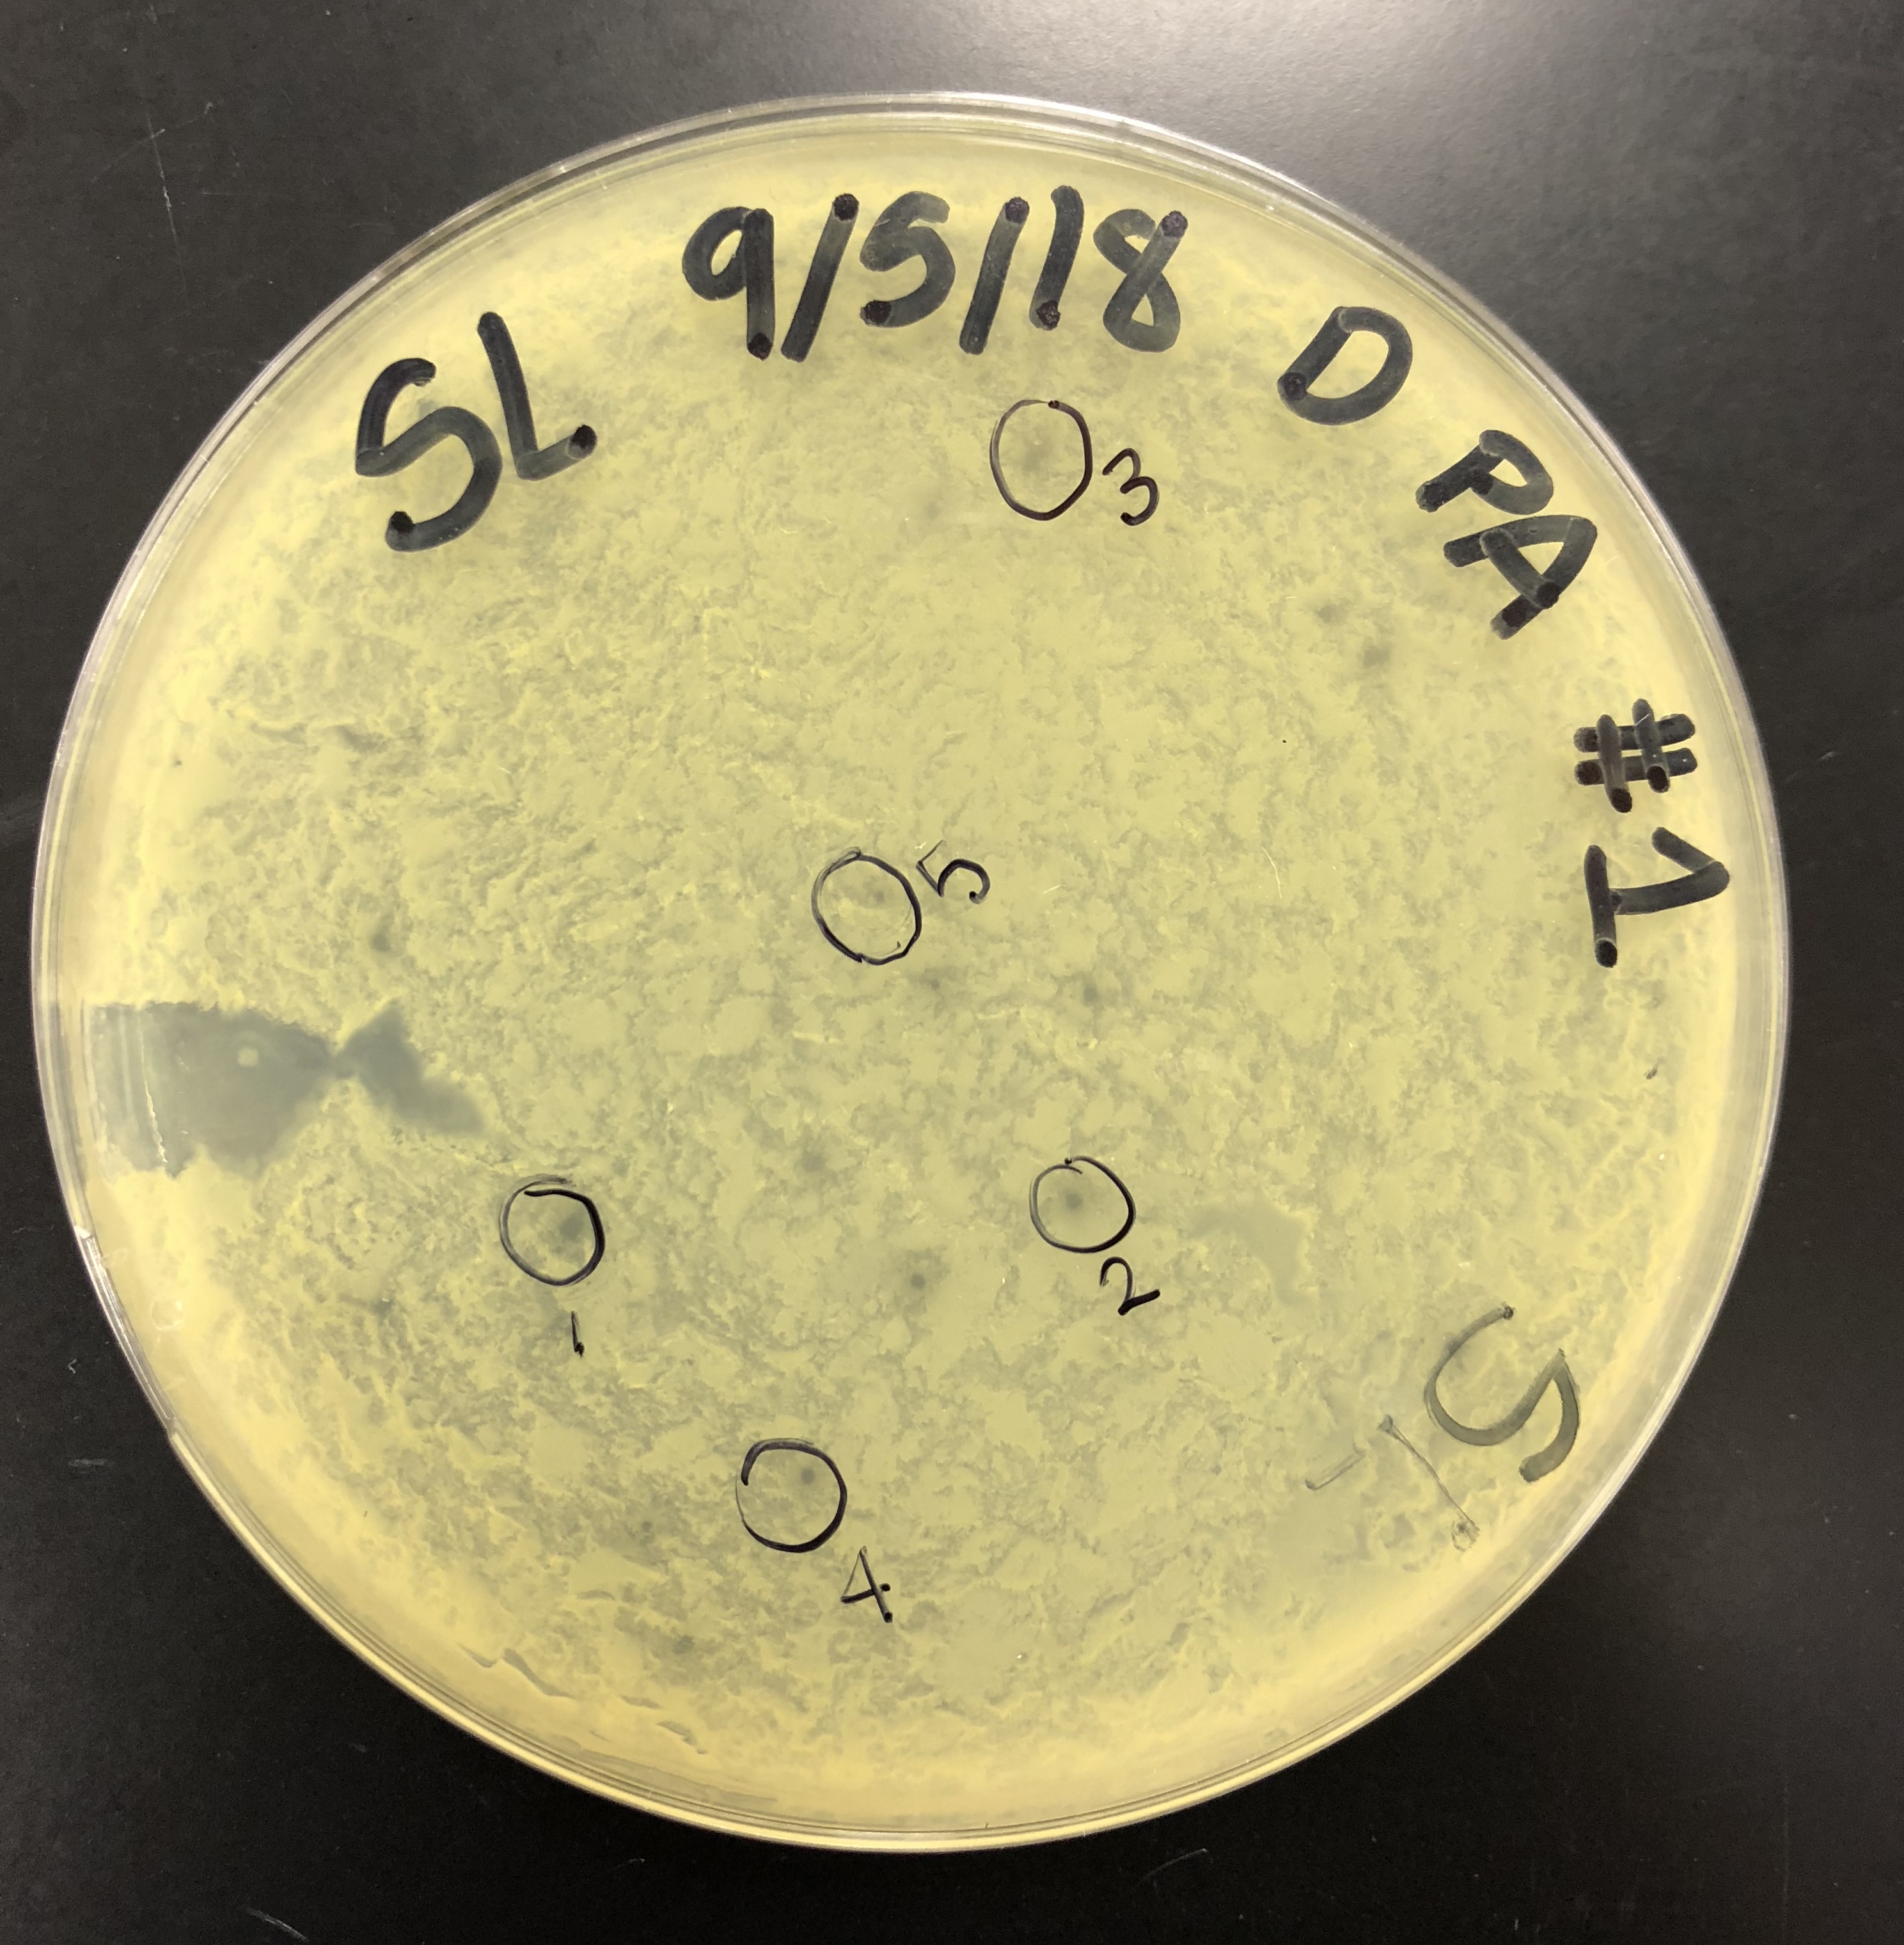
Picking a Plaque (09/07/2018)
Purpose: The purpose of picking a plaque is to retrieve phage particles from a plaque and create a liquid sample. The “picked” phage particles from the plaque are resuspended in phage buffer. This resulting liquid sample of phage can be used for other follow-up experiments.
Procedure:
The direct sample plate was examined. The plate was not smooth and the agar was rigid. However, there were plaques present.
The ripples on the plate were likely due to the plate being moved before the molten agar had solidified.
The morphology of the plaques was recorded to be small/ medium plaques with central clearings and a cloudy/ turbid halo ring.
All the plaques on the plate generally had the same morphology, with the exception of some plaques varying in size.
5 microcentrifuge tubes were gathered and labeled, one for each plaque. 100 μl of phage buffer was added into each microcentrifuge tube.
Using a sterile tip on a micropipettor, the plaque was touched perpendicular to the surface while avoiding surrounding bacteria.
The tip was then tapped in the micro centrifuge tube containing phage buffer to dislodge phage particles. The tube was then mixed by vortexing
This was done for each plaque and micro centrifuge tube.
To continue, serial dilutions must be done with each plaque solution to purify the phage by decreasing the concentration.
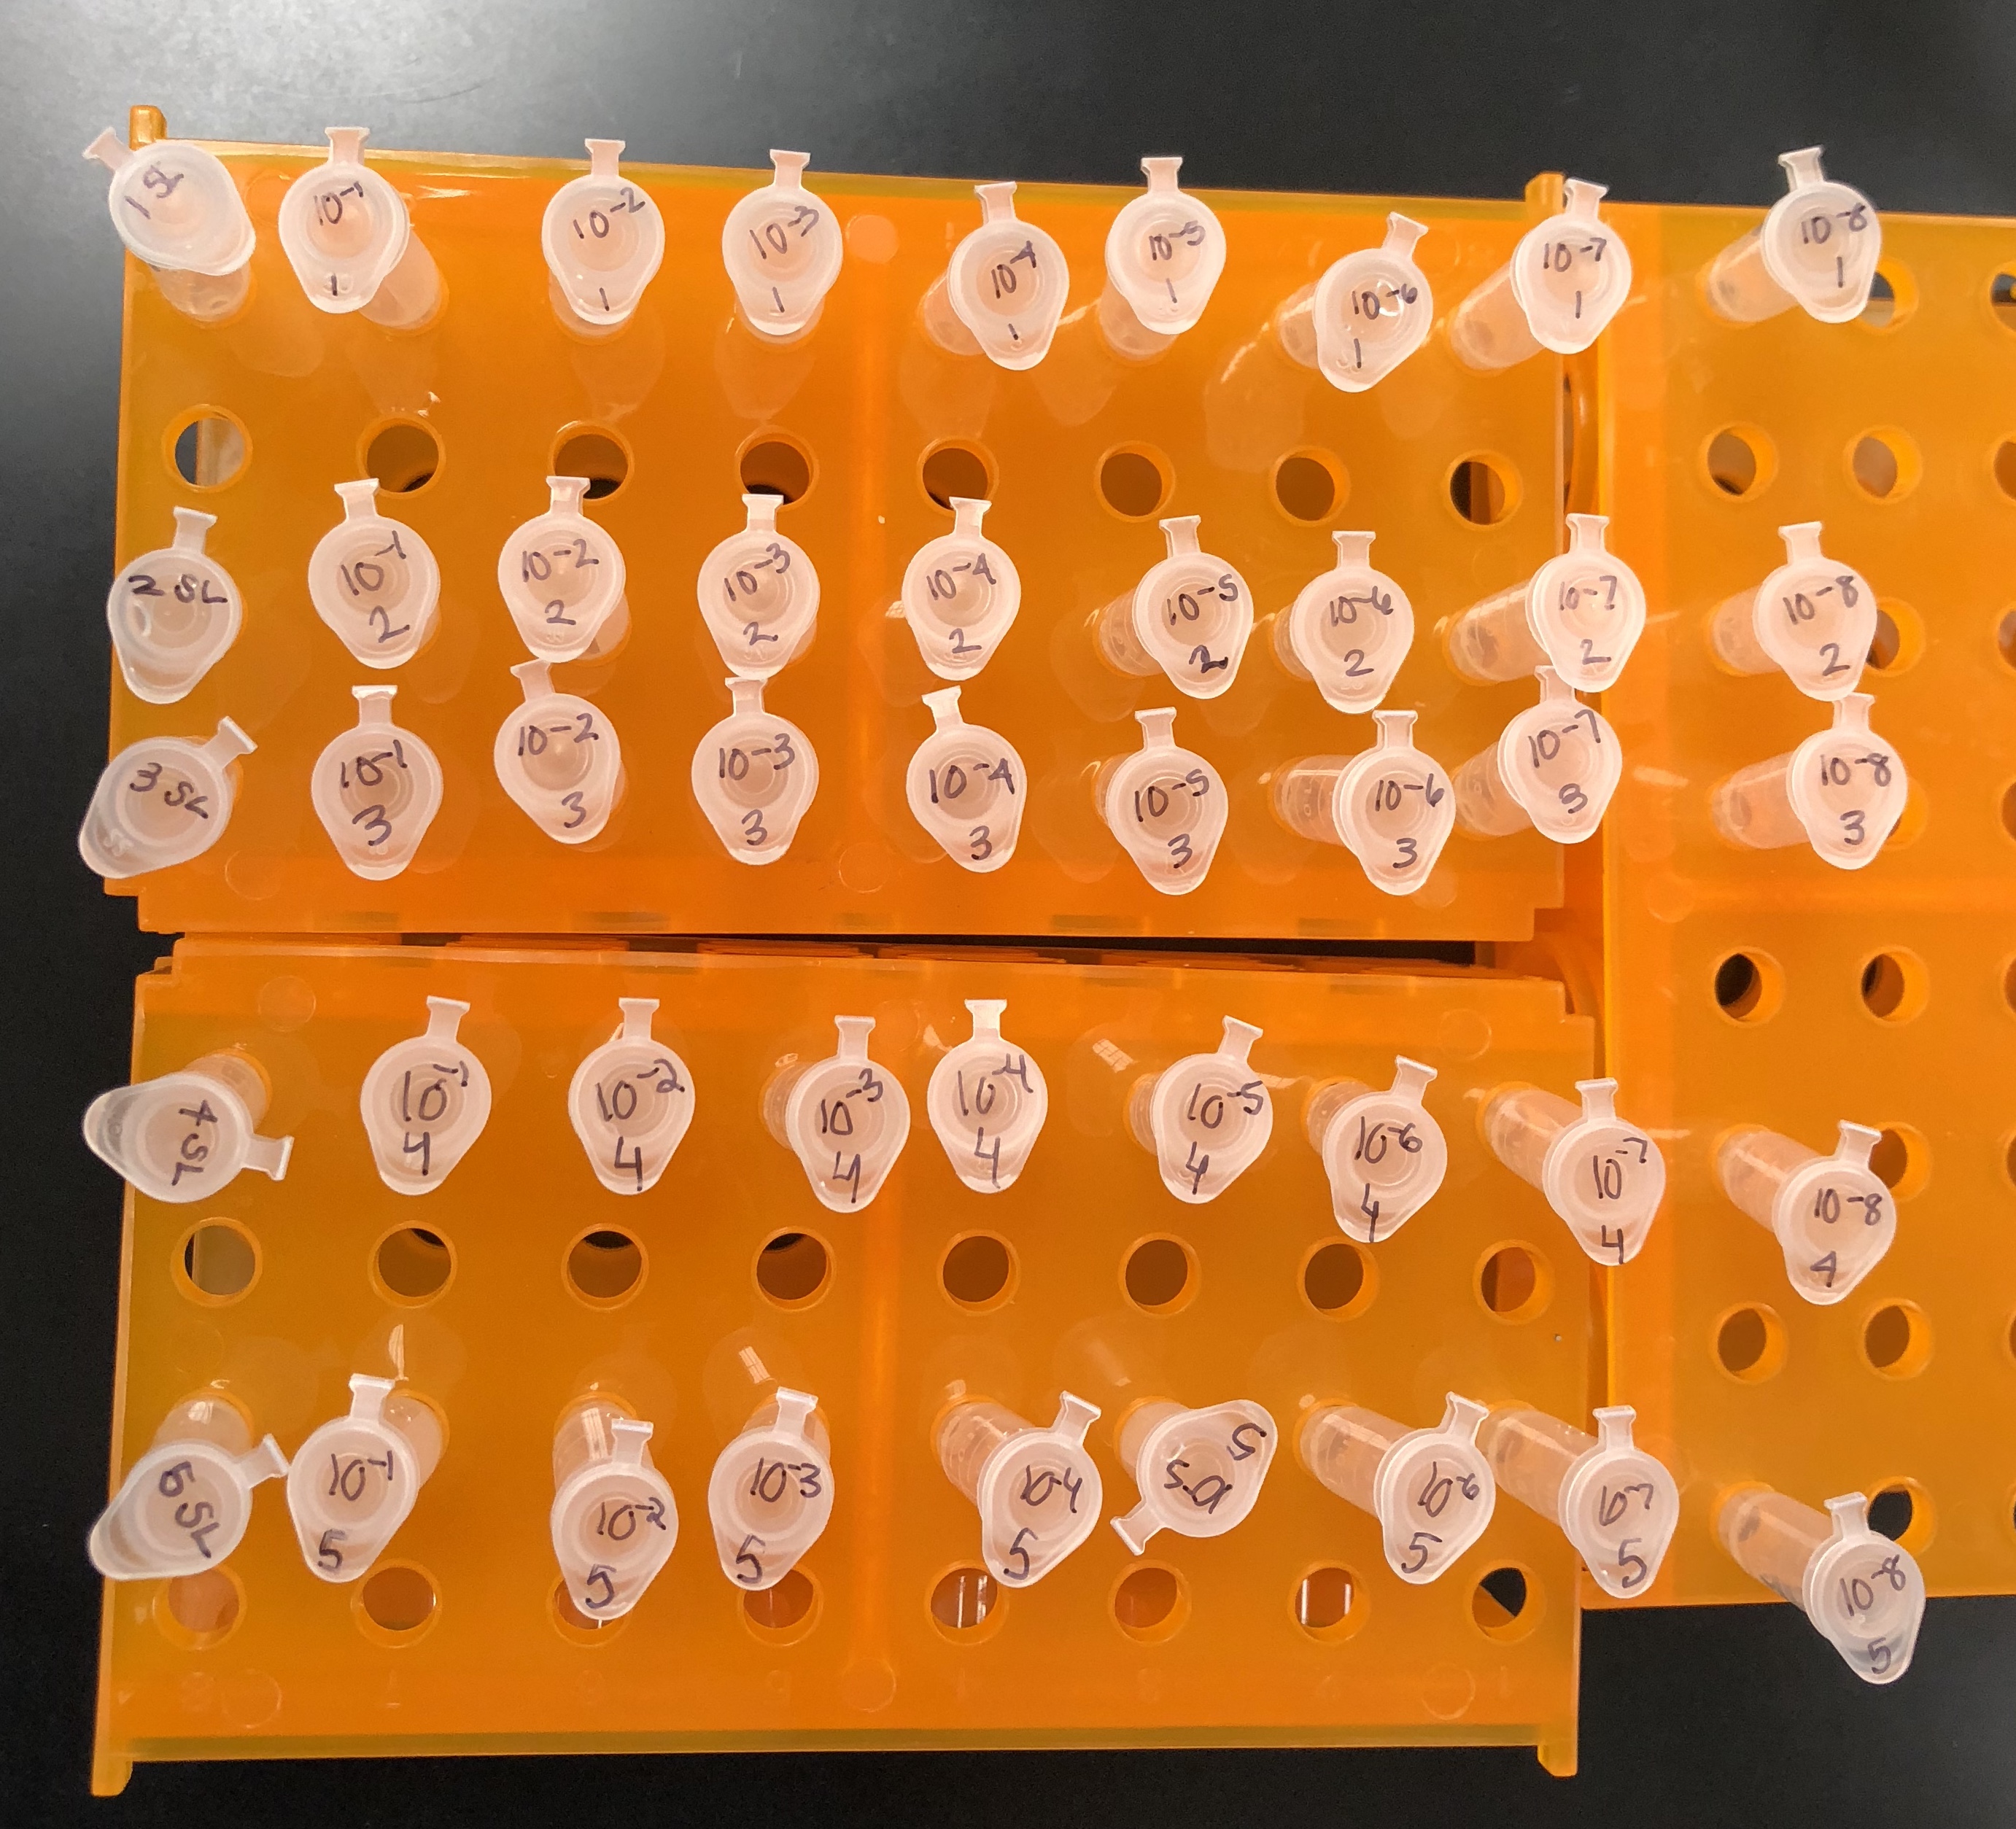
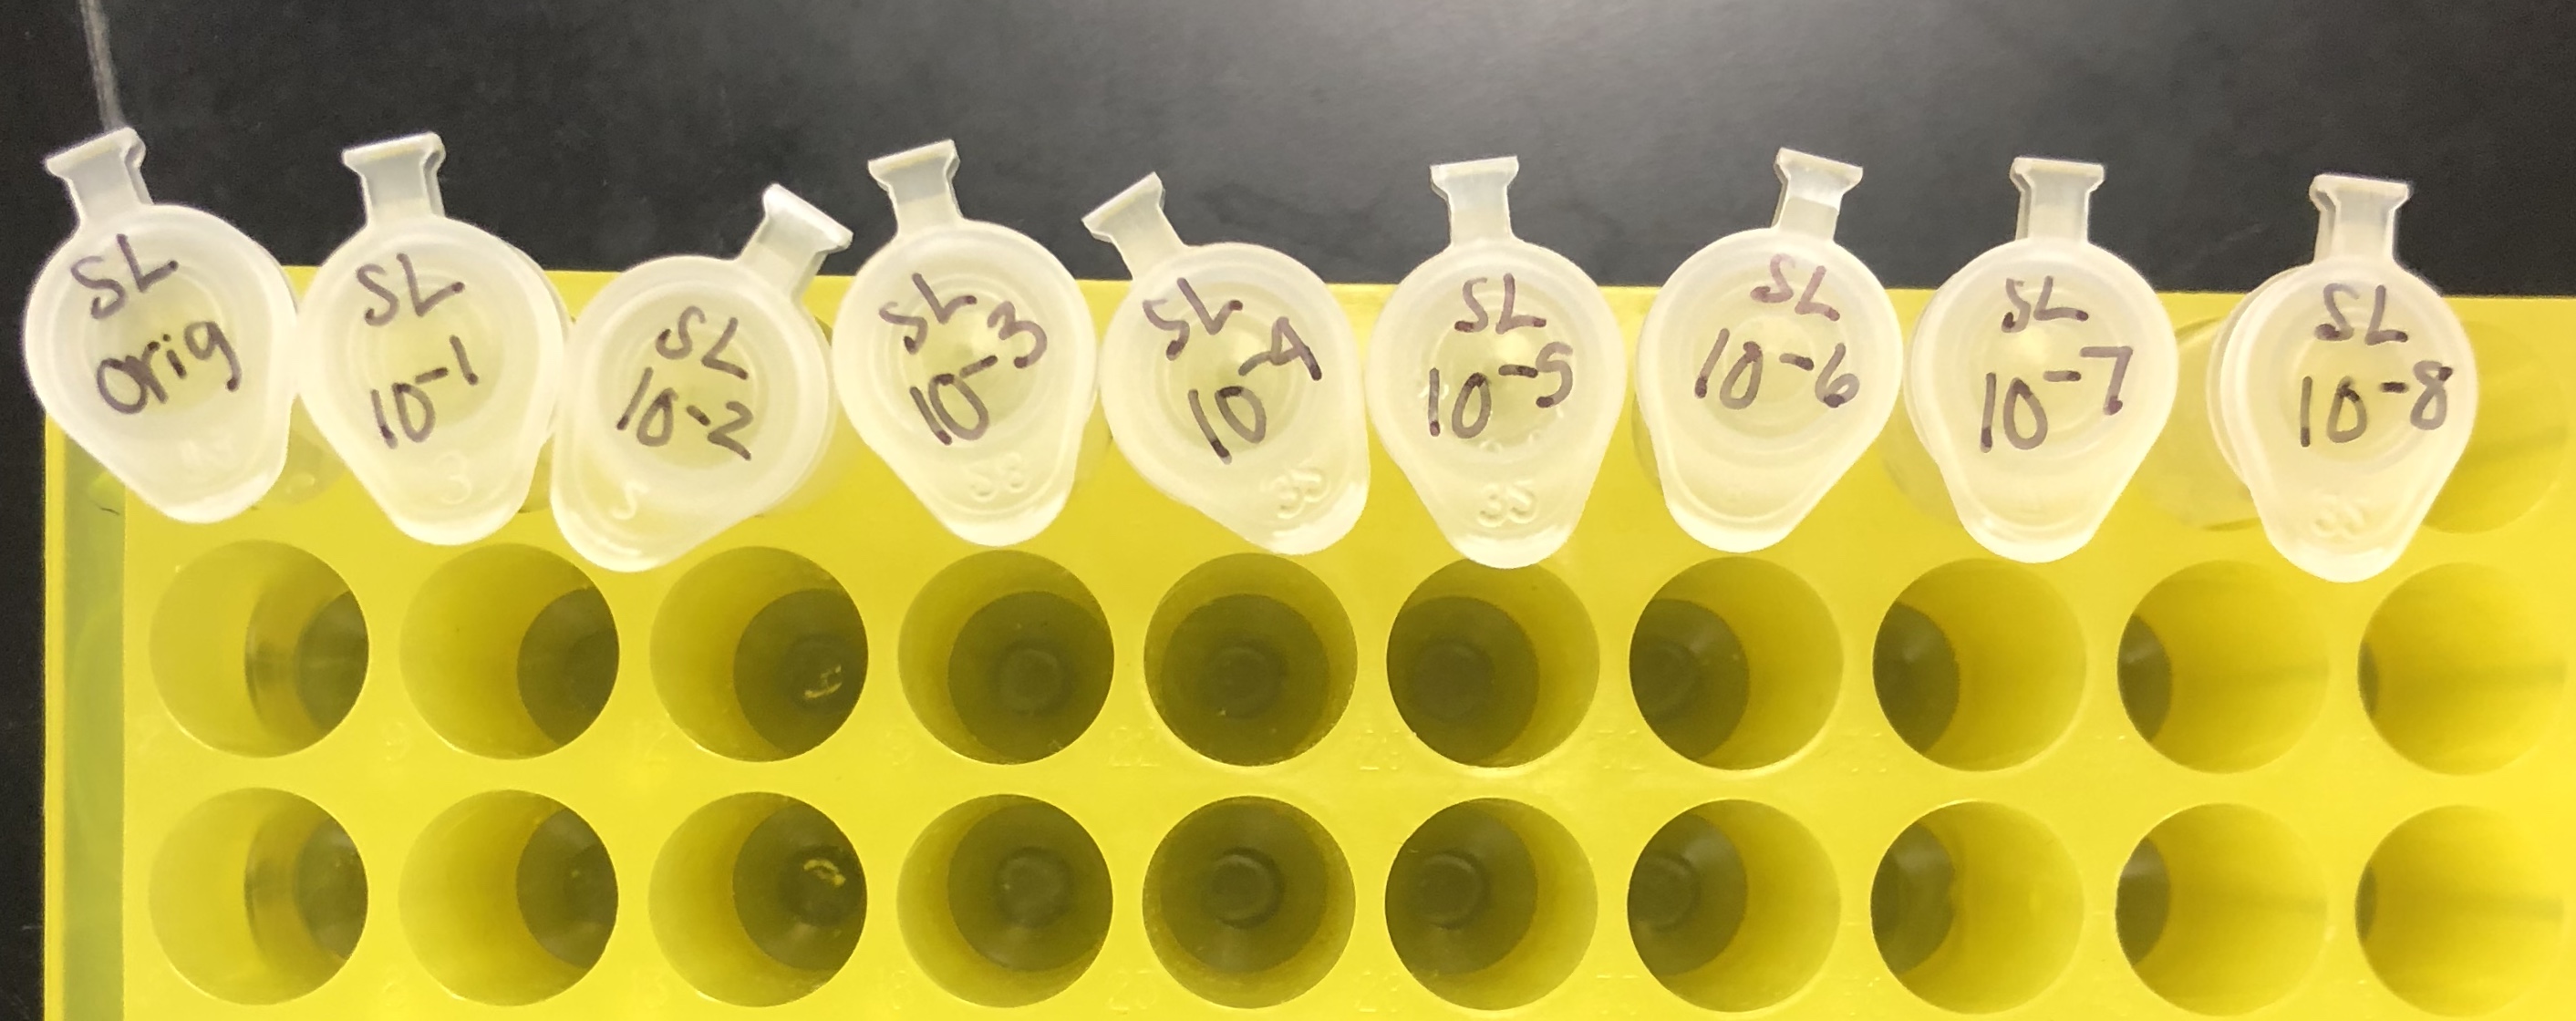
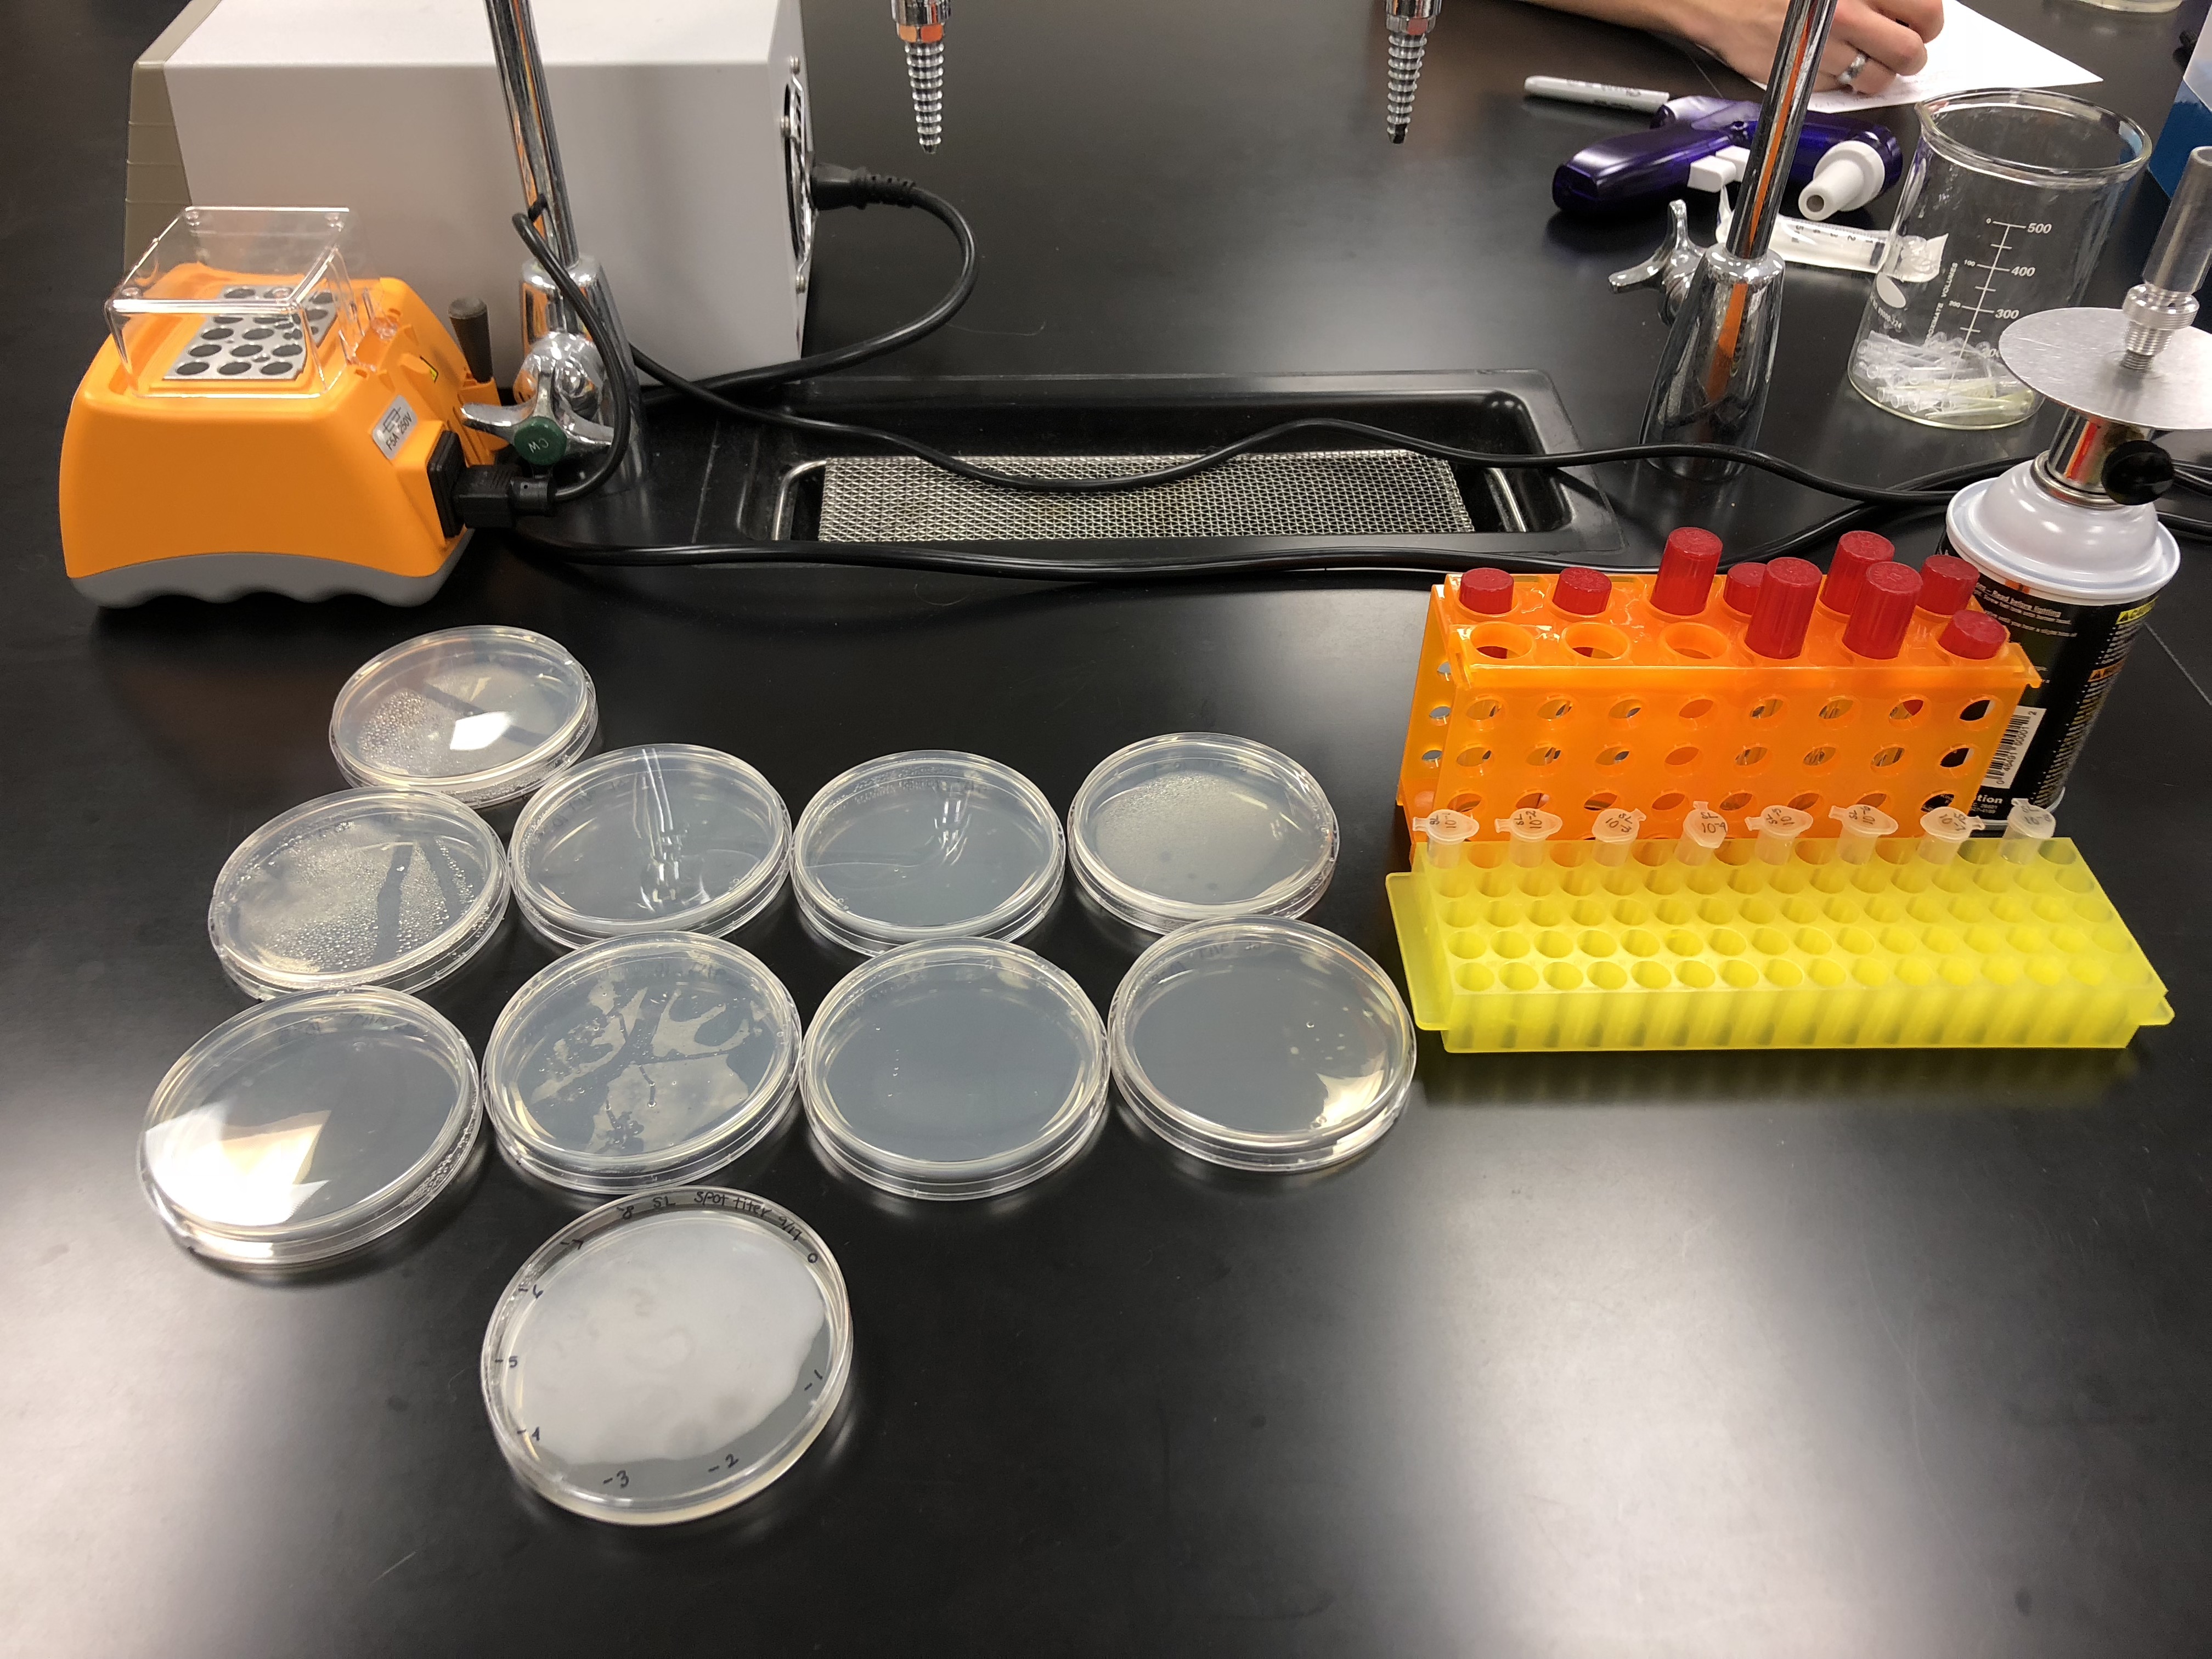
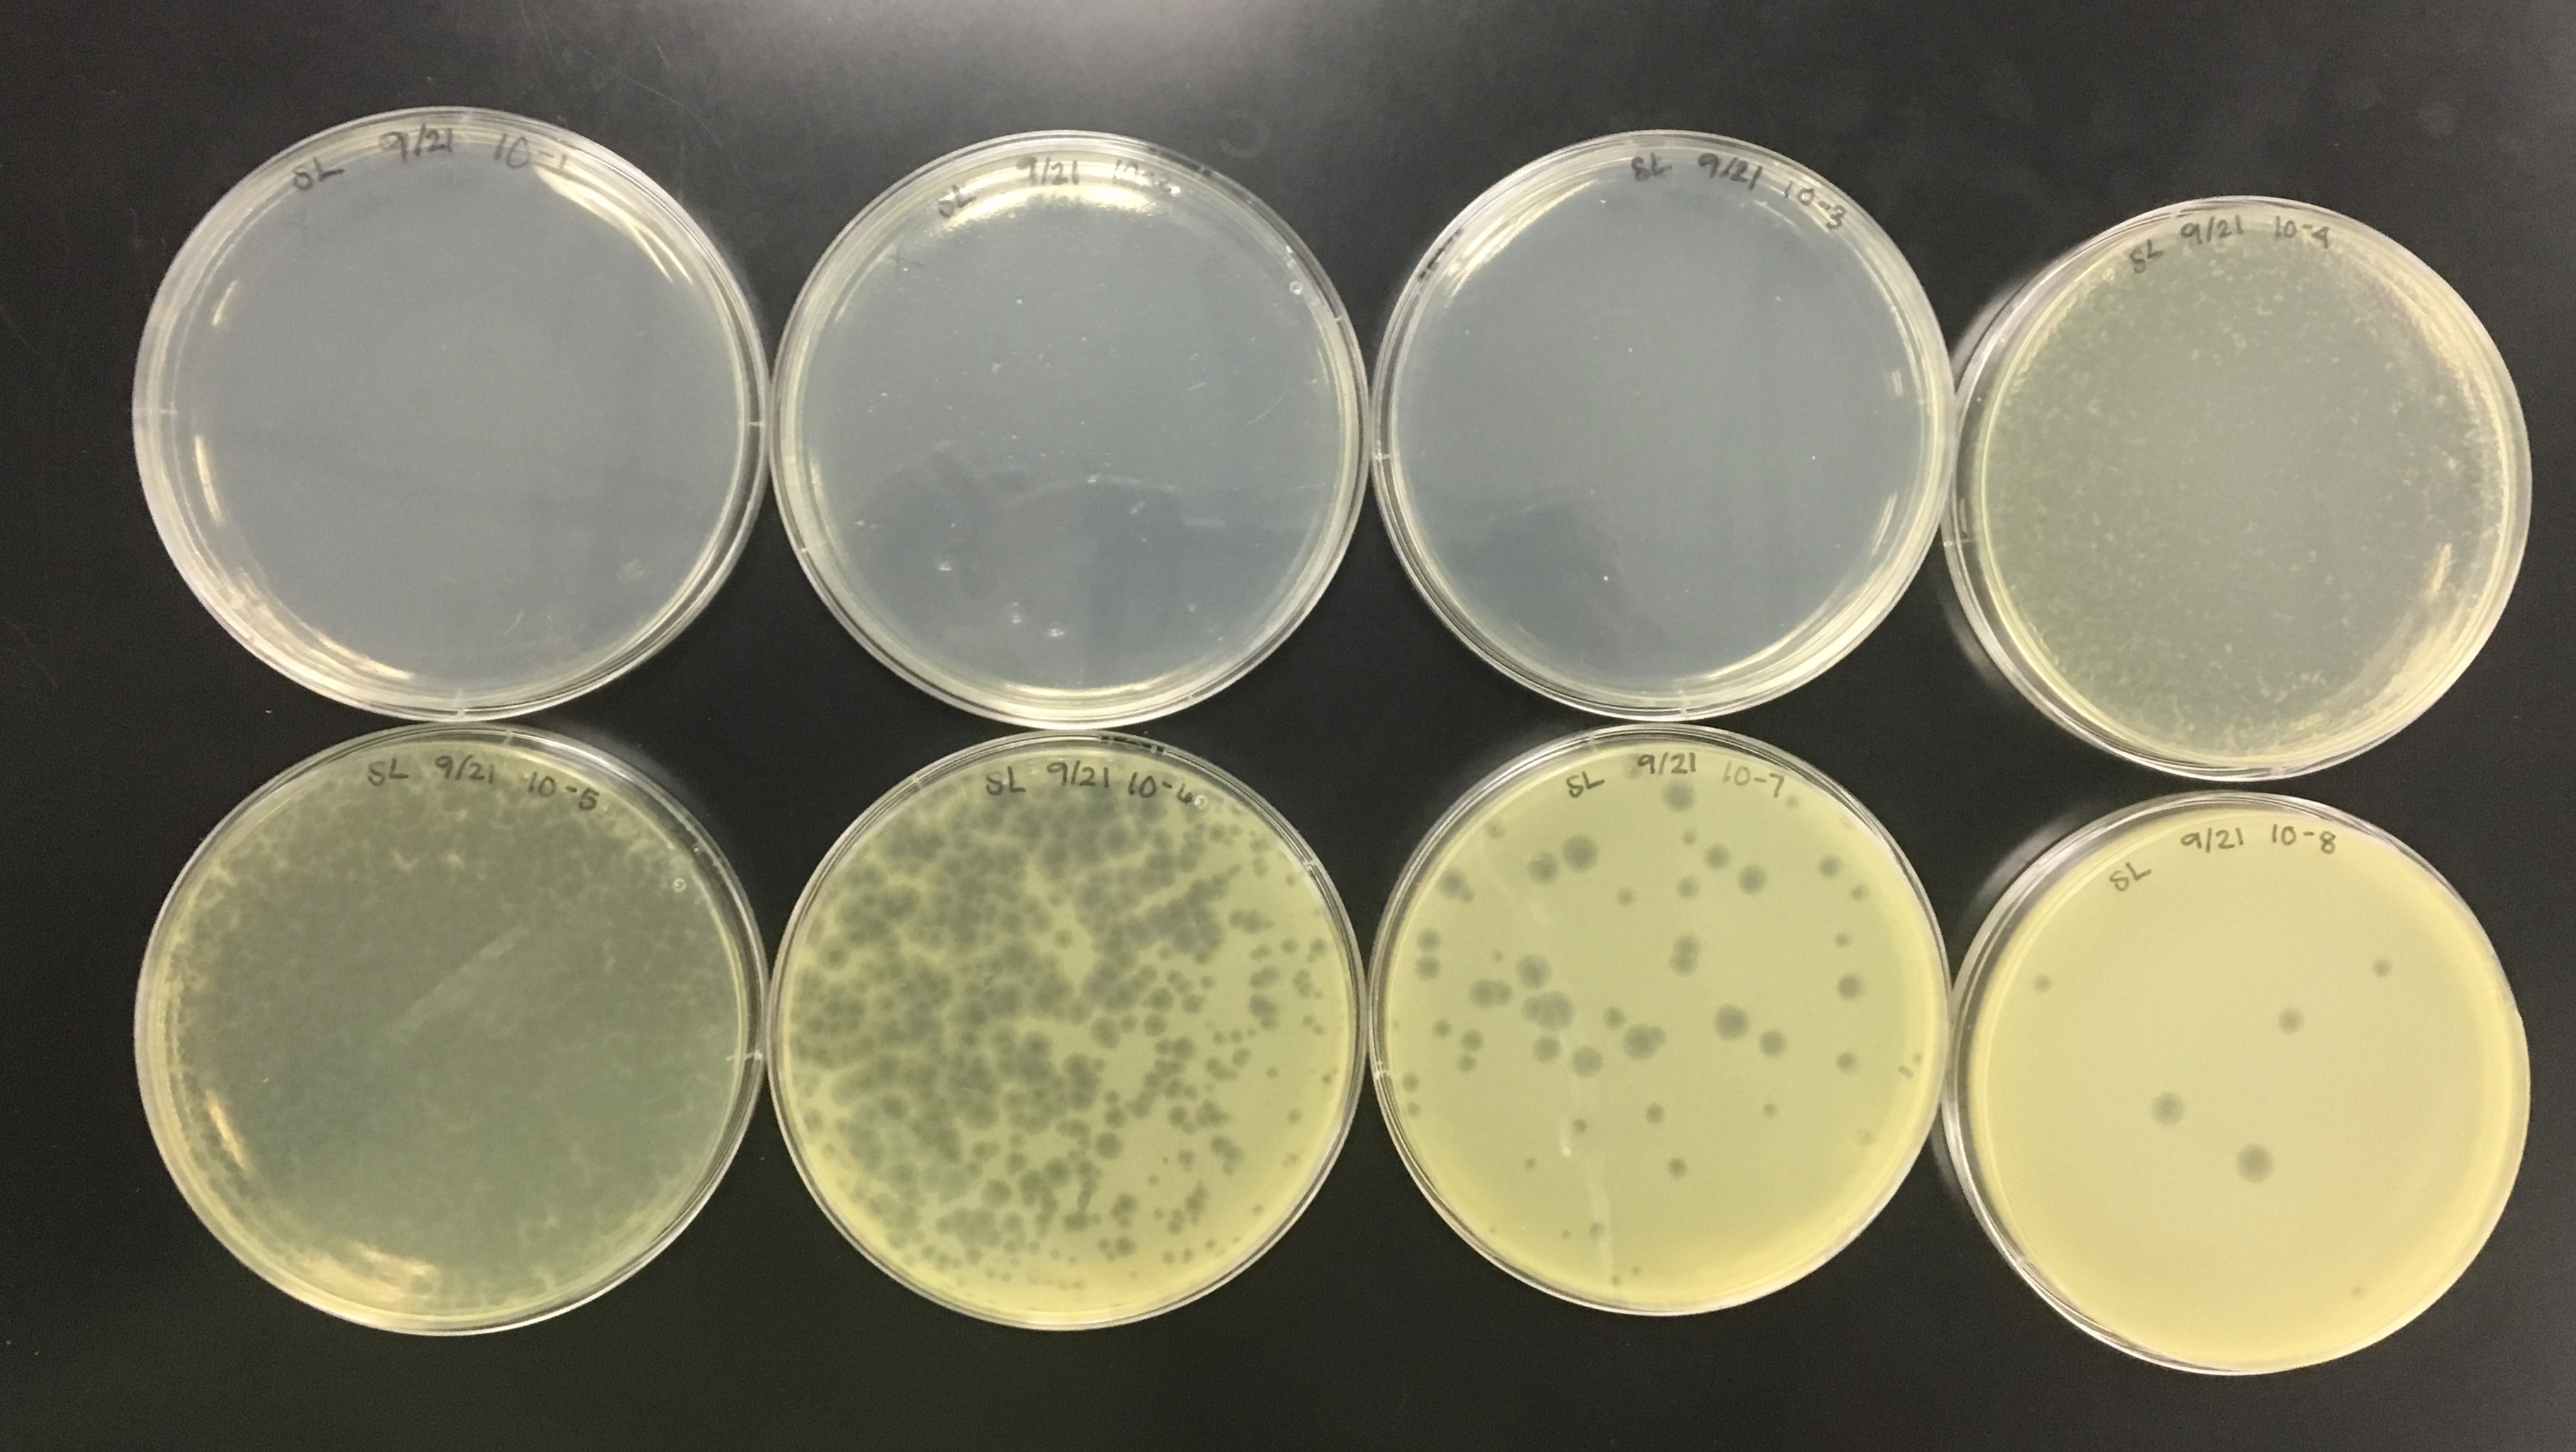
Serial Dilutions (09/07/2018)
Purpose: The purpose of serial dilutions is to prepare liquid phage samples of decreasing concentrations. The serial dilutions were used to manipulate the number of phages in a sample and purify, amplify, and titer the phage.
Procedure:
The proper number of microcentrifuge tubes were set in a rack and labeled
10-1, 10-2, 10-3….10-8.
90 μl of phage buffer was added to each of the tubes
10 μl of the undiluted phage sample was added to the 10e-1 tube and vortexed well
Using a clean pipette tip, 10 μl of the 10e-1sample was transferred to the 10e-2 tube and vortexed well.
10 μl of each dilution was transferred to the next dilution using a clean pipette tip each time until the 10e-8 dilution was complete.
After dilutions, a spot titer should be performed to determine the concentration and decide which dilutions to use to determine a more accurate titer.
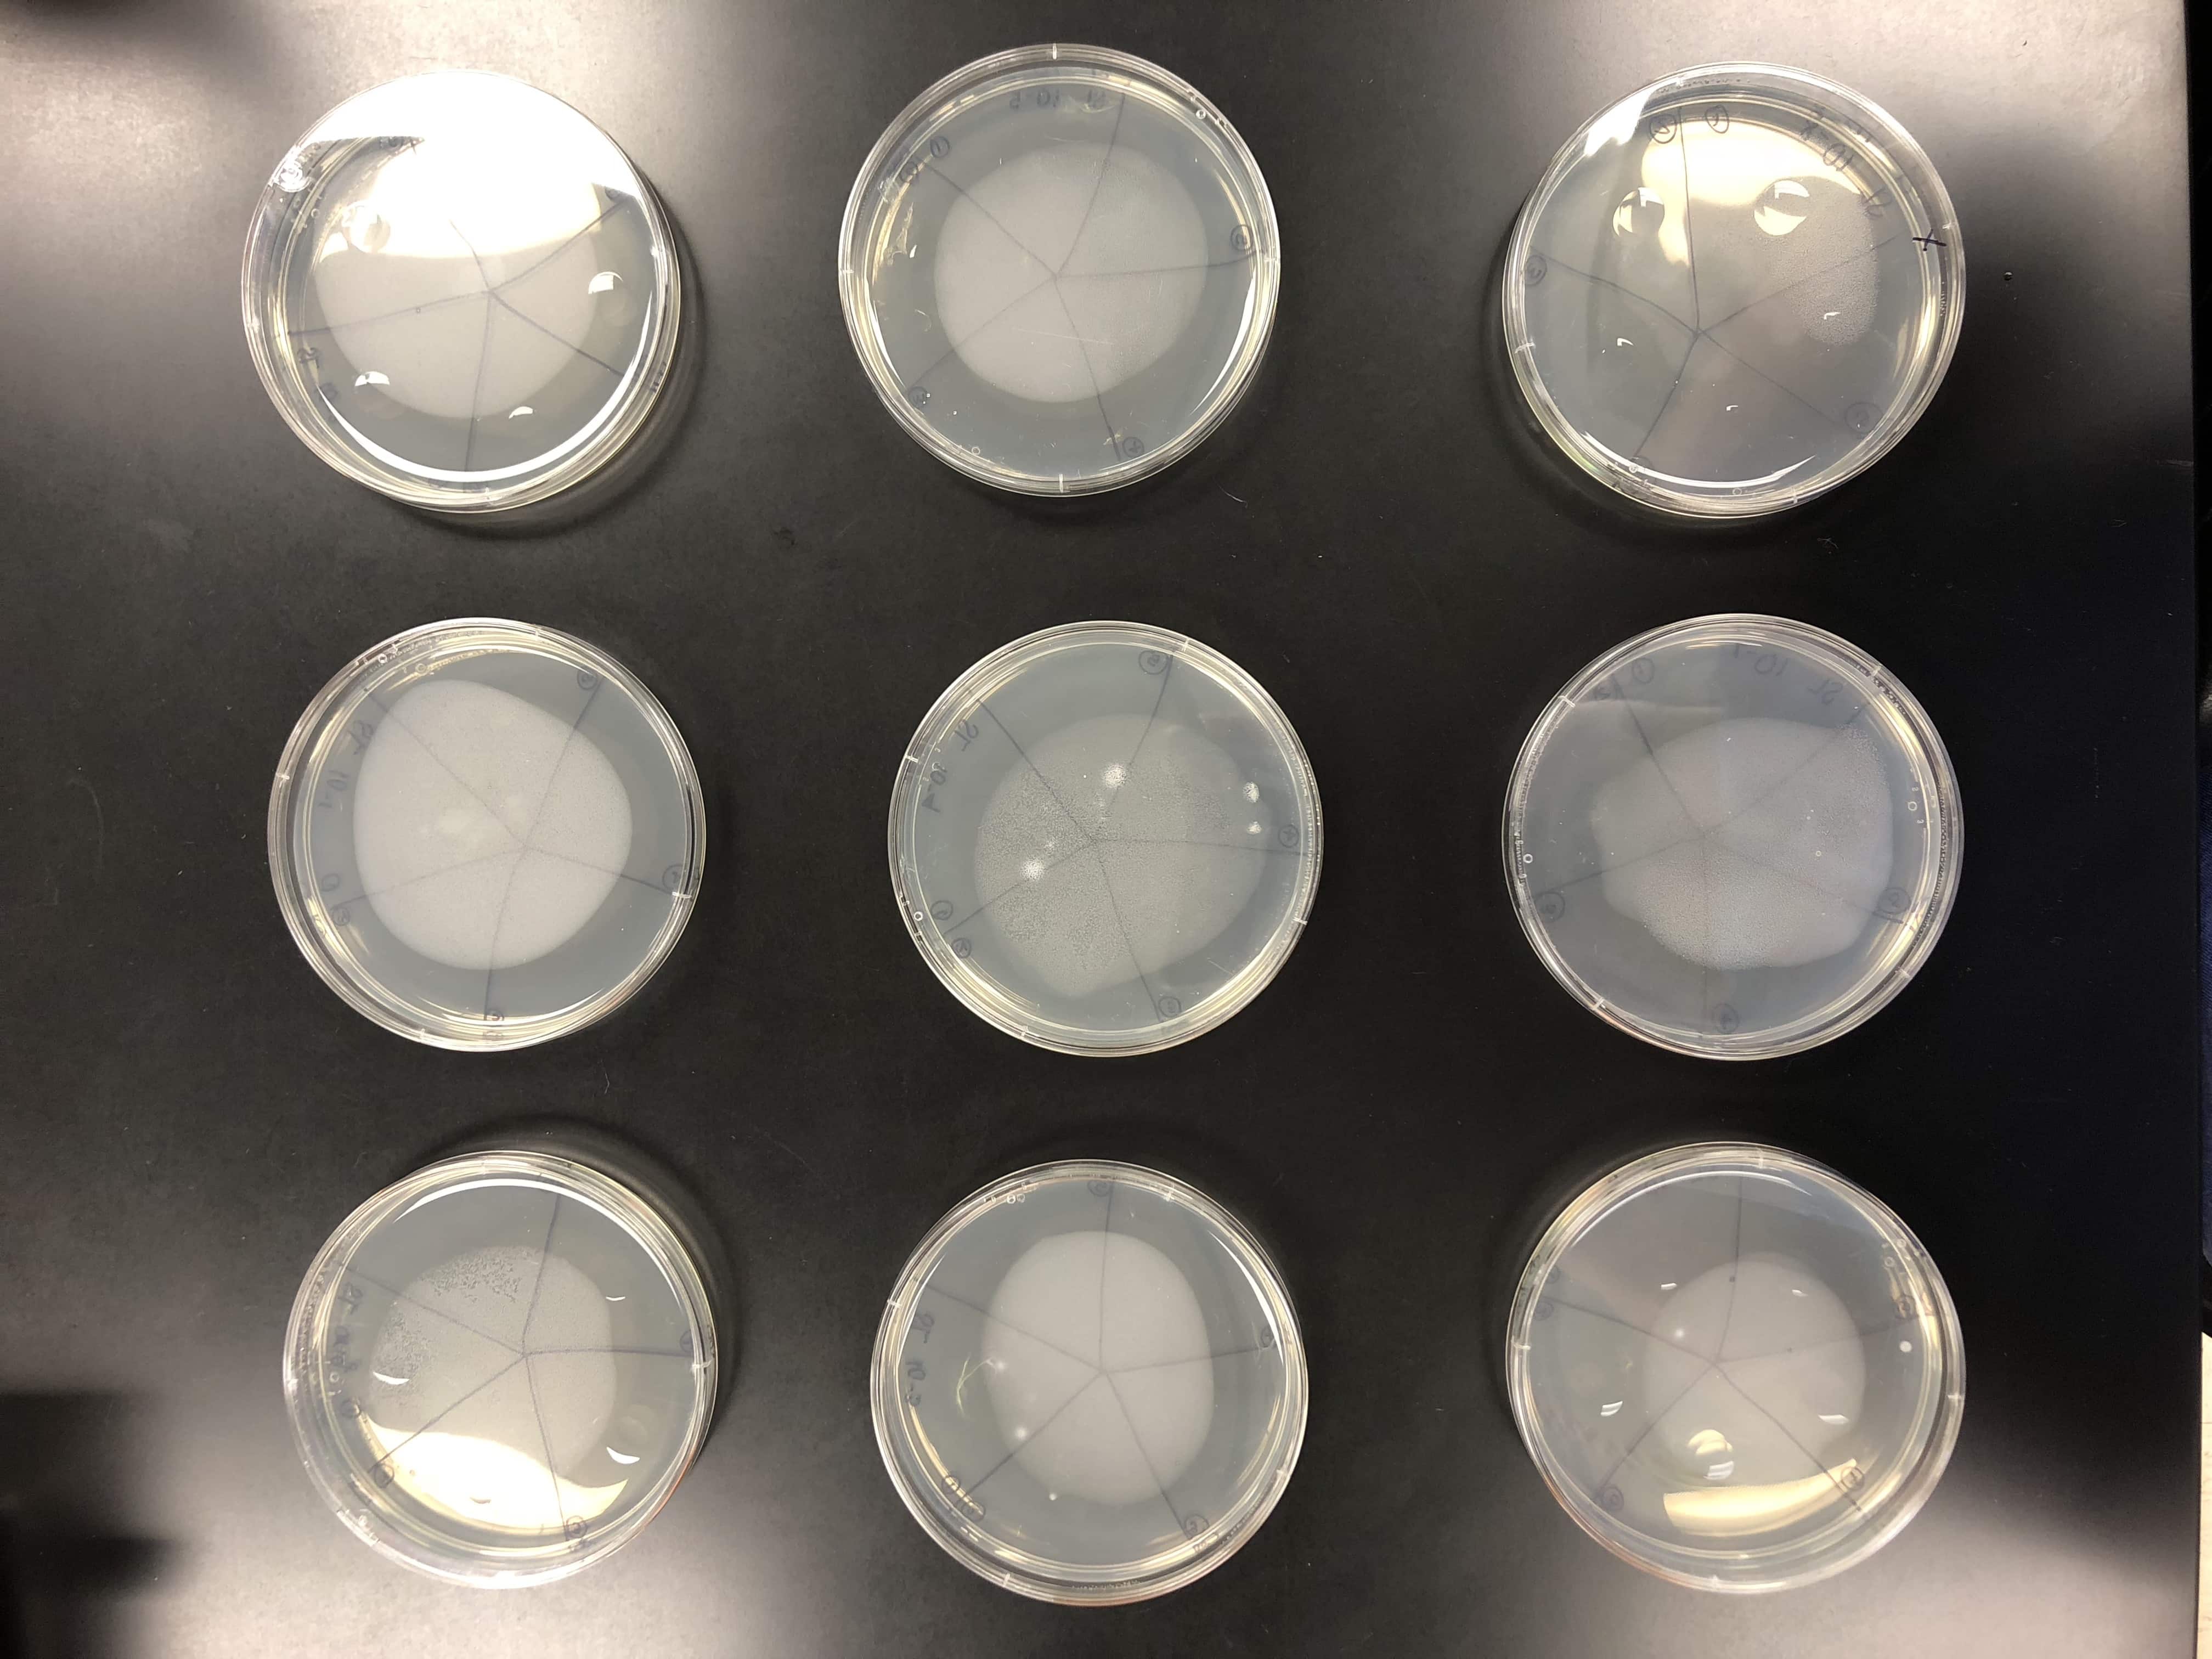
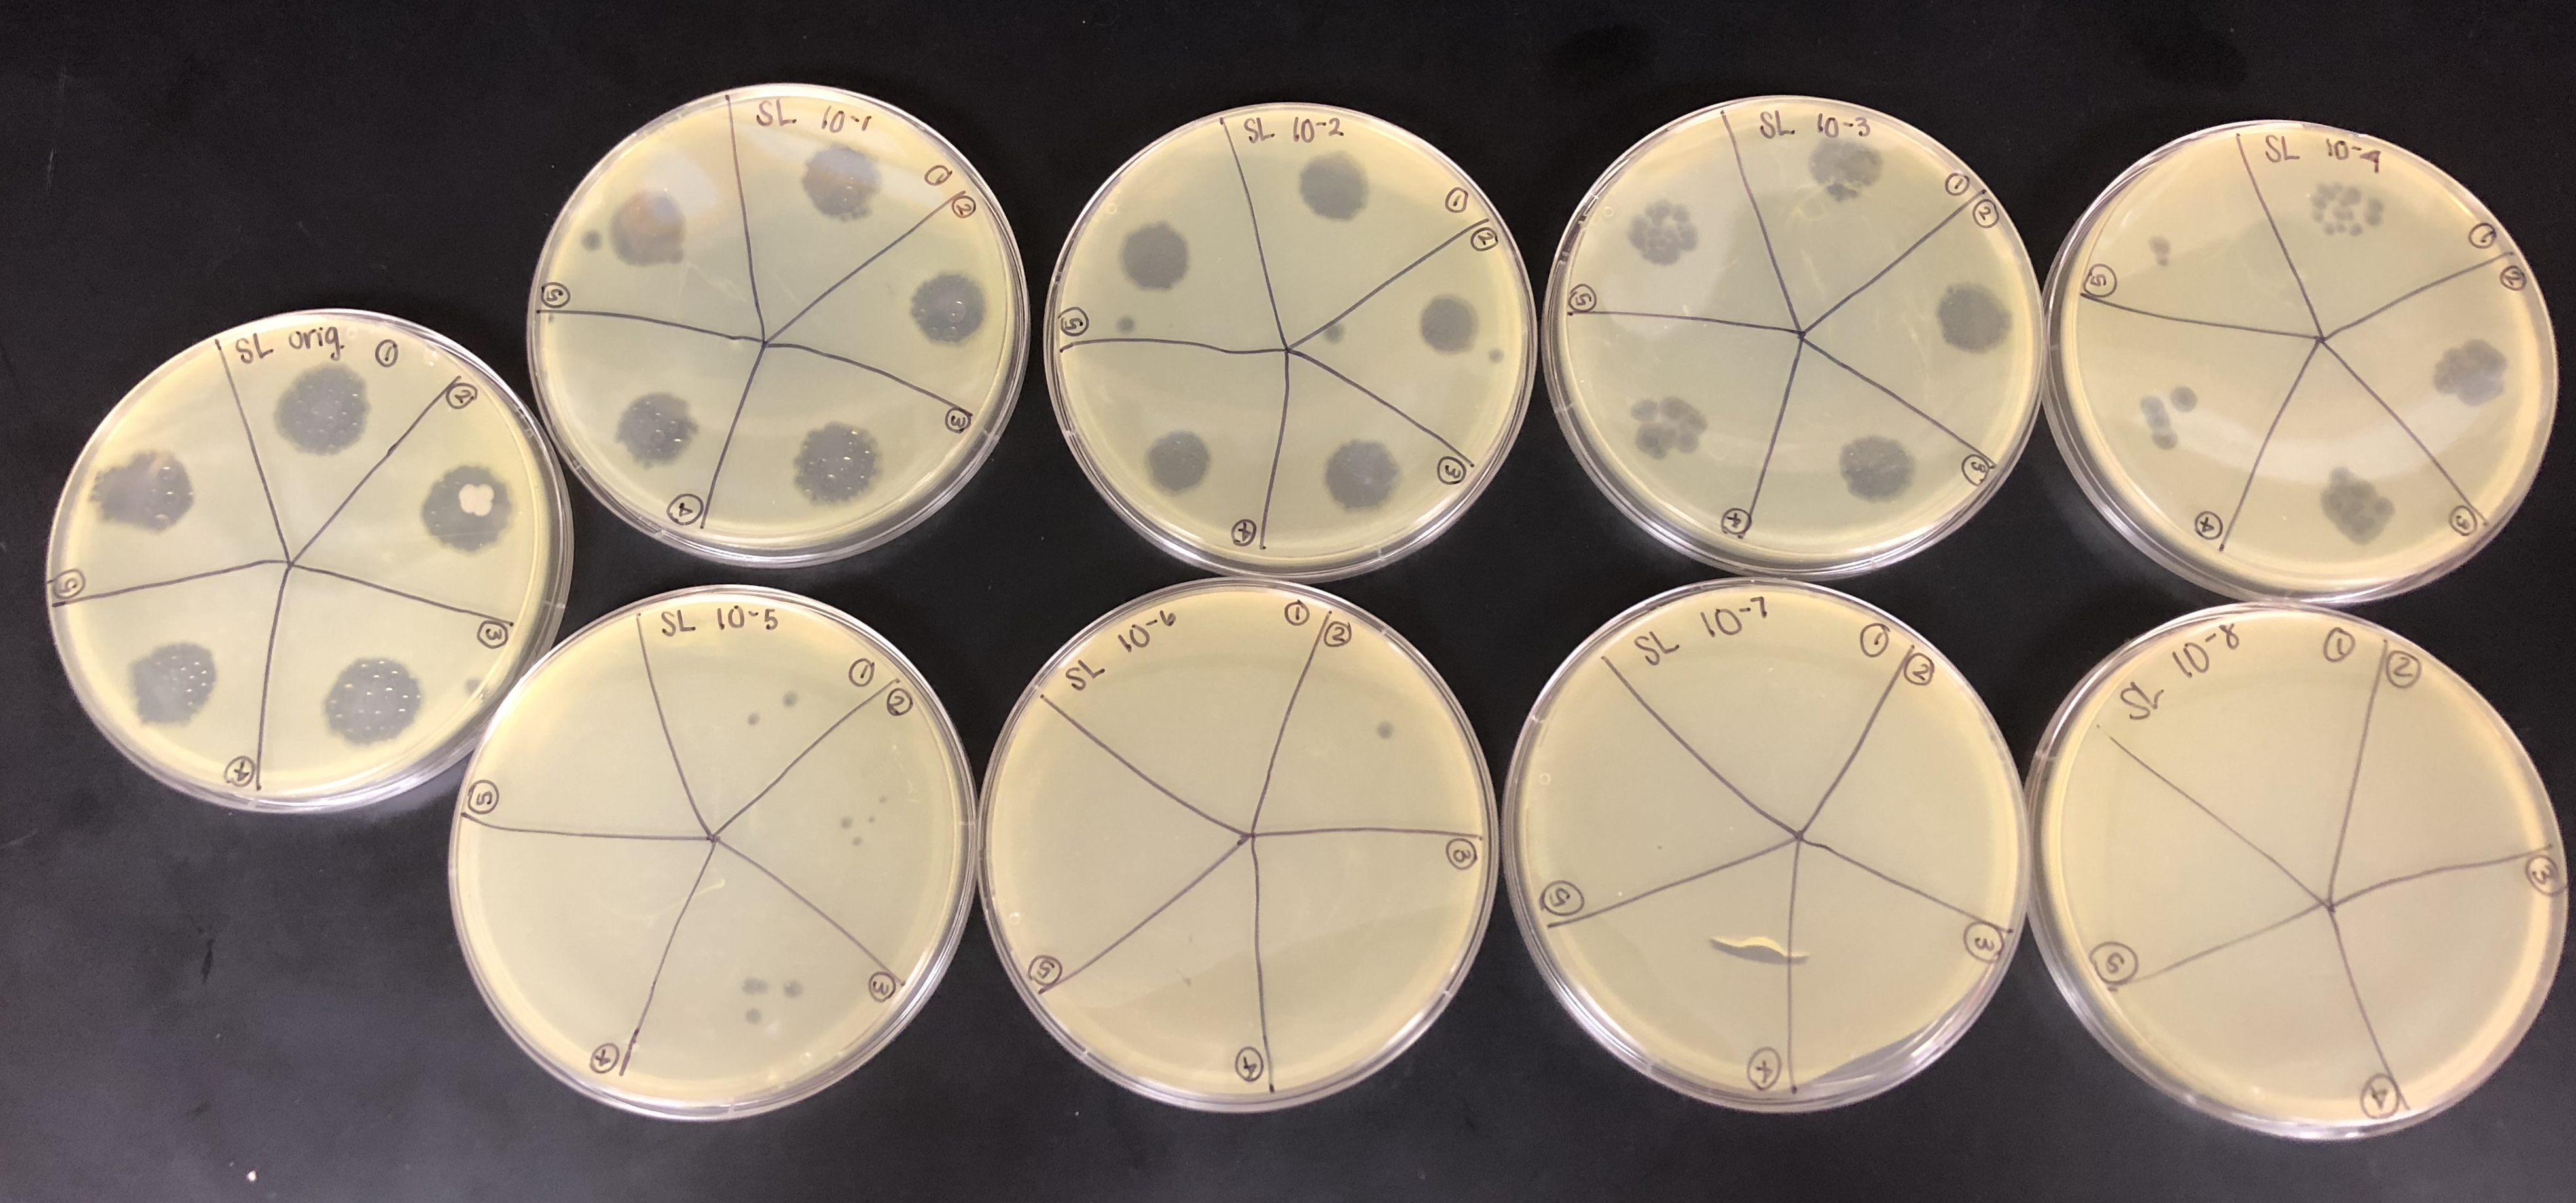
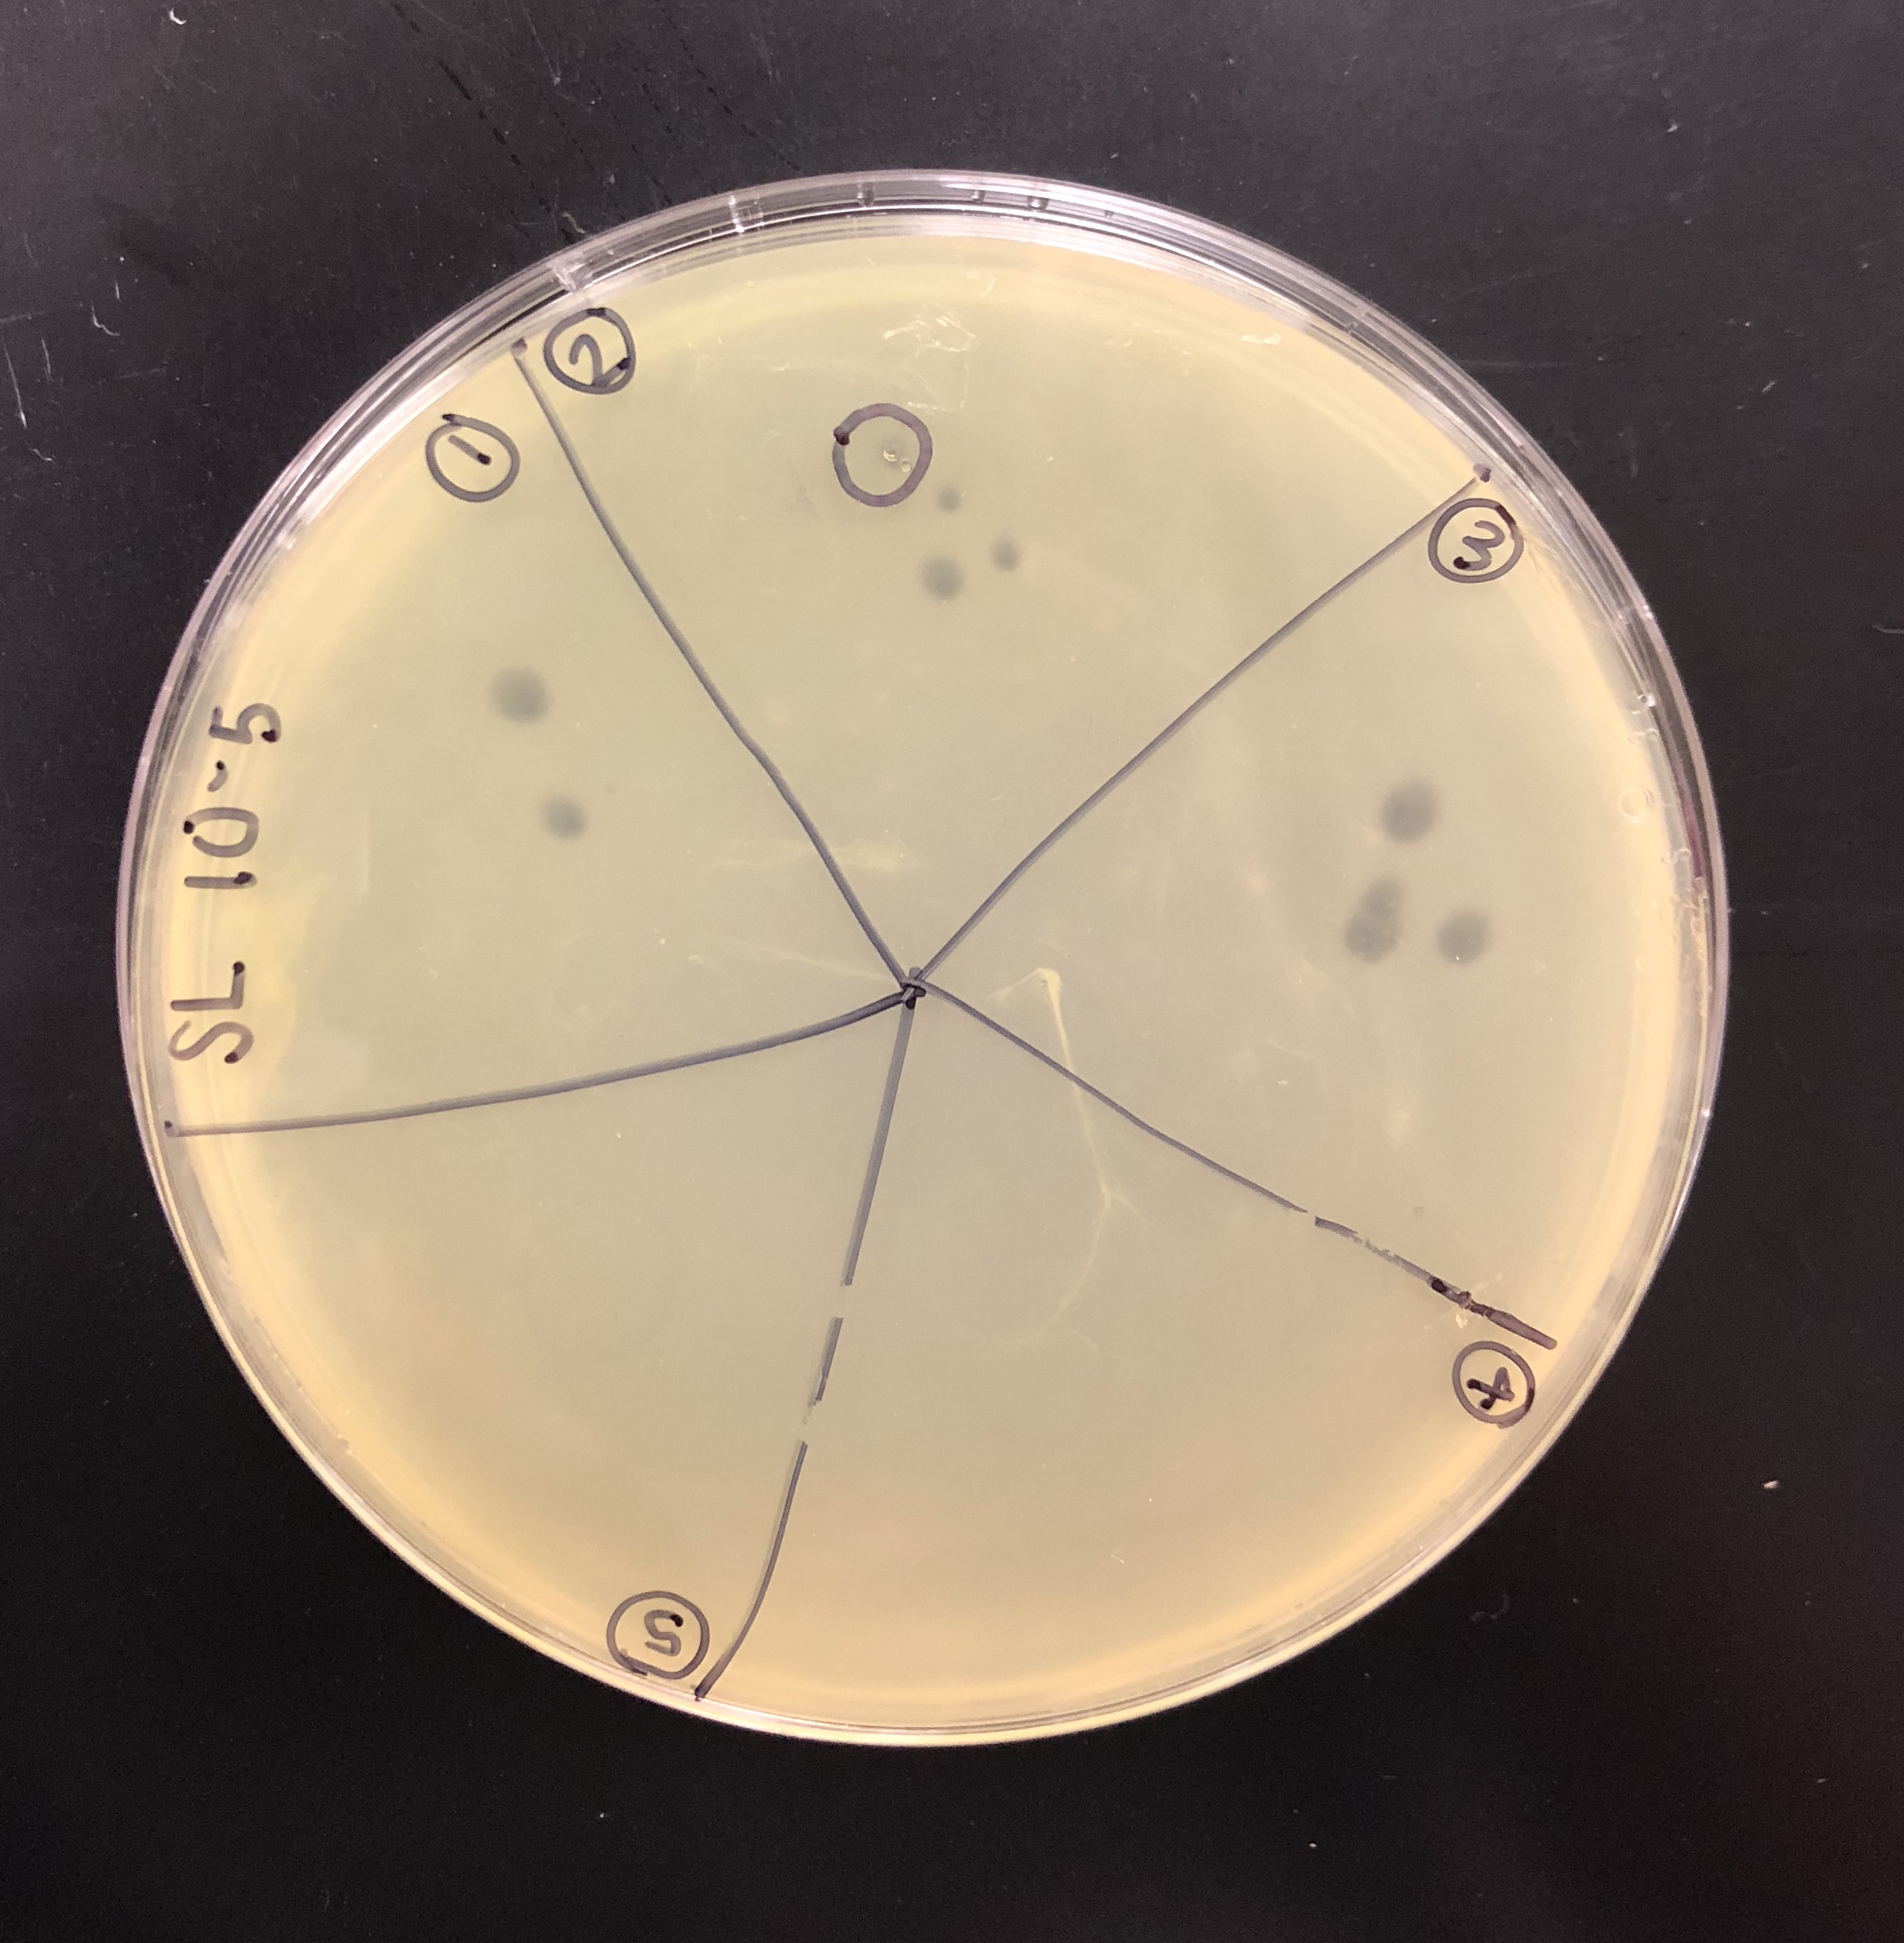
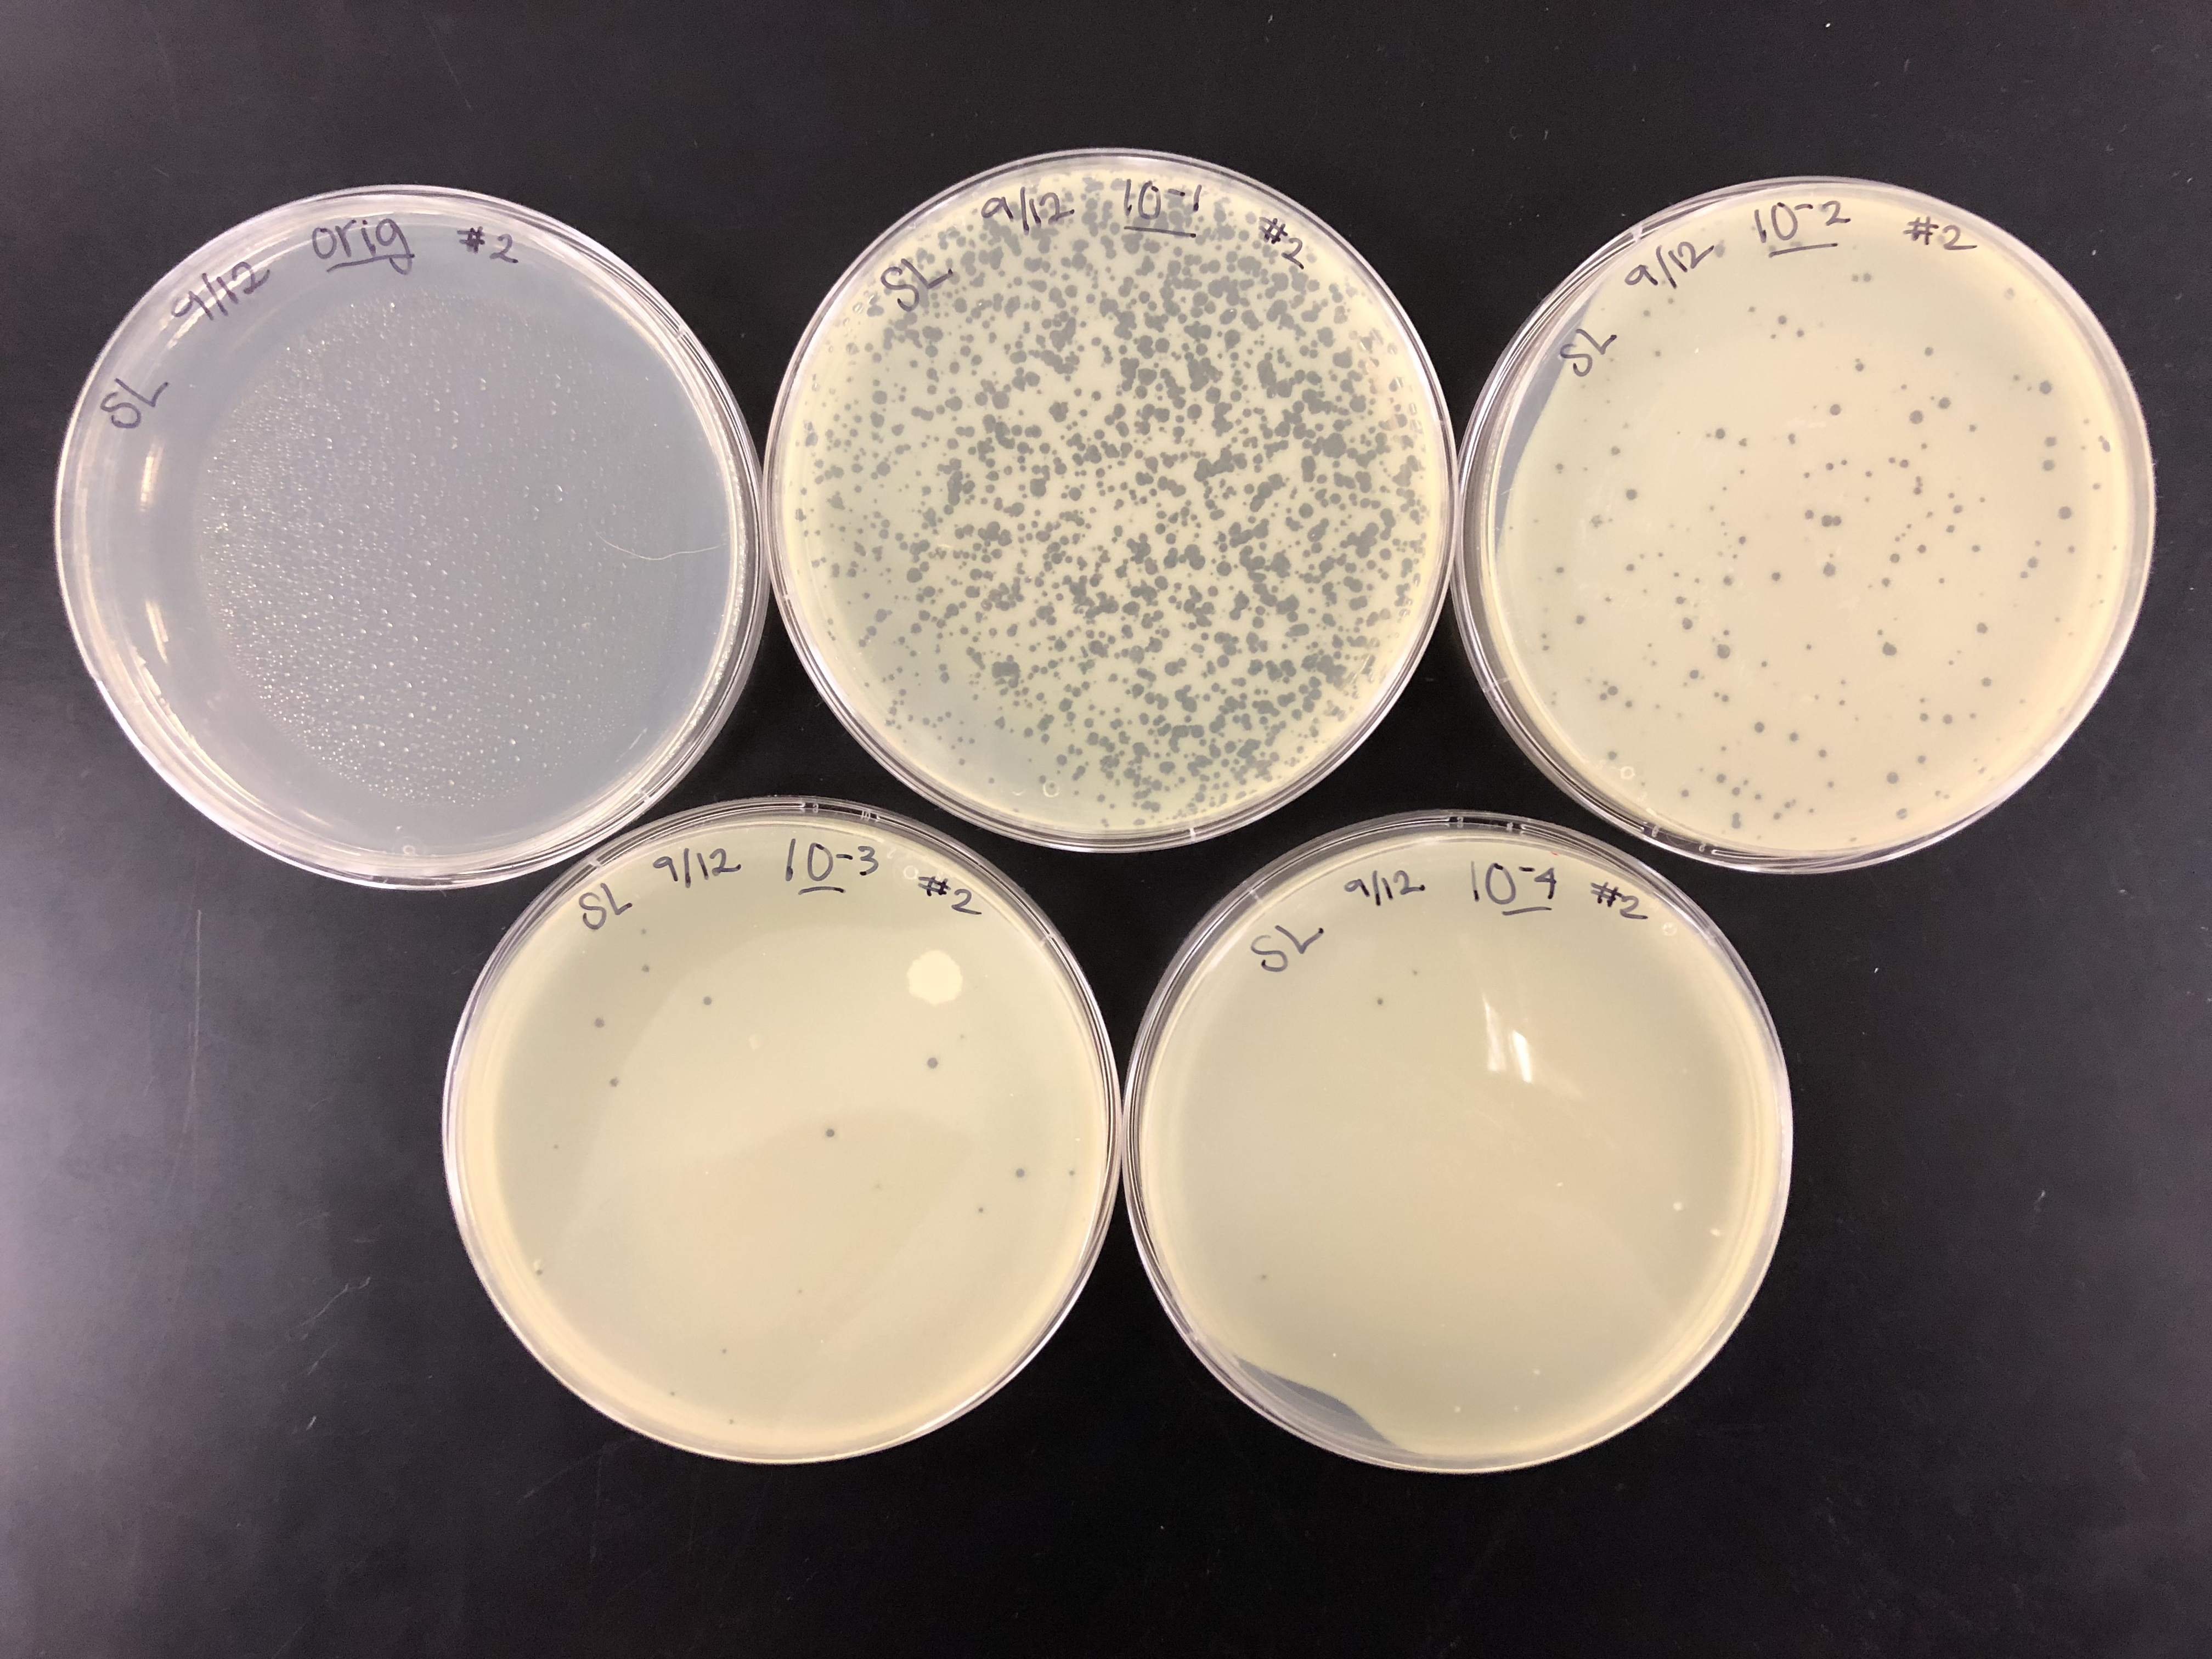
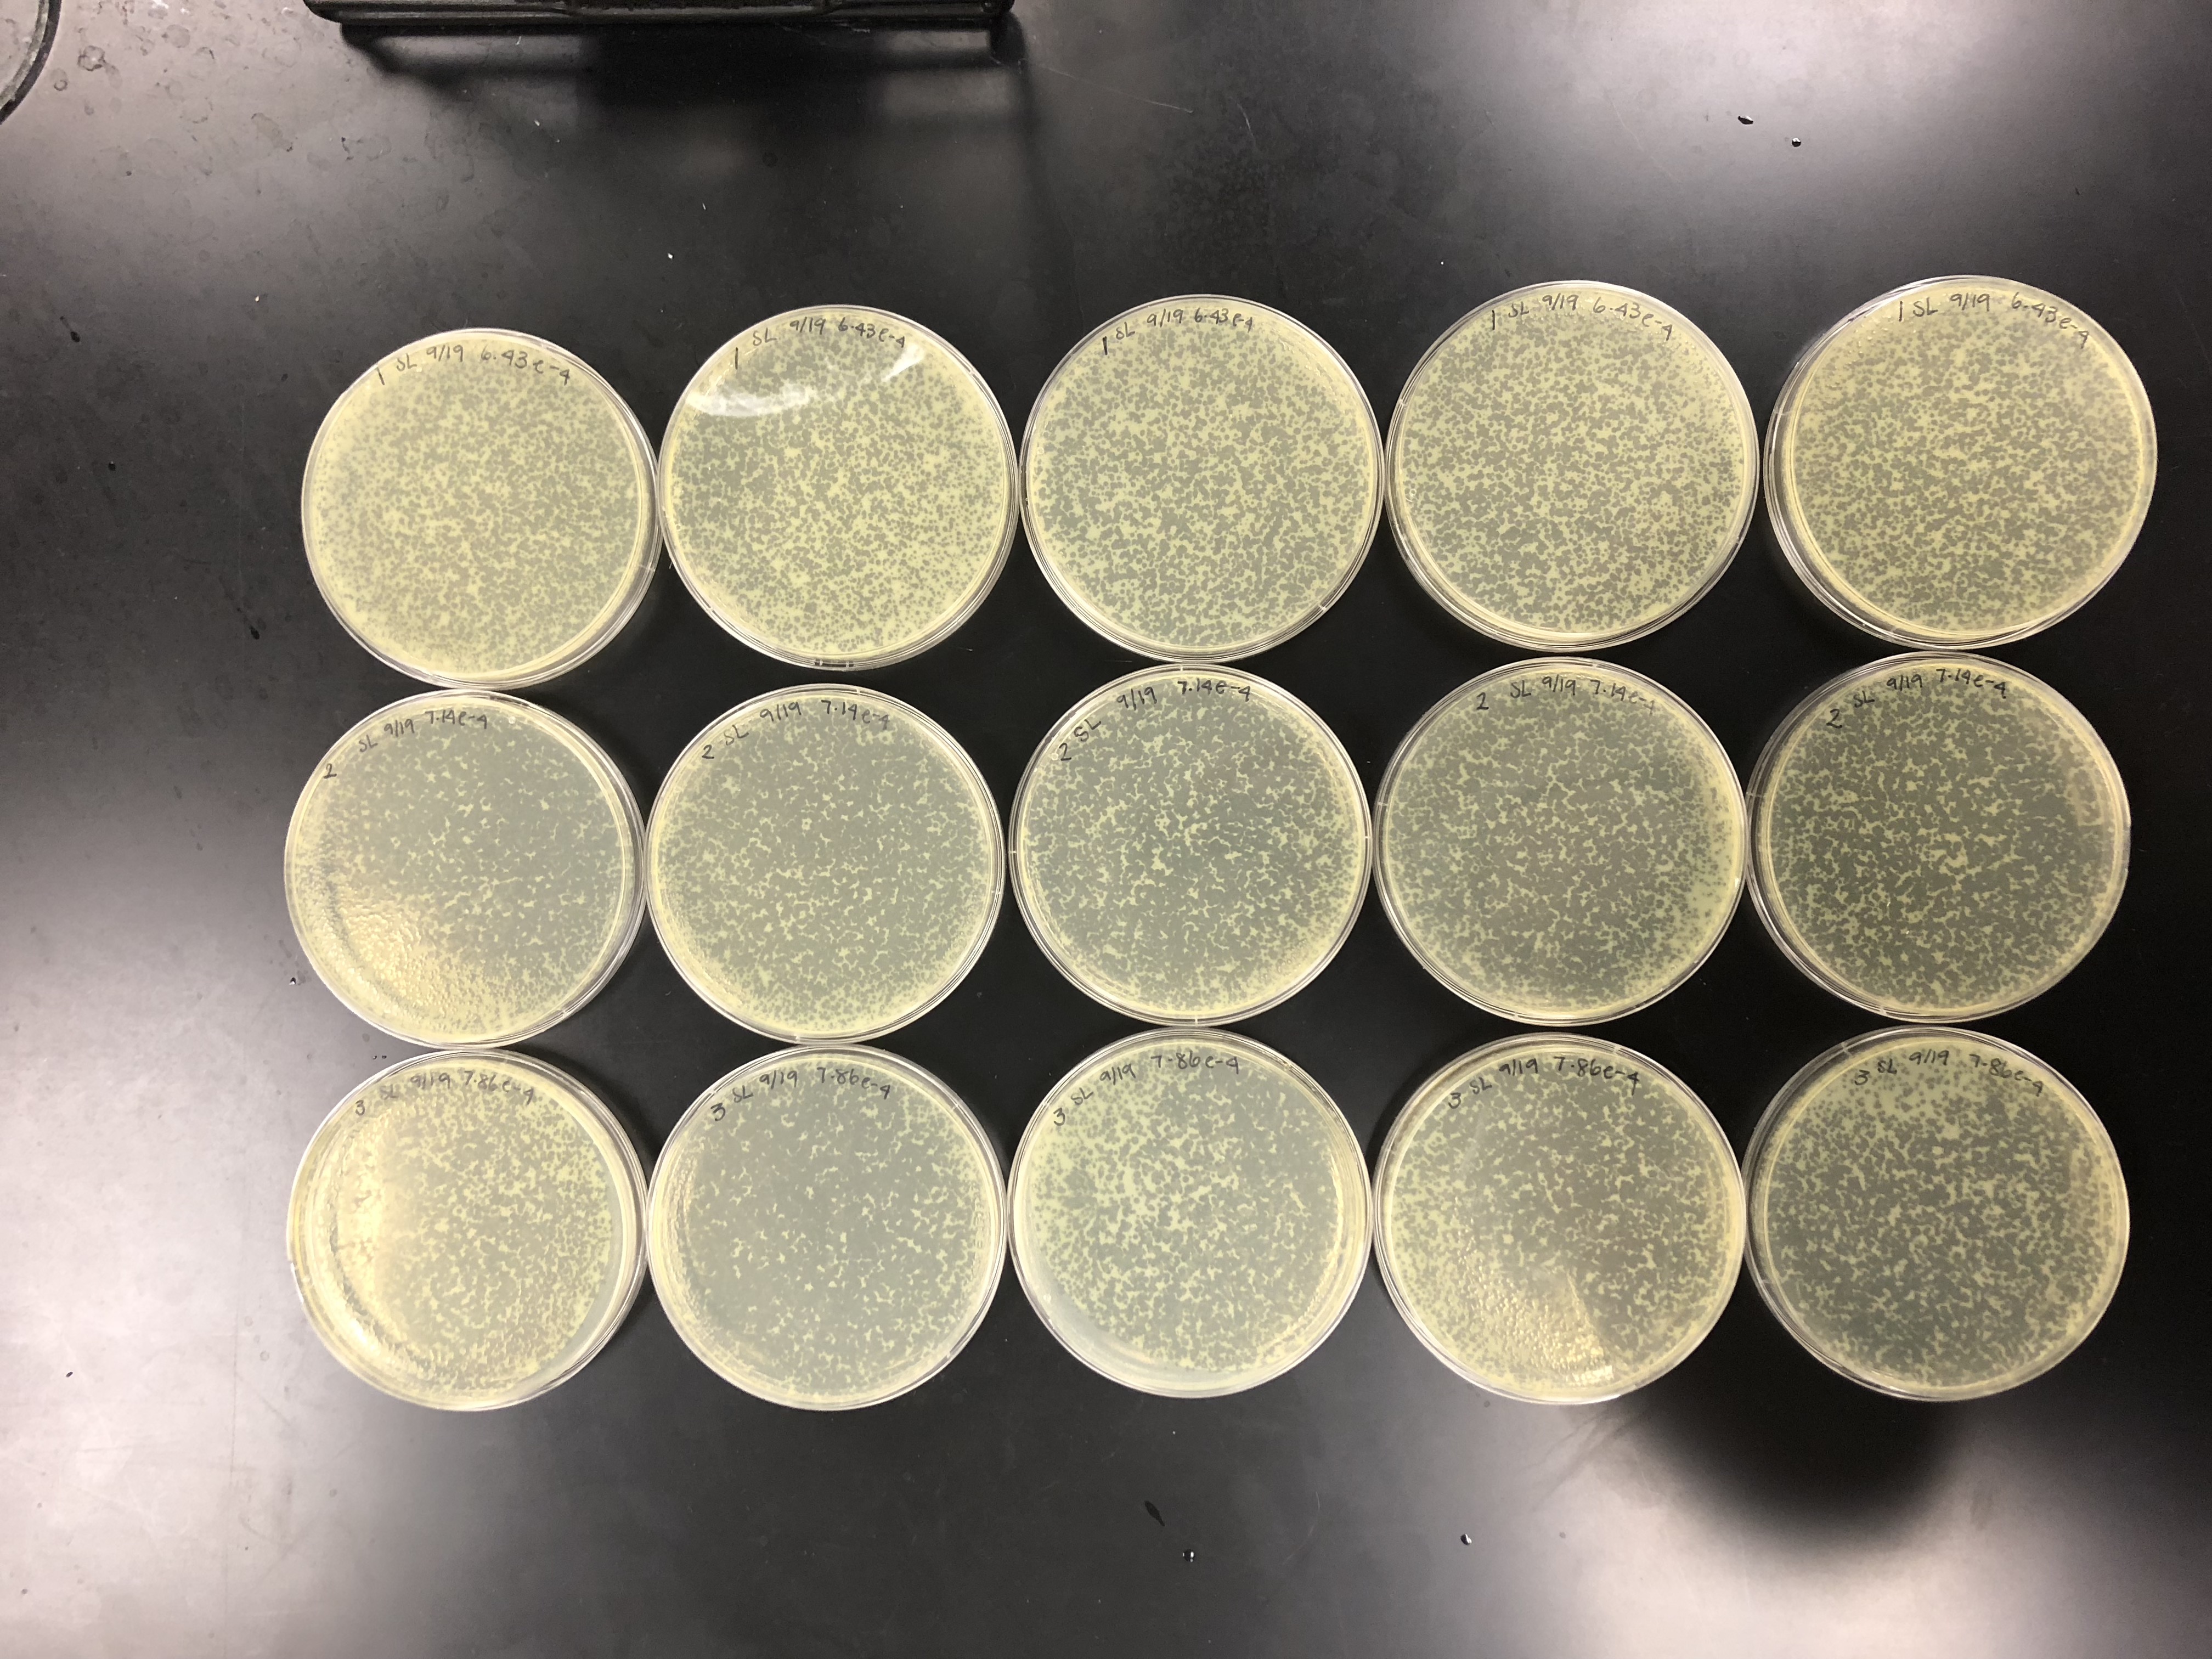
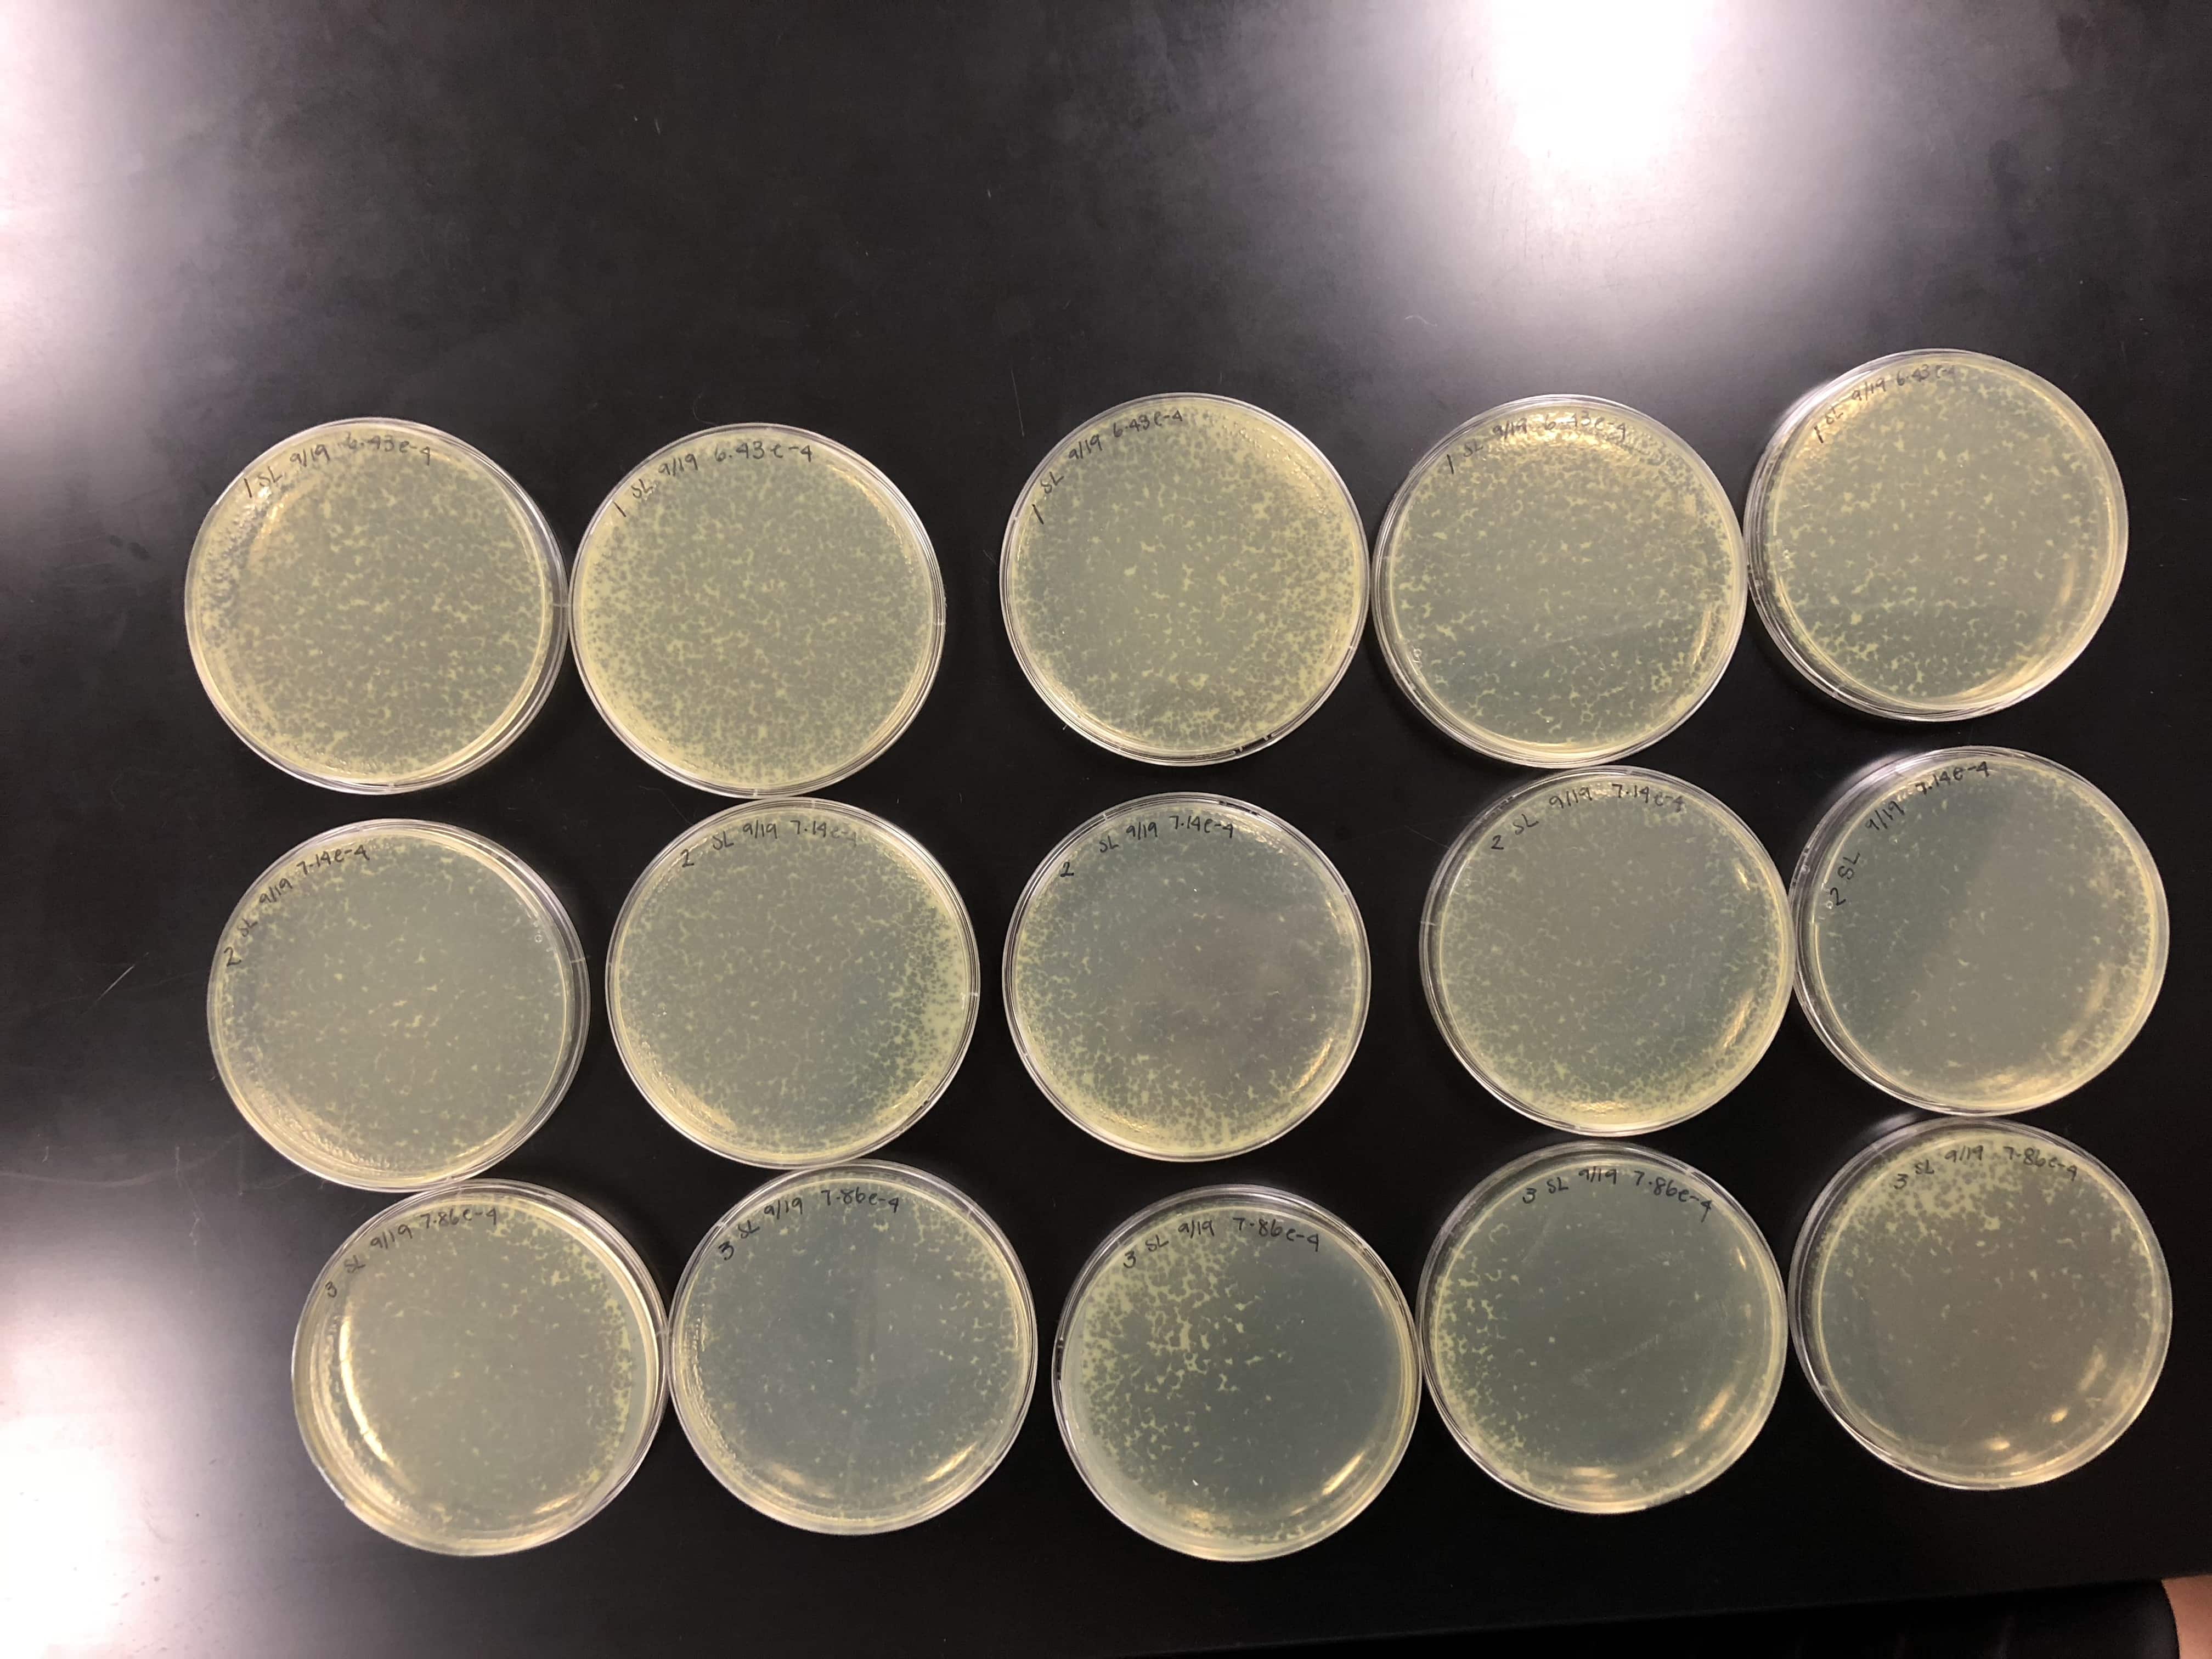
Spot Titer (09/07/2018)
Purpose: The purpose of the spot titer was to determine the concentration of phage particles in a lysate using a spot test.
Procedure:
9 plates were gathered to plate the original and all dilutions. The plates were set to warm to room temperature.
Each of the plates were then divided and labeled into 5 sections for each of the 5 picked plaques and labeled for each dilution.
Bacterial lawns had to be prepared for each plate. Using a sterile 5 ml pipette, 3 ml of molten top agar was transfered into a 5 ml a culture tube containing 250 μl of host bacteria and immediately drawn back into the same pipette.
The top agar-bacteria mixture was dispensed onto an agar plate.
Gently, but quickly, the plate was tilted in multiple directions until the top agar mixture evenly coated the agar plate.
The plate sat undisturbed for 20 minutes until the agar solidified completely.
Once the bacterial lawn was completely prepared, each dilution was spotted on the proper location on the lawns.
One at a time with clean pipette tips, 10μl of each sample was spotted.
After every sample was spotted, the plates were left undisturbed for 30 minutes to the spots could absorb into the agar.
The plates were then incubated right side up at 29.5 C at 4:30 pm.
From here, the plates should be incubated for at least 24 hours to see bacteria and phage growth.
The spot titers were pulled from the incubator at 8:00 pm and set out at room temperature.
The purpose of calculating the titer is to see the pfu/ml concentration and see how to proceed with a full plate titer. if there is a high enough titer to isolate DNA and archive the lysate.
The spot titer had contamination on the original plate, but there was no contamination on further plates that were needed to calculate the titer.
The concentration had to be calculated using this equation:
Titer (pfu/ml) = (# pfu/ volume used in μl) x (10e# μl/ml) x dilution factor
ADD CALCULATIONS!!!
looked at spot titer and calculated… put them in fridge at 10:25 am
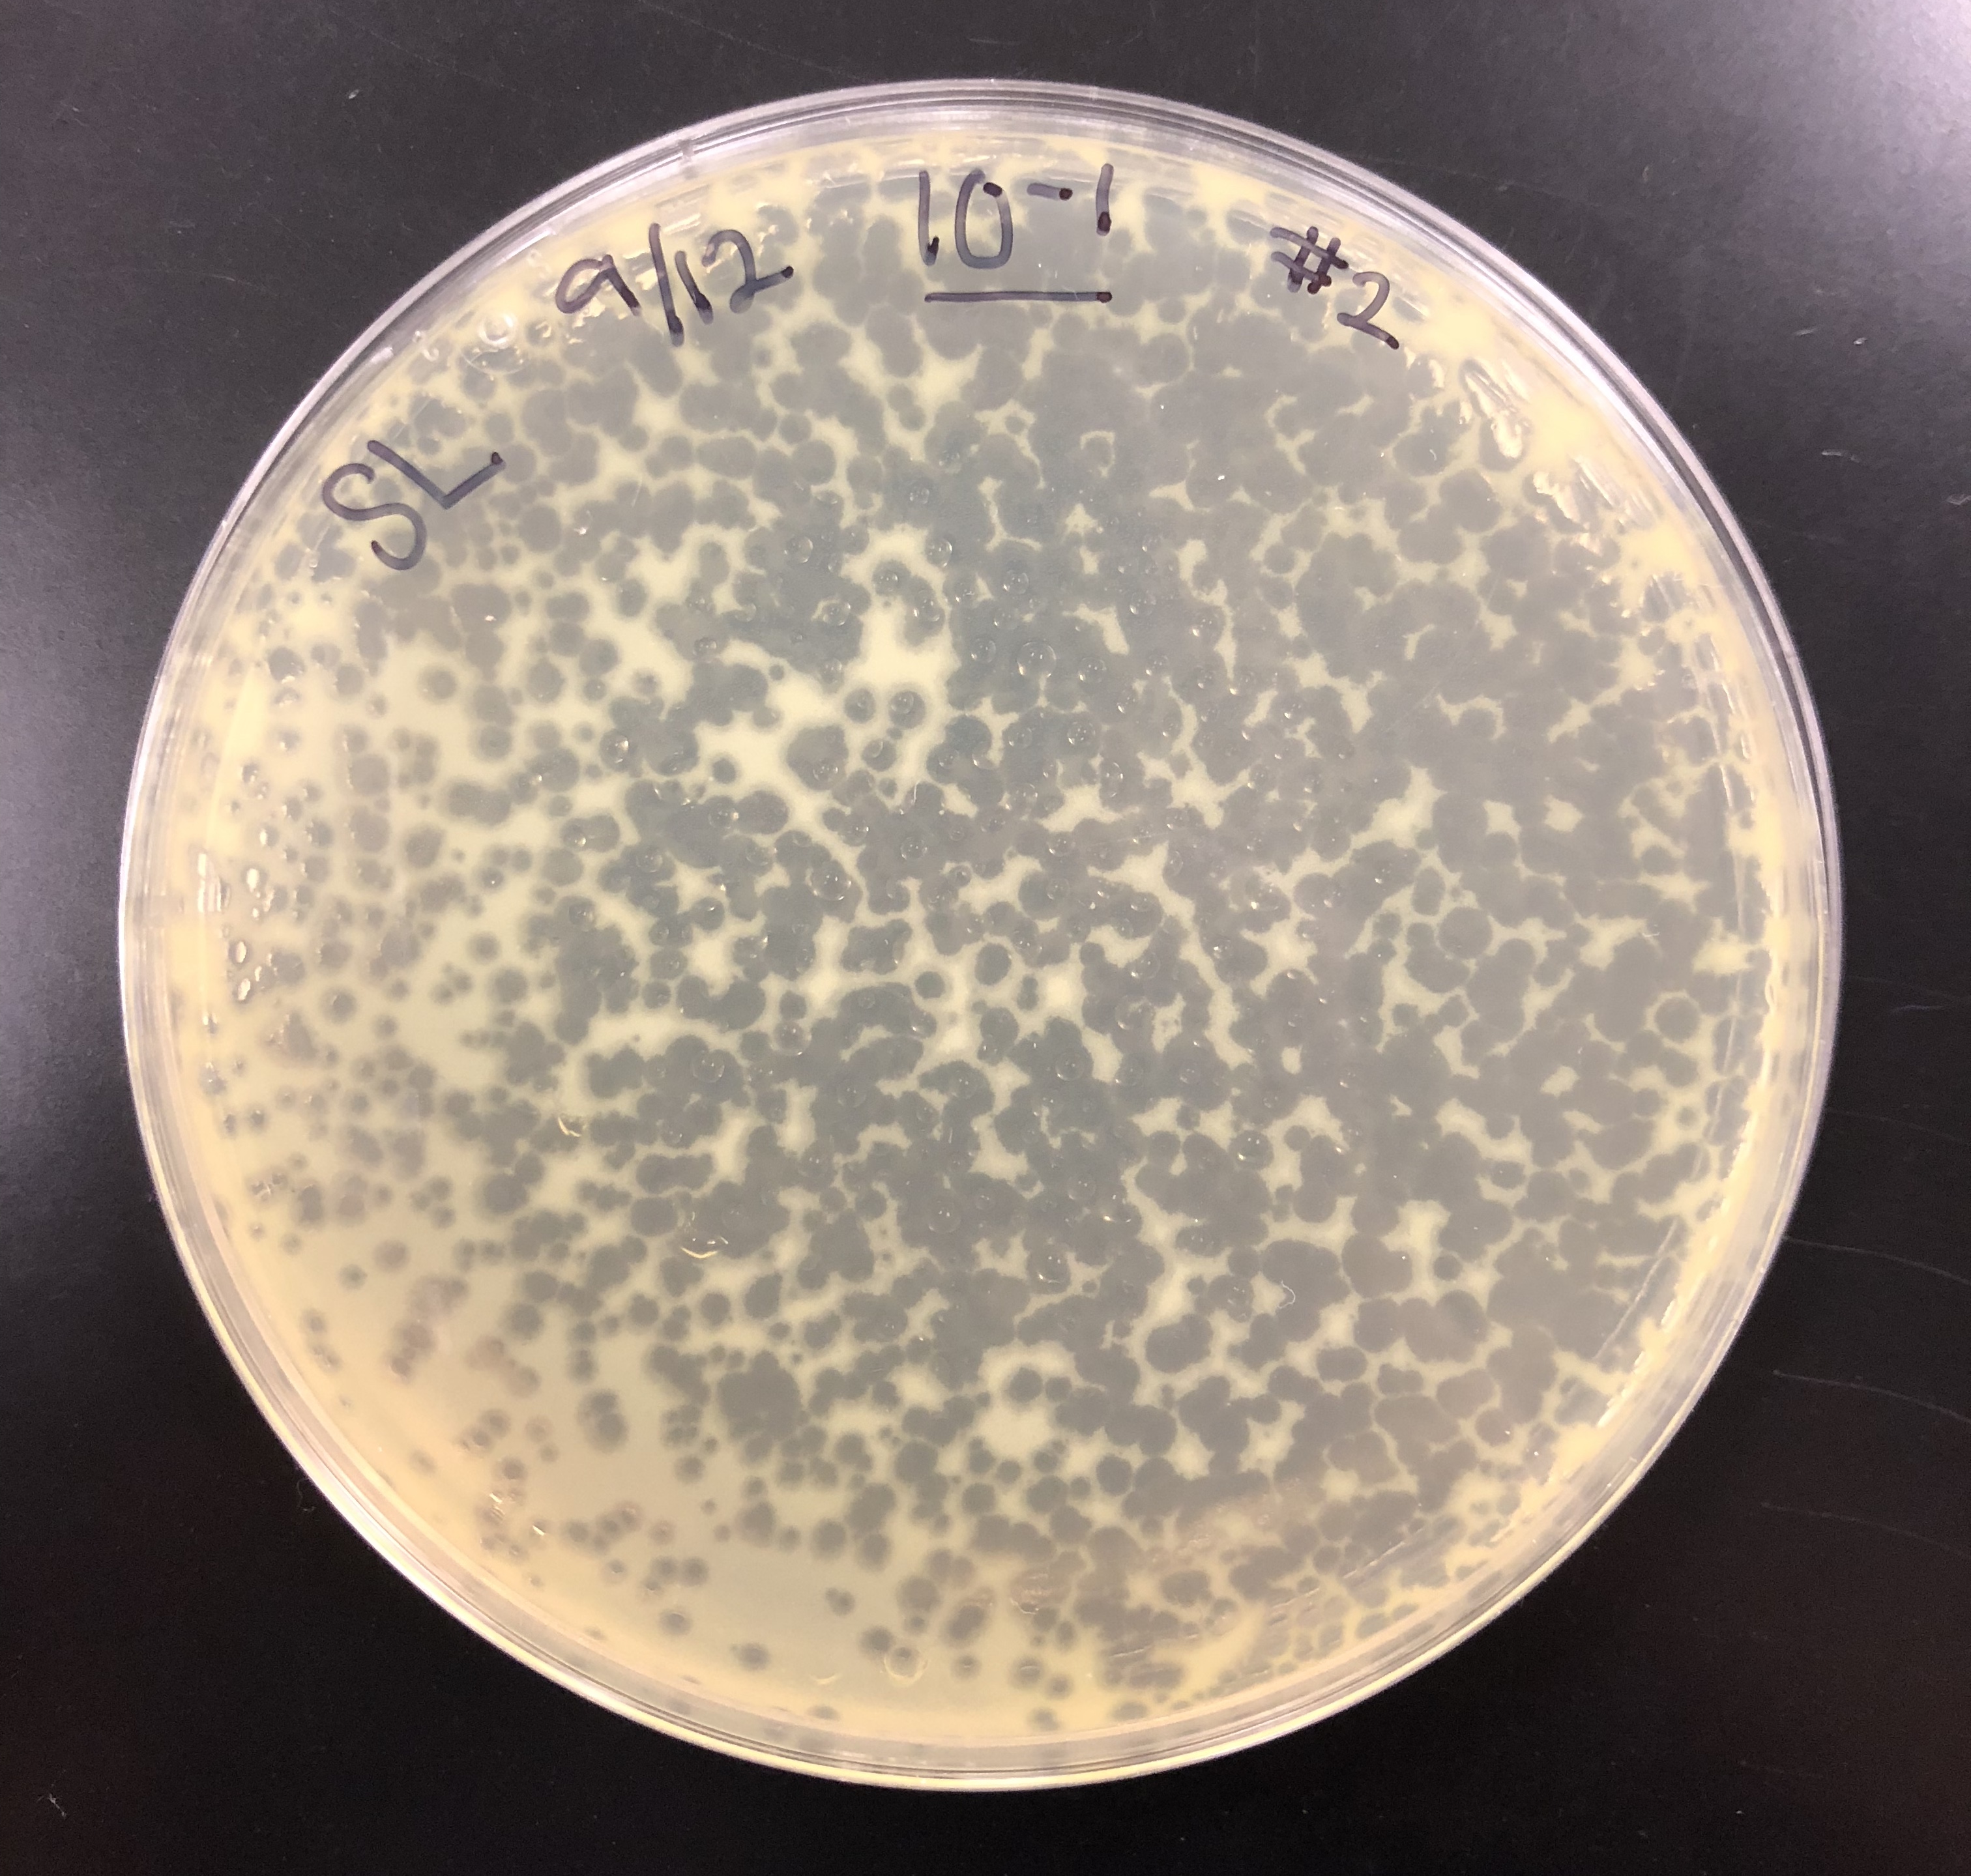
The purpose of picking a plaque is to retrieve phage particles from a plaque and create a liquid sample. The “picked” phage particles from the plaque are resuspended in phage buffer. This resulting liquid sample of phage can be used for other follow-up experiments.
A plaque was taken off of the 10e-5 plate from plaque 2 as circled below. This was done using a clean micropipette tip touched perpendicular to the plaque.
The tip was tapped on a microcentrifuge tube containing 100 μl of phage buffer.
The purpose of serial dilutions is to prepare liquid phage samples of decreasing concentrations. The serial dilutions were used to manipulate the number of phages in a sample and purify, amplify, and titer the phage.
Serial dilutions were performed again. The proper number of microcentrifuge tubes were set in a rack and labeled
10-1, 10-2, 10-3….10-8.
90 μl of phage buffer was added to each of the tubes
10 μl of the phage sample was added to the 10e-1 tube and vortexed well.
Using a clean pipette tip, 10 μl of the 10e-1sample was transferred to the 10e-2 tube and vortexed well.
10 μl of each dilution was transferred to the next dilution using a clean pipette tip each time until the 10e-8 dilution was complete.
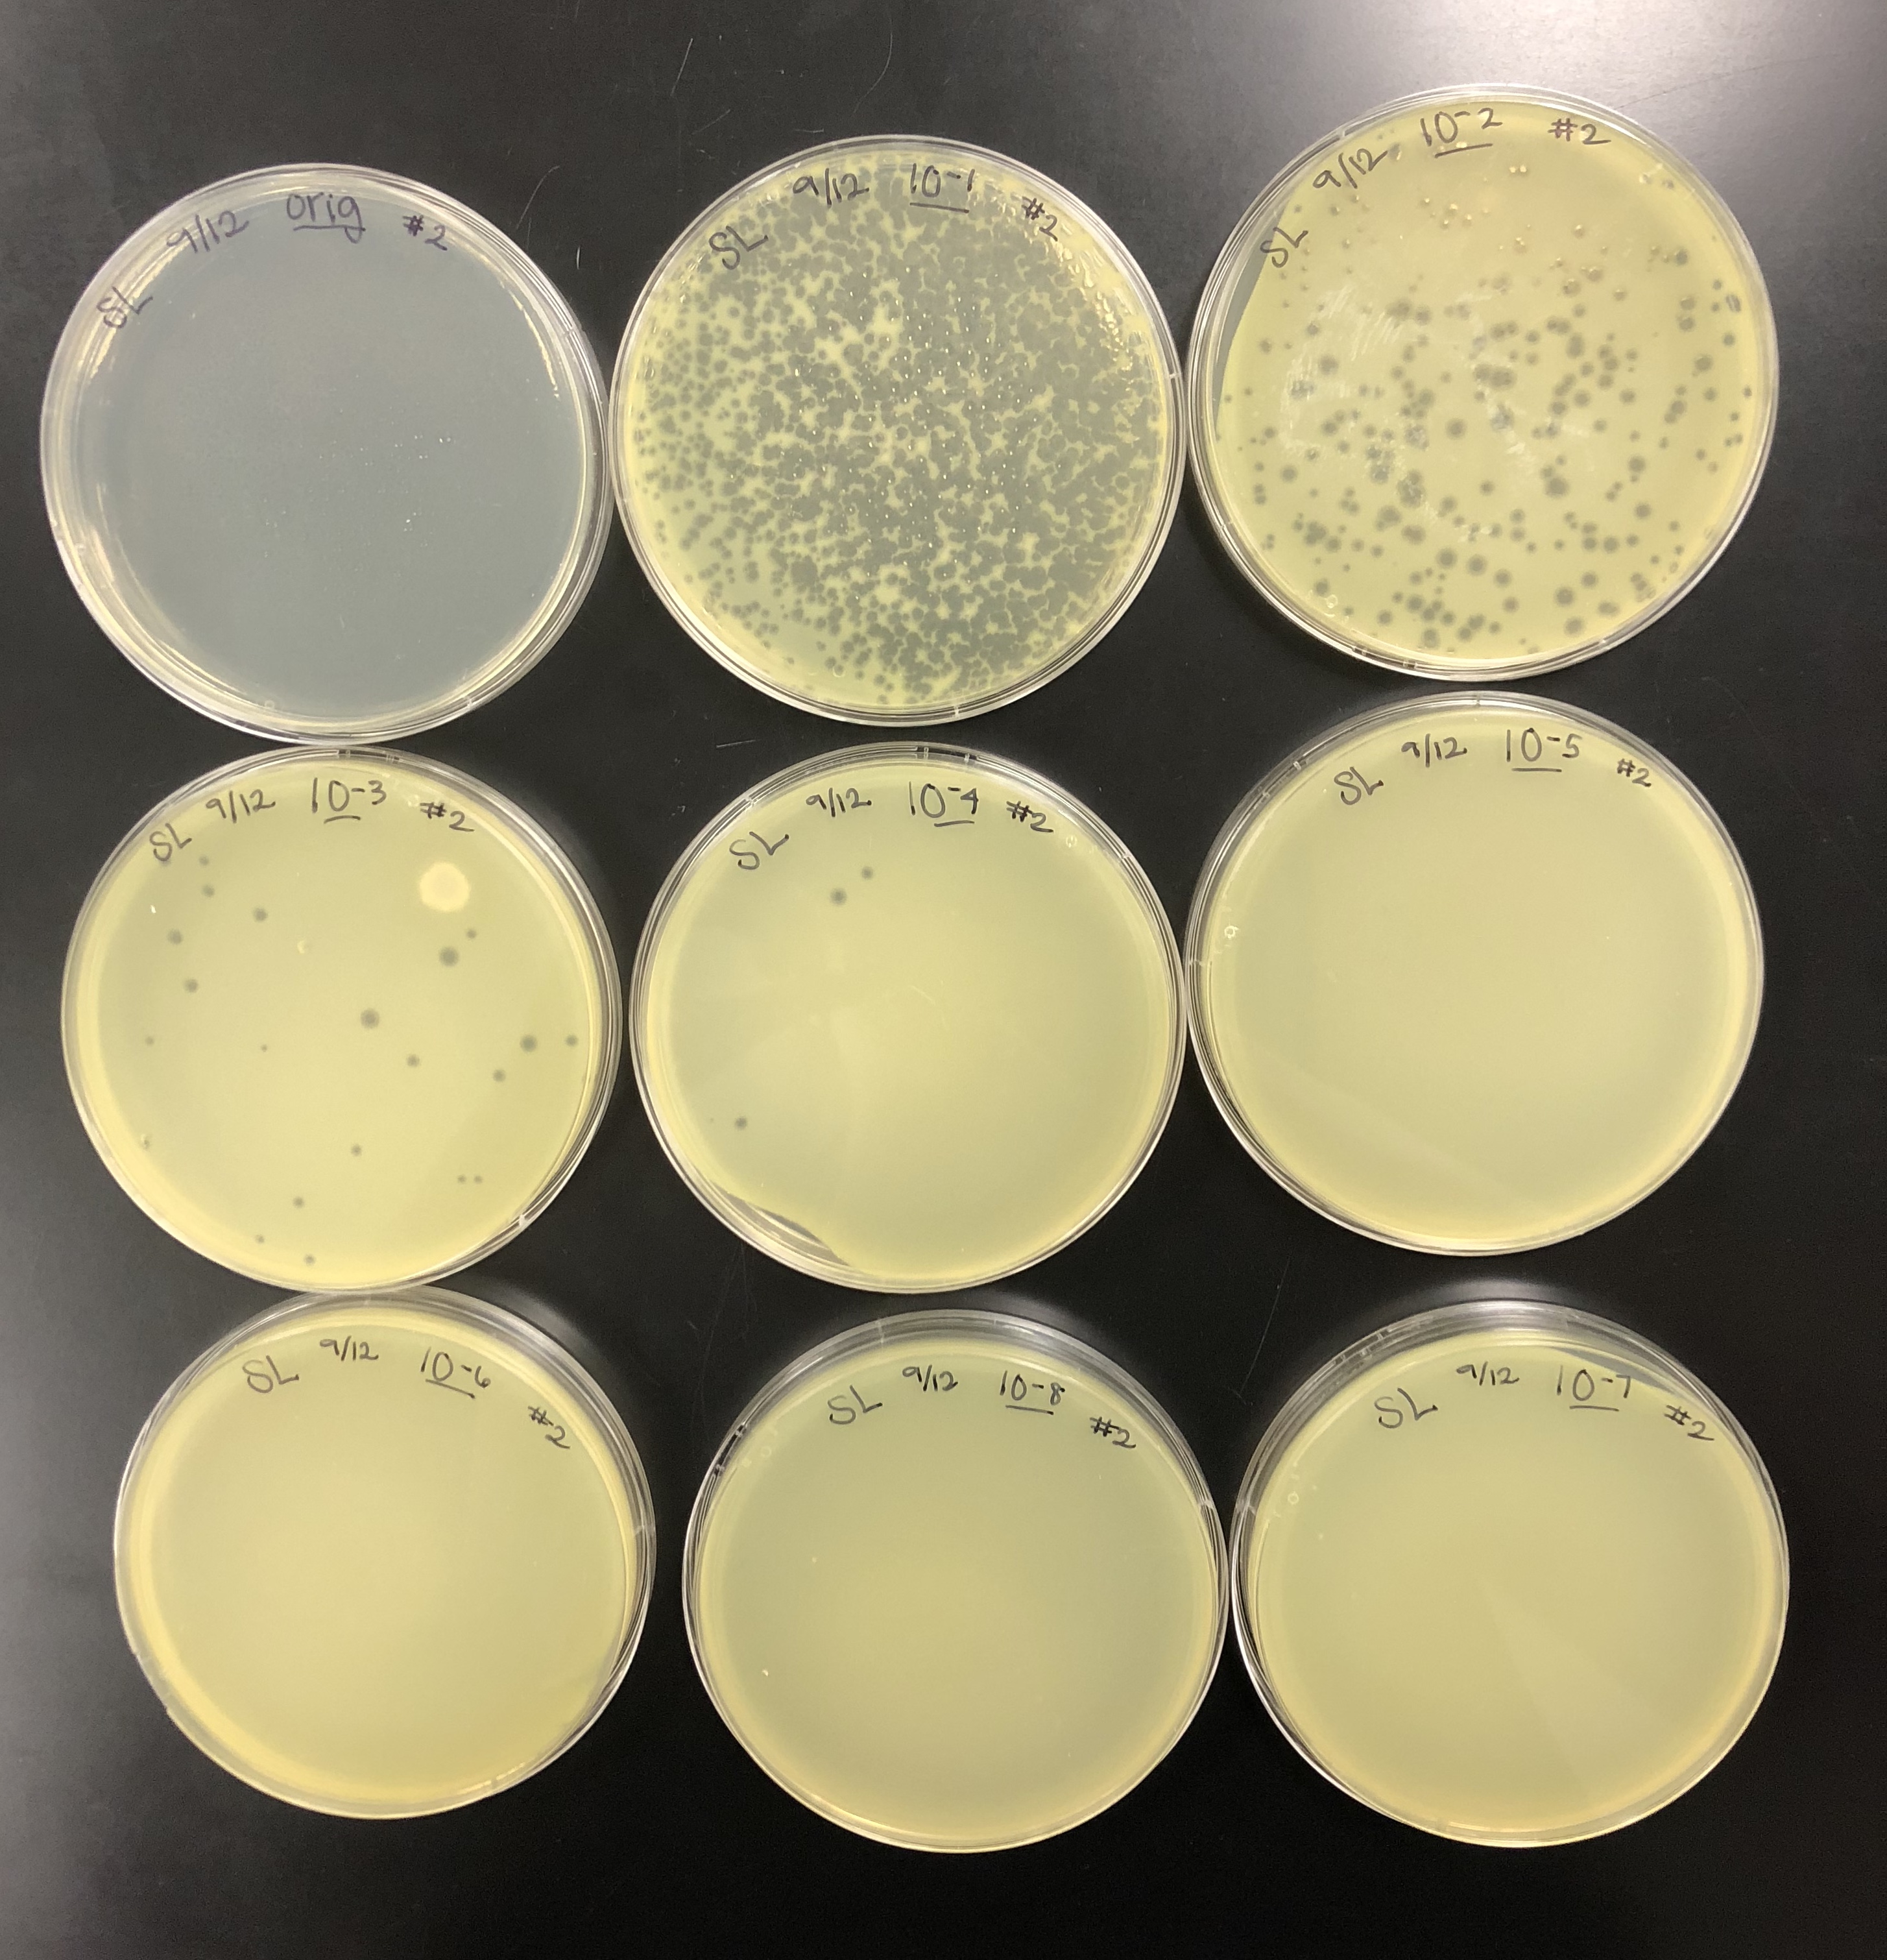
The purpose of the full plate titer was to determine the concentration of phage particles in a lysate by using a plaque assay.
9 agar plates and 9 tubes of 250 μl of host bacteria were gathered and labeled for each dilution, from original to 10e-8.
10 μl of each dilution was added to their respective bacteria culture tubes, mixed, and allowed to sit for 10 minutes for attachment.
Using a sterile pipette, 3 ml of molten top agar (kept at 55C) was added to a culture tube. The mixture was completely aspirated back up and transferred to the respective plate. The plate was gently tilted to spread the agar completely and evenly over the plate. There were a few bubbles on the plates that were sucked back up into the pipette. This was repeated for each bacterial mixture.
The plates sat undisturbed for 15 minutes.
The plates were inverted and incubated at 29.5 C at 10:34 am.
The purpose of checking the plates after 24 hours was to confirm that the dilutions were valid.
Plates were checked after approximately 24 hours, then were set back into the incubator to achieve a better webbed plate.

The purpose of calculating the concentration was to find the titer in pfu/ml to see if the titer was at least 5e9 pfu/ml to proceed.
After 48 hours, the webbed plate was seen on the 10e-1 plate.
The concentration had to be calculated using this equation:
Titer (pfu/ml) = (# pfu/ volume used in μl) x (10e# μl/ml) x dilution factor
ADD CALCULATIONS!!!!!!!!!!!!!!!!!
The purpose of collecting plate lysates is to generate a highly concentrated liquid phage sample.
8 ml of phage buffer was added to the webbed plate using a sterile pipette.
The plate and buffer solution sat at room temperature for approximately 4 hours.
Using a 5 ml syringe, the buffer was aspirated up while slightly tilting the plate. The liquid was filtered using a 0.22 μm filter into a 15 ml conical tube. The tube was stored in the fridge at 4C.
The purpose of serial dilutions is to prepare liquid phage samples of decreasing concentrations. The serial dilutions were used to manipulate the number of phages in a sample and purify, amplify, and titer the phage.
Using lysate, we did serial dilutions to 10^-8. We performed a spot titer and full plate titer for all dilutions. Incubated at 10:50am.
The purpose of the spot titer is to determine the concentration of phage particles in a lysate using a spot test.
A single plate was obtained and labeled around the the plate from original to 10e-8.
A bacterial lawn had to be prepared for the single plate. Using a sterile 5 ml pipette, 3 ml of molten top agar was transfered into a 5 ml a culture tube containing 250 μl of host bacteria and immediately drawn back into the same pipette.
The top agar-bacteria mixture was dispensed onto an agar plate.
Gently, but quickly, the plate was tilted in multiple directions until the top agar mixture evenly coated the agar plate.
The plate sat undisturbed for 20 minutes until the agar solidified completely.
Once the bacterial lawn was completely prepared, each dilution was spotted on the proper location on the lawn.
One at a time with clean pipette tips, 3 μl of each sample was spotted.
After every sample was spotted, the plates were left undisturbed for 30 minutes to the spots could absorb into the agar.
The purpose of the full plate titer is to determine the concentration of phage particles in a lysate by using a plaque assay.
9 agar plates and 9 tubes of 250 μl of host bacteria were gathered and labeled for each dilution, from original to 10e-8.
10 μl of each dilution was added to their respective bacteria culture tubes, mixed, and allowed to sit for 10 minutes for attachment.
Using a sterile pipette, 3 ml of molten top agar (kept at 55 C) was added to a culture tube. The mixture was completely aspirated back up and transferred to the respective plate. The plate was gently tilted to spread the agar completely and evenly over the plate. There were a few bubbles on the plates that were sucked back up into the pipette. This was repeated for each bacterial mixture.
The plates sat undisturbed for 15 minutes.
The plates were incubated at 29.5 C at 10:50 am
The purpose of checking the plates after 24 hours was to confirm that the dilutions were valid and to check concentrations.
The purpose of calculating the concentration was to find the titer in pfu/ml to see if the titer was at least 5e9 pfu/ml to proceed.
We calculated the concentration of the lysate by counting the plaques formed. From there, we calculated the amount of lysate needed on each plate to make a webbed plate. We bracketed the amount and did 15 plates total. 5 with (….), 5 with (…), and 5 with (…)…. We did a 10% increase because our plaques were fairly small/ medium-small sized. Did serial dilutions to 10e-4 and took from that tube. Let the plates sit after agar was added for 20 mins and put them in the incubator at 10:50am.
using small volume lysate….
the concentration was not high enough, so 5 of each plate was made to pool all the lysates together.
Did serial dilutions to 10e-4 and took from that tube. Let the plates sit after agar was added for 20 mins and put them in the incubator at 10:50am.
09/20/2018
09/21/2018
09/26/2018
Got 3 barcoded tubes. 2 to send off and 1 for out institution. Added 200 microliters of DMSO??? To 2.8 mL of our high titer lysate. Had to add sterile beads to each of the tubes. Struggled with funneling them in tubes, so we used a cut pipette tip and the lid of a conical tube to transfer. Then we added the mixed solution into each of the tubes (not too much and not too little). Put in freezer.
10/01/2018
1 ml of phage lysate was transferred into a microcentrifuge tube.
5 µl of nuclease mix was added to the lysate.
Solution was mixed gently by repeated inversions
Solution was incubated at 37 °C for 10 minutes
15 µl of EDTA was added to the nuclease-treated lysate and mixed gently
***EDTA will inactivate the nucleases by chelating, or binding, divalent cations required by the nucleases for activity
Mixture was incubated at 4°C
10/5/2018
*Denature the protein capsid to release phage DNA
2 ml of DNA clean-up resin was added to a 15 ml conical tube.
The nuclease-treated phage lysate was transferred from the microcentrifuge tube to the 15 ml conical tube containing resin.
The solution was mixed gently by inverting the tube repeatedly for 2 minutes.
*Isolate the phage genomic DNA.
Plungers were removed from two 5 ml syringes
A column was attached to each syringe barrel from the Wizard Kit
Each column and syringe barrel were set on clean micro centrifuge tubes
1.5 ml of phage DNA/resin solution was transferred to each column using a pipette
Both plungers were inserted into the syringe and the liquid was pushed through and collected in the used 15 ml conical tube.
The plungers had to be pushed down firmly with even pressure to prevent the plunger from popping out.
When all the liquid from both syringes were expelled, the columns were unscrewed and set into clean micro centrifuge tube. The plungers were then removed after.
The syringe barrels were then attached back onto the columns.
*washing the salts
2 ml of 80% isopropanol was added to each syringe. The liquid was pushed through following the same procedures as above.
This washing was repeated two more times for a total of three washes.
To remove residual isopropanol, each column was placed into a clean micro centrifuge tube.
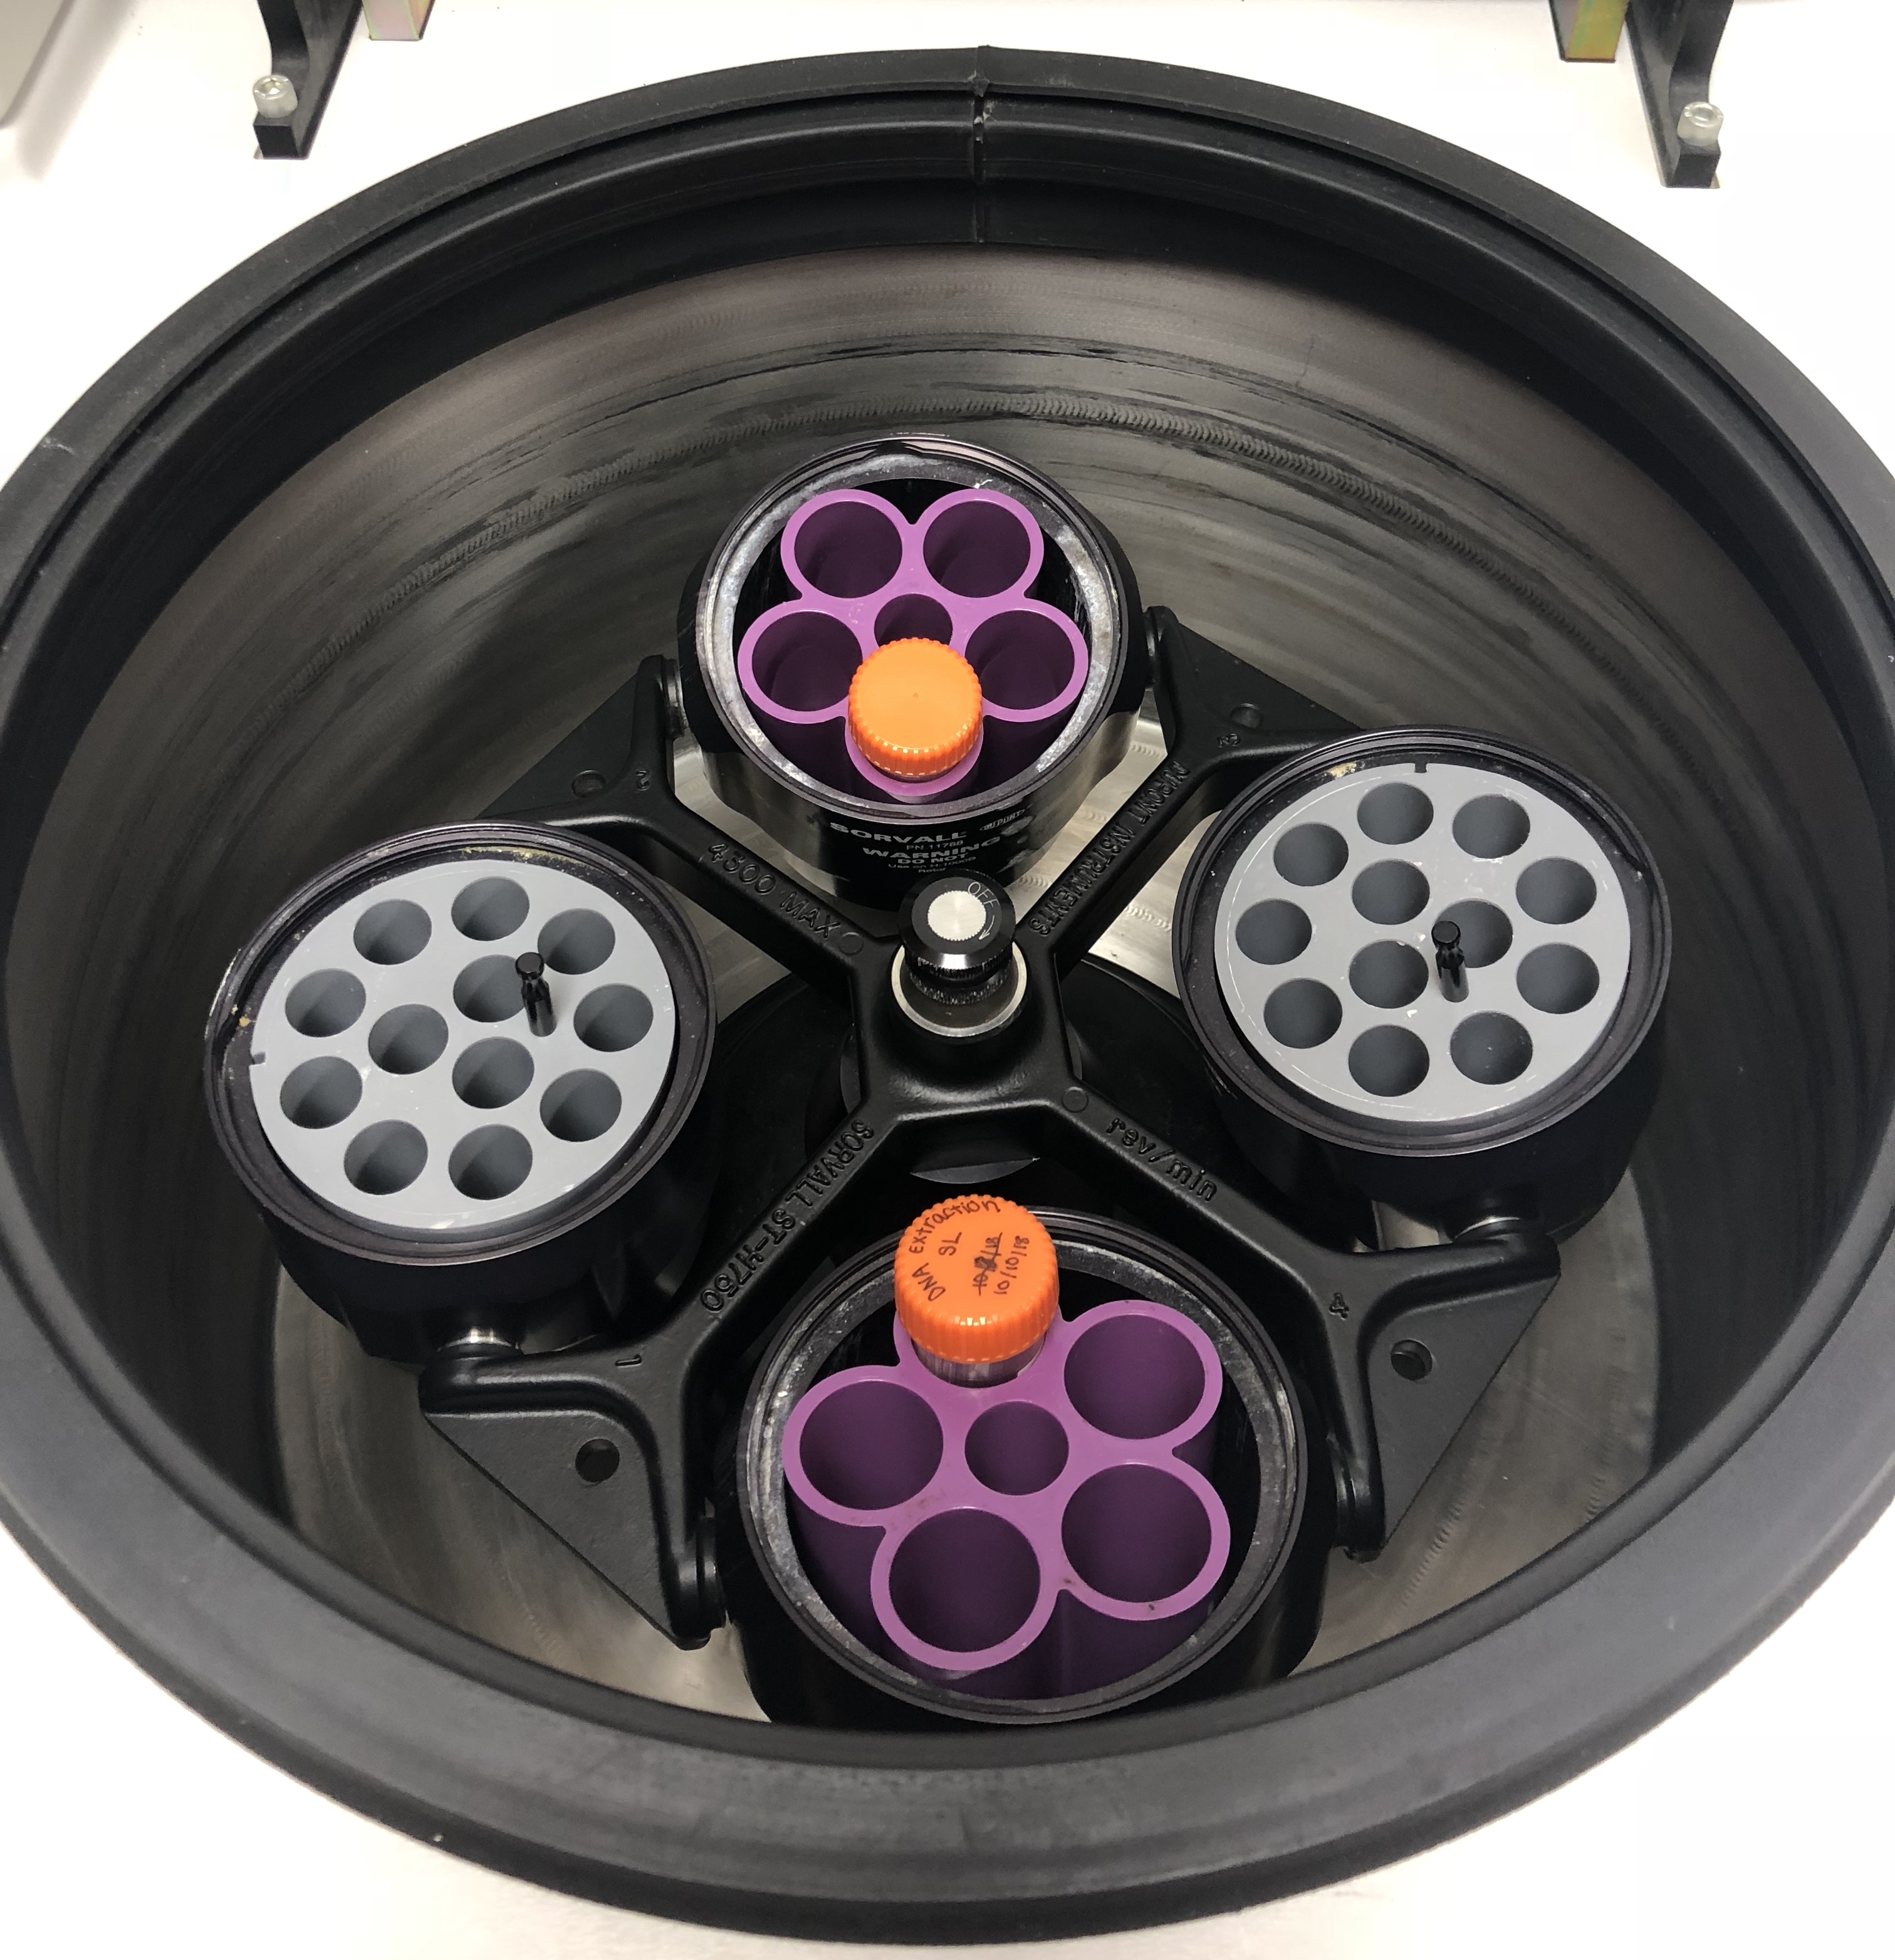
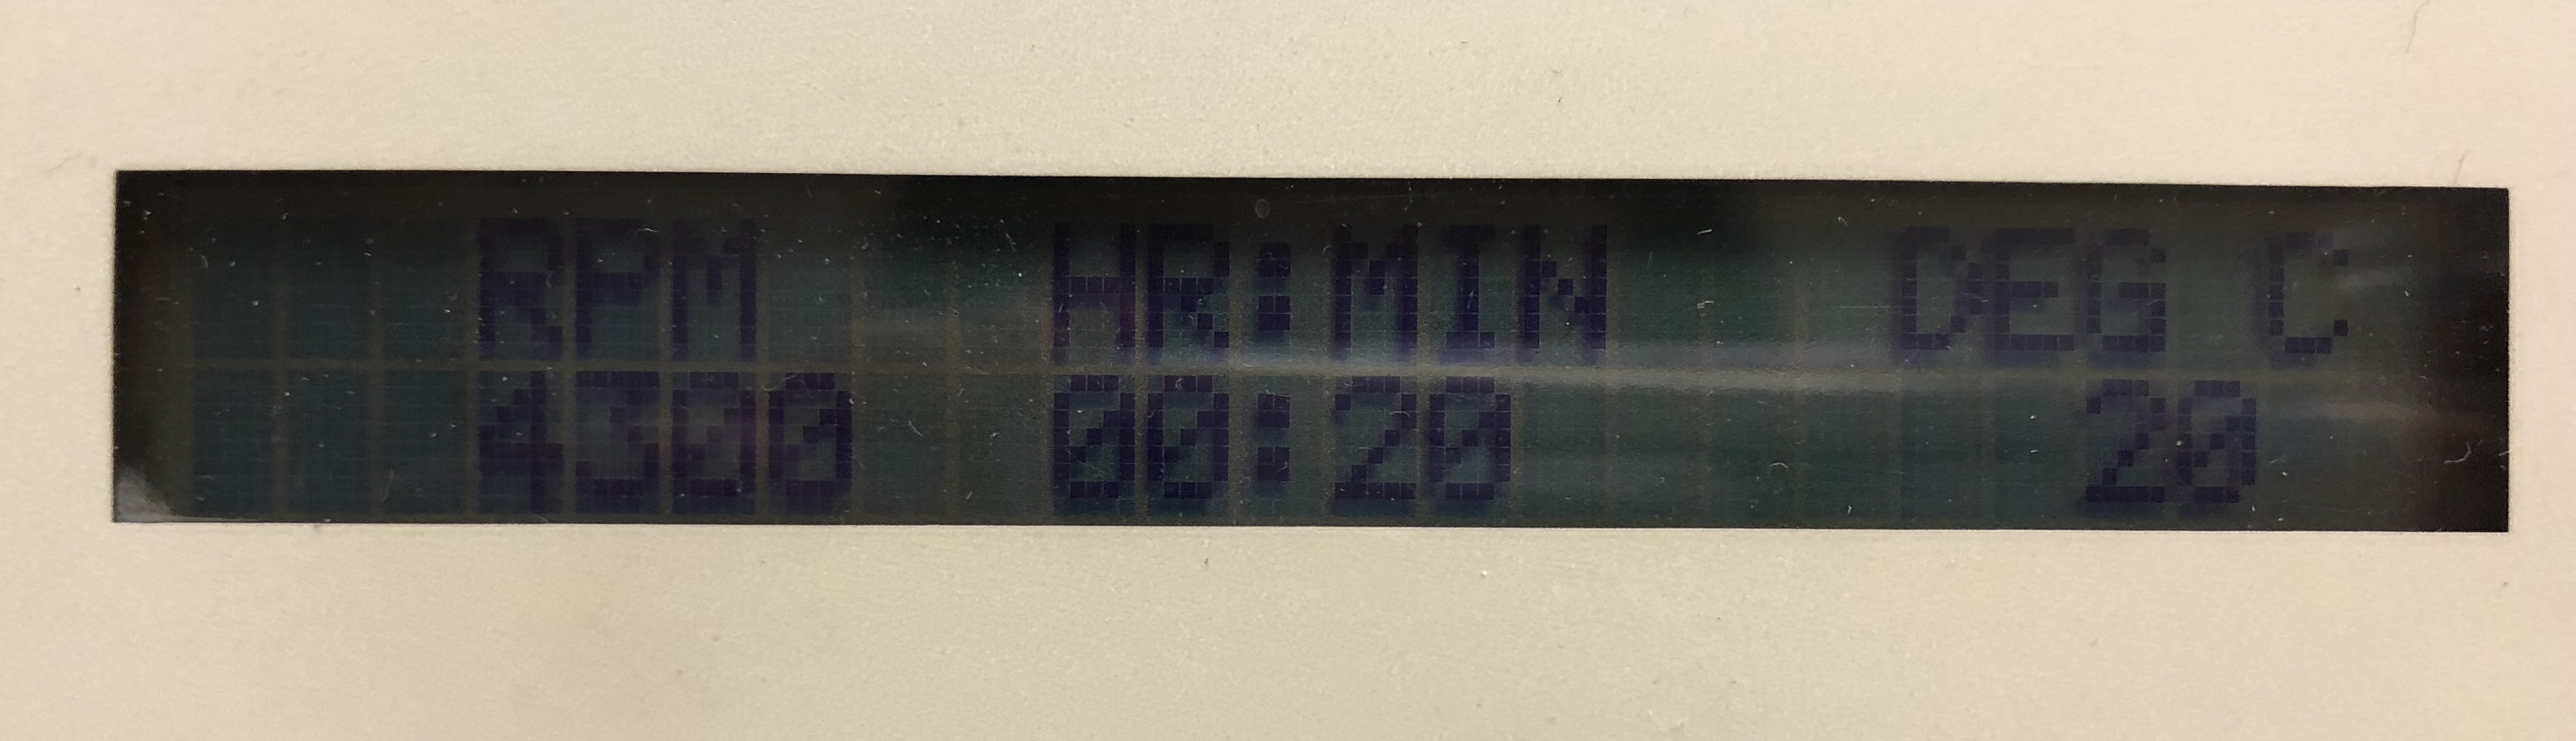
These tubes with the columns were then placed in balanced configuration, with lids pointed towards the center, and spun at 10,000 x g for 5 minutes.
The columns were then placed in new microcentrifuge tubes and spun at 10,000 × g for 1 additional minute to remove any residual isopropanol
To evaporate any left over isopropanol, the columns were placed directly into a 90 °C heating block for 60 seconds.
Each column was then placed in a clean micro centrifuge tube.
50 μl of 90 °C sterile ddH2O was added directly to each column.
Columns were incubated for 1 minute at room temperature.
The columns were then spun at 10,000 × g for 1 minute in a microcentrifuge.
*Determine the concentration of your phage DNA.
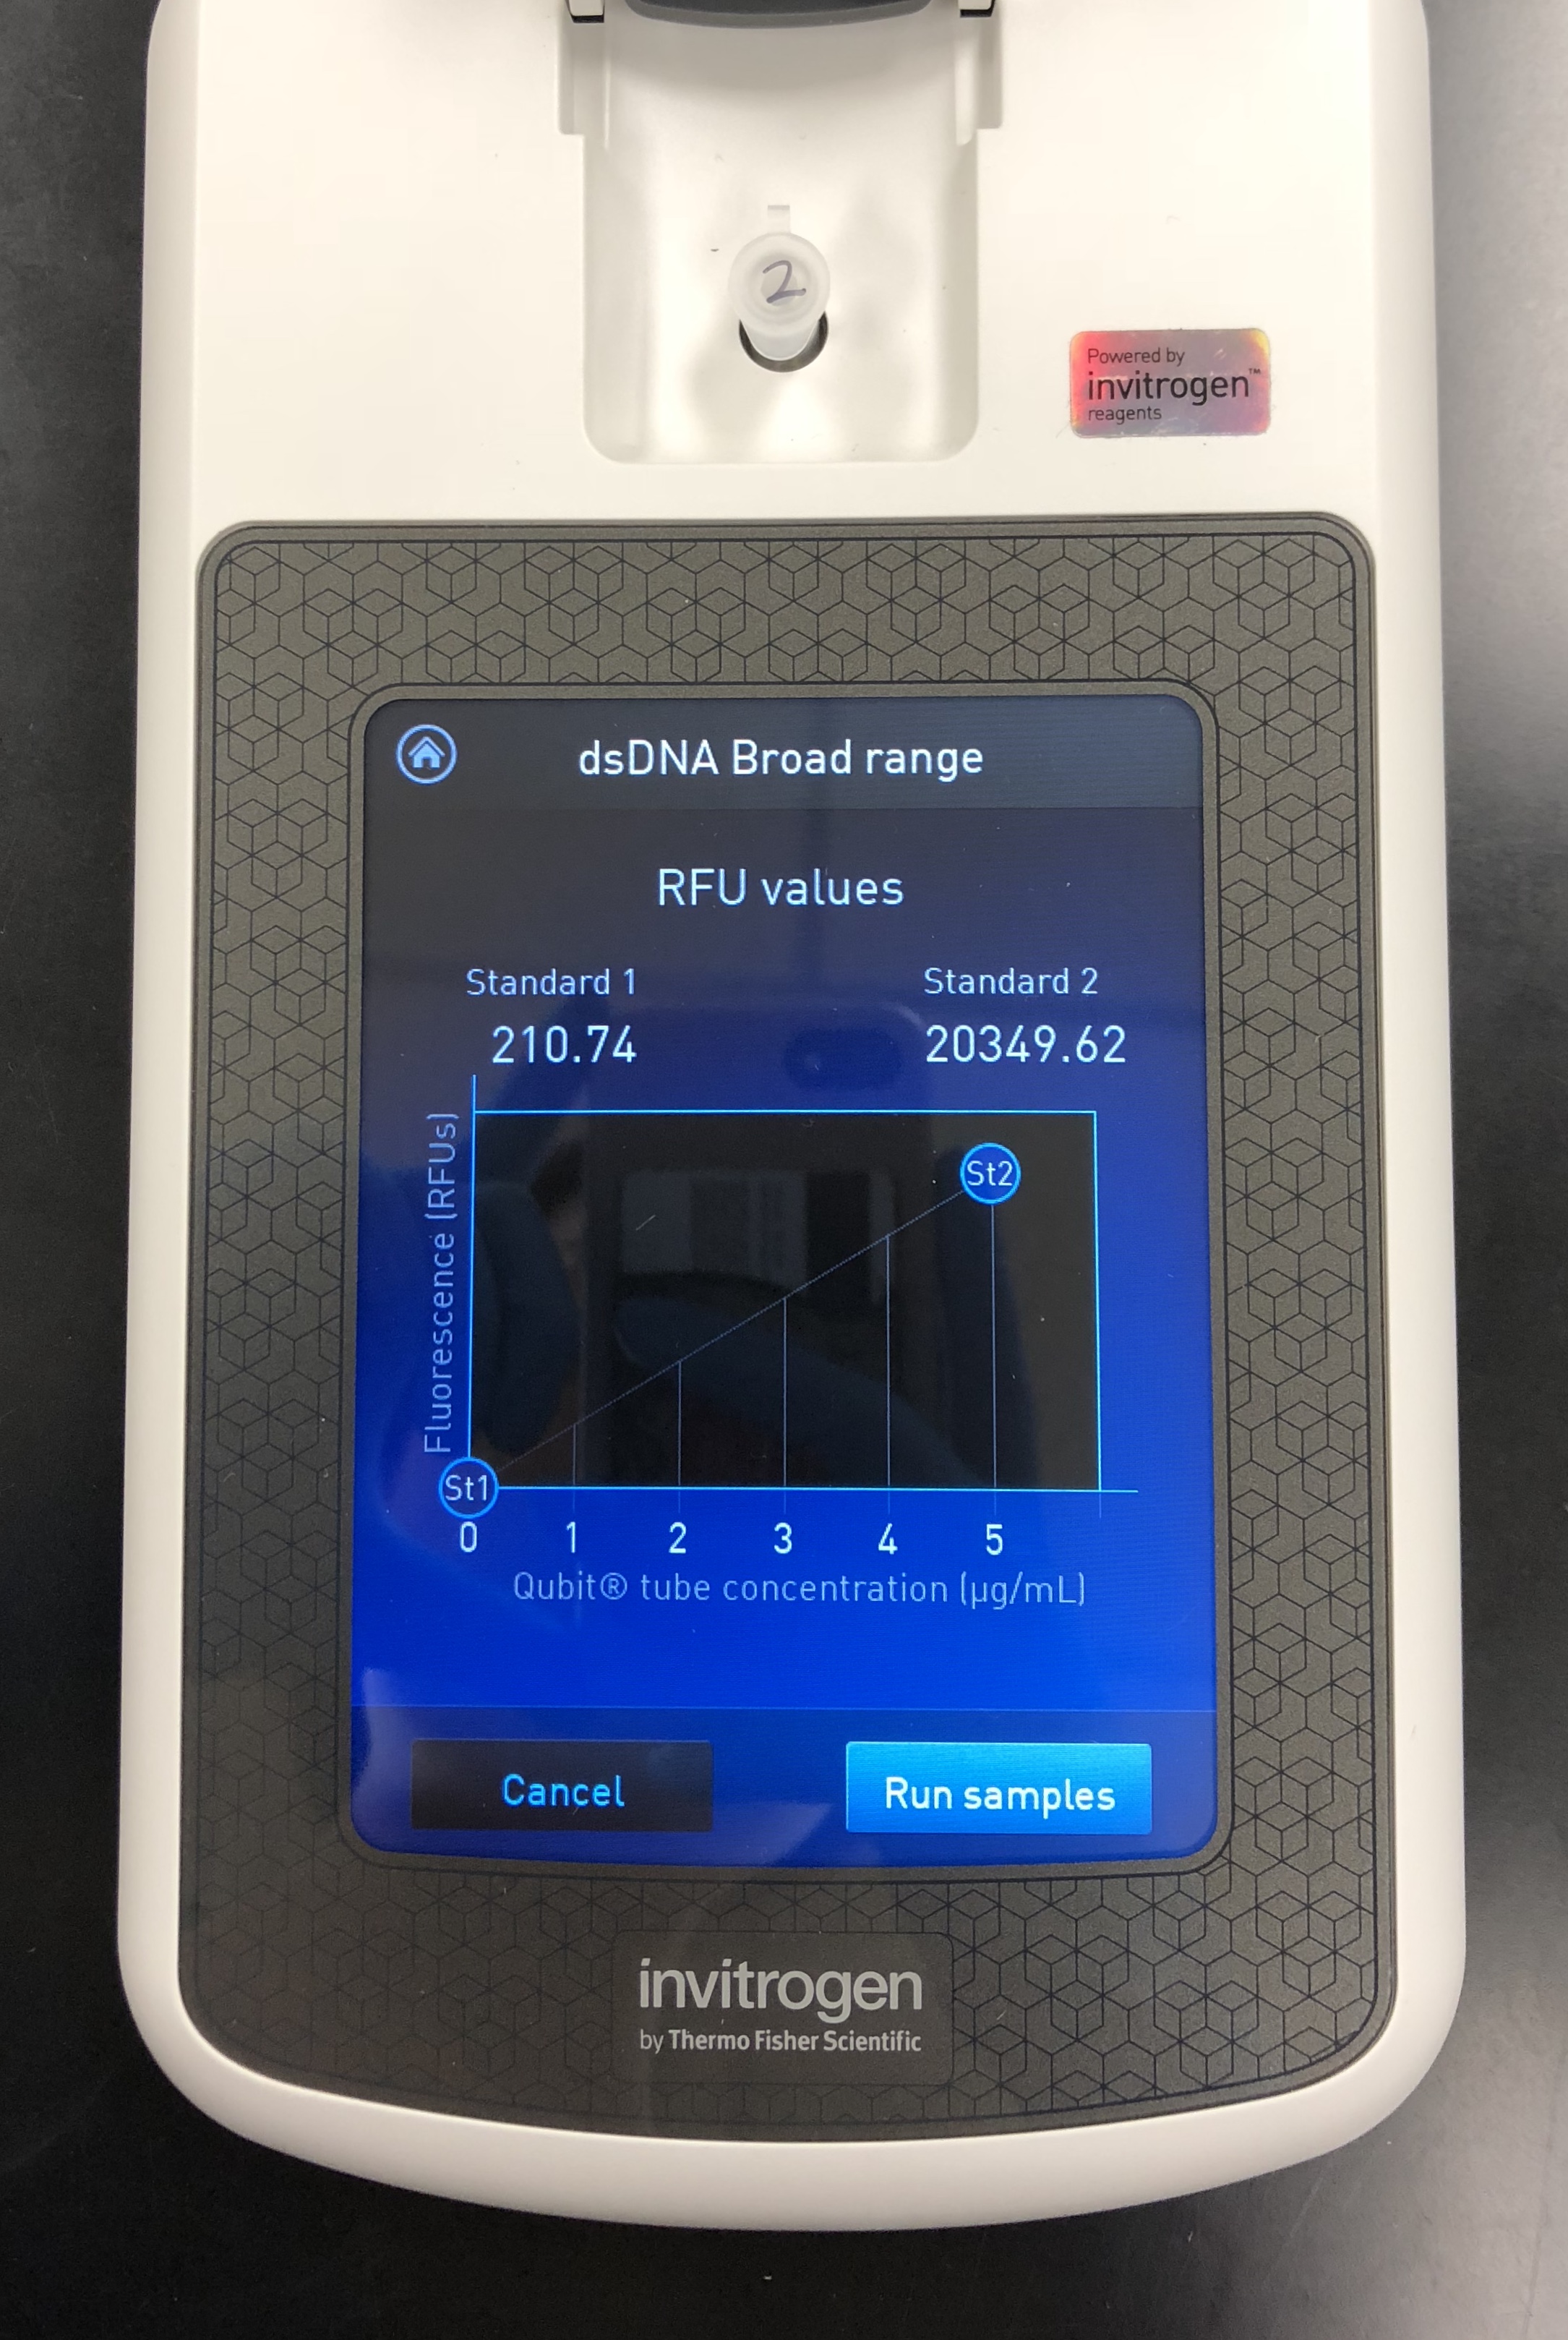
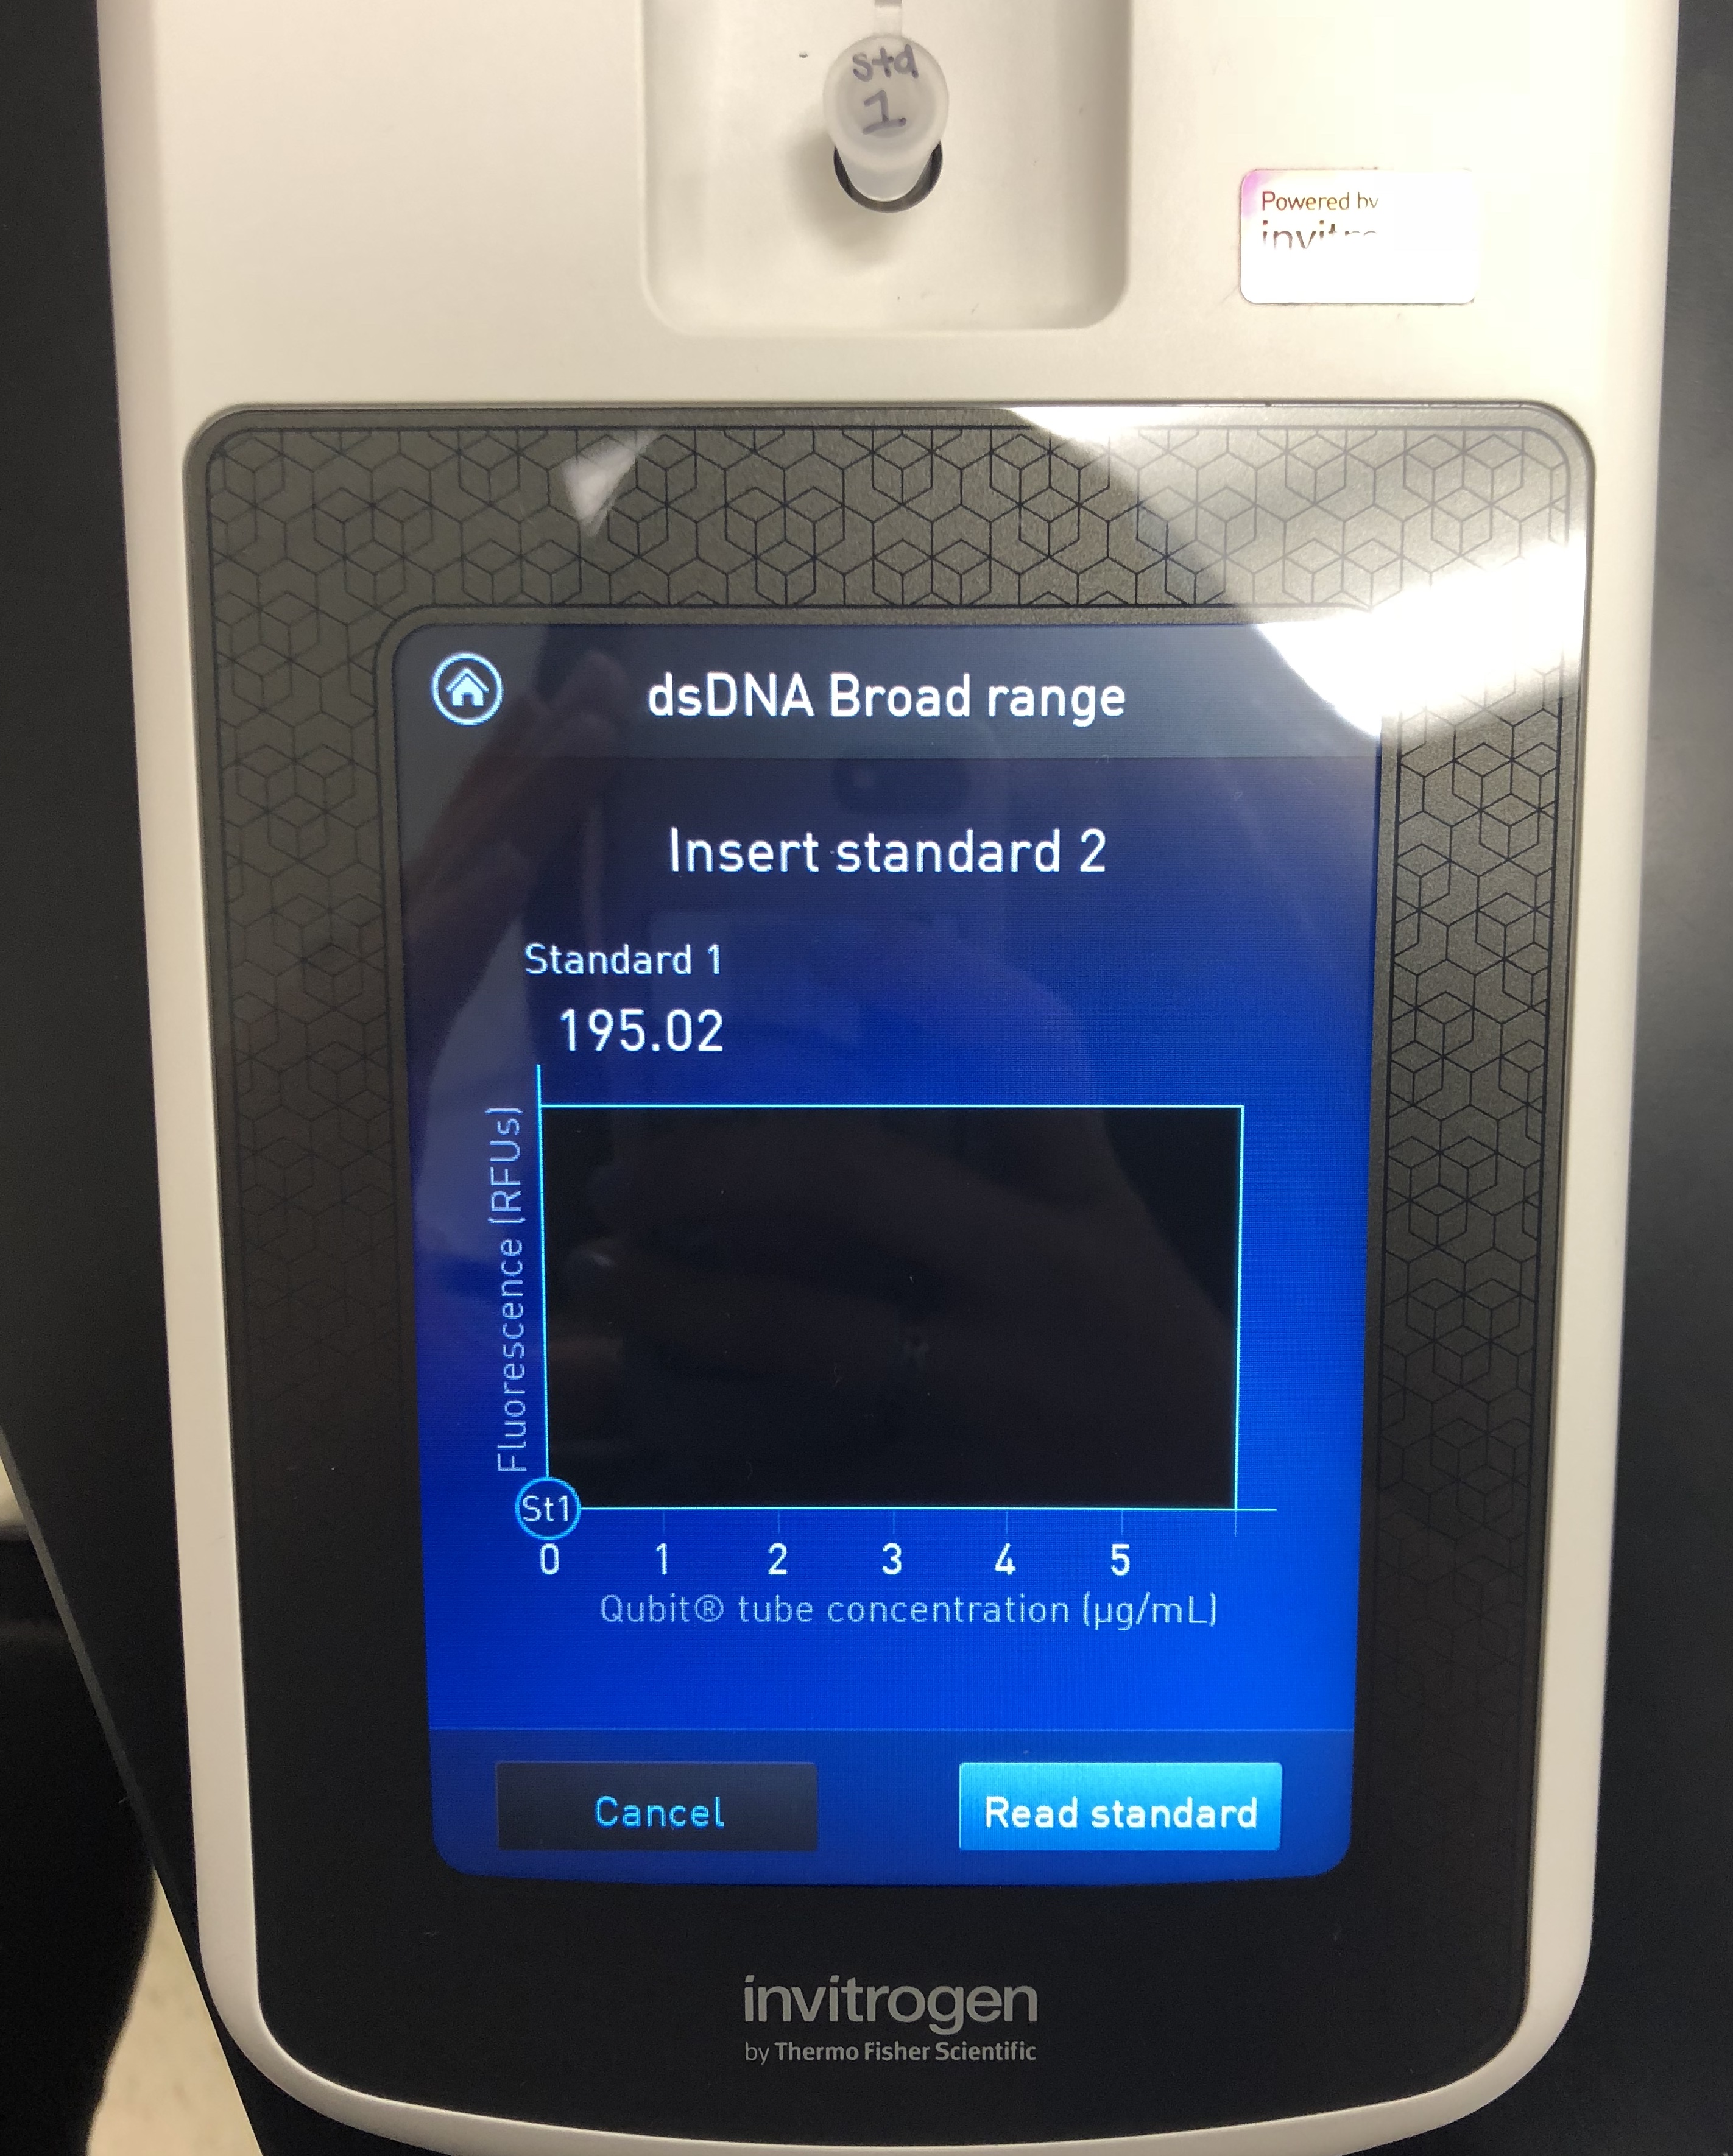
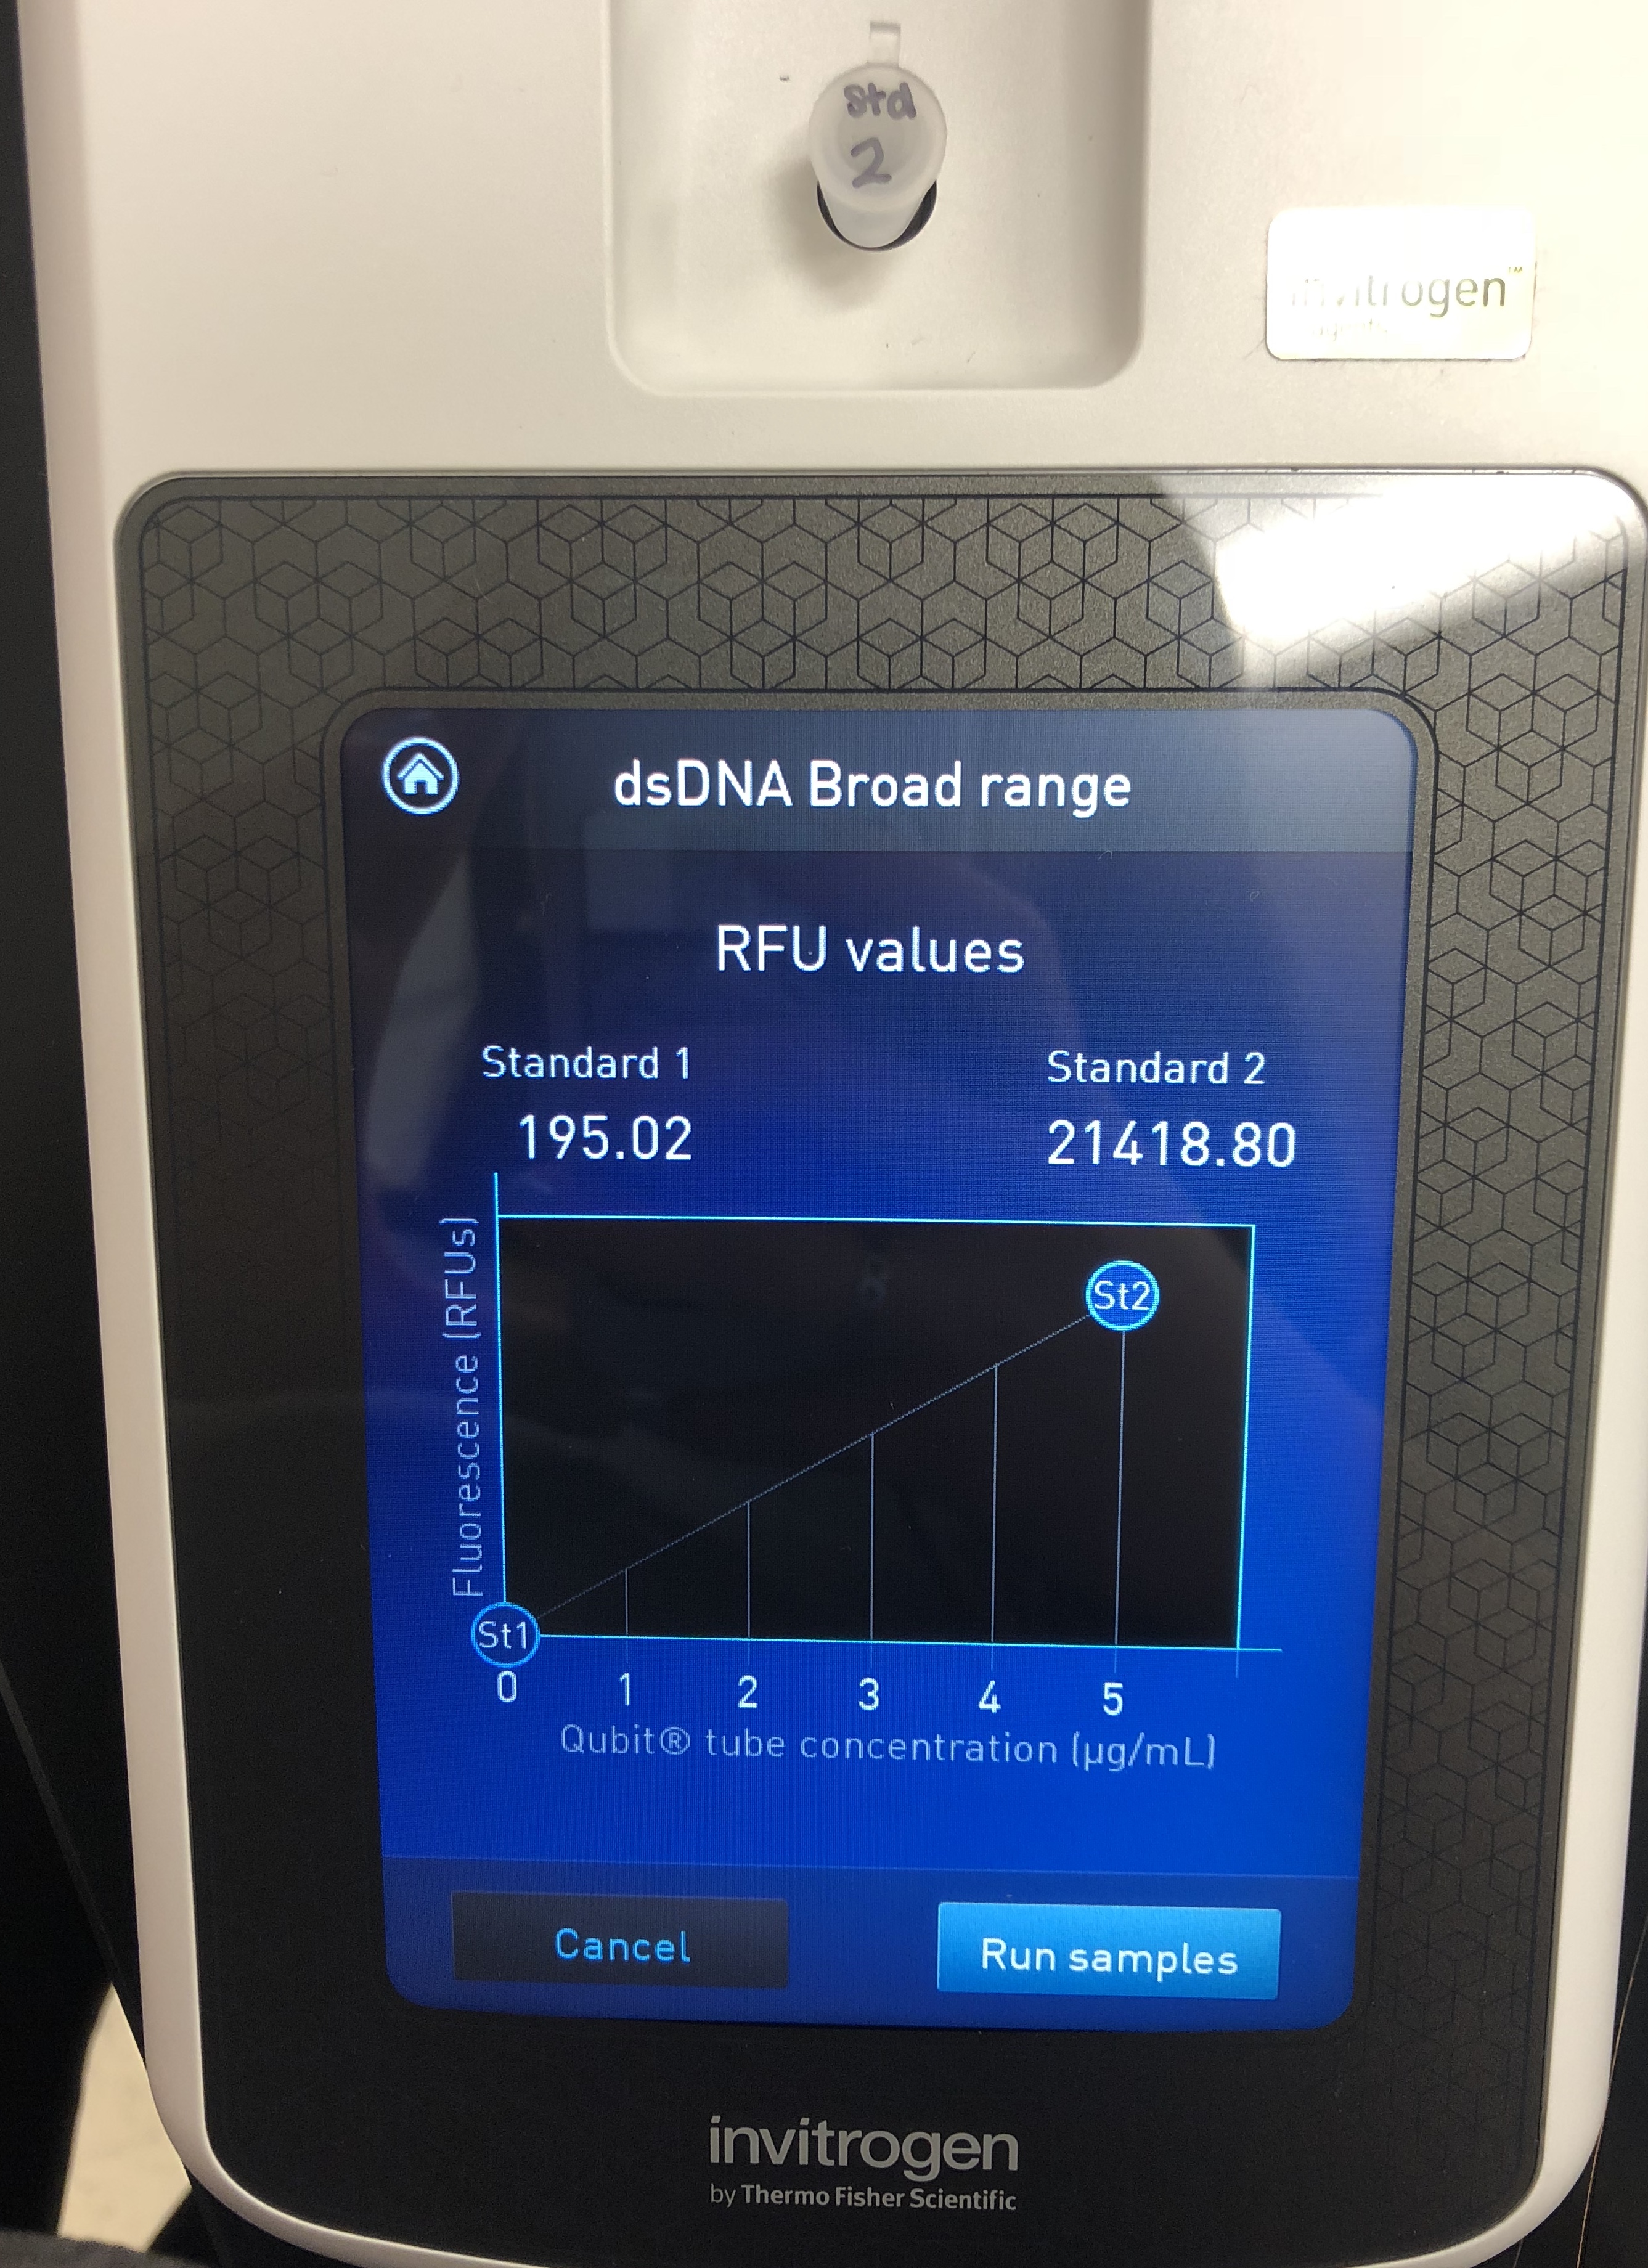
A Quitbit 3 Fluorometer was used
800 μl of Quitbit dsDNA buffer was combined with 4 μl of dsDNA BR Reagent to make mastermix.
add 190 μl to the 2 controls
add 199 μl to the others
standard 1, 10 micros into number 1
standard 2, 10 micros into number 2
1 micro of each sample into F1 and F2
vortex all 4 for a few seconds
let all 4 set for 2 minutes
double stranded DNA
read standards, then samples

10/08/2018
Started making the PEG solution.
first time, the solution was not becoming homogeneous even after hours of stirring and heating
New solution was made starting around 2:00 pm. They were heated and stirred with the magnetic stirrer for many hours. The solution was cloudy.
PEG needed up being successful by doing the procedure in reverse (adding the PEG first and then the NaCl).
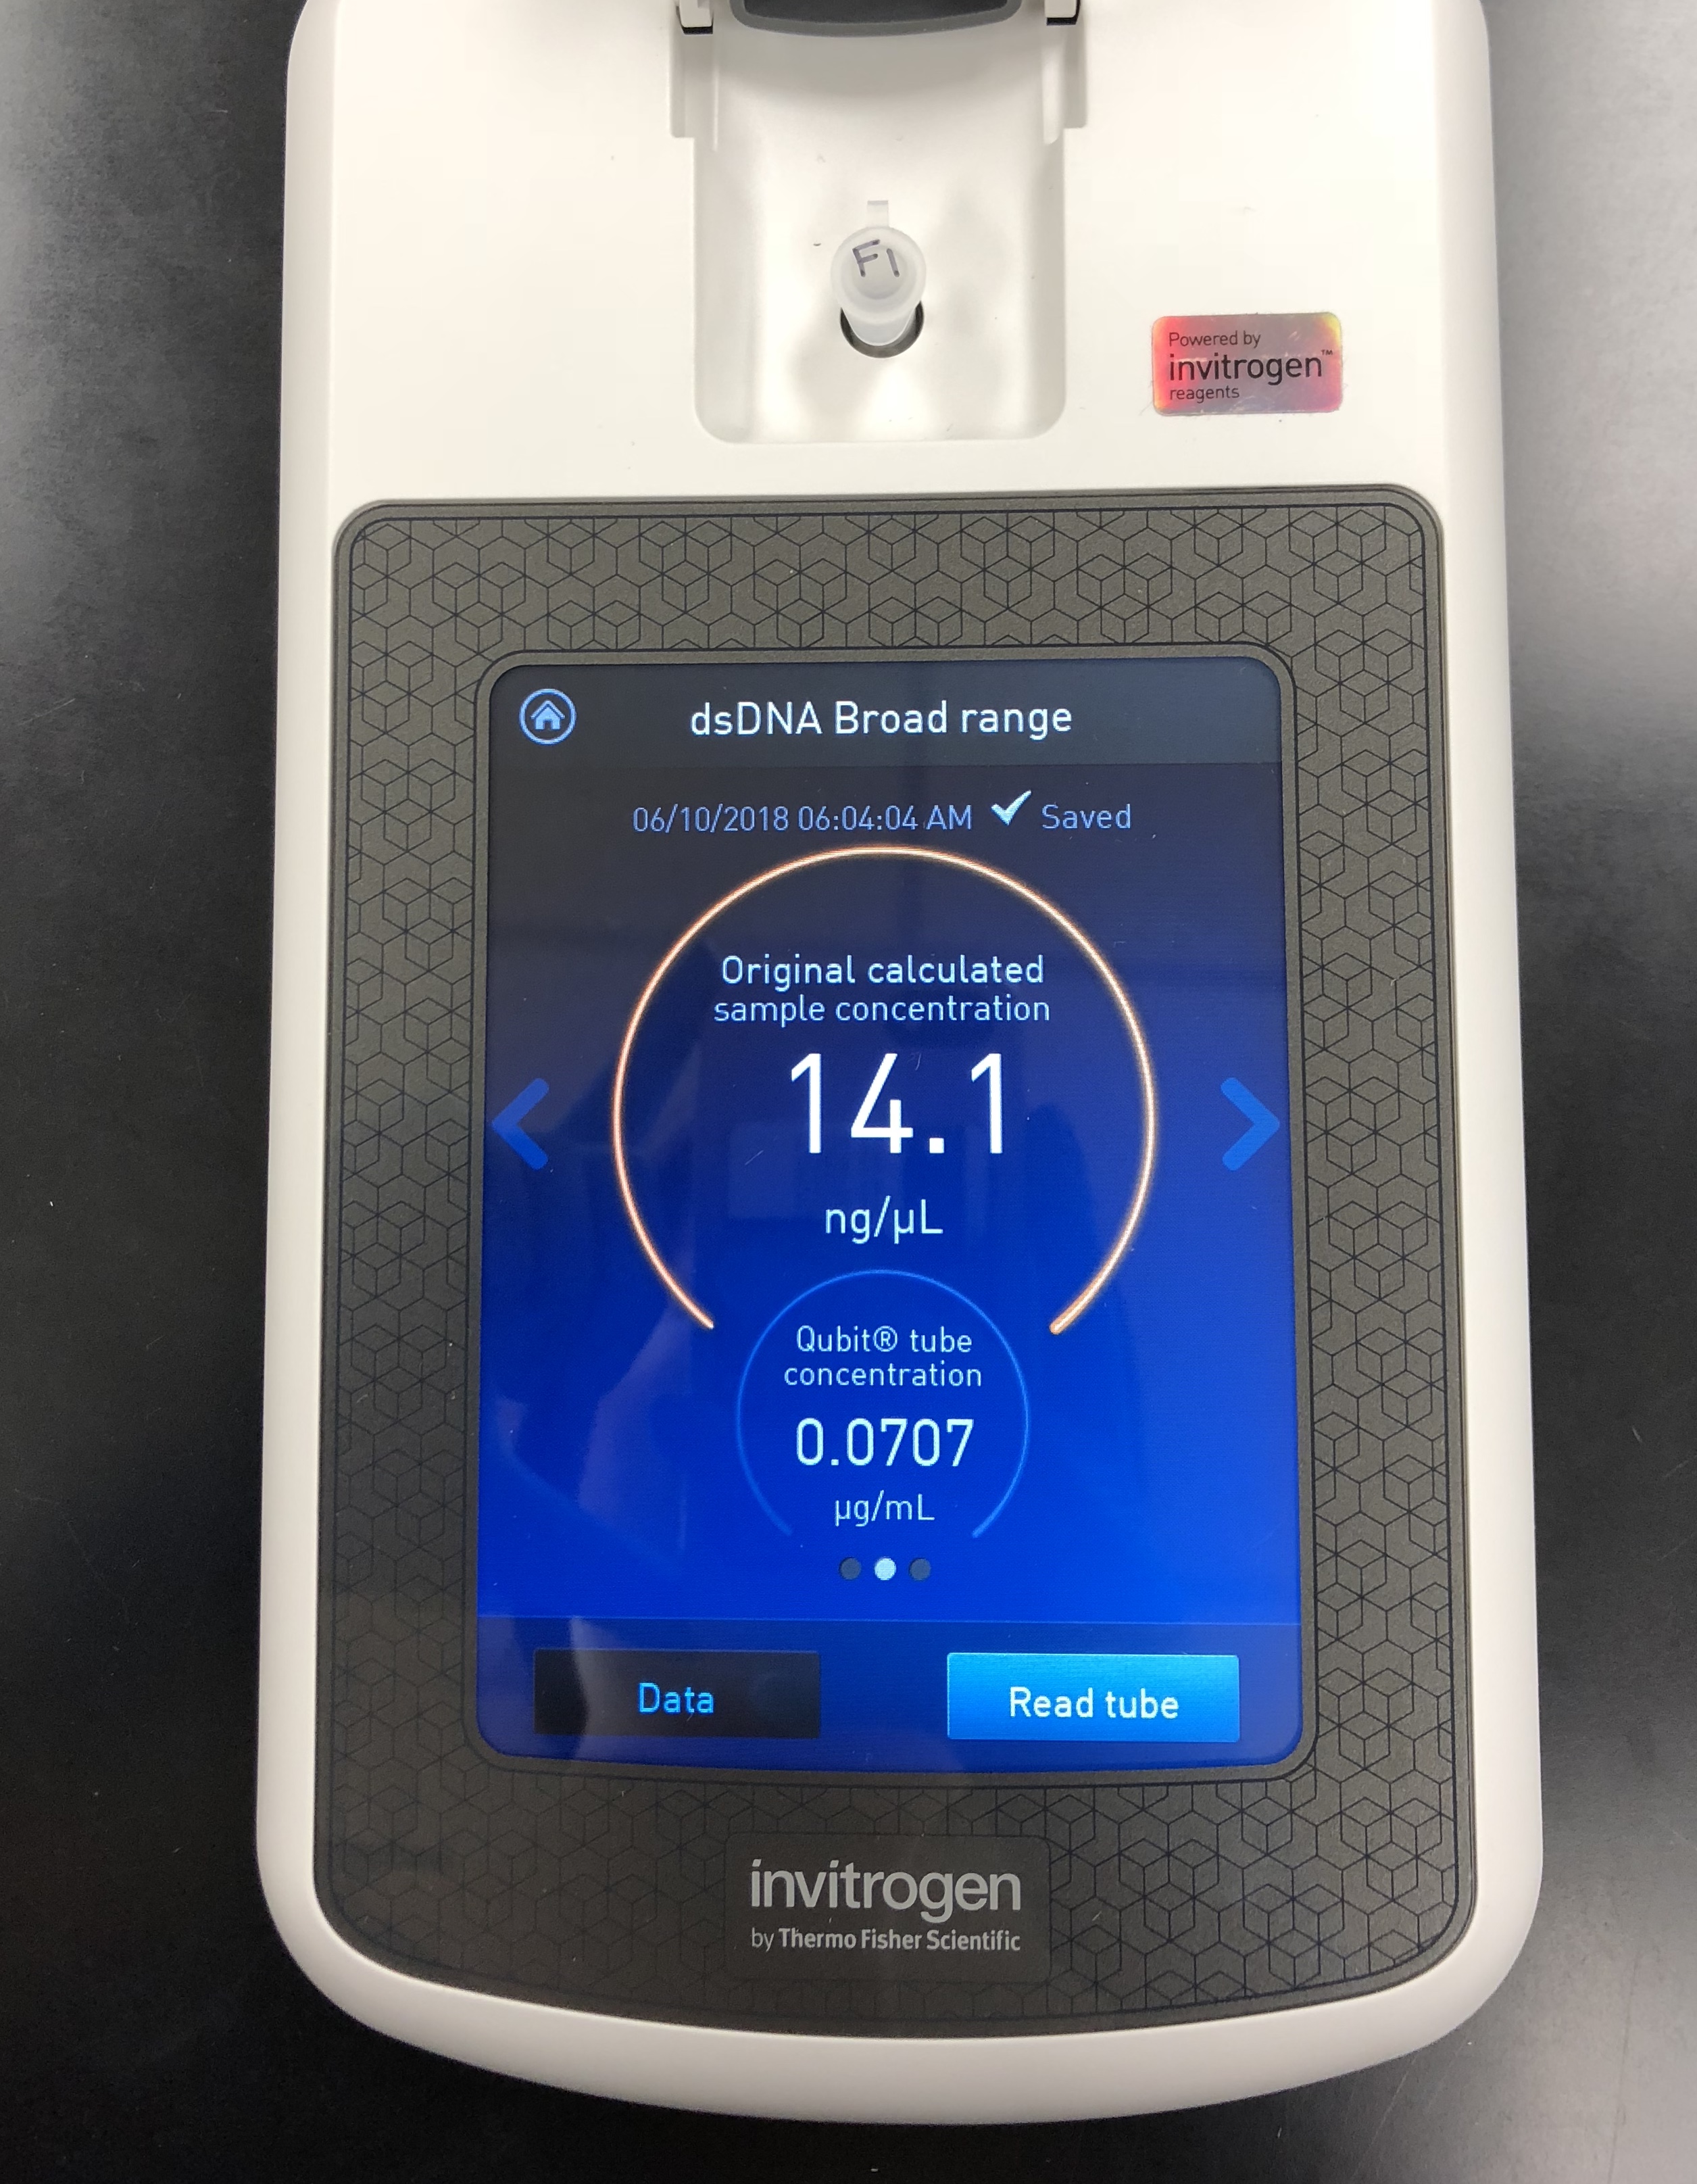
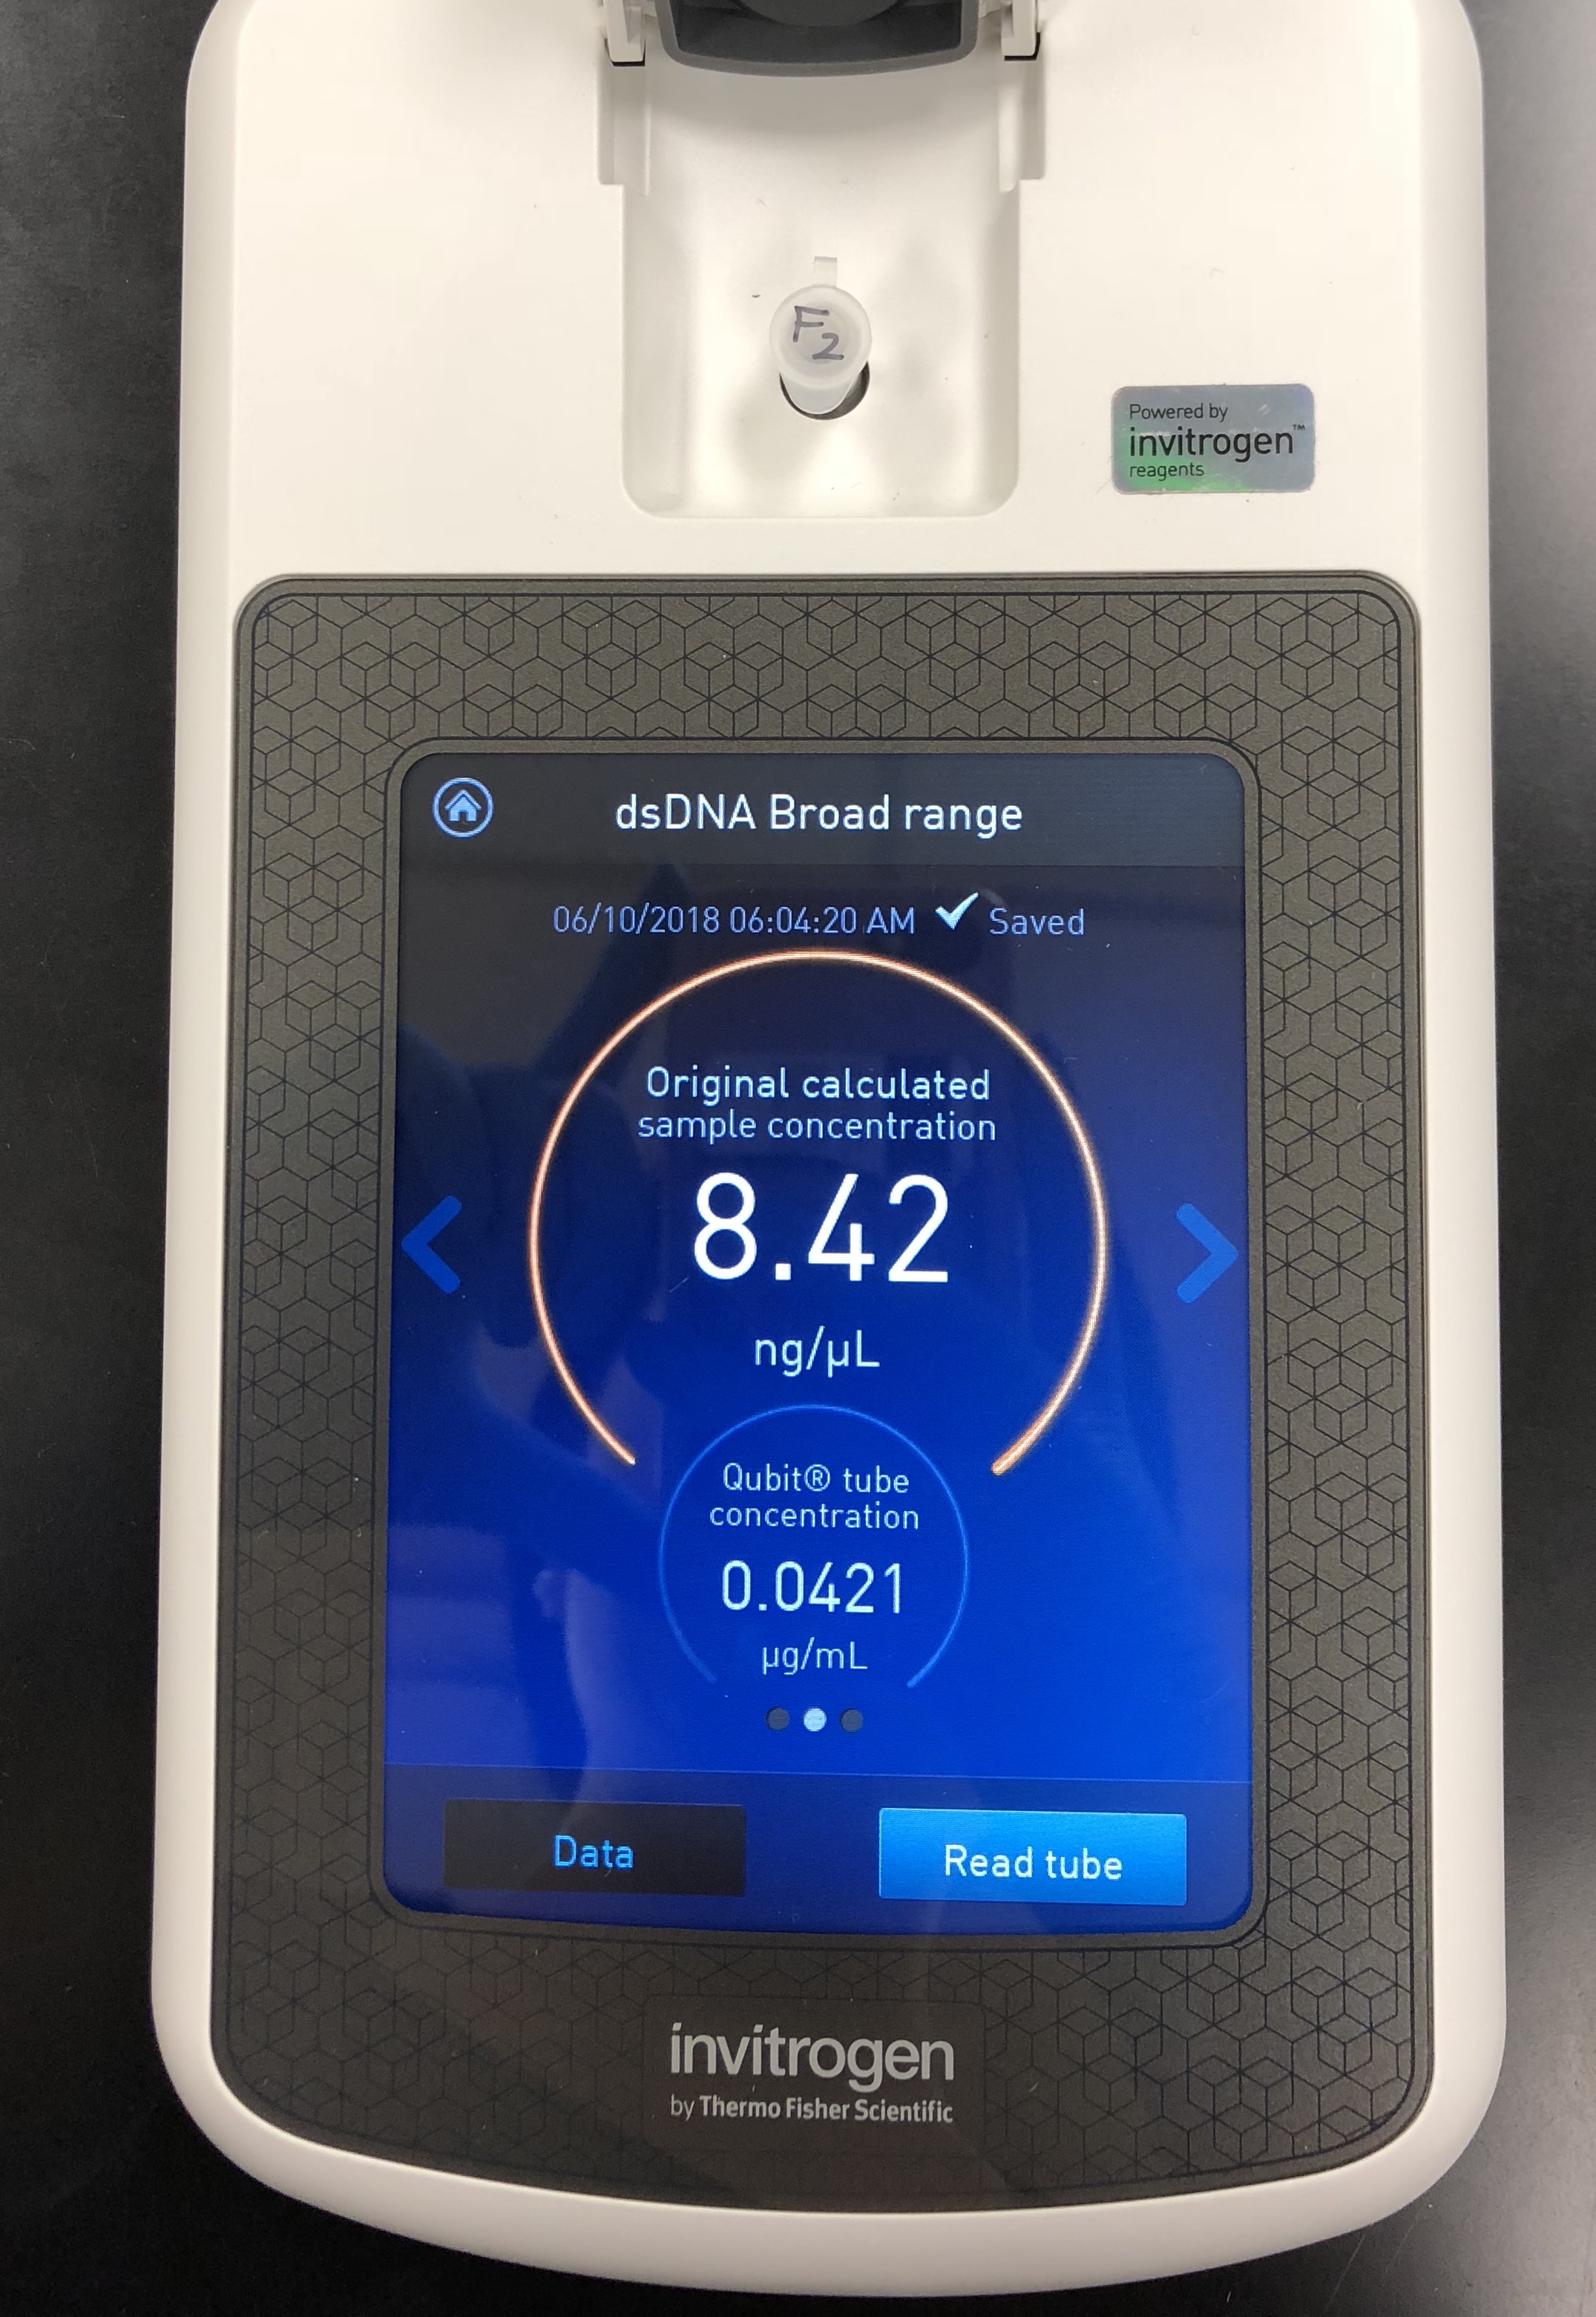
DNA Extraction (10/10/2018)
10 ml of the phage lysate was transferred to a 50 ml conical tube.
40 μl of nuclease mix was added to the tube. The tube was inverted gently several times to mix.
4 ml of the PEG8000/NaCl solution was added to the conical tube. The tube was inverted gently several times to mix.
The mixture was incubated at 37C for 30 minutes.
The mixture was then pulled out to sit at room temperature for 1 hour.
The mixture was then stored in the fridge at 4C.
The overflow was poured into new tube and placed in the fridge. The volume was approximately 14 ml of liquid.
As for the tube containing the pellet, it was drained by inverting the tube on paper towel for 3 minutes.
2 ml of DNA resin was added (35 C). It should have been at 37 C, but the pellet had been sitting for almost 10 minutes. The resin bottle was shaken before taking 2 ml. The pellet was resuspended. Resuspended liquid was transferred between two 1.5 ml micro centrifuge tubes.
10,000 RPM for 5 minutes
10,000 RPM for 4 minutes
spun for another 4 because it looked like a cloud in the tube, not a solid pellet
pellet still looked like a cloud, but more solid
supernatant was pulled off
Pellet was gently flicked
spun at 10,000 RPM for 7 minutes
added 1 ml of 80% isopropanol to each again
spun at 10,000 RPM for 7 minutes
added 1 ml of 80% isopropanol to each
resuspended
used pipette to transfer to syringe attached to column, pushed liquid through into clean microcentrifuge tube.
added elution buffer
spun at 10,000 RPM for 3 minutes.
spun at 10,000 RPM for 8 minutes
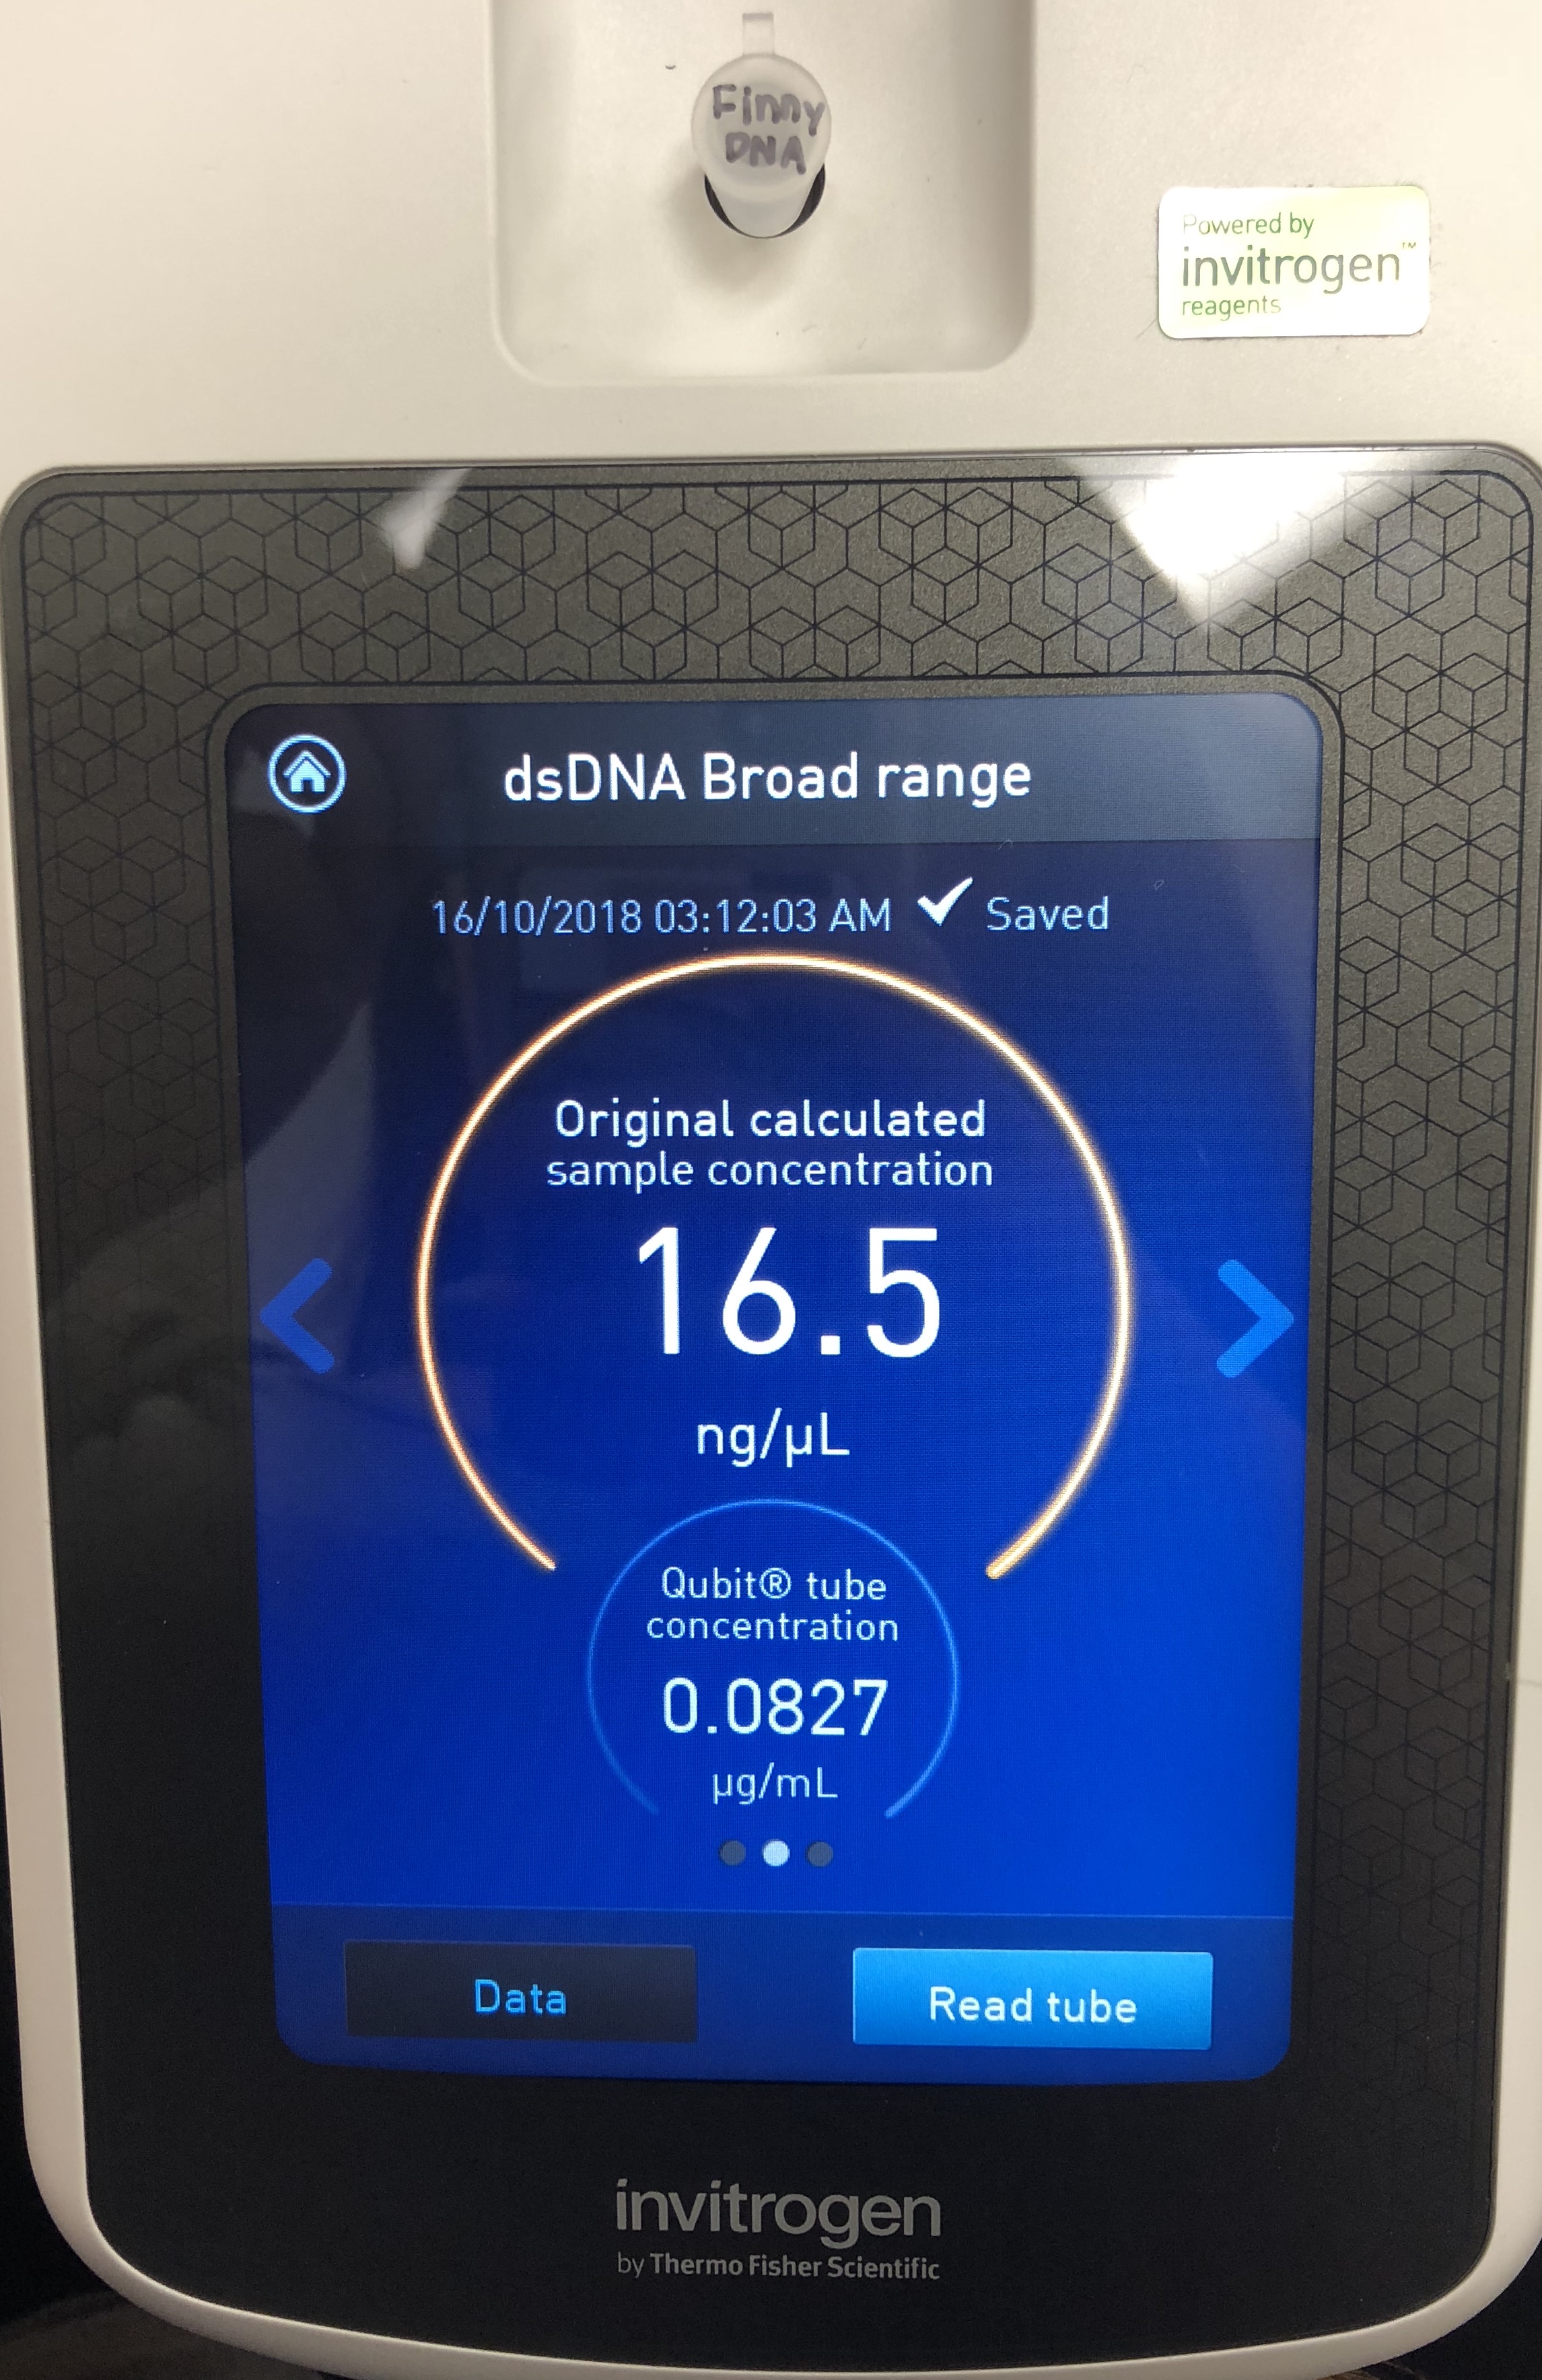
*Determine the concentration of your phage DNA.
A Quitbit 3 Fluorometer was used
800 μl of Quitbit dsDNA buffer was combined with 4 μl of dsDNA BR Reagent to make mastermix.
add 190 μl to the 2 controls
add 199 μl to the Finny DNA tube
standard 1, 10 micros into number 1
standard 2, 10 micros into number 2
1 micro of the DNA sample to the Finny DNA tube
vortex all for a few seconds
let all set for 2 minutes
double stranded DNA
read standards, then samples
The concentration was still not high enough, so to proceed, a third protocol will be followed using proteinase K and SDS. Instructions were read on the online forum.
Extraction (10/17/2018)
* sea phages protocol using ads and proteinase K
1 ml of phage lysate was transferred into a microcentrifuge tube.
5 µl of nuclease mix was added to the lysate.
Solution was mixed gently by repeated inversions
Solution was incubated at 37 °C for 10 minutes
15 µl of EDTA was added to the nuclease-treated lysate and mixed gently
***EDTA will inactivate the nucleases by chelating, or binding, divalent cations required by the nucleases for activity
0.5 µl of Proteinase K was added
50 µl of SDS was added to the nuclease-treated lysate and mix gently. It was then incubated at 37 °C for 10 minutes.
***Proteinase K is added to degrade the nucleases added in Step 2. ***SDS stimulates the activity of Proteinase K.
*Denature the protein capsid to release phage DNA
2 ml of DNA clean-up resin was added to a 15 ml conical tube.
The nuclease-treated phage lysate was transferred from the microcentrifuge tube to the 15 ml conical tube containing resin.
The solution was mixed gently by inverting the tube repeatedly for 2 minutes.
*Isolate the phage genomic DNA.
Plungers were removed from two 5 ml syringes
A column was attached to each syringe barrel from the Wizard Kit
Each column and syringe barrel were set on clean micro centrifuge tubes
1.5 ml of phage DNA/resin solution was transferred to each column using a pipette
Both plungers were inserted into the syringe and the liquid was pushed through and collected in the used 15 ml conical tube.
The plungers had to be pushed down firmly with even pressure to prevent the plunger from popping out.
When all the liquid from both syringes were expelled, the columns were unscrewed and set into clean micro centrifuge tube. The plungers were then removed after.
The syringe barrels were then attached back onto the columns.
*washing the salts
2 ml of 80% isopropanol was added to each syringe. The liquid was pushed through following the same procedures as above.
This washing was repeated two more times for a total of three washes.
To remove residual isopropanol, each column was placed into a clean micro centrifuge tube.
These tubes with the columns were then placed in balanced configuration, with lids pointed towards the center, and spun at 10,000 x g for 5 minutes.
The columns were then placed in new microcentrifuge tubes and spun at 10,000 × g for 1 additional minute to remove any residual isopropanol
To evaporate any left over isopropanol, the columns were placed directly into a 90 °C heating block for 60 seconds.
Each column was then placed in a clean micro centrifuge tube.
50 μl of 90 °C sterile ddH2O was added directly to each column.
Columns were incubated for 1 minute at room temperature.
The columns were then spun at 10,000 × g for 1 minute in a microcentrifuge.
TOO LOW TO COUNT
Extraction (10/25/2018)
*used original sea phages protocol
– incubate at room temp for 30 mins
– (add other modifications)
looking at concentration on 10/26 TOO LOW TO COUNT
– future plans: maybe add less hot sterile water so you have a more concentrated sample…. get multiple amounts of small concentrations and pool them together at the end… may need to make more webbed plates to collect more high volume lysate.
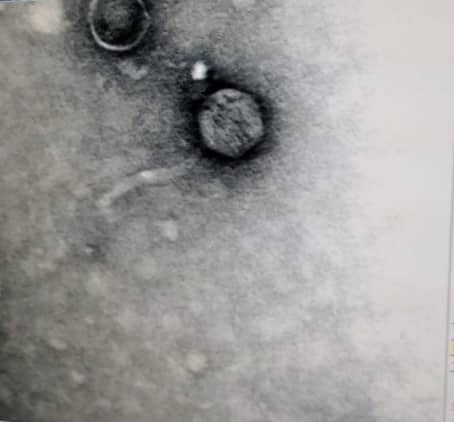
Microscopy/ TEM (10/26/2018)
Procedures were performed under fume hood
1 ml of the high-titer lysate was transferred into a sterile microcentrifuge tube.
The tube was balanced and centrifuged for 1 hour at 4 °C at top speed to concentrate the phage particles at the bottom of the tube.
Using a micropipettor, the supernatant was carefully removed, getting rid of as much liquid as possible without disrupting the concentrated phage at the bottom of the tube.
100 μl of phage buffer was added and resuspended at 4 °C for an hour and 30 minutes
………..
A piece of parafilm was cut and placed on the lid of a plate
A telco tab was then stuck on the film
Using EM forceps, a fresh grid was removed from a box of unused grids, touching only the very edge of the grid.
The grid was placed dark-and-shiny side UP, on the edge of the tab so that only the very edge of the grid was touching the adhesive.
Using a micropipettor, 10 μl of lysate was placed onto the grid without touching the tip to the grid itself. The phage was allowed to settle and attach onto the grid for 2 minutes
Using a small wedge of filter paper, the excess fluid was wicked off by sliding the wedge next to the grid and barely touching it.
The grids were then rinsed:
10 μl of sterile water was pipetted onto the grid. This sat for 2 minutes.
The water was then wicked off using a fresh wedge of filter paper.
This was then repeated one more time.
Next, 10 μl of 1 % uranyl acetate was added to the grid. This also sat for 2 minutes. Excess stains taken off by a new wedge of filter paper.
The grid was given time to air dry. After completely dry, a rainbow sheen could be seen on the grid. The grid was then carefully placed into its designated slot and placed in a vacuum.
Extraction (10/31/2018)
5mL of the high volume lysate was added into a 15 mL conical tube.20uL of nuclease mix was then added.
Once nuclease was added, the tube was gently inverted and incubated at 37°C for 10min.
1 mL of lysate was transferred into 5 microfuge tubes
To each tube, 20uL of ZnCl2 was added and mixed gently by inversion. This was incubated at 37°C for 5 min.This “precipitates” the phage.
The tubes were then centrifuged at 10,000rpm for 1min to pellet the phage.
The pellet was kept.Supernatants were removed by aspiration, trying not to disturb the pellet. Supernatant was discarded.
Pellets were resuspended in 500uL of TES buffer per tube, and were supposed to be incubated at 60°C for 15 minutes. The heating block being used was originally set to 60°C, but was turned off. Because this step needed to be done quickly, the tubes were placed in at 43°C while it kept heating up to 60°C for 15 minutes. Because the tubes were not initially placed in at 60°C, it was decided to leave them in the incubator for another 4 minutes at 60°C.
***This will denature the capsids, exposing the DNA, while protecting it from the nuclease activity (EDTA in the TES sequesters divalent cations required for nuclease function).
1uL of Proteinase K was added and mixed gently. This was incubated at 37°C for 10 minutes to completely eliminate any residual nuclease activity.
60uL of potassium acetate was added to each tube. They were mixed well and left on ice for 15 minutes. ***A white, dense precipitate will form. This represents your capsids.
The tubes were then centrifuged at 4°C for 1min at 12,000rpm to pellet the capsids.
Supernatants were kept this time because they contain the DNA. This was placed into new microfuge tubes. Pellets were discarded.
500uL of pure isopropanol was added to each of the tubes with the supernatant, mix, and left on ice overnight.
Extraction Continued (11/01/2018)
Tubes were pulled out 11/1 at 8:00 am.
Tubes were centrifuged at top speed for 10min to pellet DNA. Supernatant was discarded.
250uL of 70% ethanol was added into each tube, and spun again for 1min, at top speed. This step washed the DNA pellet. Supernatants were discarded.
DNA pellets were dried at room temperature by turning upside-down onto paper towels, and were left upside-down until the pellets began to turn clear. The tubes were also placed in a 30⁰C incubator to help with drying.
The first pellet was resuspended in 50uL nuclease-free water. Then that solution was used to resuspend the next pellet. This was continued until all 5 pellets were resuspended in the same 50uL of water.
DNA concentration was tested using the Qubit at high sensitivity. The concentration was too high to count.
Testing Concentration (11/02/2018)
This time, a nanodrop was used to test concentration. 11603.5 ng/uL was the tested concentration. This concentration was too high, so it needed to be diluted.
To do this, 1 uL of the DNA was added to 199 uL of water to create a 1:200 dilution. The expected concentration of this was 58 ng/ uL. This concentration was tested with the high sensitivity Qubit. However, the concentration was 3.8 ng/ uL. This was not the concentration we were expecting.
To proceed, we will plan on testing the concentration of the original again as well as other dilutions of the DNA.
Testing Concentration (11/05/2018)
The original DNA was tested again with the nano drop and the concentration increased to 12959.2 ng/uL with an A260/A280 of 2.09 and an A260/A230 of 2.15. One more test was run and the concentration came out to be 11996.3 ng/ uL with an A260/A280 of 2.09 and an A260/A230 of 2.14. The extremely high concentration in addition to the inconsistencies led us to believe that the concentration most likely inaccurate, so dilutions must be done to get more accurate readings.
The DNA was tested at a 1:50 ratio and 1:100 ratio. 1 uL of DNA was added to 49 uL of sterile water and vortexed to mix. This made the 1:50 dilution. Then, 25 uL of the 1:50 dilution was added to a new tube containing 25 uL of sterile water and vortexed. This created the 1:100 dilution.
When testing the concentration of the 1:50 dilution, the concentration was 58 ng/ uL with an A260/A280 of 1.83 and an A260/A230 of 2.07. When testing the concentration at 1:100, the concentration was 29.6 ng/ uL with an A260/A280 of 1.77 and an A260/A230 of 2.59.
Based off these results, it was concluded that the actual concentration of the DNA was between 2900-3000 ng/ uL.
Using this data, calculations were done to find the dilution needed for restriction enzyme procedures…. ADD CALCULATIONS!!!!!!!
Restriction Enzymes (11/05/2018)
Diluted DNA was made.
Microbacterium foliorum needed restriction ensymes HaeIII, NspI, SacII, and SalI.
DNA sample was gently mixed by vortexing it on low.
Tube was incubated at 65 °C for 10 minutes, and then quickly placed on ice.
Tubes were spun in a microcentrifuge for less than 1 minute to move all of the liquid to the bottom of the tube.
Restriction enzyme digest reactions were set up by having a microcentrifuge tube for each enzyme and a negative control.
21 uL of sterile water was added to each tube that would have a restriction enzyme added. 24 uL was added to the negative control tube.
2.5 uL of respective reaction buffer was added to each tube. 0.5 uL of restriction enzyme was then added to the respective tubes.
(We only did …. And …. Restriction enzymes and the negative control because that is all we had available at the time)
The contents of each tube were mixed gently. The tuebs were quick spun in a microcentrifuge for less than 1 minute to move all of the liquid to the bottom of the tube.
The tubes were incubated at 37 °C for 1 hour
Tubes were spun in a microcentrifuge for less than 1 minute to move all of the liquid to the bottom of the tube. They were then stored at -20 °C.
Gel Electrophoresis (11/07/2018)
A 0.7% concentration gel was made this time.
450 mL of DI water was measured out.
50 mL of 10x TBE buffer was measured and poured into the DI water.
This solution was mixed.
40 mL was measured out into an Erlenmeyer flask.
0.28 g of agarose powder was added to the solution in the flask and swirled (.007 x 40 = 0.28 g)
A paper towel was inserted in the top of the flask and it was microwaved for 30 seconds and then swirled.
The flask was microwaved again for another 30 seconds until the powder could no longer be seen.
1.4uL of ethidium bromide was added to the flask and swirled.
This solution was poured into a prepared gel apparatus and cooled for 20 or 30 minutes until solid.
The comb was pulled out and the apparatus was set up. More TBE solution that was made earlier was poured into the box.
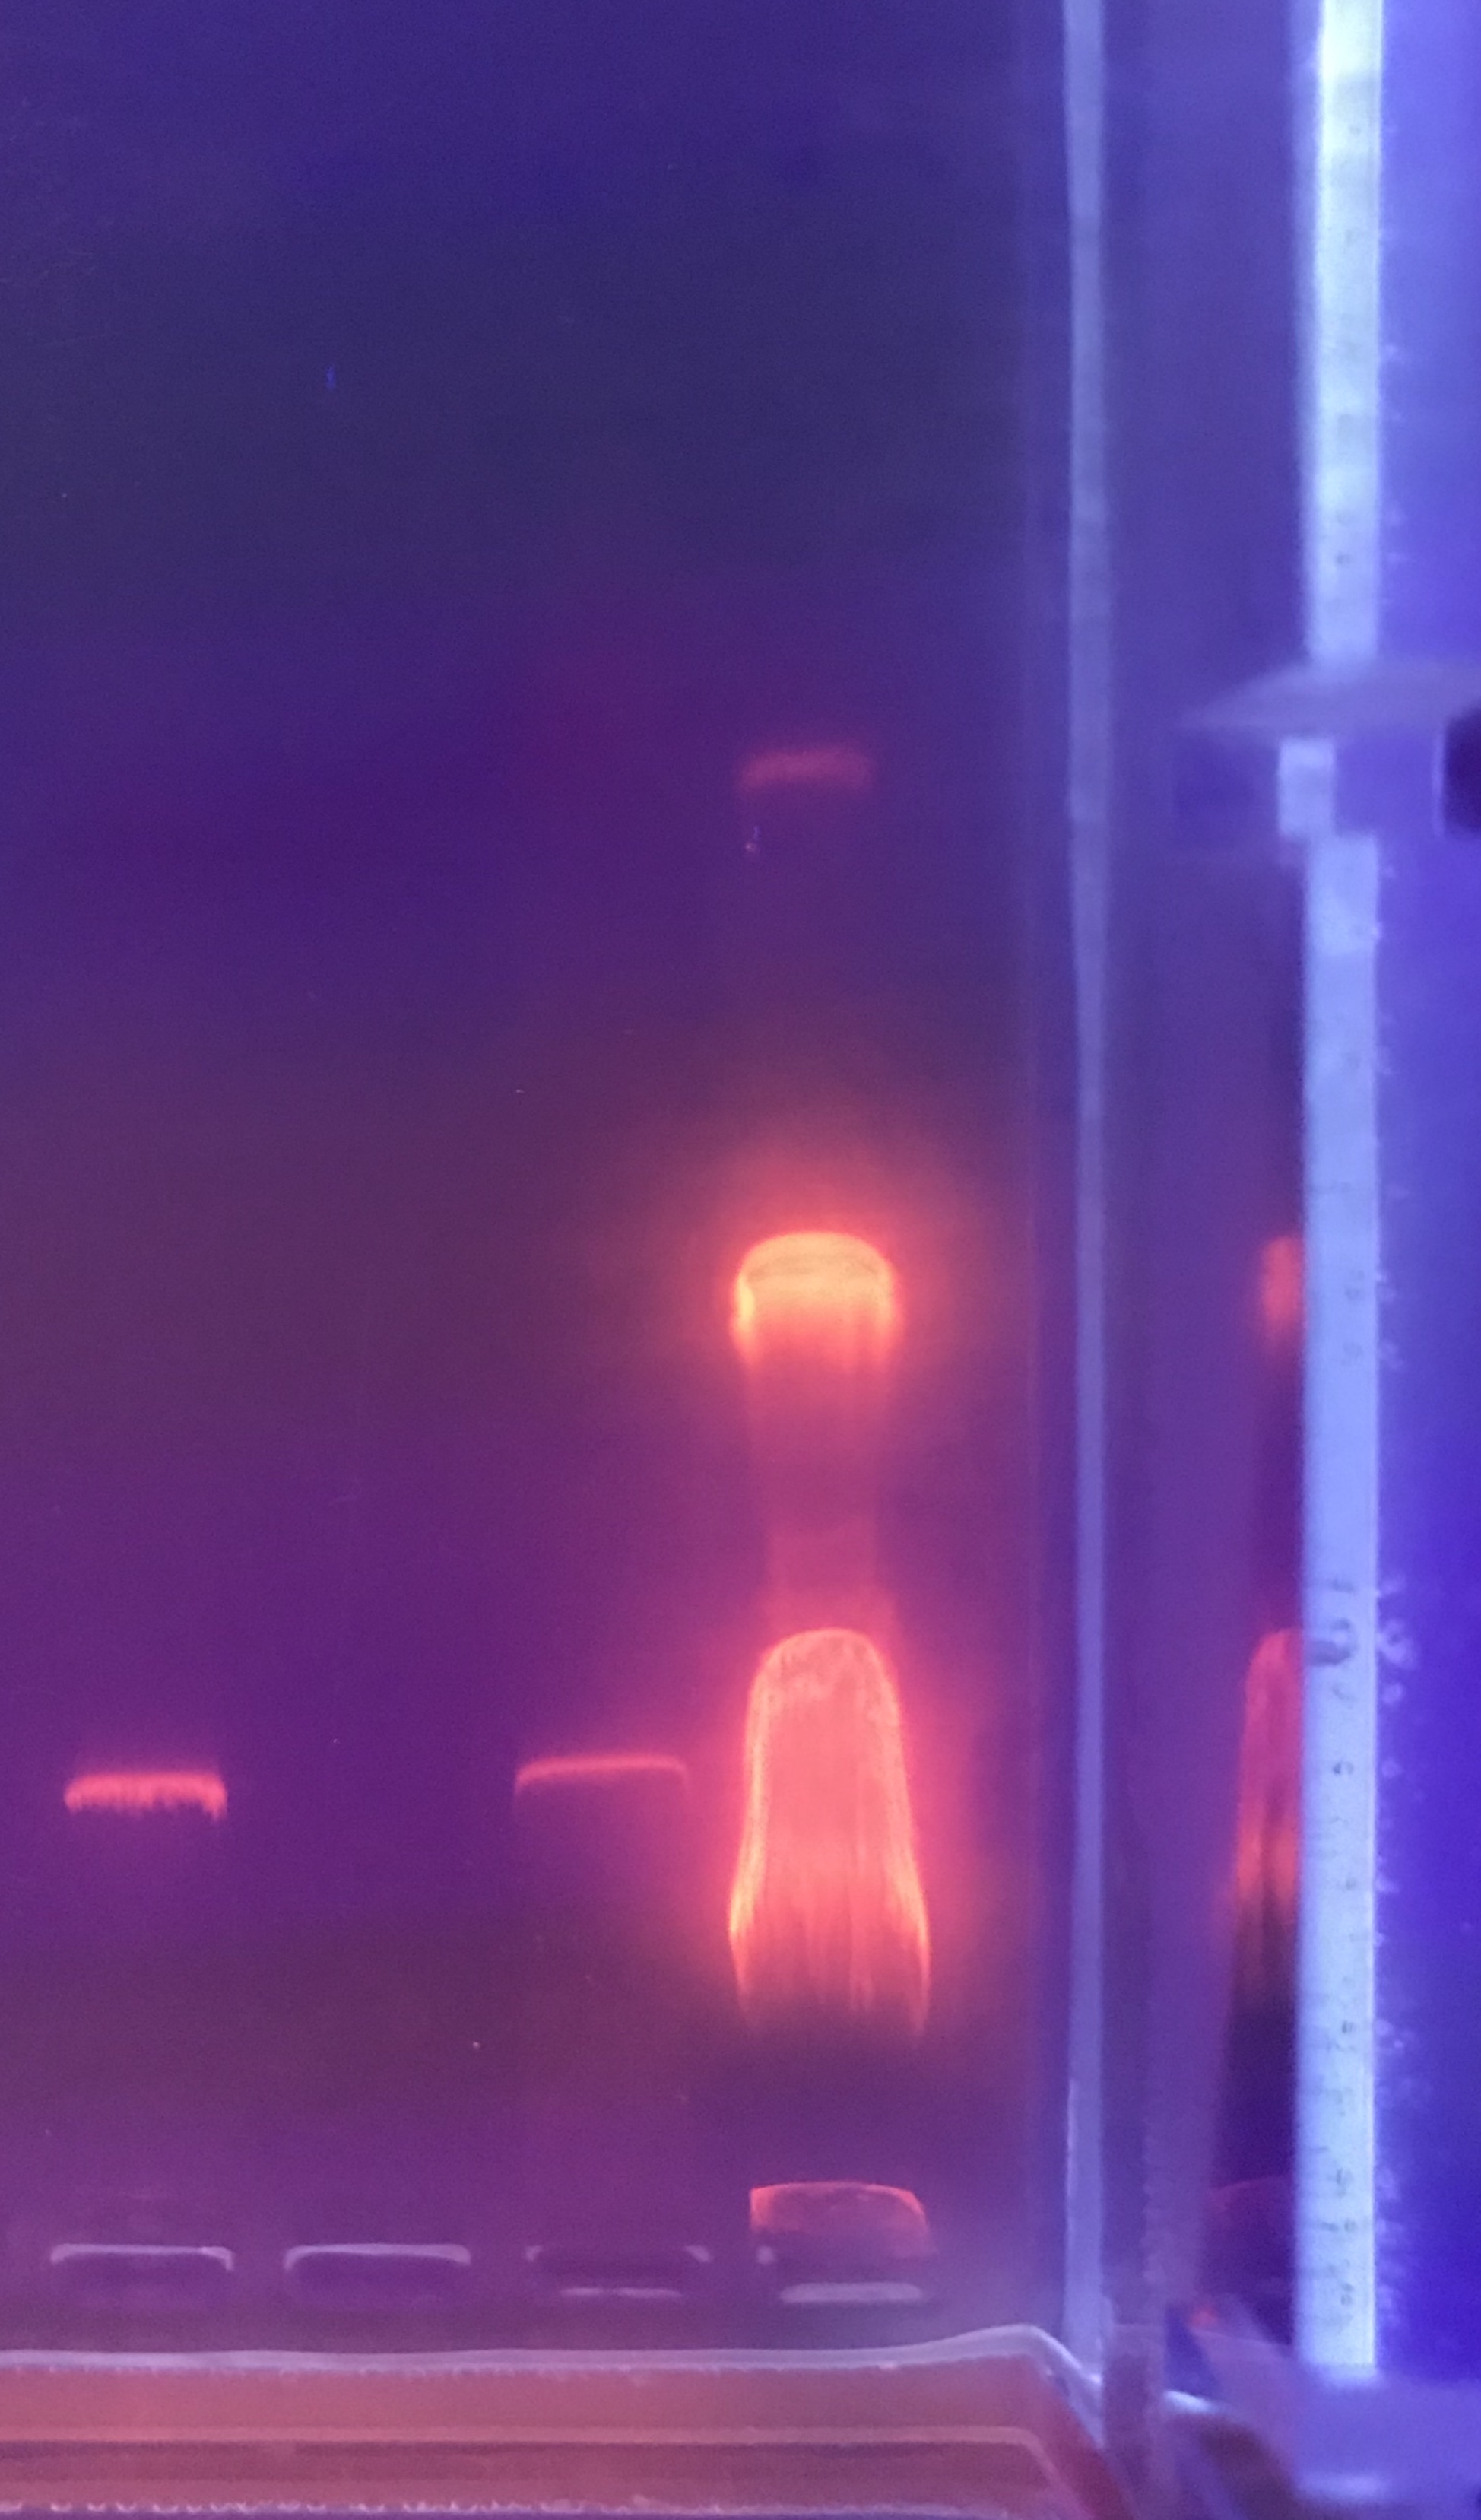
The wells were loaded in the order of: Ladder, control, HaeIII, and SalI
20uL of the ladder, control, and restriction enzymes were loaded. This caused some of the solution to spill out. This is also why we believe the ladder looked the way it did.
Future plans are to run a gel with all restriction enzymes and load less into each well, especially the ladder to get a clearer view.
Restriction Enzyme (11/15/18)
Diluted DNA was made by mixing 3.45 uL of DNA and 16.55 uL of water to get 20 uL of diluted DNA (for 0.5 ug).
Microbacterium foliorum needed restriction ensymes HaeIII, NspI, SacII, and SalI.
DNA sample was gently mixed by vortexing it on low.
Tube was incubated at 65 °C for 10 minutes, and then quickly placed on ice.
Tubes were spun in a microcentrifuge for less than 1 minute to move all of the liquid to the bottom of the tube.
Restriction enzyme digest reactions were set up by having a microcentrifuge tube for each enzyme and a negative control.
21 uL of sterile water was added to each tube that would have a restriction enzyme added. 24 uL was added to the control tube.
2.5 uL of respective reaction buffer was added to each tube. 0.5 uL of restriction enzyme was then added to the respective tubes.
The contents of each tube were mixed gently. The tubes were quick spun in a microcentrifuge for less than 1 minute to move all of the liquid to the bottom of the tube.
The tubes were incubated at 37 °C for 1 hour
Tubes were then incubated at 65°C for 20 minutes (this step was not done last time).
Tubes were spun in a microcentrifuge for less than 1 minute to move all of the liquid to the bottom of the tube. They were then stored at -20 °C.
Gel Electrophoresis (11/15/18)
A 0.8% concentration gel was made this time.
450 mL of DI water was measured out.
50 mL of 10x TBE buffer was measured and poured into the DI water.
This solution was mixed.
40 mL was measured out into an Erlenmeyer flask.
0.32 g of agarose powder was added to the solution in the flask and swirled (.008 x 40 = 0.32 g)
A paper towel was inserted int the top of the flask and it was microwaved for 30 seconds and then swirled.
The flask was microwaved again fro another 30 seconds until you could no longer see the powder.
2uL of ethidium bromide was added to the flask and swirled.
This solution was poured into a prepared gel apparatus and cooled for 20 or 30 minutes until solid.
The comb was pulled out and the apparatus was set up. More TBE solution that was made earlier was poured into the box.
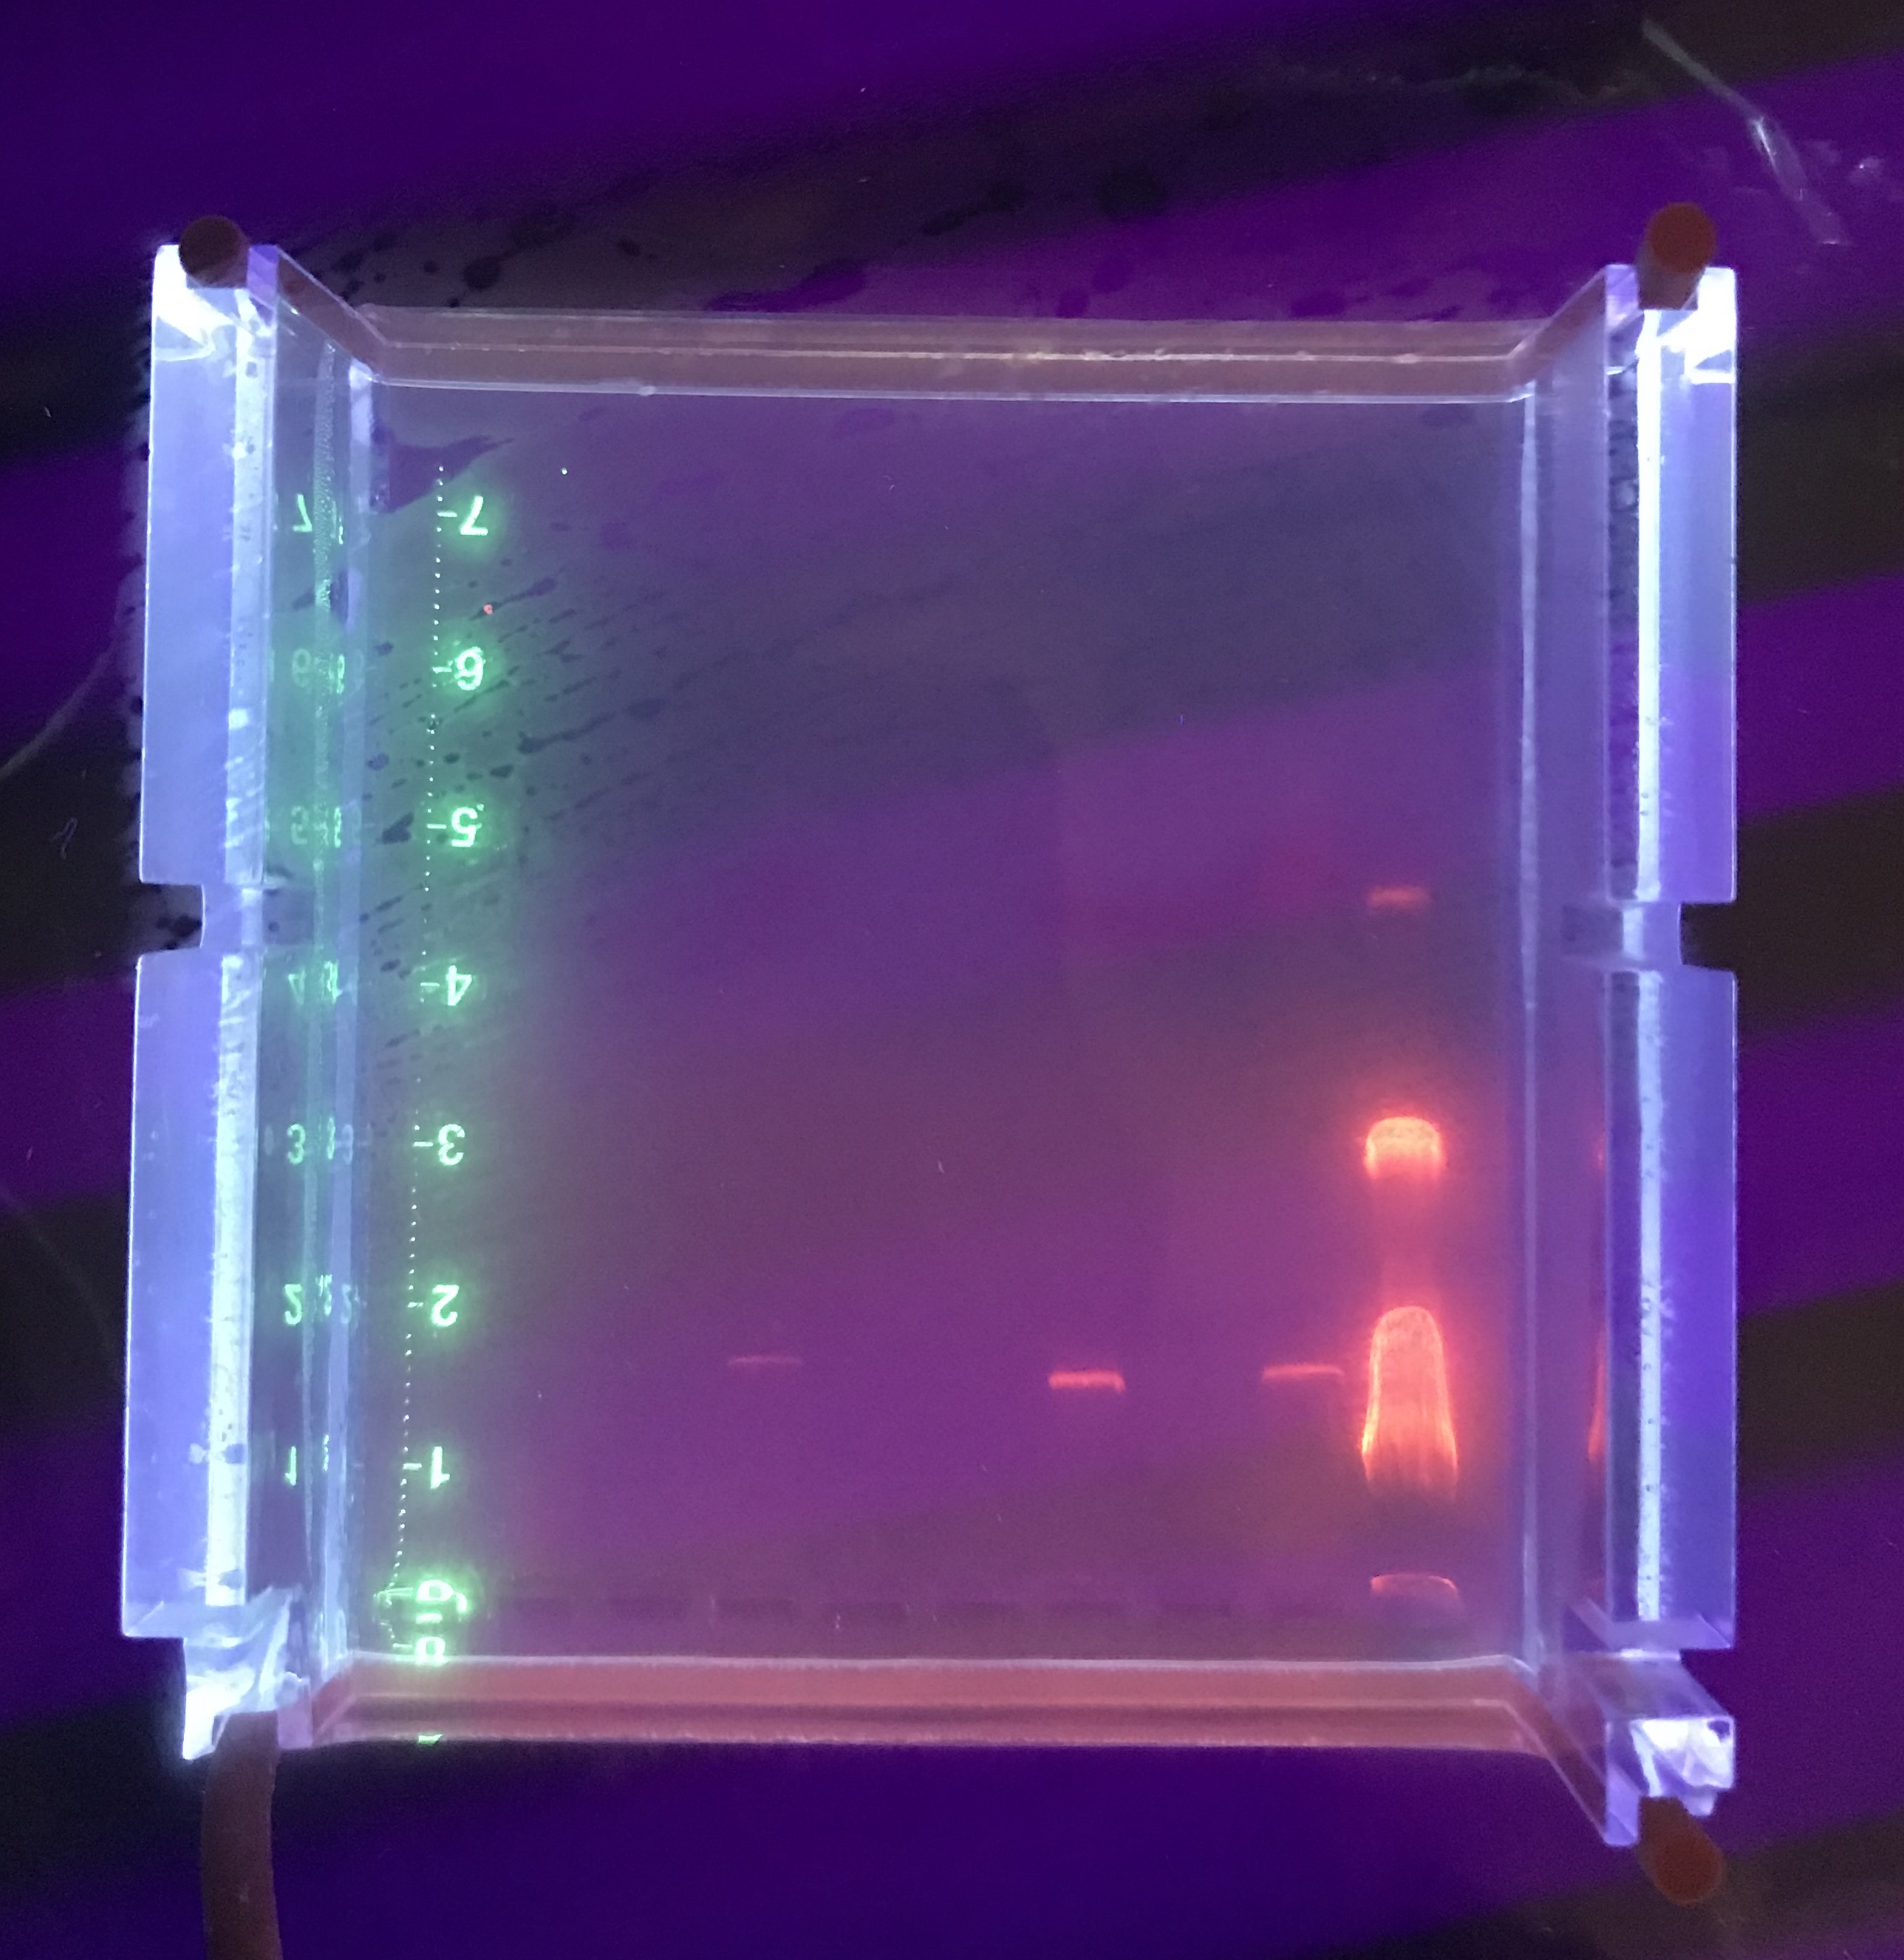
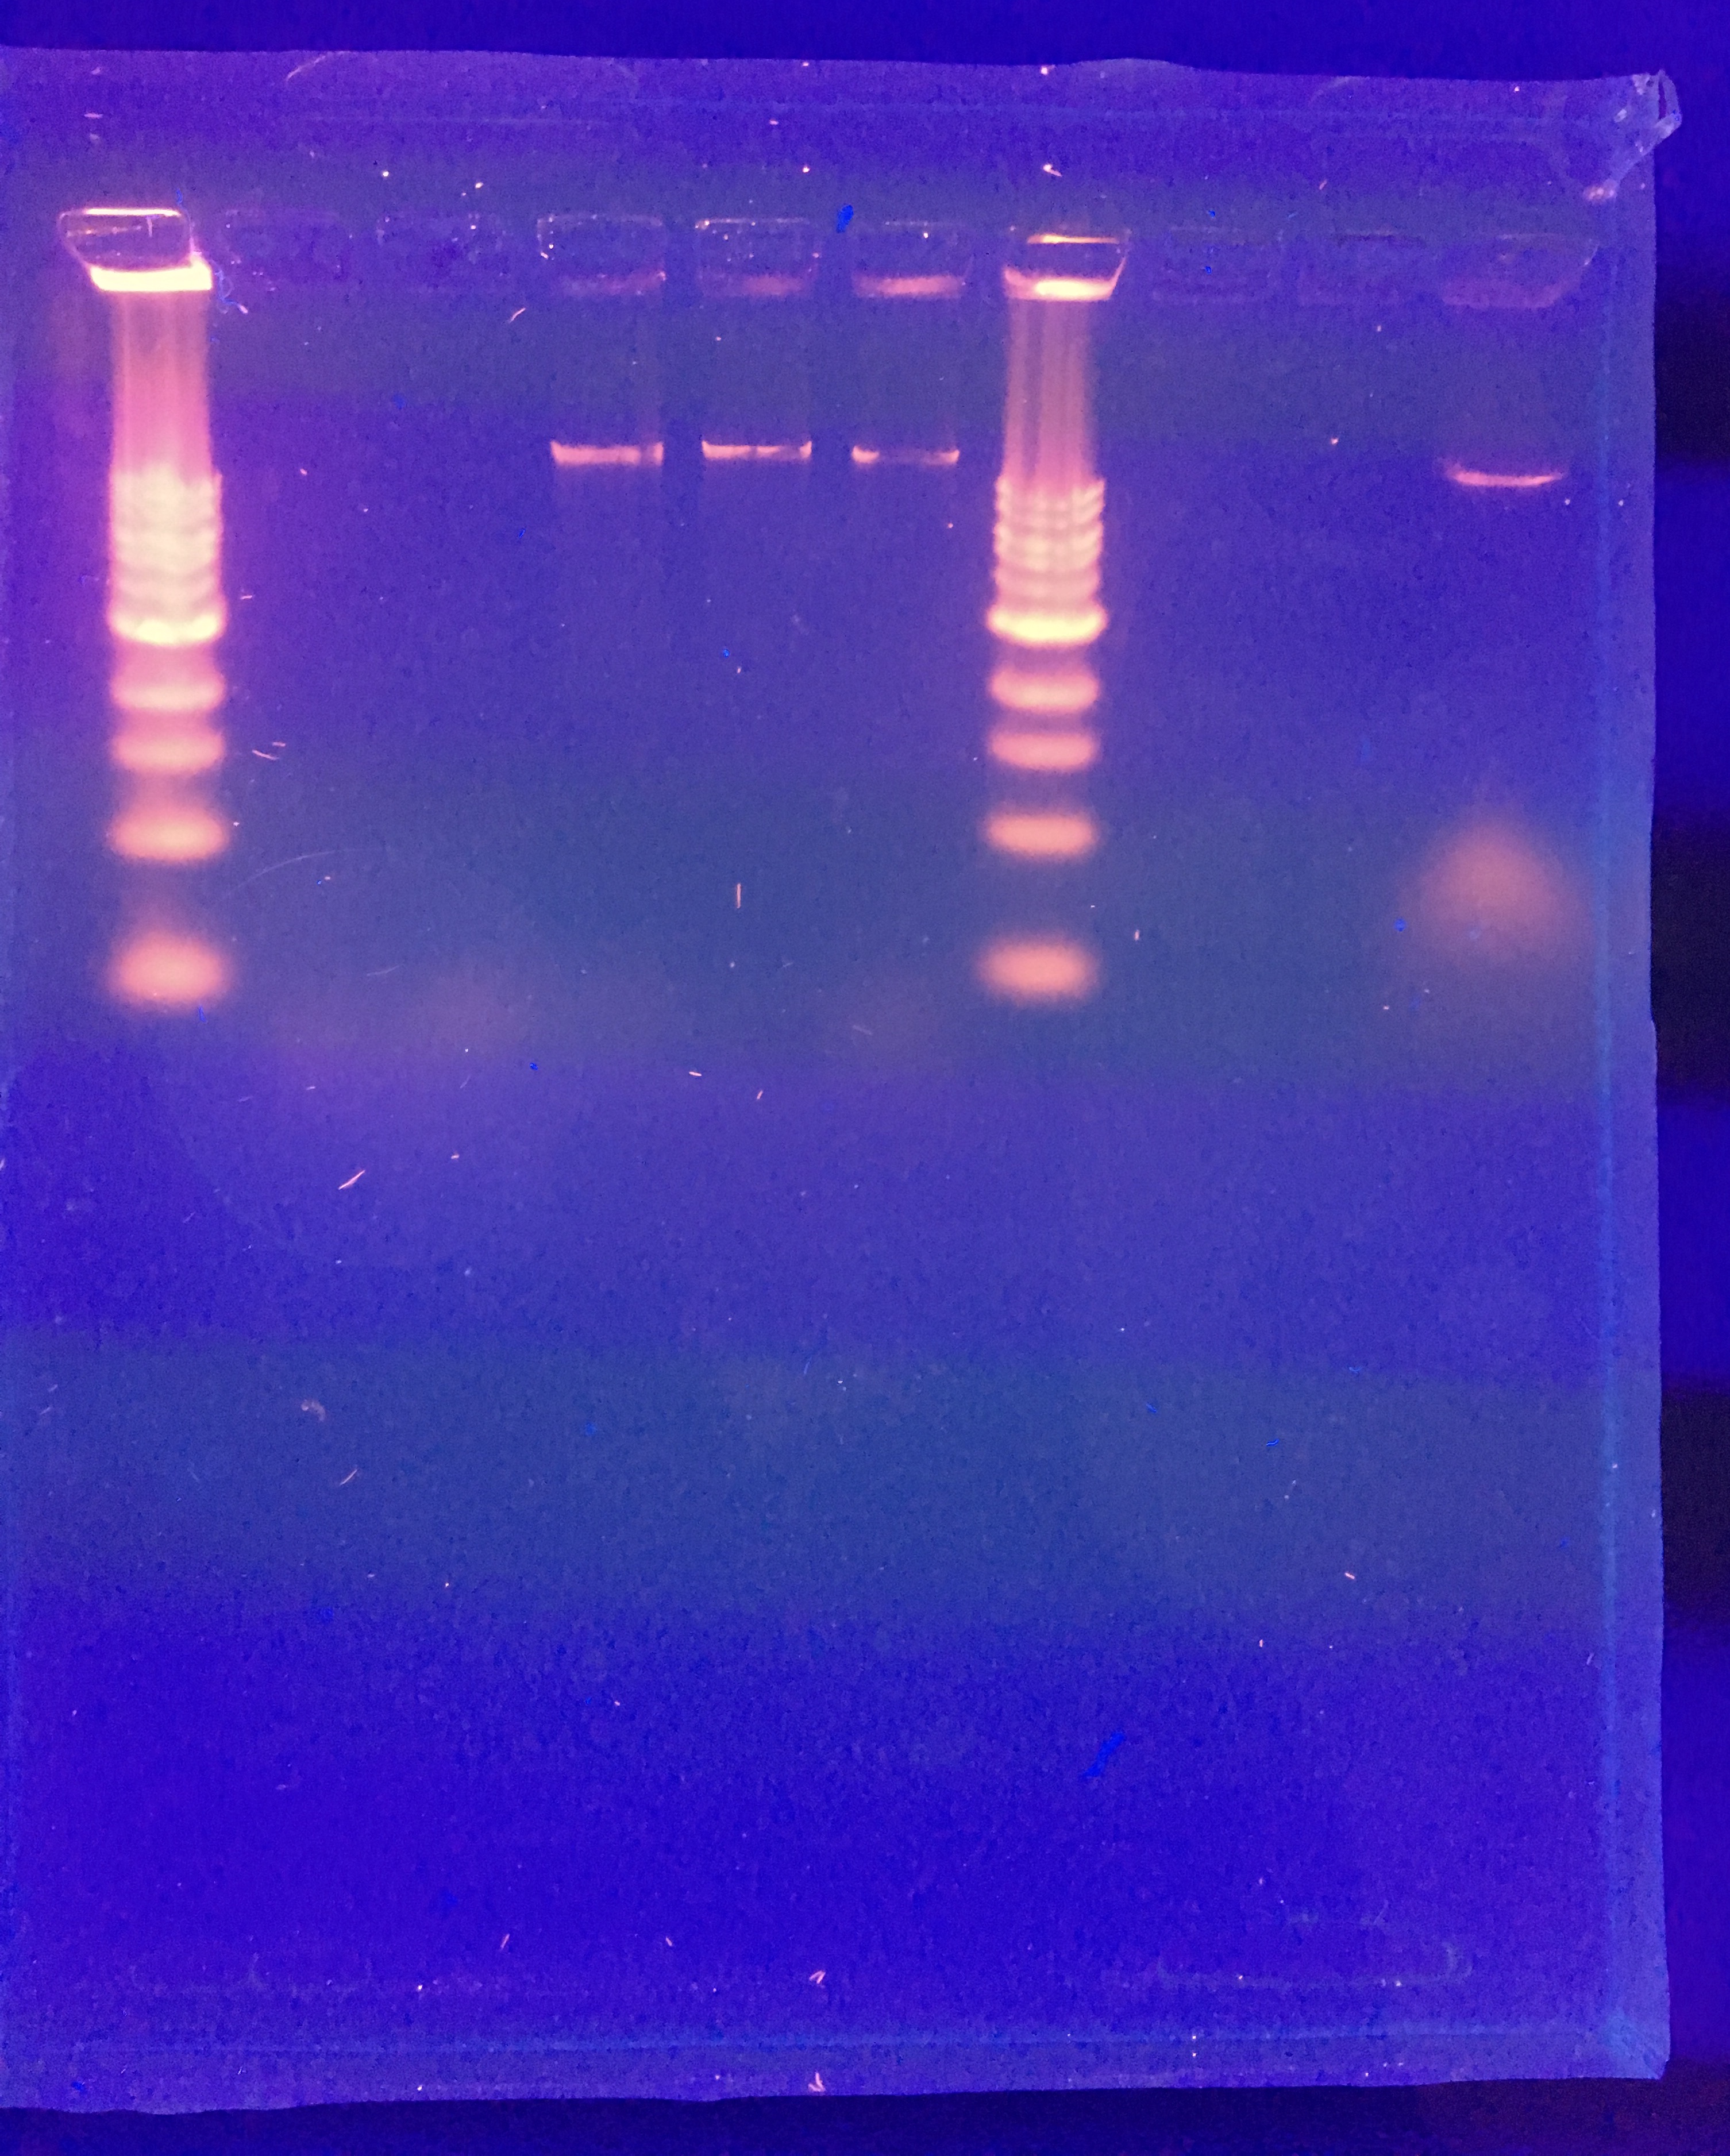
Loading wells:
put 1 micro ladder, 1 micro dye in the first well
the 10 micros of the control and restriction enzymes
The order of the wells was:
– Ladder (1 uL ladder, 1 uL dye)
– Control
– HaeIII
– NspI
– SacII
– SalI
– Ladder (2 uL ladder, 2 uL dye)
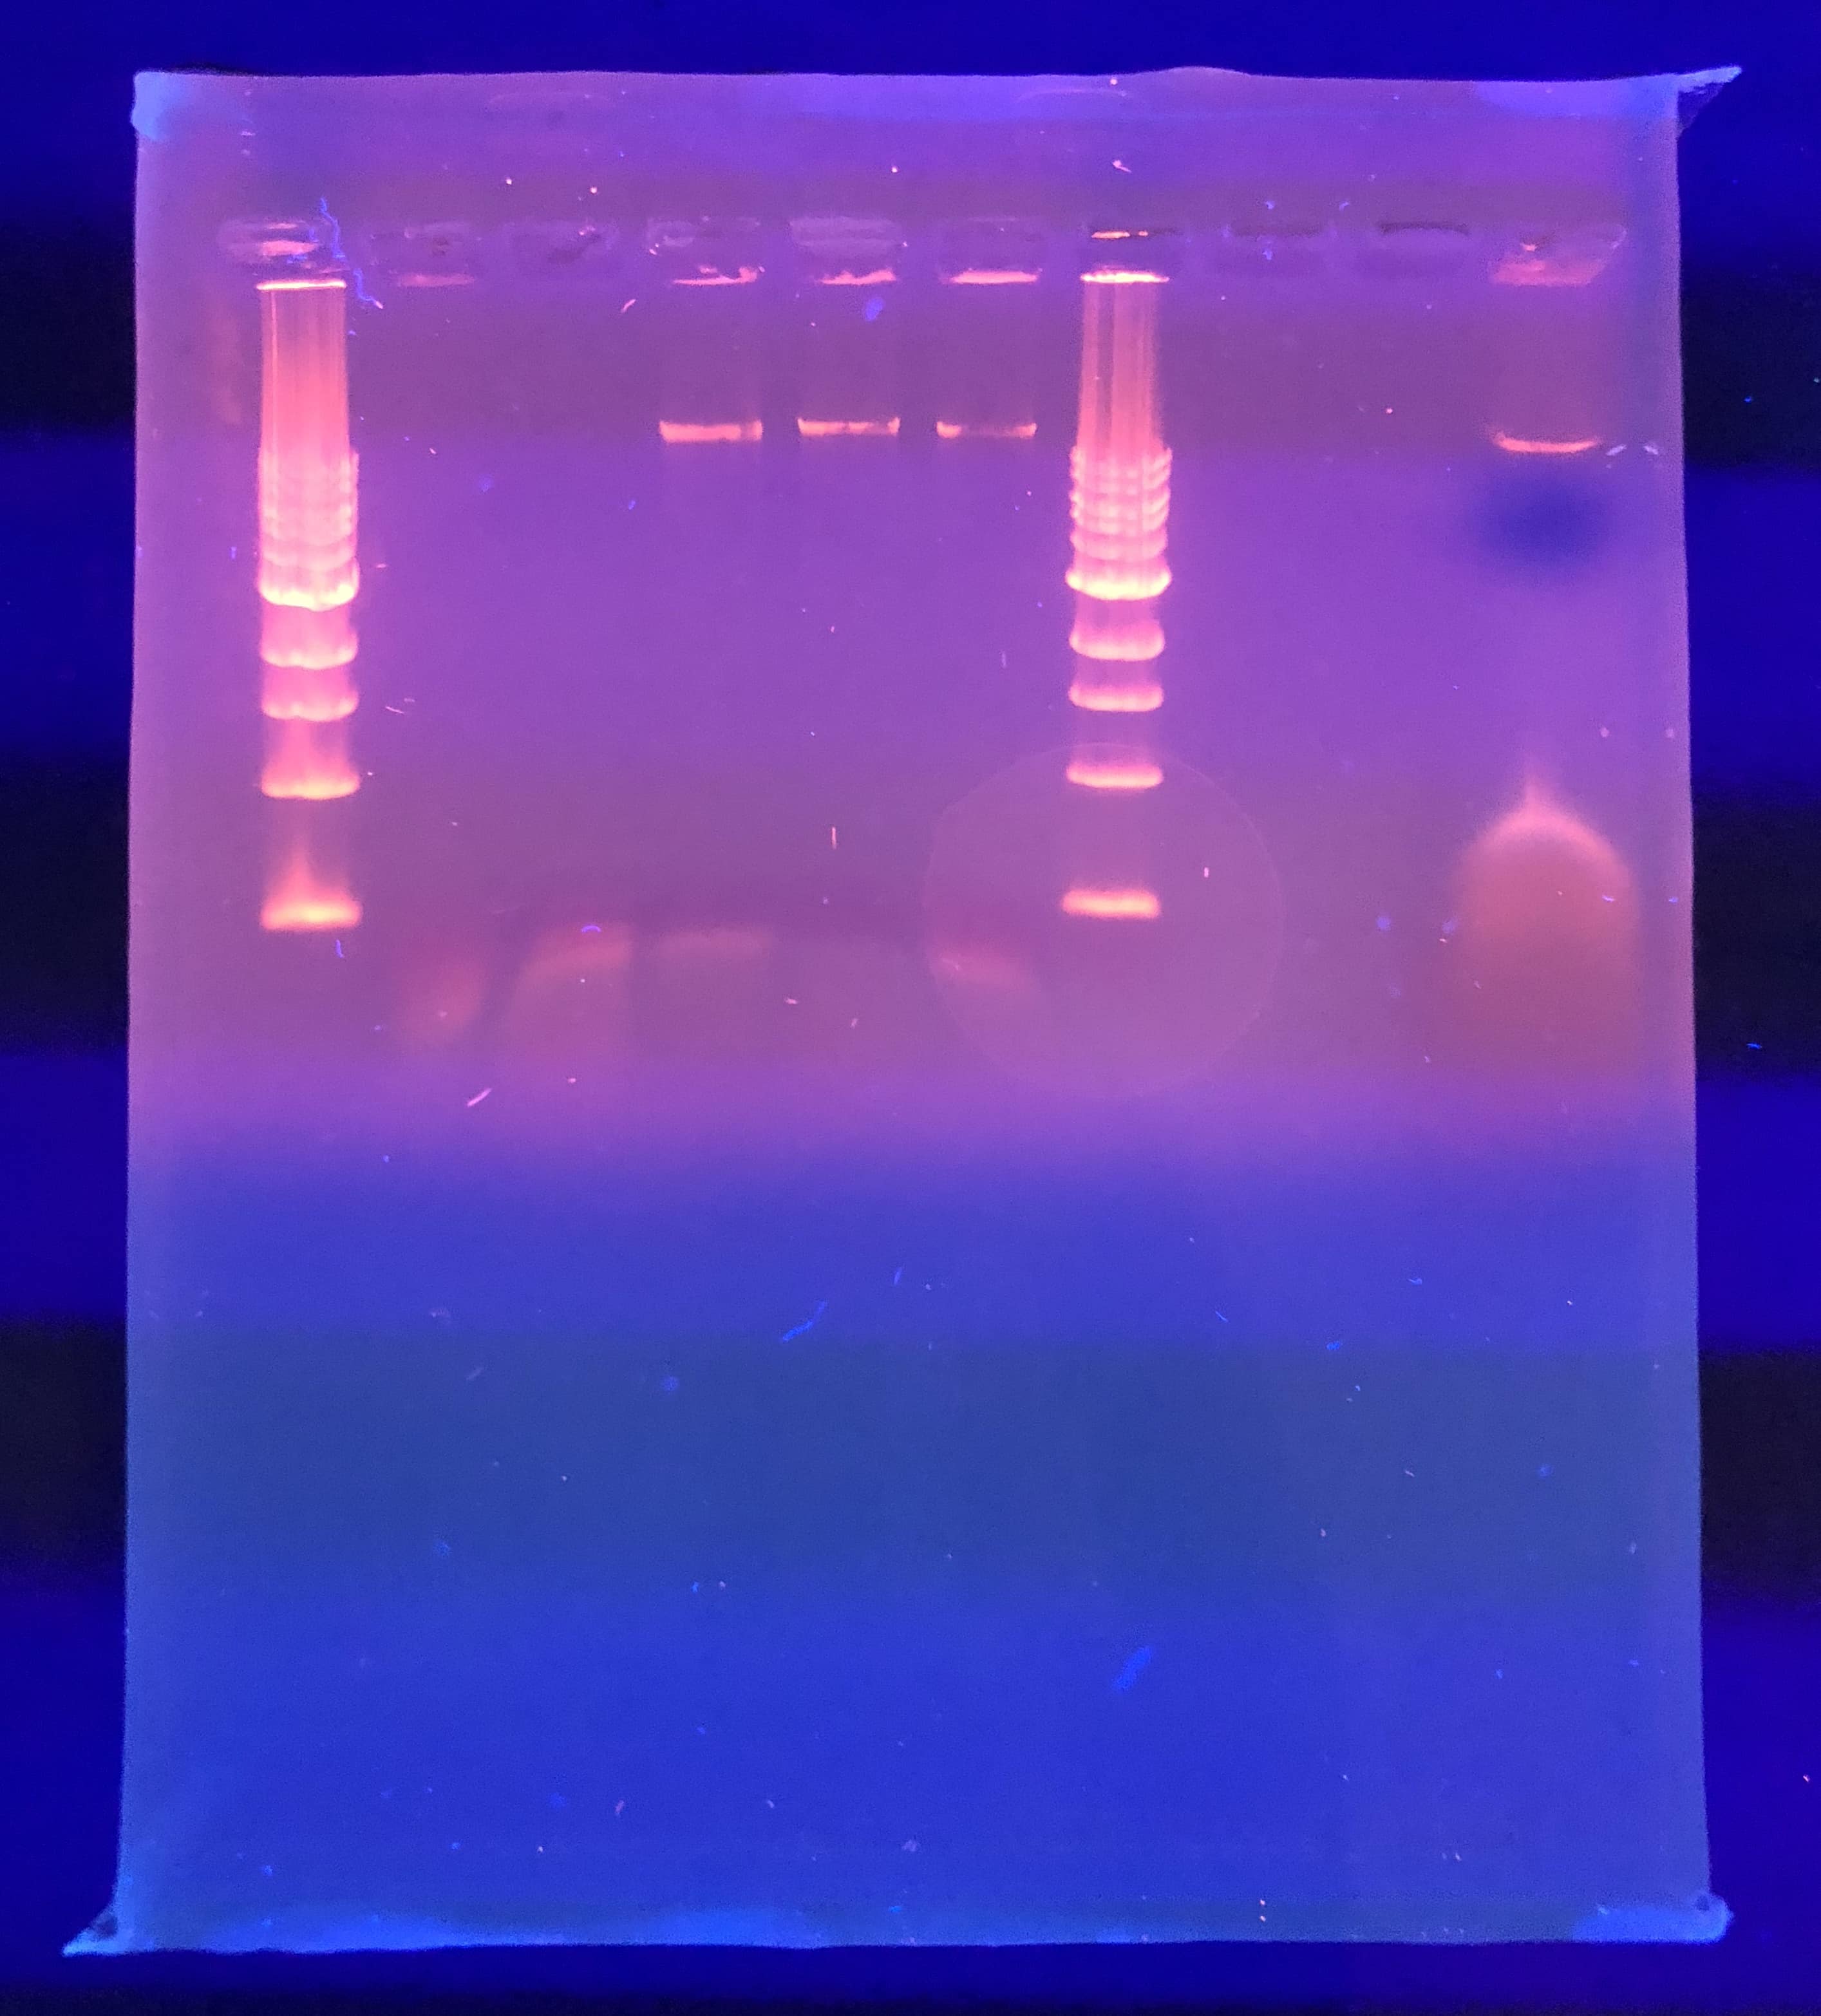
It was odd that the control DNA did not show. We were also expecting better result from NSP. The gel was soaked overnight in buffer to destain some.
Future plans: run a gel again with the same mixture of restriction enzymes to see if we possible punctured the well. If that does not work, we will go back and look at our calculations for diluting our phage DNA
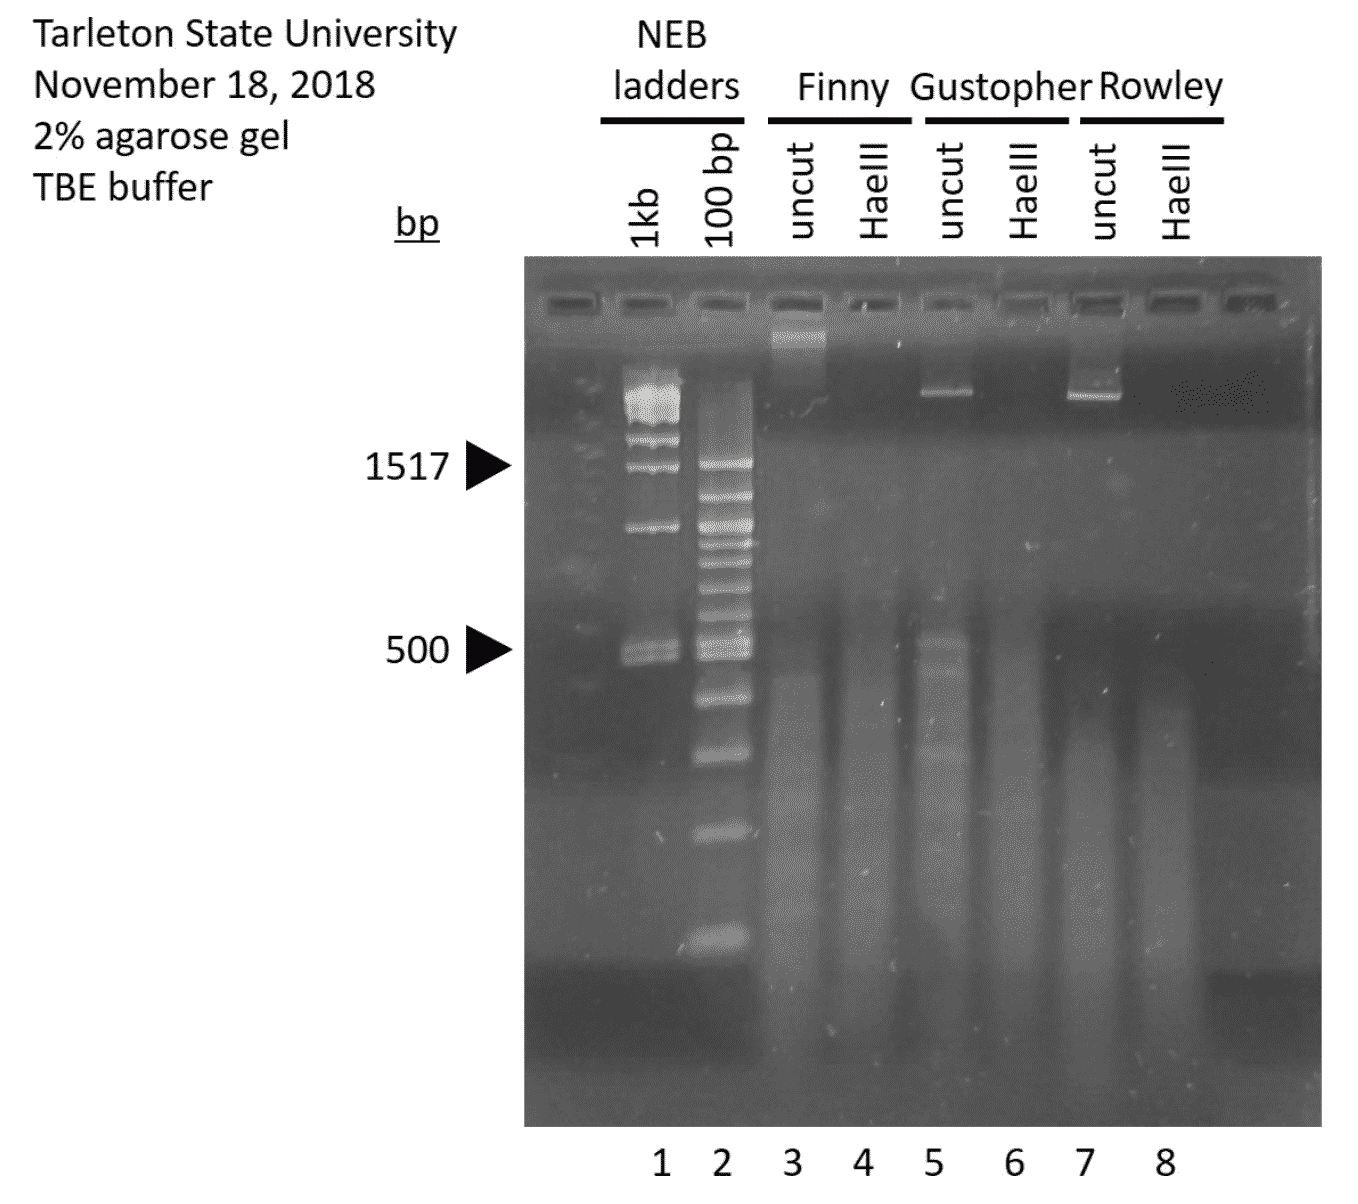
Gel Electrophoresis (11/18/2018)
A new gel was run again. This time, the uncut DNA could be seen.