Discovery of Virsces
Sample Collection
| Collector Name | Joanna Gonzalez | Gustavo Vazques |
| Sample No. | 1 | 1 |
| Date of Collection | September 2, 2019 | September 1, 2019 |
| Sample Type | Water | Soil |
| General Location | Lake | Hay and feed barn |
| Location Description | The sample was collected at Lake Travis in Austin. Water did not have much soil and was relatively clear. | The soil was collected underneath a hay feed sack. The surrounding soil was dry and the area underneath the sack was very humid and damp. |
| GPS Coordinates |
Latitude: 30.231859 Longitude: -97.541439 |
Latitude: 31.9555521 Longitude: -98.327712
|
| Sample Depth | 7 inches from the surface area | Above surface area |
| Ambient Temperature | 32.2ºC | 29ºC |
Isolation/Purification
Direct Isolation
Date Started: Sep. 04, 2019
Redo? Yes
Purpose: Being able to discover if any phages can be identify in an environmental sample by direct isolation protocol.
Notes: On September the 4th 2019, using sample #1 Lake Travis a direct isolation will be performed. The bench was prepared for aseptic work and the supplies were gathered.
Supplies
- Lake Travis sample
- Liquid media* (5 ml/sample) (1x)
- Sterile 5 ml syringe
- 0.22 μm syringe filter
- 5 ml serological pipettes
- Micro-centrifuge tubes
- 15 ml conical tube
- Gloves
- Tube Rack
- Hand Soap
- Butane fuel
- Matches
- Kitty litter
- 100% Ethanol disinfectant
Procedure
Step 1: Using aseptic technique wash hands and wipe down counters and gather all supplies needed that are sealed and sterile in labeled containers. Turn on butane fuel fire.
Step 2: Open package containing the 0.22 μm filter but leave the filter in the package to avoid any contaminants making contact.
Step 3: Use the syringe to remove about 2 mL of liquid from the very top of the 15 mL conical tube containing sample. Solid material within sample should be avoided to prevent clogging of the filter during filtration.
Step 4: Attach the syringe to the top of the filter and then remove from packaging, was screwed on tightly.
Step 5: Depressed the syringe plunger and dispensed 0.5 ml of filtrate onto microcentrifuge tube containing m.follirium. The liquid was not forced quickly through the filter and was very smoothly allowed to flow.
Step 6: The syringe and filter was discarded into waste container. (Plastic into the white container and glass/sharp material into the red container).
Finished at 10:43am and stored in the refrigerator for an hour and forty-seven minutes.
The Plaque Assay protocol was proceeded at 1:13pm on September 4, 2019. This will detect the presence of a phage if any present in sample collected.
Supplies
- Phage sample for isolation
- Host bacteria (250 μl/plate)
- Agar plates
- Phage buffer
- Top agar
- Micro-centrifuge tubes
- 5 ml serological pipettes
Day 1 procedure:
Step 1: Bench was prepared for aseptic work and the supplies were gathered.
Step 2: Host bacteria was inoculated with the phage sample using a serological pipette in order to get 500 μl into the 250 μl m.follirium.
Step 3: Waited 10 minutes to allow attachment
Step 4: Used the 5 ml serological pipette and 3 ml of top agar was pippetted into the host bacteria m.follirum and then quickly sucked back up and poured onto agar plate labeled with date and protocol.
Step 5: Tilted agar plate to allow for even distribution and allowed to sit for 20 minutes undisturbed until agar solidifies.
Step 6: Placed in the incubator overnight.
Results
On September 9, sample was checked for plaques but no visible formation of phages so sample had to be re-plated.
Conclusions and Next Steps:
Within 24-48 hours of incubation plaques should form on agar plate, meaning that sample either had no phage or aseptic technique was not followed through. Next step will be to start on day 2 (check plates for plaques).
September 9, 2019
Notes: Continuing with another direct isolation protocol on sample 1.
Procedure
Step 1: Using aseptic technique wash hands and wipe down counters and gather all supplies needed that are sealed and sterile in labeled containers. Turn on butane fuel fire.
Step 2: Open package containing the 0.22 μm filter but leave the filter in the package to avoid any contaminants making contact.
Step 3: Use the syringe to remove about 2 mL of liquid from the very top of the 15 mL conical tube containing sample. Solid material within sample should be avoided to prevent clogging of the filter during filtration.
Step 4: Attach the syringe to the top of the filter and then remove from packaging, was screwed on tightly.
Step 5: Depressed the syringe plunger and dispensed 0.5 ml of filtrate onto microcentrifuge tube containing m.follirium. The liquid was not forced quickly through the filter and was very smoothly allowed to flow.
Step 6: The syringe and filter was discarded into waste container. (Plastic into the white container and glass/sharp material into the red container).
The Plaque Assay protocol was proceeded at 1:13pm on September 9, 2019. This will detect the presence of a phage if any present in sample collected.
Supplies
- Phage sample for isolation
- Host bacteria (250 μl/plate)
- Agar plates
- Phage buffer
- Top agar
- Micro-centrifuge tubes
- 5 ml serological pipettes
Day 1 Procedure:
Step 1: Bench was prepared for aseptic work and the supplies were gathered.
Step 2: Host bacteria was inoculated with the phage sample using a serological pipette in order to get 500 μl into the 250 μl m.follirium.
Step 3: Waited 10 minutes to allow attachment
Step 4: Used the 5 ml serological pipette and 3 ml of top agar was pippetted into the host bacteria m.follirum and then quickly sucked back up and poured onto agar plate labeled with date and protocol.
Step 5: Tilted agar plate to allow for even distribution and allowed to sit for 20 minutes undisturbed until agar solidifies.
Step 6: Placed in the incubator overnight.
Incubation time: 3:46 pm, the plate did not solidified after 20 minutes.
Results:
On September 11, 2019 check for formation of plaques
Conclusions and Next Steps:
Day 2 was supposed to be continued for Lake Travis sample direct isolation but the plate did not form any plaques.
Was not able to re-plate again because the host bacteria m.follirium ran out.
Direct Isolation
Date Started: September 11, 2019 Redo? Yes
Purpose: To perform direct isolation protocol on sample #2, Pond.
Notes: Protocols for direct isolation technique: 5.2 protocol
Supplies:
- Environmental sample
- Liquid media* (5 ml/sample)
- Sterile 5 ml syringe
- 0.22 μm syringe filter
- 5 ml serological pipettes
- Micro-centrifuge tubes
- 15 ml conical tube
- Gloves
- Tube Rack
- Hand Soap
- Butane fuel
- 100% Ethanol disinfectant
Procedure
Step 1: Using aseptic technique wash hands and wipe down counters and gather all supplies needed that are sealed and sterile in labeled containers. Turn on butane fuel fire.
Step 2: Open package containing the 0.22 μm filter but leave the filter in the package to avoid any contaminants making contact.
Step 3: Use the syringe to remove about 2 mL of liquid from the very top of the 15 mL conical tube containing sample. Solid material within sample should be avoided to prevent clogging of the filter during filtration.
Step 4: Attach the syringe to the top of the filter and then remove from packaging, was screwed on tightly.
Step 5: Depressed the syringe plunger and dispensed 0.5 ml of filtrate onto microcentrifuge tube containing m.follirium. The liquid was not forced quickly through the filter and was very smoothly allowed to flow.
Step 6: The syringe and filter was discarded into waste container. (Plastic into the white container and glass/sharp material into the red container).
Supplies
- Phage sample for isolation
- Host bacteria (250 μl/plate)
- Agar plates
- Phage buffer
- Top agar
- Micro-centrifuge tubes
- 5 ml serological pipettes
Day 1 procedure:
Step 1: Bench was prepared for aseptic work and the supplies were gathered.
Step 2: Host bacteria was inoculated with the phage sample using a serological pipette in order to get 500 μl into the 250 μl m.follirium.
Step 3: Waited 10 minutes to allow attachment
Step 4: Used the 5 ml serological pipette and 3 ml of top agar was pippetted into the host bacteria m.follirum and then quickly sucked back up and poured onto agar plate labeled with date and protocol.
Step 5: Tilted agar plate to allow for even distribution and allowed to sit for 20 minutes undisturbed until agar solidifies.
Step 6: Placed in the incubator overnight.
**Faith said to wait after 1 hour because tubes were not ready. After 2 hours, me and my partner arrived to begin the rest of protocol.
Step 4: Washed hands and disinfected table, put on gloves and grabbed butane can.
Step 5: Prepared a filtrate and a 5mL syringe was attached to the filter. 2mL was removed from pond sample into labeled microcentrifuge tube.
Protocol 5.3 Plaque assay
Supplies
- Phage samples for isolation, purification, or tittering
- Host bacteria (250 μl/plate)
- Agar plates
- Phage buffer
- Top agar
- Micro-centrifuge tubes
- 5 ml serological pipettes
Day 1 Procedure:
Step 1: Bench was prepared for aseptic work and the supplies were gathered.
Step 2: Host bacteria was inoculated with the phage sample using a serological pipette in order to get 500 μl into the 250 μl m.follirium.
Step 3: Waited 10 minutes to allow attachment
Step 4: Used the 5 ml serological pipette and 3 ml of top agar was pippetted into the host bacteria m.follirum and then quickly sucked back up and poured onto agar plate labeled with date and protocol.
Step 5: Tilted agar plate to allow for even distribution and allowed to sit for 20 minutes undisturbed until agar solidifies.
Step 6: Placed in the incubator overnight.
agar plate was then left to sit for 20 minutes and then incubated at Wednesday September 4th 2019 3:55pm.
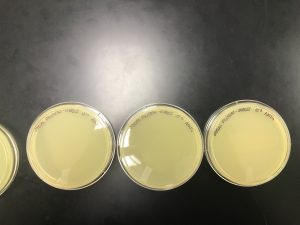
Results:
Agar plate was contaminated and thrown away by Faith, so no results were available. New environmental sample will be obtained by Joanna.
Add the date(s) that the results were obtained. Describe the results and make a table, create a figure, or add an image. This is important because this is your data.
Conclusions and Next Steps:
What can be determined from your data? What should you do next?
Title: Direct Isolation
Date Started: Sep. 9,2019 Redo?yes
Notes: Sample 2 redo direct isolation
the same steps were done for the direct isolation
when the liquid media was added it was the 10x (dark liquid ) we were supposed to use the 1x (light liquid)
when it was incubated the start time was 2:44pm and finished at 4:42pm
The sample was settled for about 6 minutes
The phage filtered was done by aseptic technique, the same steps were done
when we inoculate the host bacteria with the phage sample we waited 10 minutes from 4:54 pm-5:04 pm. we plated the sample and waited for 20 minutes for it to solidified. the time that it was incubated was at 5:27 but the agar was moving it was not solidified.
Title: Enriched isolationdure
Date Started: Sep. 04, 2019 Redo? No
Purpose: enriched isolation on sample #3
Notes:
Supplies:
- Solid environmental sample
- 0.22 µm Corning ® Tube-Top Vacuum Filter Systems or syringe filters
- Liquid media*
- 10X liquid media (if using liquid environmental samples)
- Baffled Erlenmeyer flask, Erlenmeyer flask autoclaved with pipette tips in the bottom, or 50 ml sterile conical tubes
- Sterile 5 ml syringes (if needed)
- 0.22 μm syringe filters (if needed)
- Microcentrifuge tubes
- Host bacteria (500 μl)
step 1: Extract phages from a soil sample by filling a 50 ml conical tube with environmental sample to the 15 ml mark. Added liquid media to the 35 ml mark and vortex. sample was then shaken at ~250 rpm for 1–2 hours.
sample was filtered through a 0.22 µm filter to remove unwanted bacteria and soil particles
25mL of liquid in sample was collected through a sterile 50 ml sterile conical tube.
Added 0.5 ml of bacterial host culture to the flask or conical tube.
- Incubated the conical tube at 3:42 pm on wednesday September 4th 2019, shaking at 220 rpm for 2–5 days.
What did you do? Type out the protocols that you are doing, how you did them, and when you did them. Make notes to remind you of what you did, or what you need to do. If you did something different than normal, it is important to write that down.
On September 9. 2019
we started on the enriched isolation, the solution looked like a yellow/cloudy color.
Step 1: was to transfer 1.4 ml of your enriched culture( big orange tube to a micro centrifuge tube).
Step 2: two micro centrifuge tubes, each with 1.4 ml of enriched culture.
Step 3: the micro centrifuge tubes were spinned at a high speed for 1 minute to pellet the bacteria (little cream dot was at the very bottom of the tube)
Step 4: the supernatural was transfer into a clean micro centrifuge to avoid the bacterial pellet.
Step 5: closed immediately and stored at 4 degrees celsius
Step 6: label the plates and spot plate(did two for extra)
First plate
negative control (phage buffer)
#1
#2
second plate
negative control (phage buffer)
Step 7: top agar and host bacteria into the agar plate and waited 20 minutes to solidified
Step 8: spot were done with the (010 yellow pipette with the white tips provided)
Step 9: once the spots were spotted we waited 15 minutes
Step 10: the first plate was placed in the incubator at 11:52 am and the second plate was placed in the incubator at 12:00 pm
Results:

Conclusions and Next Steps:
What can be determined from your data? What should you do next?
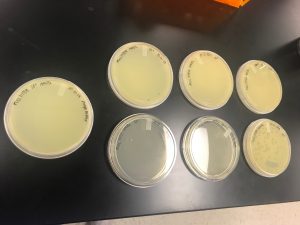
September 16th 2019.
After samples 1-3 showed no signs of plaque formation, Joanna gathered 3 new environmental samples from cedar ridge preserve, joe pool lake and a pond.
Direct Isolation Sample 4: Cedar ridge
Date Started : Sep.16, 2019 Redo? no
On Monday a direct isolation protocol was performed on cedar ridge preserve sample.
step 1: aseptic technique was performed on lab benched and sterile materials were acquired.
step 2: using a 15ml conical tube, half of environmental sample was trasnferred to new sterile tube and half filled to 7mL mark. 3mL of pyca liquid media was added and inverted several times to ensure it was mixed throughly.
step 3: tube was labeled and placed in a shaking incubator for 1-2 hours at 250 rpm at 10:58 am.
step 4: tube was taken out of incubator at 12:38 pm and was allowed to sit for 10 minutes until particle matter settles.
step 5: sample was then filtered into microcentrifuge tube with syringe and .22um filter removing 2mL of top liquid suspended above particle matter at the bottom of tube.
step 6: plaque assay protocol was then performed and prepared for by using aseptic techniquue and gathering sterile materials.
step 7: microcentrifuge sample is inoculated with host bacteria, m. folorium, and dispensed into culture tue containing host. tube was then mixed by gentle tapping and then allowed to sit for 10 minutes to allow attachment.
step 8: using a sterile pipette 3mL of hot agar from labeled agar bottle was trasnferred into culture tube and then sucked up to be trasnferred onto agar plate labeled with isolation type and date. Plate was tiltled in multiple direction to allow hot agar to spread evenly.
step 9: two agar plates were then put into incubator at 1:36 pm and one at 1:41pm.
on Tuesday, 9/17, check for plaque formation.
enriched isolation
An enriched isolation was also performed on cedar ridge sample.
step 1: filled a 50ml conical tube by adding 15mL of environmental sample and then adding 20mL of liquid media
step 2: sample was then placed in shaking incubator at 11:07am and removed at 1:02pm and then placed in a centrifuge for 10 minutes to pellet the bacteria
step 3: sample was then filtered thought a .22um filter and syinge in a 50mL conical tube.
step 4: sample was then seeded with host bacteria by adding .5mL of bacteria into conical tube and then transferred to shaking incubator at 1:28 pm for 2-5 days. Tube was left slightly opened to be properly aerated.
On: 9/18/2019
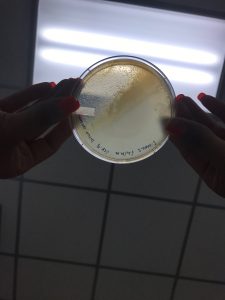
after checking both direct it was determined that neither yielded any plaques for purification so we are faced with adoption of a phage.
enriched isolation was plated after being in shaking incubator for two days. Following the enriched isolation day 2 protocol, the supernatant was filtered into micro centrifuge tube and then shaken to pellet bacteria. After seeing supernatant as cleared we skipped the “extra step” to filter solution and then proceeded to begin the spot test and plate enriched sample.
On:9/19/2019
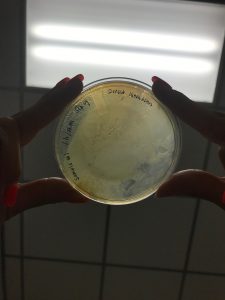
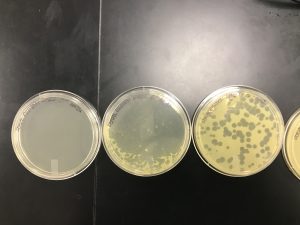
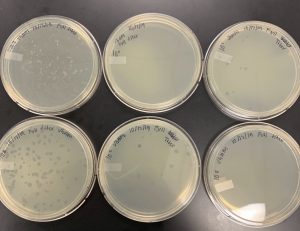
enriched isolation showed plaque formation, but was then characterized as bacterial growth and not actual phage formation.
[PICTURE]
On:9/20/2019
As a final attempt, the Joe Pool lake sample will be used to begin two direct isolation samples.
Followed direct isolation protocol as stated.
Joe pool sample was half transferred to a new conical tube and both tubes had liquid media added to them and then moved to the shaking incubator for 1-2 hours.
Incubated at 11:01 am. Tube was then filtered with .22um and syringe, 2mL of liquid was then removed and trasnferred into labeled microcentrifuge tube.
The sample was then inoculated with host bacteria, m. folorium, and then left undisturbed for 10 minutes.
Hot agar was then added to mixture and then quickly plated onto labeled agar plate and allowed to sit for 20 minutes. 1:35 pm. was allowed to sit until 2:00 pm and then icubated at 2:00 pm.
Will check results and hope for phage formation on 9/23.
On September 23, 2019
The final attempt did not contain any plaques on both of the plates. We believed that our samples were collected from a body of waters that are overseen from the city, it may have something to do why we could not be able to plate plaques.
On September 23, 2019
Me and my partner adopted a sample phage from Gus and sam.
Step 1: In the phage purification, the bench was prepared for aseptic work and the supplies were gathered. In the phage sample there are plaques, we drew a circle around the plaque of interest on the bottom of the plate and was labeled
Step 2: A microcentrifuge tube was used and labeled according in the identification of the plaque that was chosen. Using aseptic technique 100 ul of the phage buffer into the microcentrifuge.
Step 3: With the plaque that was chosen, a sterile tip was placed onto a pipette. The pipette was hold perpendicular to the agar surface and gently stab the top agar in the center of the plaque ( avoiding not to touch the bacteria that was surrounding the plaque). Carefully not touching the sterile tip with anything to avoid contamination, the end of the tip was placed into the phage buffer into the microcentrifuge tube. The tip was tapped on the wall of the tube and pipetted up and down to dislodge phage particles. The tip was discard and the microcentrifuge tube closed tightly and was mix well by vortex.
Serial Dilution:
In this procedure it prepares liquid phage sample of decreasing concentration. In the serial dilution it purifies, amplify and titer the phage. When the 10-fold, it concentration of phage in each tube which is 10 time less than the previous tube. The supplies for this protocol are phage buffer, the picked plaque and microcentrifuge tube.
Step 1: The 10-fold serial dilution was set up, the microcentrifuge were arrange in the rack and label from 10^-1, 10^2, 10^3 and so on. In the first microcentrifuge(10^0) 100 ul of the phage buffer was added in the remaining 90 ul of the phage buffer was added.
Step 2: 10-fold serial dilution was preformed. On the 10^1, 10 ul of the undiluted phage sample(10^0) was added and vortex well. The process was continued for each (10^1 to 10^2 and so on). Each tube was vortex well making each one diluted) and a clean pipette tip was used for each transfer.
Plaque Assay:
In this process, it detected the presence of phages. The supplies for this protocol are phage sample, host bacteria, agar plate, phage buffer, top agar, microcentrifuge tubes, and 5 ml serological pipette.
Step 1: Nine host bacteria was gathered, in each host bacteria 10 ul of serial dilution of picked plaque.
Step 2: Each host culture was mixed by gently swirling the tube and allow the sample to sit undisturbed for 10 minutes to allow for attachment.
Step 3: After allowing to sit for 10 minutes, each tube contained 3ml of top agar and was placed into plates.
Step 4:All the plated were allowed for 20 minutes for the top agar to solidified. Once they were solidified they were inverted and placed in the incubator.
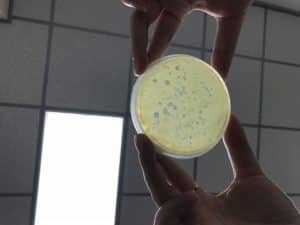
Results:
10’0 through 10’4 were incubated at 11:46 am and 10’5 through 10’8 were incubated at 11:48 am. The top agar was starting to solidified from 11:19 am through 11:28 am

On September 25, 2019
A second serial dilution was preformed. Using the plate 10’2 from the first serial dilution done on 9-23-19.
Step 1: The bench was prepared for aseptic work and the supplies were gathered. In the phage sample there were also plaques, a circle was drawn around the plaque that we were going to do the second serial dilution.
Step 2: A microcentrifuge tube was used and labeled. Using aseptic technique 100 ul of the phage buffer into the microcentrifuge.
Step 3: With the plaque that was chosen, a sterile tip was placed onto a pipette. The pipette was held perpendicular to the agar surface and gently stab the top agar in the center of the plaque. Carefully not touching the sterile tip with anything to avoid contamination, the end of the tip was placed into the phage buffer into the microcentrifuge. The tip was tapped on the wall of the tube and pipetted up and down to dislodge phage particles. The tip was discarded and the microcentrifuge tube closed tightly and mix by using the vortex.
Second Serial Dilution:
Step 1: The 10-fold serial dilution was set up, the microcentrigue were arranged in the rack and labeled from 10’0 to 10’6. In the first microcentrigue 100 ul of the phage buffer was added and in the other 10’1 to 10’6 90 ul of the phage buffer was added.
Step 2: The 10-fold was preformed, on the 10’1 microcentrigue 10 ul of the undiluted phage sample which is the 10’0 was added and vortex well making each one diluted as well a clean pipette tip was used for each transfer to avoid contamination.
Plaque Assay:
Step 1: Seven host bacteria were gathered, in each host bacteria 10 ul of the second serial dilution of picked plaque.
Step 2: Each host culture was mixed by gently swirling the tube and allow the sample to sit undisturbed for 10 minutes to allow for attachment.
Step 3: After allowing to sit for 10 minutes, each tube contained 3 ml of top agar and plated.
Step 4: All the plates were allowed for 20 minutes for the top agar to solidified. Once they were solidified they were inverted and placed in the incubator.
10’0 through 10’6 they were solidified from 10:59 am to 11:05 am, they were all incubated at 11:30 am
Results:
On Friday the 27th, the plates will be checked

On September 27, 2019
A collection plate lysates was preformed, In the phage are collected to generate concentrated phage solution which is called lysate. The way that lysate was collected is done by flooding the plate with phage buffer(webbed plate). The supplies used are Webbed plate with clonal phage population, phage buffer, 0.22 um filter, 5 ml syringe and 15 ml sterile conical tube to storage the lysate.
Step 1: The bench was prepared for aseptic work and the supplies were gathered.
Step 2: The webbed plates using the 10’1 from the second serial dilution
Step 3: Phage buffer (8 ml) was applied to the webbed plate. Once the phage buffer was applied it was sat at room temperature from 10:17 to 1:06
Step 4: The harvest of the plate lysate was done. Using the lid of the plate it was placed on the bench to allow the plate to slightly be tilted, allowing the lysate to pool to one side.
Step 5: Using 0.22 um filter and 5 ml syringe aspirate to suck up the lysate from the plate.
Step 6:The lysate that was suck up with the syringe was collected in the 15 ml sterile conical tube.
Step 7: The lysate that was in the 15 ml sterile conical tube was labeled and storage, the webbed plate was parafilm and stored.
On September 30
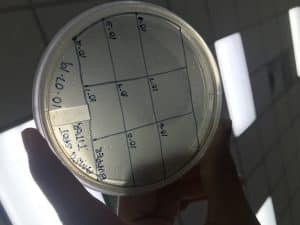
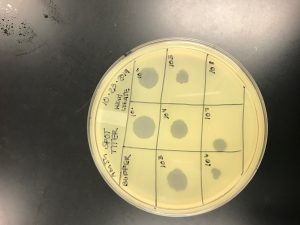
The spot titer was preformed, which was able to determine the concentration of phage particles in a lysate using the spot test.
Step 1: The bench was prepared for aseptic technique work and supplies were gathered.
Supplies: lysate for titering, agar plate, host bacterial culture, top agar, phage buffer, microcentrifuge tubes and 5 ml serological pipettes.
Step 2: An agar plate was labeled for spot titer.
Step 3: Using aseptic techniques, using the 5 ml pipetter, 3 ml of top agar was transferred into the 250 ul of host bacteria and draw the solution back into the same pipette to dispense the mix agar and bacteria mixture onto the agar plate, allowing it to sit for about 10 minutes to solidified.
Step 4: Another serial dilution was preformed with the lysates. (10^-1 to 10^8)
Step 5: The microcentrifuge tubes were labeled, and the 10^-0 was the negative control( phage buffer)
Step 6: The plate was spotted with dilution and negative control. Using 3 ul to transfer all the samples on to the proper location on the bacterial lawn. (using a different pipette to avoid contamination)
Step 6: The liquid from the spots were allowed to absorb into the agar for about 30 minutes.
Step 7: The plate was incubated right side up for 48 hours.
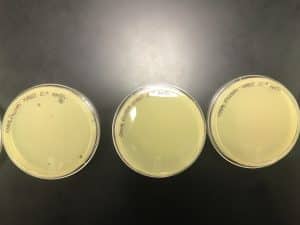
Results:
On October 2, The plates were check to count the number of plaques.
The total number of phage particles in the lysate is calculated by the preforming of serial dilutions. In the spot test each of the dilution were able to count the number of plaques that were formed.
One of the plates got contaminated and the other plate we had plaques in the negative control section.


On October 2, The spot titer was done again. In the bag of the plates some of those were contaminated, we selected one that did not have anything which did not appear to be contaminated and Dr. Edwards said it was okay to continue the experiment to see if it was the plates that were contaminated or the top agar.
On October 4, Did not replate anything due to contamination. I and my partner will replate on Monday the 7th.
On October 7, We re-plated the spot titer, with the new top agar that was provided and plates. The plates were checked on October 9 but there was still contamination. We did not replate anything until further notice.
On October 14
The procedure of the spot titer was done again, we check on the 15 for results. On the 15 when we checked in the result there was something in their buffer box. To know if the spot titer was good to go, nothing has to appear in their buffer box.
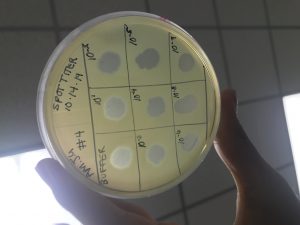
On October 16
We decided to use a new buffer and once again plate. The results were checked on the 17.
On October 17
Once we got positive results, we started the full plate titer.
In the full plate titer, it can determine the concentration of phage particles in a lysate by using the plaque assay. It’s a method that determines the number of infectious phage in a liquid sample. To count the total number of phage particles in the lysate it is able to calculate by performing serial dilution, then counting the number of plaques formed.
On October 18
We added phage buffer 10^4 on the full titer in order to flood the web plate. Someone bumped into our plate and we had to re plate the serial dilution.
On October 21
The full titer was re-plate and was checked on October 22. We flooded the web plate to collect the high lysate (10^3).
On October 23 , we plated the spot titer of the high lysate as well as the serial dilution.
Amplification


Title: Procedure
Date Started:September 27, 2019 Redo? Yes
Purpose: Conducting serial dilutions in order to get a webbed plate that can be flooded to begin titers (full and spot)
Notes:
Week of 10/21-10/25
10/21/2019
- Lab math on full titer plates
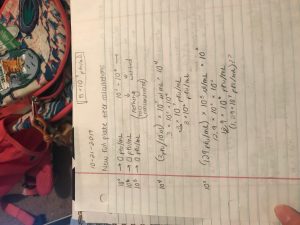
- 5×10^9 must be at this concentration in order to begin DNA extraction
- Webbed plate was flooded with 8ml of phage buffer and allowed to sit for two to four hours.
- HAD TO REDO PLATES because someone split flooded webbed plate from 1st full titer done
- Incubate time of second full titers: 2:35pm
- Check at 5pm tomorrow, to allowed 24 hours incubation as per protocol.
10/22/2019
- Full titer plates came out well, with the webbed plate being a 10^2 dilution.
- Flooded web plate with 8ml phage buffer and allowed to sit at room temp for two to four hours.
- Collecting lysate at 5:05pm after two hours at rooom temp.
- 5.4 ml of lysate collected, will conduct another serial dilution using collected lysate to amplify phage concentration.
10/23/2019
- Conducted a full titer using serial dilutions from the lysate collected
- Conducted a spot titer using serial dilutions from the lysate collected
- Will collect lysate from this webbed plate of full titer and calculate phage count based on plate after webbed plate.
- 10/24/2019
- Spot titer ran through 10^1-10^7
- Did calculations for new full titer of 10/23, used 7.1 protocol to get accurate webbed plate titer to get a larger number of phage
- 7 plates 10^4, 10^5, 10^6 had plaques
- 6 ul and 12 ul increments instead of 10ul as per 7.1 protocol of how to get a more accurate webbed plate
- Will check friday morning, but will leave so will tell faith to parafilm and store
- Incubate time: 6:53pm
Results:
Conclusions and Next Steps:
What can be determined from your data? What should you do next?
Title: Procedure
Date Started:Sep. 04, 2019 Redo? yes/no
Purpose: State in a couple of sentences what you are trying to do and why you are doing it.
Notes:
What did you do? Type out the protocols that you are doing, how you did them, and when you did them. Make notes to remind you of what you did, or what you need to do. If you did something different than normal, it is important to write that down.
Results:
Add the date(s) that the results were obtained. Describe the results and make a table, create a figure, or add an image. This is important because this is your data.
Conclusions and Next Steps:
What can be determined from your data? What should you do next?
DNA Extraction
Title: DNA Extraction Protocol 3-5
Date Started: Nov 01 2019, 2019 Redo? yes/no
Purpose: DNA extraction using lysate collected that has 5×10^9 concentration to get phage DNA in order to characterize it.
Notes:
Protocol 3-5:
Alternative DNA Isolation Protocol using ZnCl2 Solutions
Equipment required:
5ml lysate, 2 Microcentrifuges, Nuclease mix (DNAaseI + RNAaseA), 0.5M EDTA, heat block, 2M ZnCl2 (filter sterilized), Ice, TES buffer, Nanodrop 0.1M Tris-HCl, .1M EDTA, 0.5% SDS 10mg/mL, Proteinase K, 3M potassium acetate, Isopropanol, 70% ethanol, Nuclease-free water
Day One
1. Gently mix your HVL, then aliquot 5mL of your lysate into a 15 mL conical tube. Give that tube to a GSI or TA who will add 20uL of nuclease mix for you.
2. Once nuclease has been added, gently invert the tube and incubate at 37°C for 10min.
3. Aliquot lysate into 5 microfuge tubes, 1mL each.
4. To each tube, add 20uL of ZnCl2, mix gently by inversion, and incubate at 37°C for 5min. This “precipitates” the phage.
5. Centrifuge at 10,000rpm for 1min to pellet the phage.
STEPS 6 and 7 MUST BE DONE QUICKLY AND EFFICIENTLY
6. KEEP THE PELLET. Remove supernatants by aspiration, but try not to disturb the pellet. Discard the liquid filled pipette tips in the sharps trash.
7. Resuspend pellets in 500uL TES buffer per tube, and incubate at 60°C for 15min. This will denature the capsids, exposing the DNA, while protecting it from the nuclease activity (EDTA in the TES sequesters divalent cations required for nuclease function).
8. Add 1uL of Proteinase K and mix gently. Incubate at 37°C for 10min to completely eliminate any residual nuclease activity.
9. Add 60uL of potassium acetate to each tube. Mix well and leave on ice for 15min. A white, dense precipitate will form. This represents your capsids.
10. Centrifuge at 4°C for 1min at 12,000rpm to pellet the capsids. KEEP THE SUPERNATANTS containing your DNA, and place into new microfuge tubes. You can throw away the tubes with the pellets.
11. Add 500uL of isopropanol to each of the tubes with the supernatant, mix, and leave on ice overnight (or until next lab).
Day Two
12. Centrifuge at top speed for 10min to pellet DNA, and discard the supernatant into a WASTE tube. It is OK if you do not see a pellet.
13. Add 250uL of 70% ethanol in each tube, and spin again for 1min, at top speed. This washes your DNA pellet. Discard supernatants into a WASTE tube.
14. Dry the DNA pellets at room temperature by turning upside-down onto paper towels, tapping out excess liquid, and leaving upside-down until pellets begin to turn clear. The tubes can also be placed in a fume hood or 30⁰C incubator to help with drying. DO NOT RUSH THIS STEP! If not dry enough, you will NOT recover enough DNA!
15. Resuspend the first pellet in 50uL nuclease-free water. Then use that solution to resuspend the next pellet. Continue until all 5 pellets have been resuspended in the same 50uL of water.
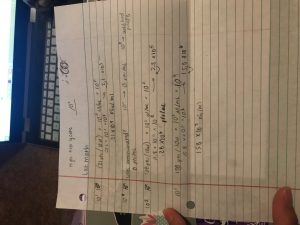
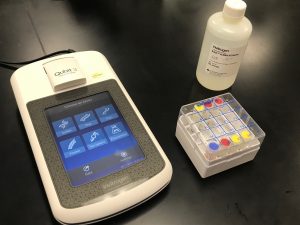
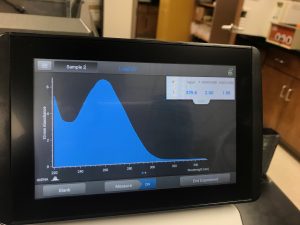
16. Check DNA concentration and quality (A260:280 and A260:230) with the Nanodrop.
17. Record the DNA concentration and A260:280 and A260:230 ratios in your notebook!!
Results:

Conclusions and Next Steps:
Restriction enzyme digest protocol 10.1
Title: Procedure
Date Started:Sep. 04, 2019 Redo? yes/no
Purpose: State in a couple of sentences what you are trying to do and why you are doing it.
Notes:
What did you do? Type out the protocols that you are doing, how you did them, and when you did them. Make notes to remind you of what you did, or what you need to do. If you did something different than normal, it is important to write that down.
Results:
Add the date(s) that the results were obtained. Describe the results and make a table, create a figure, or add an image. This is important because this is your data.
Conclusions and Next Steps:
What can be determined from your data? What should you do next?
Characterization
Title: Restriction Enzyme Digest
Date Started: November. 04, 2019 Redo? yes
Purpose: The restriction enzyme digest can cut a phage genome into multiple fragments based on the DNA sequence.
Supplies:
- Phage DNA
- 37ºC water bath
- 65ºC heat block
- Microcentrifuge tubes
- Restriction enzyme
- Buffers
Notes:
Step 1: The genomic DNA was prepared, gently the DNA sample was mixed by vortexing it on low. Then it was incubated at 65ºC for 10 minutes and quickly placed into ice. The tube was quickly spin in a microcentrifuge for less than 1 minute in order for the liquid to move to the bottom of the tube.
Step 2: The concentration of the DNA sample was used to calculate the volume of the sample. The restriction enzyme digest reaction was set up, below is a chart on the solution and the volume used.
Table:
| Tube 1 | Tube 2 | Tube 3 | Tube 4 | Tube 4 | Tube 5 | |
| Sterile ddH2O | 5.3 ul | 5.3 ul | 5.3 ul | 5.3 ul | 5.3 ul | 5.3 ul |
| 10x Reaction Buffer | 1 ul | 1 ul | 1 ul | 1 ul | 1 ul | 1 ul |
| Restriction Enzyme | 1 ul | 1 ul | 1 ul | 1 ul | 1 ul | 1 ul |
| Phage Genomic DNA | 2.7 ul | 2.7 ul | 2.7 ul | 2.7 ul | 2.7 ul | 2.7 ul |
Step 3: The contents were mixed in each tube and quick the tube was quickly spined in a microcentrifuge for less than 1 minute for all the liquid to the bottom of the tube.
Step 4: The tubes were incubated at 37ºC for an hour.
Step 5: The microcentrifuge was spin for less than a minute to move all the liquid to the bottom of the tube and was store at -20ºC until it was ready to use.
Results:
In the table above, it shows the amount that was in each tube that was done in the restriction enzyme gel.
Conclusions and Next Steps:
Use the restriction enzyme in the gel electrophoresis.
Title: Casting Agarose Gels
Date Started: November. 05, 2019 Redo? yes
Purpose: Able to prepare an agarose gel for electrophoresis. The gel electrophoresis is a method of separating DNA fragment according to size. The gel was prepared using the polymer agarose with a powder and suspended in liquid buffer as well melted before used. The concentration of agarose that is needed in the gel depends on the size of the DNA fragment to separate.
Supplies:
- Agarose
- 1X TBE buffer
- DNA dye
- Erlenmeyer flask
- Electrophoresis apparatus and power supply
Notes:
Step 1: A 0.8% agarose gel was poured to cover the tips of the gel combs by ~2-3 mm. Agarose powder was weight out and transfer to an Erlenmeyer flask. The appropriate volume of TBE buffer was added to the agrose powder, swile gently to mix. The mixture was heated in the microwave until it boils once it has boiled the heating was stopped. Using a heat resistance glove the flask was removed carefully from the microwave. Gently, the mix was swirl and then the solution was examine for small transparent clumps.
Step 2: The solution was allowed to cool between 50-60ºC (warm enough that was able to touch) waited about 10-15 mintues.
Step 3: Once the solution was cool enough, using latex gloved the gel dye was added. The gel dye that was used was ethidium bromide.
Step 4: The agarose and ethidium bromide mixture was poured into the prepared gel apparatus, carefully not to introduce any bubles. Then the combs were inserted to the case the wells.
Step 5: The gel was allowed to cool for 30 minutes
step 6: Once the gel has solidified, the combs were removed carefully by removing them slowly straight up. Then still being carful the gel platform was lift out of the casting tray.
Step 7: The platform is placed with the solidified gel into the gel box. The well is at the negative cathode end of the box where the black lead is connected.
Step 8: The 1X TBE buffer was pour into the gel apparatus until the gel is submerged by ~1/4 inches of buffer.
Conclusions and Next Steps:
The samples were loaded and runned by gel electrophoresis.
Title: Gel Electrophoresis of Restriction Enzyme Digests
Date Started: November. 07, 2019 Redo? yes
Purpose: Able to separate DNA fragments through the agarsoe gel electrophoresis. The DNA fragments are separated by size using the agrose gel. When it is being exposed by an electric current the DNA molecules migrate through the gel since it runs negative charge. The smaller the fragments they are able to move quickly than the large fragments. After the electrophoresis, the gel illuminates using the specific wavelength of light to visualize the stained DNA.
Supplies:
- Pre-poured agarsoe gel
- DNA loading dye
- Electrophoresis apparatus and power supply
- DNA cut with restriction enzymes
- DNA ladder
Notes:
Step 1: Using gloves the gel electrophoresis equipment was set up with a gel prepared.
Step 2: The restriction enzyme digest samples were prepared for eletrophoresis, by adding 5 ul of concentrated 6x loading dye to each 25 ul restriction enzyme sample.
Step 3: The samples were placed 65 C in the heat block for 5 mintues. Once the 5 mintues were done the samples were placed immediately on ice to cool and then spin them in a microcentrifuge for 15 seconds at 10,000 rpm to prevent annealing of the cohesice ends of phage DNA.
Step 4: The gel was load in order by,
(1) Ladder
(2) Uncut DNA
(3) Enzyme -1
(4) Enzyme -2
(5) Enzyme -3
(6) Enzyme – 5
Carefully the gels were load to the proper volume of DNA ladder. Using a new tip on the micropipettor for each samples, 20 ul was pipetted of each RE reaction into the well in the order that is above.
The pipette was hold with both hands, and elbow was place on the table for support. The phone flash was placed under the wells for an easier visual. The pipett tip was place directly above the well just below the surface of the buffer. Then slowly the pipetter plunger was depress, allowing the solution to go slowly into the well. The pipette was removed for the gel before releasing the pluger.
Step 5: The electrodes were plugged to the appropiate locations on the power supply. The power was turned on and the voltage was set to 100 V.
Step 6: The gel was run until the bule dye front migrated at leat 3.5 inches for the well, which should take about an hour and then once is has completed the power supply was turned off.
Step 7: Using golves, the gel was carefully removed from the electrophresis chamer. The gel was photographed.
Step 8: Clean up the work area, the buffer was poured into the sink and the gel apparatus was rinse out and set aside to air dry. The gel was disposed into the trash.
Title: Analyzing Restriction Enzyme Gel
Date Started: November. 08, 2019 Redo? no
Purpose: The DNA fragments of the phage genome was cleaved by the restiction enzyme that is able to separate by size using the gel electrophoresis. As the results are series of DNA bands on the gel that is relflects the size of each DNA fragments. The number of the DNA fragments as well as the size of each fragment is a genetic “fingerprint” of the phage and used for diagnostic tool for comparing phages.
Supplies:
- Photo of the gel
- Ruler
- DNA ladder with band sizes
Notes:
Step 1: A digital image was obtain of the gel, each lane was labeled according to the order that the gel was load.
Questions:
Is there DNA in each lane?
Did each restriction enzyme cut the Phage DNA?
Which restriction enzyme cut the most/ least?
Is there a problem with the gel?
Step 2: The band size were calculated byt using a ruler to draw a line on below the gel photo, the line reference for the measuring distance migrated by the DNA
Results:
The results in our gel were not that great, it was hard to identify. Not knowing what went wrong there was a problem when the restriction enzyme was preformed or when the gel was done.