Discovery of EarlyBird
EarlyBird Information
Morphology: Siphoviridae

Sample Collection
32.211232.28
| Collector Name |
Alyssa Reza | Kelci Hill | Kelci Hill | Alyssa Reza | Kelci Hill |
| Sample No. | 1 | 2 | 3 | 4 | 5 |
| Date of Collection | 8/30/2023 | 08/29/2023 | 09/05/2023 | 09/06/2023 | 09/13/2023 |
| Sample Type | Soil | Soil | Soil | Soil | Soil |
| General Location | Fireside District Apartments | Bosque River Trail | West End Cemetery | Fireside District Apartments | South Blakeney |
| Location Description | Behind main office | About 0.2 miles from the beginning of the Bosque River Trail, located on the left side of the sidewalk | Located at the SoutWest end of the cemetery | In the back of the apartment parking lot | In backyard of house after rainfall. |
| GPS Coordinates | 32.2112, 98.2267 | 32.2159737, -98.1969095 |
32.2097817, -98.2206256 |
32.2112, 98.2267 |
32.20844, -98.2227077 |
| Sample Depth | inch below the surface | about an inch below the soil surface level | about half an inch below the soil surface level | about an inch below the soil surface level | about an inch below the soil surface level. |
| Ambient Temperature | 35° C | 35° C | 34° C | 35° C | 19.4° C |
Isolation/Purification
Title: Isolation/Purification of Environmental Sample
Date: 08/30/2023
Redo: No
Sample: # 1
Purpose: The purpose of today was to perform a direct isolation of both soil samples we had previously collected.
Notes:
-
- We had prepared our lab bench and cleaned everything off before beginning direct isolation. Both of us also washed out hands thoroughly and set up our station.
- The soil sample #1 was collected inside of a 15mL conical tube and refrigerated until ready to be used inside of the lab.
- Approximately 2/3 of a 15mL conical tube was filled with the soil sample and submerged the soil under 2 mL of liquid media.
- The 15mL conical tube was inverted a couple times to begin mixing the soil sample with the liquid media.
- The sample was incubated in a shaking incubator at 250 rpm for one hour.
- After incubation, our sample had separated into what looked like three layers. There was a dark layer of soil and debris at the bottom of the conical tube. In the middle, was a yellowish/brownish liquid, clear of any left over debris. This was the layer that we attempted to retrieve using the syringe filter in the next step. The very top layer had a lot of soil debris floating around such as little wood chips and/or sticks.
- A syringe filter was then used to separate the liquid from soil debris left in the tube and approximately 0.5 mL of liquid was dispensed through the filter and into a labeled microcentrifuge tube.
- Once we had separated the liquid from the soil debris, we placed the micro centrifuge tube in the fridge, and planned to come back two hours later in order to move onto the plaque assay portion of the lab.
Results:
During the plaque assay, we had too many bubbles form, therefore we were not able to get a clear look at any possible plaques. These bubbles formed due to personal error when pipetting the bacteria and agar mixture onto the plate. From what we could see, there was not any plaque growth.

Conclusions and Next Steps:
We will be redoing this direct isolation next week in lab to a new sample.
Title: Isolation/Purification of Environmental Sample
Date: 08/30/2023
Redo: No
Sample: # 2
Purpose: The purpose of today was to perform a direct isolation of both soil samples we had previously collected.
Notes:
- The soil sample #1 was collected inside of a 15mL conical tube and refrigerated until ready to be used inside of the lab.
- Approximately 2/3 of a 15mL conical tube was filled with the soil sample and submerged the soil under 2 mL of liquid media.
- The 15mL conical tube was inverted a couple times to begin mixing the soil sample with the liquid media.
- The sample was incubated in a shaking incubator at 250 rpm for one hour.
- During the incubation period, we cleaned our lab bench again and set up the Bunsen burner in hopes of eliminating contamination during the filtration
- After incubation, our sample had separated into what looked like only two layers. Both layers were “muddy” and looked like the liquid media had just mixed with our soil sample, instead of separated into different layers. Despite this, we still attempted to move forward to the next step of our procedure.
- We put together the syringe filter and began to push through our newly liquid sample. It was during this step that we encountered resistance when attempting to push the liquid through the filter. Some of the debris from the soil clogged the filter and we kept pushing the syringe. This lead to the soil mixture “exploding” and contaminating our lab bench.
- We then cleaned up our bench and discarded all of the materials pertaining to sample #2.
Results:
We were not able to continue with this sample due to us losing the sample during the syringe filtration. Because of this, we were not able to obtain a picture.
Conclusions and Next Steps:
We will be moving on to the next portion of lab using the sample that we directly isolated from the soil sample. The next step is the isolation/purification of environmental sample by plaque assay.
Title: Isolation/Purification of Environmental Sample
Date: 09/11/2023
Redo: Yes
Sample: # 4
Purpose: The purpose of today was to perform a direct isolation of the fourth soil sample we collected.
Notes:
- We had prepared our lab bench and cleaned everything off before beginning the direct isolation.
- A conical tube was filled halfway (about 8 mL) with the soil sample and liquid media was added up into the 13 mL mark.
- This sample was very silty, so there’s a smaller chance of us actually finding a bacteriophage with this sample.
- Once the liquid media and soil sample were combined together, the conical tube with the mixture was placed into the shaking incubator for two hours.
- Next, the sample was sat to let the matter settle for twenty minutes.
- Once, the matter was settled a syringe is attached to the top of the filter without contamination and firmly screwed in place.
- After, we pushed the sample through the filter 0.5 of the filtrate was placed in the labeled microcentrifuge.
- The tube was put up immediately and and supplies was discarded.
Results:
We think that there could have been some contamination on this plate, but it also looks like there could possibly we one singular plaque. This possible plaque looked a little cloudy and had something that resembled an orbit around it.

Conclusions and Next Steps:
There was a possibility of plaques being located on this plate, so we are going to go ahead and try to proceed to the serial dilution part of the lab.
Title: Isolation/Purification of Environmental Sample
Date: 09/13/2023
Redo: No
Sample: # 5
Purpose: The purpose of today was to perform a direct isolation of the fifth soil sample we collected.
Notes:
- We started by cleaning out the station to be decontaminated properly.
- We then collected our sample after rainfall in a plastic bag at 8:06 AM with a temperature of 19.4 degrees Celsius. Then transferred it to a conical tube about one-half full.
- Next liquid media was added to be incorporated with the soil and mixed thoroughly.
- The sample is then placed in the shaking incubator for approximately 1-2 hours at 250 rpm.
- Afterward, the sample was put through the centrifuge for ten minutes and was ready to be filtered.
- A syringe is attached to the top of the filter, screwed into place firmly, and 0.5 ml of the filtrate was dispensed into a microcentrifuge tube.
- Lastly, we disposed of the tube, and other supplies, and disinfected our area.
Results:
We were confident about the development of the plaques and moved on to performing serial dilution.
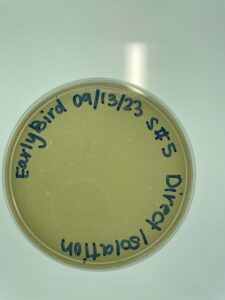
Conclusions and Next Steps:
We performed serial dilution on all of our plates.
Title: Isolation/Purification of Environmental Sample
Date: 09/06/2023
Redo: Yes
Sample: # 3
Purpose: The purpose of today was to perform an enriched isolation of one soil sample we had previously collected.
Notes:
-
- We began by cleaning our lab table as well as disinfecting our hands before touching any of the instruments that we would be using today.
- Once everything was disinfected, we took approximately 8 mL of our soil sample (because that is all we had collected) and placed it inside a conical tube.
- The rest of our liquid media (≈12 mL) into the tube. With the soil and liquid media, we had about 20 mL of substance inside the conical tube.
- The conical tube was placed inside a shaking incubator for one hour at 250 rpm.
- After one hour, the samples were placed in the centrifuge at 2,000 x g for 10 minutes in order to pellet the soil sample.
- While the sample was in the centrifuge, we set up the Bunsen burner in order to keep our environment sterile and the sample clean using the aseptic technique.
- Once the sample was done centrifuging down, we used a vacuum filtration unit, instead of a syringe filter in order to separate the bacteriophage sample liquid from the soil debris.
- The recovered liquid was about 15 mL and we added 0.5 mL of M. foliorum to the conical tube.
- The sample was properly aerated, by untwisting the cap a quarter turn and taping the lid down.
- We placed the sample in a shaking incubator at 220 rpm for 5 days.
- Once we got back into lab on 09/11/2023, we disinfected our lab bench before retrieving the sample from the incubator.
- We grabbed a 5 mL pipette and transferred 1.4 mL of the enriched culture sample to a microcentrifuge tube. We repeated this step, transferring another 1.4 mL into a separate micro centrifuge tube.
- Once both tubes were filled with the enriched culture sample, we placed them into a microcentrifuge and centrifuged them each for 1 minute.
- Once the tubes were done in the microcentrifuge, a darker pellet was visible in the bottom of the tubes. Because our liquid was not as clear as we wanted it to be and there could have been contamination by a different bacteria, we used a syringe filter to purify our sample.
- We collected about 1 mL of the enriched sample into a microcentrifuge tube after it was filtered. The cap was placed on and set aside to use for another plaque assay.
Results:
The only results we have to report for today is the fact that we were able to retrieve an enriched sample of the soil sample #3. We will be able to tell if found any plaques, once we retrieve the plaque assay results on 09/13.
Conclusions and Next Steps:
The next steps are going to be the plaque assay, which is described in an entry below. Once the plaque assay is performed, we will be able to tell if we have any plaque growth or not.
Title: Isolation/Purification of Environmental Sample by Plaque Assay
Date: 08/30/2023
Redo: No
Sample: #2
Purpose: The purpose of today was to perform a plaque assay to discover any possible phages on the bacterial plates.
Notes:
-
- To begin, we prepared our lab area by disinfecting the surface and washing our hands prior to touching any instruments we would use today.
- After cleaning everything, we then acquired the sample from the filtered enriched isolation.
- Then we attained 250 microliters of bacterial culture for our sample.
- Soon after, we labeled our culture tube and used a micropipette with an aseptic technique to disburse each phage sample into the specified tube consisting of 250 microliters of host bacteria. In our case, we only had one individual sample to pipette the phage sample into the specific culture tube.
- Next, we merged our host culture by carefully and gently tapping the tube against the table or our hands. Making sure that each part of the sample was combined thoroughly. Then, the sample was placed to be undisturbed for five minutes to permit attachment, which happened fairly quickly.
- Following this, we gathered 3 ml of molten top agar for our sample. Removed the bottle of top agar from a 55-degree Celsius bath. While working quickly and efficiently to make sure that it does not solidify while out of the bath.
- After, using a sterile 5 ml pipette to place 3 ml of top agar in the tube composed of the phage sample and bacterial host. Unfortunately, there were bubbles that did develop onto the plate but did not affect the development of a potential phage.
- Immediately, after we retracted the mixture from the tube into the pipette and released it on the correct plate. Then quickly discard the contaminated pipette.
- Following that, the plate needs to be tilted in every direction to cover the majority of the plate. On our plate, we were only able to cover the middle portion of the plate.
- Finally, the plate was placed to be undisturbed for 20 minutes to let the top agar completely solidify. Afterward, the plate must be inverted and placed in the specific incubator for 24 to 48 hours.
- The plate was inaccurately labeled with M. Goliorum, instead of M. foliorum. We did use the correct bacteria (M. foliorum), but we labeled it incorrectly. Therefore, this mistake did not affect our outcome, since it was just writing on the outside of the plate.
- The plate was put into the incubator at 29°C at 12:35 pm on 08/30/2023. We came back and checked the plaque growth on 09/01/2023 at 10:14 a.m.
Results:
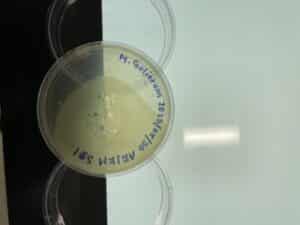
We came back into the lab and checked on the S#2 plate that was left in the incubator for 48 hours. We were able to visualize an area that possibly had a plaque growth, but there was a possibility that it could have been more contamination. Clearly, in the middle of the plate, there is a lot of contamination, which is the main reason we ended up performing enriched isolation during the next week.
Conclusions and Next Steps:
There was one spot on the plate when we checked it on 09/01/2023 at 10:14 a.m. that looked like there could be a possibility of phage growth. Due to the lack of confidence and the very small size of the possible phage, we are going to gather more soil samples and repeat this process in the lab next week.
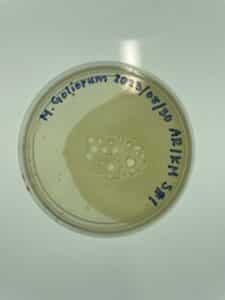
Title: Isolation/Purification of Environmental Sample by Plaque Assay
Date: 09/11/2023
Redo: No
Sample: #3
Purpose:
The purpose of today was to perform a plaque assay in order to be able to visualize whether or not we successfully retrieved a sample of a bacteriophage.
Notes:
1. Using the sample retrieved during the process of enriched isolation (with sample #3), we were tasked with performing a plaque assay.
2. We began by cleaning off our benches once again and preparing the Bunsen burner, in order to use aseptic technique. This technique was used in hopes of keeping our sample in a sterile environment.
3. We actually messed up this part at first and had to remake the S #3 enriched isolation sample. We directly pipetted the enriched isolated sample onto the plate, without the bacteria. We were moving too fast and once I realized this mistake, we got rid of the plate and used a syringe filter to filter 1 mL of the sample from each microcentrifuge tube. (these steps are back up in the isolation through enriched isolation above)
4. Since we were back on track with a clean sample, we added 10 μl of the sample into 250 μl host bacteria using a p10 micropipette. We tapped the glass tube a few times to mix the contents and then let it sit for ten minutes.
5. Once the mixture had mixed and rested, we dispensed 3 mL of top agar into the glass test tube. Immediately, we aspirated the mixture back up into the pipette and dispensed it onto an agar plate.
6. We titled the plate to disperse the mixture evenly across the entire plate. We did get on bubble on the middle to outer edge of the plate, so we know that even though it may look like plaque growth there, it will not be.
7. The plate was left on the lab bench for 20 minutes in order for the top agar to solidify and then incubated for 48 hours at 29°C.
8. We will come back into the lab on 09/13 to check on any possible plaque growth.
Results:
There was no plaque present due to possible contamination of the plate.
Conclusions and Next Steps:
A new sample taken after rainfall was immediately placed in a shaking incubator to prepare for direct isolation.
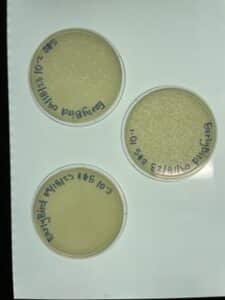
Title: First Round of Serial Dilution to Purify Phage
Date: 09/13/2023
Redo: No
Sample: #4
Purpose: To confirm that we had phage growth and to prepare liquid phage samples of decreasing concentrations.
Notes:
-
- We cleaned our lab manual and disinfect our hands before obtaining our sample #4 plaque assay.
- After monitoring the phage growth for the past five days, we thought that we might have been able to isolate a phage and continued to pick a plaque and perform a serial dilution.
- I set up the Bunsen burner in order to use an ascetic technique to keep our area disinfected.
- In the meantime, I performed a plaque assay for purification. The first thing I did for this, was marked a circle around the phage that we wanted to test.
- I took a micropipette and a clean micropipette tip to stick directly into the phage.
- I took the tip that had been placed into the phage and swirled it around in a microcentrifuge tube with 90 μl phage buffer.
- After I had obtained the undiluted phage sample, I began the serial dilution.
- I grabbed eight microcentrifuge tubes and labeled them all between 10-1 and 10-8.
- I filled each of these tubes with 90 μl of phage buffer.
- I added 10 μl of the undiluted phage sample to the microcentrifuge tube labeled 10-1 and vortexed the tube 8 times.
- I then transferred 10 μl of the 10-1 sample into the 10-2 tube and vortexed the tube again. This was continued until we reached the 10-8 tube. We performed a plaque assay for each sample of dilution and the plates were incubated at 29°C for 48 hours.
Results: The plates were empty and showed no signs of phage growth. It is possible that the plaque we picked was not actually a plaque. It is also possible that the plaque was too small to obtain a sample from.


Conclusions and Next Steps:
We are going to back to the isolation process and try to get a better plaque sample to use moving forward.
Title: First Round of Serial Dilution to Purify Phage
Date: 09/18/2023
Redo: No
Sample: #5
Purpose: To confirm that we had phage growth and to prepare liquid phage samples of decreasing concentrations.
Notes:
-
- First we cleaned and sanitized our working station before using aseptic technique to pick a plaque.
- Following sanitization we marked the plaque we intended to pick up which we identified as plaque A.
- The morphology of plaque A was cloudy, white, small, and circular.
- Futhermore, we labeled and allotted 100 microliters of phage buffer into our one microcentrifuge tube.
- Next, we took a sterile micropipette tip onto a p200 micropipettor and gently stabbed the center of the plaque’s top agar. While avoiding touching the surface around the identified plaque.
- After that we place the end of the tip into the tube containing the phage buffer against the wall to tap the phage particles off. We immediately discarded the tip afterwards.
- After the phage sample was put into the tube with phage buffer, we mixed the microcentrifuge tube by vortexing for about ten seconds.
- We moved onto performing the serial dilutions for our sample by labeling each one by 10-1, 10-2, 10-3, … 10-8 etc.
- We added 90 microliters of phage buffer to each of the tubes.
- Immediately after, we performed 10 fold serial dilutions by transferring 10 microliters of the “10-1” sample to the “10-2” tube and vortexed it well.
- We continued this until each dilution was completed for the individual tubes.
- We transferred 10 microliters of each dilution into a separate tube with 250 microliters of M. foliorum bacteria. Then we gently combined the mixtures by swirling them and letting them sit for ten minutes.
- We performed plaque assay on six plates by using aseptic technique to disburse each phage sample into the labeled tubes. Then each tube is tapped gently and sat for ten minutes to attach to the bacteria.
- The bottle of top agar was then removed from the 55 degree Celcius bath to transfer 3 mililiters of top agar into the tube containing the bacteria and host sample. Immediately, aspirating and disbursing the mixture onto the plate. We were being careful to be sure there were no bubbles and repeated this for each sample.
- Results:
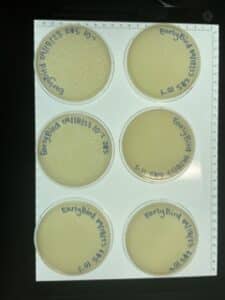
- As is shown in the photos below, this time our serial dilutions worked, which means we actually have a phage! On the 10-1 plate, our phage was able to multiply and create multiple colonies. This occurred all the way up to our fourth serial dilution. There was no plaque growth on plates 10-5 nor 10-6.


Conclusions and Next Steps:
The next steps is to move into the second round of serial dilutions. The second round will begin on 09/20/2023. Moving forward, we will only be creating four plaque assays, since the first round of serial dilutions on yielded plaques up to the fourth plate.
Amplification
Title: Second Round of Serial Dilution to Purify Phage
Date: 09/20/2023
Redo: No
Sample: 5
Purpose: The purpose of a second serial dilution is to be able to count the number of plaques we have acquired. By lessening the strength of the phage (doing two sets of serial dilutions), we should acquire a plate that has plaque easy to count.
Notes:
-
- Before we began any lab work, the bench was disinfected.
- Using aseptic technique, we made four plates of serial dilutions. We started with four microcentrifuge tubes labeled 10-1 to 10-4.
- We only decided to do four plates because of the fact that or first serial dilution only yielded plaques until 10-4.
- Afterwards, a P-200 micropipette was used to stab the phage and move it directly into microcentrifuge tube that had 90 ul of phage buffer inside of it. This tube was labeled “P”.
- We vortexed this tube for about ten seconds in order to ensure that everything was mixed together and distributed evenly.
- Then, we extracted 90 ul of the phage buffer into each of the other four tubes. A micropipette was used to extract 10 ul of the solution in “P”. This was just our direct phage sample and 90 ul of phage buffer. The 10 ul was transferred into into the tube labeled 10-1 and then vortexed for ten seconds. This step was repeated for each four tubes.
- Once we finished the four serial dilutions, four tubes of M. foliorum was obtained. Inside each tube there was approximately 250 aliquots of M. foliorum. We labeled each tube and transferred 10 ul of each serial dilution into a separate tube with M. foliorum. We tapped on the tubes and mixed the solution together and then let them sit for about five minutes.
- The top agar was obtained from the 55 degree Celsius bath and 3 ml was extracted and placed inside each tube with M.foliorum and 10 ul of our serial dilution sample. After immediately aspirating the mixture and releasing onto the designated plate, we tilted each plate to make sure that the agar covered the entirety of the plate. This was repeated four times for each plate.
Results:
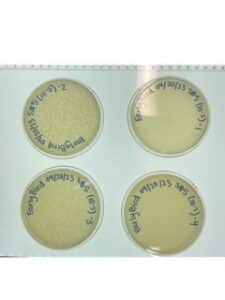
As depicted in the image below, the second round of serial dilutions worked. The phage that we have been working with was able to multiple and a plethora of plaques were able to be formed on all four plates. It looks like the phage was stronger and quicker in this second serial dilution than it was in the first one.
Conclusion and Next Steps:
We will be moving on to the next steps with this phage. This next step will be to collect a plate lysate by flooding a webbed plate from this set of serial dilutions.
Title: Collecting Low Volume Plate Lysates
Date: 09/25/2023
Redo: No
Sample: #5
Purpose: To produce a liquid phage sample that is highly concentrated.
Notes:
1. Our working area was disinfected prior to the start of the process of creating a liquid phage sample.
2. We proceeded to flood the sample #5 plate with 8 ml of buffer phage solution to the webbed plate. Making sure there was no splashing in the process of the transfer.
3. After, we stored them and let them sit for six hours at room temperature.
4. At 4pm, we were able to retrieve our sample and set up an aseptic work space.
5. We took the lid off the plate and placed it flat on the bench. The plate was set on the lid at an angle, which tilted the plate and forced all of the liquid to roll down onto one side of the plate.
6. A 5ml syringe was used to aspirate all of the liquid form the plate and then pushed through a syringe filter into a conical tube.
7. We collected approximately 6.5 mL of fluid into a conical tube. The tube was placed in the fridge at 6°C for 40 hours.
Results:
We collected a sample of our phage lysate.
Conclusion and Next Steps:
We will be proceeding onto the next step four experiment which is performing a full plate titer.
Title: Third Serial Dilution for Full Plate Titer
Date: 09/28/2023
Redo: No
Sample: #5
Purpose: To find the concentration of phage particles in the lysate by using the process of a plaque assay.
Notes:
1. First, we disinfected our area before igniting the bunsen burner to use aseptic technique.
2. Next, we had obtained the undiluted phage sample, I began the serial dilution.
3. Following this we grabbed four microcentrifuge tubes and labeled them all between 10-1 and 10-4. I filled each of these tubes with 90 μl of phage buffer.
5. After, we added 10 μl of the undiluted phage sample to the microcentrifuge tube labeled 10-1 and vortexed the tube 8 times.
6. Then, we transferred 10 μl of the 10-1 sample into the 10-2 tube and vortexed the tube again. This was continued until we reached the 10-4 tube. We performed a plaque assay for each sample of dilution and the plates were incubated at 29°C for 48 hours.
Results:
The full plate titer was successful in the sense that we transferred the phage onto plates, but we need to do more serial dilutions on the next round.

Conclusion and Next Steps:
In order to retrieve an accurate count of plaques moving forward, we need to dilute our phage sample more than we have been. I think on Monday, we will need do dilute the phage lysate up to 6 or 7 times. We won’t plate all dilutions, since the 10-3 diluted phage is still pretty aggressive. We will need to perform another lysate retrieval and plate titer moving forward.
Title: Fourth Serial Dilution for Full Plate Titer
Date: 10/02/2023
Redo: No
Sample: #5
Purpose: To find the concentration of phage particles in the lysate by using the process of a plaque assay.
Notes:
1. First, we disinfected our area before igniting the bunsen burner to use an aseptic technique.
2. Next, we had obtained the undiluted phage sample, I began the serial dilution.
3. Following this we grabbed four microcentrifuge tubes and labeled them all between 10-1 and 10-4. I filled each of these tubes with 90 μl of phage buffer.
5. After, we added 10 μl of the undiluted phage sample to the microcentrifuge tube labeled 10-1 and vortexed the tube 8 times.
6. Then, we transferred 10 μl of the 10-1 sample into the 10-2 tube and vortexed the tube again. This was continued until we reached the 10-4 tube. We performed a plaque assay for each sample of dilution and the plates were incubated at 29°C for 24 hours.
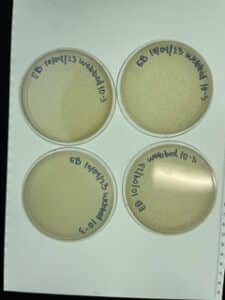
7. When we went and checked on the plates after 24 hours (on 10/03), there were a plethora of plaques dispersed throughout the plate, but they were no where close to being webbed plates. We decided to leave them in the incubator overnight, to see if more plaque growth would occur overnight.
8. On 10/04/2023, we took the plates out of the incubator again and no change had occurred from the day before. There were plenty of plaques on the plate, but we had 0/4 webbed plates.
Results:
As displayed in the image above, none of the plates that were incubated grew into webbed plates for us to retrieve a high volume lysate from. This could be due to an error in our serial dilutions and/or that process.
Conclusion and Next Steps:
Due to the fact that we need four webbed plates to retrieve a high volume lysate sample, we will need to perform another 4 set of serial dilutions using our low volume lysate sample retrieved on 09/25/2023. Instead of using 10-4 dilutions like we did this cycle, we will try using 10-3 dilutions, in order to concentrate our sample more, in hopes of creating webbed plated the next time around.
Title: Fifth Serial Dilution for Full Plate Titer
Date: 10/04/2023
Redo: No
Sample: Plate
Purpose: To find the concentration of phage particles in the lysate by using the process of a plaque assay.
Notes:
First, we disinfected our area before igniting the bunsen burner to use an aseptic technique.
2. Next, we obtained the undiluted phage sample and began the serial dilution.
3. Following this we grabbed four microcentrifuge tubes and labeled them all between 10-1 and 10-4. I filled each of these tubes with 90 μl of phage buffer.
5. After, we added 10 μl of the undiluted phage sample to the microcentrifuge tube labeled 10-1 and vortexed the tube 8 times.
6. Then, we transferred 10 μl of the 10-1 sample into the 10-2 tube and vortexed the tube again. This was continued until we reached the 10-3 tube. We performed a plaque assay for each sample of dilution and the plates were incubated at 29°C for 24 hours.
7. On 10/05/2023, we went into lab and retrieved the four plates out of the incubator, took photos, placed paradigm around them, and placed them into the fridge over the weekend.
Results:
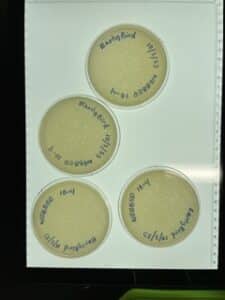
We were able to successfully make 2.5 webbed plates out of the four that were placed in the incubator on 10/04/2023.
Conclusion and Next Steps:
As the image depicts above, two complete webbed plates formed. The third plate would have been a webbed plate as well, but based on our error when plating the bacteria, only half the plate was coated with the top agar. Although we did all of the serial dilutions and plates all four plates together, two of the plates were not webbed at the end of the day. The fourth plate had almost zero plaque growth on it which could indicate an error in the dilutions or in the micro pipetting that occurred when we transferred the dilution into the tube with bacteria in it, before adding the top agar. We are going to be moving forward with the 2.5 webbed plated that we have next lab. We will be attempting to collect high volume lysate using these plates next Monday.
Title: Collecting High Volume Plate Lysates
Date: 10/09/2023
Redo: No
Sample: #5
Purpose: To produce a liquid phage sample that is highly concentrated.
Notes:
1. Our working area was disinfected prior to the start of the process of creating a liquid phage sample.
2. We proceeded to flood the two and a half webbed plates with 8 ml of buffer phage solution. We made sure there was no splashing in the process of the transfer.
3. After, we stored them and let them sit for three hours at room temperature.
4. At 1pm, we were able to retrieve our sample and set up an aseptic work space.
5. We took the lid off the plate and placed it flat on the bench. The plate was set on the lid at an angle, which tilted the plate and forced all of the liquid to roll down onto one side of the plate.
6. A 5ml syringe was used to aspirate all of the liquid form the plate and then pushed through a syringe filter into a conical tube.
7. We collected approximately 1 mL of fluid into a microcentrifuge tube.
Results:
We only were able to collect 1 mL of high volume lysate.
Conclusion and Next Steps:
Because we only collected approximately 1 mL of high volume lysate, we are going to have to redo this and remake four webbed plates using our low volume lysate to the 10-3. Our next steps are to make four webbed plates using the low volume lysate.
Title: Sixth Serial Dilution for Full Plate Titer
Date: 10/11/2023
Redo: Yes
Sample: #5 Low Volume Lysate
Purpose: To find the concentration of phage particles in the lysate by using the process of a plaque assay.
Notes:
First, we disinfected our area before igniting the bunsen burner to use an aseptic technique.
2. Next, we obtained the undiluted phage sample and began the serial dilution.
3. Following this we grabbed four microcentrifuge tubes and labeled them all between 10-1 and 10-3. I filled each of these tubes with 90 μl of phage buffer.
5. After, we added 10 μl of the undiluted phage sample to the microcentrifuge tube labeled 10-1 and vortexed the tube for ten seconds.
6. Then, we transferred 10 μl of the 10-1 sample into the 10-2 tube and vortexed the tube again. This was continued until we reached the 10-3 tube. We made four plaque assays with the goal of creating four webbed plates. The plates were stored at 29°C for 24 hours.
7. Once the plates were pulled out of the incubator, we put parfilm on them and placed them in the fridge for the next 24 hours.
8. On 10/13/2023, we pulled the plated out of the fridge and flooded each plate with 8mL of phage buffer.
9. The flooded webbed plates were left out at room temperature for two hours until the high volume lysate was able to be collected through a syringe filter.
Results:
We were able to retrieve high volume lysate.
Conclusion and Next Steps:
The next steps will involve DNA extraction and another full plate titer in order for us to determine the exact concentration of phage that we have.
Title: Seventh Serial Dilution for Full Plate Titer
Date: 10/11/2023
Redo: No
Sample: #5 High Volume Lysate
Purpose: To find the concentration of phage particles in the lysate by using the process of a plaque assay.
Notes:
1. First, we disinfected our area before igniting the bunsen burner to use an aseptic technique.
2. Next, we obtained the undiluted phage sample and began the serial dilution.
3. Following this we grabbed four microcentrifuge tubes and labeled them all between 10-3 and 10-6. I filled each of these tubes with 90 μl of phage buffer.
5. After, we added 10 μl of the undiluted phage sample to the microcentrifuge tube labeled 10-1 and vortexed the tube for ten seconds.
6. Then, we transferred 10 μl of the 10-3 sample into the 10-4 tube and vortexed the tube again. This was continued until we reached the 10-6 tube. We made four plaque assays with the goal of creating four full plate titers. The plates were stored at 29°C for 24 hours.
Results:
We were able to retrieve 28mL of high-volume lysate.
Conclusion and Next Steps:
The next step is to calculate our titer, create a grid, and DNA extraction.
Title: Eighth Serial Dilution for Full Plate Titer (to determine Titer!)
Date: 10/16/2023
Redo: No
Sample: #5 High Volume Lysate
Purpose: To calculate the titer of the high volume lysate we previously retrieved from sample 5.
Notes:
1. First, we disinfected our area before igniting the bunsen burner to use an aseptic technique.
2. Next, we obtained the undiluted high volume lysate and began the serial dilution.
3. Following this we grabbed four microcentrifuge tubes and labeled them all between 10-1 and 10-6. I filled each of these tubes with 90 μl of phage buffer.
5. After, we added 10 μl of the undiluted phage sample to the microcentrifuge tube labeled 10-1 and vortexed the tube for ten seconds.
6. Then, we transferred 10 μl of the 10-2 sample into the 10-3 tube and vortexed the tube again. This was continued until we reached the 10-6 tube.
7. We retrieved four plates and plates the 10-3, 10-4, 10-5, and 10-6 dilutions. We decided not to plate the 10-1 and 10-2 dilutions because the phage had been wiping out the entire plates up to 10-3. 10-3 is the dilution we used to create webbed plates, so we should be able to calculate the titer from one of the higher diluted plates.
8. We placed all four plates in the incubator at 29°C for approximately 29 hours. After 29 hours, we pulled the plates and placed them into the fridge overnight.
9. On 10/18/2023, we pulled the plates out of the fridge and used to 10-6 diluted plate to calculate the titer. The titer is 2.9 x 10^9.
Results:
The titer that we were able to calculate is 2.9 x 10^9. This titer is on the higher side, but it is good enough to continue to move forward to DNA extraction.
DNA Extraction
 Title: DNA Extraction

Date: 10/18/2023
Redo: No
Sample: #1
Purpose: The purpose of today’s lab work was to concentrate the liquid phage sample before being able to extract the DNA.
Notes:
-
- We began by cleaning the lab area and our hands. Once everything was clean, we transferred 5 mL of the high volume lysate sample into a conical tube and added 25 uL of nuclease mix into the tube.
- The tube was inverted for a total of two minutes and then incubated for ten minutes at 37°C.
- After thirty minutes, the 5mL of high volume lysate nuclease mix was separated into 1.5 mL microcentrifuge tubes. Using a glass pipette, 1 mL of the high volume lysate mix was transferred into each microcentrifuge tube, for a total of 5 tubes.
- 25 uL of ZnCl2 was added to each tube and then inverted for a total of two minutes. Following inversion, the 5 microcentrifuge tubes were placed into the incubator at 37°C for ten minutes.
- After ten minutes, the 5 microcentrifuge tubes were places in a high-speed centrifuge at 8500 rpm for 1 minute.
- Using a P200 pipette, the supernatant was removed carefully, in order to not disturb any of the pellets at the bottom of the microcentrifuge tube.
- 200 uL of DTA was added to each microcentrifuge tube and the pellet was immediately resuspended inside each tube by pipetting the mixture up and down twice. After each pellet was resuspended, all of the resuspensions were combined into one microcentrifuge tube.
- 0.5 uL of proteinase K and 50 uL of SDS was added to the microcentrifuge tube containing approximately 1 mL of the phage particles and DTA mixture.
- The microcentrifuge tube was placed in an incubator at 37°C for ten minutes. After the incubation period, the 1 mL of phage particle/DTA mixture was transferred into a 15 mL conical tube and 2 mL of DNA resin clean-up was added into the new tube. This new solution was mixed by inverting it for two minutes.
- Right after inversion, two columns were attached to the opening of microcentrifuge tubes and the syringes were set up on them. 1.5 mL of phage DNA/resin solution was placed into each syringe and slowly pushed through the columnist an empty conical tube.
- After the liquid was pushed through, the syringe and column was set up again and 2mL of 80% isopropyl was pushed slowly through the syringe. This was done for a total of four times.
- The microcentrifuge tubes were centrifuged at 8500 rpm for 5 minutes and then the columns were placed into clean microcentrifuge tubes and centrifuged again for one minute.
- After centrifuging, the columns were placed directly in a heat block at 90°C for one minute. After 60 seconds exactly, the columns were taken off of the heat block and attached to a new microcentrifuge tube.
- 50 uL of 90°C sterile ddH2O was added to each column. The columns were incubated at room temperature for 1 minute.
- After 1 minute, the columns were centrifuged at 8500 rpm for 1 minute and then removed from the microcentrifuge tubes. The contents from both tubes were combined into one and labeled as our eluted phage DNA. The DNA was taken to the Nanodrop and the concentration was determined.
Results:
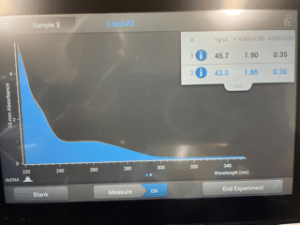
This picture was taken of the screen on the Nanodrop that we used to calculate the concentration of DNA in the eluted phage DNA sample. The 260/230 ratio was 0.36, when it should be between 2.0 and 2.2.
Conclusion and Next Steps:
Because the 260/230 ratio was well under 2.0, we can be sure that we did not extract enough pure DNA. The normal range for a 260/230 ratio falls between 2.0 and 2.2 and we were 1.64 under the lowest accepted value. Because the ration value of out eluted phage DNA was 0.36, we will be redoing the DNA extraction on Monday, October 23, 2023.
Title: DNA Extraction
Date: 10/23/2023-10/25/2023
Redo: Yes
Sample: #2
Purpose: The purpose of today’s lab work was to concentrate the liquid phage sample before being able to extract the DNA.
Notes:
-
-
-
- We began by cleaning the lab area and our hands. Once everything was clean, we transferred 5 mL of the high volume lysate sample into a conical tube and added 25 uL of nuclease mix into the tube.
- The tube was inverted for a total of two minutes and then incubated for ten minutes at 37°C.
- After thirty minutes, the 5mL of high volume lysate nuclease mix was separated into 1.5 mL microcentrifuge tubes. Using a glass pipette, 1 mL of the high volume lysate mix was transferred into each microcentrifuge tube, for a total of 5 tubes.
- 25 uL of ZnCl2 was added to each tube and then inverted for a total of two minutes. Following inversion, the 5 microcentrifuge tubes were placed into the incubator at 37°C for ten minutes.
- After ten minutes, the 5 microcentrifuge tubes were places in a high-speed centrifuge at 8500 rpm for 1 minute.
- Using a P200 pipette, the supernatant was removed carefully, in order to not disturb any of the pellets at the bottom of the microcentrifuge tube.
- 200 uL of DTA was added to each microcentrifuge tube and the pellet was immediately resuspended inside each tube by pipetting the mixture up and down twice. After each pellet was resuspended, all of the resuspensions were combined into one microcentrifuge tube.
- 0.5 uL of proteinase K and 50 uL of SDS was added to the microcentrifuge tube containing approximately 1 mL of the phage particles and DTA mixture.
- The microcentrifuge tube was placed in an incubator at 37°C for ten minutes.
- This was where we stopped on 10/23/2023 and the tube was placed in the fridge overnight.
- The first thing we did when entering the lab on 10/25/2023, was transfer 1 mL of phage particle/DTA mixture into a 15 mL conical tube and 2 mL of DNA resin clean-up was added into the new tube. This new solution was mixed by inverting it for two minutes.
- Right after inversion, two columns were attached to the opening of microcentrifuge tubes and the syringes were set up on them. 1.5 mL of phage DNA/resin solution was placed into each syringe and slowly pushed through the columnist an empty conical tube.
- After the liquid was pushed through, the syringe and column was set up again and 2mL of 80% isopropyl was pushed slowly through the syringe. This was done for a total of four times.
- The microcentrifuge tubes were centrifuged at 8500 rpm for 5 minutes and then the columns were placed into clean microcentrifuge tubes and centrifuged again for one minute.
- After centrifuging, the columns were placed directly in a heat block at 90°C for one minute. After 60 seconds exactly, the columns were taken off of the heat block and attached to a new microcentrifuge tube.
- 50 uL of 90°C sterile ddH2O was added to each column. The columns were incubated at room temperature for 1 minute.
- After 1 minute, the columns were centrifuged at 8500 rpm for 1 minute and then removed from the microcentrifuge tubes. The contents from both tubes were combined into one and labeled as our eluted phage DNA. The DNA was taken to the Nanodrop and the concentration was determined.
Results:

-
-
Conclusions and Next Steps:
We definitely were able to retrieve a higher concentration of DNA than we did the first time, what we do not have enough DNA to work with. Next week, we are going to try and extract DNA one more time and work on purifying this sample.
Title: DNA Extraction
Date: 10/30/2023-11/01/2023
Redo: Yes
Sample: #3
Purpose: The purpose of today’s lab work was to concentrate the liquid phage sample before being able to extract the DNA.
Notes:
-
- We began by cleaning the lab area and our hands. Once everything was clean, we transferred 5 mL of the high volume lysate sample into a conical tube and added 25 uL of nuclease mix into the tube.
- The tube was inverted for a total of two minutes and then incubated for ten minutes at 37°C.
- After thirty minutes, the 5mL of high volume lysate nuclease mix was separated into 1.5 mL microcentrifuge tubes. Using a glass pipette, 1 mL of the high volume lysate mix was transferred into each microcentrifuge tube, for a total of 5 tubes.
- 25 uL of ZnCl2 was added to each tube and then inverted for a total of two minutes. Following inversion, the 5 microcentrifuge tubes were placed into the incubator at 37°C for ten minutes.
- After ten minutes, the 5 microcentrifuge tubes were places in a high-speed centrifuge at 8500 rpm for 1 minute.
- Using a P200 pipette, the supernatant was removed carefully, in order to not disturb any of the pellets at the bottom of the microcentrifuge tube.
- 200 uL of DTA was added to each microcentrifuge tube and the pellet was immediately resuspended inside each tube by pipetting the mixture up and down twice. After each pellet was resuspended, all of the resuspensions were combined into one microcentrifuge tube.
- 0.5 uL of proteinase K and 50 uL of SDS was added to the microcentrifuge tube containing approximately 1 mL of the phage particles and DTA mixture.
- The microcentrifuge tube was placed in an incubator at 37°C for ten minutes. (This was where we stopped on 10/30/2023.)
- On 11/01/2023, the 1 mL of phage particle/DTA mixture was transferred into a 15 mL conical tube and 2 mL of DNA resin clean-up was added into the new tube. This new solution was mixed by inverting it for two minutes.
- Right after inversion, two columns were attached to the opening of microcentrifuge tubes and the syringes were set up on them. 1.5 mL of phage DNA/resin solution was placed into each syringe and slowly pushed through the columnist an empty conical tube.
- After the liquid was pushed through, the syringe and column was set up again and 2mL of 80% isopropyl was pushed slowly through the syringe. This was done for a total of four times.
- The microcentrifuge tubes were centrifuged at 8500 rpm for 5 minutes and then the columns were placed into clean microcentrifuge tubes and centrifuged again for one minute.
- After centrifuging, the columns were placed directly in a heat block at 90°C for one minute. After 60 seconds exactly, the columns were taken off of the heat block and attached to a new microcentrifuge tube.
- 50 uL of 90°C sterile ddH2O was added to each column. The columns were incubated at room temperature for 1 minute.
- After 1 minute, the columns were centrifuged at 8500 rpm for 1 minute and then removed from the microcentrifuge tubes. The contents from both tubes were combined into one and labeled as our eluted phage DNA. The DNA was taken to the Nanodrop and the concentration was determined.
Results:
Conclusions and Next Steps:
The results of this DNA extraction were about the same as the second DNA extraction that we did. We are going to combine this DNA sample and the second DNA sample using reprecipitation techniques next week.
Title: DNA Extraction
Date: 11/06/2023-11/08/2023
Redo: Yes
Sample: #4
Purpose:
The purpose of this lab was to combine the prior two DNA samples we extracted and combine them into one, higher concentrated sample of DNA.
Notes:
1. We began by using aseptic technique to clean our lab space. Once that was done, we removed the two DNA samples form the freezer and let them thaw to room temperature.
2. The DNA sample in each tube was aspirated using a micropipette to determine the exact volume of each sample. DNA sample #2 had a volume of 63 ul and DNA sample #3 had a volume of 56 ul. When added together, the DNA samples had a combined volume of 119 ul.
3. 11.9 ul of Sodium acetate and 357 ul of ice cold 100% Ethanol was added to the tube with the combined DNA samples.
4. The liquids were mixed together by aspirating the mixture using a micropipette. This microcentrifuge tube was inverted gently for 1 minute to mix evenly.
5. This tube was placed in -80°C overnight in order for the sample to precipitate.
6. On 11/08, the sample was removed from the freezer and places in a 4°C centrifuge for thirty minutes.
7. The supernatant was removed and dispensed into a waste tube. I decided to spin the tube for another 30 minutes because the pellet was not easily visible and I wanted to be sure I would not disturb it when removing the supernatant.
8. After the tube was centrifuged again, 0.5 mL of 75% Ethanol was added to wash it. The tube was placed back into the 4°C centrifuge for ten minutes. This step occurred twice.
8. After the tube was centrifuged, all of the supernatant possible was removed and the tube was placed in a 30°C incubator to air dry. It was vitally important that all of the liquid was removed from the pellet.
9. After about twenty minutes in the incubator, 50 ul of nuclease-free water was added to the tube. .The liquid was pipetted up and down to mix the solution.
10. We took the new DNA sample over to the Nanodrop to get a reading on the sample.
Results:
Conclusion and Next Steps:
We are currently in the process of making more HVL in order to attempt an alternate DNA extraction protocol. We let another group use some of our lysate, thinking we weren’t going to need it again. So once our plates are incubated, we will create more HVL and move forward with the alternative DNA isolation protocol using ZnCl2.
Title: DNA Isolation Protocol using ZnCl2
Date: 11/14/2023
Redo: No
Sample: #5
Purpose:
The purpose of this lab was to determine DNA concentration and quality by creating pellets to represent our capsids.
Notes:
Day one:
1. Prior to starting any protocol we disinfected the surface and washed our hands.
2. First we mix your HVL, then aliquot 5mL of your lysate into a 15 mL conical tube. Give that tube to a GSI or TA who will add 20 microliters if nuclease mix for you.
3. Aliquot lysate into 5 microfuge tubes, 1mL each.
4. To each tube, add 20 microliters of ZnCl2, mix gently by inversion, and incubate at 37 degrees for 5 min. This “precipitates” the phage.
5. Centrifuge at 10,000rpm for 1 min to pellet the phage.
6. Keep the pellet. Remove supernatants by aspiration, but try not to disturb the pellet. Discard the liquid-filled pipette tips in the sharps trash.
7. Resuspend pellets in 500 microliters TES buffer per tube, and incubate at 60 degrees for 15 minutes. This will denature the capsids, exposing the DNA, while protecting it from the nuclease activity (EDTA in the TES sequesters divalent cations required for nuclease function).
8. Add 1 microliter of Proteinase K and mix gently. Incubate at 37 degrees celsius for 10 minutes to completely eliminate any residual nuclease activity.
9. Add 60 microliters of potassium acetate to each tube. Mix well and leave on ice for 15 min. A white, dense precipitate will form. This represents your capsids.
10. Centrifuge at 4 degrees celsius for 1 minute at 12,000 rpm to pellet the capsids. Keep the supernatants containing your DNA, and place them into new microfuge tubes. You can throw away the tubes with the pellets.
11. Add 500 microliters of isopropanol to each of the tubes with the supernatant, mix, and leave on ice overnight (or until next lab)
12. Centrifuge at top speed for 10 min to pellet DNA, and discard the supernatant into a waste tube. It is OK if you do not see a pellet.
13. Add 250 microliters of 70% ethanol in each tube, and spin again for 1 minute, at top speed. This washes your DNA pellet. Discard supernatants into a waste tube.
14. Dry the DNA pellets at room temperature by turning them upside-down onto paper towels, tapping out excess liquid, and leaving them upside-down until the pellets begin to turn clear. The tubes can also be placed in a fume hood or 30-degree incubator to help with drying. Do not rush this step! If not try enough, you will not recover enough DNA!
15. Resuspend the first pellet in 50 microliters in nuclease-free water. Then use that solution to resuspend the next pellet. Continue until all 5 pellets have been resuspended in the same 50 microliters of water.
16. Check DNA concentration and quality with the Nanodrop.
DNA concentration: 84.6
A260/A280 = 1.8 | A260/A230 = 2.0-2.2
Characterization
Title: Mounting Phage Samples for Electron Microscope
Date: 10/18/2023
Redo: No
Sample: #5
Purpose: To prepare the EarlyBird phage sample for viewing under the transmission electron microscope.
Notes:
1. 1 mL of the high volume lysate was ascetically transferred into a 1 mL microcentrifuge tube.
2. The tube was centrifuged at top speed and 4°C for 1 hour. After an hour, we discarded as much of the supernatant as possible, without disrupting the pellet in the bottom of the tube. 100 uL of phage buffer was added to the pellet and the microcentrifuge was placed in the centrifuge once more at 4°C for thirty minutes.
3. EM forceps were used to extract a fresh grid and place it onto the PELCO tab. 10 uL of the phage sample was transferred onto the grid and it sat for 2 minutes, since our titer concentration was 2.9 x 10^9.
4. After two minutes, I removed the access lysate from the grid using the corner of a piece of filter paper. 10 uL of sterile water was added to the grid and it sat for 2 minutes and the excess was removed with filter paper. This step was repeated twice.
5. After the excess water was removed, 10 uL of 1% uranyl acetate was added to the grid and sat on it for 2 minutes. The excess was once again removed with filter paper. The grid sat to air dry to 2-3 minutes and then it was placed into the grid box in slot A2.
Results:
Title: Setting Up Restriction Enzyme Digests
Date: 11/14/2023
Redo: No
Sample: #5
Purpose: To cut the DNA we have extracted into different sized fragments based on its DNA sequence.
Notes:
-
- We began by disinfecting our lab area using aseptic technique and flicking the DNA in the microcentrifuge tube from the DNA extraction sample #5.
- The tube was incubated at 65°C for ten minutes and then spun in the microcentrifuge for one minute. We needed to use 5.9 uL of phage DNA sample to obtain 0.5 ug of DNA.
- We set up seven restriction enzymes: λ-HindIII, uncut DNA, HaeIII, MseI, NspI, SacII, and SaII using 2.5 ul of reaction buffer, 0.5 ul of restriction enzyme, 5.9 ul of DNA, and ddH2O to equal 25 ul in each tube.
- Each tube was centrifuged for one minute and incubated at 37°C for 15 minutes.
Conclusions and Next Steps:
The next steps will be to run the gel using the restrictions that we set up.
Title: Gel Electrophoresis of Restriction Enzyme Digests
Date: 11/14/2023
Redo: No
Sample: #5
Purpose: To separate the DNA fragments using agarose gel electrophoreses.
Notes:
- The gel was prepared using agarose and gel combs.
- 5 ul of loading dye was added to each tube and the samples were placed at a 65°C heating block for five minutes.
- The restrictions were added into a separate ladder carefully and slowly. The order that the restriction enzymes were added into the gel was as follows: λ-HindIII, uncut DNA, HaeIII, MseI, NspI, SacII, and SaII (from left to right).
- We turned the voltage up to 100V and let the gel run for one hour. We removed the gel and washed it with sterile water three times before dying it and placing it on the mixer for a total of 45 minutes.
Title: Gel Electrophoresis of Restriction Enzyme Digests
Date: 11/15/2023
Redo: Yes
Sample: #5
Purpose: To separate the DNA fragments using agarose gel electrophoreses.
Notes:
- The gel was prepared using agarose and gel combs.
- 5 ul of loading dye was added to each tube and the samples were placed at a 65°C heating block for five minutes.
- The restrictions were added into a separate ladder carefully and slowly. The order that the restriction enzymes were added into the gel was as follows: λ-HindIII, uncut DNA, HaeIII, MseI, NspI, SacII, and SaII, uncut (from left to right). For this gel, we ran our DNA with another group’s because we did not have enough DNA volume to use restriction enzymes. Our uncut DNA was placed in the farthest right well on the DNA gel and compared to the ladder in order to visualize the size of our phage DNA.
- We turned the voltage up to 100V and let the gel run for one hour. We removed the gel and washed it with sterile water three times before dying it and placing it on the mixer for a total of 45 minutes.