Discovery of Milagros
Milagros Information
Morphology:
Sample Collection
| Collector Name |
Anayeli Ramirez | Anayeli Ramirez | Ashley Olivos | Ashley Olivos |
| Sample No. | AR1 | AR2 | AO1 | AO2 |
| Date of Collection | 08/28/2022 | 08/28/2022 |
08/28/2022 |
08/28/2022 |
| Sample Type | Soil | Soil | Soil | Soil |
| General Location | In field | In a field | Near a river | Near a river |
| Location Description |
Right next to a water tank |
Next to an old pig farm | Next to some fungus | Next to a river where there was moist soil and fish swimming |
| GPS Coordinates |
(32.0665880, -98.3080864) |
(32.0676038, -98.3084757) |
(32.2159185, -98.2015437) |
(32.2158947, -98.2014049) |
| Sample Depth | Surface level | Surface level |
Surface level |
Surface level |
| Ambient Temperature | 28ºC | 29°C |
36ºC |
36ºC |
Isolation/Purification
Title: Direct Isolation
Date: 8/31/2022 Redo: No Sample: AO1
Purpose: This procedure is to isolate bacteriophages from the environmental sample and infect the host bacteria using a plaque assay
Notes:
1. To prepare for aseptic work, we first washed our hands and disinfected our workstation with Cidecon and 70% ethanol. We then proceeded to light a gas canister.
2. Using a pipette, we added liquid media into each of our environmental samples until the sample was submerged under 2 to 3 mL of liquid media. We then capped the tube and inverted it several times until it was mixed throughly.
3. After mixing, we placed our tubes in a shaking incubator for 1 to 2 hours.
4. After those 2 hours, we took the tubes out of the incubator and let them sit until the particulate matter settled.
5. Once it settled, we took 1 mL of each sample out of the tube using a 5 mL serological pipette. The 1 mL samples were then placed in their own microcentrifuge tubes and centerfuged where the debris of the samples were allowed to pellet at the bottom of the tubes.
6. We then attached a 0.22µm syringe filter to a 5 mL syringe. We poured the samples from the microcentrifuge tubes into the syringe and collected clean filtered samples in another clean microcentrifuge tube. We did this for each sample. The filtered samples were then placed in our box in the fridge overnight.
Title: Plaque Assay
Date: 9/1/2022 Redo: No Sample: AO 1
Purpose: To detect the presence of phages on bacterial lawns
Notes: After the samples were placed in the fridge, we came back the next day and took the box where our samples were being stored and prepared to begin plaque assay.
1. To prepare for aseptic work, we first washed our hands and disinfected our workstation with Cidecon and 70% ethanol. We then proceeded to light a gas canister to avoid contamination.
2. Using a pipette, we obtained 500 µl (0.5 mL) of phage sample from the direct isolation procedure. We then transferred the sample into a a tube containing host bacteria.
3. We then mixed the sample by rotating the tube gently and let it rest for about 7 minutes.
4. While waiting, we obtained agar plates for each sample and labeled the plates with our initials, sample number, and date.
5. After the 7 minutes, we transferred 3 mL of warm top agar into the sample tube and pipetted the entire mixture slowly onto an agar plate,
6. We tilted the plate to spread the mixture evenly across the plate and let the top agar solidify for 20 minutes. We then placed it into a warm incubator.
Results:
Negative Results
‣ 9/2/2022: I came to check on my plate after 17 hours but saw no signs of phages
‣ 9/7/2022: I came at 9:16 am and still saw no signs of phages
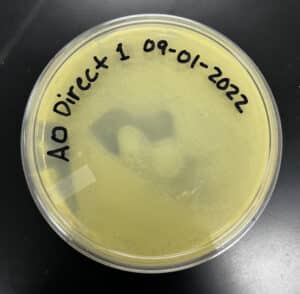
Conclusions and Next Steps:
‣ 9/2/2022: After seeing no signs of phages, I decided I would give it a few more days
‣ 9/7/2022: After still not seeing any signs of phages, I concluded there was no phage in my environmental sample
My next step was to see if my other plate or my partners plate had any signs of phages.
Title: Direct Isolation
Date: 8/31/2022 Redo: No Sample: AR1
Purpose: This procedure is to isolate bacteriophages from the environmental sample and infect the host bacteria using a plaque assay
Notes:
1. To prepare for aseptic work, we first washed our hands and disinfected our workstation with Cidecon and 70% ethanol. We then proceeded to light a gas canister.
2. Using a pipette, we added liquid media into each of our environmental samples until the sample was submerged under 2 to 3 mL of liquid media. We then capped the tube and inverted it several times until it was mixed throughly.
3. After mixing, we placed our tubes in a shaking incubator for 1 to 2 hours.
4. After those 2 hours, we took the tubes out of the incubator and let them sit until the particulate matter settled.
5. Once it settled, we took 1 mL of each sample out of the tube using a 5 mL serological pipette. The 1 mL samples were then placed in their own microcentrifuge tubes and centerfuged where the debris of the samples were allowed to pellet at the bottom of the tubes.
6. We then attached a 0.22µm syringe filter to a 5 mL syringe. We poured the samples from the microcentrifuge tubes into the syringe and collected clean filtered samples in another clean microcentrifuge tube. We did this for each sample. The filtered samples were then placed in the fridge overnight.
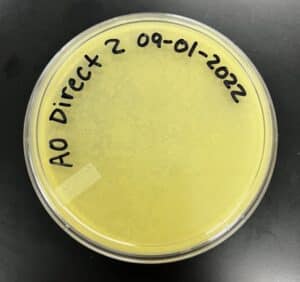
Title: Plaque Assay
Date: 9/1/2022 Redo: No Sample: AR 1
Purpose: To detect the presence of phages on bacterial lawns
Notes: After the samples were placed in the fridge, we came back the next day and took the box where our samples were being stored and prepared to begin plaque assay.
1. To prepare for aseptic work, we first washed our hands and disinfected our workstation with Cidecon and 70% ethanol. We then proceeded to light a gas canister to avoid contamination.
2. Using a pipette, we obtained 500 µl (0.5 mL) of phage sample from the direct isolation procedure. We then transferred the sample into a a tube containing host bacteria.
3. We then mixed the sample by rotating the tube gently and let it rest for about 7 minutes.
4. While waiting, we obtained agar plates for each sample and labeled the plates with our initials, sample number, and date.
5. After the 7 minutes, we transferred 3 mL of warm top agar into the sample tube and pipetted the entire mixture slowly onto an agar plate,
6. We tilted the plate to spread the mixture evenly across the plate and let the top agar solidify for 20 minutes. We then placed it into a warm incubator.
Results:
Negative Results
‣ 9/2/2022: I came to check on my plate after 17 hours but saw no signs of phages
‣ 9/7/2022: I came at 9:16 am and still saw no signs of phages

Conclusions and Next Steps:
‣ 9/2/2022: After seeing no signs of phages, I decided I would give it a few more days
‣ 9/7/2022: After still not seeing any signs of phages, I concluded there was no phage in my environmental sample
My next step was to see if my other plate or my partners plate had any signs of phages.
Title: Direct Isolation
Date: 8/31/2022 Redo: No Sample: AO2
Purpose: This procedure is to isolate bacteriophages from the environmental sample and infect the host bacteria using a plaque assay
Notes:
1. To prepare for aseptic work, we first washed our hands and disinfected our workstation with Cidecon and 70% ethanol. We then proceeded to light a gas canister.
2. Using a pipette, we added liquid media into each of our environmental samples until the sample was submerged under 2 to 3 mL of liquid media. We then capped the tube and inverted it several times until it was mixed throughly.
3. After mixing, we placed our tubes in a shaking incubator for 1 to 2 hours.
4. After those 2 hours, we took the tubes out of the incubator and let them sit until the particulate matter settled.
5. Once it settled, we took 1 mL of each sample out of the tube using a 5 mL serological pipette. The 1 mL samples were then placed in their own microcentrifuge tubes and centerfuged where the debris of the samples were allowed to pellet at the bottom of the tubes.
6. We then attached a 0.22µm syringe filter to a 5 mL syringe. We poured the samples from the microcentrifuge tubes into the syringe and collected clean filtered samples in another clean microcentrifuge tube. We did this for each sample. The filtered samples were then placed in the fridge overnight.
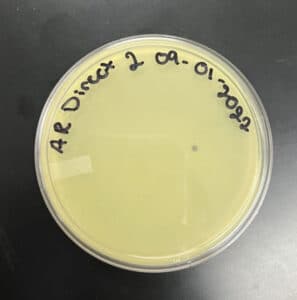
Title: Plaque Assay
Date: 9/1/2022 Redo: No Sample: AO 2
Purpose: To detect the presence of phages on bacterial lawns
Notes: After the samples were placed in the fridge, we came back the next day and took the box where our samples were being stored and prepared to begin plaque assay.
1. To prepare for aseptic work, we first washed our hands and disinfected our workstation with Cidecon and 70% ethanol. We then proceeded to light a gas canister to avoid contamination.
2. Using a pipette, we obtained 500 µl (0.5 mL) of phage sample from the direct isolation procedure. We then transferred the sample into a a tube containing host bacteria.
3. We then mixed the sample by rotating the tube gently and let it rest for about 7 minutes.
4. While waiting, we obtained agar plates for each sample and labeled the plates with our initials, sample number, and date.
5. After the 7 minutes, we transferred 3 mL of warm top agar into the sample tube and pipetted the entire mixture slowly onto an agar plate,
6. We tilted the plate to spread the mixture evenly across the plate and let the top agar solidify for 20 minutes. We then placed it into a warm incubator.
Results:
Negative Results
‣ 9/2/2022: I came to check on my plate after 17 hours but saw no signs of phages
‣ 9/7/2022: I came at 9:16 am and still saw no signs of phages

Conclusions and Next Steps:
‣ 9/2/2022: After seeing no signs of phages, I decided I would give it a few more days
‣ 9/7/2022: After still not seeing any signs of phages, I concluded there was no phage in my environmental sample
My next step was to see my partners plate had any signs of phages.
Title: Direct Isolation
Date: 8/31/2022 Redo: No Sample: AR2
Purpose: This procedure is to isolate bacteriophages from the environmental sample and infect the host bacteria using a plaque assay
Notes:
1. To prepare for aseptic work, we first washed our hands and disinfected our workstation with Cidecon and 70% ethanol. We then proceeded to light a gas canister.
2. Using a pipette, we added liquid media into each of our environmental samples until the sample was submerged under 2 to 3 mL of liquid media. We then capped the tube and inverted it several times until it was mixed throughly.
3. After mixing, we placed our tubes in a shaking incubator for 1 to 2 hours.
4. After those 2 hours, we took the tubes out of the incubator and let them sit until the particulate matter settled.
5. Once it settled, we took 1 mL of each sample out of the tube using a 5 mL serological pipette. The 1 mL samples were then placed in their own microcentrifuge tubes and centerfuged where the debris of the samples were allowed to pellet at the bottom of the tubes.
6. We then attached a 0.22µm syringe filter to a 5 mL syringe. We poured the samples from the microcentrifuge tubes into the syringe and collected clean filtered samples in another clean microcentrifuge tube. We did this for each sample. The filtered samples were then placed in the fridge overnight.
Title: Plaque Assay
Date: 9/1/2022 Redo: No Sample: AR 2
Purpose: To detect the presence of phages on bacterial lawns
Notes: After the samples were placed in the fridge, we came back the next day and took the box where our samples were being stored and prepared to begin plaque assay.
1. To prepare for aseptic work, we first washed our hands and disinfected our workstation with Cidecon and 70% ethanol. We then proceeded to light a gas canister to avoid contamination.
2. Using a pipette, we obtained 500 µl (0.5 mL) of phage sample from the direct isolation procedure. We then transferred the sample into a a tube containing host bacteria.
3. We then mixed the sample by rotating the tube gently and let it rest for about 7 minutes.
4. While waiting, we obtained agar plates for each sample and labeled the plates with our initials, sample number, and date.
5. After the 7 minutes, we transferred 3 mL of warm top agar into the sample tube and pipetted the entire mixture slowly onto an agar plate,
6. We tilted the plate to spread the mixture evenly across the plate and let the top agar solidify for 20 minutes. We then placed it into a warm incubator.
Results:
Postive Results
‣ 9/2/2022: I came to check on my plate after 17 hours but saw no signs of phages
‣ 9/7/2022: I came at 9:16 am and saw a small, cloudy plaque on my plate
Conclusions and Next Steps:
‣ 9/7/2022 9:16 am
One small plaque was identified on my plate and now we can proceed with the Picking a Plaque protocol.
Title: Picking a Plaque
Date: 09/07/22 Redo: No Sample: AR 2
Purpose: To retrieve a phage from the plaque that was picked
Notes: There was only 1 plaque on our plate and we used it for this protocol
1. To prepare for aseptic work, we first washed our hands and disinfected our workstation with Cidecon and 70% ethanol. We then proceeded to light a gas canister to avoid contamination.
2. We circled the small plaque with a sharpie to identify it on the plate
3. We then pipetted 100µl of phage buffer into a microcentrifuge tube using a a micropipettor and a sterile tip.
4. We proceeded to obtain a new sterile tip and gently touched the center of the plaque with the tip. We then placed the tip of pipette into microcentrifuge tube making sure to move the tip around the tube.
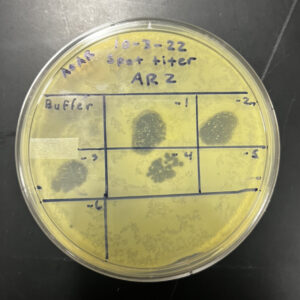
Title: Spot Test
Date: 9/07/2022 Redo: No Sample: AR2
Purpose: To confirm the presence of a phage in a plaque
Notes:
1. To prepare for aseptic work, we first washed our hands and disinfected our workstation with Cidecon and 70% ethanol. We then proceeded to light a gas canister to avoid contamination.
2. We labeled an agar plate a drew a line in the middle to divide it into 2 sections. One section was for the phage buffer, which would be our control, and the other section was our phage sample that was collected in the last protocol.
3. We transferred 3 mL of warm top agar into a tube containing host bacteria and pipetted the entire mixture slowly onto the agar plate we have already labled.
4. We tilted the plate to spread the mixture evenly across the plate and let the top agar solidify for 20 minutes.
5. After it had solidified, we pipetted 10 µl of the liquid phage sample and 10 µl of phage buffer each on their corresponding sides using micropipetter and sterile tips. We let the liquid absorb for about 20 minutes.
6. After absorbing, the plate was placed into a warm incubator for 24 hours.
Results:
9/8/2022 11:52 am: After 24 hours, we checked for any signs of clearing. The side with the phage buffer showed no signs, but the side with the phage did.

Conclusions and Next Steps:
The spot test confirmed the presence of a phage in our sample. Now we can proceed with the next protocol, Serial Dilutions.
Title: Serial Dilution
Date: 09/12/2022 Redo: No Sample: AR2
Purpose: To obtain liquid phage samples of decreasing concentrations.
Notes:
1. To prepare for aseptic work, we first washed our hands and disinfected our workstation with Cidecon and 70% ethanol. We then proceeded to light a gas canister to avoid contamination.
2. We obtained 8 microcentrifuge tubes and labeled them from 10^-1 to 10^-8. We then arranged them and placed them on a rack. We proceeded to add 90 μl of phage buffer into each tube using a micropipetter and sterile tips.
4. We began by adding 10 μl of our liquid phage sample into the tube labeled 10^-1 and proceeded to vortex it.
5. Using a new sterile tip, we transferred 10 μl of the mixture from the tube labeled 10^-1 into the next tube labeled 10^-2 and mixed it using a vortex. We repeated these steps for the next tubes until the last tube labeled 10^-8.
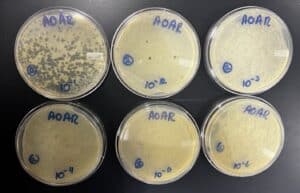
We ended up not using all 8 samples for the next steps, just the first 6. When the serial dilution was complete, did plaque assays for the first 6 diluted phage samples.
6. Once finished, we labeled 6 agar plates from 10^-1 to 10^-6 at the bottom
7. We obtained 6 tubes containing host bacteria and pipetted 10 μl of each diluted phage samples into their own corresponding tubes containing host bacteria. We rotated each tube to mix well and let it for about 7 minutes.
8. After the 7 minutes, we transferred 3 mL of warm top agar into each sample tube and pipetted the entire mixture slowly onto their corresponding agar plate. We tilted the plate to spread the mixture evenly across the plate and let the top agar solidify for 20 minutes. We then placed it into a warm incubator.
Results:
Negative results
9/15/2022 4:50 pm
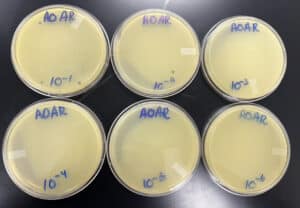
Conclusions and Next Steps:
The first plate has a few plaques on them, the second plate had 1 plaque, but the rest showed nothing. We are going to attempt to do another serial dilution, however, we are keeping plate 10^-2 just case.
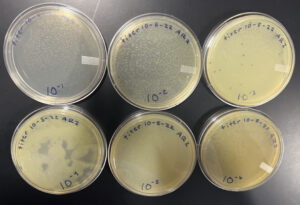
Title: Serial Dilution
Date: 09/19/2022 Redo: Yes Sample: AR2
Purpose: To obtain liquid phage samples of decreasing concentrations.
Notes:
1. To prepare for aseptic work, we first washed our hands and disinfected our workstation with Cidecon and 70% ethanol. We then proceeded to light a gas canister to avoid contamination.
2. We obtained 8 microcentrifuge tubes and labeled them from 10^-1 to 10^-6. We then arranged them and placed them on a rack. We proceeded to add 90 μl of phage buffer into each tube using a micropipetter and sterile tips.
4. We began by adding 10 μl of our liquid phage sample into the tube labeled 10^-1 and proceeded to vortex it.
5. Using a new sterile tip, we transferred 10 μl of the mixture from the tube labeled 10^-1 into the next tube labeled 10^-2 and mixed it using a vortex. We repeated these steps for the next tubes until the last tube labeled 10^-6.
6. Once finished, we labeled 6 agar plates from 10^-1 to 10^-6 at the bottom
7. We obtained 6 tubes containing host bacteria and pipetted 10 μl of each diluted phage samples into their own corresponding tubes containing host bacteria. We rotated each tube to mix well and let it for about 7 minutes.
8. After the 7 minutes, we transferred 3 mL of warm top agar into each sample tube and pipetted the entire mixture slowly onto their corresponding agar plate. We tilted the plate to spread the mixture evenly across the plate and let the top agar solidify for 20 minutes. We then placed it into a warm incubator.
Results:
Negative results
09/20/2022

Conclusions and Next Steps:
We took the plates out at 12:12 pm. They had no plaques on them and the agar was distorted on plate 10^-3 and 10^-6. It was probably because we did not let them solidify correctly. We decided to use plate 10^-2 from the previous serial dilution to use for the second serial dilution.
Title: Second Serial Dilution
Date: 09/26/2022 Redo: No Sample: AR2
Purpose: To obtain liquid phage samples of decreasing concentrations.
Notes:
1. To prepare for aseptic work, we first washed our hands and disinfected our workstation with Cidecon and 70% ethanol. We then proceeded to light a gas canister to avoid contamination.
2. We pipetted 10µl of phage buffer into a microcentrifuge tube using a a micropipettor and a sterile tip.
3. We proceeded to obtain a new sterile tip and gently touched the center of the plaque with the tip. We then placed the tip of pipette into microcentrifuge tube making sure to move the tip around the tube.
4. We then obtained 6 microcentrifuge tubes and labeled them from 10^-1 to 10^-6. We arranged them and placed them on a rack. We proceeded to add 90 μl of phage buffer into each tube using a micropipetter and sterile tips.
5. We began by adding 10 μl of our liquid phage sample into the tube labeled 10^-1 and proceeded to vortex it.
6. Using a new sterile tip, we transferred 10 μl of the mixture from the tube labeled 10^-1 into the next tube labeled 10^-2 and mixed it using a vortex. We repeated these steps for the next tubes until the last tube labeled 10^-6.
7. Once finished, we labeled 6 agar plates from 10^-1 to 10^-6 at the bottom
8. We obtained 6 tubes containing host bacteria and pipetted 10 μl of each diluted phage samples into their own corresponding tubes containing host bacteria. We rotated each tube to mix well and let it for about 7 minutes.
9. After the 7 minutes, we transferred 3 mL of warm top agar into each sample tube and pipetted the entire mixture slowly onto their corresponding agar plate. We tilted the plate to spread the mixture evenly across the plate and let the top agar solidify for 20 minutes. We then placed it into a warm incubator.
Results:
Positive results
09/27/2022

Conclusions and Next Steps:
We took the plates out of the incubator at 11:03 am. We were able to obtain a webbed plate, now we can proceed to the next protocol.
Title: Collecting Plate Lysates
Date: 09/28/2022 Redo: No Sample: AR2
Purpose: To create low concentration of liquid phage sample
Notes:
1. To prepare for aseptic work, we first washed our hands and disinfected our workstation with Cidecon and 70% ethanol. We then proceeded to light a gas canister to avoid contamination.
2. We flooded our webbed plate 10^-1 with 8 mL of sterile phage buffer and let it set for 2.5 hours
3. We placed the plate at an angle on top of the lid so the lysate would pool on the edge
4. We aspirated all of the lysate from the the plate and attached a 0.22 μm to the end of it
5. The lysate was then collected in a sterile conical tube, which was labeled and stored in the fridge
Results:
We were able to collect 6 mL of lysate from our plate

Conclusions and Next Steps:
We are now able to proceed to the next protocol which is the spot titer
Title: Spot Titer
Date: 10/03/2022 Redo: No Sample: AR2
Purpose: To determine the concentration of phage particles in a lysate using a spot test
Notes:
1. To prepare for aseptic work, we first washed our hands and disinfected our workstation with Cidecon and 70% ethanol. We then proceeded to light a gas canister to avoid contamination.
2. Using a pen, we labeled an agar plate in 7 different sections. This included dilutions 10^-1 to 10^-6 and phage buffer.
3. We then obtained 6 microcentrifuge tubes and labeled them from 10^-1 to 10^-6. We arranged them and placed them on a rack. We proceeded to add 90 μl of phage buffer into each tube using a micropipetter and sterile tips.
4. We added 10 μl of our low concentration lysate sample into the tube labeled 10^-1 and proceeded to vortex it.
5. Using a new sterile tip, we transferred 10 μl of the mixture from the tube labeled 10^-1 into the next tube labeled 10^-2 and mixed it using a vortex. We repeated these steps for the next tubes until the last tube labeled 10^-6.
6. We then pipetted 10µl of our low concentration lysate into a tube containing host bacteria. We mixed it well and let it sit for 7 minutes.
7. After the 7 minutes, 3 mL of warm top agar was pipetted into the tube and then transferred it slowly onto the agar plate. We tilted the plate to spread the mixture evenly across the plate and let the top agar solidify for 20 minutes.
8. After it has solidified, we pipetted 3µl of each sample onto their corresponding boxes and let it absorb for about 20 minutes.
9. After absorbing, the plate was placed into a warm incubator for 24 hours.
Results:
Negative results
10/04/2022
Conclusion:
We took the plate out of the incubator at 4:52 pm. The results of our plate was unclear and we were instructed to proceed with a full plate titer
Title: Full Plate Titer
Date: 10/05/2022 Redo: No Sample: AR2
Purpose: To determine the concentration of phage particles in a lysate by using a plaque assay
Notes:
1. To prepare for aseptic work, we first washed our hands and disinfected our workstation with Cidecon and 70% ethanol. We then proceeded to light a gas canister to avoid contamination.
2. We labeled 6 agar plates from 10^-1 to 10^-6 at the bottom
3. We obtained 6 tubes containing host bacteria and pipetted 10 μl of each low concentration lysate sample (from the previous protocol) into their own corresponding tubes. We rotated each tube to mix well and let it for about 7 minutes.
4. After the 7 minutes, we transferred 3 mL of warm top agar into each sample tube and pipetted the entire mixture slowly onto their corresponding agar plate. We tilted the plate to spread the mixture evenly across the plate and let the top agar solidify for 20 minutes. We then placed it into a warm incubator.
The plates were left in the incubator for almost a day and half
Results:
Positive results
10/06/22
Conclusion:
We took the plates out at 3:41 pm. The agar on plate 10^-1 was completely wiped out, but we were able to obtain a webbed plate on plate 10^-2. There were a few plaques on the other plates.
Amplification
Title: Creating Webbed Plates
Date: 10/12/2022 Redo: No Sample: AR2 10^-2
Purpose: To create a plate with a very high density of plaques from a lysate of known titer
Notes:
1. To prepare for aseptic work, we first washed our hands and disinfected our workstation with Cidecon and 70% ethanol. We then proceeded to light a gas canister.
2. Estimated the number of plaques needed to calculate the volume of lysate necessary to generate a webbed plate. The math we used is (22pfu/10ul)x(10^3ul/ml)x(10^3) (2.2×10^3×10^3) = 2.2×10^6 pfu/ml 2,200,000 plaques formed for a webbed plate
3. We decided 10^-2 looked better and we created 6 more plates with the same phage dilution.
4. Gathered 10mL of the 10^-2 concentration phage lysate sample were dispensed into six test tubes containing host bacteria. We let them sit for 10 minutes.
5. We gathered 6 agar plates and the host bacteria tubes for the webbed plates. We labeled the plates to the dilution factor of 10^-2. After we let settle, we used 3mL of top agar then was dispensed into the test tubes. Immediately back to the serological micropipette then we dispersed the agar onto the agar plates. We swirled the mixture around covering the whole plate.
6. Left it undisturbed for around 20 minutes. This process was repeated for the other mixtures.
7. We then placed the labeled agar plates into the incubator for 24-48 hours.
Results:
Positive Results
The plates was removed from the incubator 10/13/22.
Conclusions and Next Steps:
We successfully made webbed plates and our next step is to flood these plates to collect the high volume lysate.
Title: Flooding and Collecting High Concentration Lysate
Date: 10/17/2022 Redo: No Sample: AR2 10^-2
Purpose: To generate a highly concentrated liquid phage sample
Notes:
1. To prepare for aseptic work, we first washed our hands and disinfected our workstation with Cidecon and 70% ethanol. We then proceeded to light a gas canister.
2. We flooded the 10^-2 plate with 8 ml of sterile phage buffer using a serological pipette. It was added to each of the 6 plates. We let them sit at 9:30am until 12:20pm.
3. Then we removed the lid from the plates and tilted slightly by placing one edge of the plate on the lid allowing the lysate to pool to one side.
4. Using the 5mL syringe the liquid phage lysate was drawn up as much as we could from the plate.
5. We used the syringe to tightly screw it onto the 0.22 micrometer filter. Pushed down into a conical tube which collected the filtrate lysate.
6. The steps were repeated for all 6 plates.
7. We labeled the tubes and stored in the lab refrigerator 4ºC.
Results:
Lysate collected from 10^-2 webbed plates.
Conclusions and Next Steps:
We will perform a spot titer with the high volume lysate.
Title: Spot Titer with High Volume Lysate
Date: 10/20/2022 Redo: No Sample: AR2 10^-2
Purpose: To determine the concentration of phage particles in the high volume lysate using a spot test
Notes:
1. To prepare for aseptic work, we first washed our hands and disinfected our workstation with Cidecon and 70% ethanol. We then proceeded to light a gas canister to avoid contamination.
2. Using a pen, we labeled an agar plate in 7 different sections. This included dilutions 10^-1 to 10^-6 and phage buffer.
3. We then obtained 6 microcentrifuge tubes and labeled them from 10^-1 to 10^-6. We arranged them and placed them on a rack. We proceeded to add 90 μl of phage buffer into each tube using a micropipetter and sterile tips.
4. We added 10 μl of our low concentration lysate sample into the tube labeled 10^-1 and proceeded to vortex it.
5. Using a new sterile tip, we transferred 10 μl of the mixture from the tube labeled 10^-1 into the next tube labeled 10^-2 and mixed it using a vortex. We repeated these steps for the next tubes until the last tube labeled 10^-6.
6. We then pipetted 10µl of our low concentration lysate into a tube containing host bacteria. We mixed it well and let it sit for 7 minutes.
7. After the 7 minutes, 3 mL of warm top agar was pipetted into the tube and then transferred it slowly onto the agar plate. We tilted the plate to spread the mixture evenly across the plate and let the top agar solidify for 20 minutes.
8. After it has solidified, we pipetted 3µl of each sample onto their corresponding sections and let it absorb for about 20 minutes.
9. After absorbing, the plate was placed into a warm incubator for 24 hours.
Results:
Negative results
10/24/22
Conclusions and Next Steps:
We accidentally left the plate in the incubator over the weekend and spots where we pipetted the bacteria merged together. We are going to attempt to do a full plate titer next.
Title: Full Plate Titer with High Volume Lysate
Date: 10/26/2022 Redo: No Sample: AR2
Purpose: To determine the concentration of phage particles in our high volume lysate by using a plaque assay
Notes:
1. To prepare for aseptic work, we first washed our hands and disinfected our workstation with Cidecon and 70% ethanol. We then proceeded to light a gas canister to avoid contamination.
2. We labeled 6 agar plates from 10^-1 to 10^-6 at the bottom
3. We obtained 6 tubes containing host bacteria and pipetted 10 μl of each high volume lysate sample into their own corresponding tubes. We rotated each tube to mix well and let it for about 7 minutes.
4. After the 7 minutes, we transferred 3 mL of warm top agar into each sample tube and pipetted the entire mixture slowly onto their corresponding agar plate. We tilted the plate to spread the mixture evenly across the plate and let the top agar solidify for 20 minutes. We then placed it into a warm incubator.
Results:
Positive Results
10/25/22
Conclusions and Next Steps:
The agar on plate 10^-1 was completely wiped out, but there were plaques on the other plates
Title: Entering a Phage into the Actinobacteriophage Database
Date: 10/27/2022 Redo: No Sample: AR2
Purpose: To include our phage in the Actinobacteriophage Database
Notes:
1. We created an active Phages DB account
2. We added our phage “Milagros” to the database according to the naming rules on the database
3. We submitted the information required
4. Then we submitted a request to PhagesDB to be reviewed and approved.
Results:
Positive Results
Conclusions and Next Steps:
The next step is to archive our phage
Title: Archiving Phage Sample
Date: 10/31/2022 Redo: No Sample: AR2
1. To prepare for aseptic work, we first washed our hands and disinfected our workstation with Cidecon and 70% ethanol. We then proceeded to light a gas canister to avoid contamination.
2. Archiving tubes were already prepared for us and were labeled.
Every step after this was preformed under a fumehood
3. 4 ml of our high lysate titer was added to a 15 ml conical tube.
4. 280 μl of DMSO was also added and then vortexed
5. We then pipetted 1 ml of our mixture into each of the archiving tubes.
6. The tubes were then put in a storage box.
Results:
Positive Results
Conclusions and Next Steps:
The next step is DNA extraction
DNA Extraction
Title: DNA Extraction Day 1
Date: 11/2/22 Redo: No Sample: AR2
Purpose: To isolate genomic DNA from phage
Notes:
1. To prepare for aseptic work, we first washed our hands and disinfected our workstation with Cidecon and 70% ethanol. We then proceeded to put gloves on.
2. We gently mixed our high volume lysate and aliquoted it in a 15 mL conical tube. The TA added 20 uL of nuclease to our tube.
3. The lysate was then distributed into 5 microcentrifuge tubes, 1 mL each
4. We added 20 uL of ZnCl2 into each tube, gently mixed it, then incubated in at 37ºC for 5 minutes.
5. Then it was centrifuged at 10,000 rpm for 1 minute to pellet the phage
6. The supernatants were discarded while also keeping the pellets
7. The pellets were then resuspended in 500 uL TES buffer. We then incubated it at 60ºC for 15 minutes.
8. 1 uL of Proteinase K was added into the tube and gently mixed. the tubes were then incubated at 37ºC for 10 minutes
9. 60 uL of potassium acetate was then added to each tube and mixed well. It was then left in ice for 15 minutes, causing a precipitate to form.
10. The tubes were then centrifuged at 4ºC for 1 minute at 12,000 rpm to pellet the capsids. The supernatants containing the DNA was placed into new microcentrifuge tubes. The tubes with the pellets were thrown away
11. 500 uL of isopropanol was added into each tube and left on ice overnight
Title: DNA Extraction Day 2
Date: 11/4/22 Redo: No Sample: AR2
Purpose: To isolate genomic DNA from phage
Notes:
1. To prepare for aseptic work, we first washed our hands and disinfected our workstation with Cidecon and 70% ethanol. We then proceeded to put gloves on.
2. The tubes were then centrifuged at top speed for 10min to pellet DNA. We discarded the supernatant
3. 250uL of 70% ethanol was added into each tube. The tubes were then centrifuged again for 1min at top speed
4. The pellets were then dried by turning the tubes upside down on paper towels and then heated in an incubator at 30ºC
5. The first pellet was then resuspended in 50 uL of nuclease-free water. That solution was then used to resuspend the next pellets until the last tube.
6. Use Nanodrop to check DNA concentration
Results:
[image]
Conclusions and Next Steps:
The readings were low so we were instructed to do another extraction
Title: DNA Extraction Day 1
Date: 11/9/22 Redo: Yes Sample: AR2
Purpose: To isolate genomic DNA from phage
Notes:
1. To prepare for aseptic work, we first washed our hands and disinfected our workstation with Cidecon and 70% ethanol. We then proceeded to put gloves on.
2. We gently mixed our high volume lysate and aliquoted it in a 15 mL conical tube. The TA added 20 uL of nuclease to our tube.
instead of 5 tubes, we were instructed to do 20
3. The lysate was then distributed into 5 microcentrifuge tubes, 1 mL each
4. We added 20 uL of ZnCl2 into each tube, gently mixed it, then incubated in at 37ºC for 5 minutes.
5. Then it was centrifuged at 10,000 rpm for 1 minute to pellet the phage
6. The supernatants were discarded while also keeping the pellets
7. The pellets were then resuspended in 500 uL TES buffer. We then incubated it at 60ºC for 15 minutes.
there wasn’t enough proteinase k so we were instructed to only continue with 12 tubes
8. 1 uL of Proteinase K was added into the tube and gently mixed. the tubes were then incubated at 37ºC for 10 minutes
9. 60 uL of potassium acetate was then added to each tube and mixed well. It was then left in ice for 15 minutes, causing a precipitate to form.
10. The tubes were then centrifuged at 4ºC for 1 minute at 12,000 rpm to pellet the capsids. The supernatants containing the DNA was placed into new microcentrifuge tubes. The tubes with the pellets were thrown away
11. 500 uL of isopropanol was added into each tube and left on ice overnight
Title: DNA Extraction Day 2
Date: 11/11/22 Redo: Yes Sample: AR2
Purpose: To isolate genomic DNA from phage
Notes:
1. To prepare for aseptic work, we first washed our hands and disinfected our workstation with Cidecon and 70% ethanol. We then proceeded to put gloves on.
2. The tubes were then centrifuged at top speed for 10min to pellet DNA. We discarded the supernatant
3. 250uL of 70% ethanol was added into each tube. The tubes were then centrifuged again for 1min at top speed
4. The pellets were then dried by turning the tubes upside down on paper towels and then heated in an incubator at 30ºC
5. The first pellet was then resuspended in 50 uL of nuclease-free water. That solution was then used to resuspend the next pellets until the last tube.
6. Use Nanodrop to check DNA concentration
Results:
[image]
Conclusions and Next Steps:
Did have salt contamination but will move along doing the restriction enzymes with the DNA.
Characterization
Title: Mounting Phage Samples for TEM and Staining with Uranyl Acetate
Date: 10/31/22 Redo: No Sample: AR2
Purpose: This procedure is to prepare phage for viewing by using a transmission electron microscope.
Notes:
1. The first thing we did was clean and prepare our station while wearing gloves.
2. We prepared our phage sample by aseptically transferring 1 ml of high lysate into a sterile microcentrifuge tube.
3. We centrifuged the tube for 1 hour at 4°C at the top speed to get the phage particles to the bottom.
4. After centrifuged we used a micropipette to carefully remove the supernatant without disrupting the pellet.
5. We then used 100 μl of phage buffer then was added to the tube and left the phage resuspended at 4 °C for one hour.
Prepare Work Area (was done by instructor)
6. We put on a fresh pair of gloves and then we covered the area with bench paper to have a clean work surface.
7. The cover of a 5 x 5 cm piece of parafilm was removed and the parafilm was placed at the center of the petri dish lid.
8. We then placed a PELCO tab at the center of the parafilm and left the adhesive exposed.
9. We used the EM forceps to grab a grid by its edge and the grisd was placed right against the side of the tab and we had the dark shiny side facing up.
Mount and Stain Phage:
1. We used a micropipette to transferre 10 ul of the lysate onto the grid whil not touching the tip to the grid.
2. The phage was allowed to settle and attach to the grid for 2-5 minutes.
3. After the time was up we wicked off the excess fluid with the edges of filter paper.
4. The grid was rinsed 2 times by carefully pipetting 10 ul of water onto the grid and have it sit for 2 minutes. The water was wicked off in the same manner for the excess fluid.
5. Then 10 ul of uranyl acetate was added to the grid and sit for 2 minutes.
6. The excess was wicked off until the surface had an rainbow oil-like look.
7. The grid was then allow to air dry and placed safely into the grid box
Results:
(picture)
Conclusions and Next Steps:
We ready to start on the DNA extraction.
Title: Restriction Enzyme Digest
Date: 11/14/22 Redo: No Sample: AR2
Purpose: This procedure is to add restriction enzyme to cut the DNA of our sample and be able to visualize it.
Notes:
For our restriction enzymes we used: Haelll, Nspl, Sacll, and SalI.
Preparing genomic DNA:
1. We gently mixed our DNA sample by slightly vortexing it at a low speed. Then we incubated our sample at 65°C for 10 minutes, then immediately placed the sample in ice and then centrifuged the tube for less than a minute.
2. By using the concentration of our DNA sample (instructor decided between Nanodrop and Qubit), we calculated the volume of DNA need to obtain 0.5 ug of DNA.
Calculation of ul DNA=0.5ug (1ml/0.183 ug)(1000 ul/1ml)= 27.322 ul
We calculated the amount of ul need for DNA to obtain 0.5ug was 27.322 ul. (needs to be fixed)
Setting Up Restriction Enzyme Reactions:
3. We set 5 tubes for each of the enzymes reactions. One for uncut DNA and the other 4 corresponding to the restriction enzymes and then we used the table to determine the volume that is needed for each tube:
- Total Volume (25 ul)
- 4.5 ul of DNA
- 0.5 ul of Restrictive Enzyme
-
- Hae lll, Nsp l, and Sac ll required CutSmart Buffer. Sal I required 3.1 Buffer
-
- 2.5ul 10X Reaction Buffer
- 17 sterile ddH2O
Everything was calculated to make sure that each tube had a final volume of 22 uL.
4. Then the tubes were gently mixed and spun in the centrifuge for less than a minute.
5. The the tubes were incubated at 37°C for 1 hour.
6. When the incubation is done, we spun the tubes for less than a minute and stored them in the freezer at -20°C.
Conclusions and Next Steps:
We will continue to cast the agarose gel and do the gel electrophoresis.
Title: Casting Agarose Gel and Gel Electrophoresis
Date:11/14/22 Redo: No Sample: AR2
Purpose: This procedure is to prepare gel for gel electrophoresis to view digested DNA.
Notes:
Part 1-Making and Casting Agarose Gel
1. We set up the gel electrophoresis apparatus and placed the comb to prepare for the gel.
2. We calculated that we needed 0.24 g of agarose powder and we transferred that to an Erlenmeyer flask.
3. Then we added 30 ml of 1X TBE Buffer to the Erlenmeyer flask and swirled to mix.
4. Next we took the Erlenmeyer flask to heat up the mixture for 1 minute, at 30 sec, we take it out and gently swirled to mix and put it back into the microwave to continue heating.
5. We took it out of the microwave and allowed the flask to cool for 15 minutes.
6. Once it cooled down, we added 1.5 ul of ethidium bromide (EtBr) the gel dye and then mixed the mixture by swirling it.
7. We then poured the mixture of agarose and ethidium bromide into the gel cast and we used a10 well comb to create the well in the gel. We did not create any bubbles during the pouring.
8. We let the gel sit for around 20 minutes to cool and solidify.
9. Onces solidified, we carefully removed the cmob and gently remove the cast carrying the gel.
10. Then we placed the cast platform back into the apparatus but we put the wells in the direction of the (-) cathode.
11. We poured 1X TBE Buffer into the gel apparatus until the gel was submerged in about 1/4 inch of buffer.
Part 2-Gel Electrophoresis
1. Once the gel was properly placed, we prepared the restriction enzyme digest samples for electrophoresis.
a. Then we added 5 uL of concentrated 6x loading dye to each 25 uL restriction enzyme sample.
b. We then prepared our ladder, we got another microcentrifuge tube and then we added 1 ul of ladder(HindiIII Digest-given by instructor), 5 ul o 6X loading dye and then 24 ul of Nuclease-Free Water.
c.Once the samples were made, we placed the samples into the 65°C incubator for 5 minutes. Then immediately, we placed the samples on ice and spun them in the microcentrifuge for around 15 secs at 10,000 rpm.
2. We loaded the gel in the following order:
Ladder- Sall-Nspl-Hsel-Saell
Haell was not present because we missed the well while inserting the sample.
3. Using a fresh tip and we micropipetted, we loaded 20ul of each sample into the wells until it was full.
4. Once the gel was set up, we plugged in the electrodes and then we ran the gel electrophoresis apparatus at a voltage of 100 V.
5. We ran the gel until the dye had migrated to the 5 marker on the gel box.
6. After it reached the mark we turned off the power and took out the gel box. We then moved the gel to the storage room to view the gel under the UV transilluminator.
Results:
(Picture)
Haell did not show up because we missed the well while inserting the sample.
Conclusions and Next Steps:
We are done and now continue sequencing.