Discovery of DopeGoat
DopeGoat Information
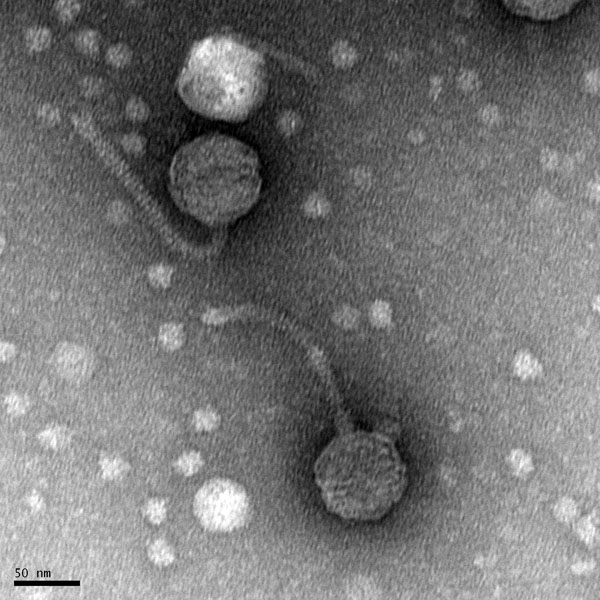
Morphology: Siphoviridae
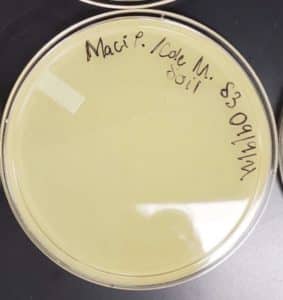
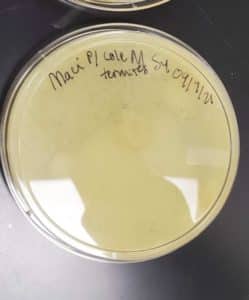
Sample Collection
| Collector Name |
Cole Moore | Maci Pitner | Maci Pitner | Cole Moore | Cole Moore | |
| Sample No. | S1 | S2 | S3 | S4 | S5 | |
| Date of Collection | 8/29/2021 | 08/29/2021 | 9/8/2021 | 9/8/2021 | 9/9/2021 | |
| Sample Type | Silt | Soil | Plant Debris | Termites | Wasp Nest | |
| General Location | Dirt Mound | Under Bush | Grass By Wisdom Gym | Metal Shed | ||
| Location Description | On the outer edge of the Stephenville City Landfill | Near Staples parking lot in grassy part by the parking lot under the bush. | A grass field between a resting area and the back of Wisdom Gym | Tool Shed behind Moore property in front of a pasture. | ||
| GPS Coordinates | 32.185791, -98.292298 | 32.205896, -98.240849 | 32.215896, -98.220461 | 32.099781, -98.329681 | ||
| Sample Depth | 1 inch | About 1 inch | Surface of Soil | Roof of building | ||
| Ambient Temperature | 29 Degrees Celsius | 30 degrees Celsius | 27 Degrees Celsius | 32 Degrees Celsius |
| Collector Name |
Cole Moore | Maci Pitner | Maci Pitner | Cole Moore | |
| Sample No. | S6 | S7 | S8 | S9 | |
| Date of Collection | 9/14/2021 | 9/14/2021 | 9/14/2021 | 9/14/2021 | |
| Sample Type | HEB Cart Swab | Walmart Cart Swab | Debris from Hospital Dumpster | Ant Pile | |
| General Location | Handle of HEB Shopping Cart | Handle of Walmart Shopping Cart | Hospital Dumpster | Student Center Sidewalk | |
| Location Description | Swab tested the handle of a HEB shopping cart left in the parking lot | Swab tested the handle of a Walmart shopping cart left in the parking lot | South-East parking lot of the Stephenville Hospital | The sidewalk leading up to the circular area of the Student Center at Tarleton | |
| GPS Coordinates | 32.208988, -98.225777 | 32.206238, -98.237010 | 32.222296, -98.204700 | 32.217317, -98.218771 | |
| Sample Depth | On Surface | On Surface | On Surface | About One Inch | |
| Ambient Temperature | 29 Degrees Celsius | 29 Degrees Celsius | 29 Degrees Celsius | 29 Degrees Celsius |
Isolation/Purification
 Title: Direct Isolation
 Title
TitleDate: August/30/2021 Redo: No Sample: S1
Purpose: This experimental process is used to isolate a bacteriophage from the environmental sample that was collected in order to infect the host bacteria using a plaque assay.
Notes:
- Wash hands and then sterilize the bench with CiDecon and 70% ethanol using aseptic techniques. After sterilizing remove gloves and light bunsen burner to maintain the sterile environment.
- We added PYCa media using the 5 mL serological pipette to the sample in a 15mL conical tube until the media was thoroughly mixed with the sample. It was then left in a rotating incubator for two hours at 220 rpm 29 degrees celsius.
- The sample was then centrifuged at 2000 gravities for 10 minutes.
- Using a 5mL syringe and .22 um syringe filter we then removed the liquid sample from the 15 mL conical tube and transferred over the now filtered sample into a microcentrifuge tube.
Then we began the plaque assay
-
Using a 100 ul micropipette, we transferred 500 microliters of the filtered sample into a test tube containing 250 microliters of host bacteria.
-
The tube was then tilted to allow for a proper mixture between the sample and bacteria and allowed to sit for 10 minutes.
-
An agar plate was removed from the fridge to allow for quick transfer of upcoming steps.
-
After we allowed the mixture to sit for 10 minutes, using a 5 mL serological pipette we transferred 3 mL of molten top agar into the test tube, and then immediately after we aspirated it back into the syringe.
-
The mixture now containing molten top agar was then dispensed onto the agar plate and tilted to allow the liquid to completely cover the surface of the agar.
-
The plate was then allowed to solidify for 20 minutes and was then incubated for 48 hours.
Results:
-
The results ended up being negative
The plate was removed from the incubator in order to check the status of the phage development at 9:21 a.m. on 09/1/2021.

Conclusions and Next Steps:
09/21/2021: Will will perform enriched isolation next on sample S2.
Title: Isolation/Purification
Date: September/1/2021 Redo: Yes Sample: S2
This experimental process is used to isolate a bacteriophage from the environmental sample that was collected in order to infect the host bacteria using a plaque assay.
Notes:
- Wash hands and then sterilize the bench with CiDecon and 70% ethanol using aseptic techniques. After sterilizing remove gloves and light bunsen burner to maintain the sterile environment.
- We then added 20 mL of PYCa media to our 15 mL sample in a 50mL conical tube and vortexed.
- The new sample was then placed in a rotating incubator and left to incubate at 220 rpms 29 degrees celsius for 2 hours.
- After the two hours the sample was centrifuged at 2000 gravities for 10 minutes.
- The supernatant was then filtered through a .22 um filter and collected in a 50 ml conical tube.
- We then added 0.5 ml of host bacteria to the conical tube
- The sample was then allowed to incubate for six days at 220 rpms, while making sure it could aerate by leaving the lid of the tube loose.
- After incubation, we transferred 1.4 ml of sample into two different microcentrifuge tubes and spun it at high speed for a minute.
- We then pipetted 1 ml from each microcentrifuge tube into a 0.22 um filter and syringe careful not to collect any of the pellet.
- The filtered sample was then stored in a microcentrifuge tube at 4 degrees celsius.
- After letting the sample sit for a day, we sat out an agar plate to allow it to warm to room temperature.
- The plate was then labeled and divided into three sections.
- We then acquired a test tube 250 ul of host bacteria and pipetted 3 ml of molten top agar on to the bacteria and quickly drew the mixture back up.
- The molten agar mixture was then dispensed onto an agar plate and allowed 20 minutes to solidify.
- After the molten agar had solidified, we transferred 10 ul of our phage sample into three small dots, each separated by a section.
Results:
Unsuccessful. No plaques were found.
Conclusions and Next Steps:
9/10/2021: We will retry direct isolation, and begin the process with multiple samples that are different from just soil.
Title: Direct Isolation
Date: September/6/2021 Redo: No Sample: S3
Purpose: This experimental process is used to isolate a bacteriophage from the environmental sample that was collected in order to infect the host bacteria using a plaque assay.
Notes:
- Wash hands and then sterilize the bench with CiDecon and 70% ethanol using aseptic techniques. After sterilizing remove gloves and light bunsen burner to maintain the sterile environment.
- We added PYCa media using the 5 mL serological pipette to a crushed termite sample in a 15mL conical tube until the media was thoroughly mixed with the sample. It was then left in a rotating incubator for two hours at 220 rpm 29 degrees celsius.
- The sample was then centrifuged at 2000 gravities for 10 minutes.
- Using a 5mL syringe and .22 um syringe filter we then removed the liquid sample from the 15 mL conical tube and transferred over the now filtered sample into a microcentrifuge tube.
Then we began the plaque assay
-
Using a 100 ul micropipette, we transferred 500 microliters of the filtered sample into a test tube containing 250 microliters of host bacteria.
-
The tube was then tilted to allow for a proper mixture between the sample and bacteria and allowed to sit for 10 minutes.
-
An agar plate was removed from the fridge to allow for quick transfer of upcoming steps.
-
After we allowed the mixture to sit for 10 minutes, using a 5 mL serological pipette we transferred 3 mL of molten top agar into the test tube, and then immediately after we aspirated it back into the syringe.
-
The mixture now containing molten top agar was then dispensed onto the agar plate and tilted to allow the liquid to completely cover the surface of the agar.
-
The plate was then allowed to solidify for 20 minutes and was then incubated for 48 hours.
Results:
-
The results ended up being negative
The plate was removed from the incubator in order to check the status of the phage development at 9:05 a.m. on 09/6/2021.
Conclusions and Next Steps:
09/6/2021: We will attempt another direct isolation next on sample S4.
Title: Direct Isolation
Date: September/8/2021 Redo: No Sample: S4
Purpose: This experimental process is used to isolate a bacteriophage from the environmental sample that was collected in order to infect the host bacteria using a plaque assay.
Notes:
- Wash hands and then sterilize the bench with CiDecon and 70% ethanol using aseptic techniques. After sterilizing remove gloves and light bunsen burner to maintain the sterile environment.
- We added PYCa media using the 5 mL serological pipette to the decomposing vegetable sample in a 15mL conical tube until the media was thoroughly mixed with the sample. It was then left in a rotating incubator for two hours at 220 rpm 29 degrees celsius.
- The sample was then centrifuged at 2000 gravities for 10 minutes.
- Using a 5mL syringe and .22 um syringe filter we then removed the liquid sample from the 15 mL conical tube and transferred over the now filtered sample into a microcentrifuge tube.
Then we began the plaque assay
-
Using a 100 ul micropipette, we transferred 500 microliters of the filtered sample into a test tube containing 250 microliters of host bacteria.
-
The tube was then tilted to allow for a proper mixture between the sample and bacteria and allowed to sit for 10 minutes.
-
An agar plate was removed from the fridge to allow for quick transfer of upcoming steps.
-
After we allowed the mixture to sit for 10 minutes, using a 5 mL serological pipette we transferred 3 mL of molten top agar into the test tube, and then immediately after we aspirated it back into the syringe.
-
The mixture now containing molten top agar was then dispensed onto the agar plate and tilted to allow the liquid to completely cover the surface of the agar.
-
The plate was then allowed to solidify for 20 minutes and was then incubated for 48 hours.
Results:
-
The results ended up being negative
The plate was removed from the incubator in order to check the status of the phage development at 9:21 a.m. on 09/9/2021.
Conclusions and Next Steps:
09/9/2021: We will perform more direct isolation next on sample S5.
Title: Direct Isolation
Date: September/12/2021 Redo: No Sample: S5
Purpose: This experimental process is used to isolate a bacteriophage from the environmental sample that was collected in order to infect the host bacteria using a plaque assay.
Notes:
- Wash hands and then sterilize the bench with CiDecon and 70% ethanol using aseptic techniques. After sterilizing remove gloves and light bunsen burner to maintain the sterile environment.
- We added PYCa media using the 5 mL serological pipette to the ground wasp nest sample in a 15mL conical tube until the media was thoroughly mixed with the sample. It was then left in a rotating incubator for two hours at 220 rpm 29 degrees celsius.
- The sample was then centrifuged at 2000 gravities for 10 minutes.
- Using a 5mL syringe and .22 um syringe filter we then removed the liquid sample from the 15 mL conical tube and transferred over the now filtered sample into a microcentrifuge tube.
Then we began the plaque assay
-
Using a 100 ul micropipette, we transferred 500 microliters of the filtered sample into a test tube containing 250 microliters of host bacteria.
-
The tube was then tilted to allow for a proper mixture between the sample and bacteria and allowed to sit for 10 minutes.
-
An agar plate was removed from the fridge to allow for quick transfer of upcoming steps.
-
After we allowed the mixture to sit for 10 minutes, using a 5 mL serological pipette we transferred 3 mL of molten top agar into the test tube, and then immediately after we aspirated it back into the syringe.
-
The mixture now containing molten top agar was then dispensed onto the agar plate and tilted to allow the liquid to completely cover the surface of the agar.
-
The plate was then allowed to solidify for 20 minutes and was then incubated for 48 hours.
Results:
-
The results ended up being negative
The plate was removed from the incubator in order to check the status of the phage development at 10:34 a.m. on 09/13/21.

Conclusions and Next Steps:
09/21/2021: We will perform enriched isolation next on sample S6-9.
Title: Isolation/Purification
Date: September/14/2021 Redo: No Sample: S6
This experimental process is used to isolate a bacteriophage from the environmental sample that was collected in order to infect the host bacteria using a plaque assay.
Notes:
- Wash hands and then sterilize the bench with CiDecon and 70% ethanol using aseptic techniques. After sterilizing remove gloves and light bunsen burner to maintain the sterile environment.
- We then added 20 mL of PYCa media to our 15 mL sample in a 50mL conical tube and vortexed.
- The new sample was then placed in a rotating incubator and left to incubate at 220 rpms 29 degrees celsius for 2 hours.
- After the two hours the sample was centrifuged at 2000 gravities for 10 minutes.
- The supernatant was then filtered through a .22 um filter and collected in a 50 ml conical tube.
- We then added 0.5 ml of host bacteria to the conical tube
- The sample was then allowed to incubate for six days at 220 rpms, while making sure it could aerate by leaving the lid of the tube loose.
- After incubation, we transferred 1.4 ml of sample into two different microcentrifuge tubes and spun it at high speed for a minute.
- We then pipetted 1 ml from each microcentrifuge tube into a 0.22 um filter and syringe careful not to collect any of the pellet.
- The filtered sample was then stored in a microcentrifuge tube at 4 degrees celsius.
- After letting the sample sit for a day, we sat out an agar plate to allow it to warm to room temperature.
- The plate was then labeled and divided into three sections.
- We then acquired a test tube 250 ul of host bacteria and pipetted 3 ml of molten top agar on to the bacteria and quickly drew the mixture back up.
- The molten agar mixture was then dispensed onto an agar plate and allowed 20 minutes to solidify.
- After the molten agar had solidified, we transferred 10 ul of our phage sample into three small dots, each separated by a section.
Results:
Unsuccessful. No plaques were found.

Conclusions and Next Steps:
9/20/2021: We will continue with our other samples in searching for a phage.
Title: Isolation/Purification
Date: September/14/2021 Redo: No Sample: S7
This experimental process is used to isolate a bacteriophage from the environmental sample that was collected in order to infect the host bacteria using a plaque assay.
Notes:
- Wash hands and then sterilize the bench with CiDecon and 70% ethanol using aseptic techniques. After sterilizing remove gloves and light bunsen burner to maintain the sterile environment.
- We then added 20 mL of PYCa media to our 15 mL sample in a 50mL conical tube and vortexed.
- The new sample was then placed in a rotating incubator and left to incubate at 220 rpms 29 degrees celsius for 2 hours.
- After the two hours the sample was centrifuged at 2000 gravities for 10 minutes.
- The supernatant was then filtered through a .22 um filter and collected in a 50 ml conical tube.
- We then added 0.5 ml of host bacteria to the conical tube
- The sample was then allowed to incubate for six days at 220 rpms, while making sure it could aerate by leaving the lid of the tube loose.
- After incubation, we transferred 1.4 ml of sample into two different microcentrifuge tubes and spun it at high speed for a minute.
- We then pipetted 1 ml from each microcentrifuge tube into a 0.22 um filter and syringe careful not to collect any of the pellet.
- The filtered sample was then stored in a microcentrifuge tube at 4 degrees celsius.
- After letting the sample sit for a day, we sat out an agar plate to allow it to warm to room temperature.
- The plate was then labeled and divided into three sections.
- We then acquired a test tube 250 ul of host bacteria and pipetted 3 ml of molten top agar on to the bacteria and quickly drew the mixture back up.
- The molten agar mixture was then dispensed onto an agar plate and allowed 20 minutes to solidify.
- After the molten agar had solidified, we transferred 10 ul of our phage sample into three small dots, each separated by a section.
Results:
Successful. A small group of plaques were found.
A single major plaque formed.
Conclusions and Next Steps:
9/20/2021: We will continue with our other sample as it was much more effective.
Title: Isolation/Purification
Date: September/14/2021 Redo: No Sample: S8
This experimental process is used to isolate a bacteriophage from the environmental sample that was collected in order to infect the host bacteria using a plaque assay.
Notes:
- Wash hands and then sterilize the bench with CiDecon and 70% ethanol using aseptic techniques. After sterilizing remove gloves and light bunsen burner to maintain the sterile environment.
- We then added 20 mL of PYCa media to our 15 mL sample in a 50mL conical tube and vortexed.
- The new sample was then placed in a rotating incubator and left to incubate at 220 rpms 29 degrees celsius for 2 hours.
- After the two hours, the sample was centrifuged at 2000 gravities for 10 minutes.
- The supernatant was then filtered through a .22 um filter and collected in a 50 ml conical tube.
- We then added 0.5 ml of host bacteria to the conical tube
- The sample was then allowed to incubate for six days at 220 rpms, while making sure it could aerate by leaving the lid of the tube loose.
- After incubation, we transferred 1.4 ml of sample into two different microcentrifuge tubes and spun it at high speed for a minute.
- We then pipetted 1 ml from each microcentrifuge tube into a 0.22 um filter and syringe careful not to collect any of the pellet.
- The filtered sample was then stored in a microcentrifuge tube at 4 degrees celsius.
- After letting the sample sit for a day, we sat out an agar plate to allow it to warm to room temperature.
- The plate was then labeled and divided into three sections.
- We then acquired a test tube 250 ul of host bacteria and pipetted 3 ml of molten top agar onto the bacteria and quickly drew the mixture back up.
- The molten agar mixture was then dispensed onto an agar plate and allowed 20 minutes to solidify.
- After the molten agar had solidified, we transferred 10 ul of our phage sample into three small dots, each separated by a section.
Results:
Unsuccessful. No plaques were found.
Conclusions and Next Steps:
9/20/2021: We will continue with our other samples in searching for a phage.
Title: Isolation/Purification
Date: September/14/2021 Redo: No Sample: S9
This experimental process is used to isolate a bacteriophage from the environmental sample that was collected in order to infect the host bacteria using a plaque assay.
Notes:
- Wash hands and then sterilize the bench with CiDecon and 70% ethanol using aseptic techniques. After sterilizing remove gloves and light bunsen burner to maintain the sterile environment.
- We then added 20 mL of PYCa media to our 15 mL sample in a 50mL conical tube and vortexed.
- The new sample was then placed in a rotating incubator and left to incubate at 220 rpms 29 degrees celsius for 2 hours.
- After the two hours the sample was centrifuged at 2000 gravities for 10 minutes.
- The supernatant was then filtered through a .22 um filter and collected in a 50 ml conical tube.
- We then added 0.5 ml of host bacteria to the conical tube
- The sample was then allowed to incubate for six days at 220 rpms, while making sure it could aerate by leaving the lid of the tube loose.
- After incubation, we transferred 1.4 ml of sample into two different microcentrifuge tubes and spun it at high speed for a minute.
- We then pipetted 1 ml from each microcentrifuge tube into a 0.22 um filter and syringe careful not to collect any of the pellet.
- The filtered sample was then stored in a microcentrifuge tube at 4 degrees celsius.
- After letting the sample sit for a day, we sat out an agar plate to allow it to warm to room temperature.
- The plate was then labeled and divided into three sections.
- We then acquired a test tube 250 ul of host bacteria and pipetted 3 ml of molten top agar onto the bacteria and quickly drew the mixture back up.
- The molten agar mixture was then dispensed onto an agar plate and allowed 20 minutes to solidify.
- After the molten agar had solidified, we transferred 10 ul of our phage sample into three small dots, each separated by a section.
Results:
Successful. A large number of plaques formed.

Conclusions and Next Steps:
9/20/2021: Because we followed the enriched protocol, we will immediately begin our first serial dilution.
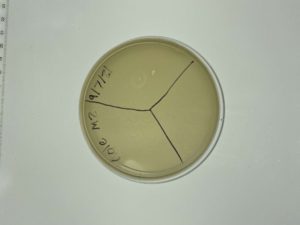
Title: Plaque Assay For Purification
Date: September/22/2021 Sample: S9 Enriched Isolation
Objective: To decrease the concentration of liquid phase samples using 10-fold serial dilutions.
Notes:
Because we followed the enriched isolation protocol for our successful sample we were not required to pick a plaque
- Prepare bench for aseptic work and assemble needed supplies.
- Set up the 10-fold serial dilutions.
- Arrange the proper number of microcentrifuge tubes in a rack and label them from 10-1, 10-2, 10-3… etc.
- Add 90 μl of phage buffer to each of the microcentrifuge tubes.
- Perform 10-fold serial dilutions
- Add 10 μl of your undiluted phage sample to the “10-1” tube and vortex them.
- The solution in this “10-1” tube contains 1/10th the number of phage particles as your undiluted sample. Also known as a 1:10 dilution.
- Make sure to use a clean pipette tip for each transfer and pipette carefully, vortexing your sample well before making each dilution. If not it will not be an accurate depiction of 10-fold dilutions.
- Transfer 10 μl of the “10 -1” sample to the “10-2” tube and vortex well.
- This solution contains 1/100th as many phage particles as your undiluted sample. It can also be referred to as your 1:100 dilution.
- Continue completing successive dilutions until the last microcentrifuge tube is reached.
- Ten microliters from each dilution were then transferred into 250 microliters of host bacteria and allowed to sit for ten minutes.
- Then we proceeded with the plaque assay protocol for each dilution-bacteria mixture.
- 3 mL of molten top agar was added to each solution and immediately aspirated back into the serological syringe.
- This was then added to a room temperature agar plate and allowed to solidify before incubating for 48 hours
10^-1 had an uncountable number of plaques.
10^-2 had an uncountable number of plaques.
10^-3 had ~200 plaques.
10^-4 had ~80 plaques.
10^-5 had ~6 plaques.

Conclusions and Next Steps:
9/24/2021: We will use the 10^-5 dilution to pick a plaque for our second serial dilution. The other plates were para-filmed and refrigerated in case we need to reset. The plates seemed to show two different plaques so we will be careful to only extract one type of phage.
Title: Second Serial Dilution
Date: September/27/2021 Sample: S9 Plaque: A
Purpose: To further dilute our phage sample to ensure the extraction of a single phage type.
Notes:
A circle was drawn around the isolated plaque on our 10^-5 dilution. The details of the plaque are below.
Plaque A: An undefined, circular, edge, about two millimeters in diameter, with a somewhat turbid inside.
- 100 microliters of phage buffer were dispensed into a microcentrifuge tube and labeled A.
- A sterile tip was then placed onto a micropipettor and positioned perpendicularly above the agar plate. The tip was then gently pushed into the center of the plaque careful to not touch any bacteria.
- Using the phage tip the phage buffer was aspirated and dispensed rapidly to ensure the phage had been released from the tip into the buffer.
Then we diluted the sample a second time
- We gathered six microcentrifuge tubes and labeled them for the five ten-fold dilutions, but also allowed for a 10^0 baseline sample.
- We then added the 90 microliters of phage buffer for each.
- Then we followed the ten-fold process. We added ten microliters of our original buffer sample to the 10^-1 tube, vortexed, and then took ten microliters from that and placed it into the 10^-2. This process was repeated to the 10^-5 tube.
- Next, we began the plaque assay protocol. We added ten microliters of each tube in 250 microliters of host bacteria and allowed the sample ten minutes to set.
- We then quickly added 3 milliliters of molten agar to each mixture and quickly aspirated the whole solution.
- The phage agar mixtures were then placed onto their respective plates and allowed to solidify, and they were incubated for 48 hours.
Results:
The plates were taken out of the incubator on 9/29/2021 at 9:05 am
The results were successful for the second serial dilution. The plaques morphology was overall similar, and they followed the overall expected pattern (10^-3 and 10^-4 were misplaced). The plaques followed the morphology of plaque A.
10^-0 had an uncountable number of plaques.
10^-1 had an uncountable number of plaques.
10^-2 had an uncountable number of plaques.
10^-3 had ~200 plaques.
10^-4 had ~60 plaques.
10^-5 had ~15 plaques.

Conclusions and Next Steps:
9/29/2021: We now need to make a low concentration lysate, and for it we will be using the 10^-2 plate as it was our best webbed plate. The other plates were para-filmed and refrigerated to preserve them. I think we have successfully isolated a phage since all plaques follow a similar morphology.
Title: Collecting Plate Lysates
Date: 09/29/2021 Sample: S9 Plaque A Plate: 10^-2
Purpose: To create a low concentration liquid sample of phage.
Notes:
- Using the 10^-2 plate we flooded it with 8 mL of phage buffer and allowed it to sit for three hours.
- After sitting, the plate was tilted and 5 mL of the lysate was drawn into a syringe.
- We then attached the syringe to a .22 micrometer filter and the fluid was pushed into a 15 mL conical tube.
- The tube was then labeled and ready for use.
We were able to collect 3 mL of our low volume lysate.
Results:
Collected Lysate from S9 Plaque A

Conclusions and Next Steps:
9/29/2021: The lysate will now be used to make a full plate titer, and determine at what dilution will a webbed plate be produced, to then make a high titer lysate.
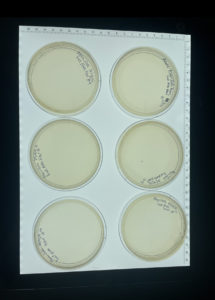
Title: Full Plate Titer
Date: 10/04/2021 Redo: No Sample: S9 Plaque A Plate: 10^-2
Purpose: To determine the concentration of phage in the lysate. So that, we can then determine what dilution will yield a webbed plate.
Notes:
- Using the low volume lysate collected we performed twelve ten fold dilutions. First, we added 90 microliters of phage buffer to each tube and then added ten microliters of our lysate to the 10^-1 tube and vortexed. Then, we took 10 microliters from the10^-1 tube and added it to the 10^-2. This was repeated to the 10^-12.
- We then did the plaque assay for each dilution. We added ten microliters of each tube into their respective 250 microliters of host bacteria and allowed ten minutes to set.
- We then added 3 mL of molten agar to each mixture and quickly aspirated it back and dispensed it onto agar plates avoiding bubbles.
- The plates were allowed to solidify and then incubated for 48 hours.
Results:
The full plate titer was successful. The morphology of each plaque was similar, and the plates followed the typical dilution pattern. We successfully created the webbed plate.
Note: Originally the titer was carried out only to the 10^-6 so on 10/6/2021 we carried it out to the 10^-12.
10^-1 had an uncountable number of plaques.
10^-2 had an uncountable number of plaques.
10^-3 had an uncountable number of plaques.
10^-4 had an uncountable number of plaques.
10^-5 had an uncountable number of plaques.
10^-6 had an uncountable number of plaques.
10^-7 had ~300 plaques.
10^-8 had ~80 plaques.
10^-9 had ~35 plaques.
10^-10 had ~6 plaques.
10^-11 had ~6 plaques.
10^-12 had ~1 plaque.

Conclusions and Next Steps:
10/24/2021: Since we correctly created a webbed plate from the low concentration lysate we will use our 10^-7 plate to create more webbed plates.
Amplification
Title: Making Webbed Plates
Date: October/22/2021 Redo: No Sample: S9 Plaque A
Purpose: To create a high density of phage lysates on multiple plates.
Notes:
- Using our 10^-9 plate we counted the plaques on the plate and used that to calculate how many plaques it would take to make a webbed plate.
(30 pfu/10 μl) x (10^3 μl/ml) x (10^9) =3 x 10^12 pfu/ml for a webbed plate
Since we actually had a webbed plate from our previous dilutions these calculations were not necessary.
- Using the 10^-7 we created six more webbed plates with the 10^-7 dilution.
- 10 mL of our 10^-7 dilution were added to six 250 microliter test tubes of host bacteria and allowed to set for ten minutes
- We then quickly added 3 mL of top agar to the mixture and aspirated it back and then dispensed it onto an agar plate and allowed it to settle. This was repeated for each tube. The plates were labeled 1-6.
- The plates were then incubated for 48 hours.
Results:

The results were successful we had created webbed plates all with similar morphology.
Conclusions and Next Steps:
We will now flood each of these plates in order to create a high volume lysate.
Title: Collecting High Concentration Plate Lysates
Date: October/22/2021 Redo: No Sample: S9 Plaque A
Purpose: This procedure is to create a high concentration liquid phage sample.
Notes:
- Using our 10^-3 webbed plates we flooded five of them with 8 mL of phage buffer and let it sit for 3 hours.
- After sitting we tilted the plates slightly to draw up the phage buffer using a serological syringe.
- Each phage buffer was then placed in a syringe with a .22 micrometer filter and pushed into a 50 mL conical tube.
We were able to collect 30 mL of phage lysate
Results:
Lysate collected from the 10^-3 tubes
Note: These pictures were taken late so most of the lysate had already been used.
Conclusions and Next Steps:
Using this lysate we will now create a full plate titer to see if we have a high enough concentration of lysate.
Title: Full Plate Titer
Date: October/22/2021 Redo: No Sample: S9 Plaque A
Purpose: To determine the concentration of lysate in the high volume lysate, which will then determine the concentration at which webbed plates are made.
Notes:
- Using the high volume lysate collected we performed eight ten-fold dilutions. First, we added 90 microliters of phage buffer to each tube and then added ten microliters of our lysate to the 10^-1 tube and vortexed. Then, we took 10 microliters from the 10^-1 tube and added it to the 10^-2. This was repeated to the 10^-8.
- We then did the plaque assay for each dilution. We added ten microliters of each tube into their respective 250 microliters of host bacteria and allowed ten minutes to set.
- We then added 3 mL of molten agar to each mixture and quickly aspirated it back and dispensed it onto agar plates avoiding bubbles.
- The plates were allowed to solidify and then incubated for 48 hours.
Results:
The full plate titer was successful. The morphology of each plaque was similar, and the plates followed the typical dilution pattern. We successfully created the webbed plate.
10^-1 had an uncountable number of plaques.
10^-2 had an uncountable number of plaques.
10^-3 had an uncountable number of plaques.
10^-4 had ~400 plaques.
10^-5 had ~200 plaques.
10^-6 had ~100 plaques.
10^-7 had ~50 plaques.
10^-8 had ~25 plaques.
Note: The molten agar was too cold for the sixth plate so it did not solidify properly.

Conclusions and Next Steps:
Using the 10^-7 plate we found that it had a concentration of 5.1*10^11. Since this was a high enough concentration we can now move on to archiving our phage.
Title: Entering the Phage into Actinobacteriophage Database
Date: 10/24/2021
Purpose: This is to include our phage in the Actinobacteriophage Database to make it available to other scientists.
Notes:
- First we named our phage according to the rules found in the “Phages” dropdown menu and “Naming Rules” on phagesdb.org. We named it DopeGoat.
- Next, we registered and logged into phagesdb.org.
- We then entered our phage name into the database.
- Then we selected the “Data” dropdown menu and added as much information as possible, paying special attention to: GPS coordinates, Program, Institution, Bacterial host, and Name.
- We filled in the Discovery Notes to explain where the sample was collected and the soil conditions, etc. Then we completed the Naming Notes to explain where our phage name came from and why we chose the name.
6. We then entered the titer of the sample in which was 5.1×10^11 and added a picture of our plaques.
7. Once the form was complete we clicked submit.
Conclusions and Next Steps:
After submitting we waited for approval from the database and began archiving our sample.
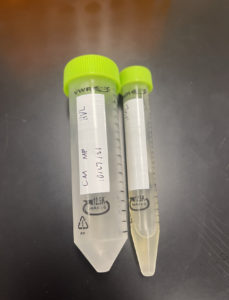
Title: Archiving Our Sample
Date: 10/24/2021
Purpose: To prepare some of our high titer lysate for long-term storage
Notes:
- We first had our phage registered on phagesdb.org., and then we followed our aseptic technique and gathered our supplies.
- We then retrieved two barcoded tubes for storage at the University of Pittsburgh and a third tube for storage at our institution. This third tube was not barcoded.
- The tubes were then labeled with our phage name and concentration.
- We then filled our tubes with beads under a fume hood to 1.5 cm under the lid of the tube.
- We then made a DMSO/lysate mixture by adding 2.8 mL of lysate into a 15 mL conical tube and then following that with 200 microliters of DMSO and vortexing.
- We then dispensed the mixture into each of the storage tubes until the solution had filled just over the beads and the tubes were closed.
- The tubes were then placed in a storage box and stored at 4 °C so they they could be shipped to the University of Pittsburgh. The sample stored at Tarleton could be frozen immediately.
DNA Extraction
Title: DNA Extraction Day 1
Date: 11/02/2021 Redo: No Protocol: Alternate 3.5
Purpose: Extract the DNA from the phage
Notes
1. After aseptically cleaning the bench and putting on gloves we gently mix the HVL (high volume lysate) , then aliquot 5mL of our lysate into a 15 mL conical tube. Our tube was then given to the best TA, Marlee, who will add 20uL of nuclease mix for you.
2. Once the nuclease has been added, we gently inverted the tube and incubated it at 37°C for 10min.
3. We the aliquoted the lysate into 5 microcentrifuge tubes, containing 1mL each.
4. To each tube, we added 20uL of ZnCl2, then proceeded to mix gently by inversion, and incubated the solution at 37°C for 5min. This
“precipitates” the phage meaning a solid substance will form at the bottom of the tube.
5. We centrifuged the 5 tubes at 10,000rpm for 1min to pellet the phage.
STEPS 6 and 7 WERE PERFORMED QUICKLY AND EFFICIENTLY
6. We kept the pellet that was formed at the bottom of the tube and removed supernatants by aspiration, and we made sure to not to disturb the pellet.
Discard the liquid filled pipette tips in the sharps trash.
7. We resuspended the pellets in 500uL TES buffer per tube, and incubate at 60°C for 15min. This will cause the capsids to denature, exposing the DNA, while protecting it from the nuclease activity (EDTA in the TES sequesters divalent cations required for nuclease function).
8. We added 1uL of Proteinase K and mix gently. Incubate at 37°C for 10min to completely eliminate any residual nuclease activity.
9. Then we added 60uL of potassium acetate to each tube. Mix well and leave on ice for 15min. A white, dense precipitate formed. This represents our capsids.
Conclusions and Next Steps:
We will come back to the lab the next day to do Day 2 of the extraction protocol.
Title: DNA Extraction Day 2
Date: 11/03/2021 Redo: No Protocol: Alternate 3.5
Purpose: Extract the DNA from the phage so we can continue with the following procedures and research.
Notes:
1. We centrifuged at the highest speed for 10 min in order to pellet the DNA, and discard the supernatant into a WASTE tube. It is OK if you do not see a pellet.
2. We added 250uL of 70% ethanol in each of the tubes, and spun it again for 1min, at top speed. This washes your DNA pellet. Then discarded the supernatants into a WASTE tube.
3. We dried the DNA pellets at room temperature by turning upside-down onto paper towels, tapping out excess liquid, and leaving upside-down until pellets begin to turn clear. We placed the tubes in a 30⁰C incubator to help with drying. DO NOT RUSH THIS STEP! If not
dry enough, you will NOT recover enough DNA!
4. We resuspended the first pellet in 50uL nuclease-free water. Then used that solution to resuspend the next pellet. Continue until all 5 pellets have been resuspended in the same 50uL of water. This is similar to the serial dilution protocol.
5. We checked the DNA concentration and quality with the Nanodrop.
Results:
The ratio the Nanodrop gave us was
ng/uL: 388.2
A260/A280: 2.07
A260/A230: 1.45
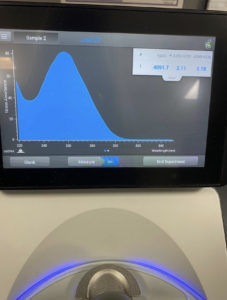
Conclusions and Next Steps:
The results we achieved from the Nanodrop met what we needed to continue to the next step of characterization.
Title: Quibit
Date: November/05/2021 Redo: No Protocol: Alternate 3.5
Purpose: This procedure is to find the exact DNA concentration in our tube.
Notes:
- We first gathered three 0.5 microcentrifuge tubes and one 1.5 tube.
- A total of 597 microliters of phage buffer was added to the 1.5 tube, and 3 microliters of dsDNA HS reagent was added as well. Then the whole solution was vortexed. This was now our working buffered to be used in other tubes.
- In one 0.5 microcentrifuge tube we added 190 uL of our working buffer, and 10 uL of standard 1 was added with a 10 uL micropipettor
- In another 0.5 microcentrifuge tube we added 190 uL of our working buffer, and 10 uL of standard 2 was added with a 10 uL micropipettor
- Then in our last tube we added 198 microliters of our working buffer and 2 microliters of our phage DNA
- The tubes were then vortexed and allowed to sit for two minutes.
- The tubes were then loaded into the Quibit for reading.
Results:
The results were a reading of 20.6 ng/uL in our 2 uL DNA sample.
|
Conclusions and Next Steps:
Our results were too low and our gel showed this as well so we will try again with another DNA extraction.
Title: DNA Extraction Day 1
Date: 11/09/2021 Redo: No Protocol: Alternate 3.5
Purpose: Extract the DNA from the phage
Notes
1. After aseptically cleaning the bench and putting on gloves we gently mix the HVL (high volume lysate) , then aliquot 5mL of our lysate into a 15 mL conical tube. Our tube was then given to the best TA, Marlee, who will add 20uL of nuclease mix for you.
2. Once the nuclease has been added, we gently inverted the tube and incubated it at 37°C for 10min.
3. We the aliquoted the lysate into 5 microcentrifuge tubes, containing 1mL each.
4. To each tube, we added 20uL of ZnCl2, then proceeded to mix gently by inversion, and incubated the solution at 37°C for 5min. This
“precipitates” the phage meaning a solid substance will form at the bottom of the tube.
5. We centrifuged the 5 tubes at 10,000rpm for 1min to pellet the phage.
STEPS 6 and 7 WERE PERFORMED QUICKLY AND EFFICIENTLY
6. We kept the pellet that was formed at the bottom of the tube and removed supernatants by aspiration, and we made sure to not to disturb the pellet.
Discard the liquid filled pipette tips in the sharps trash.
7. We resuspended the pellets in 500uL TES buffer per tube, and incubate at 60°C for 15min. This will cause the capsids to denature, exposing the DNA, while protecting it from the nuclease activity (EDTA in the TES sequesters divalent cations required for nuclease function).
8. We added 1uL of Proteinase K and mix gently. Incubate at 37°C for 10min to completely eliminate any residual nuclease activity.
9. Then we added 60uL of potassium acetate to each tube. Mix well and leave on ice for 15min. A white, dense precipitate formed. This represents our capsids.
Conclusions and Next Steps:
We will come back to the lab the next day to do Day 2 of the extraction protocol.
Title: DNA Extraction Day 2
Date: 11/10/201 Redo: No Protocol: Alternate 3.5
Purpose: Extract the DNA from the phage so we can continue with the following procedures and research.
Notes:
1. We centrifuged at the highest speed for 10 min in order to pellet the DNA, and discard the supernatant into a WASTE tube. It is OK if you do not see a pellet.
2. We added 250uL of 70% ethanol in each of the tubes, and spun it again for 1min, at top speed. This washes your DNA pellet. Then discarded the supernatants into a WASTE tube.
3. We dried the DNA pellets at room temperature by turning upside-down onto paper towels, tapping out excess liquid, and leaving upside-down until pellets begin to turn clear. We placed the tubes in a 30⁰C incubator to help with drying. DO NOT RUSH THIS STEP! If not
dry enough, you will NOT recover enough DNA!
4. We resuspended the first pellet in 50uL nuclease-free water. Then used that solution to resuspend the next pellet. Continue until all 5 pellets have been resuspended in the same 50uL of water. This is similar to the serial dilution protocol.
5. We checked the DNA concentration and quality with the Nanodrop.
Results:
The ratio the Nanodrop gave us was
ng/uL: 388.2
A260/A280: 2.07
A260/A230: 1.45
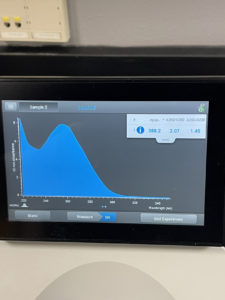
Conclusions and Next Steps:
The results we achieved from the Nanodrop met what we needed to continue to the next step of characterization.
Title: Quibit
Date: November/10/2021 Redo: No Protocol: Alternate 3.5
Purpose: This procedure is to find the exact DNA concentration in our tube.
Notes:
- We first gathered three 0.5 microcentrifuge tubes and one 1.5 tube.
- A total of 597 microliters of phage buffer was added to the 1.5 tube, and 3 microliters of dsDNA HS reagent was added as well. Then the whole solution was vortexed. This was now our working buffered to be used in other tubes.
- In one 0.5 microcentrifuge tube we added 190 uL of our working buffer, and 10 uL of standard 1 was added with a 10 uL micropipettor
- In another 0.5 microcentrifuge tube we added 190 uL of our working buffer, and 10 uL of standard 2 was added with a 10 uL micropipettor
- Then in our last tube we added 198 microliters of our working buffer and 2 microliters of our phage DNA
- The tubes were then vortexed and allowed to sit for two minutes.
- The tubes were then loaded into the Quibit for reading.
Results:
The results were a reading of 40.6 ng/uL in our 2 uL DNA sample.

Conclusions and Next Steps:
Our results were much better this time and we will proceed with gel electrophoresis.
Characterization
Title: Mounting Phage Samples for TEM and Staining with Uranyl Acetate
Date: October/22/2021 Redo: No Sample: S9
Purpose: This procedure is to prepare our sample to view with the electron microscope.
Notes:
- First we followed aseptic technique to prepare our station.
- We then transferred 1 mL of our high titer lysate into a sterile microcentrifuge tube.
- Next, we balanced a second tube with water and centrifuged them both at 4 degrees celsius and top speed for one hour.
- We then carefully used a micropipette to remove the supernatant and keep the pellet.
- Next 100 microliters of phage buffer were added to resuspend the pellet and then we let it sit for an hour at 4 degrees celsius.
Then rest was done all in one sitting to avoid damaging the phage heads.
The work area was already prepared by our instructor.
6. We put on a fresh pair gloves, and the work area was covered with bench paper to create a clean work surface.
7. Then the cover of a 5×5 cm piece of parafilm was removed and the parafilm was placed into the lid of a Petri dish.
8. A PELCO tab was then placed onto the parafilm and the adhesive was exposed.
9. Using EM forceps a fresh grid was removed, only touching the very edge of the grid, from a box of unused grids. The grid was placed dark-and-shiny side UP just barely touching the edge of the PELCO tab.
Mounting and staining phage.
1. This was done by using a micropipette to place 10 μl of lysate onto the grid without touching the tip of the grid itself.
2. The phage was allowed to settle and attach to the grid for 2 minutes
3. After 2 minutes a small wedge paper was used to wick off the excess fluid.
4. Next the grid was rinsed twice by carefully pipetting 10 μl of sterile water onto the grid and allowing it to sit for 2 minutes then wicking off the water with a fresh piece of wedge paper.
5. Once rinsed twice 10 μl of 1 % uranyl acetate was added to the grid and allowed to sit for 2 minutes.
6. The excess stain was then wicked off using the edge of a wedged filter paper until the grid looked like a rainbow oil slick.
7. The grid was then allowed to air dry and put safely back into the grid box.
Conclusions and Next Steps:
We will now follow DNA extraction.
Title: Restriction Enzyme Digest
Date: November/04/2021 Redo: No Sample: S9
Purpose: This procedure is to add enzymes to our DNA sample to make it easier to view.
Notes:
For our host bacteria we have to use the restrictive enzymes: Haelll, Nspl, Sacll, and SalI.
- After lightly vortexing our sample to mix we let the DNA incubate at 65 degrees celsius for 10 minutes.
- After incubating we quickly placed them on ice for a minute and then microcentrifuged them for less than a minute.
- Using our concentration from the Quibit we needed to acquire 0.5 ug of DNA. We then used this formula: uL DNA= 0.5 ug (mL/125 ug)(1000 uL/1 mL)
- Using the formula we calculated that we needed 0.2 microliters in each tube.
- When then set out five microcentrifuge tubes, four for each enzyme and one for our negative control.
- In the four enzyme tubes we added 21.8 microliters of nuclease free water, 2.5 microliters of each enzymes respective buffers, 0.5 microliters of the tubes enzyme, and 0.2 microliters of our DNA. Each tube received a separate enzyme and the necessary buffer for it.
- In the last tube 24.8 microliters of nuclease free water was added and 0.2 microliters of DNA was as well. This will serve as the negative control sample.
- The tubes were then gently mixed and microcentrifuged for less than a minute.
- Next the tubes were incubated at 37 degrees celsius for an hour.
- After the tubes incubated they were centrifuged again for less than a minute and stored at -20 degrees celsius.
Conclusions and Next Steps:
We will come in tomorrow to cast the agarose gel and complete gel electrophoresis.
Title: Casting Agarose Gel and Gel Electrophoresis
Date: November/05/2021 Redo: No
Purpose: This procedure is to prepare a gel for electrophoresis in order to view our restrictive enzyme digest DNA.
Notes:
PART 1- Making and Casting Agarose Gel
- We set up the apparatus and then prepared enough 0.8% agarose gel to cover the tips of the gel combs by approximately 2-3 mm.We calculated and found that we needed 0.24 g of agarose poser, so we weighted that out and the transferred the powered into an Erlenmeyer flask.We added 30 mL of 1X TBE Buffer to the agarose powered and gently swirled to mix.
- We then heat the mixture in the microwave for 1minute. We took it our of the microwave to gently swirl at 30 seconds.
- After taking it out of the microwave we allowed the flask to cool for about 15 minutes.
- Once it was sufficiently cooled down, we put on our gloves and added 1.5 uL of ethidium bromide (EtBr) as our gel dye. The mixture was gently swirled to make sure it was properly mixed together.
- We then poured the agarose/EtBr mixture into the prepared gel apparatus, being careful not to create any bubbles.
- We let the gel sit for 15 minutes to cool and solidify.
- Once the gel had solidified, we carefully removed the comb and once removed we gently lifted the gel platform out of the casting tray.
- We placed the platform with the solidified gel into the gel box. The wells were at the (-) cathode end of the box.
- We then poured 1X TBE Buffer into the gel apparatus until out gel was submerged in about 1/4 inch of buffer.
Part 2- Gel Electrophoresis
- With the gel already oriented where the wells are closest to the cathode, we prepared our restriction enzyme digest samples for electrophoresis.
- We added 5 uL of concentrated 6x loading dye to each 25 uL restriction enzyme sample.
- Also we made our ladder by taking 1 uL ladder and then added 5 uL of loading dye and 24 uL of nuclease free water.
- After we made all our samples, we placed them in a 65C incubator for 5 minutes.
- After the 5 minutes we immediately placed the samples on ice and then spun them in a microcentrifuge tube for about 15 seconds at 10,000 rpm.We loaded our gel in the following order: Ladder 1 – Uncut DNA 1 – NSPI – SalI – SacII – HaeI
- Using a fresh tip we micropipetted each sample into the wells. We loaded 20 uL of each sample, but we only filled the wells until they full. We made sure that when we were filling the well to make sure not to puncture the agarose gel.
- Once the gel was all set up, we plugged in the electrodes into the proper locations in the power supply. We then turned on the power and set the voltage to 100 V.
- We ran the gel until the dye had migrated in between the 5-6 on the gel box.
- After it reached the in between point, we turned off the power and took the gel box out of the container. We then moved the gel to the storage room where we looked at it under the UV light.
Results:
We believe nothing showed up because the amount of DNA in our sample was so minuscule.
Conclusions and Next Steps:
Since nothing showed up, except the ladder, on the gel we are going to retry from the beginning of DNA extraction and complete the process once again.
Title: Restriction Enzyme Digest
Date: November/10/2021 Redo: No Sample: S9
Purpose: This procedure is to add enzymes to our DNA sample to make it easier to view.
Notes:
For our host bacteria we have to use the restrictive enzymes: Haelll, Nspl, Sacll, and SalI.
- After lightly vortexing our sample to mix we let the DNA incubate at 65 degrees celsius for 10 minutes.
- After incubating we quickly placed them on ice for a minute and then microcentrifuged them for less than a minute.
- Using our concentration from the Quibit we needed to acquire 0.5 ug of DNA. We then used this formula: uL DNA= 0.5 ug (mL/125 ug)(1000 uL/1 mL)
- Using the formula we calculated that we needed 4 microliters in each tube.
- When then set out five microcentrifuge tubes, four for each enzyme and one for our negative control.
- In the four enzyme tubes we added 18 microliters of nuclease free water, 2.5 microliters of each enzymes respective buffers, 0.5 microliters of the tubes enzyme, and 4.0 microliters of our DNA. Each tube received a separate enzyme and the necessary buffer for it.
- In the last tube 21 microliters of nuclease free water was added and 4.0 microliters of DNA was as well. This will serve as the negative control sample.
- The tubes were then gently mixed and microcentrifuged for less than a minute.
- Next the tubes were incubated at 37 degrees celsius for an hour.
- After the tubes incubated they were centrifuged again for less than a minute and stored at -20 degrees celsius.
Conclusions and Next Steps:
We will come in tomorrow to cast the agarose gel and complete gel electrophoresis.
Title: Casting Agarose Gel and Gel Electrophoresis
Date: November/11/2021 Redo: No
Purpose: This procedure is to prepare a gel for electrophoresis in order to view our restrictive enzyme digest DNA.
Notes:
PART 1- Making and Casting Agarose Gel
- We set up the apparatus and then prepared enough 0.8% agarose gel to cover the tips of the gel combs by approximately 2-3 mm.We calculated and found that we needed 0.24 g of agarose poser, so we weighted that out and the transferred the powered into an Erlenmeyer flask.We added 30 mL of 1X TBE Buffer to the agarose powered and gently swirled to mix.
- We then heat the mixture in the microwave for 1minute. We took it our of the microwave to gently swirl at 30 seconds.
- After taking it out of the microwave we allowed the flask to cool for about 15 minutes.
- Once it was sufficiently cooled down, we put on our gloves and added 1.5 uL of ethidium bromide (EtBr) as our gel dye. The mixture was gently swirled to make sure it was properly mixed together.
- We then poured the agarose/EtBr mixture into the prepared gel apparatus, being careful not to create any bubbles.
- We let the gel sit for 15 minutes to cool and solidify.
- Once the gel had solidified, we carefully removed the comb and once removed we gently lifted the gel platform out of the casting tray.
- We placed the platform with the solidified gel into the gel box. The wells were at the (-) cathode end of the box.
- We then poured 1X TBE Buffer into the gel apparatus until out gel was submerged in about 1/4 inch of buffer.
Part 2- Gel Electrophoresis
- With the gel already oriented where the wells are closest to the cathode, we prepared our restriction enzyme digest samples for electrophoresis.
- We added 5 uL of concentrated 6x loading dye to each 25 uL restriction enzyme sample.
- Also we made our ladder by taking 1 uL ladder and then added 5 uL of loading dye and 24 uL of nuclease free water.
- After we made all our samples, we placed them in a 65C incubator for 5 minutes.
- After the 5 minutes we immediately placed the samples on ice and then spun them in a microcentrifuge tube for about 15 seconds at 10,000 rpm.We loaded our gel in the following order: Ladder 1 – Uncut DNA 1 – SalI – SacII – NSPI – HaeI
- Using a fresh tip we micropipetted each sample into the wells. We loaded 20 uL of each sample, but we only filled the wells until they full. We made sure that when we were filling the well to make sure not to puncture the agarose gel.
- Once the gel was all set up, we plugged in the electrodes into the proper locations in the power supply. We then turned on the power and set the voltage to 100 V.
- We ran the gel until the dye had migrated all the way to the seven on the gel box. (Ideally we would’ve stopped it in between 5-6, but we let it run too long)
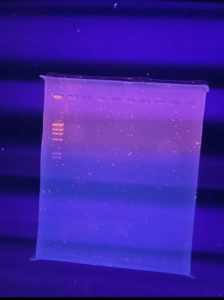
- After it reached the in between point, we turned off the power and took the gel box out of the container. We then moved the gel to the storage room where we looked at it under the UV light.
Results:
We believe the DNA is so faint because the DNA concentration was low.

Conclusions and Next Steps:
Even though the DNA was faint the DNA is still ready for sequencing.