Discovery of DJDoc
DJDoc Information
Morphology:
Sample Collection
| Collector Name |
Diana Estrada | Diana Estrada | Jasmine Muñoz | Jasmine Muñoz |
| Sample No. | D1 | D2 | J1 | J2 |
| Date of Collection | 08/28/22 | 08/28/2022 | 08/27/2022 | 08/27/2022 |
| Sample Type | Soil | Soil | Soil | Soil |
| General Location | Stephenville, Tx | Stephenville, Tx | Dublin,Tx | Dublin,Tx |
| Location Description | Base of ant infested tree | Under brick surrounding tree mulch | moist dirt, under a tree with lots of weeds | moist area, under a rotten cantaloupe |
| GPS Coordinates | 32.20387º N, 98.12513º W | 32.20418º N, 98.12527º W | 32.0596816, -98.3028256 | 32.0596978, -98.3029024 |
| Sample Depth | Surface level | Surface level | Surface level | Surface level |
| Ambient Temperature | 29ºC | 29ºC | 28°C | 28°C |
Isolation/Purification
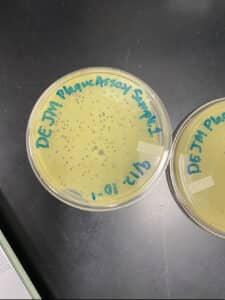
Title: Direct Isolation and Plaque Assay
Date: 08/31/2022- 09/07/2022 Redo: No Sample: D1 and D2
Purpose: This procedure is used to test for any bacteriophages in environmental samples using direct isolation and plaque assay.
Notes: After environmental samples were collected in 15 ml conical tube and brought to the lab, direct isolation and plaque assays protocols were performed on both samples.
Direct Isolation: 08/31/2022
1. Work bench was disinfected and prepped for aseptic work. Proper materials were gathered. This includes environmental samples, microcentrifuge tubes and more.
2. Once work bench was prepped, each sample was submerged in 2 ml of liquid media. Each sample was then capped and inverted several times to mix thoroughly. Both samples were then placed in an incubator at 250 rpm for 2 hours (from 10:00AM-12:00PM).
3. Once back at the lab (12:00PM), environmental samples were taken from the incubator. 1ml samples were taken from the top of the conical tubes using a 5 ml serological pipette and placed into smaller microcentrifuge tubes. These were then placed into a centrifuge to hasten the process of allowing the soil and debris to pellet.
4. After being centrifuged, the smaller samples in the microcentrifuge tubes were placed a 5ml syringe and filtered through a .22µm syringe filter and collected in a clean microcentrifuge tube. Samples were placed in the fridge to store overnight.
Plaque Assay: 09/01/2022
1. The next day in the lab (4:00PM-6:00PM), work bench was again disinfected and prepped for aseptic work. Materials were gathered and plaque assay as follows.
2. 250 µl of host bacteria was provided in a test tube for each sample. 500 µl of filtered sample was deposited into each tube of host bacteria. After being gently tapped to mix sample with bacteria, samples were left to rest for 7 minutes.
3. After the 7 minutes, warm top agar was obtained. 3ml of top agar was transferred into each sample. Immediately after adding top agar to each sample, it was aspirated and poured onto an agar plate. Mixture was spread through the plate evenly. Plates were then placed into incubator
Results: (09/02/2022) After being allowed to sit in the incubator for 15 hrs. no clear signs of phages are found. (09/07/2022) After sitting in the incubator for a few days, a phage was identified with the help of instructor. A small plaque from the Sample 1 plate was selected for the “Picking a Plaque” and “Spot Test” protocols.

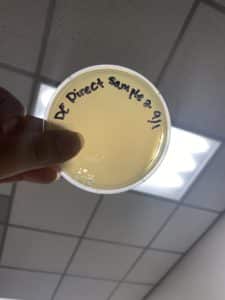
Conclusions and Next Steps: (09/02/2022) Next steps are to allow agar plates to sit in the incubator an entire 24 hrs. and collect a third environmental sample just in case. (09/07/2022) Now that a plaque has been identified, the “Picking a Plaque” protocol will be performed.
Title: Picking a Plaque and Spot Test
Date: 9/07/2022 Redo: No Sample: D1
Purpose: The following two protocols were performed in order to aquire a liquid phage sample (Picking a Plaque), and to confirm the presence of a phage in said sample (Spot Test).
Notes: Once back in the lab on Wednesday (09/07/2022), a singular small plaque on the Sample 1 plate was choosen to aquire a liquid phage sample from. Due to the small size of this plaque, we decided to run a spot test on liquid sample to ensure the presense of a phage.
Picking a Plaque
1. Work bench was disinfected and prepped for aseptic work. Proper materials were gathered. This includes agar plates, microcentrifuge tubes, phage buffer, and more.
2. Using a permanent marker, the phage was circled to identify the plaque being used.
3. A single microcentrifuge tube was obtained. Using a micropipettor and sterile tip, 100µl of phage buffer was placed into the microcentrifuge tube.
4. A new sterile tip was used to stab the center of the plaque. The tip was then placed into the phage buffer and tapped on the walls of the tube. Phage buffer was pipetted up and down in order to free any phage particles.
Spot Test
1. Work bench was disinfected and prepped for aseptic work. Proper materials were gathered. This includes agar plates, agar plates, recently aquired liquid phage sample, and more.
2. After gathering liquid sample and agar plate, the plate was labeled and devided into 2 sections. One section for the phage buffer control and the other for testing the liquid phage sample.
3. Ones 250µl of host bacteria are obtained, steps similar to those of the plaque assay come after. 3ml of warm top agar is placed into the tube containing the host bacteria. This was done with a sterile 5ml pipette. Immediately after the top agar was placed into the tube, it was aspirated back into the pipette. From there the entire solution was placed onto the agar plate and spread evenly. The plate then sat undisturbed for 20 minutes to allow the top agar to solidify.
4. Once the top agar solidified, 10µl of liquid phage sample was placed on the corresponding side of the agar plate using a micropipetter and sterile tip. The other side of the plate was spotted with 10µl of phage buffer as a control. The liquid was allowed to absorb into agar for 15 minutes.
5. The plate was placed into the incubator without inverting for 24 hours.
Results: After 24 hours, the plate was checked for any clearing. The side with liquid phage sample did present clearing and the control side with phage buffer did not.
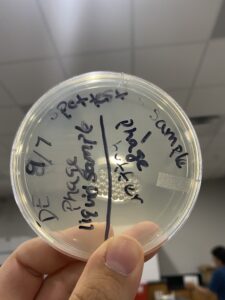
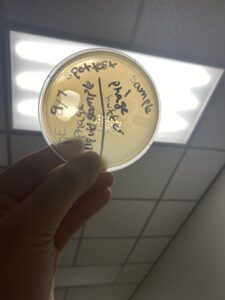
Conclusions and Next Steps: The Spot Test confirmed the presence of a phage in the liquid phage sample. Now a serial dilution will be performed on the liquid phage sample used for this spot test.
Title: Direct Isolation and Plaque Assay
Date: 09/07/2022 Redo: No Sample: J1 and J2
Purpose: This procedure is used to isolate bacteriophages from the environmental samples and infect the host bacteria using a plaque assay.
Notes: The envirnomental samples were collected in a 15 mL conical tube, brought into the lab, stored in the fridge, and direct isolation and plaque assay protocol were performed on both samples.
1. The work bench was disinfected and prepared for aseptic work using 70% alcohol as well as hands throughly washed. The correct materials were collect which include environmental samples, microcentrifudge tubes and more.
2. Once everything was gathered, submerge the sample with 2 mL of liquid media. Both samples were submerged with 2 mL of liquid media, capped and inverted to mix throughly. After they were placed in a incubator at 250 rpm for 2 hours.
3. Following the 2 hours they were removed from the incubator, allowed to sit for particulate materials to settle and 2 mL of the top of the samples using a 5 mL serological pipette were removed from the conical tubes. They were placed in a small microcentrifuge tube and placed in a centrifuge that speeds the process of soil and debris to settle.
4. After being centrifuge, the samples were put in a 5 mL syringe and filtered through a .22µm syringe filter and a sample of filtrated lysate was collected in a clean microcentrifuge tube.
Plaque Assay: 09/07/2022
5. Once finished, the plaque assay protocol was started. Test tubes of 250 µl of host bacteria were obtained for each sample. Then 500 µl of the filtered sample were added to each test tube of host bacteria and lightly tapped/ moved around. After the sample was mixed with host bacteria it was left to sit for 7-10 mintues.
6. Once it was let to sit top agar and plaques were aquired. Exactly 3 mL of top agar was transferred into each sample and immediately was pipetted back up and placed into a plate. Plates were spread evenly by tilting them and the top agar was allowed to solidfy for 30 minutes undistributed. Plates were placed in incubator afterwards.
Results: The next day (09/08/2022) after being in the incubator for 18 hours there had been no sign of a phage. After a few days (09/12/2022) a small phage was seen on sample 2 but none on sample 1. Both samples were not used instead we will be using D1 sample for the remainder of the Phage discovery process. They were kept as backups and for the protocols “Picking a Plaque” and “Spot Test” sample D1 was used.
Conclusions and Next Steps: The next steps are to prepare for “Serial Dilution” using D1 sample. (09/08/2022)
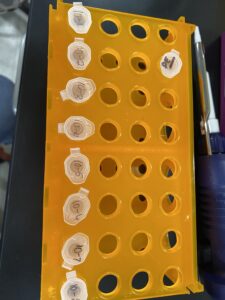
Title: First Serial Dilution and Plaque Assay
Date: 09/12/2022 Redo: No Sample: D1
Purpose: This protocol was performed in order to obtain liquid phage samples of decreasing concentrations.
Notes:
First Serial Dilution
1. Work bench was disinfected and prepped for aseptic work. Proper materials were gathered. This includes phage buffer, liquid phage sample, and microcentrifuge tubes.
2. 8 microcentrifuge tubes were arranged on a rack and labeled 10^-1 through 10^-8. Once tubes were labeled and arranged, 90μl of phage buffer were added to each tube using a micropipetter and sterile tip.
3. To begin the dilution, 10μl of undiluted liquid phage sample were added to the first tube, labeled 10^-1. The new solution was mixed well using a vortex.
4. Using a new pipette tip, 10μl of solution from the 10^-1 tube were added to the 10^-2 tube and also mixed well.
5. Step 4 was repeated for each successive dilution until the last tube (10^-8).
Plaque Assay
Once the serial dilution was complete, a plaque assay was done using the first 6 tubes of diluted liquid phage sample.
1. Work bench was disinfected and prepped for aseptic work. Proper materials were gathered. This includes top agar, host bacteria, and 5 ml serological pipettes.
2. 1 agar plate and tube of host bacteria for each of the 6 diluted liquid phage samples was gathered. The agar plates and culture tubes were each labeled to match the corresponding liquid sample.
3. Using a micropipettor, 10µl of serial dilution was deposited into the corresponding culture and mixed well. The host bacteria and liquid phage sample solution were allowed to sit undesturbed for 7 minutes.
4. 3ml of top agar was transferred into each tube of bacteria and liquid phage solution using a 5ml pipette. Immediately after adding top agar to each sample, it was aspirated and poured onto an agar plate. Mixture was spread through the plate evenly. Plates were allowed to solidify and placed into the incubator.
Results: Unfortunately, our results were not what we wanted. Many bubbles were introduced during plating. In addition, the 10^-4 plate was not properly solidified when we attempted to put it in the incubator.
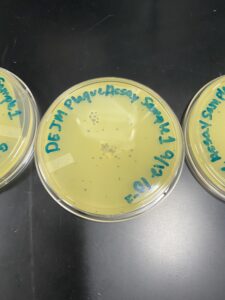


Conclusions and Next Steps: Because our first plaque assay of the diluted liquid phage samples were not great, we have decided to try plating them again.
Title: Plaque Assay Redo
Date: 09/14/2022 Redo: Yes Sample: D1
Purpose: This second plaque assay of the diluted liquid phage samples was performed in order to obtain better results.
Notes:
1. Work bench was disinfected and prepped for aseptic work. Proper materials were gathered. This includes top agar, host bacteria, and 5 ml serological pipettes.
2. 1 agar plate and tube of host bacteria for each of the 6 diluted liquid phage samples was gathered. The agar plates and culture tubes were each labeled to match the corresponding liquid sample.
3. Using a micropipettor, 10µl of serial dilution was deposited into the corresponding culture and mixed well. The host bacteria and liquid phage sample solution were allowed to sit undesturbed for 7 minutes.
4. 3ml of top agar was transferred into each tube of bacteria and liquid phage solution using a 5ml pipette. Immediately after adding top agar to each sample, it was aspirated and poured onto an agar plate. Mixture was spread through the plate evenly. Plates were allowed to solidify for around 20 minutes and placed into the incubator.
Steps 3&4 were repeated for all diluted phage samples.
Results: After plating for a second time, we obtained clearer results with many plaques and decreasing amount in each plate.

Conclusions and Next Steps: After obtaining better results, it was decided to move forward with picking a plaque for our second serial dilution.
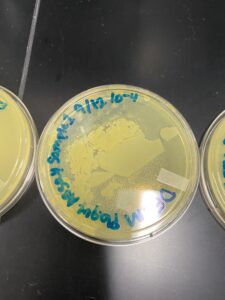
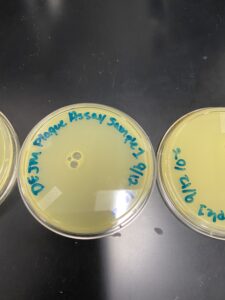
Title: Picking a Plaque, Second Serial Dilution, and Plaque Assay
Date: 09/19/2022 Redo: No Sample: D1
Purpose: The purpose of these steps was to obtain lysate from the first serial dilution and further purify this sample.
Notes:
Picking a Plaque
1. Work bench was disinfected and prepped for aseptic work. Proper materials were gathered. This includes agar plates, microcentrifuge tubes, phage buffer, and more.
2. Using a permanent marker, the phage was circled to identify the plaque being used. A plaque on the 10^-3 plate from the serial dilution was used. This plaque had a cloudy outer ring, clear center, and was the only plaque on the plate.
3. A single microcentrifuge tube was obtained. Using a micropipettor and sterile tip, 100µl of phage buffer was placed into the microcentrifuge tube.
4. A new sterile tip was used to stab the center of the plaque. The tip was then placed into the phage buffer and tapped on the walls of the tube. Phage buffer was pipetted up and down in order to free any phage particles.
Second Serial Dilution
1. Work bench was disinfected and prepped for aseptic work. Proper materials were gathered. This includes phage buffer, liquid phage sample, and microcentrifuge tubes.
2. 8 microcentrifuge tubes were arranged on a rack and labeled 10^-1 through 10^-6. Once tubes were labeled and arranged, 90μl of phage buffer were added to each tube using a micropipetter and sterile tip.
3. To begin the dilution, 10μl of undiluted liquid phage sample were added to the first tube, labeled 10^-1. The new solution was mixed well using a vortex.
4. Using a new pipette tip, 10μl of solution from the 10^-1 tube were added to the 10^-2 tube and also mixed well.
5. Step 4 was repeated for each successive dilution until the last tube (10^-6).
Plaque Assay
1. Work bench was disinfected and prepped for aseptic work. Proper materials were gathered. This includes top agar, host bacteria, and 5 ml serological pipettes.
2. 1 agar plate and tube of host bacteria for each of the 6 diluted liquid phage samples was gathered. The agar plates and culture tubes were each labeled to match the corresponding liquid sample.
3. Using a micropipettor, 10µl of serial dilution was deposited into the corresponding culture and mixed well. The host bacteria and liquid phage sample solution were allowed to sit undesturbed for 7 minutes.
4. 3ml of top agar was transferred into each tube of bacteria and liquid phage solution using a 5ml pipette. Immediately after adding top agar to each sample, it was aspirated and poured onto an agar plate. Mixture was spread through the plate evenly. Plates were allowed to solidify and placed into the incubator.
Steps 3&4 were repeated for all diluted phage samples.
Results: We did see a decreasing amount of plaques in each plate. We did not, however, obtain a webbed plate.
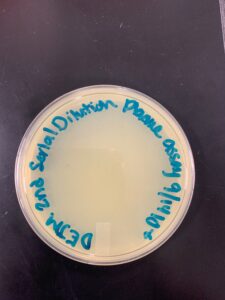


Conclusions and Next Steps: Because we did not obtain a webbed plate, we decided to try another serial dilution using a different plaque.
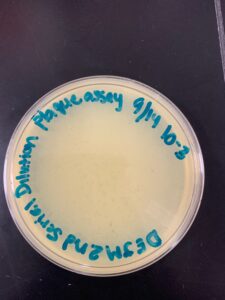
Title: Second Serial Dilution and Plaque Assay
Date: 9/21/22 Redo: Yes Sample: D1
Purpose: The second serial dilution was redone in order to obtain better results (webbed plate) and further purify our liquid phage sample.
Notes:
Second Serial Dilution
1. Work bench was disinfected and prepped for aseptic work. Proper materials were gathered. This includes phage buffer, liquid phage sample, and microcentrifuge tubes.
2. 8 microcentrifuge tubes were arranged on a rack and labeled 10^-1 through 10^-6. Once tubes were labeled and arranged, 90μl of phage buffer were added to each tube using a micropipetter and sterile tip.
3. To begin the dilution, 10μl of undiluted liquid phage sample were added to the first tube, labeled 10^-1. The new solution was mixed well using a vortex.
4. Using a new pipette tip, 10μl of solution from the 10^-1 tube were added to the 10^-2 tube and also mixed well.
5. Step 4 was repeated for each successive dilution until the last tube (10^-6).
Plaque Assay
1. Work bench was disinfected and prepped for aseptic work. Proper materials were gathered. This includes top agar, host bacteria, and 5 ml serological pipettes.
2. 1 agar plate and tube of host bacteria for each of the 6 diluted liquid phage samples was gathered. The agar plates and culture tubes were each labeled to match the corresponding liquid sample.
3. Using a micropipettor, 10µl of serial dilution was deposited into the corresponding culture and mixed well. The host bacteria and liquid phage sample solution were allowed to sit undesturbed for 7 minutes.
4. 3ml of top agar was transferred into each tube of bacteria and liquid phage solution using a 5ml pipette. Immediately after adding top agar to each sample, it was aspirated and poured onto an agar plate. Mixture was spread through the plate evenly. Plates were allowed to solidify and placed into the incubator.
Steps 3&4 were repeated for all diluted phage samples.
Results: Our second attempt did yield better results and we had a webbed plate to work with.

Conclusions and Next Steps: The next step is to collect low volume lysate.
Amplification
Title: Collecting Low Volume Lysate and Full Plate Titer
Date: 9/26/22- 9/28/22 Redo: No Sample: D1
Purpose: The purpose of these two steps was to obtain a highly concentrated liquid phage sample and calculate the concentration.
Notes:
Collecting Low Level Plate Lysate
1. Work bench was disinfected and prepped for aseptic work. Proper materials were gathered. This includes a 5ml syringe, 0.22µm filter, and 15ml conical tube
2. 8ml of sterile phage buffer were placed into the webbed plate. This was allowed to sit undisturbed at room temperature for 6 hours.
3. Once wait time was done, the lid was taken off the plate and the plate was tilted to one side.
4. A 0.22µm was prepared and a 5ml syringe was used to suck up the lysate from the plate.
5. Around 6ml of lysate was collected and placed into the conical tube after being pushed through a 0.22µm filter. The conical tube was then stored in the fridge for preservation.
Full Plate Titer
1. Work bench was disinfected and prepped for aseptic work. Proper materials were gathered. This includes phage buffer, liquid phage sample, and microcentrifuge tubes.
2. 8 microcentrifuge tubes were arranged on a rack and labeled 10^-1 through 10^-6. Once tubes were labeled and arranged, 90μl of phage buffer were added to each tube using a micropipetter and sterile tip.
3. To begin the dilution, 10μl of undiluted liquid phage sample were added to the first tube, labeled 10^-1. The new solution was mixed well using a vortex.
4. Using a new pipette tip, 10μl of solution from the 10^-1 tube were added to the 10^-2 tube and also mixed well.
5. Step 4 was repeated for each successive dilution until the last tube (10^-6).
6. Work bench was disinfected and prepped for aseptic work. Proper materials were gathered. This includes top agar, host bacteria, and 5 ml serological pipettes.
7. 1 agar plate and tube of host bacteria for each of the 6 diluted liquid phage samples was gathered. The agar plates and culture tubes were each labeled to match the corresponding liquid sample.
8. Using a micropipettor, 10µl of serial dilution was deposited into the corresponding culture and mixed well. The host bacteria and liquid phage sample solution were allowed to sit undesturbed for 7 minutes.
9. 3ml of top agar was transferred into each tube of bacteria and liquid phage solution using a 5ml pipette. Immediately after adding top agar to each sample, it was aspirated and poured onto an agar plate. Mixture was spread through the plate evenly. Plates were allowed to solidify and placed into the incubator.
Steps 8&9 were repeated for all diluted phage samples.
Results: Our Full Plate Titer did not have many plaques, we had no webbed plates and most of our plates were clear.
Conclusions and Next Steps: We have decided to try another serial dilution.
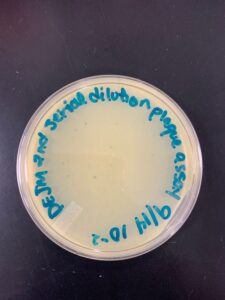
Title: Full Plate Titer
Date: 10/03/2022-10/05/2022 Redo:Yes Sample: D1
Purpose: To determine the concentration of phage particles in a lysate by using a plaque assay.
Notes:
1. Work bench was disinfected and prepped for aseptic work. Proper materials were gathered. This includes phage buffer, liquid phage sample, and microcentrifuge tubes.
2. Next 7 microcentrifuge tubes were arranged on a rack and labeled 10^-1 through 10^-6. Once tubes were labeled and arranged, 90μl of phage buffer were added to each tube using a micropipetter and sterile tip.
3. To begin the dilution, 10μl of undiluted liquid phage sample were added to the first tube, labeled 10^-1. The new solution was mixed well using a vortex.
4. Using a new pipette tip, 10μl of solution from the 10^-1 tube were added to the 10^-2 tube and also mixed well.
5. Step 4 was repeated for each successive dilution until the last tube (10^-6).
6. Work bench was disinfected and prepped for aseptic work. Proper materials were gathered.This includes top agar, host bacteria, and 5 ml serological pipettes.
7. 1 agar plate and tube of host bacteria for each of the 6 diluted liquid phage samples were gathered. The agar plates and culture tubes were each labeled to match the corresponding liquid sample.
8. Using a micropipettor, 10µl of serial dilution was deposited into the corresponding culture and mixed well. The host bacteria and liquid phage sample solution were allowed to sit undesturbed for 7 minutes.
9. 3ml of top agar was transferred into each tube of bacteria and liquid phage solution using a 5ml pipette. Immediately after adding top agar to each sample, it was aspirated and poured onto an agar plate. Mixture was spread through the plate evenly. Plates were allowed to solidify and placed into the incubator.
Steps 8&9 were repeated for all diluted phage samples.
Results: Our second attempt also didn’t have any plaques and there no was webbed plates.
Conclusions and Next Steps: The next step is to redo the Full Plate Titer
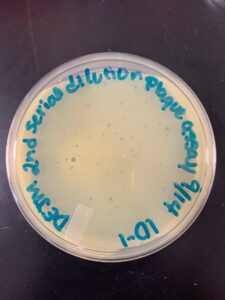
Title: Full Plate Titer
Date: 10/10/2022-10/12/2022 Redo: Yes Sample: D1
Purpose: To determine the concentration of phage particles in a lysate by using a plaque assay.
Notes:
1. Work bench was disinfected and prepped for aseptic work. Proper materials were gathered. This includes phage buffer, liquid phage sample, and microcentrifuge tubes.
2. Next 7 microcentrifuge tubes were arranged on a rack and labeled 10^-1 through 10^-6. Once tubes were labeled and arranged, 90μl of phage buffer were added to each tube using a micropipetter and sterile tip.
3. To begin the dilution, 10μl of undiluted liquid phage sample were added to the first tube, labeled 10^-1. The new solution was mixed well using a vortex.
4. Using a new pipette tip, 10μl of solution from the 10^-1 tube were added to the 10^-2 tube and also mixed well.
5. Step 4 was repeated for each successive dilution until the last tube (10^-6).
6. Work bench was disinfected and prepped for aseptic work. Proper materials were gathered.This includes top agar, host bacteria, and 5 ml serological pipettes.
7. 1 agar plate and tube of host bacteria for each of the 6 diluted liquid phage samples were gathered. The agar plates and culture tubes were each labeled to match the corresponding liquid sample.
8. Using a micropipettor, 10µl of serial dilution was deposited into the corresponding culture and mixed well. The host bacteria and liquid phage sample solution were allowed to sit undesturbed for 7 minutes.
9. 3ml of top agar was transferred into each tube of bacteria and liquid phage solution using a 5ml pipette. Immediately after adding top agar to each sample, it was aspirated and poured onto an agar plate. Mixture was spread through the plate evenly. Plates were allowed to solidify and placed into the incubator.
Steps 8&9 were repeated for all diluted phage samples.
Results: Our third attempt at a Full Plate Titer no plates were webbed or no plaques were visible either.
Conclusions and Next Steps: After three unsuccessful tries of the Full Plate Titer we decided to go back one step and pick a different plaque from our First Serial Dilution, and do another Second Serial Dilution.
Title: Picking a Plaque and Second Serial Dilution
Date: 10/12/22- Redo: Yes Sample: D1
Purpose:
Notes:
Picking a Plaque
1. Work bench was disinfected and prepped for aseptic work. Proper materials were gathered. This includes agar plates, microcentrifuge tubes, phage buffer, and more.
2. Using a permanent marker, the phage was circled to identify the plaque being used. A plaque on the 10^-2 plate from the serial dilution was used. This plaque had a cloudy outer ring, clear center, and was the only plaque on the plate.
3. A single microcentrifuge tube was obtained. Using a micropipettor and sterile tip, 100µl of phage buffer was placed into the microcentrifuge tube.
4. A new sterile tip was used to stab the center of the plaque. The tip was then placed into the phage buffer and tapped on the walls of the tube. Phage buffer was pipetted up and down in order to free any phage particles.
Second Serial Dilution
1. Work bench was disinfected and prepped for aseptic work. Proper materials were gathered. This includes phage buffer, liquid phage sample, and microcentrifuge tubes.
2. 8 microcentrifuge tubes were arranged on a rack and labeled 10^-1 through 10^-6. Once tubes were labeled and arranged, 90μl of phage buffer were added to each tube using a micropipetter and sterile tip.
3. To begin the dilution, 10μl of undiluted liquid phage sample were added to the first tube, labeled 10^-1. The new solution was mixed well using a vortex.
4. Using a new pipette tip, 10μl of solution from the 10^-1 tube were added to the 10^-2 tube and also mixed well.
5. Step 4 was repeated for each successive dilution until the last tube (10^-6).
Results:
Conclusions and Next Steps:
Title: Collecting Low Volume Lysate
Date: 10/19/22- 10/21/22 Redo: No Sample: D1
Purpose: The purpose of these two steps was to obtain a highly concentrated liquid phage sample and calculate the concentration.
Notes:
Collecting Low Level Plate Lysate
1. Work bench was disinfected and prepped for aseptic work. Proper materials were gathered. This includes a 5ml syringe, 0.22µm filter, and 15ml conical tube.
2. Next 8ml of sterile phage buffer were placed into the webbed plate. This was allowed to sit undisturbed at room temperature for 4 hours.
3. Once the wait time was done, the lid was taken off the plate and the plate was tilted to one side.
4. A 0.22µm filter was prepared and a 5ml syringe was used to suck up the lysate from the plate.
5. Around 6ml of lysate was collected and placed into the conical tube after being pushed through with a 0.22µm filter. The conical tube was then stored in the fridge for preservation.
Results:
Conclusions and Next Steps:
Title: Cryo Archiving and Database Entry
Date: 11/2/2022 Redo: No Sample: D1
Purpose: This procedure is to include your phage in the Actinobacteriophage Database to make it available for other scientists
Notes:
1. Created an active Phages DB account
2. Our phage was named “Dj Doc” and added to the database according to the naming rules on the database
3. The fields that we had information to were filled to the best of our knowledge.
4. Submitted a request to PhagesDB to be reviewed and approved.
Results:
Conclusions and Next Steps:
DNA Extraction
Title: DNA Extraction
Date: 11/02/22-11/03/22 Redo: No Sample: D1
Purpose: The purpose of this step is to isolate DNA from phage.
Notes:
Day 1:
1. 5mL of HVL were placed in a 15ml conical tube. The tube was given to a TA who added 20µl of nuclease mix. Mixture was inverted and incubated at 37ºC for 1o minutes
2. After the 10 minute incubation period, 1mL of mix was put into 5 separate microcentrifuge tubes. 20µl of zinc chloride was added to each tube and the tubes were then inverted and incubated at 37ºC for another 5 minutes. After the 5 minutes, the tubes were centrifuged at 10,000rpm for 1 minute.
3. After the minute in the centrifuge, the supernatant was removed using a micropipette.
4. The remaining pellets were then resuspended in 500µl of TES buffer. This was then incubated at 60ºC for 15 mins.
5. 1µl of Proteinase K was added to each tube and mixed gently. This mixture was then incubated at 37ºC for 10 minutes.
6. 60µl of potassium acetate was added to each tube, mixed well, and left on ice for 15 minutes. During this step a white fluffy precipitate formed.
7. After the 15 minutes, all tubes were centrifuged at 12,000rpm for 1 minute at 4ºC. The supernatant was aspirated and placed into new tubes. The pellets in the and original tubes were discarded.
8. 500µl of isopropanol was added to each tube of supernatant and the tubes were left on ice until the next day.
Day 2:
1. The tubes were centrifuged at top speed for 10 minutes. The supernatant was placed in a waste tube and discarded.
2. 250µl of 70% ethanol was added to each tube. This mixture was centrifuged again at top speed for 1 minute. The supernatant was placed into a waste tube and discarded.
3. The DNA pellets were allowed to dry at room temperature by leaving them turned upside down on a paper towel for some time.
4.The first pellet was resuspended in 50µl of nuclease free water. That same solution was used to resuspend the remaining pellets.
5. DNA concentration and purity were checked using a Nanodrop.
Results: DNA sample was not clean enough to move forward.

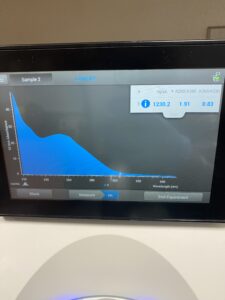
Conclusions and Next Steps: We will attempt another DNA Extraction,
Title: DNA Extraction
Date: 11/04/22 & 11/07/22 Redo: Yes Sample:
Purpose: The purpose of this step is to isolate DNA from phage.
Notes:
Day 1:
1. 5mL of HVL were placed in a 15ml conical tube. The tube was given to a TA who added 20µl of nuclease mix. Mixture was inverted and incubated at 37ºC for 1o minutes
2. After the 10 minute incubation period, 1mL of mix was put into 5 separate microcentrifuge tubes. 20µl of zinc chloride was added to each tube and the tubes were then inverted and incubated at 37ºC for another 5 minutes. After the 5 minutes, the tubes were centrifuged at 10,000rpm for 1 minute.
3. After the minute in the centrifuge, the supernatant was removed using a micropipette.
4. The remaining pellets were then resuspended in 500µl of TES buffer. This was then incubated at 60ºC for 15 mins.
5. 1µl of Proteinase K was added to each tube and mixed gently. This mixture was then incubated at 37ºC for 10 minutes.
6. 60µl of potassium acetate was added to each tube, mixed well, and left on ice for 15 minutes. During this step a white fluffy precipitate formed.
7. After the 15 minutes, all tubes were centrifuged at 12,000rpm for 1 minute at 4ºC. The supernatant was aspirated and placed into new tubes. The pellets in the and original tubes were discarded.
8. 500µl of isopropanol was added to each tube of supernatant and the tubes were left on ice until the next day.
Day 2:
1. The tubes were centrifuged at top speed for 10 minutes. The supernatant was placed in a waste tube and discarded.
2. 250µl of 70% ethanol was added to each tube. This mixture was centrifuged again at top speed for 1 minute. The supernatant was placed into a waste tube and discarded.
3. The DNA pellets were allowed to dry at room temperature by leaving them turned upside down on a paper towel for some time.
4.The first pellet was resuspended in 50µl of nuclease free water. That same solution was used to resuspend the remaining pellets.
5. DNA concentration and purity were checked using a Nanodrop.
Results: Our second attempt was not of good enough quality either.
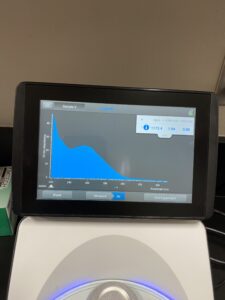
Conclusions and Next Steps: We will do a third DNA extraction.
Title: DNA Extraction
Date: 11/09/22-11/10/22 Redo: Yes Sample: D1
Purpose: The purpose of this step is to isolate DNA from phage.
Notes:
Day 1:
1. 5mL of HVL were placed in a 15ml conical tube. The tube was given to a TA who added 20µl of nuclease mix. Mixture was inverted and incubated at 37ºC for 1o minutes
2. After the 10 minute incubation period, 1mL of mix was put into 5 separate microcentrifuge tubes. 20µl of zinc chloride was added to each tube and the tubes were then inverted and incubated at 37ºC for another 5 minutes. After the 5 minutes, the tubes were centrifuged at 10,000rpm for 1 minute.
3. After the minute in the centrifuge, the supernatant was removed using a micropipette.
4. The remaining pellets were then resuspended in 500µl of TES buffer. This was then incubated at 60ºC for 15 mins.
5. 1µl of Proteinase K was added to each tube and mixed gently. This mixture was then incubated at 37ºC for 10 minutes.
6. 60µl of potassium acetate was added to each tube, mixed well, and left on ice for 15 minutes. During this step a white fluffy precipitate formed.
7. After the 15 minutes, all tubes were centrifuged at 12,000rpm for 1 minute at 4ºC. The supernatant was aspirated and placed into new tubes. The pellets in the and original tubes were discarded.
8. 500µl of isopropanol was added to each tube of supernatant and the tubes were left on ice until the next day.
Day 2:
1. The tubes were centrifuged at top speed for 10 minutes. The supernatant was placed in a waste tube and discarded.
2. 250µl of 70% ethanol was added to each tube. This mixture was centrifuged again at top speed for 1 minute. The supernatant was placed into a waste tube and discarded.
3. The DNA pellets were allowed to dry at room temperature by leaving them turned upside down on a paper towel for some time.
4.The first pellet was resuspended in 50µl of nuclease free water. That same solution was used to resuspend the remaining pellets.
5. DNA concentration and purity were checked using a Nanodrop.
Results: Our third DNA extraction was succesfull.
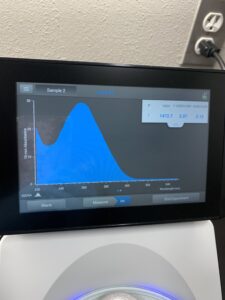

Conclusions and Next Steps: We will now move on to restriction enzyme digest and gel.
Characterization
Title: Mounting Phage Samples for TEM and Staining with Uranyl Acetate
Date: 11/2/2022 Redo: No Sample: D1
Purpose: The purpose is to prepare your phage sample for viewing with a transmission electron microscope.
Notes:
Part A: Phage sample is prepared.
- The workbench was disinfected and prepped for aseptic work by wearing gloves.
- 1 ml of high-titer lysate was transferred to a centrifuge tube.
- The tube was balanced along with a second tube of water for 22 minutes at 4 ℃ at top speed, this allowed for the phage particles to concentrate at the bottom of the tube.
- A micropipettor was used to remove as much supernatant as possible without disturbing the pellet.
- Then 100 μl of phage buffered were added to the tube and resuspended at 4 ℃ for 30 minutes to one hour.
The rest of the protocol was done immediately to avoid damaging the phage heads.
Part B: Work area is prepped.
- A fresh pair of gloves were put on, and the instructor already had the work area prepared.
- Next, the cover of a 5 x 5 cm piece of parafilm was removed, and the parafilm was placed in the lid of the Petri dish.
- A PELCO tab was placed onto the parafilm, and the adhesive was exposed.
- We used EM forceps to remove a fresh grid from a box of unused grids, we did this very carefully, only touching the very edge of the grid.
- The grid was placed dark-and-shiny side UP on the edge of the tab, so only the edge of the gride is touching the adhesive.
Part C: Mounting and Staining our phage.
- A micropipette was used to place 10 μl of lysate onto the gride without the tip touching the grid itself.
- The phage was allowed to settle and attach to the grid for at least 5 minutes.
- After 5 minutes, we used a small wedge-filtered paper to wick off the excess fluid.
- The grid was rinsed twice with the following method. 10 μl of sterile water was pipetted onto the grid and allowed to sit for 2 minutes then, the water was wicked off with a fresh piece of wedged paper.
- After rinsing the grid twice, 10 μl of 1% uranyl acetate was pipetted to the grid and allowed to sit for 2 minutes. The excess stain was wicked off with a fresh piece of wedged paper until the grid looked like a rainbow oil slick.
- We allowed the grid to air dry, and we safely put the grid back into the grid box.
- We wrote down the location of our grid in the box, and the samples were transported to the EM facility for imaging.
Results: We will know our results once EM facility examines our grid.
Conclusions and Next Steps:Our next step is to do the protocol for DNA extraction.
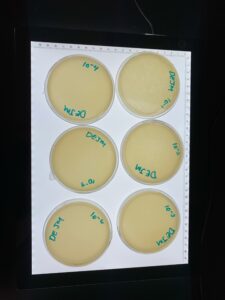
Title: Restriction Enzyme Digest
Date: 11-11-22 Redo: No Sample: D1
Purpose: To create multiple fragments of DNA using restriction enzymes.
Notes:
1. After gently mixing DNA in closed tube, we incubated it on a 65ºC heat block for 10 minutes. After this time, we placed it on ice. We then centrifuged the tube for less than a minute in order to move all the liquid to the bottom of the tube.
2. We used our DNA concentration to calculate the volume of DNA needed to obtain 0.5µg of DNA.
3. A 25µl mixture was prepared using our DNA, reaction buffer, restriction enzyme, and dionized water. In each tube we placed 14µl of dionized water, 2.5µl of reaction buffer (Cutsmart or 3.1), 0.5µl of one of the restriction enzymes, and 8µl of DNA.
4. The contents of each tube were gently mixed and centrifuged for less than 1 minute to move all liquid to the bottom of the tube.
5. All the tubes were then incubated for 1 hour at 37ºC.
Conclusions and Next Steps: Our next step will be to run a gel using our restriction enzyme digest.
Title: Gel Electrophoresis of Restriction Enzyme Digest
Date: 11-11-2022 Redo: No Sample: D1
Purpose: Seperate fragments of DNA cut using restriction enzymes via gel elctrophoresis.
Notes:
1. The appropriate mass of agarose powder was weighed out and poured into an Erlenmeyer flask. The appropriate volume of TBE buffer was added to the flask. This mixture was heated in the microwave for 1 minute. The flask was taken out of the microwave using heat resistant gloves. The flask was placed on the counter and allowed to cool down.
2. Once cool, ethidium bromide was added to the flask and swirled to mix. This was done carefully due to the mutagen nature of the dye.
3. A comb was placed into the gel apparatus and the agarose mixture was poured into the same apparatus. The gel was allowed to solidify for 25 minutes.
4. Once solidified, the comb was removed carefully. The gel box was then rotated and TBE buffer was used to submerge the gel.
5. Before loading the wells, 5µl of loading dye was added to each 25µl restriction enzyme sample. The samples were then placed on a 65ºC heat block for 5 minutes and placed in ice for less than a minute. The tubes were centrifuged for around 15 seconds at 10,000rpm.
6. Finally, the restriction enzyme digest mix was used to load the gel. We loaded each sample and ladder using a fresh tip and loading 20µl in each well.
7. The electrodes were plugged into power supplu and the voltage was set to 100V.
8. The gel was run until the dye front had migrated 4 inches from the well. This took around 1 hour.
Results: Our gel came out alright, there was a bit of smearing but overall good.
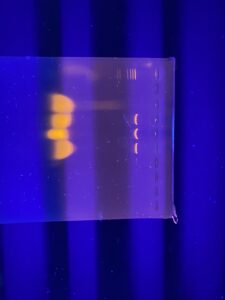
Conclusions and Next Steps: We are done and could be considered for sequencing.