Discovery of Ferdie
November 29,2017
Archiving Phage Sample
Entered Ferdie into the Actinobacteriophage database. Label the 3 tubes with the name of the phage, my name, and institution. Created DMSO/lysate mixture. Pipette the mixture into the three tubes. Sent two tubes to the University of Pittsburgh and kept one for storage at Tarleton.
November 20,2017
Gel Electrophoresis
Aims and purpose: Set up the apparatus for a gel electrophoresis. This will help analyze the phage’s DNA.
Procedure:
- Weigh the appropriate of amount of agarose in an Erlenmeyer flask
- Pour the 1x TBE buffer to the Erlenmeyer flask
- Heat mixture in microwave for 1 minute
- Let the mixture cool down
- Add ethidium bromide to the mixture
- Pour the mixture in the gel apparatus
- Allow it to solidfy
- Remove the comb straight up
- Add more 1x TBE buffer to the gel apparatus
- Micro pipette 25µl of restriction enzyme, in alphabetical order, to a parafilm, then add 5µl loading dye
- Load the gel with DNA ladder
- With a micropipettor pipette 20µl of each sample to the wells in the gel apparatus
- Turn on the power supply and set it to 100V
- Let it run for one hour
Results: The enzymes didn’t cut the DNA. There was no movement down the gel electrophoresis towards the positive charge.
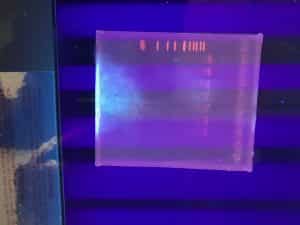
Interpretation and Analysis: Used ddH20 instead of diH20 when preparing the restriction enzyme. As a result, it cut the DNA.
Future Plans: Archive lysate
November 13, 2017
Make more lysate for archiving
Aims and Purpose: Have more lysate to archive.
Ran out of lysate after doing two rounds of DNA extraction. Forgot that we needed a specific amount of lysate to archive. In order for it to be the same virus, I used the webbed plates 10^-5 and 10^3 to create more lysate. After flooding the plates, waited 4 hours for the lysate to absorbed the DNA of the phage and bacteria. Then, proceeded to filter the lysate and store in a 15 mL conical tube. Collected 6mL of lysate.
November 06, 2017
Restriction Enzymes
Aims and Purpose: Cut genome phage genome into multiple fragments based off on its DNA sequence. The enzymes will recognize and cut specific sequences . This will help give a visualization of the phage genome when under gel electrophoresis.
Procedure:
- Prepare materials and disinfect workbench
- Mix DNA sample by flicking tube gently
- Incubate at 65°C for 10 minutes
- calculate of how many µl of DNA are needed to obtain .5 µg of DNA
- Set up restriction enzyme digest reactions
- For each enzyme (6) have a microcentrifudge tube to add the following contents in order:
- Sterile diH20 25µl
- 10x Reaction buffer 2.5 µl
- Restriction Enzyme .5 µl
- Phage DNA .5 µg
- Quick spin in microcentrifudge for less than 1 minute
- Incubate at 37°C for 1 hour
Calculations for the amount of µl of DNA needed:
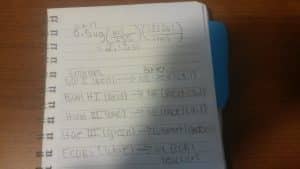
Future Plans: Gel eletrophoresis
November 01, 2017
DNA Extraction
Aims and Purpose: Isolate the phage’s DNA. In order for this to be done, the first step is to remove the bacterial DNA and RNA from the lysate. Afterwards, it is time to release the phage’s DNA from its capsid by following the proper procedure to collect a sample of pure phage DNA.
Procedure: Protocol 9.1
1) Degrading bacterial DNA/RNA
- Have supplies prepared and workbench disinfected from contamination
- Transfer 1 mL of phage lysate into a microcentrifudge tube
- While wearing gloves, add 10 µl of nuclease mix in the microcentrifudge tube
- Invert the tube gently
- Incubate the mixture at 37° C for 10 minutes
- After incubation, add 15 µl of EDTA
2) Denature the protein capsid to release phage DNA
- Add 2mL of DNA clean up resin to a 15 mL conical tube
- After incubating, transfer the nuclease-treated lysate to the 15 mL conical tube that contains resin
- Invert for 2 minutes
3) Isolate the phage genomic DNA
- Remove the plunger from two mL syringes and attach a column to teach barrel of the syringe
- Place the column and syringe on a new microcentrifuge tube
- Transfer 1.5 mL of phage DNA / resin solution column using a pippette
- Insert the plunger to the barrel and use 15 mL conical tube, used from earlier, to collect the flow thorugh
- Add the column to a new microcentrifudge tube
- Reattach the barrel to the column
- Add 2mL 80% isopropanol to each syringe barrel/column and insert the plunger into the barrel (Do this step 3 times)
4) Remove residual isopropanol
- Place the column in a new microcentrifudge tube and spin at 10000x g for 5 minutes
- Place the column in a new microcentrifudge tube and spin at 10000x g for 1 minute
- Remove the column from the microcentrifudge tube and place them in a 90°C heating block for 60 seconds
5) Elute the phage DNA from the column
- Place the column in a clean microcentrifudge tube and apply 50µl of 90°C sterile ddH2O directly to each column
- Incubate for 1 minute at room temperature
- Spin at 10000 x g for 1 minute in a microcentrifudge
- Combine both tubes into one…now you have your phage DNA
6) DNA concentration
- Waited for others to finish extracting their DNA in order to collectively determine the concentration of phage DNA. Did this in a group to minimize the waste of materials
- store DNA
Results: DNA concentration was above 100 ng/µl. The phage DNA concentration was 235 ng/µl
Interpretation / Analysis: Doubled the amount of nuclease and added EDTA, to enhance the removal process of bacterial DNA, in order to only have phage DNA.
Future Plans : Restriction Enzymes
October 30, 2017
DNA Extraction
Aims and Purpose: Isolate the phage’s DNA. In order for this to be done, the first step is to remove the bacterial DNA and RNA from the lysate. Afterwards, it is time to release the phage’s DNA from its capsid by following the proper procedure to collect a sample of pure phage DNA.
Procedure: Protocol 9.1
1) Degrading bacterial DNA/RNA
- Have supplies prepared and workbench disinfected from contamination
- Transfer 1 mL of phage lysate into a microcentrifudge tube
- While wearing gloves, add 5 µl of nuclease mix in the microcentrifudge tube
- Invert the tube gently
- Incubate the mixture at 37° C for 10 minutes
2) Denature the protein capsid to release phage DNA
- While for incubation to be finished, add 2mL of DNA clean up resin to a 15 mL conical tube
- After incubating, transfer the nuclease-treated lysate to the 15 mL conical tube that contains resin
- Invert for 2 minutes
3) Isolate the phage genomic DNA
- Remove the plunger from two mL syringes and attach a column to teach barrel of the syringe
- Place the column and syringe on a new microcentrifuge tube
- Transfer 1.5 mL of phage DNA / resin solution column using a pippette
- Insert the plunger to the barrel and use 15 mL conical tube, used from earlier, to collect the flow thorugh
- Add the column to a new microcentrifudge tube
- Reattach the barrel to the column
- Add 2mL 80% isopropanol to each syringe barrel/column and insert the plunger into the barrel (Do this step 3 times)
4) Remove residual isopropanol
- Place the column in a new microcentrifudge tube and spin at 10000x g for 5 minutes
- Place the column in a new microcentrifudge tube and spin at 10000x g for 1 minute
- Remove the column from the microcentrifudge tube and place them in a 90°C heating block for 60 seconds
5) Elute the phage DNA from the column
- Place the column in a clean microcentrifudge tube and apply 50µl of 90°C sterile ddH2O directly to each column
- Incubate for 1 minute at room temperature
- Spin at 10000 x g for 1 minute in a microcentrifudge
- Combine both tubes into one…now you have your phage DNA
6) DNA concentration
- Waited for others to finish extracting their DNA in order to collectively determine the concentration of phage DNA. Did this in a group to minimize the waste of materials
- store DNA
Results: DNA concentration was below 100 ng/µl. The concentration was 78.2 ng/µl.
Interpretation/Analysis: During the isopropanol washing, I put too much force on the plunger and the column fell in the 15mL conical tube. As a result, the column was now contaminated with bacterial DNA. This could have explained why the DNA concentration was low.
Future Plans: Retry the 9.1 protocol with modifications to the procedure
October 25, 2017
Making and Collecting High-Titer Lysate
Aims and Purpose: Deciding which dilution factor made the best webbed plate and make high-titer lysate off of it.
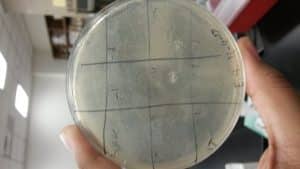
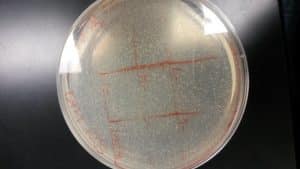
After evaluating which dilution (10^-3, 10^-4, 10^-5) made the best webbed plate. The 10^-4 had more plaques than the other two plates.
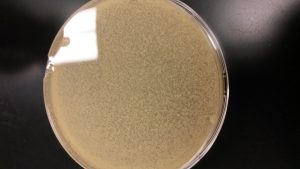
The above image is the 10^-4 plate.
Now, that I have decided which webbed plate to use to make lysate. I followed the flooding a plate for lysate collection procedure:
- Disinfect workbench, wash hands, prepare equipment
- Choose a plate with a high amount of phage from the second set of serial dilutions
- Add 8 ml of phage buffer to the webbed plate with a syringe
- Label the flooded plate and use parifilm to ensure phage buffer won’t spill
- Store the flooded plate for 4 hours
After 4 hours I collected the lysate by following the filtering lysate procedure:
- Aseptically clean workbench, wash hands, and prepare equipment needed to filter the lysate.
- Open the lid from the plate. Then use the lid as a prop to hold the plate. This will allow for the lysate to pool to one side.
- Open the .22µm filter without taking the whole thing from its package.
- With a 5ml syringe, aspirate the lysate from the plate
- Attach the syringe to filter
- Place a 15 ml conical tube under the filter to collect the filtered lysate
- Depress the syringe plunger and the filtered lysate will collect in the conical tube
- Label conical tube and place it in the fridge
Future Plans: DNA extraction
October 23, 2017
Serial dilutions
Procedure for Serial dilutions:
- Aseptic technique
- label 7 microcentrifuge tubes in to 10^1, 10^2, etc.
- Added 50µl of phage buffer in micro centrifudge
- Add 5µl of undiluted phage sample to the 10^1 microcentrifuge
- Transferred 5µl of liquid from the 10^1 to the 10^2.
- Will repeat this process until I have reached 10^6
- Made plaque assays for 10^-3, 10^-4, 10^-5 dilutions by following protocol 5.3
Future plans: Decide which dilution created the best webbed plates and make lysate.
October 20, 2017
Aims and purpose: Determine the concentration of phage particles in a lysate.
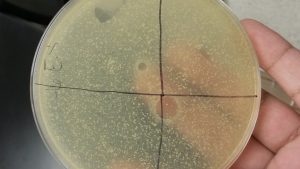
Chose 10^-6 to find the concetration of phage particles of the lysate. Divided the plate into a quadrant, since the phages are small to see. Plan to count only in one region, then multiply by 4 to determine the total number of phages.
CALCULATIONS:
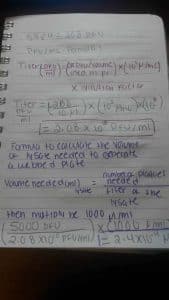
Interpretation and Analysis: To ensure which dilution was best to create a webbed plate, I “bracket” by going ten times more and ten times less. So, I’m going to a webbed plate from 2.4 X 10^-4, 2.4 X 10^-3, and 2.4 X 10^-5. Wasn’t sure how I was going to micropipette 2.4 X 10^-3, so I asked Dr. Edwards for guidance and gave me a diagram to go off on:
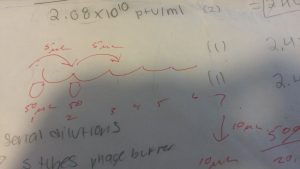
Future plans:Perform serial dilutions
October 18, 2017
Title: Full plate titer
Aims and Purpose: Perform 10^-7 dilutions of lysate and make a plaque assay for each dilution.
Procedure:
- Aseptic technique
- label 7 micro centrifuge in to 10^1, 10^2, etc.
- Added 90µl of phage buffer in micro centrifudge
- Add 10µ of undiluted lysate sample to the 10^1 microcentrifuge
- Transferred 10µl of liquid from the 10^1 to the 10^2.
- Will repeat this process until I have reached 10^7
- Completed 7 plaque assays for each diluted micro centrifuge tube by following protocol 5.3
Interpretation and Analysis: Because the previous spot titers have been unsuccessful, I tried another approach that was on page 52 on the lab notebook. This will help visualize the presence of phage in order to count the number of plaques present.
Future Plans: Determine the concentration of phage particles in a lysate by using a plaque assay.
October 12, 2017
Aims and Purpose: Check on the results the spot titer that was performed on Wednesday, October 11.
Results:Top agar is spread out unevenly and there was contamination.
Interpretation and Analysis: The unevenness of the top agar was due to inadequate absorption. Since there was a shortage of burners, the spot titer had a increasing chance of contamination.
Future Plans: Perform plaque assays for each lysate dilutions since the spot titer hasn’t been successful.
October 11, 2017
Title: Spot Titer
Aims and Purpose: Perform a spot titer by doing a serial dilutions from a lysate, in order to predict the number of dilutions to be performed in a full plate titer.
Procedure:
- Disinfect workbench, wash hands
- Gather necessary equipment: lysate, agar plate, top agar, host bacteria culture, phage buffer, micro centrifuge tubes, 5 ml serological pipettes
- Label agar plate by making sections for a 10^1-10^6 and a negative control
- Using 5ml serological pipette, aspirate 3 ml of agar and transfer to a 250 µl culture tube that contains bacteria
- With the same 5ml serological tube aspirate the agar and bacteria host from the cultured tube and dispense it to a agar plate
- Make sure the top agar is evenly distributed and wait 40 minutes
- Perform serial dilutions using the lysate
- label 6 microcentrifuge tubes in to 10^1, 10^2, etc.
- Added 90µl of phage buffer in each microcentrifudge tube
- Add 10µ of lysate to the 10^1 microcentrifuge tube
- Transferred 10µl of liquid from the 10^1 to the 10^2.
- Will repeat this process until I have reached 10^6
- After the top agar has solidified, dispense 3µl of each dilution to its appropriate label on the agar plate
- Dispense 3µl of phage buffer to the negative control in the agar plate
- Wait one hour minutes for the liquid to absorb
- Incubate for one day
- Dispose used equipment to the appropriate waste disposal, disinfect workbench
Modifications: There was a shortage of burners so I had to share one with a peer. As a result, there could be a possibility of a contamination on the plate.
Results: While transporting the plate to the incubator carefully, the liquid did not mixed in together.
Future Plans: Check in on the spot titer.
October 10, 2017
Aims and Purpose: Check on the results the spot titer that was performed on Friday, October 06.
Results: Clear plaques on 10^-1, 10^-2, 10^-3, 10^-4, 10^-5.

Interpretation and Analysis: On 10^-3, and 10^-4 regions there was two large individual sized plaques.Since, the goal is for the clearing to be small individual plaques, the spot titer will have to be performed again.
Future Plans: Performed spot titer again.
October 09, 2017
Aims and Purpose: Check on the results the spot titer that was performed on Friday, October 06.
- I was informed that the spot titer plate had only one hour of incubation, because Dr. Edwards had to take them out on Friday due to the science building being closed on the weekend.
- It was advised to put back the spot titer in the incubator and wait for results the next day.
Future Plans: Check in on the spot titer.
October 06, 2017
Title: Spot Titer
Aims and Purpose: Perform a spot titer by doing a serial dilutions from a lysate, in order to predict the number of dilutions to be performed in a full plate titer.
Procedure:
- Disinfect workbench, wash hands
- Gather necessary equipment: lysate, agar plate, top agar, host bacteria culture, phage buffer, micro centrifuge tubes, 5 ml serological pipettes
- Label agar plate by making sections for a 10^1-10^6 and a negative control
- Using 5ml serological pipette, aspirate 3 ml of agar and transfer to a 250 µl culture tube that contains bacteria
- With the same 5ml serological tube aspirate the agar and bacteria host from the cultured tube and dispense it to a agar plate
- Make sure the top agar is evenly distributed and wait 40 minutes
- Perform serial dilutions using the lysate
- label 6 microcentrifuge tubes in to 10^1, 10^2, etc.
- Added 90µl of phage buffer in each microcentrifudge tube
- Add 10µ of lysate to the 10^1 microcentrifuge tube
- Transferred 10µl of liquid from the 10^1 to the 10^2.
- Will repeat this process until I have reached 10^6
- After the top agar has solidified, dispense 3µl of each dilution to its appropriate label on the agar plate
- Dispense 3µl of phage buffer to the negative control in the agar plate
- Wait one hour minutes for the liquid to absorb
- Incubate for one day
- Dispose used equipment to the appropriate waste disposal, disinfect workbench
Results: While transporting the plate to the incubator carefully, the liquid did not mixed in together.
Future Plans: Check in on the spot titer, and if successful perform the full plate protocol.
October 04, 2017
Title: Spot titer
Aims and Purpose: Perform a spot titer by doing a serial dilutions from a lysate, in order to predict the number of dilutions to be performed in a full plate titer.
Procedure:
- Disinfect workbench, wash hands
- Gather necessary equipment: lysate, agar plate, top agar, host bacteria culture, phage buffer, micro centrifuge tubes, 5 ml serological pipettes
- Label agar plate by making sections for a 10^1-10^6 and a negative control
- Using 5ml serological pipette, aspirate 3 ml of agar and transfer to a 250 µl culture tube that contains bacteria
- With the same 5ml serological tube aspirate the agar and bacteria host from the cultured tube and dispense it to a agar plate
- Make sure the top agar is evenly distributed and wait 40 minutes
- Perform serial dilutions using the lysate
- label 6 microcentrifuge tubes in to 10^1, 10^2, etc.
- Added 90µl of phage buffer in each microcentrifudge tube
- Add 10µ of lysate to the 10^1 microcentrifuge tube
- Transferred 10µl of liquid from the 10^1 to the 10^2.
- Will repeat this process until I have reached 10^6
- After the top agar has solidified, dispense 3µl of each dilution to its appropriate label on the agar plate
- Dispense 3µl of phage buffer to the negative control in the agar plate
- Wait 30 minutes for the liquid to absorb
- Incubate for one day
- Dispose used equipment to the appropriate waste disposal, disinfect workbench
Results: The second time performing the spot titer was also unsuccessful. Phage was spread throughout the plate.
Interpretation and Analysis: The spreading of the phage was due to moving the plate too much while transporting it to the incubator.As a result, the liquid was mixed together.
Future Plans: Perform spot titer and let the liquid absorb into the plate for one hour instead of 30 minutes.
October 02, 2017
Title: Spot Titer
Aims and Purpose: Perform a spot titer by doing a serial dilutions from a lysate, in order to predict the number of dilutions to be performed in a full plate titer.
Procedure:
- Disinfect workbench, wash hands
- Gather necessary equipment: lysate, agar plate, top agar, host bacteria culture, phage buffer, micro centrifuge tubes, 5 ml serological pipettes
- Label agar plate by making sections for a 10^1-10^6 and a negative control
- Using 5ml serological pipette, aspirate 3 ml of agar and transfer to a 250 µl culture tube that contains bacteria
- With the same 5ml serological tube aspirate the agar and bacteria host from the cultured tube and dispense it to a agar plate
- Make sure the top agar is evenly distributed and wait 40 minutes
- Perform serial dilutions using the lysate
- label 6 microcentrifuge tubes in to 10^1, 10^2, etc.
- Added 90µl of phage buffer in each microcentrifudge tube
- Add 10µ of lysate to the 10^1 microcentrifuge tube
- Transferred 10µl of liquid from the 10^1 to the 10^2.
- Will repeat this process until I have reached 10^6
- After the top agar has solidified, dispense 3µl of each dilution to its appropriate label on the agar plate
- Dispense 3µl of phage buffer to the negative control in the agar plate
- Wait 30 minutes for the liquid to absorb
- Incubate for one day
- Dispose used equipment to the appropriate waste disposal, disinfect workbench
Results: After one day of incubation, the 10^1, 10^2, and 10^3 had cloudy plaques. Near 10^2, the plate appeared to be burned, and the agar was unevenly distributed towards that side.
Analysis and Interpretation: While phage was present in the plate, there was no individual phages as it decreased down in number. As a result, the spot titer will have to be performed again.
Future Plans: Perform spot titer again.
September 28, 2017
Title: Filtering Lysate
Aims and Purpose: To filter the lysate after storing the plates overnight. The lysate will contribute to long term phage storage.
Procedure:
- Aseptically clean workbench, wash hands, and prepare equipment needed to filter the lysate.
- Open the lid from the plate. Then use the lid as a prop to hold the plate. This will allow for the lysate to pool to one side.
- Open the .22µm filter without taking the whole thing from its package.
- With a 5ml syringe, aspirate the lysate from the plate
- Attach the syringe to filter
- Place a 15 ml conical tube under the filter to collect the filtered lysate
- Depress the syringe plunger and the filtered lysate will collect in the conical tube
- Label conical tube and place it in the fridge
Results: 3.5 ml was collected in the 15 ml conical tube after filtering the lysate.
Analysis and Interpretations: Storing the lysate with the 8ml buffer overnight will increase a high concentrated phage solution. As a result, the filtered lysate will have high amount of phage in the conical tube.
Future Plans: Proceed to spot tilter to calculate the titer of the lysate.
September 27, 2017
Title: Flooding a plate for lysate collection
Aims and Purpose: Find a plate from the second set of serial dilutions to make a lysate.
Procedure:
- Disinfect workbench, wash hands, prepare equipment
- Choose a plate with a high amount of phage from the second set of serial dilutions
- Add 8 ml of phage buffer to the webbed plate with a syringe
- Label the flooded plate and use parifilm to ensure phage buffer won’t spill
- Store the flooded plate overnight
Results: The plate (10^2) that was used for flooding contained cloudy and turbid phages. Since, the plate contained the most amount of phage it was used to create a lysate. After adding phage buffer, made sure it was evenly distributed.
Analysis and Interpretations: Used a plate from the second set of serial dilutions that contained the most phage. Leaving the lysate overnight will increase the amount of phage in the solution.
Future Plans: After one day, Proceed to filter the lysate from flooded plate.
September 25, 2017
Title: Second set of serial dilutions and perform a plaque assay
Aims and Purpose: Find a plate from the first set of serial dilutions that contains the least amount of phage. After completing the second set of serial dilutions and completed the plaque assays, I can use the plate with high amount of phage as my webbed plate to make a lysate.
Procedure for serial diltuion:
- Aseptic technique
- label 6 microcentrifuge tubes in to 10^1, 10^2, etc.
- Added 90µl of phage buffer in micro centrifudge
- Add 10µ of undiluted phage sample to the 10^1 microcentrifuge
- Transferred 10µl of liquid from the 10^1 to the 10^2.
- Will repeat this process until I have reached 10^6
- Completed 6 plaque assays for each diluted micro centrifuge tube by following protocol 5.3
Procedure for plaque assays:
- Completed procedure from protocol 5.4
- Proceeding to the serial dilution protocol
- Plated dilutions that were instructed from protocol 5.2
- Incubate for one day
Results: The phages from first set of serial dilutions were small, cloudy, and barely noticeable until it was observed upon a light source. I picked a plaque that was isolated from others in the plate and proceeded to do my second set of serial dilutions.
Analysis and Interpretations: It can possible that the plaques from the first set of serial dilutions were barely noticeable, because not enough phage was collected from picking a plaque from the direct isolation plate due to bad technique,
Future Plans: Flood plate for lysate collection
September 20, 2017
Plaque assay purification
Purpose: To ensure a clonal phage population
Procedure:
- Completed procedure from protocol 5.4
- Proceeding to the serial dilution protocol
- Plated dilutions that were instructed from protocol 5.2
- Incubate for one day
Serial dilutions
Purpose: dilute phage samples in a 10-fold serial dilutions
Procedure:
- Aseptic technique
- label 6 micro centrifuge in to 10^1, 10^2, etc.
- Added 90µl of phage buffer in micro centrifudge
- Add 10µ of undiluted phage sample to the 10^1 microcentrifuge
- Transferred 10µl of liquid from the 10^1 to the 10^2.
- Will repeat this process until I have reached 10^6
- Completed 6 plaque assays for each diluted micro centrifuge tube by following protocol 5.3
Future Plans: Observe the least amount of plaques on the plates to use it for my second round of serial dilutions.
September 18, 2017
- Couldn’t do the first set of serial dilutions due to scheduling conflict.
September 11-13, 2017
Picking a plaque
[Protocol 5.4]
*Picking of the plaque was only done on the 11th of September 2017
Purpose:Pick a plaque from my positive control plate and make a liquid sample. The purpose of making a liquid sample is to incorporated into the spot test.
Procedure:
- Aseptic technique before starting
- Label which plaque I’m going to pick from.
- Obtain two microcentrifudge tubes for the plaques that I have chosen to get picked.
- Dispensed 100µl of phage buffer to both microcentrifudge tubes.
- Used a p200 micropipetor to gently pick a plaque while avoiding to touch the surrounding bacteria.
- Used the tip from the micropipetor to place phage particles into the microcentrifuge tubes
- Mixed for 5 seconds in the vortex
*Plaques that were picked to use in the spot test
Spot Test
* Did the spot test on the 11th and on the 13th.
Purpose: Form a clearing oh a plate that will give the presence of a phage.
Procedure:
- Aseptic technique
- Labeled the agar plate into a 3×3
- Transferred 3ml of top agar with a 5ml pipette into a 250µl cultured tube of bacteria
- Use the same pipette to aspirate the contents in the cultured tube to the agar plate
- Placed 10µl of phage buffer into one of the labeled section as a negative control
- Placed 10µl of the liquid picked plaque into a section of the labeled agar plate. Repeat twice for each micro centrifuge tube.
- Waited 10 minutes for it to absorb
- Place the plate into the incubator for one day
*As a result of the failed attempt the first time, the class was to repeat the same procedure for the spot test again on the 13th of September 2017.
*From the first spot test on the 9/11/17
*Second spot test that was done on the 9/13/17

Future Plans: Do a serial dilution by using a plaque from the direct isolation.
September 06, 2017
Direct Isolation
[Protocol 5.2]
Purpose: Extract phages from one sample that will be used for direct isolation, and use the extracted sample to infect the host bacteria (Mycobacterium Smegmatis) by using the plaque assay.
Procedure part one:
- Cleaned worked bench with 70% ethanol and CiDecon. Used a glove while handling CiDecon for safety purposes.
- To prevent airborne contaminants, had a flaming device to create a updraft around work bench area.
- Grabbed an empty 50 mL conical tube and filled it with one-third of the first environmental sample that was collected from the ranch.
- Added 3 mL of the enrichment broth to the 50 mL conical tube.
- Placed the 50 mL conical in the vortex for 10 seconds to mix the contents thoroughly.
- Placed 50 mL conical tube that contains the enrichment broth in a shaking incubator at 10:30 am.
- Collected the 50 ml conical tube from the shaking incubator at 12:10 pm.
- Waited 5 minutes for the mixture to settle
* Before starting the aseptic technique I forgot to wash my hands. After placing one-third of the first environmental sample to the 50 mL conical tube, I realized my mistake and washed my hands.
*After waiting for five minutes, the broth was absorbed in the soil instead of settling on top of the soil. As a result, the soil appeared clumped together. After brief conversation with Dr. Edwards, he advised to add 8 mL of enrichment broth and proceed to filtrate.
Procedure part two:
- Opened a .22 µm syringe filter without taking out the actual filter itself from the packaging.
- Used a 5 mL pipette to collect the liquid that was now settled on top. Tried to avoid solid particles for a smooth filtration.
- Grabbed a plastic disposable syringe and took out the plunger to transfer the liquid that was in the 5 mL pipette to the disposable syringe.
- Attached the syringe to the .22 µm syringe filtrate, and placed the plunger back to the syringe for .5 ml of the liquid to go through the .22 µm filtrate.
- Dispense the liquid to a microcentrifudge tube
- Discard used equipment
* While doing the filtrate for the first time, some solid components created resistance. When more force was used for the sample to filtrate, liquid went all over the work area. As a result, had to used the recommended aseptic technique.
Enriched Isolation
[protocol 5.5]
Purpose: Amplify the phages present in the environment sample. This will give more chances to have a plaque in the petri dish.
* While waiting for the 50 mL conical tube for the direct isolation to be in the shaking incubator for two hours. I proceeded to the enriched isolation.
*Instead of using another environmental sample to do the enriched isolation, I used the same environmental that was used in the direct isolation.
Procedure:
- Aseptic technique. Same as described in the direct isolation procedure.
- With a empty 50 mL conical tube, filled it to the 15mL mark with the same sample that was used for the direct isolation.
- Added 20 mL of the enrichment broth to the 50 mL conical tube.
- At 10:47 am the conical tube was placed in the shaking incubator.
- Retrieved the conical tube at 12:37 pm.
- At 12:44 pm placed the conical tube to the centrifuge for ten minutes.
- Used a Tube-Top Filter system to remove unwanted bacteria.
- Retrieved a volume of 23 ml
- Added .5 ml of the bacterial host to the conical tube
- Incubated the conical tube for 2 days.
Plaque Assay
[protocol 5.3]
Purpose: Create a mixture of the direct isolation and bacterial host to a plate to create a plaque assay. Creating a plaque assay will help visualize the bacterial host being “killed” by the phage.
Procedure:
- Negative control:Micro-pipette 10µl of phage buffer into a 250µ cultured tube that contained the bacterial host.
- Positive control: Micro-pipette 10µl of the phage sample into a 250µl cultured tube that contains the bacterial host.
- Waited 15 minutes for each cultured tube.
- Used a 5 mL pipette to obtain 3ml of top agar to the cultured tube. Aspirate using the 5ml pipette to collect the mixture from the cultured tube to the plate.
- Wait 20 minutes for the agar to solidify in the plate
- Incubated the plates for 1-2 days
*Did the negative control first to practice applying top agar into the plate
*Did the fourth bullet point for both the negative and positive control
* On my positive control there was a bubble in the plate due to poor technique
After one day of incubation Ferdie was found!
Future Plans: Pick a plaque from the positive control.
SEPTEMBER/02-03/ 2017
Environmental Sample Collection
Purpose: Go to three different locations in Fort Worth, Texas, to collect environmental samples. The purpose of collecting samples in three different places will increase the chance of finding a phage.
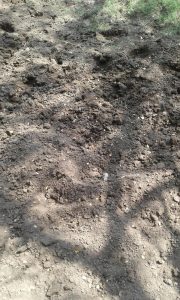
Sample 1
- Collector Name: Esperanza Sandoval and Raul Sandoval
- Date of Collection: 09-02-2017
- Sample Type: Soil
- Location Description: Ranch. The sample was collected in a picadero, where horses are being trained to compete.
- Specific Location: Latitude N 32° 40′ 47.81746” Longitude W 97°15′ 11.14521”
- Sample Depth: One inch
- Ambient Temperature: 87° F
Sample 2
- Collector Name: Esperanza Sandoval and Raul Sandoval
- Date of Collection: 09-03-2017
- Sample Type: Wet soil
- Location Description: Oakland Park. The sample was collected in a pond.
- Specific Location: Latitude N 32° 45′ 12.70879” Longitude W 97° 15′ 30.47282”
- Sample Depth: 1 1/2 inches
- Ambient Temperature: 94°F
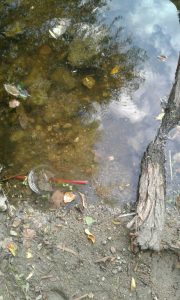
Sample 3
- Collector Name : Esperanza Sandoval and Raul Sandoval
- Date of Collection: 09-03-2017
- Sample Type: Wet soil
- Location Description: Gateway Park. Sample collected in Trinity River.
- Specific Location: Latitude N 32° 45′ 8.76212” Longitude W 97° 17′ 15.00463”
- Sample Depth: One inch
- Ambient Temperature: 94° F

Procedure
For all three samples:
- Find soil that was moist or near water.
- Once a spot was chosen, used a cellular device to collect the specific information needed to record the sample data sheet.
- Uncapped a 50 mL conical tube, and used the tube to scoop 15 mL of soil for each sample. Once the soil was collected, the conical was capped immediately. For this procedure, I tried not touch the opening of the 50 mL conical tube.
- Labeled the tubes with the date that was collected, collector’s initials, and a general description of the location.
- Stored the three samples in a small plastic storage container that didn’t contain a lid at room temperature for 2-3 days.
Future Plans: Extract phages from the environmental samples and proceed to direct isolation and enriched isolation.