Discovery of Godfather
Godfather Information
Morphology: Siphoviridae

Sample Collection
| Collector Name |
Joshua Hutchings |
Anayah Copeland | Joshua Hutchings | |
| Sample No. | 1 | 2 | 3 | |
| Date of Collection | 08/30/23 | 08/30/2023 | 9/6/2023 | |
| Sample Type | Soil Sample | Soil Sample | Soil Sample | |
| General Location | Stephenville, Tx | Stephenville, TX | Stephenville, Tx | |
| Location Description | Mole Hole Located Under a Oak Tree | Dirt surrounding a tree in a dog park | Dirt from a flowerbed with an anthill close | |
| GPS Coordinates | 32.211329, -98.211978 | 32.21191, -98.211755 | ||
| Sample Depth | Roughly 3 inches below surface | Roughly 1.5 inches below surface | Roughly 1 inch sub surface | |
| Ambient Temperature |
Isolation/Purification
Title: Isolation/Purification of Environmental Sample
Date: 08/30/23
Redo: No
Sample: 1
Purpose: The isolation and purification of the sample is used as a way to take the sample collected, and isolate a phage from all the other material collected. Once collected, the isolated phage is then used to infect the host bacteria, which for this experiment is Microbacterium foliorum. After the collected phage and host bacteria are put together they are used for a plaque assay. This is used as a way to visualize the samples collected, and see if there is a phage present in the isolated material.
Notes:
A. The surface was cleaned and prepped for aseptic technique.
B. Extraction of phage from soil sample.
1. Collect 7-10 ml of soil in a conical tube.
2. Use the liquid media to submerge the soil sample in 2 to 3 ml of fluid. The sample was 7ml once fluid was added the total content of the tube was 10ml.
3. Tube was then capped and flipped to mix
4. Once mixed, the sample was put into a shaken incubator at 220 rpm for 1 and a half hours
5. After, the sample was allowed to rest for 5 minutes to allow particles to settle
C. Preparing phage sample.
1. Once settled, a syringe was used to collect the liquid from the top of the sample.
2. After being collected in the syringe, a 0.22ul filter is placed on the end.
3. Using aseptic technique, the liquid is transferred through the filter into a microcentrifuge tube, 0.5ml minimum is required.
D. Inoculating host with phage sample.
1. Using aseptic technique, 500uL of phage sample was added to 250uL of bacteria culture.
2. Sample was set, undisturbed for 10 minuets.
E. Plating samples with top agar
1. Using agar from the 55 C bath, 3ml of top agar was added to the inoculated host tube. This was done using aseptically to ensure that there would be no unwanted growth on the plate. Also, the top agar was transfered quickly to ensure that it would not solidify prematurely.
2. After the top agar and host tube are combined they were quickly aspirated, then transfered onto a agar plate.
3. Once the top agar is on the plate it was tilted to multiple positions to ensure that the top agar coted the whole agar plate.
F. Incubation
1. The newly coted plate was allowed to rest for 20 minutes.
2. Once solidified, the plate was inverted so that the agar was on the top portion.
3. The plate was then incubated at 29 c for 48 hours.
Results:
There was no growth on the plate, meaning a new sample is needed.
Conclusions and Next Steps:
Since no growth was present on the plate, a new sample is needed to progress further.
Title: Isolation/Purification of Environmental Sample by Plaque Assay
Date: 09/06/23
Redo: No
Sample: 2
Purpose: The purpose of the Isolation and Purification was to remove the phage from the collected sample to mix it to the host bacteria. For this experiment the phage was used to infect Microbacterium foliorum. After the phage was collected from the sample, it was combined with the host bacteria and used to perform plaque assay. Plaque Assay measures the amount of host cells infected by the phage by growing a plaque like substance, so the phage is able to be visualized if it is present.
Notes:
- The sample was started in the centrifuge at 9:21 A.M., removed at 10:21 A.M., and kept at a temperature of 29° C. All samples were required to spin for 1 to 2 hours.
A. The surface was cleaned and prepped for aseptic technique.
B. Extraction of phage from soil sample.
1. Collect 7-10 ml of soil in a conical tube.
2. Use the liquid media to submerge the soil sample in 2 to 3 ml of fluid. The sample was 7ml once fluid was added the total content of the tube was 10ml.
3. Tube was then capped and flipped to mix
4. Once mixed, the sample was put into a shaken incubator at 220 rpm for 1 hour
5. After, the sample was allowed to rest for 5 minutes to allow particles to settle
C. Preparing phage sample.
1. Once settled, a syringe was used to collect the liquid from the top of the sample.
2. After being collected in the syringe, a 0.22ul filter is placed on the end.
3. Using aseptic technique, the liquid is transferred through the filter into a microcentrifuge tube, 0.5ml minimum is required.
D. Inoculating host with phage sample.
1. Using aseptic technique, 500uL of phage sample was added to 250uL of bacteria culture.
2. Sample was set, undisturbed for 10 minutes.
E. Plating samples with top agar
1. Using agar from the 55 C bath, 3ml of top agar was added to the inoculated host tube. This was done using aseptically to ensure that there would be no unwanted growth on the plate. Also, the top agar was transferred quickly to ensure that it would not solidify prematurely.
2. After the top agar and host tube are combined they were quickly aspirated, then transferred onto a agar plate.
3. Once the top agar is on the plate it was tilted to multiple positions to ensure that the top agar coted the whole agar plate.
F. Incubation
1. The newly coted plate was allowed to rest for 20 minutes.
2. Once solidified, the plate was inverted so that the agar was on the top portion.
3. The plate was then incubated at 29° C for 48 hours.
Results: The sample showed no signs of growth.

Conclusions and Next Steps:
The sample displayed no signs of growth, so a new sample will be needed.
Title: Isolation/Purification of Environmental Sample
Date: 09/12/23
Redo: No
Sample: 3
Purpose: The isolation and purification of the sample is used as a way to take the sample collected, and isolate a phage from all the other material collected. Once collected, the isolated phage is then used to infect the host bacteria, which for this experiment is Microbacterium foliorum. After the collected phage and host bacteria are put together they are used for a plaque assay. This is used as a way to visualize the samples collected, and see if there is a phage present in the isolated material.
Notes:
A. The surface was cleaned and prepped for aseptic technique.
B. Extraction of phage from soil sample.
1. Collect 7-10 ml of soil in a conical tube.
2. Use the liquid media to submerge the soil sample in 2 to 3 ml of fluid. The sample was 7ml once fluid was added the total content of the tube was 10ml.
3. Tube was then capped and flipped to mix
4. Once mixed, the sample was put into a shaken incubator at 220 rpm for 1 and a half hours
5. After, the sample was allowed to rest for 5 minutes to allow particles to settle
C. Preparing phage sample.
1. Once settled, a syringe was used to collect the liquid from the top of the sample.
2. After being collected in the syringe, a 0.22ul filter is placed on the end.
3. Using aseptic technique, the liquid is transferred through the filter into a microcentrifuge tube, 0.5ml minimum is required.
D. Inoculating host with phage sample.
1. Using aseptic technique, 500uL of phage sample was added to 250uL of bacteria culture.
2. Sample was set, undisturbed for 10 minuets.
E. Plating samples with top agar
1. Using agar from the 55 C bath, 3ml of top agar was added to the inoculated host tube. This was done using aseptically to ensure that there would be no unwanted growth on the plate. Also, the top agar was transfered quickly to ensure that it would not solidify prematurely.
2. After the top agar and host tube are combined they were quickly aspirated, then transfered onto a agar plate.
3. Once the top agar is on the plate it was tilted to multiple positions to ensure that the top agar coted the whole agar plate.
F. Incubation
1. The newly coted plate was allowed to rest for 20 minutes.
2. Once solidified, the plate was inverted so that the agar was on the top portion.
3. The plate was then incubated at 29 c for 48 hours.
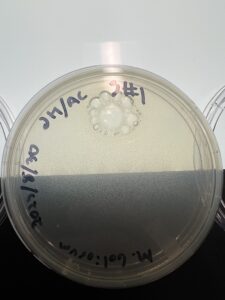
Results: The sample collected showed growth phages unlike the previous two, and will be used for further testing.

Conclusions and Next Steps: Since the test showed signs of phage activity it will be used as the source of page amplification. This sample will be the one used for the rest of the research.
Title: Serial Dilution of Plaque Assay
Date: 09/14/23
Redo: No
Sample: 3
Purpose: To acquire a sample from the phages grown on the plate in sample three, and preform a serial dilution with them.
A. Picking a Plaque
1. Put 90uL of phage buffer in 9 micro microcentrifuge tubes.
2. Find a plaque and circle it, using the tip of the micropipet gentry stab the plaque perpendicular to the plate, being sure to only make contact with the plaque. Avoid touching any of the surrounding area, or going too far into the top agar.
3. Dip the tip into one of the microcentrifuge tubes pull liquid up the pipet then back into the tube to be sure the page gets well mixed. Label this tube “Original” since it the the first in the serial dilution.
4. Mix tube well, then proceed to the dilution.
B. Serial Dilution
1. Label the remaining tubes 10^-1 through 10^-8
2. From the original tube, using the micropipet pull 10uL then put the sample into the 10^-1 tube. After the transfer take the tube to mix.
3. Remove pipet tip and repeat, pull 10uL from the 10^-1 tube then place into 10^-2 tube. Repeat the dilution all the way to the 10^-8 tube.
C. Inoculating Host with Phage
1. Use the same 250ul host bacteria cultures as before, label them 10^-1 through 10^-8.
2. Use pipettor to put 10uL into each of the bacteria cultures.
3. After mixing each culture gently tap the vial to allow the two to get mixed, then let each vial sit for 5-10 minuets.
D. Plating Phage Samples
1. Using 5mL pipet put 3mL of top agar into the vial, then quickly pull it back and put it on the agar plate. Be sure to tilt the plate to evenly distribute.
2. Repeat this for all 8 samples, then allow the plates to cool, once cooled they can be put in at 29c to allow growth.
Results: Plates incubated for 24 hours then they were pulled for evaluation. Once viewed, there was visible growth up to the 10^-6 plate. 

Amplification
Title: Second Round of Serial Dilution to Purify Phage
Date: 09/18/2023
Redo: No
Sample: 3
Purpose:
The purpose of this experiment is to further isolate the phage.
Notes:
-
- Prepare your bench for aseptic work and assemble your supplies.
- Obtain the titered lysate you prepared from your last round of phage purification using the collecting plate lysates protocol and calculating titer.
- Estimate the number of plaques you need and calculate the volume of lysate necessary to generate a webbed plate.
- Calculate how many phage were on the webbed plate used to make the lysate.
- Choose a plate with a high density of plaques and count how many plaques are in a quadrant. Use a sharpie to mark each plaque on the bottom of the plate as you count it so you don’t count it twice.
- Estimate how many more plaques you need to make a webbed plate.
- Calculate the volume of lysate needed to generate a webbed plate.
- Using data from a previous plaque assay, for example from your most recent full-plate titer of your lysate, estimate how many plaques would result in a webbed plate.
- Perform the dilutions according to the protocols for Serial Dilutions
- Plaque size often decreases the closer the plaques are on a plate. To ensure that you obtain proper webbed plates plates, it is a good idea to “bracket” the number of phage particles you put on the plate. This means you should also prepare plates with fewer phage and with more phage than the optimum number estimated. For larger plaques you may want to double and halve the number of phage. For smaller plaques you may want to use 10 times more and 10 times less. This is phage-dependent.
- Plate your dilutions to create webbed plates.
- Retrieve the proper number of agar plates and host bacterial cultures needed to plate your dilutions, including your bracket dilutions and replicates.
- Infect the bacterial host cells with the appropriate volume and dilutions of your lysate and and incubate the mixture for 5–10 minutes for phage attachment. Then add 3 ml of molten top agar to the mixture and plate.
- Remember that each webbed plate will yield ~ 3–5 ml of lysate and that you will need a minimum of 8–10 ml for subsequent experiments and long-term storage. Therefore, you may need to plate each dilution two or three times to make additional webbed plates.
- Incubate (without inverting) for at least 24 hours at the proper temperature.
- Choose the best webbed plate and collect a lysate according to the Collecting Plate Lysate protocol.
Results:

Conclusions and Next Steps:
###.
Title: Collecting Plate Lysates
Date: 09/20/2023
Redo: No
Sample: 3
Purpose: To collect a concentrated liquid phage sample from the serial dilutions.
Notes:
A. Selecting a plate to flood
1. We chose our 10^-2 plate to flood since it was the best webbed
B. Flood the chosen plate
1. Using 8ml of phage buffer, apply directly on the agar side of the plate
2. The plate sat at room temperature for 4 hours
C. Harvesting the plate lysate
1. Remove lid of plate and tilt it to the side
2. Using a syringe, aspire the liquid from the plate
3. Put the acquired liquid in a 50ml vacuum filter, turn on the filter to collect the filtered product.
Results:
The collected lysate amounted to roughly 6ml of liquid.
Conclusions and Next Steps:
The collected low volume lysate will be further used for the full plate titer from 10^-1 to 10^-4.
Title: Full Plate Titer
Date: 09/25/2023
Redo: No
Sample: 3
Purpose: To find the concentration of phage particles in the lysate collected prior.
Notes:
A. Using low volume lysate, preform a serial dilution
- Using micro tubes, preform a serial dilution up to 10^-4
- Add 90uL of phage buffer to each of the four and 10uL of low lysate into one
- Preform standard serial dilution procedure, pulling 10uL from the original into the 10^-1, then 10uL from the 10^-1 to the 10^-2 all the way to 10^-4.
B. Inoculate host bacteria with dilution samples
- Collect 4 tubes of the 250uL sample of the host bacteria M. Foliorum
- Using the micro pipet add 10uL of phage sample to each of the tubes, one for 10^-1 all the way up to 10^-4. Be sure aseptic technique is used to prevent any contamination.
- Allow these samples to rest for roughly 10 minuets to ensure attachment.
C. Plating samples with top agar
- Using agar from the 55 C bath, 3ml of top agar was added to the inoculated host tube. This was done using aseptically to ensure that there would be no unwanted growth on the plate. Also, the top agar was transfered quickly to ensure that it would not solidify prematurely.
- After the top agar and host tube are combined they were quickly aspirated, then transfered onto a agar plate.
- Once the top agar is on the plate it was tilted to multiple positions to ensure that the top agar coted the whole agar plate.
F. Incubation
- The newly coted plate was allowed to rest for 20 minutes.
- Once solidified, the plate was inverted so that the agar was on the top portion.
- The plate was then incubated at 29 c for 48 hours.
Results:
From this dilution we found that our low volume lysate wiped out the 10^-1,^-2 and 10^-3 plates. Our 10^-4 plate though was a well formed webbed plate

Conclusions and Next Steps:
From what we found out in our dilution our 10^-4 plate will be a good webbed plate to use for our high density lysate. So moving one we will repeat the 10^-4 dilution on multiple plates to form a high density lysate.

DNA Extraction
Title: DNA Extraction
Date: 10/11/2023
Redo: Yes
Sample: 3
Purpose: To concentrate liquid phage samples prior to extracting DNA.
Notes:
-
-
Prepare your bench and assemble your supplies.
- Degrade bacterial DNA/RNA in ml phage lysate.
- Aseptically transfer 4 – 10 ml of phage lysate into a 10 ml conical tube.
- Wearing gloves and working in the designated area, add 5 µl nuclease mix (per 1 ml phage lysate) to the lysate.
- Mix gently but thoroughly by repeated inversions, and incubate at 37 °C for 10 minutes or at room temperature for 30 minutes.
Precipitate phage particles.
- Using a 5 ml pipette, portion out the nuclease-treated lysate as 1 ml aliquots in clean microcentrifuge tubes.
- To each 1 ml of nucelase-treated lysate, add 25 µl ZnCl2.
- Mix gently but thoroughly by inversion.
- Incubate at 37 °C for 10 minutes.
- Place the tube in a high-speed centrifuge, balance the tubes, and spin at 10,000 × rpm for 1 minute.
- Remove and discard the supernatant from each microcentrifuge tube using a micropipettor, being careful not to disturb the pellets. This pellet contains your phage particles. Proceed immediately to Step D.
Re-suspend the phage pellet in 1.0 ml of EDTA.
1.Distribute a total of 1.0 ml of 0.1M EDTA equally between all the microcentrifuge tubes containing a pellet from Step C6.
2.Working quickly but gently, re-suspend each pellet by pipetting up and down.
3.Once all the pellets have been resuspended, combine all the resuspensions into one microcentrifuge tube.
Denature the protein capsid to release phage DNA.
- Put on a fresh pair of gloves.
- Transfer the 1.0 ml of phage pellet resuspension to a clean 15 ml conical tube.
- Add 2 ml of DNA clean-up resin to the phage pellet resuspension. The DNA resin is a slurry solution containing microscopic polymer beads. Make sure that the bottle of resin is well mixed, the precipitate dissolved by heating to 37 °C, and the beads resuspended before aliquoting your 2 ml. (Your instructor may have done this for you.)
- Mix the solution by gently inverting the tube repeatedly for 2 minutes.
Isolate the phage genomic DNA.
- Label two Wizard Kit columns with your initials.
- Remove the plungers from two syringes and attach a column to each syringe barrel.
- Follow the steps below for each column at the same time:
- Set the column and syringe barrel on a new microcentrifuge tube.
- Transfer 1.5 ml of phage DNA/resin solution to the column using a pipette.
- Do not discard the empty 15 ml conical tube.
- Insert a plunger into the syringe and carefully push all the liquid through, collecting the flow-through in the used 15 ml conical tube from above.
- Once the liquid is expelled, maintain pressure on the plunger as you dry residual liquid by touching the tip of the column to a paper towel.
- Unscrew the column from the syringe barrel before releasing the plunger and set the column into a clean microcentrifuge tube.
- Remove the plunger from the syringe barrel, and then reattach the syringe barrel to the column.
-
- Wash the salts from the DNA (now in the column) with the following steps for each column:
- Add 2 ml 80 % isopropanol to each syringe barrel/column and push the liquid through the column, repeating steps 3(d)–3(f).
- Repeat twice, for a total of three isopropanol washes.
- Remove residual isopropanol.
- With each column in a fresh 1.5 ml microcentrifuge tube, spin at 10,000 × g for 5 minutes.
- The column will prevent the microfuge tube lids from closing. Arrange the open tubes in the centrifuge so that the lids point toward the center of the rotor.
- Transfer columns to new 1.5 ml microcentrifuge tubes. Spin at 10,000 × g for 1 additional minute to remove any residual isopropanol.
- Evaporate the last traces of isopropanol by removing your columns from the microcentrifuge tubes and placing them directly in a 90 °C heating block for 60 seconds.
- With each column in a fresh 1.5 ml microcentrifuge tube, spin at 10,000 × g for 5 minutes.
- Elute the phage DNA from the columns.
- Place each column in a clean microcentrifuge tube and apply 50 μl of 90 °C sterile ddH2O directly to each column.
Important: Keep the ddH2O in the heating block so that it remains at 90 °C. - Incubate columns for 1 minute at room temperature.
- Spin at 10,000 × g for 1 minute in a microcentrifuge.
- Combine the products from both microcentrifuge tubes into one tube; this is your eluted phage DNA.
- Place each column in a clean microcentrifuge tube and apply 50 μl of 90 °C sterile ddH2O directly to each column.
- Determine the concentration of your phage DNA.
- Using a spectrophotometer (fluorimeter, or Nanodrop) and a protocol from your instructor, quantify your phage DNA.
- Place at 4 °C for short-term storage (1–2 weeks) or at -20 °C for long-term storage.
- Wash the salts from the DNA (now in the column) with the following steps for each column:
-
Results:
The sample showed to have slight salt contamination.
Conclusions and Next Steps:
As a result of the salt contamination, the sample will need to be filtered to purify it.
Title: DNA Extraction
Date: 10/04/2023
Redo: No
Sample: 3
Purpose: To concentrate liquid phage samples prior to extracting DNA
Notes:
Prepare your bench and assemble your supplies.
- Degrade bacterial DNA/RNA in ml phage lysate.
- Aseptically transfer 4 – 10 ml of phage lysate into a 10 ml conical tube.
- Wearing gloves and working in the designated area, add 5 µl nuclease mix (per 1 ml phage lysate) to the lysate.
- Mix gently but thoroughly by repeated inversions, and incubate at 37 °C for 10 minutes or at room temperature for 30 minutes.
Precipitate phage particles.
- Using a 5 ml pipette, portion out the nuclease-treated lysate as 1 ml aliquots in clean microcentrifuge tubes.
- To each 1 ml of nucelase-treated lysate, add 25 µl ZnCl2.
- Mix gently but thoroughly by inversion.
- Incubate at 37 °C for 10 minutes.
- Place the tube in a high-speed centrifuge, balance the tubes, and spin at 10,000 × rpm for 1 minute.
- Remove and discard the supernatant from each microcentrifuge tube using a micropipettor, being careful not to disturb the pellets. This pellet contains your phage particles. Proceed immediately to Step D.
Re-suspend the phage pellet in 1.0 ml of EDTA.
1.Distribute a total of 1.0 ml of 0.1M EDTA equally between all the microcentrifuge tubes containing a pellet from Step C6.
2.Working quickly but gently, re-suspend each pellet by pipetting up and down.
3.Once all the pellets have been resuspended, combine all the resuspensions into one microcentrifuge tube.
Denature the protein capsid to release phage DNA.
- Put on a fresh pair of gloves.
- Transfer the 1.0 ml of phage pellet resuspension to a clean 15 ml conical tube.
- Add 2 ml of DNA clean-up resin to the phage pellet resuspension. The DNA resin is a slurry solution containing microscopic polymer beads. Make sure that the bottle of resin is well mixed, the precipitate dissolved by heating to 37 °C, and the beads resuspended before aliquoting your 2 ml. (Your instructor may have done this for you.)
- Mix the solution by gently inverting the tube repeatedly for 2 minutes.
Isolate the phage genomic DNA.
- Label two Wizard Kit columns with your initials.
- Remove the plungers from two syringes and attach a column to each syringe barrel.
- Follow the steps below for each column at the same time:
- Set the column and syringe barrel on a new microcentrifuge tube.
- Transfer 1.5 ml of phage DNA/resin solution to the column using a pipette.
- Do not discard the empty 15 ml conical tube.
- Insert a plunger into the syringe and carefully push all the liquid through, collecting the flow-through in the used 15 ml conical tube from above.
- Once the liquid is expelled, maintain pressure on the plunger as you dry residual liquid by touching the tip of the column to a paper towel.
- Unscrew the column from the syringe barrel before releasing the plunger and set the column into a clean microcentrifuge tube.
- Remove the plunger from the syringe barrel, and then reattach the syringe barrel to the column.
-
- Wash the salts from the DNA (now in the column) with the following steps for each column:
- Add 2 ml 80 % isopropanol to each syringe barrel/column and push the liquid through the column, repeating steps 3(d)–3(f).
- Repeat twice, for a total of three isopropanol washes.
- Remove residual isopropanol.
- With each column in a fresh 1.5 ml microcentrifuge tube, spin at 10,000 × g for 5 minutes.
- The column will prevent the microfuge tube lids from closing. Arrange the open tubes in the centrifuge so that the lids point toward the center of the rotor.
- Transfer columns to new 1.5 ml microcentrifuge tubes. Spin at 10,000 × g for 1 additional minute to remove any residual isopropanol.
- Evaporate the last traces of isopropanol by removing your columns from the microcentrifuge tubes and placing them directly in a 90 °C heating block for 60 seconds.
- With each column in a fresh 1.5 ml microcentrifuge tube, spin at 10,000 × g for 5 minutes.
- Elute the phage DNA from the columns.
- Place each column in a clean microcentrifuge tube and apply 50 μl of 90 °C sterile ddH2O directly to each column.
Important: Keep the ddH2O in the heating block so that it remains at 90 °C. - Incubate columns for 1 minute at room temperature.
- Spin at 10,000 × g for 1 minute in a microcentrifuge.
- Combine the products from both microcentrifuge tubes into one tube; this is your eluted phage DNA.
- Place each column in a clean microcentrifuge tube and apply 50 μl of 90 °C sterile ddH2O directly to each column.
- Determine the concentration of your phage DNA.
- Using a spectrophotometer (fluorimeter, or Nanodrop) and a protocol from your instructor, quantify your phage DNA.
- Place at 4 °C for short-term storage (1–2 weeks) or at -20 °C for long-term storage.
- Wash the salts from the DNA (now in the column) with the following steps for each column:
Results:
The DNA was extracted from the phage, but not as pure as desired. More washes will be needed for better results.


Conclusions and Next Steps:
The sample was not purified properly, so the experiment will be repeated for better results.
Characterization
Title: Setting Up Restriction Enzyme Digests
Date: 11/01/2023
Redo: No
Sample: 3
Purpose: To cut your phage genome into multiple fragments based on its DNA sequence.
Notes:
-
-
- Prepare genomic DNA
- Gently mix your DNA sample by either flicking the closed tube with your finger or vortexing it on low.
- Incubate the tube at 65 °C for 10 minutes, and then quickly place it on ice. Quick spin the tube in a microcentrifuge for less than 1 minute to move all of the liquid to the bottom of the tube.
- Using the concentration of your DNA sample, calculate the volume of DNA sample needed to obtain 0.5 µg of DNA.
- Set up restriction enzyme digest reactions.
- Set up a reaction in a microcentrifuge tube for each enzyme according to Table 10.1-1. Include a negative control in which no restriction enzyme is added.
- Mix the contents of each tube gently and quick spin the tube in a microcentrifuge for less than 1 minute to move all of the liquid to the bottom of the tube.
- Incubate at 37 °C for up to 1 hour
- Quick spin the tube in a microcentrifuge for less than 1 minute to move all of the liquid to the bottom of the tube. Store at -20 °C until ready to use.
- To visualize your digested phage DNA, follow the protocols for the next steps.
-
Results:
A gel electrophoresis was conducted to visualize the DNA sample. The gel displayed a decent of DNA that allows us to estimate the size of the strand.

Conclusions and Next Steps:
The DNA sample was properly handled and prepared. No further steps are needed now that the sample has been visualized.