Discovery of Loca
Loca Information
Morphology: Siphoviridae

Sample Collection
| Collector Name |
Kendall Johnson | Aurod Ounsinegad | Kendall Johnson | Aurod Ounsinegad | Aurod Ounsinegad |
| Sample No. | #K1 | #A1 | #K2 | #A2 | #A3 |
| Date of Collection | 8/29/2021 | 8/29/2021 | 9/01/2021 | 9/01/2021 | 9/07/2021 |
| Sample Type | Soil | Soil | Soil | Soil | Soil |
| General Location | Stephenville City Park | Alley Way behind Chamberlin Elementary School | Tarleton Science Building | Dirt lot behind West Washington Sunoco | Telephone Pole base across the street from the Tarleton Dog Park |
| Location Description | An inch underground near a water drain within Stephenville City Park. | 1 inch underneath a shredded pile of leaves in an alleyway. | Within an ant pile next to the TSU science building. | 1 inch underneath the soil behind the West Washington Sunoco location. | 1 inch underneath the soil beside a telephone pole in between Tarleton’s Dog Park and the parking lot behind Dining Hall. |
| GPS Coordinates | 32.213, -98.204 |
32.221, -98.225 |
32.217, -98.220 | 32.218, -98.222 | 32.219, -98.218 |
| Sample Depth | 1 inch | 1 inch | 0.5 inch | 1 inch | 1 inch |
| Ambient Temperature | 30°C | 30°C | 28°C | 30°C | 32°C |
| Collector Name |
Kendall Johnson | Kendall Johnson | Aurod Ounsinegad | Maci Pitner | |
| Sample No. | #K3 | #K4 | #A4 | #S7 | |
| Date of Collection | 9/11/2021 | 9/11/2021 | 9/19/2021 | 9/14/2021 | |
| Sample Type | Soil | Soil | Soil | Walmart Cart Swab | |
| General Location | Under a rock | Base of tree | An inch under a muddy puddle | Handle of Walmart Shopping Cart | |
| Location Description | Underneath a rock about an inch underground | At the base of a tree about two inches underground | The sample was collected 1 inch underneath a muddy puddle behind a house. | Swab tested the handle of a Walmart shopping cart left in the parking lot | |
| GPS Coordinates | 30.237, -97.937 | 30.238, -97.936 |
32.235, -98.193 |
32.206, -98.237 | |
| Sample Depth | 1 inch | 2 inches | 1 inch | On the Surface | |
| Ambient Temperature | 31°C | 29°C | 27°C | 29°C |
Isolation/Purification
Title: Direct Isolation
Date: 8/30/2021 Redo: No Sample: #K1
Purpose: The purpose of this procedure is to gather any bacteriophages present within a collected soil sample and evaluate them on a plaque assay.
Notes:
- We washed our hands and put on gloves. We proceeded with aseptic technique by spraying the station with CiDecon and wiping with Kimwipes. After CiDecon, we sprayed the station with 70% Ethanol and wiped it with Kimwipes. After waiting for the station’s surface to dry, we lit a Bunsen burner.
- We gathered a 5ml serological pipette and liquid PYCa media. Using the serological pipette, we added the pyca media to our soil sample until the soil was submerged into approximately 2-3ml of liquid.
- The tube was inverted multiple times to mix the solution.
- The tube was then placed in the shaking incubator for 1.5 hours.
- We allowed the sample to sit for 5 minutes and cleaned the station using aseptic technique.
- A 0.22um syringe filter, sterile 5ml syringe, and a microcentrifuge tube was gathered.
- 2ml of liquid was removed from the sample using the 5ml syringe. It was essential to not get any solid particles in the syringe.
- The syringe was then securely attached to the 0.22um filter and the filter was removed from its package.
- With the microcentrifuge tube at the base of the filter, the syringe plunger was pushed down to gather at least 0.5ml of filtrate into the microcentrifuge tube. It was essential to push down the syringe slowly to prevent the filter from clogging.
- Once the microcentrifuge tube was filled, the tube was capped.
- The syringe was discarded in the autoclave bag, and the plaque assay began.
- A glass test tube containing 250 microliters of the host bacteria, M. folorium, was gathered.
- Using the micropipette and aseptic technique, 250 microliters of the filtered bacteriophage sample was dispensed into the glass test tube containing the M. folorium.
- The mixture was gently stirred and then left untouched for 10 minutes.
- A bottle of molten top agar and an agar plate was gathered. The agar plate was labeled and set out to reach room temperature.
- Using a sterile 5 mL pipette, 3 mL of the molten top agar was aseptically transferred into the inoculated host tube.
- The mixture was immediately aspirated back up into the pipette and transferred to the agar plate.
- Gently, but quickly, the plate was tilted in all directions until the mixture had coated the top of the agar in the plate.
- After letting the agar solidify for 20 minutes, the plate was inverted and placed in the incubator at 29°C.
- After two days, the plate was observed for any potential phages.
Results:
Conclusions and Next Steps:
The sample was contaminated, so the plate was placed in an autoclave bag. The direct isolation process was conducted again with a new sample.
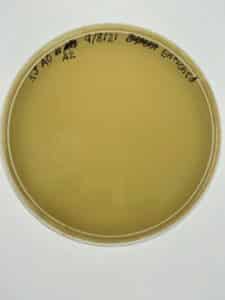
Title: Direct Isolation
Date: 8/30/2021 Redo: Yes Sample: #A1
Purpose: The purpose of this procedure is to gather any bacteriophages present within a collected soil sample and evaluate them on a plaque assay.
Notes:
- We washed our hands and put on gloves. We proceeded with aseptic technique by spraying the station with CiDecon and wiping with Kimwipes. After CiDecon, we sprayed the station with 70% Ethanol and wiped it with Kimwipes. After waiting for the station’s surface to dry, we lit a Bunsen burner.
- We gathered a 5ml serological pipette and liquid PYCa media. Using the serological pipette, we added the pyca media to our soil sample until the soil was submerged into approximately 2-3ml of liquid.
- The tube was inverted multiple times to mix the solution.
- The tube was then placed in the shaking incubator for 2 hours.
- We allowed the sample to sit for 5 minutes and cleaned the station using aseptic technique.
- A 0.22um syringe filter, sterile 5ml syringe, and a microcentrifuge tube was gathered.
- 2ml of liquid was removed from the sample using the 5ml syringe. It was essential to not get any solid particles in the syringe.
- The syringe was then securely attached to the 0.22um filter and the filter was removed from its package.
- With the microcentrifuge tube at the base of the filter, the syringe plunger was pushed down to gather at least 0.5ml of filtrate into the microcentrifuge tube. It was essential to push down the syringe slowly to prevent the filter from clogging.
- Once the microcentrifuge tube was filled, the tube was capped.
- The syringe was discarded in the autoclave bag, and the plaque assay began.
- A glass test tube containing 250 microliters of the host bacteria, M. folorium, was gathered.
- Using the micropipette and aseptic technique, 250 microliters of the filtered bacteriophage sample was dispensed into the glass test tube containing the M. folorium.
- The mixture was gently stirred and then left untouched for 10 minutes.
- A bottle of molten top agar and an agar plate was gathered. The agar plate was labeled and set out to reach room temperature.
- Using a sterile 5 mL pipette, 3 mL of the molten top agar was aseptically transferred into the inoculated host tube.
- The mixture was immediately aspirated back up into the pipette and transferred to the agar plate.
- Gently, but quickly, the plate was tilted in all directions until the mixture had coated the top of the agar in the plate.
- After letting the agar solidify for 20 minutes, the plate was inverted and placed in the incubator at 29°C.
- After two days, the plate was observed for any potential phages.
Results:
Conclusions and Next Steps:
No observable phages were present within the plate. The direct isolation process was conducted again with a new sample.
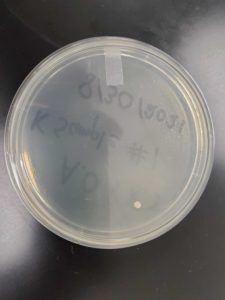
Title: Direct Isolation
Date: 9/1/2021 Redo: Yes Sample: #K2
Purpose: The purpose of this procedure is to gather any bacteriophages present within a collected soil sample and evaluate them on a plaque assay.
Notes:
- We washed our hands and put on gloves. We proceeded with aseptic technique by spraying the station with CiDecon and wiping with Kimwipes. After CiDecon, we sprayed the station with 70% Ethanol and wiped it with Kimwipes. After waiting for the station’s surface to dry, we lit a Bunsen burner.
- We gathered a 5ml serological pipette and liquid PYCa media. Using the serological pipette, we added the pyca media to our soil sample until the soil was submerged into approximately 2-3ml of liquid.
- The tube was inverted multiple times to mix the solution.
- The tube was then placed in the shaking incubator for 1.5 hours.
- We allowed the sample to sit for 5 minutes and cleaned the station using aseptic technique.
- A 0.22um syringe filter, sterile 5ml syringe, and a microcentrifuge tube was gathered.
- 2ml of liquid was removed from the sample using the 5ml syringe. It was essential to not get any solid particles in the syringe.
- The syringe was then securely attached to the 0.22um filter and the filter was removed from its package.
- With the microcentrifuge tube at the base of the filter, the syringe plunger was pushed down to gather at least 0.5ml of filtrate into the microcentrifuge tube. It was essential to push down the syringe slowly to prevent the filter from clogging.
- Once the microcentrifuge tube was filled, the tube was capped.
- The syringe was discarded in the autoclave bag, and the plaque assay began.
- A glass test tube containing 250 microliters of the host bacteria, M. folorium, was gathered.
- Using the micropipette and aseptic technique, 250 microliters of the filtered bacteriophage sample was dispensed into the glass test tube containing the M. folorium.
- The mixture was gently stirred and then left untouched for 10 minutes.
- A bottle of molten top agar and an agar plate was gathered. The agar plate was labeled and set out to reach room temperature.
- Using a sterile 5 mL pipette, 3 mL of the molten top agar was aseptically transferred into the inoculated host tube.
- The mixture was immediately aspirated back up into the pipette and transferred to the agar plate.
- Gently, but quickly, the plate was tilted in all directions until the mixture had coated the top of the agar in the plate.
- After letting the agar solidify for 20 minutes, the plate was inverted and placed in the incubator at 29°C.
- After two days, the plate was observed for any potential phages.
Results:
Conclusion and Next Steps:
The sample was contaminated and placed in an autoclave bag. A new process, Enriched Isolation, was conducted with a new sample.
Title: Enriched Isolation
Date: 9/2/2021 Redo: Yes Sample: #A2
Purpose: The purpose of this procedure is to amplify any potential bacteriophages present in a solid environmental sample by introducing it to a media in which phages can easily grow.
Notes:
- We washed our hands and put on gloves. We proceeded with aseptic technique by spraying the station with CiDecon and wiping with Kimwipes. After CiDecon, we sprayed the station with 70% Ethanol and wiped it with Kimwipes. After waiting for the station’s surface to dry, we lit a Bunsen burner.
- 15mL of the collected soil sample was transferred into a 50mL conical tube.
- Liquid PYCa media was added using a serological pipette until the liquid reached the 35mL mark.
- The sample was vortexed and inverted until the sample was properly mixed with the PYCa media.
- The sample was transferred to the shaking incubator for 1 hour.
- Once shaken, the conical tube was placed in the centrifuge. After balancing the tubes, the sample was centrifuged for 10 minutes.
- A 0.22 um filter, sterile 5ml syringe, and 50ml conical tube were gathered.
- Using aseptic technique, the sample was filtered and collected into the 50ml conical tube. There was approximately 20ml of liquid collected.
- 0.5ml, or 500um of a bacterial host, M. folorium, was added to the conical tube containing the sample.
- After inverting the tube to mix the components, the conical tube was placed in the shaking incubator for 5 days. It was important to only screw the lid a quarter closed and secure it with a piece of tape to ensure proper aeration.
- After 5 days in the shaking incubator, the station was prepared using aseptic technique.
- A 5ml serological pipette, sterile 5ml syringe, 0.22um filter, and three microcentrifuge tubes were gathered.
- Using the serological pipette, approximately 1.5ml of the enriched bacteriophage sample was transferred from the 50ml conical tube to a microcentrifuge tube. This process was repeated twice to get a total of two 1.5ml microcentrifuge tubes.
- The two microcentrifuge tubes were then placed across each other in a microcentrifuge for one minute so that the bacteria could pellet.
- The bacteriophage sample was not clear, so the sample was filtered through a 0.22um filter. To do this, the 5ml syringe was securely attached to the 0.22um filter and the filter was removed from its package.
- With a new microcentrifuge tube at the base of the filter, the syringe plunger was pushed down to gather at least 0.5ml of filtrate into the microcentrifuge tube. It was essential to push down the syringe slowly to prevent the filter from clogging.
- Once the microcentrifuge tube was filled, the tube was capped. It was important not to collect the centrifuged bacteria pellet.
- After a micropipette tube containing the filtered and centrifuged bacteriophage sample was gathered, a plaque assay could begin.
- A glass test tube containing 250 microliters of the host bacteria, M. folorium, was gathered.
- Using the micropipette and aseptic technique, 250 microliters of the filtered phage sample was dispensed into the glass test tube containing the M. folorium.
- The mixture was gently stirred and then left untouched for 10 minutes.
- A bottle of molten top agar and an agar plate was gathered. The agar plate was labeled and set out to reach room temperature.
- Using a sterile 5 mL pipette, 3 mL of the molten top agar was aseptically transferred into the inoculated host tube.
- The mixture was immediately aspirated back up into the pipette and transferred to the agar plate.
- Gently, but quickly, the plate was tilted in all directions until the mixture had coated the top of the agar in the plate.
- After letting the agar solidify for 15 minutes, the plate was inverted and placed in the incubator at 29°C. The remaining bacteriophage sample in the micropipette was placed in the fridge at 4°C.
- After one day, the plate was observed for any potential phages.
Results:
Conclusion and Next Steps:
After one day, it was apparent that the agar had not solidified before inverting. This meant that another plaque assay needed to be conducted using the remaining bacteriophage sample that was being stored in the fridge at 4°C. To do this, steps 19-27 of the Enriched Isolation were conducted a second time. A new agar plate was created and placed in the incubator at 29°C for one day.
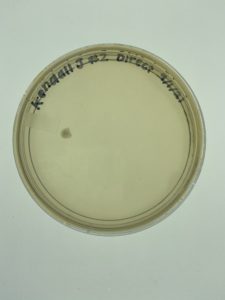
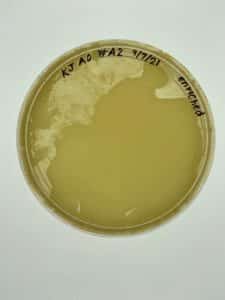
Title: Direct Isolation
Date: 9/8/2021 Redo: Yes Sample: #A3
Purpose: The purpose of this procedure is to gather any bacteriophages present within a collected soil sample and evaluate them on a plaque assay.
Notes:
- We washed our hands and put on gloves. We proceeded with aseptic technique by spraying the station with CiDecon and wiping with Kimwipes. After CiDecon, we sprayed the station with 70% Ethanol and wiped it with Kimwipes. After waiting for the station’s surface to dry, we lit a Bunsen burner.
- We gathered a 5ml serological pipette and liquid PYCa media. Using the serological pipette, we added the pyca media to our soil sample until the soil was submerged into approximately 2-3ml of liquid.
- The tube was inverted multiple times to mix the solution.
- The tube was then placed in the shaking incubator for 1.5 hours.
- We allowed the sample to sit for 5 minutes and cleaned the station using aseptic technique.
- A 0.22um syringe filter, sterile 5ml syringe, and a microcentrifuge tube was gathered.
- 2ml of liquid was removed from the sample using the 5ml syringe. It was essential to not get any solid particles in the syringe.
- The syringe was then securely attached to the 0.22um filter and the filter was removed from its package.
- With the microcentrifuge tube at the base of the filter, the syringe plunger was pushed down to gather at least 0.5ml of filtrate into the microcentrifuge tube. It was essential to push down the syringe slowly to prevent the filter from clogging.
- Once the microcentrifuge tube was filled, the tube was capped.
- The syringe was discarded in the autoclave bag, and the plaque assay began.
- A glass test tube containing 250 microliters of the host bacteria, M. folorium, was gathered.
- Using the micropipette and aseptic technique, 250 microliters of the filtered bacteriophage sample was dispensed into the glass test tube containing the M. folorium.
- The mixture was gently stirred and then left untouched for 10 minutes.
- A bottle of molten top agar and an agar plate was gathered. The agar plate was labeled and set out to reach room temperature.
- Using a sterile 5 mL pipette, 3 mL of the molten top agar was aseptically transferred into the inoculated host tube.
- The mixture was immediately aspirated back up into the pipette and transferred to the agar plate.
- Gently, but quickly, the plate was tilted in all directions until the mixture had coated the top of the agar in the plate.
- After letting the agar solidify for 20 minutes, the plate was inverted and placed in the incubator at 29°C.
- After two days, the plate was observed for any potential phages.
Results:
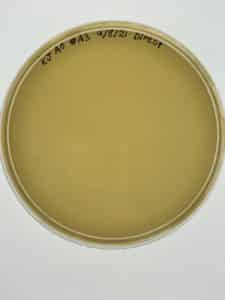
Conclusion and Next Steps: No observable phages were present within the plate. The direct isolation process was conducted again with a new sample.
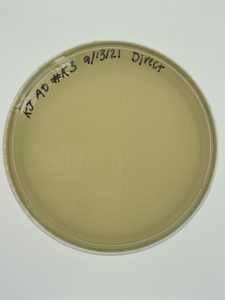
Title: Direct Isolation
Date: 9/13/2021 Redo: Yes Sample: #K3
Purpose: The purpose of this procedure is to gather any bacteriophages present within a collected soil sample and evaluate them on a plaque assay.
Notes:
- We washed our hands and put on gloves. We proceeded with aseptic technique by spraying the station with CiDecon and wiping with Kimwipes. After CiDecon, we sprayed the station with 70% Ethanol and wiped it with Kimwipes. After waiting for the station’s surface to dry, we lit a Bunsen burner.
- We gathered a 5ml serological pipette and liquid PYCa media. Using the serological pipette, we added the pyca media to our soil sample until the soil was submerged into approximately 2-3ml of liquid.
- The tube was inverted multiple times to mix the solution.
- The tube was then placed in the shaking incubator for 1.5 hours.
- We allowed the sample to sit for 5 minutes and cleaned the station using aseptic technique.
- A 0.22um syringe filter, sterile 5ml syringe, and a microcentrifuge tube was gathered.
- 2ml of liquid was removed from the sample using the 5ml syringe. It was essential to not get any solid particles in the syringe.
- The syringe was then securely attached to the 0.22um filter and the filter was removed from its package.
- With the microcentrifuge tube at the base of the filter, the syringe plunger was pushed down to gather at least 0.5ml of filtrate into the microcentrifuge tube. It was essential to push down the syringe slowly to prevent the filter from clogging.
- Once the microcentrifuge tube was filled, the tube was capped.
- The syringe was discarded in the autoclave bag, and the plaque assay began.
- A glass test tube containing 250 microliters of the host bacteria, M. folorium, was gathered.
- Using the micropipette and aseptic technique, 250 microliters of the filtered bacteriophage sample was dispensed into the glass test tube containing the M. folorium.
- The mixture was gently stirred and then left untouched for 10 minutes.
- A bottle of molten top agar and an agar plate was gathered. The agar plate was labeled and set out to reach room temperature.
- Using a sterile 5 mL pipette, 3 mL of the molten top agar was aseptically transferred into the inoculated host tube.
- The mixture was immediately aspirated back up into the pipette and transferred to the agar plate.
- Gently, but quickly, the plate was tilted in all directions until the mixture had coated the top of the agar in the plate.
- After letting the agar solidify for 20 minutes, the plate was inverted and placed in the incubator at 29°C.
- After two days, the plate was observed for any potential phages.
Results:
Conclusions and Next Steps:
No observable phages were present within the plate. The direct isolation process was conducted again with a new sample.
Title: Direct Isolation
Date: 9/15/2021 Redo: Yes Sample: #K4
Purpose: The purpose of this procedure is to gather any bacteriophages present within a collected soil sample and evaluate them on a plaque assay.
Notes:
- We washed our hands and put on gloves. We proceeded with aseptic technique by spraying the station with CiDecon and wiping with Kimwipes. After CiDecon, we sprayed the station with 70% Ethanol and wiped it with Kimwipes. After waiting for the station’s surface to dry, we lit a Bunsen burner.
- We gathered a 5ml serological pipette and liquid PYCa media. Using the serological pipette, we added the pyca media to our soil sample until the soil was submerged into approximately 2-3ml of liquid.
- The tube was inverted multiple times to mix the solution.
- The tube was then placed in the shaking incubator for 2 hours.
- We allowed the sample to sit for 5 minutes and cleaned the station using aseptic technique.
- A 0.22um syringe filter, sterile 5ml syringe, and a microcentrifuge tube was gathered.
- 2ml of liquid was removed from the sample using the 5ml syringe. It was essential to not get any solid particles in the syringe.
- The syringe was then securely attached to the 0.22um filter and the filter was removed from its package.
- With the microcentrifuge tube at the base of the filter, the syringe plunger was pushed down to gather at least 0.5ml of filtrate into the microcentrifuge tube. It was essential to push down the syringe slowly to prevent the filter from clogging.
- Once the microcentrifuge tube was filled, the tube was capped.
- The syringe was discarded in the autoclave bag, and the plaque assay began.
- A glass test tube containing 250 microliters of the host bacteria, M. folorium, was gathered.
- Using the micropipette and aseptic technique, 250 microliters of the filtered bacteriophage sample was dispensed into the glass test tube containing the M. folorium.
- The mixture was gently stirred and then left untouched for 10 minutes.
- A bottle of molten top agar and an agar plate was gathered. The agar plate was labeled and set out to reach room temperature.
- Using a sterile 5 mL pipette, 3 mL of the molten top agar was aseptically transferred into the inoculated host tube.
- The mixture was immediately aspirated back up into the pipette and transferred to the agar plate.
- Gently, but quickly, the plate was tilted in all directions until the mixture had coated the top of the agar in the plate.
- After letting the agar solidify for 20 minutes, the plate was inverted and placed in the incubator at 29°C.
- After two days, the plate was observed for any potential phages.
Results:
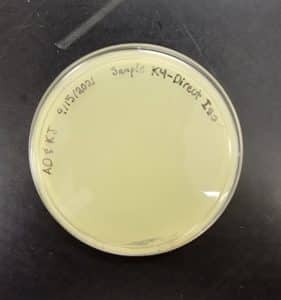
Conclusions and Next Steps:
No observable phages were present within the plate. The direct isolation process was conducted again with a new sample.
Title: Direct Isolation
Date: 9/20//2021 Redo: Yes Sample: #K5
Purpose: The purpose of this procedure is to gather any bacteriophages present within a collected soil sample and evaluate them on a plaque assay.
Notes:
- We washed our hands and put on gloves. We proceeded with aseptic technique by spraying the station with CiDecon and wiping with Kimwipes. After CiDecon, we sprayed the station with 70% Ethanol and wiped it with Kimwipes. After waiting for the station’s surface to dry, we lit a Bunsen burner.
- We gathered a 5ml serological pipette and liquid PYCa media. Using the serological pipette, we added the pyca media to our soil sample until the soil was submerged into approximately 2-3ml of liquid.
- The tube was inverted multiple times to mix the solution.
- The tube was then placed in the shaking incubator for 1.5 hours.
- We allowed the sample to sit for 5 minutes and cleaned the station using aseptic technique.
- A 0.22um syringe filter, sterile 5ml syringe, and a microcentrifuge tube was gathered.
- 2ml of liquid was removed from the sample using the 5ml syringe. It was essential to not get any solid particles in the syringe.
- The syringe was then securely attached to the 0.22um filter and the filter was removed from its package.
- With the microcentrifuge tube at the base of the filter, the syringe plunger was pushed down to gather at least 0.5ml of filtrate into the microcentrifuge tube. It was essential to push down the syringe slowly to prevent the filter from clogging.
- Once the microcentrifuge tube was filled, the tube was capped.
- The syringe was discarded in the autoclave bag, and the plaque assay began.
- A glass test tube containing 250 microliters of the host bacteria, M. folorium, was gathered.
- Using the micropipette and aseptic technique, 250 microliters of the filtered bacteriophage sample was dispensed into the glass test tube containing the M. folorium.
- The mixture was gently stirred and then left untouched for 10 minutes.
- A bottle of molten top agar and an agar plate was gathered. The agar plate was labeled and set out to reach room temperature.
- Using a sterile 5 mL pipette, 3 mL of the molten top agar was aseptically transferred into the inoculated host tube.
- The mixture was immediately aspirated back up into the pipette and transferred to the agar plate.
- Gently, but quickly, the plate was tilted in all directions until the mixture had coated the top of the agar in the plate.
- After letting the agar solidify for 20 minutes, the plate was inverted and placed in the incubator at 29°C.
- After two days, the plate was observed for any potential phages.
Results:

Conclusions and Next Steps:
No observable phages were present within the plate. The direct isolation process was conducted again with a new sample.
Title: Direct Isolation
Date: 9/20/2021 Redo: Yes Sample: #A4
Purpose: The purpose of this procedure is to gather any bacteriophages present within a collected soil sample and evaluate them on a plaque assay.
Notes:
- We washed our hands and put on gloves. We proceeded with aseptic technique by spraying the station with CiDecon and wiping with Kimwipes. After CiDecon, we sprayed the station with 70% Ethanol and wiped it with Kimwipes. After waiting for the station’s surface to dry, we lit a Bunsen burner.
- We gathered a 5ml serological pipette and liquid PYCa media. Using the serological pipette, we added the pyca media to our soil sample until the soil was submerged into approximately 2-3ml of liquid.
- The tube was inverted multiple times to mix the solution.
- The tube was then placed in the shaking incubator for 2 hours.
- We allowed the sample to sit for 5 minutes and cleaned the station using aseptic technique.
- A 0.22um syringe filter, sterile 5ml syringe, and a microcentrifuge tube was gathered.
- 2ml of liquid was removed from the sample using the 5ml syringe. It was essential to not get any solid particles in the syringe.
- The syringe was then securely attached to the 0.22um filter and the filter was removed from its package.
- With the microcentrifuge tube at the base of the filter, the syringe plunger was pushed down to gather at least 0.5ml of filtrate into the microcentrifuge tube. It was essential to push down the syringe slowly to prevent the filter from clogging.
- Once the microcentrifuge tube was filled, the tube was capped.
- The syringe was discarded in the autoclave bag, and the plaque assay began.
- A glass test tube containing 250 microliters of the host bacteria, M. folorium, was gathered.
- Using the micropipette and aseptic technique, 250 microliters of the filtered bacteriophage sample was dispensed into the glass test tube containing the M. folorium.
- The mixture was gently stirred and then left untouched for 10 minutes.
- A bottle of molten top agar and an agar plate was gathered. The agar plate was labeled and set out to reach room temperature.
- Using a sterile 5 mL pipette, 3 mL of the molten top agar was aseptically transferred into the inoculated host tube.
- The mixture was immediately aspirated back up into the pipette and transferred to the agar plate.
- Gently, but quickly, the plate was tilted in all directions until the mixture had coated the top of the agar in the plate.
- After letting the agar solidify for 20 minutes, the plate was inverted and placed in the incubator at 29°C.
- After two days, the plate was observed for any potential phages.
Results:
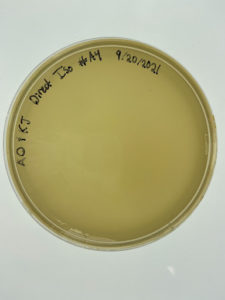
Conclusions and Next Steps:
No observable phages were present within the plate. A phage from another group was adopted so that serial dilution could commence.
Title: Direct Isolation
Date: 9/14/2021 Redo: Yes Sample: #S7
Purpose: The purpose of this procedure is to gather any bacteriophages present within a collected soil sample and evaluate them on a plaque assay. This phage was adopted, so its procedure was taken from DopeGoat.
Notes:
- Wash hands and then sterilize the bench with CiDecon and 70% ethanol using aseptic techniques. After sterilizing remove gloves and light bunsen burner to maintain the sterile environment.
- We then added 20 mL of PYCa media to our 15 mL sample in a 50mL conical tube and vortexed.
- The new sample was then placed in a rotating incubator and left to incubate at 220 RPMs 29 degrees celsius for 2 hours.
- After two hours, the sample was centrifuged at 2000 gravities for 10 minutes.
- The supernatant was then filtered through a .22 um filter and collected in a 50 ml conical tube.
- We then added 0.5 ml of host bacteria to the conical tube
- The sample was then allowed to incubate for six days at 220 RPMs, while making sure it could aerate by leaving the lid of the tube loose.
- After incubation, we transferred 1.4 ml of sample into two different microcentrifuge tubes and spun it at high speed for a minute.
- We then pipetted 1 ml from each microcentrifuge tube into a 0.22 um filter and syringe careful not to collect any of the pellets.
- The filtered sample was then stored in a microcentrifuge tube at 4 degrees celsius.
- After letting the sample sit for a day, we sat out an agar plate to allow it to warm to room temperature.
- The plate was then labeled and divided into three sections.
- We then acquired a test tube 250 ul of host bacteria and pipetted 3 ml of molten top agar onto the bacteria and quickly drew the mixture back up.
- The molten agar mixture was then dispensed onto an agar plate and allowed 20 minutes to solidify.
- After the molten agar had solidified, we transferred 10 ul of our phage sample into three small dots, each separated by a section.
Results:
Successful. A small group of plaques was found.
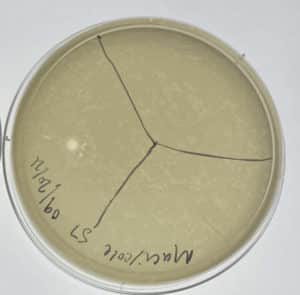
A single major plaque formed.
Conclusions and Next Steps:
With this adopted phage we can now move onto the next milestone, using serial dilution to reduce the number of phages present within our sample.
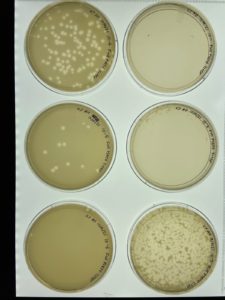
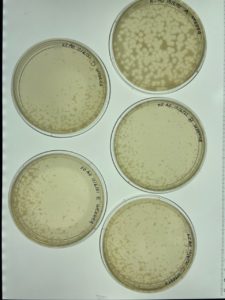
Title: Serial Dilution
Date: 9/22/2021 Redo: No Sample: #S7
Purpose: To reduce the number of phages in a sample.
Notes:
- We washed our hands and put on gloves. We proceeded with aseptic technique by spraying the station with CiDecon and wiping with Kimwipes. After CiDecon, we sprayed the station with 70% Ethanol and wiped it with Kimwipes. After waiting for the station’s surface to dry, we lit a Bunsen burner.
- Six microcentrifuge tubes were gathered and labeled from 10^-1 to 10^-6.
- Six agar plates were also gathered from the fridge, labeled, and set out to reach room temperature.
- Phage buffer was gathered and labeled. 90ul of the phage buffer was added to each microcentrifuge tube using a micropipette.
- Using a micropipette, a plaque was gathered from the plate containing a phage.
- To do this, the micropipette with a sterilized tip gently stabbed the agar surface where the plaque is located, careful not to touch any surrounding areas.
- The tip of the micropipette was then placed in the 10^-1 microcentrifuge tube and pipetted up and down to dislodge the phage.
- The 10^-1 microcentrifuge was then vortexed to mix the phage particles and phage buffer. This is the 1:10 dilution.
- Using a new pipette tip, 10ul of the 10^-1 solution was aseptically transferred to the 10^-2 microcentrifuge tube. The tube was vortexed to mix the contents. This is the 1:100 dilution.
- Using a new pipette tip, 10ul of the 10^-2 solution was aseptically transferred to the 10^-3 microcentrifuge tube. The tube was vortexed to mix the contents. This is the 1:1000 dilution.
- Using a new pipette tip, 10ul of the 10^-3 solution was aseptically transferred to the 10^-4 microcentrifuge tube. The tube was vortexed to mix the contents. This is the 1:10000 dilution.
- Using a new pipette tip, 10ul of the 10^-4 solution was aseptically transferred to the 10^-5 microcentrifuge tube. The tube was vortexed to mix the contents. This is the 1:1×10^5 dilution.
- Using a new pipette tip, 10ul of the 10^-5 solution was aseptically transferred to the 10^-6 microcentrifuge tube. The tube was vortexed to mix the contents. This is the 1:1×10^6 dilution.
- Once serial dilution was complete, a plaque assay began.
- Six glass tubes with host bacteria, M. folorium, were gathered. They were labeled 10^-1 to 10^-6.
- Using a micropipette and aseptic technique, 10ul of the 10^-1 dilution was dispensed into the glass test tube personally labeled with 10^-1.
- Each glass test tube received its corresponding components as specified in step 14-15.
- All six glass test tubes were gently mixed and left untouched for 10 minutes.
- A bottle of molten top agar and serological pipette were gathered.
- Using a sterile 5 mL pipette, 3 mL of the molten top agar was aseptically transferred into the inoculated host tube.
- The mixture was immediately aspirated back up into the pipette and transferred to the agar plate.
- Gently, but quickly, the plate was tilted in all directions until the mixture had coated the top of the agar in the plate.
- This process was repeated for the remaining 5 glass test tubes.
- After letting the agar solidify for 15 minutes, the plate was inverted and placed in the incubator at 29°C.
- After one day, the plate was observed for any potential phages.
Results:

Conclusions and Next Steps:
The serial dilution worked and many detectable phages were found on the 10^-3 and 10^-4 plate. The 10^-2 plate was not entirely solidified before inverting, which explains its abnormal composition. Another serial dilution will be conducted with one of the plaques on the 10^-4 plate.
Title: Serial Dilution #2
Date: 9/27/2021 Redo: No Sample: #S7
Purpose: To reduce the number of phages in a sample.
Notes:
- We washed our hands and put on gloves. We proceeded with aseptic technique by spraying the station with CiDecon and wiping with Kimwipes. After CiDecon, we sprayed the station with 70% Ethanol and wiped it with Kimwipes. After waiting for the station’s surface to dry, we lit a Bunsen burner.
- Six microcentrifuge tubes were gathered and labeled from 10^-1 to 10^-6.
- Six agar plates were also gathered from the fridge, labeled, and set out to reach room temperature.
- Phage buffer was gathered and labeled. 90ul of the phage buffer was added to each microcentrifuge tube using a micropipette.
- Using a micropipette, a plaque was gathered from a plate containing a phage taken from the first serial dilution. We used a plaque from the 10^-4 plate because that plate contained a countable number of isolated plaques.
- To do this, the micropipette with a sterilized tip gently stabbed the agar surface where the plaque is located, careful not to touch any surrounding areas.
- The tip of the micropipette was then placed in the 10^-1 microcentrifuge tube and pipetted up and down to dislodge the phage.
- The 10^-1 microcentrifuge was then vortexed to mix the phage particles and phage buffer. This is the 1:10 dilution.
- Using a new pipette tip, 10ul of the 10^-1 solution was aseptically transferred to the 10^-2 microcentrifuge tube. The tube was vortexed to mix the contents. This is the 1:100 dilution.
- Using a new pipette tip, 10ul of the 10^-2 solution was aseptically transferred to the 10^-3 microcentrifuge tube. The tube was vortexed to mix the contents. This is the 1:1000 dilution.
- Using a new pipette tip, 10ul of the 10^-3 solution was aseptically transferred to the 10^-4 microcentrifuge tube. The tube was vortexed to mix the contents. This is the 1:10000 dilution.
- Using a new pipette tip, 10ul of the 10^-4 solution was aseptically transferred to the 10^-5 microcentrifuge tube. The tube was vortexed to mix the contents. This is the 1:1×10^5 dilution.
- Using a new pipette tip, 10ul of the 10^-5 solution was aseptically transferred to the 10^-6 microcentrifuge tube. The tube was vortexed to mix the contents. This is the 1:1×10^6 dilution.
- Once serial dilution was complete, a plaque assay began.
- Six glass tubes with host bacteria, M. folorium, were gathered. They were labeled 10^-1 to 10^-6.
- Using a micropipette and aseptic technique, 10ul of the 10^-1 dilution was dispensed into the glass test tube personally labeled with 10^-1.
- Each glass test tube received its corresponding components as specified in step 14-15.
- All six glass test tubes were gently mixed and left untouched for 10 minutes.
- A bottle of molten top agar and serological pipette were gathered.
- Using a sterile 5 mL pipette, 3 mL of the molten top agar was aseptically transferred into the inoculated host tube.
- The mixture was immediately aspirated back up into the pipette and transferred to the agar plate.
- Gently, but quickly, the plate was tilted in all directions until the mixture had coated the top of the agar in the plate.
- This process was repeated for the remaining 5 glass test tubes.
- After letting the agar solidify for 15 minutes, the plate was inverted and placed in the incubator at 29°C.
- After one day, the plate was observed for any potential phages.
Results:

Conclusions and Next Steps:
There was a mixup in plating, so two of the plates contain a 10^-2 dilution. Aseptic technique was still used, so both plates were still placed in the autoclave. Because of this error, there is no 10^-6 plate. Additionally, the 10^-3 plate was not entirely solidified before inverting, which explains its abnormal composition. The next step requires a webbed structure plate, so the 10^-4 plate was selected.
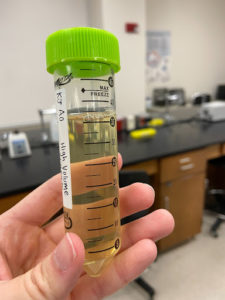
Title: Collecting Plate Lysates
Date: 9/29/2021 Redo: No Sample: #S7
Purpose: To concentrate the phage sample from plaque assay to a liquid sample.
Notes:
- We washed our hands and put on gloves. We proceeded with aseptic technique by spraying the station with CiDecon and wiping with Kimwipes. After CiDecon, we sprayed the station with 70% Ethanol and wiped it with Kimwipes. After waiting for the station’s surface to dry, we lit a Bunsen burner.
- Phage buffer and a 5mL serological pipette were gathered.
- The plates from the Serial Dilution #2 were evaluated, and a plate that had the best webbed structure (10^-4) was selected for the lysate.
- Using aseptic technique, 8mL of the phage buffer was aspirated and dispensed onto the webbed plate.
- The buffer was gently tilted to cover the surface of the plate. The plate was left out at room temperature for 2.5 hours.
- After 2.5 hours, the plate was slightly tilted to gather the liquid at one end of the plate.
- A 5mL serological pipette, 0.22um filter, a 5mL syringe, and 15mL conical tube were gathered.
- Using aseptic technique, the liquid was aspirated with the serological pipette and dispensed into the 5mL syringe, whose plunger was temporarily removed.
- The 0.22um filter was attached to the syringe with the 15mL conical tube below the filter. The plunger was added, gently putting pressure on the plunger until liquid began to filter and the filtrate was gathered.
- The conical tube was capped and labeled appropriately. It was then placed in the fridge at 4°C and can be stored for months.
Results:
While collecting the filtrate, there was an issue with the plunger not dispensing properly. This resulted in less filtrate gathered, only receiving about 2-3 mL of filtrate instead of the recommended 5mL. Because the next step doesn’t require much filtrate, this is acceptable.
Conclusions and Next Steps:
The experiment can proceed with a spot test after the lysate is gathered.
Amplification
Title: Full Plate Titer
Date: 10/4/2021 Redo: No Sample: # S7
Purpose: To determine the number of phages in the low-volume lysate.
Notes:
- We washed our hands and put on gloves. We proceeded with aseptic technique by spraying the station with CiDecon and wiping with Kimwipes. After CiDecon, we sprayed the station with 70% Ethanol and wiped it with Kimwipes. After waiting for the station’s surface to dry, we lit a Bunsen burner.
- Serial Dilutions and plaque assays were performed using the low volume lysate collected in the previous experiment:
- Six microcentrifuge tubes were gathered and labeled from 10^-1 to 10^-6.
- Six agar plates were also gathered from the fridge, labeled, and set out to reach room temperature.
- Phage buffer was gathered and labeled. 90ul of the phage buffer was added to each microcentrifuge tube using a micropipette.
- Using a pipette, 10uL of low volume was aspirated from the fridge-stored low volume lysate and dispensed into the 10^-1 microcentrifuge tube. The solution was vortexed to mix the components.
- Using a new pipette tip, 10ul of the 10^-1 solution was aseptically transferred to the 10^-2 microcentrifuge tube. The tube was vortexed to mix the contents. This is the 1:100 dilution.
- Using a new pipette tip, 10ul of the 10^-2 solution was aseptically transferred to the 10^-3 microcentrifuge tube. The tube was vortexed to mix the contents. This is the 1:1000 dilution.
- Using a new pipette tip, 10ul of the 10^-3 solution was aseptically transferred to the 10^-4 microcentrifuge tube. The tube was vortexed to mix the contents. This is the 1:10000 dilution.
- Using a new pipette tip, 10ul of the 10^-4 solution was aseptically transferred to the 10^-5 microcentrifuge tube. The tube was vortexed to mix the contents. This is the 1:1×10^5 dilution.
- Using a new pipette tip, 10ul of the 10^-5 solution was aseptically transferred to the 10^-6 microcentrifuge tube. The tube was vortexed to mix the contents. This is the 1:1×10^6 dilution.
- Once serial dilution was complete, a plaque assay began.
- Six glass tubes with host bacteria, M. folorium, were gathered. They were labeled 10^-1 to 10^-6.
- Using a micropipette and aseptic technique, 10ul of the 10^-1 dilution was dispensed into the glass test tube personally labeled with 10^-1.
- Each glass test tube received its corresponding components as specified in step k.
- All six glass test tubes were gently mixed and left untouched for 10 minutes.
- A bottle of molten top agar and serological pipette were gathered.
- Using a sterile 5 mL pipette, 3 mL of the molten top agar was aseptically transferred into the inoculated host tube.
- The mixture was immediately aspirated back up into the pipette and transferred to the agar plate.
- Gently, but quickly, the plate was tilted in all directions until the mixture had coated the top of the agar in the plate.
- This process was repeated for the remaining 5 glass test tubes.
- After letting the agar solidify for 15 minutes, the plate was inverted and placed in the incubator at 29°C.
- After two days, the plate was observed for correct dilutions.
- After the plates were examined, a plate with 20-200 plaques was selected. This plate would be used to calculate the titer in pfu/ml.
- To do this, the number of plaques was counted, 122, on the 10^-4 plate. It was then plugged into the given formula: Titer (pfu/ml) = (# pfu/volume used in ul) x (10^3 ul/ml) x dilution factor.
- Keeping the dilution factor a positive value and doing the appropriate math, the titer was calculated to be 1.22×10^8pfu/ml.
Results:
Conclusions and Next Steps:
Now that the titer is calculated, webbed plates can be created using that data.
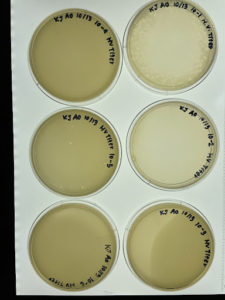
Title: Creating Webbed Plates from Known Titer
Date: 10/6/2021 Redo: No Sample: #S7
Purpose: To create a webbed plate of high concentration by using low volume lysate and calculated titer.
Notes:
- We washed our hands and put on gloves. We proceeded with aseptic technique by spraying the station with CiDecon and wiping with Kimwipes. After CiDecon, we sprayed the station with 70% Ethanol and wiped it with Kimwipes. After waiting for the station’s surface to dry, we lit a Bunsen burner.
- The titer from the Full Plate Titer was used to calculate the amount of lysate needed to generate a webbed plate. To do this, the 1.22×10^8pfu/ml was divided by 1000 to get microliters. This equaled 1.22×10^-2pfu/ul, or 0.1pfu/ul. This means that for every 1ul of lysate, there should be 99ul of phage buffer. Because of problems with capillary action, the ratio was expanded to a 90ul of phage buffer and 10ul of low volute lysate and using a 10^-3 dilution.
- Because a dilution was needed, a serial dilution was conducted, and a 100um micropipette, 3 microcentrifuge tubes, and sterile pipette tips were gathered.
- Five agar plates were also gathered from the fridge, labeled, and set out to reach room temperature.
- Phage buffer was gathered and labeled. 90ul of the phage buffer was added to each microcentrifuge tube using a micropipette.
- Using a pipette and aseptic technique, 10uL of low volume was aspirated from the fridge-stored low volume lysate and dispensed into the 10^-1 microcentrifuge tube. The solution was vortexed to mix the components.
- Using a new pipette tip, 10ul of the 10^-1 solution was aseptically transferred to the 10^-2 microcentrifuge tube. The tube was vortexed to mix the contents. This is the 1:100 dilution.
- Using a new pipette tip, 10ul of the 10^-2 solution was aseptically transferred to the 10^-3 microcentrifuge tube. The tube was vortexed to mix the contents. This is the 1:1000 dilution.
- Once serial dilution was complete, a plaque assay began.
- Five glass tubes with host bacteria, M. folorium, were gathered. They were labeled A-E because all would contain the 10^-3 dilution.
- Using a micropipette and aseptic technique, 10ul of the 10^-3 dilution was dispensed into the glass test tube personally labeled with A.
- Each glass test tube received its corresponding components as specified in step 10.
- All five glass test tubes were gently mixed and left untouched for 10 minutes.
- A bottle of molten top agar and serological pipette were gathered.
- Using a sterile 5 mL pipette, 3 mL of the molten top agar was aseptically transferred into the inoculated host tube.
- The mixture was immediately aspirated back up into the pipette and transferred to the agar plate.
- Gently, but quickly, the plate was tilted in all directions until the mixture had coated the top of the agar in the plate.
- This process was repeated for the remaining 4 glass test tubes.
- After letting the agar solidify for 15 minutes, the plate was inverted and placed in the incubator at 29°C.
- After one day, the plate was observed for webbed plates.
Results:
Conclusions and Next Steps:
Now that there are many webbed plates with high concentration, a high volume lysate can be gathered next.
Title: Collecting Plate Lysates (High Volume)
Date: 10/11/2021 Redo: No Sample: #S7
Purpose: To highly concentrate the phage sample from plaque assay to a liquid sample.
Notes:
- We washed our hands and put on gloves. We proceeded with aseptic technique by spraying the station with CiDecon and wiping with Kimwipes. After CiDecon, we sprayed the station with 70% Ethanol and wiped it with Kimwipes. After waiting for the station’s surface to dry, we lit a Bunsen burner.
- Phage buffer and a 5mL serological pipette were gathered.
- The plates from the Webbed Plates were evaluated, and since all showed signs of a webbed plate, all plates were used. Additionally, the webbed plate from the full plate titer was used as well because they all utilized the low volume lysate.
- Using aseptic technique, 8mL of the phage buffer was aspirated and dispensed onto each webbed plate.
- The buffer was gently tilted to cover the surface of the plate. The plate was left out at room temperature for 2.5 hours. The process was repeated for each plate.
- After 2.5 hours, the plates were slightly tilted to gather the liquid at one end of the plate.
- A 0.22um syringe filter, a 5mL syringe, and 50mL conical tube were gathered.
- Using aseptic technique, the liquid was aspirated with the 5mL syringe and dispensed once the 0.22um filter was attached to the syringe. While gently putting pressure on the plunger, the liquid began to filter and the filtrate was gathered in the 50mL conical tube. It should be noted that some plates had more than 5mL of liquid on the plate, so after the initial filter, the syringe was used to aspirate more liquid and filter into the same tube. It should also be noted that the same 0.22um syringe filter can be used for all filtrations, as long as the filter does not get clogged.
- The conical tube was capped and labeled appropriately. It was then placed in the fridge at 4°C and can be stored for months.
Results:
Approximately 37mL of high-volume lysate was able to be gathered.
Conclusions and Next Steps:
A serial dilution using the high volume lysate needs to be conducted. This ensures that the lysate is of high enough concentration and a new titer can be calculated from that serial dilution.
Title: Serial Dilution (of High Volume Lysate)
Date: 10/13/2021 Redo: No Sample: #S7
Purpose: To reduce the number of phages in a sample.
Notes:
- We washed our hands and put on gloves. We proceeded with aseptic technique by spraying the station with CiDecon and wiping with Kimwipes. After CiDecon, we sprayed the station with 70% Ethanol and wiped it with Kimwipes. After waiting for the station’s surface to dry, we lit a Bunsen burner.
- Six microcentrifuge tubes were gathered and labeled from 10^-1 to 10^-6.
- Six agar plates were also gathered from the fridge, labeled, and set out to reach room temperature.
- Phage buffer was gathered and labeled. 90ul of the phage buffer was added to each microcentrifuge tube using a micropipette.
- Using a micropipette, 10ul of the high volume lysate was aspirated and dispensed into the microcentrifuge tube 10^-1.
- The 10^-1 microcentrifuge was then vortexed to mix the phage particles and phage buffer. This is the 1:10 dilution.
- Using a new pipette tip, 10ul of the 10^-1 solution was aseptically transferred to the 10^-2 microcentrifuge tube. The tube was vortexed to mix the contents. This is the 1:100 dilution.
- Using a new pipette tip, 10ul of the 10^-2 solution was aseptically transferred to the 10^-3 microcentrifuge tube. The tube was vortexed to mix the contents. This is the 1:1000 dilution.
- Using a new pipette tip, 10ul of the 10^-3 solution was aseptically transferred to the 10^-4 microcentrifuge tube. The tube was vortexed to mix the contents. This is the 1:10000 dilution.
- Using a new pipette tip, 10ul of the 10^-4 solution was aseptically transferred to the 10^-5 microcentrifuge tube. The tube was vortexed to mix the contents. This is the 1:1×10^5 dilution.
- Using a new pipette tip, 10ul of the 10^-5 solution was aseptically transferred to the 10^-6 microcentrifuge tube. The tube was vortexed to mix the contents. This is the 1:1×10^6 dilution.
- Once serial dilution was complete, a plaque assay began.
- Six glass tubes with host bacteria, M. folorium, were gathered. They were labeled 10^-1 to 10^-6.
- Using a micropipette and aseptic technique, 10ul of the 10^-1 dilution was dispensed into the glass test tube personally labeled with 10^-1.
- Each glass test tube received its corresponding components as specified in step 14-15.
- All six glass test tubes were gently mixed and left untouched for 10 minutes.
- A bottle of molten top agar and serological pipette were gathered.
- Using a sterile 5 mL pipette, 3 mL of the molten top agar was aseptically transferred into the inoculated host tube.
- The mixture was immediately aspirated back up into the pipette and transferred to the agar plate.
- Gently, but quickly, the plate was tilted in all directions until the mixture had coated the top of the agar in the plate.
- This process was repeated for the remaining 5 glass test tubes.
- After letting the agar solidify for 15 minutes, the plate was inverted and placed in the incubator at 29°C.
- After one day, the plate was observed for any potential phages.
Results:
Conclusions and Next Steps:
The serial dilution did not provide the results as planned. There are no countable phages on these plates, so the problem needs to be assessed in class. The serial dilution potentially needs to be reconducted.
Title: Full Plate Titer (of High Volume Lysate)
Date: 10/18/2021 Redo: Yes Sample: #S7
Purpose: To reduce the number of phages in a sample.
Notes:
- We washed our hands and put on gloves. We proceeded with aseptic technique by spraying the station with CiDecon and wiping with Kimwipes. After CiDecon, we sprayed the station with 70% Ethanol and wiped it with Kimwipes. After waiting for the station’s surface to dry, we lit a Bunsen burner.
- Six microcentrifuge tubes were gathered and labeled from 10^-1 to 10^-6.
- Six agar plates were also gathered from the fridge, labeled, and set out to reach room temperature.
- Phage buffer was gathered and labeled. 90ul of the phage buffer was added to each microcentrifuge tube using a micropipette.
- Using a micropipette, 10ul of the high volume lysate was aspirated and dispensed into the microcentrifuge tube 10^-1.
- The 10^-1 microcentrifuge was then vortexed to mix the phage particles and phage buffer. This is the 1:10 dilution.
- Using a new pipette tip, 10ul of the 10^-1 solution was aseptically transferred to the 10^-2 microcentrifuge tube. The tube was vortexed to mix the contents. This is the 1:100 dilution.
- Using a new pipette tip, 10ul of the 10^-2 solution was aseptically transferred to the 10^-3 microcentrifuge tube. The tube was vortexed to mix the contents. This is the 1:1000 dilution.
- Using a new pipette tip, 10ul of the 10^-3 solution was aseptically transferred to the 10^-4 microcentrifuge tube. The tube was vortexed to mix the contents. This is the 1:10000 dilution.
- Using a new pipette tip, 10ul of the 10^-4 solution was aseptically transferred to the 10^-5 microcentrifuge tube. The tube was vortexed to mix the contents. This is the 1:1×10^5 dilution.
- Using a new pipette tip, 10ul of the 10^-5 solution was aseptically transferred to the 10^-6 microcentrifuge tube. The tube was vortexed to mix the contents. This is the 1:1×10^6 dilution.
- Once serial dilution was complete, a plaque assay began.
- Six glass tubes with host bacteria, M. folorium, were gathered. They were labeled 10^-1 to 10^-6.
- Using a micropipette and aseptic technique, 10ul of the 10^-1 dilution was dispensed into the glass test tube personally labeled with 10^-1.
- Each glass test tube received its corresponding components as specified in step 14-15.
- All six glass test tubes were gently mixed and left untouched for 10 minutes.
- A bottle of molten top agar and serological pipette were gathered.
- Using a sterile 5 mL pipette, 3 mL of the molten top agar was aseptically transferred into the inoculated host tube.
- The mixture was immediately aspirated back up into the pipette and transferred to the agar plate.
- Gently, but quickly, the plate was tilted in all directions until the mixture had coated the top of the agar in the plate.
- This process was repeated for the remaining 5 glass test tubes.
- After letting the agar solidify for 15 minutes, the plate was inverted and placed in the incubator at 29°C.
- After one day, the plate was observed for any potential phages.
- Using the formula: Titer (pfu/ml) = (# pfu/volume used in ul) x (10^3 ul/ml) x dilution factor, it was calculated that the titer of the high volume lysate was 1.8×10^9pfu/ml.
Results:

Conclusions and Next Steps:
The serial dilution yielded adequate plaques for evaluation. A titer of this high-volume lysate needed to be at least 5×10^9 pfu/ml. Although lower than the required concentration, this number was close enough. Using the high-volume lysate, we can proceed to the next step: DNA extraction.
Title: Archiving the Phage
Date: 10/27/2021 Redo: Yes Sample: #S7
Purpose: To prepare a high-titer lysate for long-term storage.
Notes:
- We washed our hands and put on gloves. We proceeded with aseptic technique by spraying the station with CiDecon and wiping with Kimwipes. After CiDecon, we sprayed the station with 70% Ethanol and wiped it with Kimwipes.
- The liquid High Volume Lysate (HVL) was gathered from the fridge, as well as the sample tubes and phage barcodes provided. Be sure to also get the 1000 μl pipette along with the appropriate tips for later use.
- Check Phagesdb.org to certify that the details regarding our phage sample were recorded properly on the phage database at phagesdb.org.
- Prepare the three archiving tubes by labeling them with the labels provided then collect your materials and assemble them underneath the fume hood where the Dimethyl sulfoxide (DMSO) and beads are.
- Began preparing the archiving tubes by filling ¾ of each tube with the beads that ensures that the DMSO/lysate mixture doesn’t freeze or get damaged during transport.
- Proceed by preparing the DMSO/lysate mixture by dispensing 4.0 ml of our high-titer lysate into the sterile 15ml conical tube using the 1000 μl pipette.
- Once we have properly dispensed our HVL into the sterile tube we added 280 μl of DMSO to the tube using the 1000 μl pipette and vortexed the mixture.
- Proceed to pipette the DMSO/lysate mixture into each one of the archiving tubes to the exact level at which the beads are at, approximately ¾ of the volume of the tube.
- Be sure to be as precise as possible and close the tubes properly
- Prepare the tubes for storage and place the tubes into the proper storage container which is to be placed back into the fridge until ready for shipment.
- Place the 15ml conical tube and your pipette tips into the autoclave bag and leave the DMSO mixture under the fume hood for the next group to use.
- The station was then gently cleaned with a Kimwipe and all other materials were put back in the proper place.
Results:
Phage was archived properly and was stored to be sent off to have more information entered into PhagesDB.
Conclusions and Next Steps:
Now that the phage has been physically archived, we can now continue with the DNA Isolation process.
DNA Extraction
Title: DNA Isolation
Date: 10/20/2021 Redo: No Sample: #S7
Purpose: To isolate DNA in the phage sample.
Notes:
Day 1:
- We washed our hands and put on gloves. We proceeded with aseptic technique by spraying the station with CiDecon and wiping with Kimwipes. After CiDecon, we sprayed the station with 70% Ethanol and wiped it with Kimwipes. After waiting for the station’s surface to dry, we lit a Bunsen burner.
- The liquid High Volume Lysate (HVL) was gathered from the fridge, as well as a 15mL conical tube and 5mL serological pipette.
- Using the pipette, 5mL of the HVL was aspirated and dispensed into the 15mL conical tube.
- An instructor then added 20ul of nuclease mix to the conical tube. The tube was gently inverted and placed in an incubator at 37°C for 10 min. The bunsen burner can now be extinguished.
- 5 microcentrifuge tubes were gathered. After the 10 minute incubation, 1mL of the lysate-nuclease mixture was placed into each microcentrifuge tube using a serological pipette.
- ZnCl2 was gathered, and 20uL was added using a micropipette and the solution was inverted to mix. All 5 microcentrifuge tubes were then placed in an incubator at 37°C for 5 min to precipitate the phage.
- After the waiting period, all 5 microcentrifuge tubes were centrifuged at 10,000rpm for 1 minute to pellet the phage.
- Quickly and efficiently, the supernatant liquid was aspirated from each microcentrifuge tube and dispensed into a waste tube (which was autoclaved following the collection). It was important not to disturb any of the pellets.
- 500ul of TES buffer was added to each microcentrifuge tube containing a pellet. All tubes were then incubated at 60°C for 15 min to denature the capsids, expose the DNA, while still protecting it from nuclease activity.
- After incubation, 1ul of Proteinase K was added to each microcentrifuge tube. All were placed in an incubator at 37°C for 10 min to eliminate any residual nuclease activity.
- Potassium acetate was gathered, and 60ul was added to each microcentrifuge tube. After mixing the solution well, each tube was placed on ice for 15 minutes to form a white, dense precipitate (the capsids).
- All tubes were then centrifuged at 4°C for 1 min at 12,000rpm to pellet the capsids.
- The supernatant was aspirated using a micropipette and placed in five new microcentrifuge tubes. The old tubes with the pellets were discarded.
- Isopropanol was gathered, and 500ul was added to each new microcentrifuge tube using a micropipette. All five tubes were then placed on ice and left overnight in the fridge.
Day 2:
- After one day, the five tubes were removed from the ice and centrifuged for 10 min at the highest speed (ours was 10,000rpm). This pellets the DNA, although no visible pellet may be seen.
- The supernatant was discarded by gently pouring the liquid into a waste tube (15mL conical tube worked).
- 70% ethanol was gathered, and 250ul was added to each tube. All tubes were centrifuged for 1 min at the highest speed to wash the DNA pellet. All supernatants were gently poured into a waste tube.
- All five microcentrifuge tubes were left to dry by being placed open and upside down on a paper towel. After most liquid left the tube, the remaining liquid was evaporated in the incubator at 30°C. This process took about 30 min, although it can range with the amount of liquid in the tubes.
- Once ALL liquid was dried out of the tubes, one tube received 50ul of nuclease-free water. After pipetting up and down to mix the solution, the liquid was aspirated out of the first microcentrifuge tube and placed in the second (such the process as a serial dilution).
- Once this process is complete, there should be one microcentrifuge tube containing the 50ul of nuclease-free water and all five pellets.
- The tube was taken to a Nanodrop machine, where the DNA concentration and quality (A260:280 and A260:230) was checked.
Results:
Conclusions and Next Steps:
The sample did not have acceptable values, so the DNA isolation needs to be conducted again.
Title: DNA Isolation
Date: 10/27/2021 Redo: Yes Sample: #S7
Purpose: To isolate DNA in the phage sample.
Notes:
Day 1:
- We washed our hands and put on gloves. We proceeded with aseptic technique by spraying the station with CiDecon and wiping with Kimwipes. After CiDecon, we sprayed the station with 70% Ethanol and wiped it with Kimwipes. After waiting for the station’s surface to dry, we lit a Bunsen burner.
- The liquid High Volume Lysate (HVL) was gathered from the fridge, as well as a 15mL conical tube and 5mL serological pipette.
- Using the pipette, 5mL of the HVL was aspirated and dispensed into the 15mL conical tube.
- An instructor then added 20ul of nuclease mix to the conical tube. The tube was gently inverted and placed in an incubator at 37°C for 10 min. The bunsen burner can now be extinguished.
- 5 microcentrifuge tubes were gathered. After the 10 minute incubation, 1mL of the lysate-nuclease mixture was placed into each microcentrifuge tube using a serological pipette.
- ZnCl2 was gathered, and 20uL was added using a micropipette and the solution was inverted to mix. All 5 microcentrifuge tubes were then placed in an incubator at 37°C for 5 min to precipitate the phage.
- After the waiting period, all 5 microcentrifuge tubes were centrifuged at 10,000rpm for 1 minute to pellet the phage.
- Quickly and efficiently, the supernatant liquid was aspirated from each microcentrifuge tube and dispensed into a waste tube (which was autoclaved following the collection). It was important not to disturb any of the pellets.
- 500ul of TES buffer was added to each microcentrifuge tube containing a pellet. All tubes were then incubated at 60°C for 15 min to denature the capsids, expose the DNA, while still protecting it from nuclease activity.
- After incubation, 1ul of Proteinase K was added to each microcentrifuge tube. All were placed in an incubator at 37°C for 10 min to eliminate any residual nuclease activity.
- Potassium acetate was gathered, and 60ul was added to each microcentrifuge tube. After mixing the solution well, each tube was placed on ice for 15 minutes to form a white, dense precipitate (the capsids).
- All tubes were then centrifuged at 4°C for 1 min at 12,000rpm to pellet the capsids.
- The supernatant was aspirated using a micropipette and placed in five new microcentrifuge tubes. The old tubes with the pellets were discarded.
- Isopropanol was gathered, and 500ul was added to each new microcentrifuge tube using a micropipette. All five tubes were then placed on ice and left overnight in the fridge.
Day 2:
- After two days, the five tubes were removed from the ice and centrifuged for 10 min at the highest speed (ours was 10,000rpm). This pellets the DNA, although no visible pellet may be seen.
- The supernatant was discarded by gently pouring the liquid into a waste tube (15mL conical tube worked).
- 70% ethanol was gathered, and 250ul was added to each tube. All tubes were centrifuged for 1 min at the highest speed to wash the DNA pellet. All supernatants were gently poured into a waste tube.
- All five microcentrifuge tubes were left to dry by being placed open and upside down on a paper towel. After most liquid left the tube, the remaining liquid was evaporated in the incubator at 30°C. This process took about 30 min, although it can range with the amount of liquid in the tubes.
- Once ALL liquid was dried out of the tubes, one tube received 50ul of nuclease-free water. After pipetting up and down to mix the solution, the liquid was aspirated out of the first microcentrifuge tube and placed in the second (such the process as a serial dilution).
- Once this process is complete, there should be one microcentrifuge tube containing the 50ul of nuclease-free water and all five pellets.
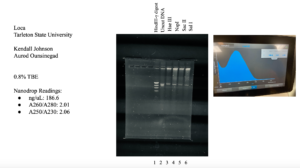
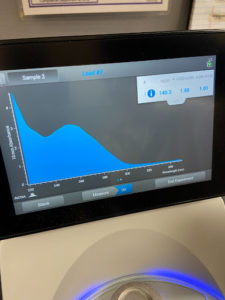
- The tube was taken to a Nanodrop machine, where the DNA concentration and quality (A260:280 and A260:230) was checked.
- Once the Nanodrop was turned on, the button for dsDNA was selected.
- A blank was needed, so 1ul of nuclease-free water was dispensed onto the Nanodrop plate using a micropipette. It was necessary to stabilize the micropipette and push down the plunger entirely to ensure that the liquid does not aspirate back into the pipette.
- The Nanodrop was gently closed and the blank reading was conducted. Once the reader deemed it successful, the nuclease-free water was gently cleaned using a Kimwipe.
- 1ul of the liquid from the microcentrifuge tube was aspirated and dispensed using the same technique as step b.
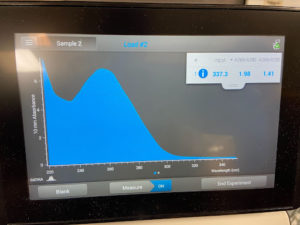
- After lowering the Nanodrop, the liquid was analyzed and a photo was taken of the results.
- The station was then gently cleaned with a Kimwipe and the microcentrifuge tube was placed in the freezer for storage.
Results:

Conclusions and Next Steps:
The sample did not have acceptable values, so the DNA isolation needs to be conducted again.
Title: Mounting Phage Samples for TEM
Date: 10/27/2021 Redo: No Sample: #S7
Purpose: To prepare the phage sample for a transmission electron microscope.
Notes:
- We washed our hands and put on gloves. We proceeded with aseptic technique by spraying the station with CiDecon and wiping with Kimwipes. After CiDecon, we sprayed the station with 70% Ethanol and wiped it with Kimwipes.
- 1mL of High Volume Lysate was aspirated using a micropipette and transferred to a microcentrifuge tube.
- The sample was centrifuged at top speed at 4°C for 1 hour.
- After one hour, all supernatants were discarded in a waste tube. It was important not to disturb the pellet.
- 100ul of phage buffer was added to the microcentrifuge tube. This tube was then placed in a 4°C fridge for 30 min.
- After 30 min, the tube was placed under a biosafety hood.
- Under the hood, a 5x5cm parafilm piece was placed in the lid of a petri dish. EM forceps were used to grab a new grid from its storage container. The dark side of the grid was placed on the edge of the adhesive, careful not to overlap.
- 10ul of high volume lysate from the microcentrifuge tube was aspirated and dispensed carefully onto the grid. It was important that the tip of the micropipette never made contact with the grid itself.
- The lysate was left on the grid for 2 minutes, and then gently wicked up by a sterile piece of filter paper.
- The grid was then washed with 10ul of sterile water, using the same technique as explained in step 8. The liquid was left to sit for 2 minutes and then was carefully wicked off. This process was repeated two times for the sterile water.
- 10ul of 1% uranyl acetate was pipetted onto the grid and left to sit for 2 minutes. After 2 minutes, the liquid was carefully wicked off.
- The grid was then left to dry undisturbed for approximately 5 minutes.
- EM forceps were then used to remove the dry grid from the petri dish and placed into its appropriate slot of the “stained grids box”. The box was placed in a vacuum-sealed container for storage to be shipped.
Results:
Conclusions and Next Steps:
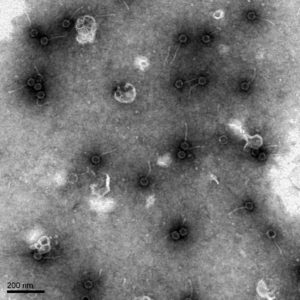
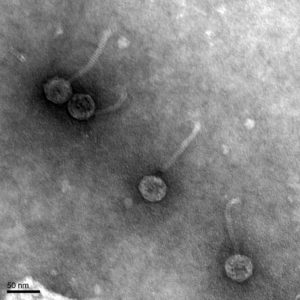
It was found that our bacteriophage Loca has a Siphoviridae morphology, has a tail length of 102.3 nanometers, and a capsid diameter of 42.8 nanometers. The pictures found from the TEM were uploaded to PhagesDB to be archived and documented.
Title: DNA Isolation
Date: 11/1/2021 Redo: Yes Sample: #S7
Purpose: To isolate DNA in the phage sample.
Notes:
Day 1:
- We washed our hands and put on gloves. We proceeded with aseptic technique by spraying the station with CiDecon and wiping with Kimwipes. After CiDecon, we sprayed the station with 70% Ethanol and wiped it with Kimwipes. After waiting for the station’s surface to dry, we lit a Bunsen burner.
- The liquid High Volume Lysate (HVL) was gathered from the fridge, as well as a 15mL conical tube and 5mL serological pipette.
- Using the pipette, 5mL of the HVL was aspirated and dispensed into the 15mL conical tube.
- An instructor then added 20ul of nuclease mix to the conical tube. The tube was gently inverted and placed in an incubator at 37°C for 10 min. The bunsen burner can now be extinguished.
- 5 microcentrifuge tubes were gathered. After the 10 minute incubation, 1mL of the lysate-nuclease mixture was placed into each microcentrifuge tube using a serological pipette.ZnCl2 was gathered, and 20uL was added using a micropipette and the solution was inverted to mix. All 5 microcentrifuge tubes were then placed in an incubator at 37°C for 5 min to precipitate the phage.
- After the waiting period, all 5 microcentrifuge tubes were centrifuged at 10,000rpm for 1 minute to pellet the phage.
- Quickly and efficiently, the supernatant liquid was aspirated from each microcentrifuge tube and dispensed into a waste tube (which was autoclaved following the collection). It was important not to disturb any of the pellets.
- 500ul of TES buffer was added to each microcentrifuge tube containing a pellet. All tubes were then incubated at 60°C for 15 min to denature the capsids, expose the DNA, while still protecting it from nuclease activity.
- After incubation, 1ul of Proteinase K was added to each microcentrifuge tube. All were placed in an incubator at 37°C for 10 min to eliminate any residual nuclease activity.
- Potassium acetate was gathered, and 60ul was added to each microcentrifuge tube. After mixing the solution well, each tube was placed on ice for 15 minutes to form a white, dense precipitate (the capsids).
- All tubes were then centrifuged at 4°C for 1 min at 12,000rpm to pellet the capsids.
- The supernatant was aspirated using a micropipette and placed in five new microcentrifuge tubes. The old tubes with the pellets were discarded.
- Isopropanol was gathered, and 500ul was added to each new microcentrifuge tube using a micropipette. All five tubes were then placed on ice and left overnight in the fridge.
Day 2:
- After one day, the five tubes were removed from the ice and centrifuged for 10 min at the highest speed (ours was 10,000rpm). This pellets the DNA, although no visible pellet may be seen.
- The supernatant was discarded by gently pouring the liquid into a waste tube (15mL conical tube worked).
- 70% ethanol was gathered, and 250ul was added to each tube. All tubes were centrifuged for 1 min at the highest speed to wash the DNA pellet. All supernatants were gently poured into a waste tube.
- All five microcentrifuge tubes were left to dry by being placed open and upside down on a paper towel. After most liquid left the tube, the remaining liquid was evaporated in the incubator at 30°C. This process took about 30 min, although it can range with the amount of liquid in the tubes.
- Once ALL liquid was dried out of the tubes, one tube received 50ul of nuclease-free water. After pipetting up and down to mix the solution, the liquid was aspirated out of the first microcentrifuge tube and placed in the second (such the process as a serial dilution).
- Once this process is complete, there should be one microcentrifuge tube containing the 50ul of nuclease-free water and all five pellets.
- The tube was taken to a Nanodrop machine, where the DNA concentration and quality (A260:280 and A260:230) was checked.
- Once the Nanodrop was turned on, the button for dsDNA was selected.
- A blank was needed, so 1ul of nuclease-free water was dispensed onto the Nanodrop plate using a micropipette. It was necessary to stabilize the micropipette and push down the plunger entirely to ensure that the liquid does not aspirate back into the pipette.
- The Nanodrop was gently closed and the blank reading was conducted. Once the reader deemed it successful, the nuclease-free water was gently cleaned using a Kimwipe.
- 1ul of the liquid from the microcentrifuge tube was aspirated and dispensed using the same technique as step b.
- After lowering the Nanodrop, the liquid was analyzed and a photo was taken of the results.
- The station was then gently cleaned with a Kimwipe and the microcentrifuge tube was placed in the freezer for storage.
Results:
Conclusions and Next Steps:
The numbers were closer to the preferred values, but could be better. The DNA extraction may be reconducted by combining the two most accurate trials.
Title: Reprecipitation of DNA
Date: 11/08/2021 Redo: No Sample: #S7
Purpose: To combine two previous DNA extraction samples to gather a more accurate Nanodrop reading.
Notes:
Day 1:
- We washed our hands and put on gloves. We proceeded with aseptic technique by spraying the station with CiDecon and wiping with Kimwipes. After CiDecon, we sprayed the station with 70% Ethanol and wiped it with Kimwipes.
- The two DNA samples from DNA Isolation (Samples 2 and 3) were removed from their storage in the freezer and set out at room temperature to thaw.
- Once the samples returned to a liquid state, a micropipette was used to aspirate and calculate the volume of each sample. This was done by aspirating all of the liquid into the micropipette, and then gradually decreasing the micropipette reading until there were no air bubbles left in the micropipette tip. DNA #2 had a volume of 46ul and DNA #3 had a volume of 46ul. Both volumes were then dispensed together into a new microcentrifuge tube.
- With the combined volume, 92ul, the volume of Sodium acetate and ice cold 100% Ethanol was calculated. The Sodium acetate would be 0.10 vols of the DNA volume, or 9.2ul. The ice cold 100% Ethanol would be 3 volumes of the DNA volume, or 276ul.
- All volumes from step 4 were aspirated using a micropipette and dispensed into the microcentrifuge tube containing the 92ul of DNA sample. The contents were inverted to mix.
- The microcentrifuge tube was then precipitated by being placed in a -80°C freezer overnight.
Day 2:
- After one day, the sample was retrieved from the freezer and centrifuged at full speed at 4°C for 30 min.
- The supernatant was then dispensed into a waste tube, and 0.5mL of 75% Ethanol was added to the microcentrifuge tube to wash it. The tube was placed in the centrifuge at 4°C for 10 min. This step was conducted twice, with all supernatants being discarded in a waste tube.
- After aspirating as much liquid out of the microcentrifuge tube, the tube was set in a 30°C incubator to air dry. It was important to not proceed with the next step until all liquid droplets were evaporated from the tube.
- Once ALL liquid was dried out of the tube, 50ul of nuclease-free water was added to the tube. The liquid was pipetted up and down to mix the solution.
- The tube was taken to a Nanodrop machine, where the DNA concentration and quality (A260:280 and A260:230) was checked.
- Once the Nanodrop was turned on, the button for dsDNA was selected.
- A blank was needed, so 1ul of nuclease-free water was dispensed onto the Nanodrop plate using a micropipette. It was necessary to stabilize the micropipette and push down the plunger entirely to ensure that the liquid does not aspirate back into the pipette.
- The Nanodrop was gently closed and the blank reading was conducted. Once the reader deemed it successful, the nuclease-free water was gently cleaned using a Kimwipe.
- 1ul of the liquid from the microcentrifuge tube was aspirated and dispensed using the same technique as step b.
- After lowering the Nanodrop, the liquid was analyzed and a photo was taken of the results.
- The tube was also taken to a Qubit Reader to gather more accurate concentration readings.
- Three smaller microcentrifuge tubes (1.5mL) and one normal microcentrifuge tube were gathered. The small tubes were labeled: 1, 2, and D.
- 796ul of High Sensitivity (HS) Qubit buffer was added to the normal microcentrifuge tube.
- 4ul of HS reagent dye was added to the buffer tube. The tube was gently vortexed to mix its contents.
- 190ul of buffer from the microcentrifuge tube was added to the smaller tubes labeled 1 & 2.
- 198ul of buffer was added to the smaller tube labeled D.
- 10ul of Standard 1 was added into the tube labeled “1”. 10ul of Standard 2 was added into the tube labeled “2”. 2ul of the personal DNA sample was added to the tube labeled “D”. All three tubes were gently vortexed to mix its contents.
- A Qubit reader was gathered and plugged in. Once booted up, the option “dsDNA” was selected. High Sensitivity was then also selected.
- Select “Read Standards” and place tube 1 into the Qubit slot. “Read Sample” was clicked. Step H was repeated for tube 2.
- Tube D was placed in the Qubit slot and “read sample” was selected. A photo was taken of tube D’s results.
Results:

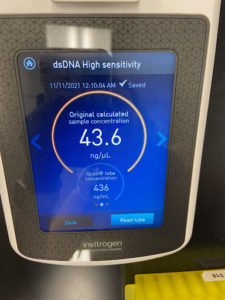
Conclusions and Next Steps:
The numbers yielded appropriate results, so the experiment can proceed with Gel Electrophoresis.
Characterization
Title: Setting up Restriction Enzyme Digests
Date: 11/11/2021 Redo: No Sample: #S7
Purpose: To cut your phage genome into multiple different fragments based on its particular DNA sequence.
Notes:
- We washed our hands and put on gloves. We proceeded with aseptic technique by spraying the station with CiDecon and wiping with Kimwipes. After CiDecon, we sprayed the station with 70% Ethanol and wiped it with Kimwipes.
- Removed the DNA sample from storage and began preparing our genomic DNA by vortexing the sample on low.
- After vortexing the DNA sample, incubate the tube at 65 °C for 10 minutes then was placed on ice quickly after incubation had occurred. After this, quick spin the tube in a microcentrifuge for about 1 minute to move all the liquid to the bottom of the tube.
- Calculate the volume of the DNA sample needed to obtain 0.5 μg of DNA using the concentration of your DNA sample, 43.6 μg/ml. After calculation, it was found that the volume of the DNA sample needed was about 11.47 μl.
- Continue by collecting 5 microcentrifuge tubes for each enzyme, making sure to include a negative control, your uncut DNA, in which no enzyme is added. The other 4 tubes will contain your restriction enzymes, HAE III, NSP I, SAC II, and SAL I.
- Into each one of the microcentrifuge tubes, except for the tube containing the Uncut DNA, add 2.5 μl of 10X Reaction Buffer, 0.5 μl of the respective restriction enzyme, 0.5 μg of the Phage DNA, and 17 μg of Sterile ddH2O. As for your Uncut DNA, add 2.5 μl of 10X Reaction Buffer, 0.5 μg of the Phage DNA, and 17.5 μg of Sterile ddH2O.
- Once all your restriction enzyme digest reactions are set up, gently mix the contents and quick spin the tubes in a microcentrifuge for less than a minute to move all the liquid to the bottom of the tube.
- Incubate all the tubes at 37 °C for 1 hour and then quick spin all your tubes for less than 1 minute to move all the liquid to the bottom and store at -20 °C until they are ready for use.
Results:
All 5 microcentrifuge tubes containing the restriction enzyme digest reactions and the Uncut DNA were successfully prepared and stored for later use.
Conclusions and Next Steps:
Use our newly made restriction enzyme digest reactions to visualize our digested phage DNA through the process of Gel Electrophoresis.
Title: Casting Agarose Gels & Gel Electrophoresis of Restriction Enzyme Digests
Date: 11/11/2021 Redo: No Sample: #S7
Purpose: To prepare an agarose gel for electrophoresis in order to separate DNA fragments by agarose gel electrophoresis.
Notes:
Casting Agarose Gels:
- We washed our hands and put on gloves. We proceeded with aseptic technique by spraying the station with CiDecon and wiping with Kimwipes. After CiDecon, we sprayed the station with 70% Ethanol and wiped it with Kimwipes.
- Retrieved our 5 microcentrifuge tubes containing the restriction enzyme digest reactions and the Uncut DNA from the freezer and allowed them to warm up to room temperature while we collected the rest of the materials needed to cast the agarose gel and conduct Gel Electrophoresis.
- Begin by setting up your gel apparatus and calculate the amount of powdered agarose needed to prepare 30 mL of 0.8% agarose gel.
- It was found that 0.24 g of the agarose powder is needed in order to prepare 30 mL of 0.8% agarose. From this, we calculated that the appropriate volume of 1X TBE buffer to add was 30 mL to get 30 mL of 0.8% agarose gel.
- After calculation, the proper amount of agarose powder and 1X TBE buffer was added into an Erlenmeyer flask, swirled gently, and heated in the microwave for 1 minute. Make sure to take it out of the microwave at 30 seconds to gently swirl the mixture once more before allowing it to heat up for the remaining 30 seconds.
- Remove the flask from the microwave using a heat-resistant glove and swirl the mixture once more before allowing it to cool for about 10-15 minutes to a temperature between 50°C and 60 °C.
- Once the mixture has cooled sufficiently, calculate the appropriate volume of ethidium bromide (EtBr) needed to use as a DNA dye in order to reach a proper final concentration of 0.5 μg/ml. It was found the 1.5 μl of EtBr was needed to reach this concentration; therefore, 1.5 μl of EtBr was added to the mixture and was swirled to mix.
- Carefully pour the agarose/EtBr mixture into the prepared gel apparatus, making sure not to allow for the creation of bubbles, and insert the comb to cast the wells needed to perform gel electrophoresis.
- Allow for the gel to cool for 20-30 minutes then carefully extract the comb by pulling it straight up slowly. Once the comb is removed, gently lift the gel platform out of the casting tray and place the solidified gel into the gel box. Ensure that the wells are at the cathode (-) end of the box, where the black lead is connected.
- Finally, pour 30 mL of the 1X TBE buffer into the gel apparatus until the gel is properly submerged by about ¼ inch of the buffer.
Gel Electrophoresis of Restriction Enzyme Digests:
- Begin by creating your ladder, add 1 μl of Hindi III digest, 24 μl of nuclease-free water, and 5 μl of 6X loading dye into a new microcentrifuge tube.
- Prepare your restriction enzyme digest samples for electrophoresis by adding 5 μl of concentrated 6X loading dye to each 25 μl restriction enzyme sample, including your uncut DNA sample.
- Place your samples at 65 °C in a heat block for 5 minutes then immediately place the samples on ice to cool before spinning them in the microcentrifuge for about 15 seconds at 10,000 RPM which prevents annealing of the cohesive ends of the phage DNA.
- Load the gel in the following order: Ladder, Uncut DNA, HAE III, NSP I, SAC II, and SAL I.
- Begin by loading the gel with the proper volume of your DNA ladder, then continue, making sure to use a new tip on your micropipettor for each sample, by pipetting 20 μl of each restriction enzyme reaction into the wells in the order mentioned above.
- Once each well has been filled with the proper sample, we drew a picture of the gel in our lab notebook and plugged in our electrodes to the proper locations on the power supply. Turn the power supply on and set the voltage to 100 V.
- Run the gel until the blue dye has migrated at least 4 to 5 inches from the well which will take approximately 1 hour. At this time we turned off our power supply and photographed the gel.
- Once a photograph has been taken and the gel has been removed, empty the buffer back into the original container to be used again, rinse out the gel apparatus with water and soap and set it aside to dry.
- Dispose of the gel in the proper receptacle and clean the station with a Kimwipe.
- After cleaning off your station, label your restriction enzyme gel appropriately and upload a picture of your gel with labels to PhagesDB.org.
Results: Resulted in a gel with strong banding and will be sent off for DNA testing.
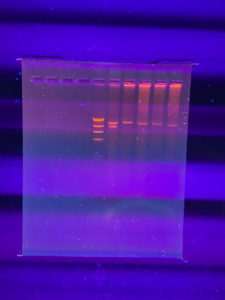
Conclusions and Next Steps: The following picture will be uploaded to PhagesDB.org: