Discovery of Tiland
Tiland Information
Morphology: Siphoviridae

Sample Collection
| Collector Name |
Kaitlyn Crow | Ethan Collum | ||
| Sample No. | 1 | 2 | 3 | 4 |
| Date of Collection | 08/30/2023 | 08/29/2023 | 09/06/23 | 09/06/23 |
| Sample Type | Soil | Soil | Soil | Soil |
| General Location | Home | City Park | River Bed | Under the bridge at City Park |
| Location Description | Chicken Coop | Bosque River | Brazos River | Brazos River/City Park |
| GPS Coordinates |
(32.380415, -97.933084) |
(32.21584, 98.20054) |
(32.2148412, -98.2028604) |
(32.2160453, -98.2022176) |
| Sample Depth | Top Soil/Bedding | Top Layer | Top Layer | Top Layer |
| Ambient Temperature | 27C | 26C |
Direct Isolation
Title: Isolation/Purification of Environmental Sample
Date: 09/01/23
Redo: Yes
Sample: # 1
Purpose: The purpose of the direct isolation was to extract phages from microbes found in this sample which came from the bedding of a chicken coop.
Notes: This sample failed to produce plaques and also was affected by air bubbles within the plaque assay.
1) Extracting phage from the environmental sample collected and submerging the sample with liquid media (roughly 8ml of media used).
2) Mixed gently by inverting the tube before placing in the shaking incubator for 2 hours.
3) Once the shaking incubation cycle is completed the liquid of the sample will be filtered through a 0.22um filter carefully to avoid flooding or clogging the filter. This process yielded 0.5 ml of filtrate.
4) The filtrate was then inoculated with host bacteria m. Smegmatis and allowed to rest for approx. 5-10 minutes
5) Following the resting period, the newly innoculated sample was plated with 3mL of molten top agar then incubated for 48 hours.
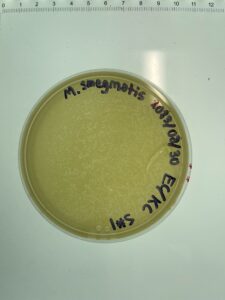
Results: The results showed no phages present from this sample and several air bubbles which conflicted the results.
Conclusions and Next Steps: For the next sample aseptic technique will be followed closely and the next environmental sample will be tested for phage presence.
Title: Isolation/Purification of Environmental Sample by Plaque Assay
Date: 09/01/23
Redo: Yes
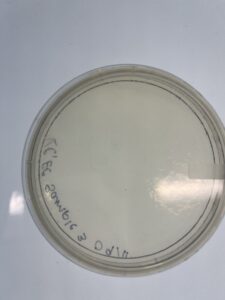
Sample: #2
Purpose: Contamination
Notes: Environmental sample #2 was innoculated and plated following the same instruction as sample 1, however during the plating process the lid was lifted which then exposed the sample to bacteria outside of the host bacteria which contaminated the sample.

Results: No plaques were formed
Conclusions and Next Steps: In the next sample aseptic technique will be followed to ensure minimal exposure to contaminants for the next environmental sample.
Date: 09/11/23
Redo: Yes
Sample: # 3
Purpose: The purpose of the direct isolation was to extract phages from microbes found in this sample which came from a sandbar near the Brazos River.
Notes: This sample failed to produce plaques. Sample #3 followed the same direction as samples 1&2 per direct Isolation protocol however no plaques formed.
Results: No plaques
Conclusions and Next Steps: Recollect a different sample to test for plaques
Date: 09/11/23
Redo: Yes
Sample: #4
Purpose: Failure to produce plaques.
Notes:

Results: No plaques were formed
Conclusions and Next Steps: Recollect samples to test for plaques.
Title: Isolation/Purification of Environmental Sample
Date: 09/15/23
Redo: No
Sample: # 5
Purpose: The purpose of the direct isolation was to extract phages from microbes found in this sample which came from an ant pile near a cemetery.
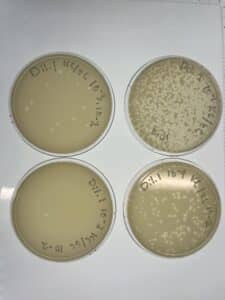
Notes: Following the same steps for direct isolation, sample 4 showed small plaques forming after 48 hours of incubation.
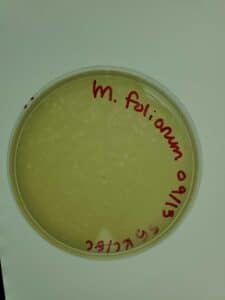
Results: Several small Plaques formed on the sample 4 plate.
Conclusions and Next Steps: This sample will undergo serial dilution to isolate bacteriophage.
Title: Isolation/Purification of Environmental Sample by Plaque Assay
Date: 09/15/23
Redo: No
Sample: #6
Purpose: This sample was collected from an ant pile near a construction site.
Notes:
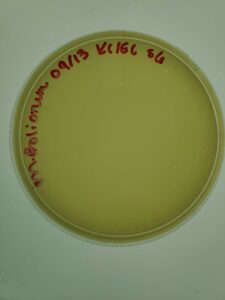
Results: Plaques were formed.
Conclusions and Next Steps: This sample will be saved in the refrigerator for later testing.
Purification/ Amplification
Title: First Round of Serial Dilution to Purify Phage
Date: 09/18/2023
Redo: Yes
Sample: #5
Purpose: Isolate bacteriophage plaques.
Notes: This sample was diluted in 6 plates to amplify and isolate bacteriophages.
1) By collecting the liquid phage from sample 5, then picking a plaque for serial dilutions.
2) Using 6 samples for our serial dilution method in order to control how many phage are present on each plate. 10-1 being the most highly concentrated plate while 10-6 is the lowest concentration.
3) Each sample was diluted with 90ul of phage buffer and 10ul of phage sample.
4) Each sample was then innoculated with host bacteria m. Smegmatis and sat at rest for 5-10 minutes
5) Then plates with 3mL of molten top agar and incubated for 48 hours.

Results: Plates 1 and 2 were successful in serial dilution however plates 3-6 were void due to contamination.
Conclusions and Next Steps: For the second round of serial dilution, plates 1 and 2 will be used and aseptic technique will be closely followed to prevent contamination to the samples.
Title: Second Round of Serial Dilution to Purify Phage
Date: 10/4/2023
Redo: Yes
Sample: #2
Purpose: Isolate phage for full plate titer
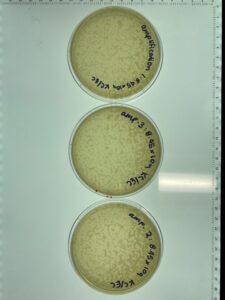
Notes: This sample of plates were produced using the sample 5, 10-1 dilution. Following serial dilution and plaque assay, plaques were present on each plate successfully and plate 10-2 has the most countable plaques (169pfu) for a full plate titration.
Results: Plate 10-2 was the most countable sample for calculation with 169 Plaque forming units (pfu) which gave the titer of 1.69×10⁻⁵pfu/mL
Conclusions and Next Steps: 8.45×10⁻⁹ pfu/mL is the estimated concentration needed or a high concentration titration.
Date: 10/11/23
Redo: Yes
Sample: #2
Purpose: Isolate bacteriophage plaques.
Notes: This sample was to ensure the calculations for the first round of full plate titrations was accurate.

Results: Plates 1 and plate 2 were incorrectly plated which skewed the results. Plate 1 had 35 pfu while plate 2 had tntc.
Conclusions and Next Steps: The full plate titer of this sample was 3.5×10⁻⁴pfu/mL which is to far off the first round of titration. This step will need to be redone to ensure calculations are accurate.
Title: Third Round of Serial Dilution to Purify Phage
Date: 10/16/2023
Redo: No
Sample: 3
Purpose: To ensure the calculations for the full plate titer is accurate.
Notes:
Results: This sample had more close results with the original full plate titer at 1.78×10⁻⁵pfu/mL
Conclusions and Next Steps: The next step will be to extract DNA, a high concentrate titration and transelectron microscopy (TEM).
DNA Extraction
DNA Extraction
Date: 10/11/2023
Redo: No
Sample: Sample 1 of full plate titer
Purpose: Amplify phage for DNA extraction
Notes:
Results: Amplification for DNA extraction was successful.
Conclusions and Next Steps: Following extraction of high concentration phage will be to extract DNA.
Title: DNA Extraction
Date: 10/11/2023
Redo: Yes
Sample:
Purpose: To Collect DNA from bacteriophages.
Notes:
1. First, we transferred 8mL of phage lysate into a conical tube, then added to that 40uL of nuclease (5ul for ever 1 mL phage lysate).
2. Mix the phage lysate and nuclease well but gently and incubated for 10 minutes.
3. By using a 5ml pipette to control the amount of nuclease-treated lysate, we added them into 8 mictrocentriguge tubes (one tube for each mL).
4. In each tube of nuclease-treated lysate, 25uL of ZnCl2 was added and mixed thoroughly before incubated for another 10 minutes.
5. Once done with the second round of incubation was completed the supernatant from each centrifuge tube was discarded gently without disturbing the pellet.
6. Then the phage pellet was resuspended into 1.0 mL of EDTA (125uL per microcentrifuge tube). Afterwards each microcentrifuge tube was combined into one single microcentrifuge tube.
7. 0.5 uL of Proteinase K was then added and gently mixed with the nuclease treated lysate and incubated for 10 minutes.
8. After incubation is done the next steps will be to denature the protein capsid by resuspending the pellet into a clean conical tube, then adding 2mL of of DNA clean-up resin to the resuspended phage pellet and mix by inverting the tube for 2 minutes.
9. Using two Wizard Kits next to isolate the phage DNA. We removed plungers from two syringes and attached a column to each of them. We then set the columns and syringe barrel on a new microcentrifuge tube.
10. 1.5 ml of phage DNA/Resin solution into a the column via pipette.
11. Using the plunger, inserting it into the syringe and carefully pushing though he liquid in the 15ml conical tube. This step was important to not damage the phage.
12. Reattach the syringe barrel to the column.
13. Next we washed the salts from the DNA by adding 2ml of 80% isopropanol to each syringe/column and repeating for 3 isopropanol washes.
14. Then we removed residual isopropanol by centrifuging for 5 minutes at 10,000 x g. Then transferring into new 1.5 ml microcentrifuge tubes and spinning for an additional minute at 10,000. Once complete we used a 90 degree c heating block for one minute.
15. Lastly we eluted the phage DNA from the columns by placing each column into a clean microcentrifuge tube and adding 50ul of 90 degree celsius sterile ddH20 to each column. Incubating the columns for one minute at room temperature and then spinning at 10,000 x g for one minute and combining the products from each tube.
16. Then we used a spectrophotometer to measure the concentration of DNA which in this sample was incredibly low.

Results: There wasn’t much DNA available
Conclusions and Next Steps: In our next round of phage extraction, we will work on creating a more concentrated sample of phage DNA.
Date: 11/1/2023
Redo: No
Sample: Second round of DNA extraction
Purpose: This was a redo of the first round of DNA extraction.
Notes: The procedure for this DNA extraction was the same as the first one, DNA Extraction following phage precipitation with ZnCl2.
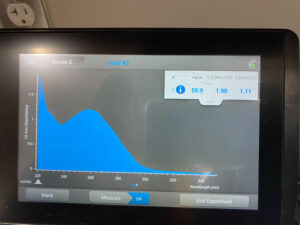
Results: The results of this extraction were much more successful than the first round, with 59.9ng/uL and
Conclusions and Next Steps: There was a good amount of DNA in this round however not quite enough to archive. We will create another extraction and combine DNA extraction (2) with DNA extraction (3) to generate enough DNA at a high lysate.
Title: DNA Extraction (3)
Date: 11/6/2023
Redo: No
Sample: DNA Extraction (3)
Purpose: The purpose of performing this procedure is to cultivate more DNA for the phage achieves.
Notes: Following the same procedure as the extractions prior, DNA extraction following phage precipitation with ZnCl2.

Results: This sample was yielded the greatest amount of DNA thus far.
Conclusions and Next Steps: We will archive this data and work on an alternative route to growing the DNA for the gel electrophoresis procedure.
Characterization
Date: 11/6/2023
Redo: No
Sample: Trans Electron Microscopy (TEM)
Purpose: The purpose of TEM is to be able to see the phage, Tiland and determine it’s morphology.
Notes:
This phage was mounted using Uranyl Acetate and Pelco Tabs.
1. First we transferred 1 ml of high titer lysate into a microcentrifuge tube and centrifuged at 4 degrees Celsius, at top speed for 1 hour.
2. Once the first round of centrifuge was complete, we added 100ul of phage buffer to the tube and resuspended for 40 minutes at 4 degrees Celsius at top speed.
3. In the prepared TEM station, we removed the grid with the forceps and placed no the edge of the adhesive part of the tab with the dark side facing upwards.
4. Using a micropipettor we placed 10ul of lysate onto the grid, careful not to touch the tip of the pipettor to the grid and allowed the phage to settle for 2 minutes.
5. Then using the side edge of the filter paper to carefully wick away the excess fluid off of the grid.
6. The grid was then rinsed twice by placing 10ul of sterile water on the grid and allowing it to settle for 2 minutes, then wicking away excess fluid off of the grid with the filter paper. It was important to do this step quickly to avoid allowing the grid to dry out.
7. Then, 10ul of Uranyl Acetate was added onto the grid and allowed to settle for 2 minutes to allow the stain to absorb onto the grid. After the 2 minutes have passed, we wicked away the excess acetate with the edge of the filter paper.
8. Once this step was complete the grid was replaced in the designated grid box for storage and shipment to the TEM location.
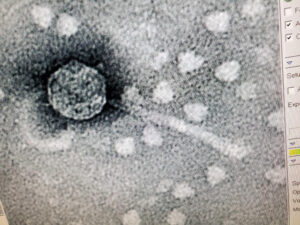
Results: The results of the TEM for Tiland, is the morphology is siphoviridae with a long tail.
Conclusions and Next Steps: The next steps will be to prep more DNA for the DNA restriction enzymes and Gel electrophorisis.
DNA restriction and Gel Electrophorisis
Date: 11/13/2023
Redo:
Sample: DNA Restriction
Purpose: The purpose of this was to set up restriction enzyme digests for gel electrophorisis. This is done to cleave the enzymes at restriction sites that can be on different sites and locations to give us a “DNA fingerprint”.
Notes:
1. We pulled out DNA sample out of the fridge, allowed it to come to room temperature and gently mixed. Once it was mixed we incubated it at 65 degrees Celsius for 10 minutes on the hot plate.
2. Once the 10 minutes on the hot plate was completed, we placed it into an ice bath and centrifuged for 1 minute. This is important to move all of the liquid to the bottom of the tube.
3. We calculated for our DNA sample and the volume we needed to obtain the 5ug. Our DNA concentration came out to 0.15ul that was diluted with ddh20 to create 5ug of uncut DNA.
4. Next we prepared our microcentrifuge tubes. There were 7 total in this order. Ladder, Uncut DNA, Haelll, Msel, Nspl, Sacll, Sall.
5. In the first tube, ladder, we added 24ul of ddH20, and 1 ul of Lambda DNA.
6. In the uncut DNA tube, we added 24ul of ddH20, and 1 ul of DNA.
7. The remaining 5 tubes were set up in the same pattern. 20.5 ul of ddH20, 2.5 of 10x Reaction Buffer, 1ul of restriction enzyme and 1 ul of DNA. 8. Once all of the microcentrifuge tubes were combined they were incubated at 37 degrees Celsius for up to one hour.
8. Once the incubation was completed, centrifuge for less than one minute and immediately place on ice until ready for Gel Electrophorisis.
Results:
Conclusions and Next Steps: The next step will be to conduct Gel Electrophoresis and get “DNA fingerprinting”.
Gel Electrophoresis:
Date: 11/13/2023
Redo: Yes
Purpose: To separate the DNA fragments (bands) through an electric current and sieve DNA molecules through the agarose gel. This when compared to the size of the ladder, will provide a DNA fingerprint of the phage.
Notes:
1. Step one we prepared the agarose 0.8% (w/v) and calculated how much agarose we would need for the gel electrophoresis.
2. We needed .33 grams of agarose powder combined with 40 ml of TBE buffer into an Erlenmeyer Flask.
3. Once we combined those substances, we microwaved for 1-2 minutes and gently stirred the substance to ensure that the agarose powder was fully dissolved. To prevent the substance from boiling over, we covered the top of the Erlenmeyer Flask with paper towel.
4. Once it had been microwaved to a boiling point, we allowed the mixture to cool on the countertop for 10-15 minutes to a manageable temperature. Then we poured the gel into the apparatus and placed the comb. We allowed the gel to solidify in the apparatus placed in the electrophoresis chamber for 20-30 minutes.
5. Once the gel had solidified we covered with TBE buffer, enough to cover the surface area of the gel roughly 1/4 of an inch.
6. Then we mixed in 5ul of purple loading dye into each microcentrifuge tube. Mixed gently, then we very carefully pippetted 20 ul into each well. Being sure to change the tips each time and not break the surface of the gel.
7. Once the wells were filled we covered the top, and connected the electical outlets appropriately. Turned on the machine, and set to 100v. We ran the machine at least an hour, it took slightly longer to reach the end of the chamber.
8. When the electrophoresis is completed, we will remove the gel and place into a tupperware bowl. We add 4ul of ethidium bromide, and add just enough TBE liquid to cover the top of the gel.
9. With the gel covered then we place it onto the shaker and shake for 15 minutes. Once complete we’ll rinse with ddh20 and cover with ddh20. Then shake again for 15 minutes. This step is done twice.
10. When the shaking is complete, then rinse the gel and place on imaging for measuring and visual.
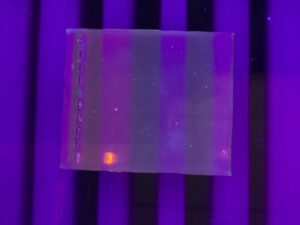
Results: The electrophoresis was unsuccessful.
Conclusion and Next Steps: Redo the gel electrophoresis procedure and follow protocol carefully, and closely to observe for any errors.
Gel Electrophoresis procedure Round 2
Date: 11/14/2023
Purpose: To redo and correct any errors from the first procedure.
Notes: The same procedure was followed with greater accuracy and detail to ensure no steps were missed and all mathematical problems were accurate.
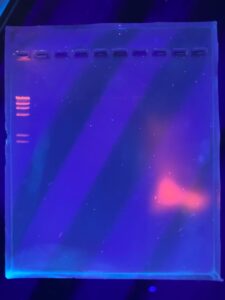
Results: The results showed that there wasn’t any DNA loaded within the gel.
Conclusion and Next Steps: We will redo the gel electrophoresis and adjust the DNA concentration in order to achieve a stained plaque.
Title: Gel Electrophoresis (round 3)
Date: 11/15/2023
Redo:
Sample: Round 3 of Gel Electrophoresis
Purpose: To get visible DNA fragments that can be seen via gel electrophoresis and separate DNA fragments into bands.
Notes: We needed a higher concentration of DNA in order to visualize the DNA on the gel. We kept the procedure the same as the previous two gel procedures, however this time we adjusted the measurements within the restriction enzymes. Instead of filling to the 25ul per the protocol, we adjusted to fill the microcentrifuge tubes to 20 ul instead. This will increase the DNA concentration in the microcentrifuge tubes. For the ladder we added 19ul of ddH20 and 1ul of Lambda DNA. In the uncut DNA tube, we added 18.8ul of ddH20 and 1.2ul of DNA. For the remaining 5 microcentrifuge tubes we added this formula, 1.2of DNA, 2.5 of TBE buffer, 1ul of Restriction enzyme and 15.3 ul of ddH20. We followed the rest of the gel electrophoresis as the SEAphages protocol.
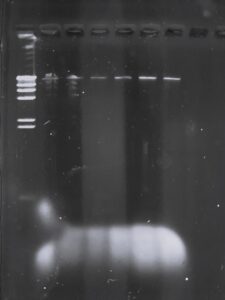
Results: This round of gel electrophoresis was successful and we were able to cut the DNA.
Conclusions and Next steps: