Discovery of IndyLu
IndyLu Information
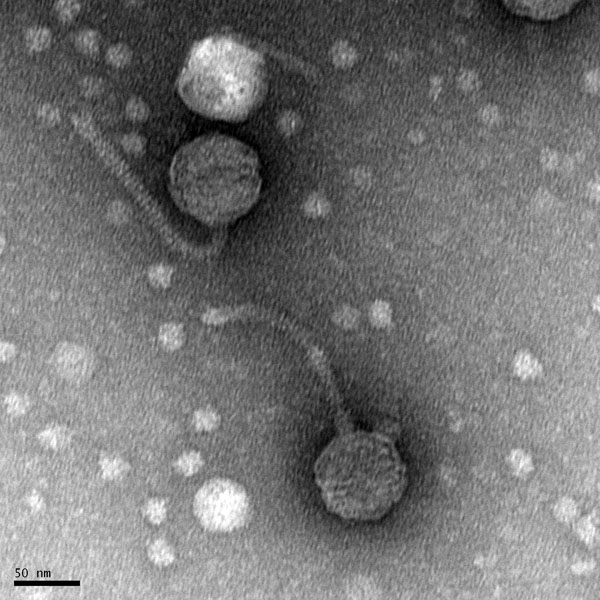
Morphology: Siphoviridae
Sample Collection
| Collector Name |
Ashley Suris | Ashley Suris | Ashley Suris | Ashley Suris | Ashley Suris | Raylon Huckaby |
| Sample No. | 1(AS) | 2(AS) | 3(AS) | 4(AS) | 5(AS) | 1(RH) |
| Date of Collection | 8/24/2020 | 8/24/2020 | 8/26/2020 | 8/26/2020 | 8/31/2020 | 8/24/2020 |
| Sample Type | Soil | Liquid | Liquid | Soil | Soil | Soil |
| General Location | Home Ant Hill | Buffalo Creek | Buffalo Creek | Home Ant Hill | 67 Brazos Bridge | Horse barn |
| Location Description | Ant mound near foundation – backyard | Old Foamy Bridge over Buffalo Creek – Cleburne, TX | Old Foamy Bridge over Buffalo Creek – Cleburne, TX | Ant mound near foundation – front yard | Grassy area off North side of Brazos access road off Hwy 67 near Glen Rose | Near a horse barn in a dry environment |
| GPS Coordinates | 32.309997, -97.410511 |
32.304379, -97.396358 |
32.304379, -97.396358 | 32.309997, -97.410511 | 32.2714258, -97.6669912 | 32.248390, -98.209732 |
| Sample Depth | Surface | 3.8 cm | 3.8cm | Surface | 2.5cm | <1 inch |
| Ambient Temperature | 35°C | 35°C | 38°C | 38°C | 27°C | 33.88°C |
| Collector Name |
Jaime Merrill | Jaime Merrill | Jaime Merrill | Jaime Merrill | Jaime Merrill |
| Sample No. | 1(JM) | 2(JM) | 3(JM) | 4(JM) | 5(JM) |
| Date of Collection | 8/24/2020 | 8/23/2020 | 8/25/2020 | 8/25/2020 | 8/25/2020 |
| Sample Type | Soil | Liquid | Soil | Soil | Liquid |
| General Location | Ant hill with cow droppings | Large pond | Horse stall | Cabernet Sauvignon with Ants | Bull Lion Ranch & Vinyard |
| Location Description | Ant mound under cow droppings | Large pond in Morgan TX | Horse stall | Cabernaet Sauvignon grape vines roots with ants | Wine waste |
| GPS Coordinates | 32.2201, -98.1420 |
32.060500, -97.595600 |
32.304379, -97.396358 | 32.1028433, 97.9911100 | 32.1037663, -97.9930938 |
| Sample Depth | 4 cm | 10 cm | 8 cm | 4 cm | surface |
| Ambient Temperature | 30°C | 35°C | 35°C | 30°C | 34°C |
Isolation/Purification
/Indy
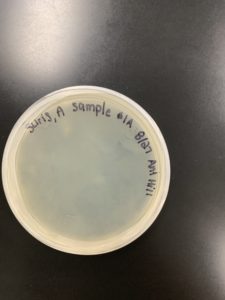
Title: Direct Isolation
Date: 08/26/2020 Redo: No Sample: AS1
Purpose: This procedure is to extract phages from the environmental soil sample and infect the host bacteria using a plaque assay.
Notes:
- Work station was cleaned with CiDecon and Ethyl Alcohol and flame was lit to ensure an aseptic environment
- PYCa was added to the 15mL conical tube containing the soils sample until ~2mL of fluid was above the solid sample
- Sample tube was added to the shaking incubator for one hour
- Sample tube was allowed to sit for ~15 minutes
- Bacterial colony in separate tube was broken up via figure 8 swirl and dragging over sink grate
- Liquid was pipetted off the top of sample tube and added to a syringe with a previously attached .22um filter
- Sample was pushed through the filter into a microcentrifuge tube
- 500uL of the sample was pipetted into a bacterial tube using a 100uL pipette repeated 5x, changing tip each time
- Inoculated ample was allowed to sit for approximately 10 minutes to allow phage attachment
- 3mL top agar was added to the inoculated sample using a pipette and immediately redrawn into the same pipette tube and added to pre-labeled Plate 1*
- *NOTE: not all sample was re-drawn into pipette
- Plate 1 was allowed to sit for 20min to allow agar to solidify
- Plate was microfilmed and added to the incubator at 10:40am
Results:
No growth
Conclusions and Next Steps:
There was no bacterial growth on this plate. This can be attributed to two errors: first, it is possible that too little or no sample made it to the plate when sample was left behind in the inoculated sample tube. Additionally, the bacteria may have starved as the plate was microfilmed prior to being added to the incubator. This sample will be redone, ensuring a) the complete sample is added to the plate and b) the plate is not microfilmed when added to the incubator.
Title: Direct Isolation
Date: 08/26/2020 Redo: No Sample: AS2
Purpose: This procedure is to extract phages from the environmental liquid sample and infect the host bacteria using a plaque assay.
Notes:
- Work station was cleaned with CiDecon and Ethyl Alcohol and flame was lit to ensure an aseptic environment
- <2mL of liquid sample was pipetted off the top of the 15mL conical tube and added to a syringe with a previously attached .22um filter
- Sample was pushed through the filter into a microcentrifuge tube
- 500uL of the sample was pipetted into a bacterial tube using a 100uL pipette repeated 5x, changing tip each time
- Inoculated sample was allowed to sit for approximately 5 min
- Inoculated sample was disturbed (swirled in figure 8, scraped over sink drain) to break apart the bacterial colony as this was not previously done
- Inoculated sample was allowed to sit for approximately 7 additional minutes to allow phage attachment
- 3mL top agar was added to the inoculated sample using a pipette and immediately redrawn into the same pipette tube and added to pre-labeled Plate 2
- Plate 2 was allowed to sit for 20min to allow agar to solidify
- Plate was microfilmed and added to the incubator at 10:40am
Results:
Good bacterial growth, however no plaque was present.

Conclusions and Next Steps
Despite microfilming initially, the film was removed in sufficient time to allow bacterial growth. No plaque was visible. Additional new samples are needed. It is also possible that the disturbance of the inoculated sample to break up the bacterial colony prevented good phage attachment to the bacteria. In future isolation attempts, it will be ensured that the colony is broken up prior to the addition of the filtered sample. Sample 2 will be abandoned
____________________________________________________________________________________________
Title: Direct Isolation
Date: 08/27/2020 Redo: Yes Sample: AS1 (a)
Purpose: This procedure is to extract phages from the environmental soil sample 1 and infect the host bacteria using a plaque assay. This is a redo of Sample AS1 in order to eliminate the parafilming of the original tray as the cause of no bacterial growth.
Notes:
- Work station was cleaned with CiDecon and Ethyl Alcohol and flame was lit to ensure an aseptic environment
- The microcentrifuge tube containing Sample 1 was removed from the refrigerator
- Bacterial colony was broken up using a figure 8 swirl and scraping the tube over the sink grate
- 500uL of the sample was pipetted into a bacterial tube using a 100uL pipette repeated 5x, changing tip each time
- Inoculated ample was allowed to sit for approximately 10 minutes to allow phage attachment
- 3mL top agar was added to the inoculated sample using a pipette and immediately redrawn into the same pipette tube and added to pre-labeled Plate 1A
- Plate was allowed to rest to be added to the incubator simultaneously with plates 3 and 4 at ~5:37pm
Results:
No bacterial growth for the second time. Plate was found in incubator with microfilm.
Conclusions and Next Steps:
While the microfilm on the plate remains a mystery, there was no bacterial growth on the plate. This could be due to the microfilming on the plate. As plate 1 and plate 2 had microfilm removed at the same time and growth was present on plate 2, but absent on plates 1 and 1a, it is possible that previous lawn treatments trace materials may have killed bacteria that thrive on PYCa material from the samples. Sample 1 will be abandoned.
_____________________________________________________________________________________________
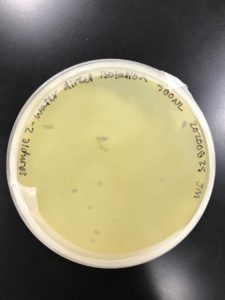
Title: Direct Isolation
Date: 08/27/2020 Redo: No Sample: AS3
Purpose: This procedure is to extract phages from the liquid environmental sample and infect the host bacteria using a plaque assay.
Notes:
- Liquid was pipetted from the sample tube and added to a syringe with a previously attached .22um filter
- Sample was pushed through the filter into a microcentrifuge tube
- Bacterial colony in separate tube was broken up via figure 8 swirl and dragging over sink grate
- 500uL of the sample was pipetted into a bacterial tube using a 100uL pipette repeated 5x, changing tip each time. Additions 1&2 were done without changing the tip
- Inoculated ample was allowed to sit for approximately 10 minutes to allow phage attachment
- 3mL PYCa was added to the inoculated sample using a pipette and immediately redrawn into the same pipette tube and added to pre-labeled Plate 3
- Plate 3 was allowed to sit for 20min to allow agar to solidify, which did not happen, as agar was not added
- A new bacterial tube and new plate was obtained for a second attempt
- Plate was brought to room temperature by adding it to the incubator for a short period
- Bacterial colony was broken up using a figure 8 swirl and scraping the tube over the sink grate
- 500uL of the sample was pipetted from the labeled microcentrifuge tube into a bacterial tube using a 100uL pipette repeated 5x, changing tip each time
- Inoculated ample was allowed to sit for approximately 10 minutes to allow phage attachment
- 3mL top agar was added to the inoculated sample using a pipette and immediately redrawn into the same pipette tube and added to pre-labeled Plate 3
- Plate was allowed to rest to be added to the incubator simultaneously with plates 1A and 4 at ~5:37pm
Results:
Good bacterial growth was present, along with agar bubbles, however no phage growth was visible.

Conclusions and Next Steps:
Improper agar handling may have contributed to lack of success. The agar was warmed in the incubator and bubbles/melt may have created a poor surface for the inoculated sample to replicate. The sample was also collected and refrigerated the day prior to plating and carried in a backpack with an ice pack for the early part of the day. It is possible that phage did not survive this handling prior to plating. Contamination in the bacterial sample was also identified. Plate and sample will not be further used.
___________________________________________________________________
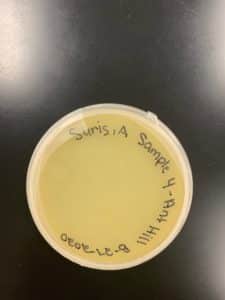
Title: Direct Isolation
Date: 08/27/2020 Redo: No Sample: AS4
Purpose: This procedure is to extract phages from the environmental soil sample and infect the host bacteria using a plaque assay.
Notes:
- Work station was cleaned with CiDecon and Ethyl Alcohol and flame was lit to ensure an aseptic environment
- PYCa was added to the 15mL conical tube containing the soils sample until ~2mL of fluid was above the solid sample
- Sample tube was added to the shaking incubator for one hour
- Sample tube was allowed to sit for ~15 minutes
- Bacterial colony in separate tube was broken up via figure 8 swirl and dragging over sink grate
- Liquid was pipetted off the top of sample tube and added to a syringe with a previously attached .22um filter
- Sample was pushed through the filter into a microcentrifuge tube
- 500uL of the sample was pipetted into a bacterial tube using a 100uL pipette repeated 5x, changing tip each time
- 3mL PYCa was added to the inoculated sample using a pipette and immediately redrawn into the same pipette tube and added to pre-labeled Plate 4
- Plate 4 was allowed to sit for 20min to allow agar to solidify, which did not happen, as agar was not added
- A new bacterial tube and new plate was obtained for a second attempt
- Plate was brought to room temperature by adding it to the incubator for a short period
- Bacterial colony was broken up using a figure 8 swirl and scraping the tube over the sink grate
- 500uL of the sample was pipetted from the labeled microcentrifuge tube into a bacterial tube using a 100uL pipette repeated 5x, changing tip each time
- Inoculated ample was allowed to sit for approximately 10 minutes to allow phage attachment
- 3mL top agar was added to the inoculated sample using a pipette and immediately redrawn into the same pipette tube and added to pre-labeled Plate 3*
- Plate was allowed to rest to be added to the incubator at 23°-30°C simultaneously with plates 1A and 3 at ~5:37pm
Results:
Good bacterial growth was present, along with agar bubbles, however no phage growth was visible.
Conclusions and Next Steps:
Improper agar handling may have contributed to lack of success. The agar was warmed in the incubator and bubbles/melt may have created a poor surface for the inoculated sample to replicate. The sample was also collected and refrigerated the day prior to plating and carried in a backpack with an ice pack for the early part of the day. It is possible that phage did not survive this handling prior to plating. Contamination in the bacterial sample was also identified. Plate and sample will not be further used.
____________________________________________________________________
Title: Direct Isolation
Date: 08/31/2020 Redo: No Sample: AS5
Purpose: This procedure is to extract phages from the environmental soil sample and infect the host bacteria using a plaque assay. This is a new sample, but care will be take to avoid microfilming and agar mishandling.
Notes:
- Work station was cleaned with CiDecon and Ethyl Alcohol and flame was lit to ensure an aseptic environment
- 5mL of soil sample was transfered via pouring from the clean reusable water bottle used for collection into a 15mL conical tube.
- PYCa liquid media was added to the 15mL conical tube containing the soils sample, using a pipette to the 11mL mark, allowing 7mL of PYCa liquid media above the solid sample
- *Note: two separate solutions of PYCa was used, as one ran out. Pipette tip was changed between samples
- 15mL conical tube was closed and shaken to ensure complete distribution of PYCa and wetting of soil sample
- Sample was added to the shaking incubator at 9:49am
- Sample was removed from the shaking incubator at 4:15pm
- A syringe was used to directly siphon 1.3mL of the supernatant fluid from the sample
- The 1.3mL sample was then filtered through a 22 micron filter into a microcentrifuge tube
- Filtered sample was allowed to sit while a previously refrigerated plate was allowed to warm to room temperature, unassisted
- Bacterial colony was broken up using a figure 8 swirl and scraping the tube over the sink grate
- 500uL of the sample was pipetted from the labeled microcentrifuge tube into a bacterial tube using a 100uL pipette repeated 5x, changing tip each time
- Inoculated ample was allowed to sit for approximately 10 minutes to allow phage attachment
- 3mL top agar was added to the inoculated sample using a pipette and immediately redrawn into the same pipette tube and added to pre-labeled Plate 5
- Plate was allowed to rest until top agar solidified and then added to the incubator at 23°-30°C overnight
Results:
No plaque was present

Conclusions and Next Steps:
No plaque was present. Potentially, there was no phage in the sample that could infect m. foliorum. Sample will not be used for further isolation or purification and a plaque sample will be adopted from a fellow student’s successful plate.
______________________________________________________________________________________________
Title: Direct Isolation
Date: 08/25/2020 Redo: No Sample: JM1
Purpose: This procedure is to extract phages from the environmental soil sample 1 and infect the host bacteria using a plaque assay.
Notes:
- Work station was cleaned with CiDecon and Ethyl Alcohol and flame was lit to ensure an aseptic environment
- Using a pipette, 5mL of PYCa liquid media was added to the 15mL conical tube containing ~7mL of soils sample
- 15mL conical tube was closed and shaken to ensure complete distribution of PYCa and wetting of soil sample
- Sample was added to the shaking incubator for 1.5 hours
- A pipette was used to remove supernatent liquid, which was transferred into a syringe fitted with a 22um filter
- The sample was then filtered through the 22um filter into a microcentrifuge tube
- 500uL of the sample was pipetted into 250uL of bacterial sample using a 100uL pipette repeated 5x, changing tip each time
- Inoculated ample was allowed to sit for approximately 10 minutes to allow phage attachment
- 3mL top agar was added to the inoculated sample using a pipette and immediately redrawn into the same pipette tube and added to pre-labeled Plate 1
- Plate was allowed to rest until top agar solidified and then to added to the incubator at 23°-30°C overnight
Results:
Good bacterial growth, however no plaque was present.

Conclusions and Next Steps:
No plaque was present. Isolation will be attempted with another sample.
___________________________________________________________________________________________
Title: Direct Isolation
Date: 08/25/2020 Redo: No Sample: JM2
Purpose: This procedure is to extract phages from the liquid environmental sample and infect the host bacteria using a plaque assay.
Notes:
- Work station was cleaned with CiDecon and Ethyl Alcohol and flame was lit to ensure an aseptic environment
- A pipette was used to collect a small amount of sample from the 15mL conical tube, which was transferred into a syringe fitted with a 22um filter
- The sample was then filtered through the 22um filter into a microcentrifuge tube
- 500uL of the sample was pipetted into 250uL of bacterial sample using a 100uL pipette repeated 5x, changing tip each time
- Inoculated ample was allowed to sit for approximately 10 minutes to allow phage attachment
- 3mL top agar was added to the inoculated sample using a pipette and immediately redrawn into the same pipette tube and added to pre-labeled Plate 2
- Plate was allowed to rest until top agar solidified and then to added to the incubator at 23°-30°C overnight
Results:
No plaque was present.
Conclusions and Next Steps:
No plaque was present. Isolation will be attempted with another sample.
___________________________________________________________________________
Title: Direct Isolation
Date: 08/26/2020 Redo: No Sample: JM3
Purpose: This procedure is to extract phages from the environmental sample and infect the host bacteria using a plaque assay.
Notes:
- Work station was cleaned with CiDecon and Ethyl Alcohol and flame was lit to ensure an aseptic environment
- Using a pipette, 5mL of PYCa liquid media was added to the 15mL conical tube containing the soil sample
- 15mL conical tube was closed and shaken to ensure complete distribution of PYCa and wetting of soil sample
- Sample was added to the shaking incubator for 1.5 hours
- A pipette was used to remove supernatant liquid, which was transferred into a syringe fitted with a 22um filter
- The sample was then filtered through the 22um filter into a microcentrifuge tube
- 500uL of the sample was pipetted into 250uL of bacterial sample using a 100uL pipette repeated 5x, changing tip each time
- Inoculated ample was allowed to sit for approximately 10 minutes to allow phage attachment
- 3mL top agar was added to the inoculated sample using a pipette and immediately redrawn into the same pipette tube and added to pre-labeled Plate 3
- Plate was allowed to rest until top agar solidified and then to added to the incubator at 23°-30°C overnight
Results:
No plaque was present
Conclusions and Next Steps:
No plaque was present. Isolation will be attempted with another sample.
_______________________________________________________________________________________________
Title: Direct Isolation
Date: 08/26/2020 Redo: No Sample: JM4
Purpose: This procedure is to extract phages from the environmental soil sample and infect the host bacteria using a plaque assay.
Notes:
- Work station was cleaned with CiDecon and Ethyl Alcohol and flame was lit to ensure an aseptic environment
- Using a pipette, 5mL of PYCa liquid media was added to the 15mL conical tube containing the soil sample
- 15mL conical tube was closed and shaken to ensure complete distribution of PYCa and wetting of soil sample
- Sample was added to the shaking incubator for 1.5 hours
- A pipette was used to remove supernatent liquid, which was transferred into a syringe fitted with a 22um filter
- The sample was then filtered through the 22um filter into a microcentrifuge tube
- 500uL of the sample was pipetted into 250uL of bacterial sample using a 100uL pipette repeated 5x, changing tip each time
- Inoculated ample was allowed to sit for approximately 10 minutes to allow phage attachment
- 3mL top agar was added to the inoculated sample using a pipette and immediately redrawn into the same pipette tube and added to pre-labeled Plate 4
- Plate was allowed to rest until top agar solidified and then to added to the incubator at 23°-30°C overnight
Results:
No plaque was present.
Conclusions and Next Steps:
No plaque was present. Isolation will be attempted with another sample.
___________________________________________________________________________
Title: Direct Isolation
Date: 08/26/2020 Redo: No Sample: JM5
Purpose: This procedure is to extract phages from the wine waste sample and infect the host bacteria using a plaque assay.
Notes:
- Work station was cleaned with CiDecon and Ethyl Alcohol and flame was lit to ensure an aseptic environment
- A pipette was used to collect a small amount of sample from the 15mL conical tube, which was transferred into a syringe fitted with a 22um filter
- The sample was then filtered through the 22um filter into a microcentrifuge tube
- 500uL of the sample was pipetted into 250uL of bacterial sample using a 100uL pipette repeated 5x, changing tip each time
- Inoculated ample was allowed to sit for approximately 10 minutes to allow phage attachment
- 3mL top agar was added to the inoculated sample using a pipette and immediately redrawn into the same pipette tube and added to pre-labeled Plate 2
- Plate was allowed to rest until top agar solidified and then to added to the incubator.
Results:
No plaque was present.
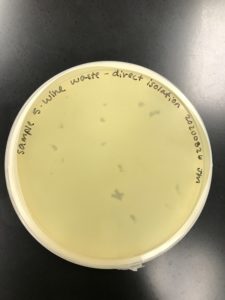
Conclusions and Next Steps:
No plaque was present. A plaque will be adopted from another group for further isolation and purification.
__________________________________________________________________________
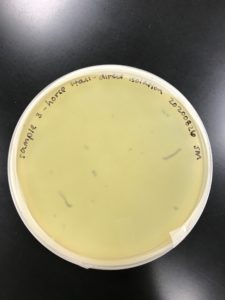
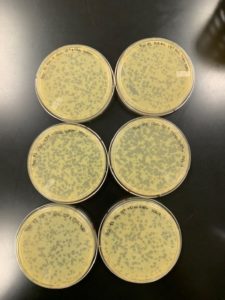
The Title: Direct Isolation
Date: 08/24/2020 Redo: No Sample: 1(RH)
Purpose: This procedure is to extract phages from the environmental sample and infect the host bacteria using a plaque assay. This was copied from the notes on Tank18, the sample that was adopted for further study.
Notes:
1) For the direct isolation we used sample 1 (Horse barn). The sample was placed in 15 mL conical tube that was about halfway full.
2) Liquid media was added to the soil sample until the sample was submerged in 2-3 mL of media. Invert the tube several times making sure that the sample is mixed thoroughly.
3) Insert the sample into the shaking incubator for 1-2 hours at 250 rpm. Allow the sample to sit and for the soil to sink to the bottom.
3.1) Although there was a little bit of liquid on top of the soil, there was not 2 mL worth.
3.2) More media was added and the sample was placed back in the incubator for 25 minutes
3.3) Once the sample was removed from the incubator the liquid was definite on the top and the soil had sunk to the bottom allowing procedure to the next part.
4) Open the .22 um syringe filter and attach it to the syringe, then place it back into the package.
5) Remove the plunger from the syringe allowing for the 2 mL of liquid. Remove ~2 mL using the serological pipette and aspirating into the the 5 mL syringe.
6) Dispense the purified liquid into the microcentrifuge tube. Immediately cap the tube keeping it sterile.
7) Insert 500 microliters from the microcentrifuge tube into the 250 microliters of host bacteria. Let them sit untouched for 5-10 minutes.
8) Obtained top agar from the 55°C bath and then prepared the room temperature agar plates to be plated.
9) Using a serological pipette, 3 ml of molten top agar was dispensed into the tube that consisted of the inoculated host.
10) Then the mixture was then sucked back up into the serological pipette and then dispensed onto the agar plate. (Avoid making or withdrawing bubbles)
11) Gently tilt the plates in many different directions making sure the entire bottom of the plates is covered with top agar.
12) The plates sat out between 15-20 minutes, and were then flipped upside down and inserted into the incubator.
13) Incubate the plates for 24-48 hours. The plate incubated for approximately 32 hours.
14) The plates were removed from the incubator to find that plaques were on the plate.
15) The plaques were then circled and labeled to identify the plaque(s) that were going to be used for the plaque assay and serial dilutions.
Results:
The results were positive. Plaques formed onto the plate.

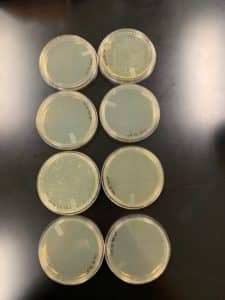
Image of the plaques sample 1
Conclusions and Next Steps:
The next step is to do a plaque assay and serial dilution on the plaque that was chosen to be used. The plaque that was chosen to be used was the plaque labeled with the number 1.
___________________________________________________________________________________________
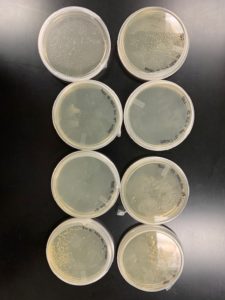
Title: Picking a Plaque & Spot Checking
Date: 09/03/2020 Redo: No Sample: A
Purpose: This procedure is to isolate a plaque and perform a spot check plating of the sample
Notes:
- Work station was cleaned with CiDecon and Ethyl Alcohol and flame was lit to ensure an aseptic environment
- Plaque A was selected and labeled on the plate
- Plaque A was picked by inserting a clean tip of a micropipette, held perpendicular to the plate, into the plaque avoiding the surrounding bacteria and ensuring not to poke too deep into the bottom agar
- The sample was added to a microcentrifuge tube containing 100uL of buffer solution by dipping the tip into the buffer and tapping the tip to the side of the tube. The tube was then vortexed.
- While the initial sample sat, 8 additional microcentrifuge tubes were collected and labeled 10e-1 through 10e-8. 90uL of buffer solution was added to each tube with a pipette, changing the tip between each tube
- 10uL from the original sample tube was collected with a micropipette and added to the tube labeled 10e-1. Sample tube was vortexed.
- 10uL of sample 10e-1 was collected and added to sample 10e-2. Sample tube was vortexed.
- This serial dilution process was repeated 6 more times until a 10e-8 dilution was obtained.
- A spot check plate was labeled, with a region for each of the 9 microcentrifuge plates and one for buffer
- 3mL of top agar was added to 250uL of a bacteria sample using a pipette and immediately recollected into the pipette and added to a pre-labeled plate
- The plate was allowed to sit for 15 min to allow for top agar solidification
- Using a micropipette, 3uL of each sample from the microcentrifuge tubes was dropped into the properly labeled region on the plate
- Plate was allowed to sit for an additional 15 minutes and added to the incubator to sit overnight
Results:
No plaque was present.
Conclusions and Next Steps:
Sample A will be abandoned. It is likely the plaque wasn’t properly picked into the original microcentrifuge sample, given that no plaques were present in any of the samples in the spot check
___________________________________________________________________________________________
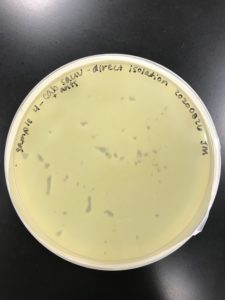
Title: Picking a Plaque & Spot Checking
Date: 09/02/2020 Redo: No Sample: B
Purpose: This procedure is to isolate a plaque and perform a spot check plating of the sample
Notes:
- Work station was cleaned with CiDecon and Ethyl Alcohol and flame was lit to ensure an aseptic environment
- Plaque A was selected and labeled on the plate
- Plaque A was picked by inserting a clean tip of a micropipette, held perpendicular to the plate, into the plaque avoiding the surrounding bacteria and ensuring not to poke too deep into the bottom agar
- The sample was added to a microcentrifuge tube containing 100uL of buffer solution by dipping the tip into the buffer and tapping the tip to the side of the tube. The tube was then vortexed.
- While the initial sample sat, 8 additional microcentrifuge tubes were collected and labeled 10e-1 through 10e-8. 90uL of buffer solution was added to each tube with a pipette, changing the tip between each tube
- 10uL from the original sample tube was collected with a micropipette and added to the tube labeled 10e-1. Sample tube was vortexed.
- 10uL of sample 10e-1 was collected and added to sample 10e-2. Sample tube was vortexed.
- This serial dilution process was repeated 6 more times until a 10e-8 dilution was obtained.
- A spot check plate was labeled, with a region for each of the 9 microcentrifuge plates and one for buffer
- 3mL of top agar was added to 250uL of a bacteria sample using a pipette and immediately recollected into the pipette and added to a pre-labeled plate
- The plate was allowed to sit for 15 min to allow for top agar solidification
- Using a micropipette, 3uL of each sample from the microcentrifuge tubes was dropped into the properly labeled region on the plate
- Plate was allowed to sit for an additional 15 minutes and added to the incubator to sit overnight
Results:
Plaques were visible in the 10e-1 region of the plate
Conclusions and Next Steps:
The microcentrifuge tube labeled Sample B 10e-1 will be serial diluted.
_______________________________________________________________________________________________
Title: First Serial Dilution of Sample B
Date: 09/03/2020 Redo: No Sample: B
Purpose: This procedure is to serially dilute sample B to obtain a countable number of plaques
Notes:
- Work station was cleaned with CiDecon and Ethyl Alcohol and flame was lit to ensure an aseptic environment
- 8 plates and 8 microcentrifuge tubes were gathered and labeled 10e-1 through 10e-8
- 8 250uL bacterial samples were collected and staged
- The microfuge tube labeled Sample B 10e-1 was collected from the refrigerator
- 90uL of buffer solution was added to the newly labeled tubes with a pipette, changing the tip between each tube
- 10uL from the original sample B tube was collected with a micropipette and added to the tube labeled 10e-1. Sample tube was vortexed.
- 10uL of sample 10e-1 was collected and added to sample 10e-2. Sample tube was vortexed.
- This serial dilution process was repeated 6 more times until a 10e-8 dilution was obtained.
- 10uL from each serial dilution was added to a separate labeled bacterial sample with a pipette, changing the tip between samples
- Samples were left undisturbed for 5 minutes to allow for attachment
- 3mL of top agar was added to the first 250uL of a bacteria sample using a pipette and immediately recollected into the pipette and added to a pre-labeled plate
- The plate was allowed to sit for 20 min to allow for top agar solidification
- The process was repeated for each inoculated sample, with the sample being added to the respectively labeled plate
- Plates were added to the incubator at 23°C-30°C and left for ~24 hours
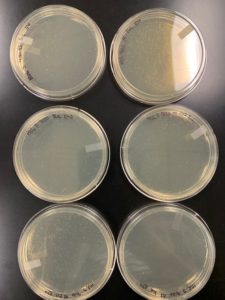
Results:

Conclusions and Next Steps:
Serial dilutions may have degraded or weren’t fully concentrated enough to form plaques on a full plate. A second attempt will be made at serial dilution.
____________________________________________________________________
Title: Picking a Plaque and Second Serial Dilution
Date: 09/03/2020 Redo: Yes Sample: B – renamed Crickett; renamed IndyLu
Purpose: This procedure is to extract phages from the environmental soil sample and infect the host bacteria using a plaque assay.
Notes:
- Work station was cleaned with CiDecon and Ethyl Alcohol and flame was lit to ensure an aseptic environment
- PYCa was added to the 15mL conical tube containing the soils sample until ~2mL of fluid was above the solid sample
- Sample tube was added to the shaking incubator for one hour
- Sample tube was allowed to sit for ~15 minutes
- Bacterial colony in separate tube was broken up via figure 8 swirl and dragging over sink grate
- Liquid was pipetted off the top of sample tube and added to a syringe with a previously attached .22um filter
- Sample was pushed through the filter into a microcentrifuge tube
- 500uL of the sample was pipetted into a bacterial tube using a 100uL pipette repeated 5x, changing tip each time
- Inoculated ample was allowed to sit for approximately 10 minutes to allow phage attachment
- 3mL top agar was added to the inoculated sample using a pipette and immediately redrawn into the same pipette tube and added to pre-labeled Plate 1*
- *NOTE: not all sample was re-drawn into pipette
- Plate 1 was allowed to sit for 20min to allow agar to solidify
- Plates were added to the incubator at 23°C-30°C and left overnight
Results:
Good phage results were obtained

Conclusions and Next Steps:
Good phage growth was obtained. Next steps are a low volume lysate.
_______________________________________________________________________________________________
Title: Collection of Low Volume Lysate
Date: 09/03-04/2020 Redo: No Sample: Crickett/IndyLu
Purpose: This procedure is to extract phages from a webbed plate in order to collect a low volume lysate.
Notes:
- 09/03
- Work station was cleaned with CiDecon and Ethyl Alcohol and flame was lit to ensure an aseptic environment
- 8mL phage buffer was added to Crickett/IndyLu 10^-1 plate from previous plaque assay.
- *NOTE: This plate was NOT webbed. Using this to collect lysate because it contains the most plaques.
- Allowed phage buffer to sit on plate overnight in 4*C fridge. Sat for ~13 hours.
- 09/04
- Work station was cleaned with CiDecon and Ethyl Alcohol and flame was lit to ensure an aseptic environment
- Used sterile syringe to collect phage buffer from plate
- Pushed buffer through sterile .22um filter into 15mL conical tube
Results:
- A total of 4.75 mL low volume lysate was collected
Conclusions and Next Steps:
- I believe the titer of this lysate is very low since it was collect from a non-webbed plate. Next step is to run a plaque assay to calculate the titer of the LVL.
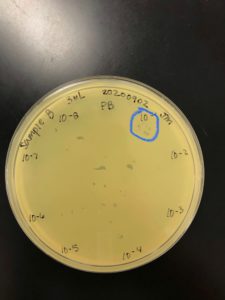
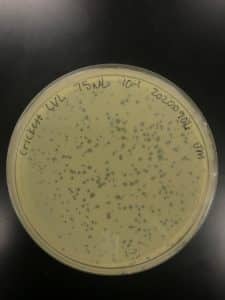
Title: Serial Dilutions/Full Plate Assay
Date: 09/05/2020 Redo: No Sample: Crickett/IndyLu
Purpose: This procedure is to determine the titer of the LVL.
Notes:
- Work station was cleaned with CiDecon and Ethyl Alcohol and flame was lit to ensure an aseptic environment
- 8 microcentrifuge tubes were labeled from 10^-1 to 10^-8 and 90uL of phage buffer was added to each tube
- 10uL LVL added to tube 10^-1 and vortexed
- 10uL 10^-1 added to tube 10^-2 and vortexed
- 10uL 10^-2 added to tube 10^-3 and vortexed, and so on until reaching 10^-8
- 8 agar plates and 8 tubes of bacteria obtained and labeled accordingly
- 10uL of each serial dilution were added to their respective bacterial culture and allowed to sit 10 minutes for attachment
- After attachment, 3mL top agar was pipetted into each culture tube, aspirated back up, plated onto its respective agar plate, and allowed 20 minutes to solidify
- Plates left in 23°C-30°C incubator overnight
Results:
Conclusions and Next Steps:
Titer is 7.0×10^-4. Pretty low. Going to run a hail mary and plate the remaining 75uL of 10^-1 to try for a “high volume lysate”
Amplification
_
Title: Creation of Webbed Plates
Date: 09/06/2020 Redo: No Sample: Crickett/IndyLu 10^-1
Purpose: This procedure is to create webbed plates for high volume lysate collection.
Notes:
- 1 plate and 1 250uL bacterial tube was gathered and labeled for the creation of webbed plates
- Sample Crickett/IndyLu 10^-1 was removed from the fridge
- Work area was cleaned and prepared for aseptic work
- 75uL of Sample Crickett/IndyLu 10^-1 was pipetted from the tube into the 250uL bacterial sample. This was the remainnder of the sample.
- The tube was allowed to sit for 10 minutes to allow phage attachment
- 3mL of PYCa top agar was pipetted into each a bacterial tube and the complete solution was immediately aspirated and added to a pre-labeled plate
- Plate was allowed to sit for 20 minutes to allow top agar to solidify
- Plate was incubated at 23°C-30°C overnight
Results:
Conclusions and Next Steps:
Our math indicated that we need ~300uL of 10^-1 to make a webbed plate, so it’s not surprising that this didn’t work. Going to collect and serial dilute to find titer.
_________________
Title: Collection of “High” Volume Lysate
Date: 09/07/2020 Redo: No Sample: Crickett/IndyLu
Purpose: This procedure is to extract phages from a webbed plate in order to collect a high volume lysate.
Notes:
- Work station was cleaned with CiDecon and Ethyl Alcohol and flame was lit to ensure an aseptic environment
- 8mL phage buffer was added to Crickett/IndyLu 10^-1 plate from 09/06.
- *NOTE: This plate was NOT webbed. Using this to collect lysate because it contains the most plaques.
- Allowed phage buffer to sit on plate for ~3 hours.
- Used sterile syringe to collect phage buffer from plate
- Pushed buffer through sterile .22um filter into 15mL conical tube
Results:
- A total of 4.5 mL high volume lysate was collected
Conclusions and Next Steps:
- I know the titer is going to be low. The next step is to serial dilute, plate, and calculate titer.
_______________________________________________________________________________________________
Title: Serial Dilutions/Full Plate Assay
Date: 09/07/2020 Redo: No Sample: Crickett/IndyLu
Purpose: This procedure is to determine the titer of the HVL.
Notes:
- Work station was cleaned with CiDecon and Ethyl Alcohol and flame was lit to ensure an aseptic environment
- 8 microcentrifuge tubes were labeled from 10^-1 to 10^-8 and 90uL of phage buffer was added to each tube
- 10uL LVL added to tube 10^-1 and vortexed
- 10uL 10^-1 added to tube 10^-2 and vortexed
- 10uL 10^-2 added to tube 10^-3 and vortexed, and so on until reaching 10^-8
- 8 agar plates and 8 tubes of bacteria obtained and labeled accordingly
- 10uL of each serial dilution were added to their respective bacterial culture and allowed to sit 10 minutes for attachment
- After attachment, 3mL top agar was pipetted into each culture tube, aspirated back up, plated onto its respective agar plate, and allowed 20 minutes to solidify
- Plates left in 23°C-30°C incubator overnight
Results:

Conclusions and Next Steps:
- Estimating that 15uL of 10^-1 will finally make a good webbed plate for HVL collection. Going to make 6 of these plates for lysate collection.
___________________________________________________________________________________________-
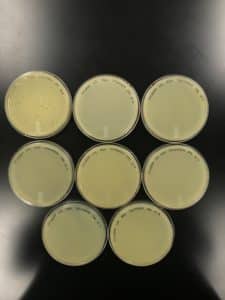
Title: Creation of Webbed Plates
Date: 09/08/2020 Redo: No Sample: Crickett/IndyLu 10^-1
Purpose: This procedure is to create webbed plates for high volume lysate collection.
Notes:
- 6 plates and 6 250uL bacterial tubes were gathered and labeled for the creation of webbed plates
- Sample Crickett/IndyLu 10^-1 was removed from the fridge
- Work area was cleaned and prepared for aseptic work
- 15uL of Sample Crickett/IndyLu 10^-1 was micropipetted from the containing tube into each 250uL bacterial sample. There was less than 15uL for plate 6.
- The tubes were allowed to sit for 10 minutes to allow phage attachment
- 3mL of PYcA top agar was pipetted into each a bacterial tube and the complete solution was immediately recaptured and added to a pre-labeled plate
- This process was repeated for each innoculated sample
- All plates were allowed to sit for 20 minutes to allow top agar to solidify
- Plates were added to the incubator at 23°C-30°C at 11:45am and left overnight
Results:
Conclusions and Next Steps:
5 webbed plates were created. As expected, there were insufficient plaques on plate 6. Next steps are lysate collection and serial dilution for titer calculation.
_______________________________________________________________________________________________
Title: High Volume Lysate Collection and Serial Dilution
Date: 09/09/2020 Redo: No
Purpose: This procedure is to collect high volume lysate from webbed plates and create a serial dilution for titer calculation.
Notes:
- Area was prepared for aseptic work and the 5 successfully webbed plates were removed from the refrigerator
- Each of the plates was flooded with 8ml of phage buffer and left to site for 2.5 hours
- After incubation, the lysate was aspirated from each plate and filtered through a 22uL filter into a labeled 15mL conical tube
- 31.5mL of lysate was collected in total
- 8 microcentrifuge tubes, (8) 250uL bacterial samples, and 8 plates were collected. Plates were allowed to reach room temperature
- Microcentrifuge tubes were labeled 10^1 to 10^-8 and 90uL of phage buffer was added to each using a micropipettor.
- 10uL of high volume lysate was added to the microcentrifuge tube with a micropipettor, tube was tightly closed and vortexted, and pipette tip was discarded
- 10uL of the sample from the 10^-1 microcentrifuge tube was added to the 10^-2 microcentrifuge tube and the serial dilution process was repeated as such until completing the 10^-8 dillution
- 10uL from each microcentrifuge tube was added to a respectively labeled 250uL bacterial sample with a micropipettor, changing tips between each sample
- Each tube was gently swirled after phage addition and allowed to sit for 10 minutes to allow phage attachment
- Using a pipette, 3mL of top agar was added to each sample, immediately aspirated and added to a plate respectively labeled with the dilution factor and Cricket HVL
- Plates were allowed to sit for 15 minutes to allow top agar solidification
- Plates were placed in the incubator at 23°C-30°C at ~1:15pm, left overnight, and retreived from the incubator on 9/10 for titer calculation
Results:

Conclusions and Next Steps:
An acceptable serial dilution series of plates was acheived and titer was calculated to be 2.5×10^8. This is too low of a titer for sufficient DNA extraction, so a second amplification attempt to increase the titer will be made.
_______________________________________________________________________________________________
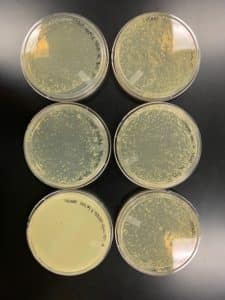
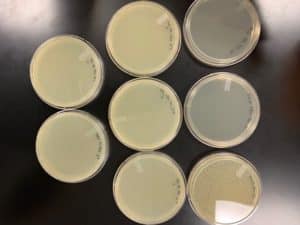
Title: Webbed Plate Creation from a Lysate of a Known Titer
Date: 09/14/2020 Redo: No
Purpose: This procedure is to create a new set of webbed plates for lysate collection in a way that increases lystate titer.
Notes:
- Area was prepared for aseptic work and serial dilution HVL was collected from the refrigerator
- 7 plates were brought to room temperature and labeled HVL1
- Volume of phage sample to be plates was calculated to be 2uL of a 10^-2 dillution
- 6 250 uL bacterial samples were collected and gently figure 8 swirled to breakup any bacterial colony. 4 of the tubes were inoculated with 2uL of the 10^-2uL dilltion using a micropipette. One tube was inoculated with 1.5uL and one tube was inoculated with 2.5uL of the same dilution, using a micropipette.
- Inoculated samples were left to sit for 10 minutes for phage attachment while the plates were labeled accordingly
- Each inoculated sample was plated with 3mL of top agar using a pipette.
- Plates were left to solidify for 15 minutes before being placed in the incubator at 23°C-30°C and left overnight
Results:
Webbed plates were not acheived
Conclusions and Next Steps:
The failure to grow webbed plates could be due to a number of factors, including improper pipetting techniques involving such a small sample size. Another attempt will be made to get webbed plates from this series using a higher volume of an increased dilution.
______________________________________________________________________________________
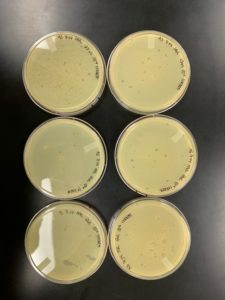
Title: Webbed Plate Creation from a Lysate of a Known Titer
Date: 09/16/2020 Redo: Yes
Purpose: This procedure is to create a new set of webbed plates for lysate collection in a way that increases lystate titer. This is a redo of the previous attempt on 9/14/2020 and uses an increased volume of a more diluted sample to acheive better results
Notes:
- Area was prepared for aseptic work and serial dilution HVL was collected from the refrigerator
- 7 plates were brought to room temperature and labeled HVL2
- Volume of phage sample to be plates was calculated to be 20uL of a 10^-3 dillution
- As only 90uL of each dilution existed, a second serial dilution was created up to the 10^-4 dilution in order to have enough volume of the 10^-3 dilution for 6 plates. These microcentrifuge tubes were labled HVL2
- (7) 250 uL bacterial samples were collected and gently figure 8 swirled to breakup any bacterial colony. Each tube was inoculated with 20uL of the 10^-3uL dilltion using a micropipette.
- Inoculated samples were left to sit for 10 minutes for phage attachment while the plates were labeled accordingly
- Each inoculated sample was plated with 3mL of top agar using a pipette.
- Plates were left to solidify for 15 minutes before being placed in the incubator at 23°C-30°C and left overnight
Results:
Insufficient webbed plates were acheived

Conclusions and Next Steps:
Two plates created acceptable webbed plates. The other four did not. This could be due to aging or deteriorated serial dilutions. One set was fresh and one set was several days old. We also experienced top agar issues as we were near the bottom of our jar. The top agar would begin to solidify before we were able to plate it. The successful creation of two webbed plates are indicative that the proper volume and dilution was plated.
______________________________________________________________________________________
Title: Webbed Plate Creation from a Lysate of a Known Titer
Date: 09/19/2020 Redo: Yes
Purpose:This procedure is to create a new set of webbed plates for lysate collection in a way that increases lystate titer. This is a redo of the previous attempt on 9/14/2020 and 9/16/2020 and will use a fresh serial dilution to alleviate sample degradation as a possible failure point
Notes:
- Two new serial dillutions down to 10^-4 were created on 9/17 in preparation for a new round of plates. These microcentrifuge tubes were labeled HVL3
- Area was prepared for aseptic work and serial dilution HVL3 was collected from the refrigerator
- 6 plates were brought to room temperature and labeled HVL3
- 50 uL bacterial samples were collected and gently figure 8 swirled to breakup any bacterial colony. Each tube was inoculated with 20uL of the 10^-3uL dilltion using a micropipette.
- Inoculated samples were left to sit for 10 minutes for phage attachment while the plates were labeled accordingly
- Each inoculated sample was plated with 3mL of top agar using a pipette.
- Plates were left to solidify for 15 minutes before being placed in the incubator at 23°C-30°C and left overnight
Results:
Webbed plates were not obtained. Plates

Conclusions and Next Steps:
Plates were left in the incubator to allow further growth. By 9/21, growth was still insufficient so another series will be plated.
_____________________________________________________________
Title: Webbed Plate Creation from a Lysate of a Known Titer
Date: 09/21/2020 Redo: Yes
Purpose:This procedure is to create a new set of webbed plates for lysate collection in a way that increases lystate titer. This is a redo of the previous attempts will use a more diluted sample combined in 1:1 ratio with buffer solution
Notes:
- Area was prepared for aseptic work and serial dilution HVL4 was collected from the refrigerator
- Two new serial dillutions down to 10^-4 were created in preparation for a new round of plates. These microcentrifuge tubes were labeled HVL4
- 6 plates were brought to room temperature and labeled HVL4
- 50 uL bacterial samples were collected and gently figure 8 swirled to breakup any bacterial colony. Each tube was inoculated with 10uL of the 10^-4uL dillution and 10uL of phage buffer using a micropipette.
- Inoculated samples were left to sit for 10 minutes for phage attachment while the plates were labeled accordingly
- Each inoculated sample was plated with 3mL of top agar using a pipette.
- Plates were left to solidify for 15 minutes before being placed in the incubator at 23°C-30°C and left overnight
Results:
Webbed plates were not obtained.
Conclusions and Next Steps:
Although enhanced growth was seen overnight, the plates were not sufficiently webbed. Another series will be attempted with the same amount of a lower dillution.
____________________________________________________________________
Title: Webbed Plate Creation from a Lysate of a Known Titer
Date: 09/23/2020 Redo: Yes
Purpose:This procedure is to create a new set of webbed plates for lysate collection in a way that increases lystate titer. This is a redo of the previous attempts will use a less diluted sample.
Notes:
- Area was prepared for aseptic work
- Two new serial dillutions down to 10^-3 were created in preparation for a new round of plates. These microcentrifuge tubes were labeled HVL4
- 8 plates were brought to room temperature and (erroneously) labeled HVL4
- 50 uL bacterial samples were collected and gently figure 8 swirled to breakup any bacterial colony. (4) tubes were inoculated with 10uL of 10^-1 dilution and (4) tubes were inoculated with 10uL of 10^-2 phage dilution
- Inoculated samples were left to sit for 10 minutes for phage attachment while the plates were labeled accordingly
- Each inoculated sample was plated with 3mL of top agar using a pipette.
- Plates were left to solidify for 15 minutes before being placed in the incubator at 23°C-30°C and left overnight
Results:
Plates were fully “eaten” in less than a day and a half.
Conclusions and Next Steps:
While phage viability was verified, the sample was too concentrated for a webbed plate in the amount of time the plates were allowed to incubate. Another attempt will be taken with the 10^-2 dillution in a smaller amount for less incubation.
____________________________________________________________________
Title: Webbed Plate Creation from a Lysate of a Known Titer
Date: 09/30/2020 Redo: Yes
Purpose:This procedure is to create a new set of webbed plates for lysate collection in a way that increases lystate titer. This is a redo of the previous attempts will use a smaller amount of the same dilution sample.
Notes:
- Area was prepared for aseptic work
- One new serial dillutions down to 10^-3 were created in preparation for a new round of plates. These microcentrifuge tubes were labeled HVL5
- 6 plates were brought to room temperature and (erroneously) labeled HVL5
- 50 uL bacterial samples were collected and gently figure 8 swirled to breakup any bacterial colony. Each tube was inoculated with 8uL of 10^-2
- Inoculated samples were left to sit for 10 minutes for phage attachment while the plates were labeled accordingly
- Each inoculated sample was plated with 3mL of top agar using a pipette.
- Plates were left to solidify for 15 minutes before being placed in the incubator at 23°C-30°C and left overnight
Results:
Sufficiently webbed plates were finally obtained.
Conclusions and Next Steps:
Plates will be flooded for lysate collection and then serially diluted for titer calculation.
______________________________________________________________________________
Title: Webbed Plate Creation from a Lysate of a Known Titer
Date: 10/01/2020 – 10/02/2020 Redo: No
Purpose: This procedure is to collect high volume lysate from the previously created webbed plates and produce a serial dillution in order to calculate titer.
Notes:
- Area was prepared for aseptic work
- 8mL of phage buffer was added to each of the (6) webbed plates on 10/01/2020.
- Plates were wrapped and put in the refrigerator to sit overnight.
- On 10/02/2020, the area was prepped for aseptic work and the plates were retreived from the refrigerator
- A syringe was used to collect the liquid lysates from one plate.
- The lysate was filtered through a 22um filter into a 15mL conical tube, labeled HVL2
- The process was repeated until no further lysate was left on the plate
- Lysates were removed from each of the (6) plates using this same procedure
- A total of 40mL of lysate was collected
- A serial dilution in 90uL of buffer was created from HVL2 Tube A down to 10^-8 in microcentrifuge tubes labeled HVL2 10/02/2020
- (6) 250uL bacterial samples were available, so (6) PYCa plates were retreived from the refrigerator and brought to room temperature.
- The bacterial samples were labled 2-6 and 10uL of the respectively inverse labeled serial dilution was was added to each bacterial sample using a micropipette
- The inoculated samples were left to sit for 10 min to allow for phage attachment.
- Plates were labeled HVL2 Serial 10^-2 through 10^-6.
- Using a serologial pipette, 3mL of top agar was added to the first bacterial sample, immediately aspirated, and added to the corespondingly labeled plate.
- This proces was repeated for each plate/inoculated sample
- The plates were added to the incubator and left for 2 days.
Results:
A succesful serial diluation was carried out and the titer calculated to be 2.7×10^8.

Conclusions and Next Steps:
Titer was still too low. One more attempt at webbed plates will be made and adjustments to lysate collection should help increase titer.
___________________________________________________________________________________________________________
Title: Webbed Plate Creation from a Lysate of a Known Titer
Date: 10/05/2020 – 10/6/2020 Redo: Yes
Purpose: This procedure is one final to collect high volume lysate from the previously created webbed plates and produce a serial dillution in order to calculate titer.
Notes:
- Area was prepared for aseptic work
- One new serial dilution, down to 10^-3 was created from the lysates collected on 10/2
- 6 plates were brought to room temperature
- (6)50 uL bacterial samples were collected and gently figure 8 swirled to breakup any bacterial colony. Each tube was inoculated with 8uL of 10^-2 concentrated phage
- Inoculated samples were left to sit for 10 minutes for phage attachment while the plates were labeled HVL6B
- Each inoculated sample was plated with 3mL of top agar using a pipette.
- Plates were left to solidify for 15 minutes before being placed in the incubator at 23°C-30°C and left overnight
- 10/6/2020 – Afternoon
- Area was prepared for septic work
- Highly webbed plates were removed from the incubator
- 8mL phage buffer of was added to each (3) webbed plates.
- Plates were left to sit indisburbed for 2 hours.
- In aseyptic conditions, a syringe was used to collect the liquid lysates from one plate and transferred to a previously “unbuffered” plate, in an attempt to carry over and increase titer. This was repeated for the other two pairs of plates
- The second set of plates was left to sit undisturbed for two hours
- In aseptic conditions, the lysate was collected in a syringe tube and filtered through a 22um filter into a 15mL conical tube, labeled HVL3
- The process was repeated until no further lysate was left on the plate
- A total of XmL of lysate was collected
- A serial dilution in 90uL of buffer was created from HVL3 down to 10^-8 in microcentrifuge tubes labeled HVL3 10/03/2020
- (8) 250uL bacterial samples were gathered, so (8) PYCa plates were retreived from the refrigerator and brought to room temperature.
- The bacterial samples were labled 1-8 and 10uL of the respectively inverse labeled serial dilution was was added to each bacterial sample using a micropipette
- The inoculated samples were left to sit for 10 min to allow for phage attachment.
- Plates were labeled HVL2 Serial 10^-1 through 10^-8
- Using a serologial pipette, 3mL of top agar was added to the first bacterial sample, immediately aspirated, and added to the corespondingly labeled plate.
- This proces was repeated for each plate/inoculated sample
- The plates were added to the incubator overnight.
Results:
A succesful serial diluation was carried out and the titer calculated to be 2.5×10^8.

Conclusions and Next Steps:
Titer was still too low, but to stay on track, I will be moving on to the next steps
Title: Webbed Plate Creation from a Lysate of a Known Titer
Date: 11/9/2020 – 11/11/2020 Redo: Yes
Purpose: This procedure is to collect high volume lysate from the previously created webbed plates and produce a serial dillution in order to calculate titer.
Notes:
- Area was prepared for aseptic work
- One new serial dilution, down to 10^-3 was created from the lysates collected on 10/2
- 8 plates were brought to room temperature
- (8)50 uL bacterial samples were collected and gently figure 8 swirled to breakup any bacterial colony. Each tube was inoculated with 8uL of 10^-2 concentrated phage
- Inoculated samples were left to sit for 10 minutes for phage attachment while the plates were labeled 11/9AS
- Each inoculated sample was plated with 3mL of top agar using a pipette.
- Plates were left to solidify for 15 minutes before being placed in the incubator at 23°C-30°C
- 11/11/2020
- Area was prepared for septic work
- Highly webbed plates were removed from the incubator
- 8mL phage buffer of was added to (4) webbed plates.
- Plates were left to sit indisburbed for 2 hours.
- In aseyptic conditions, a syringe was used to collect the liquid lysates from one plate and transferred to a previously “unbuffered” plate, in an attempt to carry over and increase titer. This was repeated for the other two pairs of plates
- The second set of plates was left to sit overnight
- 11/12/2020
- In aseptic conditions, the lysate was collected in a syringe tube and filtered through a 22um filter into a 15mL conical tube, labeled HVL4
- The process was repeated until no further lysate was left on the plate
- A total of 15mL of lysate was collected to be used for DNA extraction
Results:
15mL of high volume lysate was collected from 8 webbed plates.
DNA Extraction
Title: Mounting and Staining TEM samples with Uranyl Acetate
Date: 10/07/2020 Redo: No
Purpose: This procedure is to prepare the phage sample for viewing the TEM.
Notes:
- 1mL lysate was transferred into a sterile microcentrifuge tube. Four such samples were created
- Tubes were centrifuged for 1.25 hour at 4°C
- Supernatant fluid was removed from the microcentrifuge tube using a micropipette. Care was taken not to disturb the pellet
- 100uL of phage buffer was added and the tubes were gently inverted for 15minutes to re-suspend
- The following steps were completed with the assistance of Raylon Huckabee
- Clean gloves were put on and one microcentrifuge tube was moved to the already set up work station in the hood
- A 5x5cm piece of parafilm was placed in the lid of a Petri dish
- A pelco tab with exposed adhesive on both sides taped onto the parafilm
- EM forceps were used to carefully remove an unused grid, touching only the edges
- The grid was placed on the PELCO tab with the dark-and-shiny side up. Only the edge of the grid was touching the PELCO tab
- Using a micropipette, 10uL was added to the grid, avoiding making physical contact with the grid (a ball/drop formed) (At this point, Raylon had to go to class)
- Phage was allowed to attach to the grid for 5min, based on the 10^8 titer and provided chart
- A wedge of filter paper was used to wick off excess fluid
- Wedge was washed by pipetteing 10uL of sterile water on the grid and allowing it to sit for 10 min. Excess fluid was wicked off with a filter paper wedge
- The previous step was quickly repeated for a second washing
- 10uL of 1% uranyl acetate was added to the grid and allowed to sit for 10 minutes
- Excess liquid was wicked off with filter paper until the rainbow/oil slick was visible
- Grid was allowed to air dry for 5 minutes
- Completed grid box was retrieved from the vacuum storage and this disk was added to slot A3
- Completed grid box was replaced in vacuum storage and vacuum turned back on
Results:
Text
Conclusions and Next Steps:
Text
Title: DNA Extraction – Alternate Protocol 3.5
Date: 10/09/2020 – 10/12/2020 Redo: No
Purpose: This procedure is to extract phage DNA from the high volume lysate.
Notes:
- 5mL. of high volume lysate was added to a 15mL conical tube.
- 20uL of nuclease was aseptically added to the conical tube
- Tube was gently inverted and incubated at 37°C for 10 minutes
- Lysate was aliquoted by 1mL into 5 microcentrifuge tubes
- 20uL of ZnCl2 was added to each microcentrifuge tube and gently mixed by inversion. Tubes was incubated at 37°C for 5 minutes to precipitate the phage
- Tubes were centrifuged at 10,000 rmp for 1 minute to pellet the phage
- Supernatant liquid was removed via aspiration and fluid filled pipette tips were disposed into the sharps trash on the bench. Care was taken not to disturb the pellet
- Pellets were resuspended in 500uL of TES buffer and left to sit while heating block warmed to 6o°C (if repeated this mistake will be avoided the next time)
- Tubes were incubated for 15 minutes at 60°C
- 1uL of Proteinase K was added and tubes gently inverted. Tubes were incubated at 37°C for 10 minutes
- 60uL of potassium acetate was added to each tube, gently but repeatedly inverted, and added to the ice bucket. Tubes were left for 15 minutes
- Tubes were centrifuged at 4°C for 1 min at 12,000 rpm to pellet the capsids. Supernatant fluid from each tube was removed with a micropipette and added into new microcentrifuge tube. Tubes containing pellets were discarded
- 500uL of 80% isopropanol was added to each of the 5 new tubes and left on ice over the weekend.
10/12/2020
- Microcentrifuge tubes were retrieved from the ice box and centrifuged at top speed for 10 min. Supernatant fluid was micropipetted out and discarded into a waste tube
- 250uL of 70% ethanol was added into each tube and centrifuged for 1 minute at top speed. Supernatants were discarded into the same 15mL conical waste tube
- DNA pellets were dried by inverting over a paper towel for 40 min and incubating at 30°C for 20 minutes
- Pellets were resuspended in 50uL of nuclease free water (*mistake)
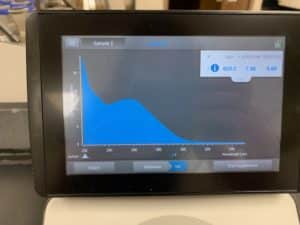
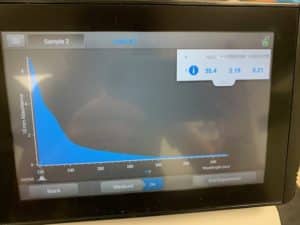
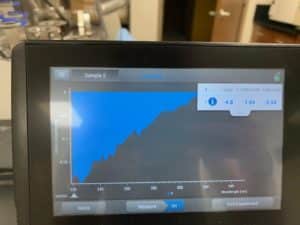
- Each resuspended pellet was run through the nanodrop
Results:


Conclusions and Next Steps:
Because resuspension was done incorrectly, the results were atrocious. Will reattempt from extraction again.
___________________________________________________________________________________________
Title: DNA Extraction – Alternate Protocol 3.5
Date: 10/14/2020 – 10/15/2020 Redo: Yes
Purpose: This procedure is to extract phage DNA from the high volume lysate.
Notes:
- 5mL of high volume lysate from HVL3 was added to a 15mL conical tube.
- 20uL of nuclease was aseptically added to the conical tube
- Tube was gently inverted and incubated at 37°C for 10 minutes
- Lysate was aliquoted by 1mL into 5 microcentrifuge tubes with a micropipette
- 20uL of ZnCl2 was added to each microcentrifuge tube and gently mixed by inversion. Tubes was incubated at 37°C for 5 minutes to precipitate the phage
- Tubes were centrifuged at 10,000 rmp for 1 minute to pellet the phage
- Supernatant liquid was removed via aspiration and fluid filled pipette tips were disposed into the sharps trash on the bench. Care was taken not to disturb the pellet
- Pellets were resuspended in 500uL of TES buffer and left to sit while heating block warmed to 6o°C (if repeated this mistake will be avoided the next time)
- Tubes were incubated for 15 minutes at 60°C
- 1uL of Proteinase K was added and tubes gently inverted. Tubes were incubated at 37°C for 10 minutes
- 60uL of potassium acetate was added to each tube, gently but repeatedly inverted, and added to the ice bucket. Samples were left for 15 minutes
- After being distracted (and working too quickly) supernatant was discarded. Process was started over from the beginning, repeating each step exactly up through being centrifuged after icing after the addition of potassium acetate
- Tubes were centrifuged at 4°C for 1 min at 12,000 rpm to pellet the capsids. Supernatant fluid from each tube was removed with a micropipette and added into new microcentrifuge tube. Tubes containing pellets were discarded
- 500uL of 80% isopropanol was added to each of the 5 new tubes and left on ice overnight.
10/15/2020e
- Microcentrifuge tubes were retrieved from the ice box and centrifuged at top speed for 10 min. Supernatant fluid was micropipetted out and discarded into a waste tube
- 250uL of 70% ethanol was added into each tube and centrifuged for 1 minute at top speed. Supernatants were discarded into the same 15mL conical waste tube
- DNA pellets were dried by inverting over a paper towel for 3.5 hours
- The first pellet was resuspended in 50uL of nuclease free water. Pipette tip was used to gently stir pellet and the sample was aspirated and ejected several times to ensure thorough resuspension
- This fluid was carried over into the next tube for resuspension until all pellets had been resuspended in the same 50uL of water
- DNA concentration and quality was checked with the nanodrop.
- DNA sample was added to the properly labeled box in the refrigerator.
Results:

Conclusions and Next Steps:
Sample is of an acceptable quality and will be further characterized.
____________________________________________________________________________________________
Title: DNA Extraction – Alternate Protocol 3.5
Date: 10/26/2020 – 10/27/2020 Redo: Yes
Purpose: This procedure is to extract phage DNA from the high volume lysate.
Notes:
- 5mL of high volume lysate from HVL3 was added to a 15mL conical tube.
- 20uL of nuclease was aseptically added to the conical tube
- Tube was gently inverted and incubated at 37°C for 10 minutes
- Lysate was aliquoted by 1mL into 5 microcentrifuge tubes with a micropipette
- 20uL of ZnCl2 was added to each microcentrifuge tube and gently mixed by inversion. Tubes was incubated at 37°C for 5 minutes to precipitate the phage
- Tubes were centrifuged at 10,000 rmp for 1 minute to pellet the phage
- Supernatant liquid was removed via aspiration and fluid filled pipette tips were disposed into the sharps trash on the bench. Care was taken not to disturb the pellet
- Pellets were resuspended in 500uL of TES buffer and left to sit while heating block warmed to 6o°C (if repeated this mistake will be avoided the next time)
- Tubes were incubated for 15 minutes at 60°C
- 1uL of Proteinase K was added and tubes gently inverted. Tubes were incubated at 37°C for 10 minutes
- 60uL of potassium acetate was added to each tube, gently but repeatedly inverted, and added to the ice bucket. Samples were left for 15 minutes
- After being distracted (and working too quickly) supernatant was discarded. Process was started over from the beginning, repeating each step exactly up through being centrifuged after icing after the addition of potassium acetate
- Tubes were centrifuged at 4°C for 1 min at 12,000 rpm to pellet the capsids. Supernatant fluid from each tube was removed with a micropipette and added into new microcentrifuge tube. Tubes containing pellets were discarded
- 500uL of 80% isopropanol was added to each of the 5 new tubes and left on ice overnight.
10/27/2020
- Microcentrifuge tubes were retrieved from the ice box and centrifuged at top speed for 10 min. Supernatant fluid was micropipetted out and discarded into a waste tube
- 250uL of 70% ethanol was added into each tube and centrifuged for 1 minute at top speed. Supernatants were discarded into the same 15mL conical waste tube
- DNA pellets were dried by inverting over a paper towel for 3.5 hours
- The first pellet was resuspended in 50uL of nuclease free water. Pipette tip was used to gently stir pellet and the sample was aspirated and ejected several times to ensure thorough resuspension
- This fluid was carried over into the next tube for resuspension until all pellets had been resuspended in the same 50uL of water
- DNA concentration and quality was checked with the nanodrop.
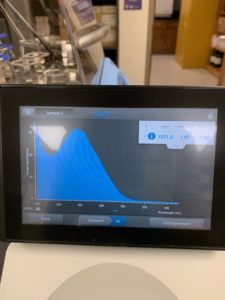
- Because questions remained about electrophoresis results, DNA concentration was also checked using QUBIT.
- 1000uL of working solution was created by adding 5uL of Broad Range reagent and 995mL of broad range buffer to a 1.5mL microcentrifuge tube and vortexing.
- 190uL of the working solution was aliquoted into QUBIT tubes labeled 1-3.
- 10uL of Broad Range Standard 1 was added to tube 1
- 10uL of Broad Range Standard was added to tube 2
- 10uL of DNA sample AS3 was added to tube 3
- The QUBIT was powered on standards run
- 10uL of DNA was selected and Tube 3 was run
Results:

Conclusions and Next Steps:
DNA concentration returned by nanodrop was significantly off from the concentration returned by QUBIT. Another DNA extraction will be carried out using 10uL of lysate.
_____________________________________________________________________________________
Title: DNA Extraction – Alternate Protocol 3.5
Date: 10/28/2020 – 11/2/2020 Redo: Yes
Purpose: This procedure is to extract phage DNA from the high volume lysate.
Notes:
- 10mL of HVL2B/C were filtered through a 22um filter to ensure proper filtration, as it is likely the filter popped during the original filtration
- 10mL of high volume lysate from the newly filtered and combined HVL2 was added to a 15mL conical tube.
- 40uL of nuclease was aseptically added to the conical tube
- Tube was gently inverted and incubated at 37°C for 10 minutes
- Lysate was aliquoted by 1mL into 10 microcentrifuge tubes with a micropipette
- 20uL of ZnCl2 was added to each microcentrifuge tube and gently mixed by inversion. Tubes was incubated at 37°C for 5 minutes to precipitate the phage
- Tubes were centrifuged at 10,000 rmp for 1 minute to pellet the phage
- Supernatant liquid was removed via aspiration and fluid filled pipette tips were disposed into the sharps trash on the bench. Care was taken not to disturb the pellet
- Pellets were thoroughly resuspended in 500uL of TES buffer through aspiration and collection in a micropipette tip
- Tubes were incubated for 15 minutes at 60°C
- 1uL of Proteinase K was added and tubes gently inverted. Tubes were incubated at 37°C for 10 minutes
- 60uL of potassium acetate was added to each tube, which formed a gel. Tubes were shaken until contents returned to liquid form from gel form
- Tubes were centrifuged at 4°C for 1 min at 12,000 rpm to pellet the capsids. Supernatant fluid from each tube was removed with a micropipette and added into new microcentrifuge tube. Tubes containing pellets were discarded
- 500uL of 80% isopropanol was added to each of the 10 new tubes and left on ice until Monday
11/2/2020
- Microcentrifuge tubes were retrieved from the ice box and centrifuged at top speed for 10 min. Supernatant fluid was micropipetted out and discarded into a waste tube
- 250uL of 70% ethanol was added into each tube and centrifuged for 1 minute at top speed. Supernatants were discarded into the same 15mL conical waste tube
- DNA pellets were dried in a heat block at 30°C for 45 minutes
- The first pellet was resuspended in 50uL of nuclease free water. Pipette tip was used to gently stir pellet and the sample was aspirated and ejected several times to ensure thorough resuspension
- This fluid was carried over into the next tube for resuspension until all pellets had been resuspended in the same 50uL of water
- DNA concentration and quality was checked with the nanodrop.
Results:
Conclusions and Next Steps:
DNA was a salt block. Additional lysates will need to be created for further attempts.
Title: DNA Extraction – Alternate Protocol 3.5
Date: 11/12/-11/13/2020 Redo: Yes
Purpose: This procedure is to extract phage DNA from the high volume lysate.
Notes:
- 5mL of high volume lysate from the newly retreived (11/12/2020) lysate was added to a 15mL conical tube.
- 20uL of nuclease was aseptically added to the conical tube
- Tube was gently inverted and incubated at 37°C for 10 minutes
- Lysate was aliquoted by 1mL into 10 microcentrifuge tubes with a micropipette
- 20uL of ZnCl2 was added to each microcentrifuge tube and gently mixed by inversion. Tubes was incubated at 37°C for 5 minutes to precipitate the phage
- Tubes were centrifuged at 10,000 rmp for 1 minute to pellet the phage
- Supernatant liquid was removed via aspiration and fluid filled pipette tips were disposed into the sharps trash on the bench. Care was taken not to disturb the pellet
- Pellets were thoroughly resuspended in 500uL of TES buffer through aspiration and collection in a micropipette tip
- Tubes were incubated for 15 minutes at 60°C
- 1uL of Proteinase K was added and tubes gently inverted. Tubes were incubated at 37°C for 10 minutes
- 60uL of potassium acetate was added to each tube, which formed a gel. Tubes were shaken until contents returned to liquid form from gel form
- Tubes were centrifuged at 4°C for 1 min at 12,000 rpm to pellet the capsids. Supernatant fluid from each tube was removed with a micropipette and added into new microcentrifuge tube. Tubes containing pellets were discarded
- 500uL of 80% isopropanol was added to each of the 10 new tubes and left on ice overnight
11/13/2020
- Microcentrifuge tubes were retrieved from the ice box and centrifuged at top speed for 10 min. Supernatant fluid was micropipetted out and discarded into a waste tube
- 250uL of 70% ethanol was added into each tube and centrifuged for 1 minute at top speed. Supernatants were discarded into the same 15mL conical waste tube
- DNA pellets were dried in a heat block at 30°C for 45 minutes
- The first pellet was resuspended in 50uL of nuclease free water. Pipette tip was used to gently stir pellet and the sample was aspirated and ejected several times to ensure thorough resuspension
- This fluid was carried over into the next tube for resuspension until all pellets had been resuspended in the same 50uL of water
- DNA concentration and quality was checked with the nanodrop
- Following Nanodrop analysis, QUBIT samples were created for testing
- 796uL of BR Buffer was combined and vortexed with 4uL of BR Reagent
- 190uL of this working solution was added to (3) QUBIT tubes
- 1ouL of BR Standard 1 was added to a tube labeled 1
- 10uL of BR Standard 2 was added to a tube labeled 2
- 9 additional uL of working solution was added to the third tube, along with 1uL of DNA
- Standards were read and sample read on Qubit 3 per manufacturer instructions
Results:

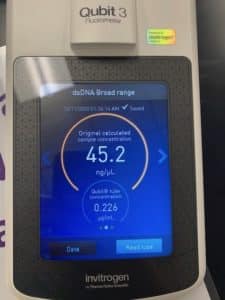
Conclusions and Next Steps:
Concentration was a bit low. An additional 5mL of lysates will be processed for DNA extraction and resuspension with this sample.
Title: DNA Extraction – Alternate Protocol 3.5
Date: 11/13/-11/16/2020 Redo: Yes
Purpose: This procedure is to extract phage DNA from the high volume lysate in order to be resuspended with a previous sample.
Notes:
- 5mL of high volume lysate (11/12/2020) lysate was added to a 15mL conical tube.
- 20uL of nuclease was aseptically added to the conical tube
- Tube was gently inverted and incubated at 37°C for 10 minutes
- Lysate was aliquoted by 1mL into 10 microcentrifuge tubes with a micropipette
- 20uL of ZnCl2 was added to each microcentrifuge tube and gently mixed by inversion. Tubes was incubated at 37°C for 5 minutes to precipitate the phage
- Tubes were centrifuged at 10,000 rmp for 1 minute to pellet the phage
- Supernatant liquid was removed via aspiration and fluid filled pipette tips were disposed into the sharps trash on the bench. Care was taken not to disturb the pellet
- Pellets were thoroughly resuspended in 500uL of TES buffer through aspiration and collection in a micropipette tip
- Tubes were incubated for 15 minutes at 60°C
- 1uL of Proteinase K was added and tubes gently inverted. Tubes were incubated at 37°C for 10 minutes
- 60uL of potassium acetate was added to each tube, which formed a gel. Tubes were shaken until contents returned to liquid form from gel form
- Tubes were centrifuged at 4°C for 1 min at 12,000 rpm to pellet the capsids. Supernatant fluid from each tube was removed with a micropipette and added into new microcentrifuge tube. Tubes containing pellets were discarded
- 500uL of 80% isopropanol was added to each of the 10 new tubes and left on ice over the weekend
11/13/2020
- Microcentrifuge tubes were retrieved from the ice box and centrifuged at top speed for 10 min. Supernatant fluid was micropipetted out and discarded into a waste tube
- 250uL of 70% ethanol was added into each tube and centrifuged for 1 minute at top speed. Supernatants were discarded into the same 15mL conical waste tube
- DNA pellets were dried in a heat block at 30°C for 40 minutes
- The first pellet was resuspended in the DNA sample that was extracted on 11/13/2020. Pipette tip was used to gently stir pellet and the sample was aspirated and ejected several times to ensure thorough resuspension
- This fluid was carried over into the next tube for resuspension until all pellets had been resuspended in the same 50uL of sample
- DNA concentration and quality was checked with the nanodrop
- Following Nanodrop analysis, QUBIT samples were created for testing
- 796uL of BR Buffer was combined and vortexed with 4uL of BR Reagent
- 190uL of this working solution was added to (3) QUBIT tubes
- 1ouL of BR Standard 1 was added to a tube labeled 1
- 10uL of BR Standard 2 was added to a tube labeled 2
- 9 additional uL of working solution was added to the third tube, along with 1uL of DNA
- Standards were read and sample read on Qubit 3 per manufacturer instructions
Results:
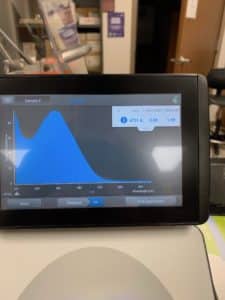
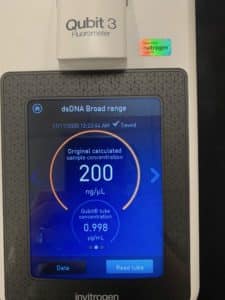
Conclusions and Next Steps:
Purity and concentration were at an acceptable level to run restriction enzymes and gel electrophoresis.
Characterization
Title: Setting Up Restriction Enzyme Digests for Gel Electrophoresis
Date: 10/19/2020 Redo: No
Purpose: This procedure is to add restriction enzymes to DNA in preparation for gel electrophoresis and DNA visualization through gel electrophoresis.
Notes:
- Area was cleaned with Ci-Decon and Ethanol
- DNA was retrieved from the refrigerator and gently flicked to mix
- DNA was incubated at 65°C for 10 minutes and then placed on ice
- Tube was vortexed for a few seconds to move all DNA to the bottom of the tube
- Based on a DNA concentration of 1879.4ug/mL, it was calculated that .27uL of DNA would be added to each microcentrifuge tube. Because this amount was so small, the total needed was calculated:
- .5ug per tube * 7 tubes = 3.5ug total
- 3.5ug (1mL/1879.4ug)(1000uL/1mL) = 1.86uL DNA total = .27uL DNA per tube after separation
- 25uL per tube – 2.5uL buffer – .5uL enzyme – .27uL DNA = 21.73uL ddH20 per tube = 152.11 ddH2O in total tube
- 22uL from the total tube (consisting of 152.11 ddH20 + 1.86uL DNA) was aliquoted from the total tube into 6 pre-labeled microcentrifuge tubes
- .5 uL Sac + 2.5uL of the associated buffer
- Uncut – this tube received an additional 3uL of ddH20 to get the the desired total volume of 25uL
- .5 uL SalII + 2.5uL of the associated buffer
- .5 uL HAE III + 2.5uL of the associated buffer
- .5 uL NSPL + 2.5uL of the associated buffer
- Marker
- Contents were gently mixed and centrifuged for a few seconds, then placed on a 37°C heat block for one hour
- While the DNA incubated, the agarose gel was prepared
- .24g agarose was added to an erlenmeyer flask
- .8% gel = .8%(30mL)/100 = .24g
- The flask was filled to 30mL with 1X TBE buffer and gently swirled
- Flask was microwaved for 1 minute to boiling, removed from the microwave, swirled, and inspected to ensure no clumps were visible
- Solution was allowed to cool for 15 minutes while gel apparatus was assembled
- 1.5uL of EtBr was added to the cooled flask and swirled
- (30mL (.05 ug/mL EtBr)) / 10 mg/mL = 1.5uL EtBr
- Gel solution was carefully poured into the apparatus and comb inserted
- Gel was cooled for 30 min
- Wearing gloves, comb was removed and gel tray realigned in the apparatus so the wells were at the negative end (black)
- .24g agarose was added to an erlenmeyer flask
- Ladder was prepared with 1uL of Hindi III, 2uL of purple loading dye and 7uL of sterile water
- 5uL of 6X purple loading dye was added to each of the (5) prepared restriction enzyme tubes
- The 6 tubes were added to a 65°C heat block for 5 minutes and immediately placed on ice
- The 6 pre-prepared tubes and ladder were centrifuged for a few seconds to move all liquid to the bottom of the tube
- 1X TBE buffer was added until the level lined up with the middle of the electrodes
- Gel was loaded in the following order from left to right, using a pipette and ~20uL of sample per well : Sac I, Uncut, Sal II, HAE III, NSPL, Ladder (Hindii)
- Cover was placed on the gel apparatus and plugged in to the power source.
- Power source was turned on, set to 100V and run
- After 1 hour, power supply was turned off, electrodes unplugged and cover removed for gel inspection
- Wearing gloves, gel tray was removed and the plastic was gently patted dry with a paper towel
- Gel was viewed over the UV light
Results:
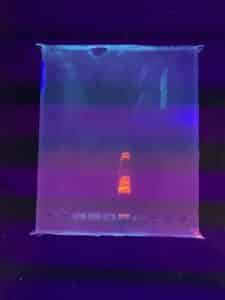
Conclusions and Next Steps:
Only the ladder was visible, so another attempt will be made with a higher concentration of DNA
Setting Up Restriction Enzyme Digests for Gel Electrophoresis
Date: 10/21/2020 – 10/22/2020 Redo: Yes
Purpose: This procedure is to add restriction enzymes to DNA in preparation for gel electrophoresis and DNA visualization through gel electrophoresis.
Notes:
10/21/2020
- Area was cleaned with Ci-Decon and Ethanol
- DNA was retrieved from the refrigerator and gently flicked to mix
- DNA was incubated at 65°C for 10 minutes and then placed on ice
- Tube was vortexted for a few seconds to move all DNA to the bottom of the tube
- Based on conversations with fellow students who had DNA of a similar concentration and had run previous trials, it was decided to attempt this gel with 2uL of DNA per tube (1.1ug).
-
- .5 uL Sac + 2.5uL of the associated buffer
- Uncut – this tube received an additional 3uL of ddH20 to get the the desired total volume of 25uL
- .5 uL SalII + 2.5uL of the associated buffer
- .5 uL HAE III + 2.5uL of the associated buffer
- .5 uL NSPL + 2.5uL of the associated buffer
- Marker
-
- Contents were gently mixed and centrifuged for a few seconds, then placed on a 37°C heat block for one hour
- After being incubated, tubes were added to the DNA being Tested box in the freezer at -20°C overnight
10/22/2020
- Agarose gel was prepared
- .24g agarose was added to an erlenmeyer flask
- .8% gel = .8%(30mL)/100 = .24g
- The flask was filled to 30mL with 1X TBE buffer and gently swirled
- Flask was microwaved for 1 minute to boiling, removed from the microwave, swirled, and inspected to ensure no clumps were visible
- Solution was allowed to cool for 15 minutes while gel apparatus was assembled
- 1.5uL of EtBr was added to the cooled flasked and swirled
- (30mL (.05 ug/mL EtBr)) / 10 mg/mL = 1.5uL EtBr
- Gel solution was carefully poured into the apparatus and comb inserted
- Gel was cooled for 30 min
- While gel cooled, the DNA sample tubes were retrieved from the freezer and allowed to thaw
- Wearing gloves, comb was removed and gel tray realigned in the apparatus so the wells were at the negative end (black)
- .24g agarose was added to an erlenmeyer flask
- Ladder was prepared with 1uL of 1uL of Hindi III, 2uL of purple loading dye and 7uL of sterile water
- 5uL of 6X purple loading dye was added to each of the (5) prepared restriction enzyme tubes
- The tubes were added to a 65°C heat bloock for 5 minutes and immediately placed on ice
- The pre-prepared tubes and ladder were centrifuged for a few seconds to move all liquid to the bottom of the tube
- 1X TBE buffer was added until the level lined up with the middle of the electrodes
- Gel was loaded in the following order from left to right, using a pipette and ~20uL of sample per well : Ladder, Uncut, HAE III, NSP I, Sac II, Sal II, Negative
- Cover was placed on the gel apparatus and plugged in to the power source.
- Power source was turned on, set to 100V and run
- After 1 hour, power supply was turned off, electrodes unplugged and cover removed for gel inspection
- Wearing gloves, gel tray was removed and the plastic was gently patted dry with a paper towel
- Gel was viewed over the UV light
Results:
Text

Conclusions and Next Steps:
Ladder was absent (lack of DNA added to it) but a faint line of DNA became visible with this attempt. Additional DNA will be purified for another attempt with a higher concentration. Additionally, the gel was incredibly fragile, so a mis-measuring of agarose should be considered. It was later determined that Hindi III enzymes were used instead of Hindii digests, which is why no ladder was visible.
_______________________________________________________________________________________________
Setting Up Restriction Enzyme Digests for Gel Electrophoresis
Date: 10/26/2020 – 10/27/2020 Redo: Yes
Purpose: This procedure is to add restriction enzymes to DNA in preparation for gel electrophoresis and DNA visualization through gel electrophoresis
Notes:
10/26/2020
- Area was cleaned with Ci-Decon and Ethanol
- DNA was retrieved from the refrigerator and gently flicked to mix
- DNA was incubated at 65°C for 10 minutes and then placed on ice
- Tube was vortexed for a few seconds to move all DNA to the bottom of the tube
- It was decided to attempt this gel with 4uL of DNA per tube along with 18uL of ddH2O.
-
- .5 uL SacII + 2.5uL of the associated buffer
- Uncut – this tube received an additional 3uL of ddH20 to get the the desired total volume of 25uL
- .5 uL Hindii III + 2.5uL of the associated buffer
- .5 uL HAE III + 2.5uL of the associated buffer
- .5 uL NSPL + 2.5uL of the associated buffer
- Marker
-
- Contents were gently mixed and centrifuged for a few seconds, then placed on a 37°C heat block for one hour. While tubes incubating, an additional sample of DNA was prepared for future attempts
- After being incubated, tubes were centrifuged and added to the DNA being Tested box in the freezer at -20°C overnight
10/22/2020
- Agarose gel was prepared
- .24g agarose was added to an erlenmeyer flask
- .8% gel = .8%(30mL)/100 = .24g
- The flask was filled to 30mL with 1X TBE buffer and gently swirled
- Flask was microwaved for 1 minute to boiling, removed from the microwave, swirled, and inspected to ensure no clumps were visible
- Solution was allowed to cool for 15 minutes while gel apparatus was assembled
- 1.5uL of EtBr was added to the cooled flask and swirled
- (30mL (.05 ug/mL EtBr)) / 10 mg/mL = 1.5uL EtBr
- Gel solution was carefully poured into the apparatus and comb inserted
- Gel was cooled for 30 min
- While gel cooled, the DNA sample tubes were retrieved from the freezer and allowed to thaw
- Wearing gloves, comb was removed and gel tray realigned in the apparatus so the wells were at the negative end (black)
- .24g agarose was added to an erlenmeyer flask
- Ladder was prepared with 1uL of 1uL of Hindi digests, 2uL of purple loading dye and 7uL of sterile water
- 5uL of 6X purple loading dye was added to each of the (5) prepared restriction enzyme tubes
- The tubes were added to a 65°C heat block for 5 minutes and immediately placed on ice
- The pre-prepared tubes and ladder were centrifuged for a few seconds to move all liquid to the bottom of the tube
- 1X TBE buffer was added until the level lined up with the middle of the electrodes
- Gel was loaded in the following order from left to right, using a pipette and ~20uL of sample per well : Ladder, Uncut, HAE III, Hindi III, NSP I, Sac II,
- Cover was placed on the gel apparatus and plugged in to the power source.
- Power source was turned on, set to 100V and run
- After 1 hour, power supply was turned off, electrodes unplugged and cover removed for gel inspection
- Wearing gloves, gel tray was removed and the plastic was gently patted dry with a paper towel
- Gel was viewed over the UV light
Results:
Text
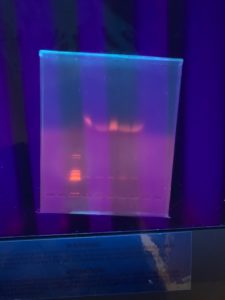
Conclusions and Next Steps:
Gel was still not bright enough. DNA (extraction 3) will be analyzed in QUBIT before another attempt.
Title: Setting Up Restriction Enzyme Digests for Gel Electrophoresis
Date: 11/16/2020 Redo: Yes
Purpose:This procedure is to add restriction enzymes to DNA in preparation for gel electrophoresis and DNA visualization through gel electrophoresis
Notes:
- Freshly extracted DNA was incubated at 65°C for 10 minutes and then placed on ice
- Tube was vortexed for a few seconds to move all DNA to the bottom of the tube
- Based on a DNA concentration of 200ng/uL, it was calculated that 4uL of DNA would be added to each microcentrifuge tube. After setting aside sufficient DNA for shipping, microcentrifuge tubes were labeled for restriction enzyme processing and gel electrophoresis
- Sal I digests were prepared with 4uL of DNA, 2.5uL enzyme buffer, .5uL Sal Ienzymes, and 17uL nuclease free water
- Sac II digests were prepared with 4uL of DNA, 2.5uL enzyme buffer, .5uL Sac II enzymes and 17uL nuclease free water
- At this point, DNA available for processing was very low so adjustments were made to the remaining two samples
- NSPI digests were prepared with 1uL of DNA, 2.5uL of enzyme buffer, .5uL NSPI enzymes, and 20uL nuclease free water
- HAEIII digests were prepared with 1uL of DNA, 2.5uL of enzyme buffer, .5uL of HAEIII enzymes, and 20uL nuclease free water
- Contents were gently mixed and centrifuged for a few seconds, then placed on a 37°C heat block for 20 minutes
- While the DNA incubated, the agarose gel was prepared
- .24g agarose was added to an erlenmeyer flask
- .8% gel = .8%(30mL)/100 = .24g
- The flask was filled to 30mL with 1X TBE buffer and gently swirled
- Flask was microwaved for 1 minute to boiling, removed from the microwave, swirled, and inspected to ensure no clumps were visible
- Solution was allowed to cool for 15 minutes while gel apparatus was assembled
- 1.5uL of EtBr was added to the cooled flask and swirled
- (30mL (.05 ug/mL EtBr)) / 10 mg/mL = 1.5uL EtBr
- Gel solution was carefully poured into the apparatus and comb inserted
- Gel was cooled for 30 min
- Wearing gloves, comb was removed and gel tray realigned in the apparatus so the wells were at the negative end (black)
- .24g agarose was added to an erlenmeyer flask
- Hindii III digests were prepared with 22.25uL of nuclease free water, 2.25uL of digests, and 2.5uL purple loading dye
- 5uL of 6X purple loading dye was added to each of the (5) prepared restriction enzyme tubes
- The 6 tubes were added to a 65°C heat block for 5 minutes and immediately placed on ice for an additional 5 minutes
- The 6 pre-prepared tubes and ladder were centrifuged for a few seconds to move all liquid to the bottom of the tube
- 1X TBE buffer was added until the level lined up with the middle of the electrodes
- Gel was loaded in the following order from left to right, using a pipette and ~20uL of sample per well : Ladder, HAEIII, NSPI, SacII, SalI
- Cover was placed on the gel apparatus and plugged in to the power source.
- Power source was turned on, set to 100V and run for 40 minutes
- Power was adjusted to 150V and run for an additional 20 minutes
- After 1 hour, power supply was turned off, electrodes unplugged and cover removed for gel inspection
- Wearing gloves, gel tray was removed and viewed over UV light
Results:

Conclusions and Next Steps:
A relatively successful gel was obtained, although no cuts were visible.