Discovery of Nephthys
Nephthys Information
Morphology: Siphoviridae

Sample Collection
| Collector Name |
TimYee Leung |
TimYee Leung |
Jessica Blakely | Jessica Blakely |
| Sample No. | 3 | 3 | 1 | 2 |
| Date of Collection | 08/31/2022 | 08/31/2022 | 8/29/2022 | 8/31/2022 |
| Sample Type | soil | soil | soil | soil |
| General Location | Family personal garden | Neighbors personal garden | Fireside District | Stephenville City Park |
| Location Description | soil under plants | soil under trees | Back field behind the apartment building | Soil next to the river |
| GPS Coordinates | 29.624º N -95.729º N |
29.624º N -95.729º N |
32.2134N, 98.2018W | 32.2134 N, 98.2018 W |
| Sample Depth | surface | surface | surface | surface |
| Ambient Temperature | 37ºC | 37ºC | 37ºC | 37ºC |
Isolation/Purification
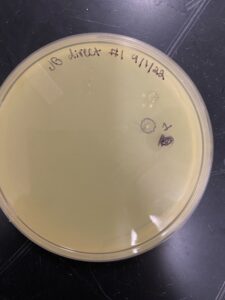
9/08/2022- picking a plaque Direct Isolation and Plaque Assay for TL1
Date: 8/31/2022 Redo: yes Sample: TL1
Purpose: This procedure is to see if any phages are detected in a controlled setting
1) we washed our hands and bench (using 70% Ethanol solution) and then started to prepare for aspect work later getting materials needed for this protocol.
2) we picked our 15ml conical tube soil sample and submerge the liquid media beneath 2-3ml of liquid.
3) we cap the tube and shake it with the Incubate at 250 pm for 1-2 hours.
4) we allow the sample to sit undisturbed for 2-20 min (until the particles settle).
5) we used a 0.22 microliter syringe filter and removed approximately 2ml of from the top of the sample, avoiding material that would clog the filter.
6) we attach the syringe tightly on top of the filter removing the filter from the package without contaminating it.
7) using the syringe we dispense 0.5ml of the filtrate to a labeled (TL#1) microcentrifuge tube.
8) we closed the tube quickly after the procedure.
9) we discard our unneeded supplies (syringe and filter).
9/07/2022- Plaque Assay
10) we washed our hands and bench (using 70% Ethanol solution) and then started to prepare for aspect work.
11) we grabbed our samples from the Direct Isolation and the materials needed for this protocol.
12) we obtain 250.00 micrometers of host bacteria culture per sample.
13) we used a 100-micrometer micro pipettor and aspect technique to dispense the phage sample to the tube from step 12.
14) we mixed the host culture by tapping the tube and then letting it sit undisturbed for 5-10 minutes (allowing for attachment).
15) we obtained the agar plate and labeled it (initial, “direct”, test name, and date).
16) we removed the top agar from the 55°C bath to prevent it from solidifying on the bench.
17) using a 5ml pipette we transfer 3ml of top agar to the host tube, avoiding making bubbles on the plate.
18) immediately we suck the mixture back into the 5ml pipette and transfer it to the plate before the agar solidifies.
19) we tilt the plate until the top agar is mixed evenly on the agar plate.
20) we incubated the plate to let the. bacteria grow and phage infection.
– –
–
9/08/2022
21) we removed the plate from the incubator to the light to check for plaques.
22) we looked at and noted the plaque size, amount, and shape. (which is nothing)
Results: No final results. we have to retake the samples again.
Conclusions and Next Steps: We test and go on for JB 1 or 2
Direct Isolation and Plaque Assay for JB1
Date: 8/31/2022 Redo: no Sample: JB1
Purpose: This procedure is to see if any phages are detected in a controlled setting.
1) we washed our hands and bench (using 70% Ethanol solution) and then started to prepare for aspect work later getting materials needed for this protocol.
2) we picked our 15ml conical tube soil sample and submerge the liquid media beneath 2-3ml of liquid.
3) we cap the tube and shake it with the centrifuge at 250 rpm for 1-2 hours.
4) we allow the sample to sit undisturbed for 2-20 min (until the particles settle).
5) we used a 0.22-micrometer syringe filter and removed approximately 2ml of from the top of the sample, avoiding material that would clog the filter.
6) we attach the syringe tightly on top of the filter removing the filter from the package without contaminating it.
7) using the syringe we dispense 0.5ml of the filtrate to a labeled (TL#1) microcentrifuge tube.
8) we closed the tube quickly after the procedure.
9) we discard our unneeded supplies (syringe and filter).
9/07/2022- plaque assay
10) we washed our hands and bench (using 70% Ethanol solution) and then started to prepare for aspect work.
11) we grabbed our samples from the Direct Isolation and the materials needed for this protocol.
12) we obtain 250.00 micrometers of host bacteria culture per sample.
13) we used a 100-microliter micro pipettor and aspect technique to dispense the phage sample to the tube from step 12.
14) we mixed the host culture by tapping the tube and then letting it sit undisturbed for 5-10 minutes (allowing for attachment).
15) we obtained the agar plate and labeled it (initial, “direct”, test name, and date).
16) we removed the top agar from the 55°C bath to prevent it from solidifying on the bench.
17) using a 5ml pipette we transfer 3ml of top agar to the host tube, avoiding making bubbles on the plate.
18) immediately we suck the mixture back into the 5ml pipette and transfer it to the plate before the agar solidifies.
19) we tilt the plate until the top agar is mixed evenly on the agar plate.
20) we let the plate sit for ~20 minutes so the top agar could solidify.
21) we incubated the plate to let the bacteria grow and phage infect.
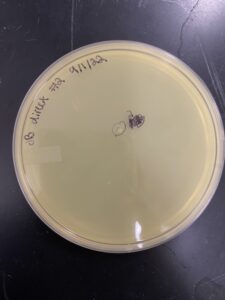
9/08/2022- picking a plaque
21) we removed the plate from the incubator to check for plaques.
22) we looked at and noted the plaque size, amount, and shape.
23) we picked the biggest/ visible plaque and called it JB#1
Results: One plaque was found.
Conclusions and Next Steps: The next steps are to prepare for “Serial Dilution” using the JB1 sample
9/10/2022- Serial Dilution
1) we washed our hands and bench (using 70% Ethanol solution) and then started to prepare for aspect work later getting materials needed for this protocol.
2)we set up the 10-fold serial dilution (label every 8 tubes and plates before starting work)
3) we used the 1000 micropipette to add 90 microliters of phage buffer to each microcentrifuge tube
4) then we change the tip of the micropipette and use a new one to take 10 ml of our phage to the first tube (10-1)
5) tube was then vortexed.
6) we change the tip for the micropipette for the next dilution.
7) the process is repeated for each dilution.
8) we perform a plaque assay and transfer 10 microliters of each dilution and phage buffer to their designated spot on the plate. We put it in the incubator for 24 hours
9/19/22-picking a plaques-(serial dilution)
9) we removed the plate from the incubator to check for plaques.
10) we looked at and noted the plaque size, amount, and shape.
11) no visible plaque has shown
Results: no plaques found.
Conclusions and Next Steps: attempt spot titer on the JB2 sample.
Direct Isolation and Plaque Assay for JB2
Date: 8/31/2022- 10/03/22 Redo: No. Sample: JB2
Purpose: This procedure is to see if any phages are detected in a controlled setting.
1) we washed our hands and bench (using 70% Ethanol solution) and then started to prepare for aspect work later getting materials needed for this protocol.
2) we picked our 15ml conical tube soil sample and submerge the liquid media beneath 2-3ml of liquid.
3) we cap the tube and shake it with the centrifuge at 250 rpm for 1-2 hours.
4) we allow the sample to sit undisturbed for 2-20 min (until the particles settle).
5) we used a 0.22-micrometer syringe filter and removed approximately 2ml of from the top of the sample, avoiding material that would clog the filter.
6) we attach the syringe tightly on top of the filter removing the filter from the package without contaminating it.
7) using the syringe we dispense 0.5ml of the filtrate to a labeled (TL#1) microcentrifuge tube.
8) we closed the tube quickly after the procedure.
9) we discard our unneeded supplies (syringe and filter).
9/07/2022- plaque assay
10) we washed our hands and bench (using 70% Ethanol solution) and then started to prepare for aseptic work.
11) we grabbed our samples from the Direct Isolation and the materials needed for this protocol.
12) we obtain 250 microliters of host bacteria culture per sample.
13) we used a 100-microliter micro pipettor and aseptic technique to dispense the phage sample to the tube from step 12.
14) we mixed the host culture by tapping the tube and then letting it sit undisturbed for 5-10 minutes (allowing for attachment).
15) we obtained the agar plate and labeled it (initial, “direct”, test name, and date).
16) we removed the top agar from the 55°C bath to prevent it from solidifying on the bench.
17) using a 5ml pipette we transfer 3ml of top agar to the host tube, avoiding making bubbles on the plate.
18) immediately we suck the mixture back into the 5ml pipette and transfer it to the plate before the agar solidifies.
19) we tilt the plate until the top agar is mixed evenly on the agar plate.
20) we let the plate sit for ~20 minutes so the top agar could solidify.
21) we incubated the plate to let the bacteria grow and phage infect.
9/08/2022-picking a plaque
21) we removed the plate from the incubator to check for plaques.
22) we looked at and noted the plaque size, amount, and shape.
23) we picked the biggest/ visible plaque and named it JB#2
Results: One plaque was found.
Conclusions and Next Steps: The next steps are to prepare for “Serial Dilution” using the JB2 sample
9/12/2022- Serial Dilution
1) we washed our hands and bench (using 70% Ethanol solution) then started to prepare for aspect work later getting the materials needed for this protocol.
2)we set up the 10-fold serial dilution (label each tube and plate before starting work)
3) we used the 1000 micropipette to add 90 microliters of phage buffer to each microcentrifuge tube
4) then we change the tip of the micropipette and use a new one to take 10 ml of our phage to the first tube (10-1)
5) we vortex the tube.
6) we change the tips for the micropipette for the next mixture
7) we take 10 ml from the first sample and mix it with the second tube (10-2) fully shake it and repeat the step for the rest of the tubes.
8) we perform a plaque assay and place dilutions and buffer on their designated spot on the plate. We left the incubator for 24 hours
9/14/22 – picking a plaque from the serial dilution
9) we removed the plate from the incubator to check for plaques.
10) we looked at and noted the plaque size, amount, and shape.
11) Plaques were unclear and not fully grown
9/18/22 – redo the first dilution
1) we washed our hands and bench (using 70% Ethanol solution) then started to prepare for aspect work later getting the materials needed for this protocol.
2)we set up the 10-fold serial dilution (label each tube and plate before starting work)
3) we used the 1000 micropipette to add 90 microliters of phage buffer to each microcentrifuge tube
4) then we change the tip of the micropipette and use a new one to take 10 ml of our phage to the first tube (10-1)
5) we vortex the tube.
6) we change the tips for the micropipette for the next mixture
7) we take 10 ml from the first sample and mix it with the second tube (10-2) fully shake it and repeat the step for the rest of the tubes.
8) we perform a plaque assay and place dilutions and buffer on their designated spot on the plate. We left the incubator for 24 hours
– —
—
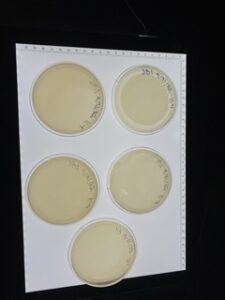
9/19/22 – picking a plaque from serial dilution
9) we removed the plate from the incubator to check for plaques.
10) we looked at and noted the plaque size, amount, and shape.
11) we picked the biggest/ visible plaque and named each plate on a plaque on plate one(-1a, -1a, -1b….) on plate 2(-2a, -2b….), and so on
Results: Sample JB2 is the only soil with big/ clear phage
Conclusions and Next Steps: After Isolating and purification of all samples, Sample JB2 is the only sample that was clear or the biggest phage for us to be able for us to Amplify. We will now Amplify only Sample JB2 from the plaque we picked on 9/19/22 (from serial dilution)
Amplification
JB is the only sample that we Amplification and continue to test with, since the other samples are discontinued/ no phages
Phage Purification and Amplification
Date: 9/28/22- 10/12/22 Redo: yes Sample: JB2
Purpose: To prepare liquid phage samples of decreasing concentrations
9/28/22 – second Dilution
1) we washed our hands and bench (using 70% Ethanol solution) and then started to prepare for aspect work later getting materials needed for this protocol.
2)we set up the 10-fold serial dilution (label every 8 tubes and plates before starting work)
3) we used the 1000 micropipette to add 90 microliters of phage buffer to each microcentrifuge tube
4) then we change the tip of the micropipette and use a new one to take 10 ml of our phage to the first tube (10-1)
5) tube was then vortexed.
6) we change the tip for the micropipette for the next dilution.
7) the process is repeated for each dilution.
8) we perform a plaque assay and transfer 10 microliters of each dilution and phage buffer to their designated spot on the plate. We put it in the incubator for 24 hours
–

 –
–
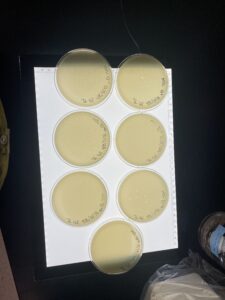
Results: plaques found on 10-1 through 10-4
Conclusions and Next Steps: need to pick the plaque in-3 and -4 and do serial dilution again
10/3/2022- flooded webbed plate and made our low-volume lysate
1) we washed our hands and bench (using 70% Ethanol solution) and then started to prepare for aspect work later getting materials needed for this protocol.
2) we picked plate 10-3 as our webbed plate and did our protocol on the 10-3 plate
3) we apply 8 ml of sterile phage buffer to the 10-3 dilution plate.
4) we let the plate sit at room temperature for 3 hours
5) we then swirl the phage buffer gently.
6) We Tilt the plate slightly by placing one edge of the plate on the lid, allowing the lysate to pool
7) We prepare a 0.22 μm filter and set it aside.
8) Using a 5 ml syringe, we suck up the lysate from the plate.
9) we depress the syringe plunger and collect the filtrate in a 15 ml sterile conical tube
10) we aspirate the remaining lysate, reattach the used filter, and filter the remaining lysate, collecting the filtrate in the same sterile conical tube.
11) Label the tube “JB1 3b 10-3 lysate 10/3/22”
10/5/2022 Full plate titer on low-volume lysate
1) we washed our hands and bench (using 70% Ethanol solution) and then started to prepare for aspect work later getting materials needed for this protocol.
2)we set up the 10-fold serial dilution (label every 8 tubes and plates before starting work)
3) we used the 1000 micropipette to add 90 microliters of phage buffer to each microcentrifuge tube
4) then we change the tip of the micropipette and use a new one to take 10 ml of our phage to the first tube (10-1)
5) tube was then vortexed.
6) we change the tip for the micropipette for the next dilution.
7) the process is repeated for each dilution.
8) we perform a plaque assay and transfer 10 microliters of each dilution and phage buffer to their designated spot on the plate. We put it in the incubator for 24 hours
9) see if any webbed plate pattern has shown, none has come
10/10/2022- Low volume Lysate Dilution
1) we washed our hands and bench (using 70% Ethanol solution) and then started to prepare for aspect work later getting materials needed for this protocol.
2)we set up the 10-fold serial dilution (label every 8 tubes and plates before starting work)
3) we used the 1000 micropipette to add 90 microliters of phage buffer to each microcentrifuge tube
4) then we change the tip of the micropipette and use a new one to take 10 ml of our phage to the first tube (10-1)
5) tube was then vortexed.
6) we change the tip for the micropipette for the next dilution.
7) the process is repeated for each dilution.
8) we perform a plaque assay and transfer 10 microliters of each dilution and phage buffer to their designated spot on the plate. We put it in the incubator for 24 hours
–
10/12/2022- flooded the plates to make high-volume lysate
1) we washed our hands and bench (using 70% Ethanol solution) and then started to prepare for aspect work later getting materials needed for this protocol.
2) we picked plate 10-3 as our webbed plate and did our protocol on the 10-3 plate
3) we apply 8 ml of sterile phage buffer to the 10-3 dilution plate.
4) we let the plate sit at room temperature for 3 hours
5) we then swirl the phage buffer gently.
6) We Tilt the plate slightly by placing one edge of the plate on the lid, allowing the lysate to pool
7) We prepare a 0.22 μm filter and set it aside.
8) Using a 5 ml syringe, we suck up the lysate from the plate.
9) we depress the syringe plunger and collect the filtrate in a 15 ml sterile conical tube
10) we aspirate the remaining lysate, reattach the used filter, and filter the remaining lysate, collecting the filtrate in the same sterile conical tube.
10/17/2022- making more webbed. plates from 10-3
1) we washed our hands and bench (using 70% Ethanol solution) and then started to prepare for aspect work later getting materials needed for this protocol.
2)we set up the 10-fold serial dilution (label every 3 tubes and plates before starting work)
3) we used the 1000 micropipette to add 90 microliters of phage buffer to each microcentrifuge tube
4) then we change the tip of the micropipette and use a new one to take 10 ml of our phage to the first tube (10-1)
5) tube was then vortexed.
6) we change the tip for the micropipette for the next dilution.
7) the process is repeated for each dilution.
8) we perform a plaque assay and transfer 10 microliters of each dilution and phage buffer to their designated spot on the plate. We put it in the incubator for 24 hours
9) see if all webbed plate pattern has shown
– –
–
10/18-10/19/2022 – flooded the 10-3 plates
1) we washed our hands and bench (using 70% Ethanol solution) and then started to prepare for aspect work later getting materials needed for this protocol.
2) we picked plate all10-3 as our webbed plate and did our protocol on all 10-3 plate
3) we apply 8 ml of sterile phage buffer to the 10-3 dilution plate.
4) we let the plate sit at room temperature for 3 hours
5) we then swirl the phage buffer gently.
6) We Tilt the plate slightly by placing one edge of the plate on the lid, allowing the lysate to pool
7) We prepare a 0.22 μm filter and set it aside.
8) Using a 5 ml syringe, we suck up the lysate from the plate.
9) we depress the syringe plunger and collect the filtrate in a 15 ml sterile conical tube
10) we aspirate the remaining lysate, reattach the used filter, and filter the remaining lysate, collecting the filtrate in the same sterile conical tube.
11) Label the tube “JB, TL high 10/19 volume lysate 10/3/22”
10/24/2022 – serial dilution on High Volume Lysate
1) we washed our hands and bench (using 70% Ethanol solution) and then started to prepare for aspect work later getting materials needed for this protocol.
2)we set up the 10-fold serial dilution (label every 8 tubes and plates before starting work)
3) we used the 1000 micropipette to add 90 microliters of phage buffer to each microcentrifuge tube
4) then we change the tip of the micropipette and use a new one to take 10 ml of our phage to the first tube (10-1)
5) tube was then vortexed.
6) we change the tip for the micropipette for the next dilution.
7) the process is repeated for each dilution.
8) we perform a plaque assay and transfer 10 microliters of each dilution and phage buffer to their designated spot on the plate. We put it in the incubator for 24 hours

10-1 went bad for the top Algar
10/25/2022 – calculate titer
1) we calculate the titer by using the formula
Titer (pfu/ml) = (# pfu/ volume used in μl) x (103 μl/ml) x dilution factor
Titer (pfu/ml) = (160pfu/10 μl) x (103 μl/ ml) x (105)
= (16 x 103 x 105) pfu/ml
= 16 x 108 pfu/ml
2) we label the high-volume lysate tube with our results (16 x 108 pfu/ml)
Results: the high volume lysate tube with 16 x 108 pfu/ml
Conclusions and Next Steps: to do the DNA extraction and the TEM
DNA Extraction & TEM
Date: 10/26- 11/08/2022 Redo: yes Sample: JB2
Purpose: to do a genetic analysis
10/26/2022 – Day one (DNA Extraction)
1. We gently mix your HVL, then aliquot 5mL of your lysate into a 15 mL conical tube then add 20uL of nuclease mix.
2. Once nuclease has been added, we gently invert the tube and incubate it at 37°C for 10min.
3. We then aliquot lysate into 5 microfuge tubes, 1mL each.
4. To each tube, we add 20uL of ZnCl2, mix gently by inversion, and incubate at 37°C for 5min. This “precipitates” the phage.
5. We centrifuge at 10,000rpm for 1min to pellet the phage.
6. we remove supernatants by aspiration and discard the liquid-filled pipette tips in the sharps trash.
7. We resuspend pellets in 500uL TES buffer per tube, and incubate at 60°C for 15min.
8. We then add 1uL of Proteinase K and mix gently. Incubate at 37°C for 10min to completely eliminate any residual nuclease activity.
9. Add 60uL of potassium acetate to each tube. Mix well and leave on ice for 15min. A white, dense precipitate will form. This represents your capsids.
10. We centrifuge at 4°C for 1min at 12,000rpm to pellet the capsids. containing your DNA, and place it into new microfuge tubes.
11. We add 500uL of isopropanol to each of the tubes with the supernatant, mix, and leave on ice overnight.
10/27/2022 – Day two (DNA Extraction)
12. We centrifuge at top speed for 10min to pellet DNA, and discard the supernatant into a waste tube
13. Add 250uL of 70% ethanol in each tube, and spin again for 1min, at top speed.
14. We dry the DNA pellets at room temperature by turning them upside-down onto paper towels, tapping out excess liquid, and leaving them upside-down until the pellets begin to turn clear.
15. Resuspend the first pellet in 50uL nuclease-free water. Then we use that solution to resuspend to all 5 pellets have been resuspended in the same 50uL of water.
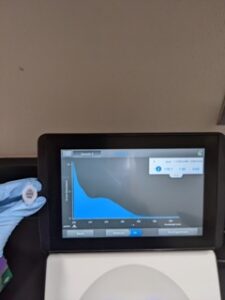
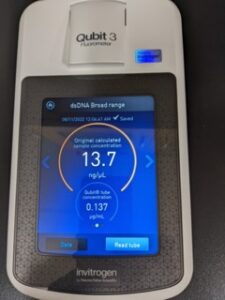
Results: DNA concentration 178.7ng/ul and quality (1.95 and 0.65) with the Nanodrop (13.7ng/ul).
Conclusions and Next Steps: we have to do the Gel readings first to see our first DNA extraction and then restrict redo DNA Extraction because our results were low and need to be higher. We will double the numbers to get a higher concentration
11/07/2022 – redo Day one (DNA Extraction)
1. We gently mix your HVL, then aliquot 5mL of your lysate into a 15 mL conical tube then add 20uL of nuclease mix.
2. Once nuclease has been added, we gently invert the tube and incubate it at 37°C for 10min.
3. We then aliquot lysate into 10 microfuge tubes, 1mL each.
4. To each tube, we add 20uL of ZnCl2, mix gently by inversion, and incubate at 37°C for 5min. This “precipitates” the phage.
5. We centrifuge at 10,000rpm for 1min to pellet the phage.
6. we remove supernatants by aspiration and discard the liquid-filled pipette tips in the sharps trash.
7. We resuspend pellets in 500uL TES buffer per tube, and incubate at 60°C for 15min.
8. We then add 1uL of Proteinase K and mix gently. Incubate at 37°C for 10min to completely eliminate any residual nuclease activity.
9. Add 60uL of potassium acetate to each tube. Mix well and leave on ice for 15min. A white, dense precipitate will form. This represents your capsids.
10. We centrifuge at 4°C for 1min at 12,000rpm to pellet the capsids. containing your DNA, and place it into new microfuge tubes.
11. We add 500uL of isopropanol to each of the tubes with the supernatant, mix, and leave on ice overnight.
11/08/2022 -redo Day two (DNA Extraction)
12. We centrifuge at top speed for 10min to pellet DNA, and discard the supernatant into a waste tube
13. Add 250uL of 70% ethanol in each tube, and spin again for 1min, at top speed.
14. We dry the DNA pellets at room temperature by turning them upside-down onto paper towels, tapping out excess liquid, and leaving upside-down until the pellets begin to turn clear.
15. Resuspend the first pellet in 50uL nuclease-free water. Then we use that solution to resuspend all 5 pellets have been resuspended in the same 50uL of water.
 .
. 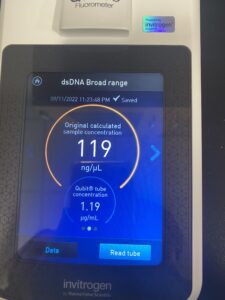
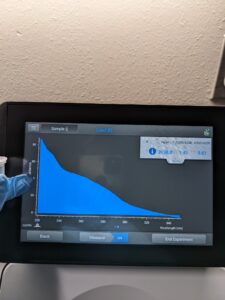
Results: DNA concentration is bigger than the last option 2138.8ng/ul and quality (1.14 and 0.61) with the Nanodrop(119ng/ul).
Conclusions and Next Steps: we will do Gell reading
Title: TEM
Date:10/27 Redo: No Sample: JB 2
Purpose: To prepare your phage sample for viewing with a transmission electron microscope and the characterization.
10/26/2022 – fix phages on grid & reverse stain
- Aseptically transfer 1 ml of our high-titer lysate into a sterile microcentrifuge tube.
- Balance the tube(s) and centrifuge for 1 hour at 4 °C at top speed to concentrate the phage particles at the bottom of the tube.
- Using a micropipette, we carefully remove as much supernatant as possible without disrupting the concentrated phage at the bottom of the tube.
- Add 100 μl of phage buffer and let resuspend at 4 °C for 30 minutes to one hour.
- We proceed with the rest of the protocol immediately to avoid damaging the phage heads.
- We remove the cover from a 5 x 5 cm piece of parafilm and place the parafilm into the lid of the Petri dish.
- We place a small piece of double-sided tape onto the parafilm in the lid of the Petri dish.
- Using EM forceps, we remove a fresh grid from a box of unused grids.
- We place the grid dark-and-shiny side UP, on the edge of the tab or double-sided tape.
- Using a micropipette, we place 10 μl of lysate onto the grid without touching the tip of the grid itself.
- Using a small wedge of filter paper, we wick off the excess fluid.
- We rinse the grid two times by carefully pipetting 10 μl of sterile water onto the grid. Allowing it to sit for 2 minutes. Then we wick off the water using a fresh wedge of filter paper.
- Add 10 μl of 1 % uranyl acetate to the grid.
- We let it sit for 2 minutes.
- Wick off excess stain by using a wedge of filter paper. We continue to wick away the stain until the surface of the grid. Then allow the grid to air dry before putting it safely back into the grid box.
- We place our grid in the designated grid box for storage.
- We then transport your samples to your EM facility for imaging.
- Using a ruler, we measure the edge-to-edge of the capsid and the length of the tail (excluding the capsid and the tail tip).
- We measure the length of the sidebar with the ruler.
- Using the known and relative lengths of the sidebar, we calculate the length of the capsid and tail
Results: unknown scaled tail size = 8nm
Conclusions and Next Steps: We continue to finish the DNA extractions
Characterization
Restrict DNA Enzymes & Gel Electrophoresis
Date: 11/01/22- Redo: Yes Sample: JB2
Purpose: to do a genetic analysis
- We gently mix our DNA sample by flicking the closed tube
- Incubate the tube at 65 °C for 10 minutes, and then we quickly place it on ice.
- Using the concentration of our DNA sample, we calculate the volume of the DNA sample needed to obtain 0.5 µg of DNA.
- we Set up a reaction in a microcentrifuge tube for each enzyme 1. Include a negative control in which no restriction enzyme is added.
- Quickly spin the tube in a microcentrifuge for less than 1 minute to move all of the liquid to the bottom of the tube.
- we Store at -20 °C until ready to use.
11/10/2022 – Casting Argose Gel
- We Prepare enough 0.8 % agarose gel to cover the tips of the gel combs by ~2–3 mm.
- Weigh out the appropriate mass of agarose powder, and then we transfer the powder to an Erlenmeyer flask.
- Add the appropriate volume of 1X TBE buffer to the agarose powder. We swirl gently to mix.
- We heat the mixture in the microwave just until it boils (1–2 minutes).
- We carefully remove the flask from the microwave.
- Very gently, we swirl to mix and then examine the solution for small transparent clumps.
- We Allow the solution to cool to between 50 °C and 60 °C
- We Pour the agarose/EtBr mixture into the prepared gel apparatus.
- Allow the gel to cool for 20–30 minutes.
- Once the gel has solidified, we very carefully remove the comb by pulling it slowly straight up. Once the comb is removed, we gently lift the gel platform out of the casting tray.
- Place the platform with the solidified gel into the gel box.
- we Pour 1X TBE buffer into the gel apparatus until your gel is submerged by ~ 1/4 inch of the buffer.

- Results: not clear has faded in the first enzyme however not strong enough
Conclusions and Next Steps: Restart the DNA extraction with a different concentration number.
11/09/2022 – redo from the DNA extraction 11/07/22
- We gently mix our DNA sample by flicking the closed tube
- Incubate the tube at 65 °C for 10 minutes, and then we quickly place it on ice.
- Using the concentration of our DNA sample, we calculate the volume of the DNA sample needed to obtain 0.5 µg of DNA.
- we Set up a reaction in a microcentrifuge tube for each enzyme 1. Include a negative control in which no restriction enzyme is added.
- Quickly spin the tube in a microcentrifuge for less than 1 minute to move all of the liquid to the bottom of the tube.
- we Store at -20 °C until ready to use.
11/02/2022 – Casting Argose Gel
- We Prepare enough 0.8 % agarose gel to cover the tips of the gel combs by ~2–3 mm.
- Weigh out the appropriate mass of agarose powder, and then we transfer the powder to an Erlenmeyer flask.
- Add the appropriate volume of 1X TBE buffer to the agarose powder. We swirl gently to mix.
- We heat the mixture in the microwave just until it boils (1–2 minutes).
- We carefully remove the flask from the microwave.
- Very gently, we swirl to mix and then examine the solution for small transparent clumps.
- We Allow the solution to cool to between 50 °C and 60 °C
- We Pour the agarose/EtBr mixture into the prepared gel apparatus.
- Allow the gel to cool for 20–30 minutes.
- Once the gel has solidified, we very carefully remove the comb by pulling it slowly straight up. Once the comb is removed, we gently lift the gel platform out of the casting tray.
- Place the platform with the solidified gel into the gel box.
- we Pour 1X TBE buffer into the gel apparatus until your gel is submerged by ~ 1/4 inch of the buffer.
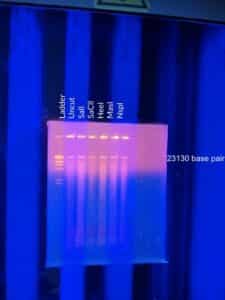
Results: 23130 Base pairs are shown
Conclusions and Next Steps: do the whole genome DNA sequencing.
Whole genome DNA sequences
Date: Redo: Sample:
Purpose:
Notes:
Results:
Conclusions and Next Steps: