Discovery of DaddyP
DaddyP Information
Morphology: Siphoviridae

Sample Collection
| Collector Name |
Justin Spere | Justin Spere | Justin Spere | Justin Spere |
| Sample No. | JS1 | JS2 | JS3 | JS4 |
| Date of Collection | August 28, 2022 | August 28, 2022 | September 12, 2022 | September 19, 2022 |
| Sample Type | Soil | Soil | Soil | Plant |
| General Location | In a ditch on the side of the Highway 6 less than 0.5 miles outside of De Leon, Tx | Off the shoulder of Highway 6 roughly 1 mile outside of De Leon, Tx | In a dried up creek bed off of North Barker St. in Stephenville, Tx. | Outside the Science and Mathematics building on the campus of Tarleton State University, Stephenville Tx. |
| Location Description | Very few trees or bodies of water nearby. Soil was fairly dry | Few trees, a pond was roughly 1000 feet away. Soil was fairly dry. | Surrounded by trees and plant life. The creek bed was roughly 4-5 feet lower than the dry land. Soil was very moist | It was a sample made of dry grass clippings. It was on top of green grass. |
| GPS Coordinates | 32 Degrees 06’41″N by 98 Degrees 30’42″W | 32 Degrees 06’40” N by 98 Degrees 30’40″W | 32 Degrees 12’31” N by 98 Degrees 13’51” W | 32 Degrees 13’00” N by 98 Degrees 13’11″W |
| Sample Depth | 2-3 inches | 2-3 inches | 2-3 inches | On top of grass |
| Ambient Temperature | 36 Degrees Celsius | 36 Degrees Celsius | 31 Degrees Celsius | 26 Degrees Celsius |
| Collector Name | Selina Gomes | Justin Spere | Justin Spere | Justin Spere |
| Sample No. | SG1 | JS5 | JS6 | JS7 |
| Date of Collection | Semptember 20, 2022 | September 19, 2022 | September 21, 2022 | October 8, 2022 |
| Sample Type | Soil | Water | Water | Soil |
| General Location | In an anthill from Selina’s backyard. | In the Bosque River in Stephenville, Tx | In the Bosque River in Stephenville, Tx | My father’s farm outside of Carbon, Tx |
| Location Description | Soil was out of an ant hill. | The water has been stagnant for awhile. It is mostly dried up, so what is left is in shallow ponds along the river bed. | The water has been stagnant for awhile. It is mostly dried up, so what is left is in shallow ponds along the river bed. | The area has been kept irrigated, the grass was bright green, so the soil should be plenty wet. It was also near the dog’s water tub, so the animals should attract more bacteria. |
| GPS Coordinates | 32 Degreea 14’07” N by 98 Degrees 19’05” W | 32 Degrees 13’24” N By 98 Degrees 11’42” W | 32 Degrees 13’24” N By 98 Degrees 11’41” W | 32 Degrees 14’08” N by 98 Degrees 55’11” W |
| Sample Depth | Surface level of ant hill | Right at the surface of the water | Surface level | ~2-3 inches below surface. |
| Ambient Temperature | 37 Degrees Celsius | 35 Degrees Celsius | 33 Degrees Celsius | 23 Degrees Celsius |
| Collector Name | Ethan Zavala | Ethan Zavala | Ethan Zavala | Ethan Zavala |
| Sample No. | EZ1 | EZ2 | EZ3 | EZ4 |
| Date of Collection | August 28, 2022 | August 28, 2022 | September 12, 2022 | September 19, 2022 |
| Sample Type | Soil | Soil | Soil | Water |
| General Location | In a ditch off of the side road outside of Stephenville, TX | In a ditch off of the side road outside of Stephenville, TX | In a dried up creek bed off of North Barker St. in Stephenville, Tx. | In the Bosque River in Stephenville, Tx |
| Location Description | Few trees lining the neighboring homes. With minimal plant life. Soil was failry dry. | Few trees lining the neighboring homes. With minimal plant life. Soil was fairly dry. | Surrounded by trees and plant life. The creek bed was roughly 4-5 feet lower than the dry land. Soil was very moist | The water has been stagnant for awhile. It is mostly dried up, so what is left is in shallow ponds along the river bed. |
| GPS Coordinates | 32 Degrees 13’47″N By 98 Degrees 11’33″W | 32 Degrees 13’49″N By 98 Degrees 11’34″W | 32 Degrees 12’33” N by 98 Degrees 13’52” W | 32 Degrees 13’24” N By 98 Degrees 11’42” W |
| Sample Depth | 2-3 inches | 2-3 inches | 2-3 inches | Surface level |
| Ambient Temperature | 36 Degrees Celsius | 36 Degrees Celsius | 31 Degrees Celsius | 35 Degrees Celsius |
Isolation/Purification
Title: Direct Isolation & Plaque Assay
Date: 8/31/2022 Redo: No Sample: EZ1
Purpose: This procedure serves to isolate the possible bacteriophages within the environmental sample EZ1 for further testing and to determine the existence of phages within sample EZ1.
Notes:
- We washed our hands and disinfected our work area with a 70% ethanol solution. We used aseptic technique by lighting a burner attached to a can of butane. We operated within 8 inches of the burner.
- We emptied the samples from their plastic bag into a sterile 15 mL conical tube.
- We added liquid media PYCa to the sample until it was under roughly 2-3 mL of liquid media.
- We sent the sample through a shaking incubator for ~1 hour.
- We removed our sample, but it was not seperated well enough. We extracted the liquid sample and placed it into 2 one mL microcentrifuge tubes to be further seperated. They were sent through the centrifuge at 2,000 RPMs for 2 minutes.
- After removing our samples from the centrifuge, we filtered our samples through a .22 microliter filter into a one mL microcentrifuge tubes for further testing.
- On 9/7/2022, we performed plaque assay. We washed our hands and disinfected our work area with a 70% ethanol solution. We used aseptic technique by lighting a burner attached to a can of butane. We operated within 8 inches of the burner.
- We then pipetted 500 microliters of filtrate into a tube containing 250 microliters of Microbracterium Foliorum.
- We gently mixed the solution and let it sit for ~10 minutes. We then pipetted 3 mL of top agar into tube containing solution.
- We pipetted the liquid agar mixture onto an agar plate. We tilted the plate in different directions to evenly distribute the mixture. We then let the plate sit for ~20 minutes
- We placed the plate into the incubator at 3:45 PM on 9/7/2022.
- We checked the plate on 9/8/2022 and there were no plaques; we will check again on 9/12/2022.
Results: We found no evidence of phages in this sample.
Conclusions and Next Steps: Collect new samples on 9/12/2022.
Title: Direct Isolation
Date: 8/31/2022 Redo: No Sample: EZ2
Purpose: This procedure serves to isolate possible bacteriophages from the environmental sample EZ2 for further testing.
Notes:
- We washed our hands and disinfected our work area with a 70% ethanol solution. We used aseptic technique by lighting a burner attached to a can of butane. We operated within 8 inches of the burner.
- We emptied the samples from their plastic bag into a sterile 15 mL conical tube.
- We added liquid media PYCa to the sample until it was under roughly 2-3 mL of liquid media.
- We sent the sample through a shaking incubator for ~1 hour.
- We removed our sample, but it was not separated well enough. Roughly 1 mL of the liquid sample was spilled; however, no contamination occurred to the rest of the liquid that remained in the tube. We extracted the liquid sample and placed it into a one mL microcentrifuge tube to be further separated. It was sent through the centrifuge at 2,000 RPMs for 2 minutes.
- After removing our samples from the centrifuge, we sent our sample through a .22 microliter filter to inject our pure samples into 2 one mL microcentrifuge tubes for plaque assays.
- We then pipetted 500 microliters of filtrate into a tube containing 250 microliters of Microbracterium Foliorum.
- We gently mixed the solution and let it sit for ~10 minutes. We then pipetted 3 mL of top agar into tube containing solution.
- We pipetted the liquid agar mixture onto an agar plate. We tilted the plate in different directions to evenly distribute the mixture. We then let the plate sit for ~20 minutes
- We placed the plates directly in the fridge instead of the incubator. ~4 hours later, we removed the plate and placed it into an incubator at ~3:00 PM on 9/7/2022. We will check for plaques on 9/8/2022.
- As of 9/8/2022, there were no plaques.
- On 9/12/2022, there were no plaques. We decided the sample was not viable.
Results: We found no evidence of phages.
Conclusions and Next Steps: We will collect new samples on 9/12/2022
____________________________________________________________________________________
Title: Direct Isolation and Plaque Assay
Date: 9/1/2022 Redo: No Sample: JS1
Purpose: This procedure serves to isolate the possible bacteriophages within the environmental sample JS1 for further testing and determine the existence of phages within the sample.
Notes:
- We washed our hands and disinfected our work area with a 70% ethanol solution. We used aseptic technique by lighting a burner attached to a can of butane. We operated within 8 inches of the burner.
- We added liquid media PYCa to the sample until it was under roughly 3-4 mL of liquid media.
- We sent the sample through a shaking incubator for ~1 hour.
- After removing our samples from the incubator, we put the samples into the fridge until 9/7/2022.
- On 9/7/2022, we filtered the sample through a .22 microliter filter into a one mL microcentrifuge tubes for further testing.
- We then proceded with the plaque assay, we pipetted 500 microliters of filtrate into a tube with 250 microliters of Microbactium Foliorum. We gently flicked the tube to mix the solution.
- We let the sample sit undisturbed for 25 minutes while we waited for the agar plate to reach room temperature.
- We pipetted the liquid agar into the tube with the sample, then we pipetted the mixture onto an agar plate. There were minimal bubbles.
- We placed the plates directly in the fridge instead of the incubator. ~4 hours later, we removed the plate and placed it into an incubator at ~3:00 PM on 9/7/2022. We will check for plaques on 9/8/2022.
- As of 9/8/2022, there were no plaques.
- On 9/12/2022, there were no plaques. We decided the sample was not viable
Results: We found no evidence of phages in this sample.
Conclusions and Next Steps: Collect new samples on 9/12/2022.
____________________________________________________________________________________________
Title: Direct Isolation & Plaque Assay
Date: 9/1/2022 Redo: No Sample: JS2
Purpose: This procedure serves to isolate the possible bacteriophages within the environmental sample JS2 for further testing and determine the existence of phages within the sample.
Notes:
- We washed our hands and disinfected our work area with a 70% ethanol solution. We used aseptic technique by lighting a burner attached to a can of butane. We operated within 8 inches of the burner.
- We added liquid media PYCa to the sample until it was under roughly 3-4 mL of liquid media.
- We sent the sample through a shaking incubator for ~1 hour.
- After removing our samples from the incubator, we filtered our samples through a .22 microliter filter into 4 one mL microcentrifuge tubes for further testing.
- We then proceeded with the plaque assay; we pipetted 500 microliters of filtrate into a tube with 250 microliters of Microbactium Foliorum. We gently flicked the tube to mix the solution.
- We let the sample sit for ~10 minutes.
- We placed the plates directly in the fridge instead of the incubator. ~4 hours later, we removed the plate and placed it into an incubator at ~3:00 PM on 9/7/2022. We will check for plaques on 9/8/2022.
- As of 9/8/2022, there were no plaques.
- On 9/12/2022, there were no plaques. We decided the sample was not viable
Results: We found no evidence of phages in this sample.
Conclusions and Next Steps: Collect new samples on 9/12/2022.
________________________________________________________________________________________
Title: Direct Isolation and Plaque Assay
Date: 9/12/2022 Redo: Yes Sample: JS3
Purpose: This procedure serves to isolate the possible bacteriophages within the environmental sample JS3 for further testing and determine the existence of phages within the sample.
Notes:
- We washed our hands and disinfected our work area with a 70% ethanol solution. We used aseptic technique by lighting a burner attached to a can of butane. We operated within 8 inches of the burner.
- We added liquid media PYCa to the sample until it was under roughly 3-4 mL of liquid media.
- We sent the sample through a shaking incubator for ~1 hour.
- After removing our samples from the incubator, we discovered that the sample was not as clear as we wanted it. We withdrew the liquid part of the sample and injected it into a 1 mL microcentrifuge tube. We put the sample into the centrifuge for 2 minutes at 2,000 RPMs.
- We filtered our samples through a .22 microliter filter into 2 1 mL microcentrifuge tubes for further testing.
- We then proceeded with the plaque assay; we pipetted 500 microliters of filtrate into a tube with 250 microliters of Microbactium Foliorum. We gently flicked the tube to mix the solution.
- We let the sample sit for ~10 minutes.
- We then pipetted 3 mL of liquid top agar into the tube containing the solution and immediately withdrew the new mixture and dispensed it onto an agar plate.
- We let the sample sit for ~15 minutes
- We placed the sample into the incubator.
- We checked the samples on 9/19/2022 and found no evidence of phages.
Results: We found no evidence of phages
Conclusions and Next Steps: We will collect new samples and try again.
________________________________________________________________________________________
Title: Direct Isolation and Plaque Assay
Date: 9/12/2022 Redo: Yes Sample: EZ3
Purpose: This procedure serves to isolate the possible bacteriophages within the environmental sample EZ3 for further testing and determine the existence of phages within the sample.
Notes:
- We washed our hands and disinfected our work area with a 70% ethanol solution. We used aseptic technique by lighting a burner attached to a can of butane. We operated within 8 inches of the burner.
- We added liquid media PYCa to the sample until it was under roughly 3-4 mL of liquid media.
- We sent the sample through a shaking incubator for ~1 hour.
- After removing our samples from the incubator, we discovered that the sample was not as clear as we wanted it. We withdrew the liquid part of the sample and injected it into 2 1 mL microcentrifuge tubes. We put the samples into the centrifuge for 2 minutes at 2,000 RPMs.
- We filtered our samples through a .22 microliter filter into 2 one mL microcentrifuge tubes for further testing.
- We then proceeded with the plaque assay; we pipetted 500 microliters of filtrate into a tube with 250 microliters of Microbactium Foliorum. We gently flicked the tube to mix the solution.
- We let the sample sit for ~10 minutes.
- We then pipetted 3 mL of liquid top agar into the tube containing the solution and immediately withdrew the new mixture and dispensed it onto an agar plate.
- We let the sample sit for ~15 minutes
- We placed the sample into the incubator.
- We checked the samples on 9/19/2022 and found no evidence of phages.
Results: We found no evidence of phages
Conclusions and Next Steps: We will collect new samples and try again.
________________________________________________________________________________________
Title: Direct Isolation and Plaque Assay
Date: 9/19/2022 Redo: Yes Sample: JS4
Purpose: This procedure serves to isolate the possible bacteriophages within the environmental sample JS4 for further testing and determine the existence of phages within the sample.
Notes:
- We washed our hands and disinfected our work area with a 70% ethanol solution. We used aseptic technique by lighting a burner attached to a can of butane. We operated within 8 inches of the burner.
- We added liquid media PYCa to the sample until the sample tube was filled with roughly 11 mL of liquid
- We shook the sample by hand for roughly 5 minutes. We did not send it through the shaking incubator as the sample was loose grass.
- We filtered our samples through a .22 microliter filter into 4 one mL microcentrifuge tubes for further testing.
- We then proceeded with the plaque assay; we pipetted 1 mL of filtrate into a tube with 250 microliters of Microbactium Foliorum. We gently flicked the tube to mix the solution.
- We let the sample sit for ~10 minutes.
- We then pipetted 3 mL of liquid top agar into the tube containing the solution and immediately withdrew the new mixture and dispensed it onto an agar plate.
- We let the sample sit for ~15 minutes
- We placed the sample into the incubator.
- We checked the incubator once on 9/20/22 and again on9/21/22 an we found no evidence of phages.
- Results: We found no evidence of phages
Conclusions and Next Steps: We will collect new samples and try again.
________________________________________________________________________________________
Title: Direct Isolation and Plaque Assay
Date: 9/20/2022 Redo: Yes Sample: SG1
Purpose: This procedure serves to isolate the possible bacteriophages within the environmental sample SG1 for further testing and determine the existence of phages within the sample.
Notes:
- We washed our hands and disinfected our work area with a 70% ethanol solution. We used aseptic technique by lighting a burner attached to a can of butane. We operated within 8 inches of the burner.
- We added liquid media PYCa to the sample until the sample was fully saturated and submerged below 3 mL of liquid.
- We sent the sample through a shaking incubator for ~2 hours
- We filtered our samples through a .22 microliter filter into 4 one mL microcentrifuge tubes for further testing.
- We then proceeded with the plaque assay; we pipetted 1 mL of filtrate into a tube with 250 microliters of Microbactium Foliorum. We gently flicked the tube to mix the solution.
- We let the sample sit for ~10 minutes.
- We then pipetted 3 mL of liquid top agar into the tube containing the solution and immediately withdrew the new mixture and dispensed it onto an agar plate.
- We let the sample sit for ~15 minutes
- We placed the sample into the incubator.
- We checked the incubator once on 9/20/2022, again on 9/21/2022, and again on 9/22/2022. We found no evidence of phages.
Results: We found no evidence of phages
Conclusions and Next Steps: We will collect new samples and try again.
________________________________________________________________________________________
Title: Direct Isolation and Plaque Assay
Date: 9/20/22 Redo: Yes Sample: JS5
Purpose: This procedure serves to isolate the possible bacteriophages within the environmental sample JS5 for further testing and determine the existence of phages within the sample.
Notes:
- We washed our hands and disinfected our work area with a 70% ethanol solution. We used aseptic technique by lighting a Bunsen Burner. We operated within 8 inches of the burner.
- We filtered our samples through a .22 microliter filter into 2 one mL microcentrifuge tubes for further testing.
- We then proceeded with the plaque assay; we pipetted 500 microliters of filtrate into a tube with 250 microliters of Microbactium Foliorum. We gently flicked the tube to mix the solution.
- We let the sample sit for ~10 minutes.
- We then pipetted 3 mL of liquid top agar into the tube containing the solution and immediately withdrew the new mixture and dispensed it onto an agar plate.
- We let the sample sit for ~35 minutes
- We turned over the sample to label it, but the agar had not properly set. We do not know why it did not harden, but the sample was practically destroyed. We placed it into the incubator anyway just in case something grew.
- We check the samples on 9/20/22 and again on 9/21/22 and we found no evidence of phages
Results: We found no evidence of phages
Conclusions and Next Steps: We will collect new samples and try again.
__________________________________________________________________________________
Title: Direct Isolation and Plaque Assay
Date: 9/26/22 Redo: Yes Sample: JS5
Purpose: This procedure serves to isolate the possible bacteriophages within the environmental sample JS5 for further testing and determine the existence of phages within the sample.
Notes:
We are doing another plaque assay on this sample, but with a different agar in hopes of finding a phage.
- We washed our hands and disinfected our work area with a 70% ethanol solution. We used aseptic technique by lighting a Bunsen Burner. We operated within 8 inches of the burner.
- We filtered our samples through a .22 microliter filter into a one mL microcentrifuge tubes for further testing.
- We then proceeded with the plaque assay; we pipetted 500 microliters of filtrate into a tube with 250 microliters of Microbactium Foliorum. We gently flicked the tube to mix the solution.
- We let the sample sit for ~15 minutes.
- We then pipetted 3 mL of liquid top agar into the tube containing the solution and immediately withdrew the new mixture and dispensed it onto an agar plate.
- The sample was turned over on accident before it could harden, so we threw out the plate.
Results: The sample was destroyed.
Conclusions and Next Steps: We will collect new samples and try again.
_________________________________________________________________________________________________
Title: Direct Isolation and Plaque Assay
Date: 9/20/22 Redo: Yes Sample: EZ4
Purpose: This procedure serves to isolate the possible bacteriophages within the environmental sample EZ4 for further testing and determine the existence of phages within the sample.
Notes:
- We washed our hands and disinfected our work area with a 70% ethanol solution. We used aseptic technique by lighting a Bunsen Burner. We operated within 8 inches of the burner.
- We filtered our samples through a .22 microliter filter into 2 one mL microcentrifuge tubes for further testing.
- We then proceeded with the plaque assay; we pipetted 500 microliters of filtrate into a tube with 250 microliters of Microbactium Foliorum. We gently flicked the tube to mix the solution.
- We let the sample sit for ~10 minutes.
- We then pipetted 3 mL of liquid top agar into the tube containing the solution and immediately withdrew the new mixture and dispensed it onto an agar plate. We did this with each tube of filtrate.
- We let the samples sit for ~35 minutes
- We placed the samples into the incubator
- We check the samples on 9/20/22, again on 9/21/22, and again on 9/22/22 and we found no evidence of phages
Results: We found no evidence of phages
Conclusions and Next Steps: We will collect new samples and try again.
_________________________________________________________________________________________________
Title: Direct Isolation and Plaque Assay
Date: 9/20/22 Redo: Yes Sample: EZ4
Purpose: This procedure serves to isolate the possible bacteriophages within the environmental sample EZ4 for further testing and determine the existence of phages within the sample.
Notes:
We are doing this procedure again with the same sample but with a different agar in hopes of finding phages.
- We washed our hands and disinfected our work area with a 70% ethanol solution. We used aseptic technique by lighting a Bunsen Burner. We operated within 8 inches of the burner.
- We filtered our samples through a .22 microliter filter into 2 one mL microcentrifuge tubes for further testing.
- We then proceeded with the plaque assay; we pipetted 500 microliters of filtrate into a tube with 250 microliters of Microbactium Foliorum. We gently flicked the tube to mix the solution.
- We let the sample sit for ~15 minutes.
- We then pipetted 3 mL of liquid top agar into the tube containing the solution and immediately withdrew the new mixture and dispensed it onto an agar plate. We did this with each tube of filtrate.
- We let the samples sit for ~35 minutes
- We placed the samples into the incubator
- We checked the sample on 9/28/2022 and found no evidence of phages
Results: We found no evidence of phages
Conclusions and Next Steps: We will proceed with adopting a phage due to time constraints.
_________________________________________________________________________________________________
Title: Adoption of the Hanzbop Phage
Date: 9/28/2022 Redo: No Sample: JSEZ1
Purpose: To isolate an adopted phage sample for further testing.
Notes:
- We washed our hands and disinfected our work area with a 70% ethanol solution. We used aseptic technique by lighting a Bunsen Burner. We operated within 8 inches of the burner.
- We then proceeded with the plaque assay; we pipetted 500 microliters of filtrate into a tube with 250 microliters of Microbactium Foliorum. We gently flicked the tube to mix the solution.
- We let the sample sit for ~15 minutes.
- We then pipetted 3 mL of liquid top agar into the tube containing the solution and immediately withdrew the new mixture and dispensed it onto an agar plate. We did this with each tube of filtrate.
- We let the samples sit for ~35 minutes
- We placed the samples into the incubator
- We checked the samples ~48 hours later and found no plaques.
Results: No phages were found
Conclusions and Next Steps: Redo the plaque assay with different samples
_________________________________________________________________________________________________
Title: Direct Isolation and Plaque Assay
Date: 10/3/22 Redo: Yes Sample: JS5
Purpose: This procedure serves to isolate the possible bacteriophages within the environmental sample JS5 for further testing and determine the existence of phages within the sample.
Notes:
We are doing another plaque assay on this sample.
- We washed our hands and disinfected our work area with a 70% ethanol solution. We used aseptic technique by lighting a Bunsen Burner. We operated within 8 inches of the burner.
- We used a previously filtered sample, so we did not have to filter it today.
- We then proceeded with the plaque assay; we pipetted 500 microliters of filtrate into a tube with 250 microliters of Microbactium Foliorum. We gently flicked the tube to mix the solution.
- We let the sample sit for ~7 minutes.
- We then pipetted 3 mL of liquid top agar into the tube containing the solution and immediately withdrew the new mixture and dispensed it onto an agar plate.
- We check the samples ~48 hours later and found no plaques.
-
Results: No phages were found
Conclusions and Next Steps: Redo the plaque assay with different samples
-
_________________________________________________________________________________________________
Title: Direct Isolation and Plaque Assay
Date: 10/3/22 Redo: Yes Sample: Hanzbop
Purpose: This procedure serves to isolate the possible bacteriophages within the environmental sample Hanzbop for further testing and determine the existence of phages within the sample.
Notes:
We are doing another plaque assay on this sample. This sample was collected and isolated by Aeron Pennington.
- We washed our hands and disinfected our work area with a 70% ethanol solution. We used aseptic technique by lighting a Bunsen Burner. We operated within 8 inches of the burner.
- We used a previously filtered sample, so we did not have to filter it today.
- We then proceeded with the plaque assay; we pipetted 500 microliters of filtrate into a tube with 250 microliters of Microbactium Foliorum. We gently flicked the tube to mix the solution.
- We let the sample sit for ~7 minutes.
- We then pipetted 3 mL of liquid top agar into the tube containing the solution and immediately withdrew the new mixture and dispensed it onto an agar plate.
- We placed the plates into the incubator.
- We checked the plates after 4 hours, 31 hours, and finally at 48 hours, and we found no plaques.
Results: We found no plaques.
Conclusions and Next Steps: We will do plaque assay with a new sample.
_________________________________________________________________________________________________
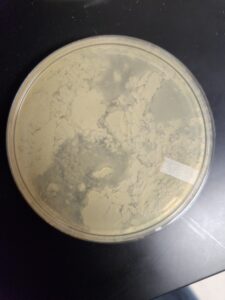
Title: Direct Isolation and Plaque Assay
Date: 10/3/22 Redo: Yes Sample: Positive Control
Purpose: This procedure serves to find any errors in our procedure.
Notes:
We are doing a plaque assay on another group’s low volume lysate. When they did their plate, they found plaques. This will tell us if the problem has been in our samples or our procedure.
- We washed our hands and disinfected our work area with a 70% ethanol solution. We used aseptic technique by lighting a Bunsen Burner. We operated within 8 inches of the burner.
- We proceeded with the plaque assay; we micropipetted 10 microliters of lysate into a tube with 250 microliters of Microbactium Foliorum. We gently flicked the tube to mix the solution.
- We let the sample sit for ~7 minutes.
- We then pipetted 3 mL of liquid top agar into the tube containing the solution and immediately withdrew the new mixture and dispensed it onto an agar plate.
- We placed the sample into the incubator
- We check the plate at 24 hours and the phage had cleared the plate. This told us that the error is in the samples.
Results: Concluded on why we had found no phages yet
Conclusions and Next Steps: Gather a new sample from a new area.
_________________________________________________________________________________________________
Title: Direct Isolation and Plaque Assay
Date: 10/3/22 Redo: Yes Sample: EZ4
Purpose: This procedure serves to isolate the possible bacteriophages within the environmental sample EZ4 for further testing and determine the existence of phages within the sample.
Notes:
We are doing another plaque assay on this sample.
- We washed our hands and disinfected our work area with a 70% ethanol solution. We used aseptic technique by lighting a Bunsen Burner. We operated within 8 inches of the burner.
- We pulled our filtrate out of the fridge.
- We used a previously filtered sample, so we did not have to filter it today.
- We then proceeded with the plaque assay; we pipetted 500 microliters of filtrate into a tube with 250 microliters of Microbactium Foliorum. We gently flicked the tube to mix the solution.
- We let the sample sit for ~7 minutes.
- We then pipetted 3 mL of liquid top agar into the tube containing the solution and immediately withdrew the new mixture and dispensed it onto an agar plate.
- We checked the plate at 24 and 48 hours and found no plaques
Results: We found no evidence of phages
Conclusions and Next Steps: We will gather new samples and try again.
_________________________________________________________________________________________________
Title: Direct Isolation and Plaque Assay
Date: 10/3/22 Redo: Yes Sample: JS6
Purpose: This procedure serves to isolate the possible bacteriophages within the environmental sample JS6 for further testing and determine the existence of phages within the sample.
Notes:
We are doing another plaque assay on this sample.
- We washed our hands and disinfected our work area with a 70% ethanol solution. We used aseptic technique by lighting a Bunsen Burner. We operated within 8 inches of the burner.
- We pulled our filtrate out of the fridge.
- We used a previously filtered sample, so we did not have to filter it today.
- We then proceeded with the plaque assay; we pipetted 500 microliters of filtrate into a tube with 250 microliters of Microbactium Foliorum.
- We let the sample sit for ~7 minutes.
- We then pipetted 3 mL of liquid top agar into the tube containing the solution and immediately withdrew the new mixture and dispensed it onto an agar plate.
- We placed the plate into the incubator
- We checked the plate at 24 and 48 hours and found no plaques.
Results: We found no evidence of phages
Conclusions and Next Steps: We will gather new samples and try again.
_________________________________________________________________________________________________
Title: Direct Isolation and Plaque Assay
Date: 10/8/22 Redo: Yes Sample: JS7
Purpose: This procedure serves to isolate the possible bacteriophages within the environmental sample JS7 for further testing and determine the existence of phages within the sample.
Notes:
We did this entire procedure under the supervision of intern Marlee Goppert.
- We washed our hands and disinfected our work area with a 70% ethanol solution. We used aseptic technique by lighting a Bunsen Burner. We operated within 8 inches of the burner.
- We injected liquid media until the sample was under 2-3 mL of media.
- We sent the sample through the shaking incubator for 2 hours.
- The sample was not separated to our liking, so we sent the sample through the microcentrifuge for 2 minutes.
- We took the filtrate and filtered it through a 0.22 micrometer filter; however, the sample filtered faster than I (Justin Spere) expected, so it overflowed out of the tube. We were able to divide the filtrate into 2 tubes. A third one had ~0.4 mL of filtrate.
- We then proceeded with the plaque assay; we pipetted 500 microliters of filtrate into a tube with 250 microliters of Microbactium Foliorum.
- We let the sample sit for ~7 minutes.
- We then pipetted 3 mL of liquid top agar into the tube containing the solution and immediately withdrew the new mixture and dispensed it onto an agar plate.
- We placed the plate into the incubator at 3:30 PM.
- We checked the plate at 11:20 AM the next day (~20 hrs later) and found 2 plaques. While a low number, we proceeded with serial dilutions and picking a plaque.
Results: We found evidence of phages. 2 plaques labeled 71 & 72
Conclusions and Next Steps: We will continue with the picking a plaque and serial dilution procedures.
_________________________________________________________________________________________________
Title: Picking a Plaque & Serial Dilution
Date: 10/11/2022 Redo: No Sample: JS7 Plaque 72
Purpose: To increase the concentration of phages and increase the number of plaques. This will purify and amplify the phage concentration.
Notes:
- We washed our hands and disinfected our work area with a 70% ethanol solution. We used aseptic technique by lighting a Bunsen Burner. We operated within 8 inches of the burner.
- We began by selecting the plaque 72 out of sample JS7. We circled it on the plate.
- We poked the plaque with a p200 tip on the micropipette to collect a sample of the phage.
- We mixed the phage selection with 100 microliters of phage buffer. We then vortexed the sample for ~1 second. This is our 10^0 sample.
- We withdrew 10 microliters of 10^0 sample. We mixed the phage selection with 90 microliters of phage buffer. We then vortexed the sample for ~1 second. This is our 10^-1 dilution.
- We withdrew 10 microliters of 10^-1 sample. We mixed the phage selection with 90 microliters of phage buffer. We then vortexed the sample for ~1 second. This is our 10^-2 dilution.
- We withdrew 10 microliters of 10^-2 sample. We mixed the phage selection with 90 microliters of phage buffer. We then vortexed the sample for ~1 second. This is our 10^-3 dilution.
- We withdrew 10 microliters of 10^-3 sample. We mixed the phage selection with 90 microliters of phage buffer. We then vortexed the sample for ~1 second. This is our 10^-4 dilution.
- We withdrew 10 microliters of 10^-4 sample. We mixed the phage selection with 90 microliters of phage buffer. We then vortexed the sample for ~1 second. This is our 10^-5 dilution.
- We set out plates for each of the dilutions and the undiluted sample (6 plates).
- We inoculated 6 tubes of 250 microliters of Microbacterium Foliorum with a corresponding sample. The result was 6 tubes containing a different concentration of phage and bacteria. (Each tube was paired with ONE dilution and one with undiluted sample.)
- We let the samples sit for ~7 minutes.
- We made a plate for each phage-bacteria solution (6 total).
- We let the samples sit for ~ 30 minutes to set.
- We placed the samples into the incubator.
- Removed the plates from the incubator and placed them into the fridge.
Results: We obtained the plaque that will be used in the second serial dilution.
Conclusions and Next Steps: We will use the plaque from our 10^-4 dilution to perform the second serial dilution.
_________________________________________________________________________________________________
Title: Picking a Plaque & Serial Dilution
Date: 10/12/2022 Redo: No Sample: JS7 Plaque 721
Purpose: To increase the concentration of phages and increase the number of plaques. This will purify and amplify the phage concentration.
Notes:
- We washed our hands and disinfected our work area with a 70% ethanol solution. We used aseptic technique by lighting a Bunsen Burner. We operated within 8 inches of the burner.
- We began by selecting the plaque 721 out of sample first serial dilution (10^-4 dilution.). We circled it on the plate.
- We poked the plaque with a p200 tip on the micropipette to collect a sample of the phage.
- We mixed the phage selection with 100 microliters of phage buffer. We then vortexed the sample for ~1 second. This is our 10^0 sample.
- We withdrew 10 microliters of 10^0 sample. We mixed the phage selection with 90 microliters of phage buffer. We then vortexed the sample for ~1 second. This is our 10^-1 dilution.
- We withdrew 10 microliters of 10^-1 sample. We mixed the phage selection with 90 microliters of phage buffer. We then vortexed the sample for ~1 second. This is our 10^-2 dilution.
- We withdrew 10 microliters of 10^-2 sample. We mixed the phage selection with 90 microliters of phage buffer. We then vortexed the sample for ~1 second. This is our 10^-3 dilution.
- We withdrew 10 microliters of 10^-3 sample. We mixed the phage selection with 90 microliters of phage buffer. We then vortexed the sample for ~1 second. This is our 10^-4 dilution.
- We withdrew 10 microliters of 10^-4 sample. We mixed the phage selection with 90 microliters of phage buffer. We then vortexed the sample for ~1 second. This is our 10^-5 dilution.
- We set out plates for each of the dilutions and the undiluted sample (6 plates).
- We inoculated 6 tubes of 250 microliters of Microbacterium Foliorum with a corresponding sample. The result was 6 tubes containing a different concentration of phage and bacteria. (Each tube was paired with ONE dilution and one with undiluted sample.)
- We let the samples sit for ~7 minutes.
- We made a plate for each phage-bacteria solution (6 total).
- We let the plates sit for ~ 30 minutes to set.
- We placed the samples into the incubator.
- Removed the plates from the incubator and placed them into the fridge.
Results: We obtained the plate that will be used in the procedure “Flooding the plate”
Conclusions and Next Steps: We will flood the plate from our 10^0 second dilution.
Amplification
Title: Making Webbed Plates
Date: 9/17/2022 Redo: No Sample: JS7 plaque 721
Purpose: To create several plates with a high density of phages.
Notes:
- We washed our hands and disinfected our work area with a 70% ethanol solution. We used aseptic technique by lighting a burner attached to a can of butane. We operated within 8 inches of the burner.
- We took our webbed plate from the second serial dilution, 10^0, and dispensed 8 mL of phage buffer onto the plate.
- We let the plate sit for 5 hours
- We aspirated the new solution off of the top of the plate and dispensed it through a 0.2 micrometer filter. We stored this as our low volume lysate
- We set up a serial dilution by labeling 6 microfuge tubes 0 through -5, we dispensed 90 microliters of phage buffer into each.
- We dispensed 10 microliters of low volume lysate into the tube labeled 10^0. We then vortexed for ~2 seconds.
- We aspirated 10 microliters out of the 10^0 and dispensed it into the 10^-1. We then vortexed for ~2 seconds.
- We aspirated 10 microliters out of the 10^-1 and dispensed it into the 10^-2. We then vortexed for ~2 seconds.
- We aspirated 10 microliters out of the 10^-2 and dispensed it into the 10^-3. We then vortexed for ~2 seconds.
- We aspirated 10 microliters out of the 10^-3 and dispensed it into the 10^-4. We then vortexed for ~2 seconds.
- We aspirated 10 microliters out of the 10^-4 and dispensed it into the 10^-5. We then vortexed for ~2 seconds.
- We injected 10 microliters out of each tube into respective tubes containing 250 microliters of Microbacterium Foliorum.
- We lightly mixed the solution by flicking the tube.
- We let the solutions sit for ~8 minutes.
- We dispensed 3 mL of molten agar into each tube and immediately aspirated the solution and dispensed it onto a plate. We did the first three, then let the agar heat back up in the incubator. We then did the last three.
- We let the samples solidify for ~30 minutes. We labeled the plates and placed them into the incubator at 4:10 PM.
- We checked the plates 41 hours later and the plates had fully incubated, but we made a mistake in our dilution. The 10^0 dilution should have had no phage buffer.
Results: We obtained a good set of plates; however, they were of the wrong dilution.
Conclusions and Next Steps: We will redo the procedure, but only with the 10^0 through the 10^-2 dilutions.
Title: Making Webbed Plates
Date: 9/19/2022 Redo: Yes Sample: JS7 plaque 721
Purpose: To create several plates with a high density of phages.
Notes:
- We washed our hands and disinfected our work area with a 70% ethanol solution. We used aseptic technique by lighting a burner attached to a can of butane. We operated within 8 inches of the burner.
- We used our low volume lysate made in the previous procedure.
- We set up a serial dilution by labeling 3 microfuge tubes 0 through -2, we dispensed 90 microliters of phage buffer into the -1 and -2 dilution, but no buffer in the 10^0 dilution.
- We dispensed 10 microliters of low volume lysate into the tube labeled 10^0. We then vortexed for ~2 seconds.
- We aspirated 10 microliters out of the 10^0 and dispensed it into the 10^-1. We then vortexed for ~2 seconds.
- We aspirated 10 microliters out of the 10^-1 and dispensed it into the 10^-2. We then vortexed for ~2 seconds.
- We injected 10 microliters out of each tube into respective tubes containing 250 microliters of Microbacterium Foliorum.
- We lightly mixed the solution by flicking the tube.
- We let the solutions sit for ~7 minutes.
- We dispensed 3 mL of molten agar into each tube and immediately aspirated the solution and dispensed it onto a plate.
- We let the samples solidify for ~30 minutes. We labeled the plates and placed them into the incubator at 10:15 AM.
- We checked the incubator on 10/20/2022, and the 0 dilution ate the plate, the -1 dilution was webbed, the -2 dilution had ~250 plaques.
Results: We had one successful webbed plate.
Conclusions and Next Steps: We will make more plates of the same dilution to make more webbed plates.
_________________________________________________________________________________________________
Title: Making Webbed Plates
Date: 9/19/2022 Redo: Yes Sample: JS7 plaque 721
Purpose: To create several plates with a high density of phages.
Notes:
- We washed our hands and disinfected our work area with a 70% ethanol solution. We used aseptic technique by lighting a burner attached to a can of butane. We operated within 8 inches of the burner.
- We used our low volume lysate made in the previous procedure.
- We did not need to run an entire serial dilution because we only needed webbed plates, and we know they form in a 10^-1 dilution. So we made 8 tubes of 10^-1 dilution for the high titer lysate.
- We dispensed 90 microliters of phage buffer into the 8 tubes which we will be using today.
- We aspirated 10 microliters out of the low volume lysate and dispensed it into the 10^-1. We then vortexed for ~2 seconds. We did this for 8 separate tubes.
- We injected 10 microliters out of each tube into respective tubes containing 250 microliters of Microbacterium Foliorum.
- We lightly mixed the solution by flicking the tube.
- We let the solutions sit for ~7 minutes.
- We dispensed 3 mL of molten agar into each tube and immediately aspirated the solution and dispensed it onto a plate.
- We let the samples solidify for ~30 minutes. We labeled the plates and placed them into the incubator at 10:15 AM.
- We checked the plates at 10:41 AM on 10/25/22 and we had made 8 good webbed plates.
Results: We made 8 webbed plates of the 10^-1 dilution of low volume lysate.
Conclusions and Next Steps: We will flood the plates to obtain a high titer lysate.
_________________________________________________________________________________________________
Title: Flooding The Plate
Date: 10/25/2022 Redo: No Sample: JS7 plaque 721
Purpose: To obtain a high volume lysate for future procedures
Notes:
- We washed our hands and disinfected our work area with a 70% ethanol solution. We used aseptic technique by lighting a Bunsen Burner. We operated within 8 inches of the burner.
- We dispensed 8 mL of phage buffer on 4 of the webbed plates obtained in our last procedure and one webbed plate from our serial dilution.
- We waited four hours to let the phage buffer “extract” the phages from the plates.
- We aspirated the liquid from the plates
- We dispensed 8 mL of the liquid obtained in the last step onto the 4 other plates.
- We waited ~3 and a half hours to the liquid “extract” more phages.
- We did it in two separate steps to increase the concentration.
- We aspirated the liquid and stored it in a 50 mL conical tube for future procedures.
Results: We obtained our high volume lysate.
Conclusions and Next Steps: We will calculate the titer.
_________________________________________________________________________________________________
Title: Calculating Titer
Date: 10/25/2022 Redo: No Sample: JS7 plaque 721
Purpose: To calculate the titer of our high volume lysate for future procedures.
Notes:
- We washed our hands and disinfected our work area with a 70% ethanol solution. We used aseptic technique by lighting a Bunsen Burner. We operated within 8 inches of the burner.
- We set up a serial dilution by labeling 6 microfuge tubes 0 through -5, we dispensed 90 microliters of phage buffer into all of the tubes except for the 10^0.
- We dispensed 30 microliters of high volume lysate into the tube labeled 10^0. We then vortexed for ~2 seconds.
- We aspirated 10 microliters out of the 10^0 and dispensed it into the 10^-1. We then vortexed for ~2 seconds.
- We aspirated 10 microliters out of the 10^-1 and dispensed it into the 10^-2. We then vortexed for ~2 seconds.
- We aspirated 10 microliters out of the 10^-2 and dispensed it into the 10^-3. We then vortexed for ~2 seconds.
- We aspirated 10 microliters out of the 10^-3 and dispensed it into the 10^-4. We then vortexed for ~2 seconds.
- We aspirated 10 microliters out of the 10^-4 and dispensed it into the 10^-5. We then vortexed for ~2 seconds.
- We got 6 tubes containing 250 microliters of Microbacterium Foliorum. We had to resuspend the bacteria because it had coagulated. We labeled each one from 0 to -5 for the dilutions
- We aspirated 10 microliters out of each dilution and injected them into their respectful tubes of bacteria.
- We let the samples sit for ~7 minutes to let the phage sample inoculate the bacteria.
- We injected 3 mL of liquid top agar into the tube and immediately aspirated the solution and dispensed it onto a plate. We let the plates sit for ~30 minutes. We repeated this for each tube.
- We made mistakes on the 0 and -5 dilutions, so we redid those with the leftover dilution solution.
- We placed the 6 plated into the incubator at 19:45 on 10/25/2022
- We check the plates at 15:06 on 10/26/2022, and the plates were successful, so we used the 10^-5 dilution to calculate the titer.
- There were 36 plaques, so the titer was 3.6 x 10^8
Results: We determined our titer.
Conclusions and Next Steps: We will proceed with the Transmission Electron Microscopy (TEM).
_________________________________________________________________________________________________
Title: Transmission Electron Microscopy (TEM)
Date: 10/26/2022 Redo: No Sample: JS7 plaque 721
Purpose: To prepare the electron grid to be sent off to the facility to be used with the electron microscope.
Notes:
- We washed our hands and disinfected our work area with a 70% ethanol solution. We used aseptic technique by lighting a Bunsen Burner. We operated within 8 inches of the burner.
- We aspirated 1 mL of our high volume lysate (titer: 3.6 x10^8) and put it into a 1.5 mL microcentrifuge tube. Because it must be in a balanced configuration, we placed another 1.5 mL microcentrifuge tube filled with water on the opposite side of the centrifuge
- We put the sample into a centrifuge at 4 degrees Celsius for 1 hour.
- We aspirated and disposed of the supernatant
- We injected 100 microliters of phage buffer into the microcentrifuge tube.
- We let the solution sit for 30 minutes at 37 degrees Celsius in the fridge.
- We put on gloves and operated within a fume hood.
- We placed a piece of parafilm onto a plate. We stuck a sticky tab onto the parafilm. We attached the grid to the side of the sticky tab so that the edge of the grid was adhered to the side of the tab. The dark shiny side was facing up.
- We dispensed 10 microliters of solution onto the grid. We let it sit for 5 minutes.
- We wicked off as much liquid as possible without touching the grid
- We dispensed 10 microliters of nuclease free water onto the grid to rinse. We let it sit for 2 minutes. We wicked the water off without touching the grid. We repeated this one more time.
- We dispensed 10 microliters of 1 % uranyl acetate onto the grid. We let it sit for two minutes. We wicked off the solution without touching the grid.
- We placed the grid into the grid box to be shipped to the facility.
Results: We prepared our grid to be shipped to the facility for TEM
Conclusions and Next Steps: We will get the TEM back and record its morphology and what type it is.
_________________________________________________________________________________________________
Title:
Date: Redo: Sample:
Purpose:
Notes:
Results:
Conclusions and Next Steps:
DNA Extraction
Title: DNA Extraction Using Zinc DiChloride
Date: 10/31/2022 Redo: No Sample: JS7 plaque 721
Purpose: To extract the DNA from the phages out of our High Titer Lysate.
Notes:
Day One
- We started by applying aseptic technique by washing our hand, sanitizing our workbench with 70% ethanol, and putting on gloves.
- We gently mixed our high titer lysate(Henceforth referred to as HTL). We then aspirated 5 mL of HTL and dispensed it into a 15 mL conical tube.
- We gave the tube to the intern Marlee Goppert, and she added 20 microliters of nuclease mix to the tube. We then gently inverted the tube several times to mix the solution.
- We incubated the tube at 37 degrees Celsius for 10 minutes.
- We aliquoted the solution into 5 microfuge tubes, putting 1 mL of solution into each.
- We added 20 microliters of zinc dichloride to each tube and gently mixed by inverting the tube several times.
- We incubated the solution at 37 degrees Celsius for 5 minutes.
- We centrifuged it at 10,000 RPM for 1 minute.
- We aspirated and discarded the supernatant, but kept the pellet.
- We dispensed 500 microliters of TES buffer into each tube.
- We incubated the tubes at 60 degrees Celsius for 15 minutes.
- We added 1 microliter of Proteinase K and mixed it gently. (We did NOT vortex).
- We incubated at 37 degrees Celsius for 10 minutes.
- We added 60 microliters of potassium acetate to each tube. We mixed it but did not vortex. We let it sit in ice for 15 minutes.
- We centrifuged at 4 degrees Celsius for 1 minute at 12,000 RPM.
- We aspirated the supernatant and dispensed it into new microfuge tubes. We discarded the pellets.
- We added 500 microliters of isopropanol to each tube. We then mixed the solution
- We left the tubes on ice for ~46 hours.
Day Two - We started by applying aseptic technique by washing our hand, sanitizing our workbench with 70% ethanol, and putting on gloves.
- We pulled our tubes out of the ice.
- We centrifuged our tubes at 8,500 RPM for 10 minutes.
- We discarded the supernatant into a waste tube. We could visibly see a pellet.
- We added 250 microliters of 70% ethanol to the tubes.
- We centrifuged our tubes at 8,500 RPM for 1 minute.
- We discarded the supernatant into the waste tube.
- We left the tubes upside-down on a paper towel for ~ an hour and 45 minutes in a fume hood to dry out the DNA.
- We injected 50 microliters of nuclease free water into one of the tubes, then aspirated it and dispensed it into the next tube. We then repeatedly dispensed and aspirated the same 50 microliters of nuclease free water into each tube. Similar to a serial dilution procedure.
- We left the water in the last tube.
- We used this solution in the Nanodrop machine and got 1174.7 micrograms per microliter. The A260/280 ratio was 2.06, and the A260/230 ratio was 2.33.
- We ran the sample through the Qubit machine and we got a concentration of 25.9 ng/microliter
Results: We obtained roughly 45 microliters of DNA extract.
Conclusions and Next Steps: We do not have enough extract to use all of the enzymes, so we will do 2 more DNA Extractions to obtain more extract. We would like to run more; however, we do not have enough High Titer Lysate.
Title: DNA Extraction Using Zinc DiChloride
Date: 11/02/2022 Redo: No Sample: JS7 plaque 721
Purpose: To extract the DNA from the phages out of our High Titer Lysate.
Notes:
We did this with two samples at once. For note keeping purposes, below is the notes for one, all things were done for each sample though.
Day One
- We started by applying aseptic technique by washing our hand, sanitizing our workbench with 70% ethanol, and putting on gloves.
- We gently mixed our high titer lysate(Henceforth referred to as HTL). We then aspirated 5 mL of HTL and dispensed it into a 15 mL conical tube.
- We gave the tube to the intern Marlee Goppert, and she added 20 microliters of nuclease mix to the tube. We then gently inverted the tube several times to mix the solution.
- We incubated the tube at 37 degrees Celsius for 10 minutes.
- We aliquoted the solution into 5 microfuge tubes, putting 1 mL of solution into each.
- We added 20 microliters of zinc dichloride to each tube and gently mixed by inverting the tube several times.
- We incubated the solution at 37 degrees Celsius for 5 minutes.
- We centrifuged it at 10,000 RPM for 1 minute.
- We aspirated and discarded the supernatant, but kept the pellet.
- We dispensed 500 microliters of TES buffer into each tube.
- We incubated the tubes at 60 degrees Celsius for 15 minutes.
- We added 1 microliter of Proteinase K and mixed it gently. (We did NOT vortex).
- We incubated at 37 degrees Celsius for 10 minutes.
- We added 60 microliters of potassium acetate to each tube. We mixed it but did not vortex. We let it sit in ice for 15 minutes.
- We centrifuged at 4 degrees Celsius for 1 minute at 12,000 RPM.
- We aspirated the supernatant and dispensed it into new microfuge tubes. We discarded the pellets.
- We added 500 microliters of isopropanol to each tube. We then mixed the solution
- We left the tubes on ice for ~46 hours.
Day Two - We started by applying aseptic technique by washing our hand, sanitizing our workbench with 70% ethanol, and putting on gloves.
- We pulled our tubes out of the ice.
- We centrifuged our tubes at 8,500 RPM for 10 minutes.
- We discarded the supernatant into a waste tube. We could visibly see a pellet.
- We added 250 microliters of 70% ethanol to the tubes.
- We centrifuged our tubes at 8,500 RPM for 1 minute.
- We discarded the supernatant into the waste tube.
- We left the tubes upside-down on a paper towel for ~ an hour and 45 minutes in a fume hood to dry out the DNA.
- We injected 50 microliters of nuclease free water into one of the tubes, then aspirated it and dispensed it into the next tube. We then repeatedly dispensed and aspirated the same 50 microliters of nuclease free water into each tube. Similar to a serial dilution procedure.
- We left the water in the last tube.
- We used this solution (Sample 1) in the Nanodrop machine and got 196.2 micrograms per microliter. The A260/280 ratio was 1.8, and the A260/230 ratio was 1.17.
- For our second solution (Sample 2), we got 196.2 micrograms per microliter. The A260/280 ratio was 1.86, and the A260/230 ratio was 1.25.
- We ran the samples through the Qubit and obtained concentrations of 19.3 ng/microliter and 14.8 ng/microliter.
Results: We obtained 2 samples of roughly 45 microliters each.
Conclusions and Next Steps: We will use these samples in Enzyme restriction.
_________________________________________________________________________________________________
Title:
Date: Redo: Sample:
Purpose:
Notes:
Results:
Conclusions and Next Steps:
Characterization
Title: Enzyme Restriction
Date: 11/10/2022 Redo: No Sample: JS7 Plaque 721
Purpose: To introduce enzymes that cut the DNA at specific nucleotides into the phage DNA to prepare for Gel Electrophoresis.
Notes:
We did not have enough high titer lysate to do all enzymes; we could only do restrictions on SAII, SACII, and NSP1.
- We started by applying aseptic technique by washing our hand, sanitizing our workbench with 70% ethanol, and putting on gloves.
- We gently mixed the DNA by flicking the microfuge.
- We then incubated the DNA at 65 degrees Celsius in the heat block for 10 minutes, then immediately placed it on ice.
- After waiting ~1 minute, we spun it in a microcentrifuge for ~1 minute.
- We did the calculations and we required 25.9 microliters of our 19.3 concentration, 33.8 microliters of our 14.8 concentration, and 19.3 microliters of our 25.9 concentration. The enzymes used were SAII (19.3 concentration), SACII (14.8 concentration), and NSPI (25.9 concentration).
- We set up the digestion by mixing in 2.5 microliters of 10x reaction buffer, .5 microliters of enzyme, the respective amount of DNA, and however much nuclease free water was needed to bring the total to 25 microliters.
- We gently mixed the solutions and spun it in a microcentrifuge for less than 1 minute.
- We incubated at 37 degrees Celsius for ~1 hour.
- We stored the samples in the cryofridge.
Results: We obtained 3 samples of DNA restricted by enzymes for electrophoresis.
Conclusions and Next Steps: We will run an electrophoresis gel with the DNA.
Title: Electrophoresis Gels
Date: 11/14/2022 Redo: No Sample: JS7 Plaque 721
Purpose: To visualize the DNA of our phage.
Notes:
- We started by applying aseptic technique by washing our hand, sanitizing our workbench with 70% ethanol, and putting on gloves.
- We set up our gel by weighing out the appropriate amount of agarose powder, and transferring it into an Erlenmeyer flask. We added the appropriate amount of 1x TBE buffer to the powder. We swirled gently and microwaved until boiling.
- We swirled the solution, and allowed it to cool.
- We waited for the solution to cool, then we added an appropriate amount of ethidium bromide. We swirled the solution to mix it.
- We poured the solution into the gel apparatus and inserted the comb.
- While it set, we prepared the enzyme digests by adding 5 microliters of loading dye into each sample. We placed them into a heat block at 65 degrees Celsius for 5 minutes, then immediately placed them on ice.
- We then spun the samples in a microfuge at 10,000 rpm for ~15 seconds.
- We loaded the enzymes digests into the now cooled gel. We did so by adding 20 microliters of each enzyme as well as 20 microliters of ladder.
- We plugged the gel into the power supply and set the voltage to 70 volts.
- We ran it for around 45 minutes, which is when it reached the 4.0 mark. We photographed the gel and disposed of it.
-
Results: We were able to visualize our phage’s DNA.
Conclusions and Next Steps: We will decide whose phage will be sent off for sequencing. We successfully visualized DaddyP’s DNA.