Discovery of KelliBelli
September 5, 2018 – Collection of Environmental Sample
Purpose: Environmental samples were collected in an attempt to extract a bacteriophage. 3 separate environmental samples were collected.
Collection of Solid Samples
- One 1.5 mL micro centrifuge tube was secured and the site of collection was selected.
- Using a gloved hand the top layer of soil was removed and a sample was collected into the tube. Making sure to secure the lid.
- While at the site, details of the location of the collection were recorded (ie. GPS coordinates, ambient temperature, and soil depth.
- The tube was labeled with the initials of the collector, date, and sample number. The tube was then stored in a refrigerator until taken to the laboratory.
- This procedure was repeated for the solid samples.
Results: Three soil samples were collected. Details of these samples were included in the chart below.
| Sample | 1 | 2 | 3 |
| Collector Name | R. Sandoval | R. Sandoval | R. Sandoval |
| Date of Collection | Sept. 5, 2018 | Sept. 5, 2018 | Sept. 5, 2018 |
| Sample Type | Soil | Soil | Soil |
| Location Description | Under a tree | Ant Hill | Hole dug by dogs |
| General Location | Jaycee Park | Jaycee Park | Yard |
| Latitude | 32.224 | 32.223 | 32.2111 |
| Longitude | -98.2297 | -98.2307 | -98.2155 |
| Sample Depth | 0.5 in | 0.5 in | 4 in |
| Ambient Temperature | 73°F | 73°F | 73°F |
September 6, 2018- Obtaining sample filtrate
Extracted sample 2 using direct isolation technique.
- In a 15 mL conical tube the soil sample was transferred.
- Liquid media was added to the sample until it was saturated, and was submerged beneath about 3 mL of media. The conical tube was capped and slowly inverted several times to ensure the whole sample was wet and there went any noticeable clumps of soil.
- The sample was left to incubate at 27 degrees Celsius in a shaking incubator for 2 hours at 250 rpm.
- The sample was allowed to settle before preparing the filtrate.
Preparing a phage filtrate
- Prepare a sterile syringe filter (0.22 μm) by opening the filter but leaving it in the package
- Using a sterile syringe to around 2 mL of liquid media that is above the soil sample was removed. Avoiding the soil sample in the process is key to ensure the filter was not clogged.
- Attach the syringe to the top of the filter, and then remove the filter from the package. Ensure the filter is screwed on securely, and the filter is not contaminated.
- In to a labeled 1.5 mL microcentifuge tube the liquid sample was filtered by depressing the syringe plunger forcing the sample through the filter.
- 0.9 mL of filtrate was collected
September 10th, 2018- Direct Isolation
- Prepare your bench for aseptic work and assemble your supplies.
- You will need an environmental sample collected
- Extract phage from solid environmental samples, such as soil or compost. If you collected a liquid sample, proceed directly to Step 4.
- Using a 15 ml conical tube, fill it approximately one-third to one-half full with soil.
- Add liquid media until the sample is submerged beneath 2–3 ml of liquid.
- Cap the tube and invert several times to mix thoroughly.
- Incubate the tube while shaking vigorously in a shaking incubator at 250 rpm for 1–2 hours.
- Allow the sample to sit until particulate matter has mostly settled. This may take as few as 2 minutes or as many as 20 minutes.
- Prepare a phage filtrate using aseptic technique.
- Open the package of a syringe filter (0.22 μm), leaving the filter in the packaging.
- Using a syringe, remove approximately 2 ml of liquid from the top of the flooded sample.
- Avoid withdrawing any solid material from the bottom of the tube to prevent clogging the filter during filtration.
- Attach the syringe to the top of the filter, and then remove the filter from the package. Be careful not to contaminate the filter in the process.
- Make sure the filter is screwed firmly into place.
- Depressing the syringe plunger, dispense a minimum of 0.5 ml of filtrate into a labeled microcentrifuge tube.
- Because debris can clog the filter, you may encounter resistance. Do not continue to force liquid through the filter or it will break. If your filter clogs, remove the clogged filter, replace it with a new one, and continue filtering.
- Cap the tube immediately.
- Discard the syringe and filter.
- Proceed directly to the Plaque Assay protocol.
September 12th, 2018- Plaque Assay
Day One
- Prepare your bench for aseptic work and assemble your supplies.
- Assemble the samples you want to assay.
- Inoculate the host bacteria with your phage sample.
- Obtain the same number of aliquots of 250 μl host bacterial cultures as you have phage samples, plus one for a positive control and one for a negative control.
- Label the culture tubes accordingly.
- Use a micropipettor and aseptic technique to
- Dispense each phage sample into the appropriate culture tube containing 250 μl of host bacteria according to Table 5.3-1.
- Mix each inoculated host culture by gently tapping the tube.
- Let your sample sit undisturbed for 5–10 minutes to allow for attachment.
- Plate the samples with top agar. For this part of the experiment you will need 3 ml of molten top agar per sample.
- Obtain the same number of agar plates as you have samples. (Don’t forget your positive and negative control samples.) Label these plates accordingly.
- Remove a bottle of top agar from the 55 °C bath.
- For each sample, including controls
- Using a sterile 5 ml pipette, aseptically transfer 3 ml of top agar to an inoculated host tube (i.e., the tube containing bacterial host and phage sample).
- Immediately aspirate (suck-up) the mixture back into the pipette and transfer it to the appropriate plate and discard the pipette.
- Gently, but quickly, tilt the plate in multiple directions until the top agar mixture evenly coats the agar plate.
- Repeat this process for each of your samples.
- Incubate plates to allow bacterial growth and phage infection.
- Let the plates sit undisturbed for ~20 minutes until the top agar solidifies.
- After the top agar has solidified, gently invert the plates and place in the proper incubator.
- Incubate the plates at 38 degree incubator for 15 hours.
September 13th, 2018
Day Two
- Check the plates for plaques.
- Remove the plates from the incubator and hold them up to a light source to look for plaques. (It is easier to see them if you remove the lid.)
- If you do not see plaques, return the plates to the incubator for further incubation and check again.
- Record your results in your lab notebook. What do you see on your plates? Count the number of plaques and take note of the size, shape, and other distinctive features of the plaques. Remember, negative results are important too.
- Remove the plates from the incubator and hold them up to a light source to look for plaques. (It is easier to see them if you remove the lid.)
September 17th, 2018- Picking a plaque
- Prepare your bench for aseptic work and assemble your supplies.
- Label the plaques.
- Using a labeling pen, mark the plaques you intend to pick by drawing a small circle around the plaque on the bottom of the plate. If picking multiple plaques, label each plaque with a unique letter or number, or with some other identifier.
- Record the detailed morphology of each plaque (e.g., size, cloudy or clear, margin type) you have circled.
- Label and prepare microcentrifuge tubes.
- Obtain as many tubes as the number of plaques you intend to pick.
- Using aseptic technique, aliquot 100 μl of phage buffer into each microcentrifuge tube.
- Label each tube according to the identifier you used for each plaque.
- “Pick” a plaque.
- Place a sterile tip onto a p200 micropipettor.
- Holding the pipettor perpendicular to the agar surface, gently stab the top agar in the center of the plaque avoiding the bacteria around he plaque.
- Place the end of the tip into the phage buffer in the corresponding microcentrifuge tube. Then tap the tip on the wall of the tube and pipette up and down to dislodge phage particles. Discard the tip.
- Mix well by vortexing.
- Repeat first 4 steps for remaining samples.
September 2018- Spot Test
- Prepare your bench for aseptic work and assemble your supplies.
- Collect the liquid phage samples that need testing.
- Prepare a bacterial lawn by using aseptic technique.
- Label the bottom of an agar plate.
- Divide the plate into as many sections as you have samples by drawing on the bottom of the plate. (See Figure 5.6-1 for examples of how to best divide the plate into sections.)
Label each section according to your samples.
- Divide the plate into as many sections as you have samples by drawing on the bottom of the plate. (See Figure 5.6-1 for examples of how to best divide the plate into sections.)
- Obtain a 250 μl culture of host bacteria.
- Using a sterile 5 ml pipette, transfer 3 ml of molten top agar to a culture tube containing host bacteria and then immediately draw the solution back into the same pipette.
- Dispense the top agar-bacteria mixture onto an agar plate.
- The top agar should not sit in the pipette for more than a few seconds because the agar will begin to solidify.
- Gently, but quickly, tilt the plate in multiple directions until the top agar mixture evenly coats agar plate.
- Allow the plate and to sit undisturbed for 20 minutes or until the top agar solidifies completely.
- Label the bottom of an agar plate.
.jpg?width=1600&height=750) |
| Figure 5.6-1. Possible spot plate patterns. |
- Spot the liquid phage samples and controls on the prepared bacterial lawn.
- Aseptically transfer 10 μl of each sample, one at a time, onto the proper location on the bacterial lawn.
- Hold the tip slightly above the agar and expel the drop slowly to avoid splattering.
- Be sure to spot your samples in the right place! Remember that labels on the bottom of a plate are mirror images (i.e., they will appear backward) of your labeling scheme when the plate is turned over.
- Spot 10 μl of sterile phage buffer on the plate as a negative control.
- Allow the liquid from the spots to absorb into the agar (generally 10–15 minutes).
- Without inverting the plates, incubate them at the proper temperature for 24–48 hours.
- Aseptically transfer 10 μl of each sample, one at a time, onto the proper location on the bacterial lawn.
- Check spot plates for clearing.
- After at least 24 hours, check each spot on the agar plate. If you see a zone of clearing for any of your spotted samples, congratulations! Your original sample contained phage!
- Make sure that your negative control does NOT show signs of phages.
- Record the details of your spot plate in your laboratory notebook.
September 2018- Serial Dilutions
- Prepare your bench for aseptic work and assemble your supplies.
- Set up 10-fold serial dilutions.
- Arrange the proper number of microcentrifuge tubes in a rack and label them 10-1, 10-2, 10-3,….10-8.
Important: See “Helpful Tips” to determine how many dilutions to make. - Add 90 μl of phage buffer to each of the tubes.
- Arrange the proper number of microcentrifuge tubes in a rack and label them 10-1, 10-2, 10-3,….10-8.
- Perform 10-fold serial dilutions (Figure 6.2-1).
- Add 10 μl of your undiluted phage sample to the “10-1” tube and vortex well.
- The solution in this “10-1” tube contains 1/10th the number of phage particles as your undiluted sample. It is also referred to as a 1:10 dilution.
- Make sure to use a clean pipette tip for each transfer and pipette carefully, vortexing your sample well before making each dilution. Otherwise, you will not make accurate 10-fold dilutions.
- Transfer 10 μl of the “10 -1” sample to the “10-2” tube and vortex well.
- This solution contains 1/100th as many phage particles as your undiluted sample. It can also be referred to as your 1:100 dilution.
- Continue each successive dilution until you get to your last tube.
- Add 10 μl of your undiluted phage sample to the “10-1” tube and vortex well.
 |
|
Figure 6.2-1. Serial dilutions. The serial dilution of phage in preparation for a plaque assay. A volume of the undiluted phage sample (10 μl) is transferred into 90 μl of phage buffer in the 10-1 tube. After the tube is mixed, 10 μl of the 10-1 sample is transferred into the 10-2 tube, and the tube is mixed. This serial dilution continues until the desired dilutions are obtained. The last tube will contain a final volume of 100 μl. |
September 2018- Plaque Assay for Purification
- Prepare your bench for aseptic work and assemble your supplies.
- Gather your phage samples.
- If you are starting from an enriched isolation that tested positive for phage, skip to Step D.
- If your phage sample is a plaque, draw a circle around the plaque of interest on the bottom of the plate and label it. Record the details in your lab notebook.
- Follow the Picking a Plaque (5.4) protocol to pick the plaque(s) you want purify.
- It is best to pick only well-isolated plaques (at least 1.5 cm apart) from a fresh plate.
- At the end of the “Picking a Plaque” protocol, you will have liquid phage samples.
- Dilute your liquid phage samples according to the Serial Dilutions (6.2) protocol.
- Prepare your agar plates.
- Obtain as many agar plates as you have phage samples to purify.
- Label the bottom of the plate with your name, the date, and a reference to the sample.
- Plate your dilutions according to the Plaque Assay (5.3) protocol.
- After incubating the plates for 24–48 hours, record your results in your lab notebook.
September 2018- Collecting Plate Lysate
- Prepare your bench for aseptic work and assemble your supplies.
- Identify one or more plates for lysate collection.
- Your webbed plate may be one prepared from your last round of plaque purification or from the protocol Making Webbed Plates (7.1).
 |
| Figure 6.3-1. Webbed plate with confluent plaques. |
- Flood the webbed plate(s).
- Apply 8 ml of sterile phage buffer to the webbed plate.
- Let the plate(s) sit at room temperature for 2–4 hours OR store the plates overnight (12–14 hours) at 4 °C.
- Swirl the phage buffer gently, taking care not to splash.
- Harvest a plate lysate.
- When the incubation time is complete, remove the lid from the plate and place it on the bench. Tilt the plate slightly by placing one edge of the plate on the lid, allowing the lysate to pool to one side (Figure 6.3-2).
- Prepare a 0.22 μm filter by opening the packaging but not removing the filter. Set aside.
- Using a 5 ml syringe aspirate (suck up) the lysate from the plate.
- Carefully attach the syringe to the filter. Depress the syringe plunger and collect the filtrate in a 15 ml sterile conical tube.
- If you still have unfiltered lysate remaining on your plate, remove the filter and store it in its plastic packaging to maintain sterility. Aspirate the remaining lysate, reattach the used filter, and filter the remaining lysate, collecting the filtrate in the same sterile conical tube.
- Label the tube appropriately.
 |
|
Figure 6.3-2. Collecting a plate lysate. After flooding a plate with phage buffer, the lysate can be collected by tipping the plate and allowing the liquid to pool to one side. It can then be aspirated into a syringe. |
- Pool the lysates.
- If you have multiple webbed plates for a single phage sample, repeat Step D for each plate. The same filter can be used for all plates if it remains sterile and unclogged. However, if it has been contaminated or becomes clogged, use a new filter.
- Combine all of the filtered lysates into the same sterile conical tube.
- Record the final volume of lysate collected.
- Store the lysates at 4 °C.
- This lysate can be stored for months at 4 °C. For longer-term storage, follow the protocol Archiving Your Phage Sample (7.3).
November 15, 2018- Alternative DNA Isolation protocol using ZnCl2 – Trial 1
Day One
Extracted sample 2 using direct isolation technique.
- In a 15 mL conical tube the soil sample was transferred.
- Liquid media was a
Gently mixed high volume lysate and aliquot 5 ml into a 15 ml conical tube, then carefully and with gloves 20 microliters of nuclease mix was added
- -The tube was gently inverted and incubated at 37 degrees Celsius for 10 minutes
- -The mixture was then equally aliquoted into 5 1.5 ml microcentrifuge tubes. About 1 mL of lysate in each.
- -20 mL of ZnCl2was added and gently mixed with inversion and incubate at 37 degrees Celsius for 5 minutes
- -Centrifuge 10,000 rpm for 1 minute to pellet the phage
- -Keeping the pellet the supernatants were removed by aspiration discarding the liquid filled pipette tips in the sharp trash.
- -Resuspending the pellets in 500 mL TES buffer per tube, and incubated at 60°C for 15 minutes. This will denature the capsids, exposing the DNA, while protecting it from the nuclease activity (EDTA in the TES sequesters divalent cations required for nuclease function).
- -1mL of Proteinase K was added then mixed gently. It was then incubated at 37°C for 10 minutes to completely eliminate any residual nuclease activity.
- -Adding 60mL of potassium acetate to each tube. Mixing each thoroughly and leaving on ice for 15 minutes. A white, dense precipitate formed. This represents the capsids.
- -Centrifuged at 4 °C for 1 minute at 12,000rpm to pellet the capsids. Keeping the supernatants containing the DNA, and pipetted into new microfuge tubes. The pelleted capsids were discarded.
- – 500 mL of isopropanol was then added to each of the tubes with the supernatant, mixed, and left on ice overnight.
November 16, 2018
Day Two
-Centrifuged at top speed for 10 minutes to pellet the precipitated DNA, and the supernatant was discarded into a waste tube. The pellets were a bit large and more white than clear.
– 250mL of 70% ethanol was added to each tube, and spun again for 1 minute, at top speed. This washed the DNA pellet. The supernatants were discarded into the waste tube.
-Drying DNA pellets at room temperature by turning them upside down for 15 minutes and then the tubes were placed in a 30°C incubator to help with drying. It was left in the incubator for roughly 30 minutes to ensure sample was dry.
-The first pellet was resuspended in 50mL of nuclease-free water. Then that solution was used to resuspend the next pellet. Continuing for all 5 pellets until they had been resuspended in the same 50mL of water.
-The DNA was stored at 4°C
November 17, 2018
Day Three
-The DNA concentration and quality were tested by Nanodrop with the following results:
ng/mL: 2182.4
A260/280: 2.04
A260/A230: 0.87
November 18, 2018- Alternative DNA Isolation protocol using ZnCl2 – Trial 2
Day One
-Gently mixed high volume lysate and aliquot 5 ml into a 15 ml conical tube, then carefully and with gloves 20 microliters of nuclease mix was added
-The tube was gently inverted and incubated at 37 degrees Celsius for 10 minutes
-The mixture was then equally aliquoted into 5 1.5 ml microcentrifuge tubes. About 1 mL of lysate in each.
-20 mL of ZnCl2was added and gently mixed with inversion and incubate at 37 degrees Celsius for 5 minutes
-Centrifuge 10,000 rpm for 1 minute to pellet the phage
-Keeping the pellet the supernatants were removed by aspiration discarding the liquid filled pipette tips in the sharp trash.
-Resuspending the pellets in 500 mL TES buffer per tube, and incubated at 60°C for 15 minutes. This will denature the capsids, exposing the DNA, while protecting it from the nuclease activity (EDTA in the TES sequesters divalent cations required for nuclease function).
-1mL of Proteinase K was added then mixed gently. It was then incubated at 37°C for 10 minutes to completely eliminate any residual nuclease activity.
-Adding 60mL of potassium acetate to each tube. Mixing each thoroughly and leaving on ice for 15 minutes. A white, dense precipitate formed. This represents the capsids.
-Centrifuged at 4 °C for 1 minute at 12,000rpm to pellet the capsids. Keeping the supernatants containing the DNA, and pipetted into new microfuge tubes. The pelleted capsids were discarded.
– 500 mL of isopropanol was then added to each of the tubes with the supernatant, mixed, and left on ice and in a freezer for 2 hours.
-Centrifuged at top speed for 10 minutes to pellet the precipitated DNA, and the supernatant was discarded into a waste tube. The pellets were very small and very opaque
– 250mL of 70% ethanol was added to each tube, and spun again for 1 minute, at top speed. This washed the DNA pellet. The supernatants were discarded into the waste tube.
– 250mL of 70% ethanol was added to each tube, and spun again for 1 minute, at top speed. Then ensures that all of the salts and contaminants were washed from the DNA
-Drying DNA pellets at room temperature by turning them upside down for 15 minutes and then the tubes were placed in a 30°C incubator to help with drying. It was left in the incubator for roughly 30 minutes to ensure sample was dry.
-The first pellet was resuspended in 50mL of nuclease-free water. Then that solution was used to resuspend the next pellet. Continuing for all 5 pellets until they had been resuspended in the same 50mL of water.
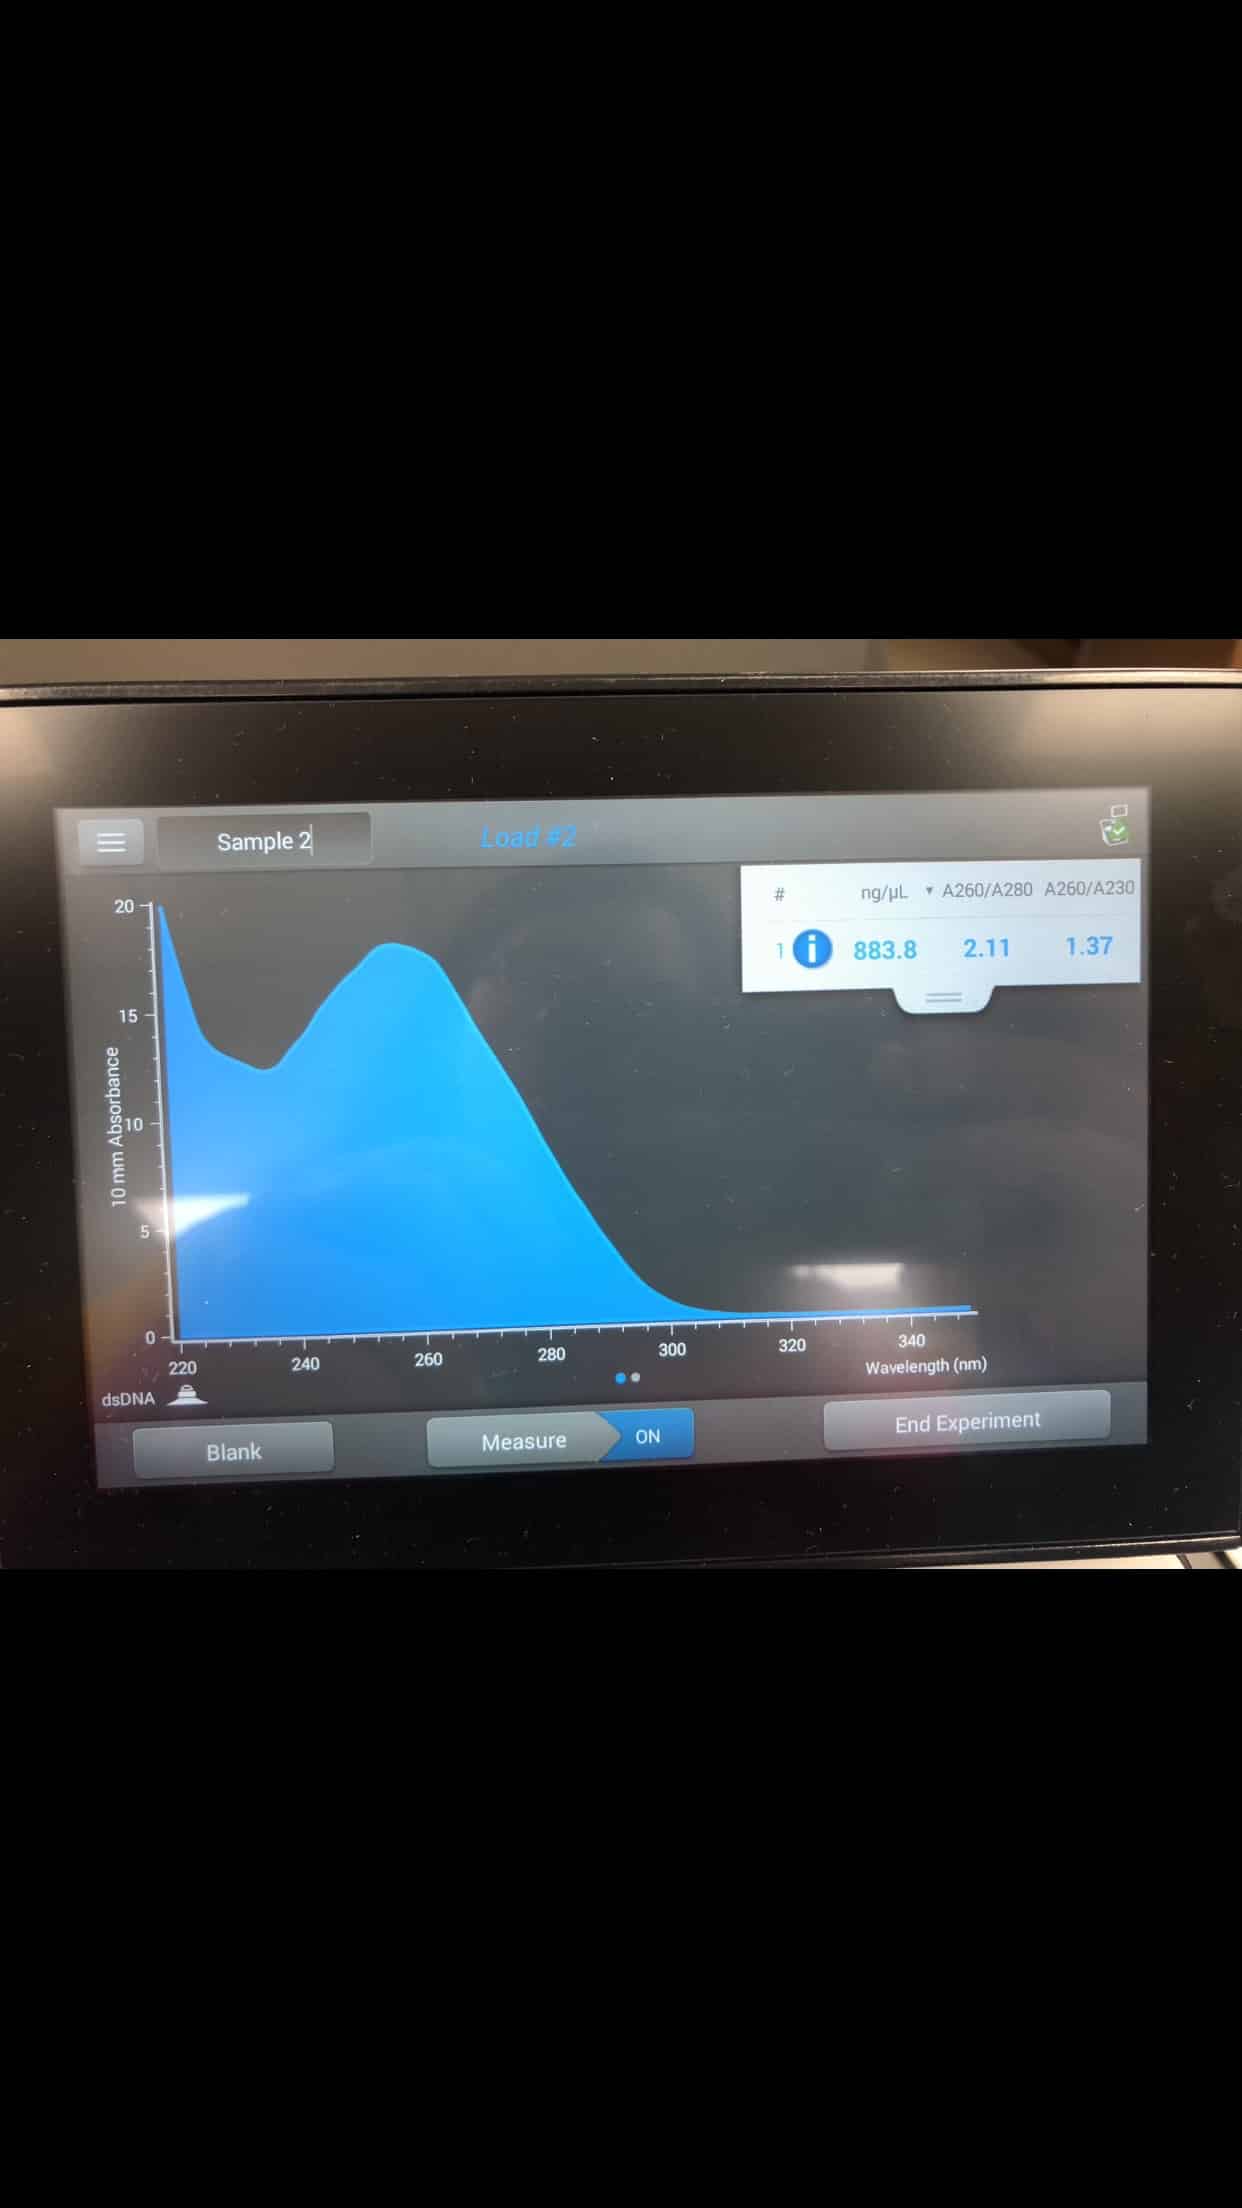
November 19th
Day Two
-The DNA concentration and quality were tested by Nanodrop with the following results:
ng/mL: 883.8
A260/280: 2.11
A260/A230: 1.37