Discovery of Lucinda
Soil Samples
Where and when the initial environmental samples were taken, along with details.

*Please note that before each of these procedures, the work bench was aseptically cleansed and a Bunsen burner was lit during each procedure in order to prevent contamination issues/
Direct Isolation
- Use “small animal yard” sample
- fill 15 ml conical tube about 1/3 with sample
- add 2.5 ml enrichment broth using sterile 5 ml syringe
- gently shake/invert several times to mix
- go to Rathburn’s lab to put tube into shaking incubator at 250 rpm
- start time- 10:25
- stop time- 11:38
- set aside to let settle
- remove plunger from new syringe- attach syringe to .22 microliter filter to filter
- use pipettor to extract 2 ml of liquid from top of flooded sample into syringe
- re-attach plunger to syinge-filter
- dispense filtrate into a 0.5 ml microcentrifuge tube
- cap tube
- proceed to Plaque Assay protocol
Enriched Isolation
Used “Santo” Sample
- Fill a 50 ml conical tube to the 16 ml mark with soil sample
- Add enrichment broth to the 35 ml mark
- Vortex on setting 6 for 10 sec
- Take to Dr. Rathburn’s lab and insert into the shaking incubator
- Shake at 250 rpm; start- 10:36, and- 11:38
- After retrieving the sample from the shaking incubator, filter the supernatant through a .22 microliter filter
- use the .22 microliter Corning Tube-Top Vacuum filter; assemble appropiately to
- attach to vacuum inside of hood
- collect flow inside a 50 ml conical tube
- Add .5 ml of bacterial host into new conical tube containing supernatant
- Shake and incubate at 250 rpm for a few hours
- To aerate conical tube, twist lid one half turn until lid is loosely on. Secure the lid with a piece of tape
Day Two
- using a 5 ml syringe, transfer 1.4 ml of supernatant into a microcentrifuge tube
- Repeat so that you have two microcentrifuge tubes with 1.4 ml of supernatant
- Spin tube in microcentrifuge for one minute
- make sure to balance the tubes in the machine
- Filter through a .22 microliter filter
- remove plunger from syringe
- open a sterile filter and attach it to the barrel
- Pipette 1 ml from each microcentrifuge tube into the syringe barrel
- place the syringe-filter over a new microcentrifuge tube
- attach plunger and push it to collect filtrate
- Label tube and place in refrigerator
Picking a plaque
For this, I used a plaque from Morgan’s direct isolation sample’s spot test
- Place a sterile tip (white) onto a micropipettor
- Gently stab the top agar into the center of the chosen plaque
- Place end of tip into 100 microliters of phage buffer in a microcentrifuge tube
- Vortex for about 5-10 seconds to mix
- Proceed to Serial Dilutions
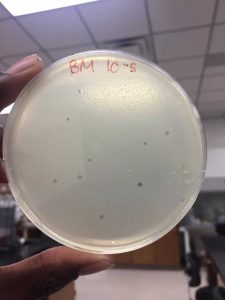
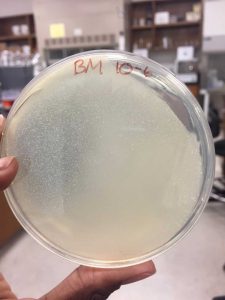
Serial Dilution
This procedure is for deciding how much phage is wanted in a sample. It is a 10-fold dilution, meaning that the each tube contains 10 times less the concentration of phage than the previous tube.
- Do this immediately after doing the “Picking a Plaque” protocol
- Obtain 6 1.5-ml microcentrifuge tubes
- Label them 10^-1, 10^-2…10^-6
- Add 90 microliters of phage buffer to each tube
- Pipette 10 microliters of tube containing phage from the spot test; dispel into the 10^-1 tube
- From here, pipette 10 microliters of the 10^-1 dilution and dispel into the 10^-2 tube. Continue this pattern to the 10^-6 tube.
- Plate these dilutions according to the Plaque Assay protocol
- During this step, 10 microliters is to be added to the bacterial host


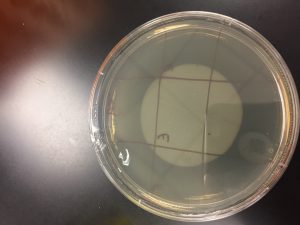
After the Plaque Assay of the serial dilutions, my 10^-3 plate was the one that produced the “webbed” effect. I used this to collect the lysate as described in the procedure below:
Collecting Plate Lysates
A webbed plate is used because of its high concentration of phage. These phage are collected to produce a concentrated, filtered solution called a lysate. When flooding the webbed plate, the phage diffuse into the buffer so that they can be easily aspirated with a syringe.
- Flood the webbed plate
- Apply 8 ml of phage buffer to the webbed plate
- Store in refrigerator overnight
- The next day, collect plate, being careful to not spill. Swirl gently
- Remove lid of plate and place it on the bench. Put one edge of the plate on the lid, allowing the lysate to pool to one side
- Using a syringe, aspirate the lysate from the plate
- Attach syringe to a .22 microliter filter
- Depress the syringe plunger and collect lysate into a 15 ml conical tube
- Store in refrigerator
The lysate collected in the tube was measured to be 4 ml. Move onto the Spot Titer protocol
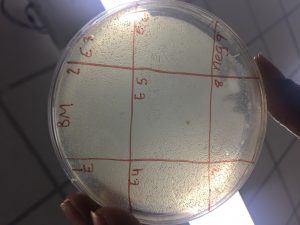
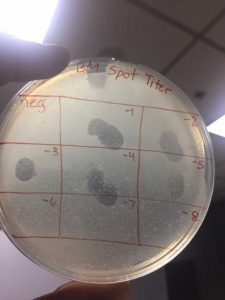
Spot Titer
A spot titer is used to predict which dilutions should be used when performing a full plate titer so that the concentration of phage lysate can be calculated.
- Label the agar plate for a spot titer
- View picture

- Collect 3 ml of hot agar into a 5 ml pipette
- Immediately transfer agar into a culture tube containing 250 microliters of host bacteria
- Dispense the agar-bacteria onto the labeled agar plate
- Allow plate to solidify COMPLETELY.
This is called a bacterial lawn
- Dilute the lysate according to the Serial Dilution protocol
- use 10 microliters of lysate for the initial dilution tube
- Create a dilution for each section of the plate (until 10^-8)
- Once agar plate is dry, using a micropipettor transfer 3 microliters of each dilution onto its proper place on the bacterial lawn
- Use 3 microliters of phage buffer for the negative control section on lawn
- Allow spots to dry for at least 30 minutes
- Incubate the plate
I had to redo this procedure because my spots dripped into other sections of the plate because they were not fully dried when incubated. However, the second round turned out as it should.

Proceed directly to the Full Plate Titer protocol (5.6)
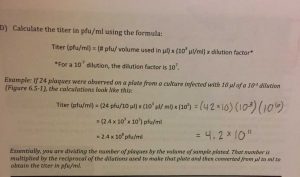
Full Plate Titer
In this procedure, I used the 10^-6 dilution from the Spot Titer, and plated it according to the Plaque Assay protocol. This resulted in 42 plaques. In the calculation of how much titer in pfu/ml needed, I did the following:
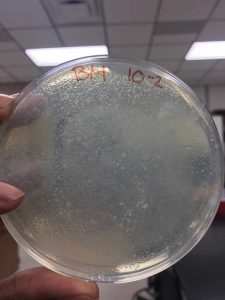
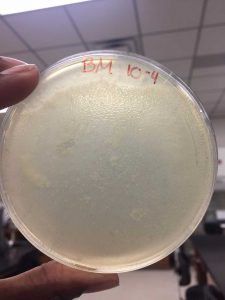
Making Webbed Plates from a Lysate of Known Titer
For this, I needed to calculate the number of plaques I need and to calculate the volume of lysate necessary to generate a webbed plate:

However, this calculation produced too much phage; the plate was covered in plaques and there was barely any bacteria left. To fix this, I increased the dilution to 10^-4 and used 5 microliters. This produced a better webbed plate. As a result a total of 17.5 ml of lysate was collected.
The dilutions were prepared according to the Serial Dilution protocol and then plated according to the Plaque Assay protocol. Lysate was collected according to the Collecting Plate Lysate protocol.
Phage DNA Extraction
We can extract DNA in order to study it.
- Degrade bacterial DNA in high titer phage lysate
- Transfer 1 ml of lysate into a microcentrifuge tube.
- Wearing gloves, go to the designated area and add 5 microliters of nuclease mix to the lysate
- Mix repeatedly by gentle inversions
- Incubate at 37 degrees for 10 minutes of at room temperature at 30 minutes
- Remove gloves
- Denature the protein capsid to release the phage DNA
- Put on a FRESH pair of gloves
- Add 2 ml of DNA clean-up resin to a 15 ml conical tube
- Transfer the nuclease-treated phage lysate from the microcentrifuge tube to the 15 ml conical tube containing resin
- Mix the solution by gently inverting the tube repeatedly for two minutes
- Isolate the phage genomic DNA
- Remove the plungers from two 5 ml syringes and attach a column to each syringe barrel
- Do the following for each columns at the same time:
- Set the column and syringe barrel on a new microcentrifuge tube.
- Transfer 1.5 ml of phage DNA/resin solution to the column using a pipette
- Do not discard the empty 15 ml conical tube
- Insert a plunger into the syringe and carefully push all the liquid through, collecting this waste in the used 15 ml conical tube
- After all of the liquid is expelled, keep pushing on the plunger to dry residual liquid by touching the tip of a column to a paper towel
- Unscrew the column from the syringe barrel before releasing the plunger and set the column in a new microcentrifuge tube
- Remove the plunger from the syringe barrel and reattach barrel to the column
- Wash the salts from the DNA (now in the column) with the following steps for each column:
- add 2 ml 80% isopropanol to each syringe barrel/column and push the liquid through the column
- repeat steps 2(1)-2(f)
- Repeat twice, for a total of three isopropanol washes
- add 2 ml 80% isopropanol to each syringe barrel/column and push the liquid through the column
- Remove residual isopropanol
- With each column in a fresh 1.5 ml microcentrifuge tube, spin at 10,000 x g for five minutes
- Transfer columns to new microcentrifuge tubes. Spin at 10,000 x g for one additional minute to remove any residual isopropanol
- Remove columns from the tubes and place directly into a heating block of 90 degrees Celsius for 60 seconds
- Elute the phage DNA from the columns
- Place each column in a clean microcentrifuge tube and apply 50 microliters of 90 degrees Celsius sterile ddH20 directly into each column
- incubate the columns for one minute at room temperature
- Spin at 10,000 x g for one minute in a microcentrifuge
- Combine the products from both microcentrifuge tubes into one tube
- This is your eluted phage DNA
- Determine the concentration of your phage DNA using a spectrophotometer
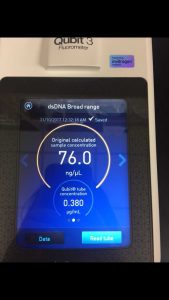
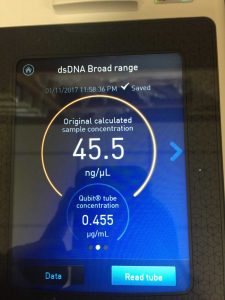
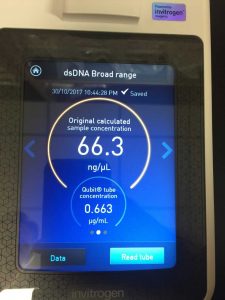
Note: this procedure was done multiple times with varying results. During the 3rd and 4th time, 15 microliters of EDTA was added to the nuclease-treated lysate and mixed gently. During the 4th time, 7 microliters of nuclease mix, not 5, was added to the lysate. After doing the DNA extraction protocol the fifth time, I decided to make more webbed plates to collect high titer lysate. However, the original lysate was too degraded by this time and was not able to produce any webbed plates. The spectrophotometer readings were as followed:
Setting Up Restrictive Enzyme Digests
- Prepare genomic DNA
- For this, we used the DNA that read 76.0 ng/microliter on the spectrophotometer
- gently mix DNA sample by vortexing it on low
- Incubate the tube for 65 degrees Celsius for 10 minutes, then quickly place it on ice. Quick spin the tube in s microcentrifuge for one minute
- Calculate how many microliters of DNA are needed to obtain .5 micrograms of DNA
- Since the DNA reading was so low, Dr. Edwards adjusted our amounts to the following:
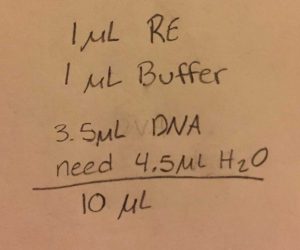
- Set up restrictive enzyme digest reactions
- Set up a reaction in a microcentrifuge tube for each enzyme (Bam HI, Cla I, Eco RI, Hae III, Hind III) and a negative control
- The negative control is the Uncut DNA and consists on 24 microliters of ddH20 and 1 microliter of DNA
- Mix the contents of each tube gently and then quick spin them in a microcentrifuge for one minute
- Incubate at 37 degrees Celsius for one hour
- Quick spin the tubes in a microcentrifuge again, and move onto the casting and viewing agarose gels
Microscopy
- Aseptically transfer 1 ml of high titer lysate to a microcentrifuge tube
- Centrifuge for one hour at 4 degrees Celsius
- Add 100 microliters of phage buffer and allow to resuspend for 45 minutes
- Go to the designated work area
- Put on a fresh pair of gloves
- Remove the cover from a 5×5 cm piece of parafilm and place into the lid of a Petri dish
- Place a PELCO tab black side up onto the parafilm
- Using EM forceps, remove a fresh grid from the designated box and place only the edge onto the PELCO tab
- Make sure the put the grid shiny side UP
- Mount and stain the phage
- Using a micropipettor, place 10 microliters of lysate onto the grid
- Allow the phage to settle and attach onto the grid for two minutes
- Using the edge of filter paper, wick off excess fluid
- Rinse the grid:
- Carefully pipette 10 microliters of sterile water onto the grid. Allow to sit for two minutes
- Wick off excess water using a fresh piece of filter paper
- Add 10 microliters of 1% uranyl acetate to the grid
- Let sit for two minutes
- Wick off excess fluid using a fresh piece of filter paper
- Allow grid to dry, and place the grid into the paper box and label where you put it