Discovery of Nuggs
Collecting Environmental Samples
September 2, 2017- September 4, 2017
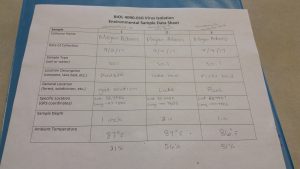
The purpose was to collect soil samples that so that they can be isolated through the direct or enriched isolation process. The objective was to obtain an environmental samples that could possibly contain bacteriophage. These samples were recovered from areas that were moist or near a water source like a river or a lake. The materials used were three 50 ml conical tubes, one for each sample, a labeling pen, and a smartphone with GPS capabilities. The soil samples were to be obtained from various locations and documented on the table below.
Direct Isolation- City Beach Sample
September 6, 2017
Purpose and Objective: The purpose was to find phages in an environmental sample. The objective was to extract phages from an environmental sample that was collected using the direct isolation process.
Materials:
- Environmental Sample
- 5 ml syringe
- Enrichment broth
- 0.22 mircometer syringe filter
- 5 ml serological pipettes
- Microcentrifuge tubes
- 15 ml conical tube
Procedure:
- Prepared area for aseptic technique using a portable burner
- Gathered environmental sample two (City Beach)
- Filled a 15 ml conical tube with approximately one-third of soil from the City Beach sample
- Added 3 ml of enrichment broth to the tube, capped tube and inverted several times
- Placed the tube in a shaking incubator at 250 rpm for 2 hours (from 10:35 am – 12:35 pm)
- Allowed sample to sit for 20 minutes, but the contents did not separate enough to obtain a liquid sample
- Placed the 15 ml conical tube containing the sample in a centrifuge 3 times, for 10 minute cycles each, then tried to filter the sample by pipetting a portion of liquid sample into the 5 ml syringe and the 0.22 micrometer syringe but the filter clogged
- Added more enrichment broth to the tube containing the sample and centrifuged again for 10 minutes
- Recovered liquid sample using another 5 ml syringe and dispensed sample into two microtcentrifuge tubes each containing approximately 0.5 ml of liquid sample
- Placed the two microcentrifuge tubes in a microcentrifuge for five minutes
- Pipetted the liquid sample contents from the two tubes into one mircrocentrifuge tube and capped the tube quickly
- Continued on to the Plaque Assay techinque
Analysis: The environmental sample that was used for the direct isolation process known as the City Beach sample was obtained from the lake bed of Lake Grandbury. This sample did not separate easily because it was a more silt like texture and contained a few large particles. The use of the microcentrifuge to determine if a liquid sample could be recovered was directed by Dr. Edwards. The use of the 0.22 micrometer filters was not needed after obtaining the samples from the mircocentrifuge.
Enriched Isolation- Houston St. Park
September 6, 2017- September 11, 2017
Objective: To detect phages in environmental samples
Materials:
- solid environmental sample
- 0.22 mircometer Corning Tube- Top Vacuum filter systems
- enrichment broth
- 50 ml conical tubes
- host bacteria (500 microliters)
- microcentrifuge tubes
Procedure:
Day 1- September 6, 2017
- Cleaned are and prepared for aseptic work
- Gathered environmental sample labeled houston st. park
- filled tube with soil sample with enrichment broth to the 35 ml mark
- Sample was shaken at 250 rpm for 2 hours (from 12:40 pm – 2:40)
- Centrifuged the sample twice for 10 minute cycles
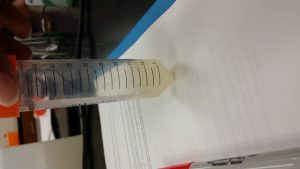
- Filtered the contents carefully through a 0.22 micrometer filter and the drip was collected in a sterile 50 ml conical tube
- Approximately 12 ml of the the filtered sample was collected
- Added 500 microliters of bacterial host to tube containing sample
- Loosely capped tube and placed tape over top to secure and then incubated at 37 degrees Celsius and while shaking at 250 rpm for 2 days
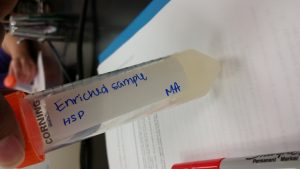
Day 2- September 11, 2017
- Cleaned and prepared area for aseptic work
- Gathered sample from the fridge where it stayed for about 3 days
- Filtered all of liquid top from sample using a 0.22 micrometer filter into two microcentrifuge tubes
- Spun the the two tubes for 1 minute on high speed in the microcentrifuge
- Filtered samples again into two microcentrifuge tubes each contained 1 ml of sample contents
- Capped tubes and labeled them appropriately
- Disposed of leftover culture and then proceed to the spot test protocol
Plaque Assay Protocol- Day 1 and 2
September 6, 2017- September 8, 2017
Objective: Identify phages in the form of plaques on bacterial lawns
Materials:
- Phage sample from direct isolation protocal
- agar plates
- host bacteria (250 microliter/ plate)
- phage buffer
- top agar
- microcentrifuge tubes
- negative control
- 5 ml serological pipettes
Procedure:
Day 1- September 6, 2017
- Prepared area for aseptic work
- Gathered direct isolation phage sample
- Obtained two aliquots of 250 microliter host bacterial cultures, one for phage sample and one for negative control, and labeled tubes accordingly
- Dispensed 10 microliters of phage buffer into the tube containing host bacteria labeled negative control using a micropipettor. Mixed gently by tapping the the bottom of the tube and let the sample sit undisturbed for 5 minutes
- While the negative control sample sat, 500 microliters of direct isolation sample was pipetted into the correctly labeled host bacteria culture tube. Mixed gently by tapping the bottom of the tube and let sample sit undisturbed for 10 minutes
- Obtained two agar plates, one for direct isolation sample and one for negative control, then labeled them accordingly
- Removed a bottle of top agar from the 55 degree Celsius bath
- For direct isolation sample and negative control, respectively: a sterile 5 ml pipette was used to transfer 3 ml of top agar to a host bacteria tube (containing direct sample or negative control) and straightaway the mix was aspirated back into the pipette and quickly distributed onto the correctly labeled agar plate.
- The plates were swirled and tilted in various directions so the top agar mixture was spread evenly
- After the top agar solidified, the plates were inverted and placed in the incubator at 37 degrees Celsius for 48 hours
Day 2- September 8, 2017
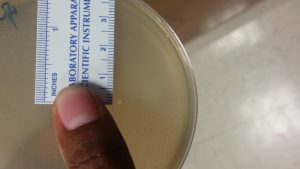
- Removed the plate with the direct isolation sample and held the plate up to the light and looked for plaques

- After measurements and pictures were taken the plate was placed into fridge until further use
Characteristics of plaques found:
- number of plaques: 1
- size: approximately 0.2 cm
- shape: circular
- Clear
- distinctive features: There is only one plaque, other students plates contained at least 20-100 plaques on there plates that were incubated at the same temperature for the same amount of time as plate
Analysis: The use of the top agar throughout the plaque assay process proved to be more challenging than expected. The first attempt in pipetting the top agar it solidified in the pipette before I could distribute it on an agar plate. In the second attempt, I was able to dispense the top agar on to the plate labeled negative control, but I was not quick enough in tilting the plate around and it solidified in one spot instead of spreading evenly across the plate. The third and fourth time I was successful in dispensing and distributing the negative control and direct isolation sample. The exact time was not recorded for when the plates were taken out of the incubator because I did not take them out myself.
Picking a Plaque
September 11, 2017
Objective: To find phage particles from a plaque
Materials:
- agar plate with direct sample
- phage buffer
- microcentrifuge tubes
Procedure:
- Clean and cleared area for aseptic work
- Gathered direct isolation plaque sample on the agar plate from the fridge
- Circled the one plaque that was to e picked
- Pipetted 100 microliters of phage buffer into a microcentrifge tube
- Used a micropipettor with a sterile tip to stab the center of the plague on the agar plate
- Placed the end of the tip in the phage buffer and swirled the tip around in the tube
- Disposed of tip and capped the tube and labeled it appropriately
- Mixed by vortexing
- Proceeded to spot test
Spot Test
September 11, 2017- September 13, 2017
Objective: Test direct and enriched samples for phages
Materials:
- Liquid phage samples (direct and enriched)
- agar plates
- host bacteria (250 microlters)
- top agar
- phage buffer
- 5 ml serological pipettes
Procedure:
Day 1- September 11, 2017
- Clean and cleared area for aseptic work
- Gathered liquid phage samples, direct and enriched samples
- Grabbed an agar plate and created zones and labeled the bottom of it for direct sample, enriched sample, and a negative control
- Acquired a tube of host bacteria and top agar
- Used the 5 ml pipette to transfer 3 ml of top agar into the tube of host bacteria, then aspirated the mixture and quickly distributed the mix onto the agar plate
- Moved the plate around to spread evenly
- Plate sat covered for 20 minutes
- Spotted 10 microliters of phage buffer on to the plate in designated area
- Spotted 10 microliters of direct sample and enriched samples in designated areas
- Plate sat for 10 minutes
- Set plate into incubator at 37 degrees Celsius for 48 hours
Day 2- September 13, 2017
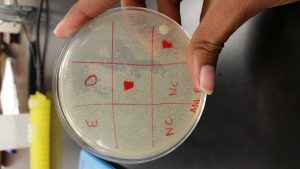
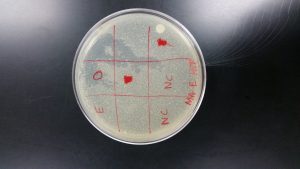
Analysis: The direct sample from the spot test showed signs of plaques, but there was contamination. Most of the other students also had contamination in there tests and the possible reasons why were discussed amongst everyone. The spot test procedure was repeated on September 13, 2017. I changed the measurements of the samples and negative control to 5 microliters to spot on the plate. Also, instead of waiting for the plate to sit for 20 minutes I let it sit for 30 minutes because the first test the samples slide across the plate. My plate for the second spot test was very much contaminated and was disposed of. I had let Ashley Cooper use my direct sample on her second spot test and her test was not contaminated. On Ashley’s plate, my direct sample clearly had plaques.
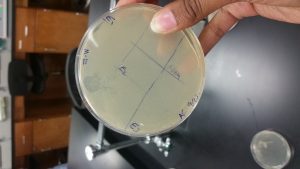
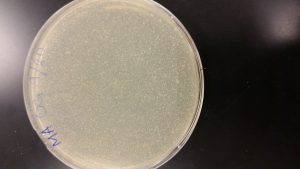
Serial Dilutions 1
September 20, 2017- September 22, 2017
Objective: Decrease concentrations of liquid phage samples
Materials:
- Phage buffer
- Samples required for diluting ( picked plaques)
- Microcentrifuge tubes
- Host bacteria (250 microliters)
- Agar plates
- Top agar
- 5 ml serological pipette
Procedure:
- Cleaned area for aseptic work
- Gathered direct phage sample
- Grabbed six mircrocentrifuge tubes and labeled them OG, 10-1, 10-2, 10-3, 10-4, and 10-5 for diluted concentrations
- Added 90 microliters of phage buffer to each of the tubes
- Added 10 microliters of undiluted direct phage sample to the OG tube and vortex it
- Transferred 10 microliters from the OG tube to the 10-1 tube and vortex it
- Transferred 10 microliters from the 10-1 tube to the 10-2 tube and vortex it
- Repeated the previous step of dilution into the respective tubes
- Pipetted 10 microliters of each dilution into its own host bacteria tube using a clean tip after each and they were undisturbed for ten minutes
- Obtained six agar plates and six 5 ml serological pipettes for each dilution, labeled plates accordingly
- Used the pipette to acquire 3 ml of top agar, transferred the top agar to a dilution-bacteria tube, aspirated the mixture, then quickly placed it onto the designated plate, and tilted plate in several directions so it spread evenly
- Repeat previous step for all dilutions respectively
- The plates sat undisturbed for 30 minutes
- The plates were stacked, taped, and labeled before placing them into the incubator for 48 hours
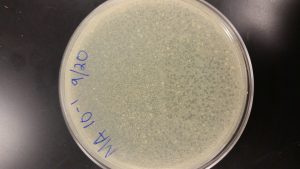
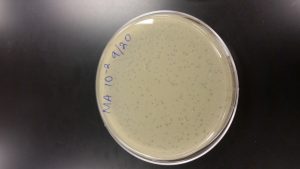
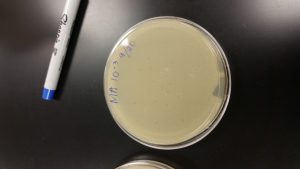


Serial Dilutions 2
September 25, 2017 – September 27, 2017
Objective: Decrease concentration of liquid phage samples based on Serial Dilutions 1
Materials:
- Phage buffer
- Samples required for diluting ( picked plaques)
- Microcentrifuge tubes
- Host bacteria (250 microliters)
- Agar plates
- Top agar
- 5 ml serological pipette
Procedure:
- Cleaned area for aseptic work
- Gathered direct phage sample
- Grabbed six mircrocentrifuge tubes and labeled them OG, 10-1, 10-2, 10-3, 10-4, and 10-5 for diluted concentrations
- Added 90 microliters of phage buffer to each of the tubes
- Added 10 microliters of undiluted direct phage sample to the OG tube and vortex it
- Transferred 10 microliters from the OG tube to the 10-1 tube and vortex it
- Transferred 10 microliters from the 10-1 tube to the 10-2 tube and vortex it
- Repeated the previous step of dilution into the respective tubes
- Pipetted 10 microliters of each dilution into its own host bacteria tube using a clean tip after each and they were undisturbed for ten minutes
- Obtained six agar plates and six 5 ml serological pipettes for each dilution, labeled plates accordingly
- Used the pipette to acquire 3 ml of top agar, transferred the top agar to a dilution-bacteria tube, aspirated the mixture, then quickly placed it onto the designated plate, and tilted plate in several directions so it spread evenly
- Repeat previous step for all dilutions respectively
- The plates sat undisturbed for 30 minutes
- The plates were stacked, taped, and labeled before placing them into the incubator for 48 hours