Discovery of Malware
September 03 – September 06, 2017
~25 mL of each sample was collected in a 50 mL tube. Sample 1 was kept refrigerated at 4°C until September 06.
| Sample | 1 | 2 | 3 |
| Date of Collection | 09/03/2017 | 09/06/2017 | 09/06/2017 |
| Sample Type | Soil | Soil | Soil |
| Location description | Under tree by creek | Manure compost | Fertilized flower bed |
| Specific location | (33.1163, -96.6652) | (32.1807, -98.1608) | (32.2178, -98.2203) |
| Sample depth | 2-3″ | 2-3″ | 2-3″ |
| Ambient Temperature | 92°F | 67°F | 61°F |
September 06, 2017
Protocol 5.2: Direct Isolation
Aims and purpose: To isolate bacteriophage from the collected soil sample.
Procedures and protocols:
– Sample #1 was used for the direct isolation.
- Pour ~6 mL of soil sample from the 50 mL tube into a 15 mL prelabeled tube.
- Pipette enrichment buffer into the 15 mL tube until the soil is submerged in 2-3 mL of buffer.
- Invert the tube several times to mix.
- Put in incubator at 250 RPM for 2 hours.
- Remove the sample from the incubator and allow the sample to stand undistrubed for 20 minutes.
- Pipette about 2 mL of supernatant from the top of the soil sample into a 1.5 mL microcentrifuge tube.
- Remove the plunger from a syringe, connect a clean 0.22 micron filter, and pipette the supernatant into the syringe. Insert the plunger and slowly filter the solution into a new 1.5 mL microcentrifuge tube.
- Gather at least 0.5 mL of filtered supernatant.
- Begin plaque assay.
Results: Roughly 1 mL of supernatant was recovered. The solution was filtered twice.
Future plans: Continue on with plaque assay to determine if phage was recovered from the soil sample.
Protocol 5.5: Enriched Isolation
Aims and purpose: To isolate bacteriophage from the soil sample.
– Sample #3 was used for the enriched isolation.
Procedures and protocols:
- Pour 15 mL of soil sample into a 50 mL prelabeled tube.
- Pipette enrichment buffer to the 35 mL mark.
- Vortex 6-8 seconds.
- Incubate sample at 220 RPM for 2 hours.
- Centrifuge at 2,000 x g for 10 minutes.
- Using the hood’s vacuum, filter the supernatant into a new 50 mL tube until ~25mL is recovered.
- Pipette 500 microliters of M. smeg. into the 50 mL tube.
- Incubate the tube shaken at 220 RPM for 3 days,
Future plans: Complete day 2 of enriched isolation and perform spot test to determine if any phage was extracted from the enriched soil sample.
Protocol 5.3: Plaque Assay
Aims and purpose: To determine if the direct isolation performed on sample #1 isolated any phage.
Procedures and protocols:
- Pipette 500uL of sample into one tube of 250uL M. smeg. and 10uL of phage buffer into another 250uL tube of M. smeg. as a negative control.
- Gently tap the tubes to mix the sample/buffer with the bacterial cells.
- Leave the tubes undisturbed for 10 minutes to allow for attachment.
- Obtain 2 agar plates and label the bottom around the edges.
- Remove a bottle of top agar from the 55°C bath and quickly pipette 3mL of top agar into the sample/cell tubes. Immediately pipette both the agar and sample onto an agar plate and gently tilt the solution until the plate is evenly coated.
- Repeat step 5 for the negative control.
- Allow the agar to solidify for 20 minutes.
- Incubate at 38°C for 48 hours.
Results: No plaques formed; contamination was present, so the plate was disposed of before the full 48 hours of incubation was completed.
Analysis and interpretations: Although contamination interfered with the sample’s incubation time, the absence of plaques suggests that this sample contains no phage.
Future plans: Spot test enriched isolation sample to test for phage.
September 11, 2017
Protocol 5.6: Spot Test
Aim and purpose: To determine if phage is present in the enriched isolation sample.
Procedures and protocols:
- Using a sharpie on the bottom of an agar plate, draw three horizontal lines across the plate followed by three vertical lines across the plate to create 9 sections. Label each section 1-9.
- Remove a bottle of top agar from the 55°C bath and quickly pipette 3mL of top agar into a 250uL tube of M. smeg. Immediately pipette both the agar and bacteria onto an agar plate and gently tilt the solution until the plate is evenly coated.
- Allow the agar to solidify for 20 minutes.
- Pipette 10uL of enriched isolation sample onto section 1, 3, and 5.
- Pipette 10uL of phage buffer onto section 9.
- Let the samples absorb into the agar for 30 minutes.
- Incubate the plate at 38°C for 48 hours.
Results: No plaques formed on the plate. The samples also did not absorb into the agar, resulting in the samples mixing together on the plate.
Analysis and interpretation: No plaques forming indicates that there are no phages present in the sample.
Future plans: Adopt a phage from a classmate by picking a plaque and performing another spot test.
September 13, 2017
Protocol 5.4: Picking a Plaque
Aims and purpose: To obtain phage particles from a plaque from Brittany Stewart’s direct isolation plaque assay.
Procedures and protocols:
- Label an isolated plaque with “CWT” beside circled plaque.
- Pipette 100uL of phage buffer into a 1.5 microcentrifuge tube.
- Using a 200 microliter pipette tip, gently stab the center of the marked plaque perpendicular to the plate.
- Dispense the phage into the buffer by pipetting up and down and tapping the pipette tip on the side of the microcentrifuge tube.
- Vortex the tube for 3-5 seconds.
- Continue onto Protocol 5.6: Spot Test.
Analysis and interpretations: The chosen plaque was clear and very small, no more than 2 cm in diameter.
Future plans: Perform a spot test with adopted phage sample.
Protocol 5.6: Spot Test
Aim and purpose: To determine if phage is present in the sample picked from Brittany Stewart’s direct isolation plaque assay or enriched isolation.
Procedures and protocols:
- Using a sharpie on the bottom of an agar plate, draw three horizontal lines across the plate followed by three vertical lines across the plate to create 9 sections. Label each section 1-9.
- Remove a bottle of top agar from the 55°C bath and quickly pipette 3mL of top agar into a 250uL tube of M. smeg. Immediately pipette both the agar and bacteria onto an agar plate and gently tilt the solution until the plate is evenly coated.
- Allow the agar to solidify for 20 minutes.
- Pipette 10uL of direct isolation sample onto section 1 and 3.
- Pipette 10uL of enriched isolation sample into section 5.
- Pipette 10uL of phage buffer onto section 9.
- Let the samples absorb into the agar for 4-5 hours.
- Incubate the plate at 38°C for 48 hours.
Results: Plaques formed on all of the samples except for the negative control.
Analysis and interpretation: There is plaque present in both the direct and the enriched isolation.
Future plans: Because the direct isolation may have more variance in phage, the same plaque will be picked from Stewart’s direct isolation plaque assay again. The picked plaque will then be used for serial dilutions to isolate a single phage.
September 19, 2017
Protocol 5.4: Picking a Plaque
Aims and purpose: To obtain phage particles from a plaque from Brittany Stewart’s direct isolation plaque assay.
Procedures and protocols:
- Pipette 100uL of phage buffer into a 1.5 microcentrifuge tube.
- Using a 200 microliter pipette tip, gently stab the center of the marked plaque (circled and labeled “CWT”) perpendicular to the plate.
- Dispense the phage into the buffer by pipetting up and down and tapping the pipette tip on the side of the microcentrifuge tube.
- Vortex the tube for 3-5 seconds.
- Continue onto serial dilutions.
]Future plans: Perform a serial dilution with the picked phage.
Primary Serial Dilutions: protocols 5.4, 6.2, and 5.3.
Aims and purpose: To begin isolating the phages found in the plaque chosen from Stewart’s direct isolation plaque assay.
Procedures and protocols:
- Add 90uL phage buffer into 6 prelabeled 1.5 microcentrifuge tubes.
- Pipette 10uL of the picked plaque sample into the first microcentrifuge tube, diluting the sample 10^-1
- Pipette 10uL of the 10^-1 solution into the second microcentrifuge tube, diluting the sample 10^-2.
- Continue this pattern until the sixth microcentrifuge tube is reached, diluting the sample 10^-6.
- Pipette 500uL of the 10^-1 sample into one tube of 250uL M. smeg.
- Gently tap the tubes to mix the sample with the bacterial cells.
- repeat steps 5 and 6 for each of the diluted samples.
- Leave the tubes undisturbed for 10 minutes to allow for attachment.
- Obtain 6 agar plates and label the bottom around the edges.
- Remove a bottle of top agar from the 55°C bath and quickly pipette 3mL of top agar into the sample/cell tubes. Immediately pipette both the agar and sample onto an agar plate and gently tilt the solution until the plate is evenly coated.
- Repeat step 5 for each of the 6 samples.
- Allow the agar to solidify for 20 minutes.
- Incubate at 38°C for 48 hours.
Results:
- 10^-1: TNTC
- 10^-2: ~72 plaques; some turbid and close together, some clear and isolated
- 10^-3: none clearly visible
- 10^-4: one turbid plaque; top agar didn’t set right
- 10^-5: none
- 10^-6: none
Future plans: Pick a plaque from the 10^-2 dilution and perform another serial dilution.
September 21, 2017
Secondary Serial Dilutions: protocols 5.4, 6.2, and 5.3
Aims and purpose: By further diluting a plaque picked from the already diluted phage sample, a singular bacteriophage may be isolated.
Procedure and protocol:
- Label plaque picked for serial dilution.
- Pipette 100 microliters of phage buffer into a 1.5 mL microcentrifuge tube.
- Using a 200 microliter pipette tip, gently stab the center of the marked plaque perpendicular to the plate.
- Dispense the phage into the buffer by pipetting up and down and tapping the pipette tip on the side of the microcentrifuge tube.
- Vortex the tube for 3-5 seconds.
- Add 90uL phage buffer into 6 prelabeled 1.5 microcentrifuge tubes.
- Pipette 10uL of the picked plaque sample into the first microcentrifuge tube, diluting the sample 10^-1
- Pipette 10uL of the 10^-1 solution into the second microcentrifuge tube, diluting the sample 10^-2.
- Continue this pattern until the sixth microcentrifuge tube is reached, diluting the sample 10^-6.
- Pipette 500uL of the 10^-1 sample into one tube of 250uL M. smeg.
- Gently tap the tubes to mix the sample with the bacterial cells.
- repeat steps 5 and 6 for each of the diluted samples.
- Leave the tubes undisturbed for 10 minutes to allow for attachment.
- Obtain 6 agar plates and label the bottom around the edges.
- Remove a bottle of top agar from the 55°C bath and quickly pipette 3mL of top agar into the sample/cell tubes. Immediately pipette both the agar and sample onto an agar plate and gently tilt the solution until the plate is evenly coated.
- Repeat step 5 for each of the 6 samples.
- Allow the agar to solidify for 20 minutes.
- Incubate at 38°C for 48 hours.
Results:
Plaques were clearly visible on all plates except for the 10^-1 dilution.

Analysis and interpretations: The dilutions should have isolated the phage, which is likely as all the plaques look very similar in size and clarity.
Future plans: Continue on to collecting plate lysates protocol to figure out concentration of 10^-2 plate.
September 27, 2017
Protocol 6.3: Collecting Plate Lysates
Aims and purpose: To obtain a heavily phage-concentrated liquid sample from a serial dilution plate
Procedures and protocols:
- Select a plate from the secondary serial dilution, aiming for a plate with higher phage concentration and more plaques (used 10^-2 plate; couldn’t tell if 10^-1 plate had phage or not).
- Add 8 mL of phage buffer to the selected plate.
- Leave for 2-4 hours at room temperature or for 12-14 hours at 4°C (took phage out of refrigerator after 6 hours; incubated at room temperature for 3 hours).
- Gently swirl phage buffer.
- Attach 0.22 um filter to syringe, leaving the filter in its wrapper and removing the plunger.
- Tilt plate to pool buffer to one side and pipette buffer using a 5 mL pipette tip.
- Dispense buffer into syringe and plunge liquid through filter into a 15 mL conical tube.
- Proceed to 6.5: Full Plate Titer
Notes: Collected ~5 mL of filtered lysate.
Protocol 6.4: Spot Titer
Aims and purpose: To determine roughly how concentrated the lysate sample is with bacteriophage.
Procedures and protocols:
- Using a sharpie on the bottom of an agar plate, draw three horizontal lines across the plate followed by three vertical lines across the plate to create 9 sections. Label each section 1-8 and one section “N” for the negative control.
- Remove a bottle of top agar from the 55°C bath and quickly pipette 3mL of top agar into a 250uL tube of M. smeg. Immediately pipette both the agar and bacteria onto an agar plate and gently tilt the solution until the plate is evenly coated.
- Allow the agar to solidify for 20 minutes.
- Add 90uL phage buffer into 8 prelabeled 1.5 microcentrifuge tubes.
- Pipette 10uL of the lysate into the first microcentrifuge tube, diluting the sample 10^-1
- Pipette 10uL of the 10^-1 solution into the second microcentrifuge tube, diluting the sample 10^-2.
- Continue this pattern until the eighth microcentrifuge tube is reached, diluting the sample 10^-8.
- Pipette 3uL of the 10^-1 diluted lysate onto section 1.
- Pipette 3uL of the 10^-2 diluted lysate onto section 2.
- Pipette 3uL of the 10^-3 diluted lysate onto section 3.
- Continue pipetting 3uL of diluted lysate onto the appropriate section, finishing at section 8.
- Pipette 3uL of phage buffer onto section N.
- Let the samples absorb into the agar for 30 minutes.
- Incubate the plate at 38°C for 48 hours.
- Store lysate at 4°C.
Notes: Top agar didn’t set quite right – became solid, but wasn’t adhering to the agar plate.
Results:
The spot titer had the most isolated and countable number of plaques at the 10^-6 dilution with roughly 22 plaques. Several of the samples did not set properly or were otherwise incorrectly spotted.
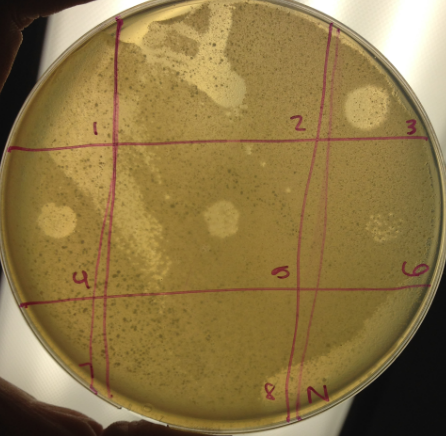
Analysis and interpretation: The 10^-6 dilution resulted in a countable number of plaques. The titer of the 10^-6 spot is as follows:
titer (pfu/ml) = 22pfu/3uL * 10^3uL/mL * 10^6
titer = 7.3*10^9 pfu/mL
The titer of the 10^-6 dilution is considered large and can be used for a full plate titer.
Future plans: Run a full plate titer with 10^-5, 10^-6, and 10^-7 samples.
September 29, 2017
Protocol 6.5: Full Plate Titer
Aims and purpose: To plate dilutions considered to be ideal in order to determine the pfu/mL concentration of the isolated bacteriophage
Procedures and protocols:
- Add 90uL phage buffer into 7 prelabeled 1.5 microcentrifuge tubes.
- Pipette 10uL of the filtered lysate into the first microcentrifuge tube, diluting the sample 10^-1
- Pipette 10uL of the 10^-1 solution into the second microcentrifuge tube, diluting the sample 10^-2.
- Continue this pattern until the seventh microcentrifuge tube is reached, diluting the sample 10^-7.
- Pipette 500uL of the 10^-5 sample into one tube of 250uL M. smeg.
- Gently tap the tubes to mix the sample with the bacterial cells.
- repeat steps 5 and 6 for the 10^-6 and 10^7 diluted samples.
- Leave the tubes undisturbed for 10 minutes to allow for attachment.
- Obtain 3 agar plates and label the bottom around the edges.
- Remove a bottle of top agar from the 55°C bath and quickly pipette 3mL of top agar into the sample/cell tubes. Immediately pipette both the agar and sample onto an agar plate and gently tilt the solution until the plate is evenly coated.
- Repeat step 5 for both of the other samples.
- Allow the agar to solidify for 20 minutes.
- Incubate at 38°C for ~24 hours.
Results: None of the plates showed definite plaques, and they all appeared to have been cut through to the bottom agar in some places. Samples were also left for closer to 60 hours in the incubator.
Future plans: Redo the spot titer to ensure the 10^-6 plate was an ideal dilution for the full plate titer.
October 02, 2017
Protocol 6.4: Spot Titer
Aims and purpose: To determine roughly how concentrated the lysate sample is with bacteriophage.
Procedures and protocols:
- Using a sharpie on the bottom of an agar plate, draw three horizontal lines across the plate followed by three vertical lines across the plate to create 9 sections. Label each section 1-8 and one section “N” for the negative control.
- Remove a bottle of top agar from the 55°C bath and quickly pipette 3mL of top agar into a 250uL tube of M. smeg. Immediately pipette both the agar and bacteria onto an agar plate and gently tilt the solution until the plate is evenly coated.
- Allow the agar to solidify for 20 minutes.
- Add 90uL phage buffer into 8 prelabeled 1.5 microcentrifuge tubes.
- Pipette 10uL of the lysate into the first microcentrifuge tube, diluting the sample 10^-1
- Pipette 10uL of the 10^-1 solution into the second microcentrifuge tube, diluting the sample 10^-2.
- Continue this pattern until the eighth microcentrifuge tube is reached, diluting the sample 10^-8.
- Pipette 3uL of the 10^-1 diluted lysate onto section 1.
- Pipette 3uL of the 10^-2 diluted lysate onto section 2.
- Pipette 3uL of the 10^-3 diluted lysate onto section 3.
- Continue pipetting 3uL of diluted lysate onto the appropriate section, finishing at section 8.
- Pipette 3uL of phage buffer onto section N.
- Let the samples absorb into the agar for 30 minutes.
- Incubate the plate at 38°C for 48 hours.
- Store lysate at 4°C.
Results: Roughly the same amount of small plaques was observed (~22 pfu) in the 10^-6 spot. However, put back in incubator and plaques ran together some. Didn’t get a picture when plaques where distinct from one another.

Future plans: Perform full plate titer with 10^-5 through 10^-7th dilutions.
October 04, 2017
Protocol 6.5: Full Plate Titer
Aims and purpose: To obtain a heavily phage-concentrated liquid sample from a serial dilution plate
Notes: When pipetting 10uL of 10^-6 sample into the bacterial tube, not quite 10uL got pipetted so did it again. Probably closer to 13-16uL of sample was placed in bacterial tube.
Results: The titer was unable to be determined from the plate – the top layer of agarose hadn’t stayed adhered to the plate again, making it impossible to tell plaques apart.
Future plans: Going to continue on with a titer calculated of 7.3*10^9 pfu/mL.
October 17, 2017
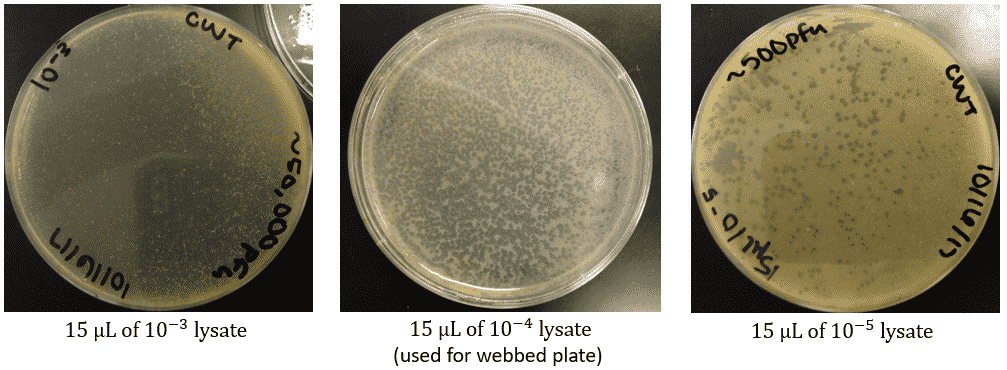
Protocol 7.1: Making Webbed Plates for a Lysate of Known Titer
Aims and purpose: To create a plate with a very high density of plaques from a lysate of known titer.
Procedures and protocols:
- Add 90uL phage buffer into 5 prelabeled 1.5 microcentrifuge tubes.
- Pipette 10uL of the lysate from September 27, 2017 into the first microcentrifuge tube, diluting the sample 10^-1.
- Pipette 10uL of the 10^-1 solution into the second microcentrifuge tube, diluting the sample 10^-2.
- Continue this pattern until the fifth microcentrifuge tube is reached, diluting the sample 10^-5.
- Pipette 15uL of the 10^-3 sample into one tube of 250uL M. smeg.
- Gently tap the tubes to mix the sample with the bacterial cells.
- repeat steps 5 and 6 for 2 more bacterial tubes with 10^-4 and 10^-5 samples.
- Leave the tubes undisturbed for 10 minutes to allow for attachment.
- Obtain 6 agar plates and label the bottom around the edges.
- Remove a bottle of top agar from the 55°C bath and quickly pipette 3mL of top agar into the 10^-3 sample/cell tubes. Immediately pipette both the agar and sample onto an agar plate and gently tilt the solution until the plate is evenly coated.
- Repeat step 10 to make a duplicate plate of 10^-3.
- Repeat steps 10 and 11 for each of the dilutions.
- Allow the agar to solidify for 20 minutes.
- Incubate at 38°C for 24 hours.
Notes: The 10^-14 plate turned out the best, so it was used for the webbed plate.
October 18, 2017
Protocol 6.3: Collecting Plate Lysates
Notes: 8mL was added to each of the 10^-4 webbed plates and filtered for collection. About 9.5 mL of high titer lysate was collected.
October 29, 2017
Protocol 9.1: Phage DNA Extraction
Notes: I tried it with 5uL, 10uL, 15uL, and 20uL nuclease mix, using a total of 4mL of my lystate. Only a few ng/mL of DNA was recorded using the Qubit.
Future plans: Going to make more lysate and try again with Baylor’s DNA extraction protocol.
November 17, 2017
Protocol 7.1: Making Webbed Plates for a Lysate of Known Titer
Aims and purpose: To create a plate with a very high density of plaques from a lysate of known titer. 10mL or more is needed for cryogenic archiving and 10mL is needed for DNA extraction, so going to make 6 webbed plates for ~18-30mL of collected high titer lysate.
Procedures and protocols: Preparation for TEM viewing
- Add 90uL phage buffer into 4 prelabeled 1.5 microcentrifuge tubes.
- Pipette 10uL of the lysate from September 27, 2017 into the first microcentrifuge tube, diluting the sample 10^-1.
- Pipette 10uL of the 10^-1 solution into the second microcentrifuge tube, diluting the sample 10^-2.
- Continue this pattern until the fourth microcentrifuge tube is reached, diluting the sample 10^-4.
- Pipette 15uL of the 10^-4 sample into one tube of 250uL M. smeg.
- Gently tap the tubes to mix the sample with the bacterial cells.
- repeat steps 5 and 6 for 2 more bacterial tubes.
- Leave the tubes undisturbed for 10 minutes to allow for attachment.
- Obtain 3 agar plates and label the bottom around the edges.
- Remove a bottle of top agar from the 55°C bath and quickly pipette 3mL of top agar into the sample/cell tubes. Immediately pipette both the agar and sample onto an agar plate and gently tilt the solution until the plate is evenly coated.
- Repeat step 5 for each of the 3 samples.
- Allow the agar to solidify for 20 minutes.
- Incubate at 38°C for 24 hours.
Notes:
Left it for ~45 hours to incubate; the plate was completely covered in bacteriophage on one side, but not really on the other side.
November 19, 2017
Protocol 6.3: Collecting Plate Lysates
Notes: 8mL was added to all 3 of the 10^-4 webbed plates and filtered for collection. About 15 mL of high titer lysate was collected.
November 20, 2017
Baylor’s DNA Extraction Protocol
[pdf-embedder url=”https://dustinedwards.info/wp-content/uploads/2017/09/DNA-Extraction-Protocol-Baylor.pdf” title=”DNA Extraction Protocol – Baylor”]
Notes: The Qubit measured 168 ug/mL from the sample.
Future plans: Continue to the enzyme digest protocol.
Protocol 10.1: Setting Up Restriction Enzyme Digests
uL DNA = 0.5 ug(mL / 168 ug)(1000 uL / mL) = 3 uL
| diH2O | 38 uL |
| 10X Reaction Buffer | 5 uL |
| Restriction Enzyme | 1 uL |
| DNA |
6 uL |
Future plans: Run the restriction enzyme digests on a 2% agarose gel. Currently stored at 4 C.
November 21, 2017
Put 1.4ml high titer lysate (the one that the titer was calculated to be 7.3*10^9 pfu/mL) and 100uL DMSO into a 1.5mL tube, which was divvied into 3 tubes with glass beads at 400uL/tube. Each was stored at 4 degrees C.
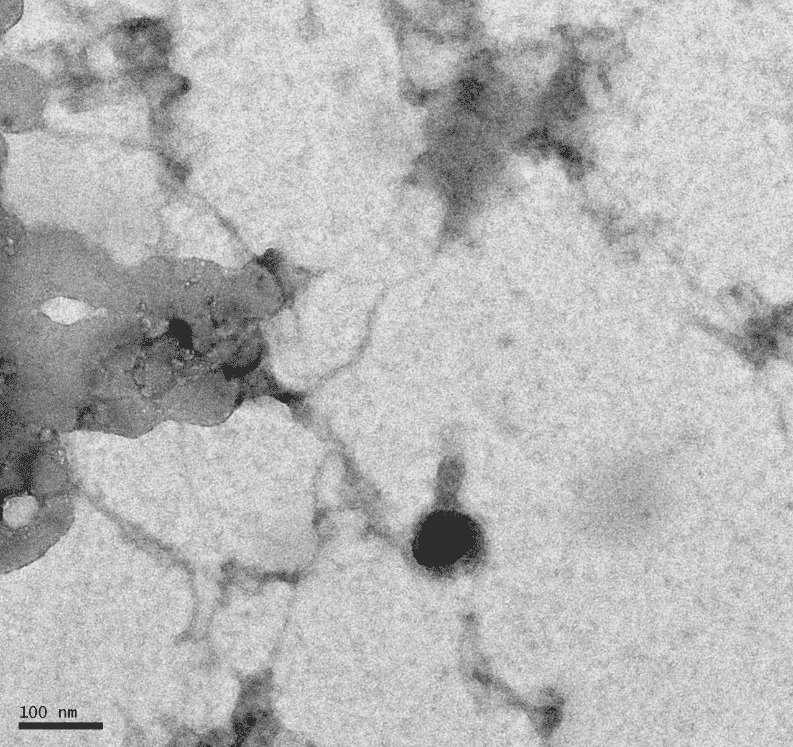
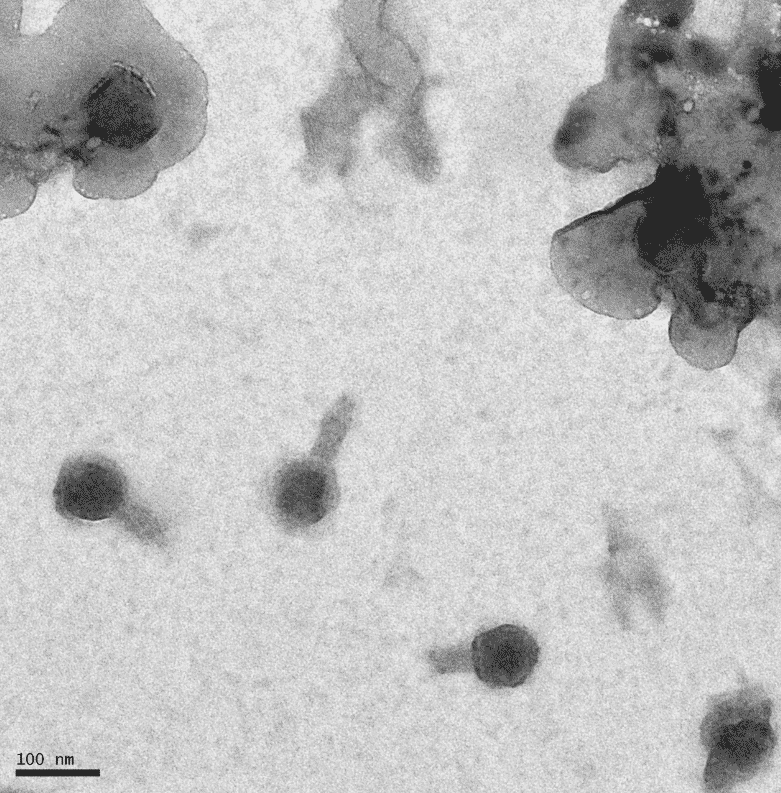
Protocol 8.1a: Mounting Phage Samples for TEM and Staining with Uranyl Acetate
Notes: Forgot to do the second wash with water, so the TEM picked up on residual salts.