Discovery of Ashaug
Ashaug Information
Morphology: Siphoviridae

Sample Collection
| Collector Name |
Anna Buchholz | Ashlynn Nowlin |
Ashlynn Nowlin
|
Anna Buchholz |
| Sample No. | 1 | 2 | 3 | 4 |
| Date of Collection | 8/29/23 | 8/29/23 | 9/6/23 | 9/5/23 |
| Sample Type | soil | soil | soil | soil |
| General Location | Dublin, TX | Stephenville, TX |
Stephenville, TX |
Stephenville, TX |
| Location Description | city park, lots of tree cover, very dry earth | side yard of a house, no coverage, very dry soil | back yard of house, by a tree and a fence | grocery store parking lot, very trashed, no cover. |
| GPS Coordinates | 32.086481, -98.348017 | 32.2291532, -98.2223771 | 32.229704, -98.201283 | 32.20933, -98.22605 |
| Sample Depth | surface | surface | surface | 5 cm below surface |
| Ambient Temperature | 36C | 34C | 28C | 29C |
| Collector Name |
Ashlynn Nowlin | # |
#
|
# |
| Sample No. | 5 | # | # | # |
| Date of Collection | 09/11/23 | mm/dd/yy | mm/dd/yy | mm/dd/yy |
| Sample Type | soil | soil | soil | soil |
| General Location | Stephenville, TX | # |
# |
# |
| Location Description | Side yard of house, very wet soil | # | # | # |
| GPS Coordinates | 32.229704, -98.201283 | # | # | # |
| Sample Depth | surface | # | # | # |
| Ambient Temperature | 18.8C | # | # | # |
Isolation/Purification
Isolation/Purification of Environmental Sample 1
Date: 08/30/23
Redo: No
Sample: 1
Purpose: Isolating the phages in our sample for further experiments
Notes:
1. We collected our materials: liquid media, and our 5ml soil sample. We filled our sample tube with liquid media until it was 2ml above the soil. We shook the tube and inverted it several times until the soil and the liquid media were fully mixed. We added the sample to a shaking incubator at 250 rpm for 1 hour.
2. We removed the sample from the incubator, and let it rest for 10 minutes while we prepared our materials. We prepared a 5ml syringe, a syringe filter, a microcentrifuge, and a Bunsen burner. We lit the Bunsen burner and used the syringe to remove the liquid from the sample tube. We used the syringe to push the liquid through a syringe filter and into a microcentrifuge. We let the sample rest for another 10 minutes.
3. While it rested, We prepared our micropipette and host bacteria sample tube. Using the micropipette under the bunsen burner, We added our sample to the host bacteria tilted it around, and tapped it to let the sample attach to the bacteria. We let this rest for another 10 minutes.
4. We prepared hot top agar (~55°C), another clean micropipette, and an agar plate. Working very quickly we pipetted 3 ml of hot agar into the sample and bacteria host mix, removed it from its tube, dispersed it onto our labeled agar plate, and tilted it so it covered the surface evenly. We placed the lid and set it into the incubator for 48 hours at 29C.
5. We washed our hands and cleaned the area.
Results:

Sample 1 was contaminated.
Conclusions and Next Steps:
We will try again with a new sample. This contamination was likely due to accidentally forgetting aseptic preparation in the beginning. We will make adjustments with the new sample.
Isolation/Purification of Environmental Sample 2
Date: 08/30/23
Redo: No
Sample: 2
Purpose: Isolating the phages in our sample for further experiments
Notes:
1. We collected our materials: liquid media, our 7ml soil sample, and gloves. We filled our sample tube with liquid media until it was 2ml above the soil. We shook the tube and inverted it several times until the soil and the liquid media were fully mixed. We added the sample to a shaking incubator at 250 rpm for 1-2 hours.
2. We removed the sample from the incubator, and let it rest for 10 minutes while we prepared our materials. We prepared a 5ml syringe, a syringe filter, a microcentrifuge, and a Bunsen burner. We lit the Bunsen burner and used the syringe to remove the liquid from the sample tube. We used the syringe to push the liquid through a syringe filter and into a microcentrifuge. We let the sample rest for another 10 minutes.
3. While it rested, We prepared our micropipette and host bacteria sample tube. Using the micropipette under the bunsen burner, We added our sample to the host bacteria tilted it around, and tapped it to let the sample attach to the bacteria. We let this rest for another 10 minutes.
4. We prepared hot top agar (~55°C), another clean micropipette, and an agar plate. Working very quickly we pipetted 3 ml of hot agar into the sample and bacteria host mix, removed it from its tube, dispersed it onto our labeled agar plate, and tilted it so it covered the surface evenly. We placed the lid and set it into the incubator for 48 hours at 29C.
5. We washed our hands and cleaned the area.
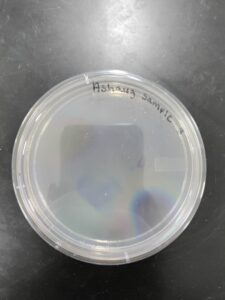
Results:
Sample 2 did not have any bacteriophages.
Conclusions and Next Steps:
We will try again with a new sample.
Isolation/Purification of Environmental Sample 3
Date: 09/06/23
Redo: No
Sample: 3
Purpose: Isolating the phages in our sample for further experiments
Notes:
1. We prepared our area for aseptic work. We sprayed our work area with Cideon and 70% ethanol and put on our gloves. We gathered our materials: a 50 ml conical tube, our sample, and 30 ml of liquid media.
2. We prepared the Bunsen burner and poured our liquid media into our samples under it. we filled it to 35 ml and inverted it several times, we put it into the shaker machine at 250 rpm for 1 hour. After an hour, our samples were placed into a centrifuge to pellet the soil.
3. Once removed, we cleaned our area again and began the next step by retrieving our materials. We used a vacuum filter, 2 pipettes (one 5ml and the other 2ml), and 500 microliters of our bacteria host.
4. In our aseptic area, we used the 5ml pipette tool to take the liquid from the top of our sample and add it to the filtering mechanism. Once we extracted all we could, we placed the lid and began the vacuum. After it was completely through the filter, we capped the sample and set it aside, discarding the vacuum filter.
5. We then got our 500 microliters of bacteria and used the 2ml pipette to add it to our filtered sample. We placed the cap on 1/4 of the way screwed, then taped and labeled it. We placed the product into the shaking incubator where it stayed for 5 days. After 5 days in the shaking incubator, we removed it and set our sample to the side.
6. We collected materials: 2 microcentrifuge tubes, a 3ml pipette tip, a pipette gun, and our host bacteria. We prepared for aseptic work, spraying our area with Cideon and 70% ethanol, and lighting the bunsen burner.
7. We transferred 1.4 ml of our enriched sample to a microcentrifuge tube and pelleted them in the centrifuge for 1 minute. Once pelleted, we used our micropipette to collect the sample, avoiding the pellet, and transferred it into a new clean microcentrifuge tube.
8. We then used our 10-microliter micropipette and transferred 10 microliters of our enriched sample to a tube containing our host bacteria. We tapped to incorporate the 2 and let the bacteria attach.
9. We retrieved some hot agar (~55C) and pipetted 3ml of hot agar into our bacteria and sample combination, immediately sucked it up and dispersed it atop our agar plate. We labeled our plate and set it in the incubator at 28C.
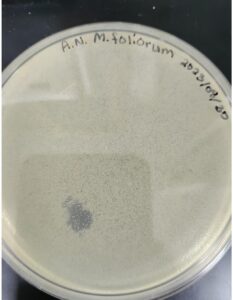
Results:
There were no host bacteria on the sample 3 plate. We believe this is because the bacteriophage was too aggressive.
Conclusions and Next Steps:
We believe this is because the bacteriophage was too aggressive. We will dilute the phage using serial dilution and replate the dilutions.
Isolation/Purification of Environmental Sample 4
Date: 09/08/23
Redo: no
Sample: 4
Purpose: Isolating the phages in our sample for further experiments
Notes:
1. We prepared our area by spraying and wiping with Cideon and 70% ethanol, and we lit our Bunsen burner. We then collected materials: liquid media, a 5ml soil sample, and gloves. We filled our sample tube with liquid media until it was 2ml above the soil. We shook the tube and inverted it several times until the soil and the liquid media were fully mixed. We added the sample to a shaking incubator at 250 rpm for 1-2 hours.
2. We removed the sample from the incubator, and let it rest for 10 minutes while we prepared our materials. We prepared a 5ml syringe, a syringe filter, a microcentrifuge, and a Bunsen burner. We lit the Bunsen burner and used the syringe to remove the liquid from the sample tube. We used the syringe to push the liquid through a syringe filter and into a microcentrifuge. We then let the sample rest for another 10 minutes.
3. While it rested, we prepared our micropipette and host bacteria sample tube. Using the micropipette under the bunsen burner, we added the sample to the host bacteria tilted it around, and tapped it to let the sample attach to the bacteria. We let this rest for another 10 minutes.
4. We prepared hot top agar (~55°C), another clean micropipette, and an agar plate. Working very quickly we pipetted 3 ml of hot agar into the sample and bacteria host mix, removed it from its tube, dispersed it onto a labeled agar plate, and tilted it so it covered the surface evenly. We placed the lid and set it into the incubator for 48 hours at 29C.
5. We washed our hands and cleaned the area.
Results:
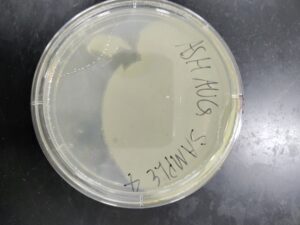
Sample 4 did not have bacteria phages.
Conclusions and Next Steps:
The agar did not get a chance to solidify before it was flipped. Host bacteria was grown, but no bacteriophage was found.
Isolation/Purification of Environmental Sample 5
Date: 09/11/23
Redo: no
Sample: 5
Purpose: Isolating the phages in our sample for further experiments
Notes:
1. We prepared our area by spraying and wiping with Cideon and 70% ethanol, and we lit our Bunsen burner. We then collected materials: liquid media, a 5ml soil sample, and gloves. We filled our sample tube with liquid media until it was 2ml above the soil. We shook the tube and inverted it several times until the soil and the liquid media were thoroughly mixed. We added the sample to a shaking incubator at 250 rpm for 1-2 hours.
2. We removed the sample from the incubator, and let it rest for 10 minutes while we prepared our materials. We prepared a 5ml syringe, a syringe filter, a microcentrifuge, and a Bunsen burner. We lit the Bunsen burner and used the syringe to remove the liquid from the sample tube. We used the syringe to push the liquid through a syringe filter and into a microcentrifuge. We then let the sample rest for another 10 minutes.
3. We prepared our micropipette and host bacteria sample tube while it rested. Using the micropipette under the bunsen burner, we added the sample to the host bacteria, tilted it around, and tapped it to let the sample attach to the bacteria. We let this rest for another 10 minutes.
4. We prepared hot top agar (~55°C), another clean micropipette, and an agar plate. Working very quickly we pipetted 3 ml of hot agar into the sample and bacteria host mix, removed it from its tube, dispersed it onto a labeled agar plate, and tilted it so it covered the surface evenly. We placed the lid and set it into the incubator for 48 hours at 29C.
5. We washed our hands and cleaned the area.
Results:
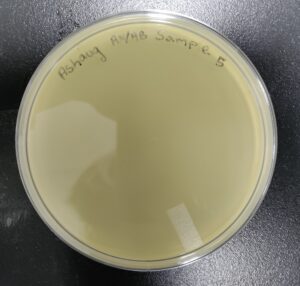
Sample 5 did not have bacteriophage
Conclusions and Next Steps:
We will continue our process with sample 3, and discard samples 4 and 5.
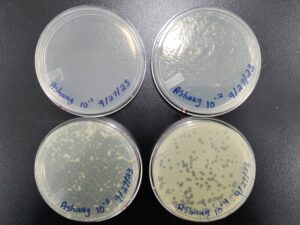
1st Serial Dilution of Sample 3
Date: 09/11/23
Redo: No
Sample: 3
Purpose: To isolate and dilute the phage found in sample 3 for further testing, purification, and amplification.
Notes:
1. We prepared our bench for aseptic work, spraying with Cideon and wiping with paper towels, and then spraying with 70% ethanol and wiping with paper towels again. We lit our Bunsen burner and then assembled our supplies: the sample 3 plate, 8 ml of phage buffer, a .22μm filter, a 5 ml syringe, and a 15 ml sterile conical tube.
2. We opened the plate under the Bunsen burner and flooded it with 8 ml of phage buffer. We let it sit for a couple of seconds, before using the 5 ml syringe to aspirate and filter the phage buffer into our 15 ml conical tube.
3. Next, we prepared for serial dilutions. We retrieved 8 microcentrifuge tubes, a 10 μl pipette, a 90 μl pipette, and 720 μl of phage buffer. We labeled each microcentrifuge tube from 10^(-1) to 10^(-8). We pipetted 90 μl of phage buffer into each microcentrifuge in each tube.
4. We switched to the 10 μl pipette and opened our 15 ml conical tube with the phage buffer and sample 3 phage. We put 10 μl of liquid into the tube labeled 10^(-1). We repeated this process with each new tube, taking 10 μl of the last dilution and mixing it into the next tube of phage buffer accordingly. We repeated until we had all microcentrifuges filled and set them aside.
5. Next, we prepared 5 agar plates, molten top agar (~55C), 5 tubes containing host bacteria, 5ml pipettes, a pipette gun, and a 10 μl pipette tool. For each dilution and its corresponding plate, We took 3 ml of molten agar, put it into the tube with the host bacteria, immediately aspirated it back into the pipette, and dispersed it on the plate, tilting to make sure it spread evenly. We repeated this with 4 more plates. Next, we took the 10 μl pipette and took 10 μl of each sample dilution, and placed a drop on its corresponding plate. We repeated this for each dilution, down to 10 ^(-5). We waited for these plates to dry and set before placing them in the incubator at 29.8C.
Results:
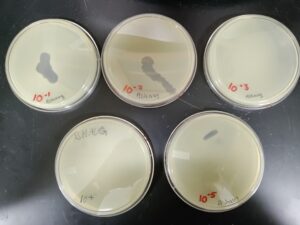
Results after 29 hours in the incubator.
Results after 49 hours in the incubator.
Conclusions and Next Steps:
We will pick the plaque from the 10^(-2) plate and do another round of serial dilutions, continuing to amplification of our phage.
Amplification
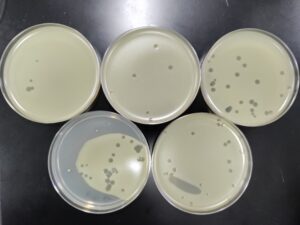
2nd Serial Dilution of Sample 3
Date: 09/18/23
Redo: No
Sample: 3
Purpose: To isolate and dilute the phage found in sample 3 for further testing, purification, and amplification.
Notes:
1. We prepared our bench for aseptic work, spraying with Cideon and wiping with paper towels, and then spraying with 70% ethanol and wiping with paper towels again. We lit our Bunsen burner and then assembled supplies for plaque picking and serial dilutions: 6 microcentrifuge tubes, a p10 micropipette, pipette tips, and phage buffer. Into each microcentrifuge, We pipetted 90 μl of phage buffer. We labeled each microcentrifuge tube from 10^(-1) to 10^(-6).
2. We opened the plate under the Bunsen burner, and, using the p10 micropipette, we stuck the tip into one of the plaques on our 10^(2) plate. We then swirled the tip around in a labeled microcentrifuge tube. We vortexed this for 10 seconds, and set it down.
3. We switched to the p10 pipette, took 10 μl of liquid from the first tube, and put it into the tube labeled 10^(-1). We repeated this process with each new tube, taking 10 μl of the last dilution and mixing it into the next tube of phage buffer accordingly. We repeated until we had all microcentrifuges filled and set them aside.
4. Next, we retrieved 6 tubes with the bacteria M. foliorum and added 10 μl of each tube into its own bacteria tube. We tapped it to attach the sample and bacteria and let it rest for ~5 minutes. We were left with 6 tubes of varying dilutions from 10^(-1) to 10^(-6) mixed with host bacteria.
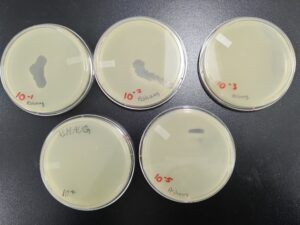
5. Next, we prepared 6 agar plates, molten top agar (~55C), 6 tubes containing host bacteria, 5ml pipettes, a pipette gun, and a 10 μl pipette tool. For each dilution and its corresponding plate, We took 3 ml of molten agar, put it into the tube with the host bacteria and corresponding dilution, immediately aspirated it back into the pipette, and dispersed it on the plate, tilting to make sure it spread evenly. We repeated this with 5 more plates. We waited for these plates to dry and set before placing them in the incubator at 29.8C.
Results:
Results after 24 hours in the incubator
Conclusions and Next Steps:
We will pick the plaque from the 10^(-4) plate and do a third round of serial dilutions.
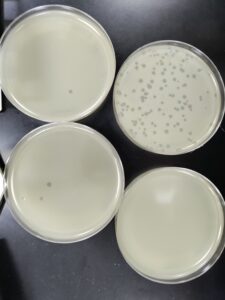
3rd Serial Dilution of Sample 3
Date: 09/20/2023
Redo: No
Sample: 3
Purpose: To dilute our sample to a point where only one phage remains.
Notes:
-
- We prepared our bench for aseptic work, spraying with Cideon and wiping with paper towels, and then spraying with 70% ethanol and wiping with paper towels again. We lit our Bunsen burner then assembled supplies for plaque picking and serial dilutions: 4 microcentrifuge tubes, a p10 micropipette, pipette tips, and phage buffer. Into each microcentrifuge, We pipetted 90 μl of phage buffer. We labeled each microcentrifuge tube from 10^(-1) to 10^(-4).
- We opened the plate under the Bunsen burner, and, using the p10 micropipette, we stuck the tip into one of the plaques on our 10^(4) plate. We then swirled the tip around in a labeled microcentrifuge tube. We vortexed this for 10 seconds, and set it down.
- We switched to the p10 pipette and took 10 μl of liquid from the first tube, and put it into the tube labeled 10^(-1), we then vortexed it for 10 seconds, and moved on. We repeated this process with each new tube, taking 10 μl of the last dilution and mixing it into the next tube of phage buffer accordingly. We repeated until we had all microcentrifuges filled and set them aside.
- Next, we retrieved 4 tubes with the bacteria M. foliorum and added 10 μl of each tube into its own bacteria tube. We tapped it to attach the sample and bacteria and let it rest for ~5 minutes. We were left with 4 tubes of varying dilutions from 10^(-1) to 10^(-4) mixed with host bacteria.
- Next, we prepared 4 agar plates, molten top agar (~55C), 4 tubes containing host bacteria, 5ml pipettes, a pipette gun, and a 10 μl pipette tool. For each dilution and its corresponding plate, We took 3 ml of molten agar, put it into the tube with the host bacteria and corresponding dilution, immediately aspirated it back into the pipette, and dispersed it on the plate, tilting to make sure it spread evenly. We repeated this with 3 more plates. We waited for these plates to dry and set before placing them in the incubator at 29.8C.
Results:
Results after 24 hours in the incubator
Conclusions and Next Steps:
We will flood our webbed plate to get a lysate, and then plate it in different dilutions to calculate the lysate.
Flooding of the webbed plate to retrieve low-titer lysate
Date: 09/25/2023
Redo: No
Sample: 3
Purpose: To obtain a high concentration of our phage sample to plate and calculate titer.
Notes:
-
- We prepared our bench for aseptic work, spraying with Cideon and wiping with paper towels, and then spraying with 70% ethanol and wiping with paper towels again. We lit our Bunsen burner and then assembled supplies: 8ml of phage buffer, and our 10^(-1) plate.
- Working close to our flame, we poured 8 ml of phage buffer onto our plate, replaced the lid, and gently swirled it. We set this aside and let it rest at room temperature for ~6 hours.
- After this time had passed, we returned to the lab, resanitized our area, and lit the Bunsen burner. We then retrieved supplies for the next step. We got a 3ml syringe, a 22μm syringe filter, and a 15 ml conical tube.
- We opened the lid under the burner and propped the plate onto the lid so the liquid phage buffer pooled at the bottom; then with the syringe aspirated all of the phage buffer and filtered it into the conical tube. We labeled this and placed it in isolation.
Results:
We now have a low titer lysate to continue our work with.
Conclusions and Next Steps:
We will plate this sample at different dilutions to calculate which concentration produces a webbed plate.
Full Plate Titer
Date: 09/27/2023
Redo: No
Sample: 3
Purpose: To calculate titer, and to see which dilution will produce webbed plates.
Notes:
-
- We prepared our bench for aseptic work, spraying with Cideon and wiping with paper towels, and then spraying with 70% ethanol and wiping with paper towels again. We lit our Bunsen burner and then assembled supplies: 4 agar plates, 4 microcentrifuge tubes, 4 m. foliorum bacteria tubes, a 10μL pipette gun, and a 90μL pipette gun.
- Working close to our flame, we added 90μL of phage buffer and added it to 4 labeled microcentrifuge tubes. we labeled them 10^(-1),10^(-2),10^(-3), and 10^(-4).
- We switched to the p10 pipette, took 10 μl of liquid from the sample tube, and put it into the tube labeled 10^(-1). We then vortexed it for 10 seconds, and moved on. We repeated this process with each new tube, taking 10 μl of the last dilution and mixing it into the next tube of phage buffer accordingly. We repeated until we had all microcentrifuges filled and set them aside.
- Next, we retrieved 4 tubes with the bacteria M. foliorum and added 10 μl of each dilution tube into its own bacteria tube. We tapped it to attach the sample and bacteria and let it rest for ~5 minutes. We were left with 4 tubes of varying dilutions from 10^(-1) to 10^(-4) mixed with host bacteria.
- Next, we prepared 4 agar plates, molten top agar (~55C), 4 tubes containing host bacteria mixed with the dilutions, four 5ml pipettes, and a pipette gun. For each dilution and its corresponding plate, We took 3 ml of molten agar, put it into the tube with the host bacteria and corresponding dilution, immediately aspirated it back into the pipette, and dispersed it on the plate, tilting to make sure it spread evenly. We repeated this with 3 more plates. We waited for these plates to dry and set before placing them in the incubator at 29.8C for 29 hours.
Results:
Results after 29 hours in the incubator. The 10^(-1) and 10^(-2) plates are completely cleared, and we have a webbed plate in our 10^(-3) plate.
Conclusions and Next Steps:
A 10^(-3) dilution is needed to produce a webbed plate. We can use this information to make more webbed plates. We can now move on to the next step in the process.
Making Webbed Plates
Date: 10/02/2023
Redo: No
Sample: 3
Purpose: To make more webbed plates to obtain high titer lysate from.
Notes:
1. We prepared our bench for aseptic work, spraying with Cideon and wiping with paper towels, and then spraying with 70% ethanol and wiping with paper towels again. We lit our Bunsen burner and then assembled supplies for dilution plaque assay: 7 microcentrifuge tubes, a p10 micropipette, a p100 micropipette, pipette tips, phage buffer, and our sample 3 lysate. Into each microcentrifuge, We labeled 3 microcentrifuge tubes 10^(-1), 10^(-2) and 10^(-3), and 5 separate microcentrifuge tubes as 10^(-3) We pipetted 90 μl of phage buffer into each.
2. We opened the conical tube with lysate under the Bunsen burner, and, using the p10 micropipette, we retrieved 10μl and put it in the microcentrifuge tube labeled 10^(-1). We vortexed this for 10 seconds, and set it down.
3. We switched to the p10 pipette and took 10 μl of liquid from the first tube, and put it into the tube labeled 10^(-2), we then vortexed it for 10 seconds, and moved on. We repeated this process with each new tube, taking 10 μl of the last dilution and mixing it into the next tube of phage buffer accordingly. We repeated until we had all microcentrifuges filled and set them aside.
4. Next, we retrieved 5 tubes with the bacteria M. foliorum and added 10 μl of each tube into its own bacteria tube. We tapped it to attach the sample and bacteria and let it rest for ~5 minutes. We were left with 4 tubes of varying dilutions from 10^(-1) to 10^(-5) mixed with host bacteria.
5. We then prepared 5 agar plates, molten top agar (~55C), 4 tubes containing host bacteria, 5ml pipettes, and a pipette gun.For each dilution and its corresponding plate, We took 3 ml of molten agar, put it into the tube with the host bacteria and corresponding dilution, immediately aspirated it back into the pipette, and dispersed it on the plate, tilting to ensure it spread evenly. We repeated this with 3 more plates. We waited for these plates to dry and set before placing them in the incubator at 29.8C.
Results:
Results after 24 hours in the incubator
Conclusions and Next Steps:
We have a few theories as to what happened. Most likely, something went wrong in the dilution process, and we ended up plating the 10^(-4) dilution. We will do another serial dilution and plating to figure out the required dilution
Full Plate Titer 2
Date: 10/04/2023
Redo: Yes
Sample: 3
Purpose: To see which dilution will produce webbed plates.
Notes:
-
- We prepared our bench for aseptic work, spraying with Cideon and wiping with paper towels, and then spraying with 70% ethanol and wiping with paper towels again. We lit our Bunsen burner and then assembled supplies: 4 agar plates, 4 microcentrifuge tubes, 4 m. foliorum bacteria tubes, a 10μL pipette gun, and a 90μL pipette gun.
- Working close to our flame, we added 90μL of phage buffer and added it to 4 labeled microcentrifuge tubes. we labeled them 10^(-1),10^(-2),10^(-3), and 10^(-4).
- We switched to the p10 pipette, took 10 μl of liquid from the high lysate sample conical tube, and put it into the tube labeled 10^(-1). We then vortexed it for 10 seconds, and moved on. We repeated this process with each new tube, taking 10 μl of the last dilution and mixing it into the next tube of phage buffer accordingly. We repeated until we had all microcentrifuges filled and set them aside.
- Next, we retrieved 4 tubes with the bacteria M. foliorum and added 10 μl of each dilution tube into its own bacteria tube. We tapped it to attach the sample and bacteria and let it rest for ~5 minutes. We were left with 4 tubes of varying dilutions from 10^(-1) to 10^(-4) mixed with host bacteria.
- Next, we prepared 4 agar plates, molten top agar (~55C), 4 tubes containing host bacteria mixed with the dilutions, four 5ml pipettes, and a pipette gun. For each dilution and its corresponding plate, We took 3 ml of molten agar, put it into the tube with the host bacteria and corresponding dilution, immediately aspirated it back into the pipette, and dispersed it on the plate, tilting to ensure it spread evenly. We repeated this with 3 more plates. We waited for these plates to dry and set before placing them in the incubator at 29.8C for 29 hours.
Results:

The same results as the last time we attempted this. the 10^(-3) produces a webbed plate.
Conclusions and Next Steps:
We will make webbed plates using the 10^(-3) dilution.
Making Webbed Plates 2
Date: 10/09/2023
Redo: Yes
Sample: 3
Purpose: To make more webbed plates to obtain high titer lysate from.
Notes:
1. We prepared our bench for aseptic work, spraying with Cideon and wiping with paper towels, and then spraying with 70% ethanol and wiping with paper towels again. We lit our Bunsen burner and then assembled supplies for dilution plaque assay: 3 microcentrifuge tubes, a p10 micropipette, a p100 micropipette, pipette tips, phage buffer, and our sample 3 lysate. Into each microcentrifuge, We labeled 3 microcentrifuge tubes 10^(-1), 10^(-2), and 10^(-3), and pipetted 90 μl of phage buffer into each.
2. We opened the conical tube with lysate under the Bunsen burner, and, using the p10 micropipette, we retrieved 10μl and put it in the microcentrifuge tube labeled 10^(-1). We vortexed this for 10 seconds, and set it down. We then took 10 μl of liquid from the 10^(-1) tube, and put it into the tube labeled 10^(-2); we then vortexed it for 10 seconds, and moved on. We repeated this process with the third tube, taking 10 μl of the last dilution and mixing it into the 10^(-3) microcentrifuge tube.
3. Next, we retrieved 4 tubes with the bacteria M. foliorum and added 10 μl of the 10^(-3) dilution. We tapped it to attach the sample and bacteria and let it rest for ~5 minutes. We were left with 4 tubes of diluted sample mixed with host bacteria.
4. We then prepared 4 agar plates, molten top agar (~55C), 4 tubes containing host bacteria, four 5ml pipettes, and a pipette gun. For each bacteria tube and its corresponding plate, We took 3 ml of molten agar, put it into the tube, immediately aspirated it back into the pipette, and dispersed it on the plate, tilting to ensure it spread evenly. We repeated this with 3 more plates. We waited for these plates to dry and set before placing them in the incubator at 29.8C.
Results:
Results after ~24 hours in the incubator
Conclusions and Next Steps:
Something is going wrong between the titer calculations and the plating for webbed plates. We will try plating our 10^(-2) and see if that produces a webbed plate
Making Webbed Plates 3
Date: 10/11/2023
Redo: Yes
Sample: 3
Purpose: To make more webbed plates to obtain high titer lysate from.
Notes:
1. We prepared our bench for aseptic work, spraying with Cideon and wiping with paper towels, and then spraying with 70% ethanol and wiping with paper towels again. We lit our Bunsen burner and then assembled supplies for dilution plaque assay: 2 microcentrifuge tubes, a p10 micropipette, a p100 micropipette, pipette tips, phage buffer, and our sample 3 lysate. We labeled 3 microcentrifuge tubes 10^(-1) and 10^(-2) and pipetted 90 μl of phage buffer into each.
2. We opened the conical tube with lysate under the Bunsen burner, and, using the p10 micropipette, we retrieved 10μl and put it in the microcentrifuge tube labeled 10^(-1). We vortexed this for 10 seconds, and set it down. We then took 10 μl of liquid from the 10^(-1) tube and put it into the tube labeled 10^(-2), vortexed it for 10 seconds, and moved on.
3. Next, we retrieved 2 tubes with the bacteria M. foliorum and added 10 μl of the 10^(-2) dilution. We tapped it to attach the sample and bacteria and let it rest for ~5 minutes. We were left with 4 tubes of diluted sample mixed with host bacteria.
4. We then prepared 2 agar plates, molten top agar (~55C), 2 tubes containing host bacteria and sample, two 5ml pipettes, and a pipette gun. For each bacteria tube and its corresponding plate, We took 3 ml of molten agar, put it into the tube, immediately aspirated it back into the pipette, and dispersed it on the plate, tilting to ensure it spread evenly. We repeated this 1 more plate. We waited for these plates to dry and set before placing them in the incubator at 29.8C.
Results:

Conclusions and Next Steps:
Due to scheduling and lab availability, taking the plates out of the incubator in time was impossible. the 10^(-2) cleared the plate. this dilution does not make a webbed plate. Something is going wrong between the dilution process and the process of making webbed plates. We will attempt to make webbed plates again using our 10^(-1) and 10^(-2) plates as a control to see if we were going through the dilution process wrong.
Serial Dilution and Making Webbed Plates 4
Date: 10/16/2023
Redo: No
Sample: 3
Purpose: To plate dilutions and make more webbed plates to obtain high titer lysate from.
Notes:
1. We prepared our bench for aseptic work, spraying with Cideon and wiping with paper towels, and then spraying with 70% ethanol and wiping with paper towels again. We lit our Bunsen burner and then assembled supplies for dilution and plaque assay: 3 microcentrifuge tubes, a p10 micropipette, a p100 micropipette, pipette tips, phage buffer, and our sample 3 lysate. Into each microcentrifuge, We labeled 3 microcentrifuge tubes 10^(-1), 10^(-2), and 10^(-3), and pipetted 90 μl of phage buffer into each.
2. We opened the conical tube with lysate under the Bunsen burner, and, using the p10 micropipette, we retrieved 10μl and put it in the microcentrifuge tube labeled 10^(-1). We vortexed this for 10 seconds, and set it down. We then took 10 μl of liquid from the 10^(-1) tube, and put it into the tube labeled 10^(-2); we then vortexed it for 10 seconds, and moved on. We repeated this process with the third tube, taking 10 μl of the last dilution and mixing it into the 10^(-3) microcentrifuge tube.
3. Next, we retrieved 6 tubes with the bacteria M. foliorum and added 10 μl of each dilution tube into its own bacteria tube. We tapped it to attach the sample and bacteria and let it rest for ~5 minutes. We were left with 4 tubes of varying dilutions: one 10^(-1), one 10^(-2), and four 10^(-3) tubes mixed with host bacteria.
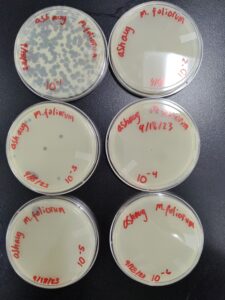
4. Next, we prepared 6 agar plates, molten top agar (~55C), 6 tubes containing host bacteria mixed with the dilutions, four 5ml pipettes, and a pipette gun. For each dilution and corresponding plate, We took 3 ml of molten agar, put it into the tube with the host bacteria and corresponding dilution, immediately aspirated it back into the pipette, and dispersed it on the plate, tilting to ensure it spread evenly. We repeated this with 5 more plates. We waited for these plates to dry and set before placing them in the incubator at 29.8C for 29 hours.
Results:
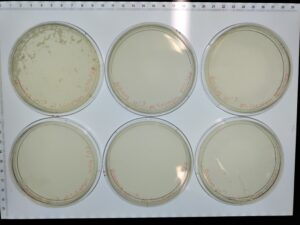
Results after 29 hours. All 6 plates

All 4 webbed plates. Not very noticeable in the picture, there are wisps of host bacteria left in three of the four 10^(-3) plates. We consider these webbed.
Conclusions and Next Steps:
We have 4 webbed plates with our 10^(-3) dilution. We will flood and filter these plates to get high titer lysate.
Flooding the webbed plates to retrieve high-titer lysate
Date: 10/18/2023
Redo: No
Sample: 3
Purpose: To obtain a high concentration of our phage sample to plate and calculate titer.
Notes:
-
- We prepared our bench for aseptic work, spraying with Cideon and wiping with paper towels, and then spraying with 70% ethanol and wiping with paper towels again. We lit our Bunsen burner and then assembled supplies: 32ml of phage buffer, and our four 10^(-3) plates.
- Working close to our flame, we poured 8 ml of phage buffer onto each plate, replaced the lid, and gently swirled it. We set this aside and let it rest at room temperature for ~6 hours.
- After this time had passed, we returned to the lab, resanitized our area, and lit the Bunsen burner. We then retrieved supplies for the next step. We got a 3ml syringe, a Corning .22 μm vacuum filter, and the included 40 ml tube provided with the Corning vacuum.
- We opened the lid under the burner and propped the plate onto the lid so the liquid phage buffer pooled at the bottom; then, the syringe aspirated all of the phage buffer into the filter and vacuum filtered it into the 40ml tube. We retrieved 25 ml of high-titer lysate. We labeled this and placed it in the fridge at 4C.
Results:
We now have a high-titer lysate to continue our work with.
Conclusions and Next Steps:
We will plate this sample at different dilutions in a full plate titer to calculate titer for TEM analysis.
Full Plate Titer
Date: 10/20/2023
Redo: No
Sample: 3
Purpose: To calculate titer.
Notes:
-
- We prepared our bench for aseptic work, spraying with Cideon and wiping with paper towels, and then spraying with 70% ethanol and wiping with paper towels again. We lit our Bunsen burner and then assembled supplies: 6 agar plates, 6 microcentrifuge tubes, a P10 pipette, and a P100 pipette.
- Working close to our flame, we added 90μL of phage buffer and added it to 6 labeled microcentrifuge tubes. we labeled them 10^(-1),10^(-2),10^(-3), 10^(-4),10^(-5),and 10^(-6).
- We switched to the p10 pipette, took 10 μl of liquid from the high titer lysate sample tube, and put it into the tube labeled 10^(-1). We then vortexed it for 10 seconds, and moved on. We repeated this process with each new tube, taking 10 μl of the last dilution and mixing it into the next tube of phage buffer accordingly. We repeated until we had all microcentrifuges filled and set them aside.
- Next, we retrieved 6 tubes with the bacteria M. foliorum and added 10 μl of each dilution tube into its own bacteria tube. We tapped it to attach the sample and bacteria and let it rest for ~5 minutes. We were left with 6 tubes of varying dilutions from 10^(-1) to 10^(-6) mixed with host bacteria.
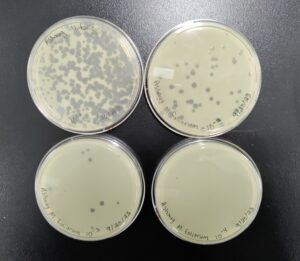
- Next, we prepared 6 agar plates, molten top agar (~55C), the 6 tubes containing host bacteria mixed with the dilutions, a pipette gun, and six 5ml serological pipettes. For each dilution and its corresponding plate, We took 3 ml of molten agar, put it into the tube with the host bacteria and corresponding dilution, immediately aspirated it back into the pipette, and dispersed it on the plate, tilting to make sure it spread evenly. We repeated this with 5 more plates. We waited for these plates to dry and set before placing them in the incubator at 29.8C for 24 hours
Results:

Results after 24 hours in the incubator. We have a countable number of plaques on our 10^(-3) dilution, so we will use this to calculate titer.
Conclusions and Next Steps:
We now have our titer calculated at 7.1 x 10^(6). We will mount grids with our phage lysates for electron microscopy next.
Characterization
Phage mounting for TEM grids
Date: 10/23/2023
Redo: No
Purpose: Mounting phages for electron microscopy
Notes:
-
- We cleaned and prepared our lab desk by spraying with Cideon, wiping with a paper towel, then spraying with 70% ethanol, and wiping with a towel again. We lit our Bunsen burner and gathered our supplies. P100 pipette, our high titer lysate, and phage buffer. We aseptically transferred 1 ml of high-titer lysate into a sterile microcentrifuge tube, balanced the tubes, and centrifuged them for 1 hour at 4 °C at top speed to concentrate the phage particles at the bottom of the tube.
- We retrieved our tubes and then carefully micropipetted out as much supernatant as possible without disrupting the concentrated phage at the bottom of the tube. We added 100 μl of phage buffer and let resuspend at 4 °C for 30 minutes to one hour.
- We put on a fresh pair of gloves and continued to our workstation, which was prepared by our instructor. The work area was covered with bench paper, and there were EM forceps, Pelco tabs, 200–400 mesh carbon–formvar-coated copper grids, wedges of Watman filter paper, sterile filtered water, and 1 % uranyl acetate. There was also a petri dish lid with a piece of parafilm and a PELCO tab on top.
- Using EM forceps, we removed a fresh grid from a box of unused grids and placed the grid’s shiny side up on the edge of the tab. With a p10 micropipette, we gently placed 10 μl of our lysate onto the grid and let sit for 6 minutes. We then wicked off the excess with the filter paper and moved on.
- Next, we rinsed the grid. We did this by carefully placing 10 μl of sterile water on the grid, letting sit for 2 minutes, and then wicking off with filter paper. We repeated this twice before we continued to the next step. To stain our grid, we delicately placed 10 μl of 1% uranyl acetate onto the grid and let it sit for 2 minutes before wicking it off with filter paper. We let this sit to air dry for ~1-2 minutes. We placed our grid in a designated spot and marked where it was.
Results:
TEM grids are ready to be shipped to the EM facility.
Setting Up Restriction Enzyme Digests
Date: 11/10/23
Redo: No
Purpose: Setting up restriction enzymes for gel electrophoresis.
Notes:
-
- We prepared our bench for aseptic work and gently mixed our DNA sample. We put it in the heating block to incubate at 65 degrees C for 10 minutes and then immediately put it on ice. we then quickly microcentrifuge it to move all the DNA to the bottom of the tube. We calculated the volume of DNA sample needed to obtain 0.5 µg of DNA: .23 microliters.
- We got 7 microcentrifuge tubes and labeled them Ladder, Uncut, HaeIII, MseI, NspI, SacII, and SalI.
- To each tube except the ladder and uncut, we added .2 microliters of our phage DNA. To each tube except uncut, we added .5 microliters of the corresponding enzyme. To each tube, we added 2.5 microliters of 10x reaction buffer, and to all tubes except ladder and uncut, we added 21.7 microliters of ddh2o, and to the ladder and uncut, we added 24.5 microliters of ddh20. We then microcentrifuged each tube for around 1 minute to get all the liquid to the bottom.
- We incubated for 15 minutes at 37 degrees C, and then quickly spinned in a microcentrifuge for around 1 minute.
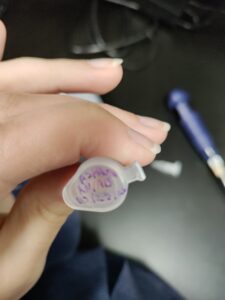
Results:
These are our restriction enzyme digests.
Conclusions and Next Steps:
We will put these in storage and move on to making the agarose gels for electrophoresis next lab period.
Making Agarose Gels for Electrophoresis
Date: 11/13/23
Redo: No
Purpose: Setting up agarose gels for gel electrophoresis.
Notes:
-
- We prepared our bench for aseptic work. We set up a gel apparatus and prepared enough 0.8 % agarose gel to cover the tips of the gel combs by ~2–3 mm. We weighed the appropriate amount of agarose powder and transferred it to an Erlynmeyer flask. We added the appropriate amount of 1X TBE buffer to the agarose powder and gently mixed it. We heated the mixture until boiling, about 1-2 minutes, carefully removed the flask from the microwave, examined for clumps, and continued. We allowed it to cool for ~15 minutes.
- We poured the agarose mixture into the prepared gel apparatus and inserted the comb to cast the wells. We removed the comb, and poured 1X TBE buffer until the gel was ~1/4 inch covered
Conclusions and Next Steps:
We will move on to electrophoresis.
Gel electrophoresis
Date: 11/13/23
Redo: No
Purpose: DNA analysis and characterization.
Notes:
-
- We prepared our bench for aseptic work. We retrieved our enzymes and added .5 microliters of 6x concentrated loading dye to each tube. We placed them in a heating block at 65 degrees C for about 5 minutes, before placing them on ice to cool, and then spinning at 10k rpm for ~15 seconds.
- Next, we loaded the enzymes into the gel in order, Ladder, Uncut, HaeIII, MseI, NspI, SacII, and SalI. We ran at 100 volts until the blue dye moved 3.5 inches from the well. (approx. 1 hour) We carefully removed the gel from the electrophoresis chamber and photographed our gel.
Results:
Our electrophoresis didn’t go as planned, so we will retry tomorrow.
Conclusions and Next Steps:
We will retry restriction enzyme digests, agarose gels, and electrophoresis.
Setting Up Restriction Enzyme Digests
Date: 11/15/23
Redo: Yes
Purpose: Setting up restriction enzymes for gel electrophoresis.
Notes:
-
- We prepared our bench for aseptic work and gently mixed our DNA sample. We put it in the heating block to incubate at 65 degrees C for 10 minutes and then immediately put it on ice. we then quickly microcentrifuge it to move all the DNA to the bottom of the tube. We calculated the volume of DNA sample needed to obtain 0.5 µg of DNA: .23 microliters.
- We got 7 microcentrifuge tubes and labeled them Ladder, Uncut, HaeIII, MseI, NspI, SacII, and SalI.
- To each tube except the ladder and uncut, we added .2 microliters of our phage DNA. To each tube except uncut, we added .5 microliters of the corresponding enzyme. To each tube, we added 2.5 microliters of 10x reaction buffer, and to all tubes except ladder and uncut, we added 21.7 microliters of ddh2o, and to the ladder and uncut, we added 24.5 microliters of ddh20. We then microcentrifuged each tube for around 1 minute to get all the liquid to the bottom.
- We incubated for 15 minutes at 37 degrees C, and then quickly spinned in a microcentrifuge for around 1 minute.
Results:
These are our restriction enzyme digests.
Conclusions and Next Steps:
We will put these in storage and move on to making the agarose gels for electrophoresis next lab period.
Making Agarose Gels for Electrophoresis
Date: 11/15/23
Redo: Yes
Purpose: Setting up agarose gels for gel electrophoresis.
Notes:
-
- We prepared our bench for aseptic work. We set up a gel apparatus and prepared enough 0.8 % agarose gel to cover the tips of the gel combs by ~2–3 mm. We weighed the appropriate amount of agarose powder and transferred it to an Erlynmeyer flask. We added the appropriate amount of 1X TBE buffer to the agarose powder and gently mixed it. We heated the mixture until boiling, about 1-2 minutes, carefully removed the flask from the microwave, examined for clumps, and continued. We allowed it to cool for ~15 minutes.
- We poured the agarose mixture into the prepared gel apparatus and inserted the comb to cast the wells. We removed the comb, and poured 1X TBE buffer until the gel was ~1/4 inch covered
Conclusions and Next Steps:
We will move on to electrophoresis.
Gel electrophoresis
Date: 11/15/23
Redo: Yes
Purpose: DNA analysis and characterization.
Notes:
-
- We prepared our bench for aseptic work. We retrieved our enzymes and added .5 microliters of 6x concentrated loading dye to each tube. We placed them in a heating block at 65 degrees C for about 5 minutes, before placing them on ice to cool, and then spinning at 10k rpm for ~15 seconds.
- Next, we loaded the enzymes into the gel in order, Ladder, Uncut, HaeIII, MseI, NspI, SacII, and SalI. We ran at 100 volts until the blue dye moved 3.5 inches from the well. (approx. 1 hour) We carefully removed the gel from the electrophoresis chamber and photographed our gel.
Results:
Our electrophoresis didn’t go as planned, so we will retry.
Conclusions and Next Steps:
We will retry restriction enzyme digests, agarose gels, and electrophoresis.
Setting Up Restriction Enzyme Digests
Date: 11/15/23
Redo: Yes
Purpose: Setting up restriction enzymes for gel electrophoresis.
Notes:
-
- We prepared our bench for aseptic work and gently mixed our DNA sample. We put it in the heating block to incubate at 65 degrees C for 10 minutes and then immediately put it on ice. we then quickly microcentrifuge it to move all the DNA to the bottom of the tube. We calculated the volume of DNA sample needed to obtain 0.5 µg of DNA: .23 microliters.
- We got 7 microcentrifuge tubes and labeled them Ladder, Uncut, HaeIII, MseI, NspI, SacII, and SalI.
- To each tube except the ladder and uncut, we added .2 microliters of our phage DNA. To each tube except uncut, we added .5 microliters of the corresponding enzyme. To each tube, we added 2.5 microliters of 10x reaction buffer, and to all tubes except ladder and uncut, we added 21.7 microliters of ddh2o, and to the ladder and uncut, we added 24.5 microliters of ddh20. We then microcentrifuged each tube for around 1 minute to get all the liquid to the bottom.
- We incubated for 15 minutes at 37 degrees C, and then quickly spinned in a microcentrifuge for around 1 minute.
Results:
These are our restriction enzyme digests.
Conclusions and Next Steps:
We will put these in storage and move on to making the agarose gels for electrophoresis next lab period.
Making Agarose Gels for Electrophoresis
Date: 11/15/23
Redo: Yes
Purpose: Setting up agarose gels for gel electrophoresis.
Notes:
-
- We prepared our bench for aseptic work. We set up a gel apparatus and prepared enough 0.8 % agarose gel to cover the tips of the gel combs by ~2–3 mm. We weighed the appropriate amount of agarose powder and transferred it to an Erlynmeyer flask. We added the appropriate amount of 1X TBE buffer to the agarose powder and gently mixed it. We heated the mixture until boiling, about 1-2 minutes, carefully removed the flask from the microwave, examined for clumps, and continued. We allowed it to cool for ~15 minutes.
- We poured the agarose mixture into the prepared gel apparatus and inserted the comb to cast the wells. We removed the comb, and poured 1X TBE buffer until the gel was ~1/4 inch covered
Conclusions and Next Steps:
We will move on to electrophoresis.
Gel electrophoresis
Date: 11/15/23
Redo: Yes
Purpose: DNA analysis and characterization.
Notes:
-
- We prepared our bench for aseptic work. We retrieved our enzymes and added .5 microliters of 6x concentrated loading dye to each tube. We placed them in a heating block at 65 degrees C for about 5 minutes, before placing them on ice to cool, and then spinning at 10k rpm for ~15 seconds.
- Next, we loaded the enzymes into the gel in order, Ladder, Uncut, HaeIII, MseI, NspI, SacII, and SalI. We ran at 100 volts until the blue dye moved 3.5 inches from the well. (approx. 1 hour) We carefully removed the gel from the electrophoresis chamber and photographed our gel.
Results:

We successfully got a good enough reading on our electrophoresis.
Conclusions and Next Steps:
Phage has been archived and sent off for DNA sequencing at another facility.
DNA Extraction
Extraction of Phage DNA Following Phage Precipitation with ZnCl2
Date: 10/25/2023
Redo: No
Purpose: Extracting DNA for analysis and quantification using a spectrophotometer.
Notes:
-
- At a prepared workbench, We transferred 5 ml of phage lysate into a 10 ml conical tube. We then added 5 µl nuclease mix (per 1 ml phage lysate) to the lysate for a total of 25 µl. We mixed this gently and thoroughly by repeated inversions and incubated it at 37 °C for ~10 minutes. After this time had passed, we retrieved our tube. Then, using a 5 ml pipette, portion out the nuclease-treated lysate, putting 1 ml aliquots in 5 clean microcentrifuge tubes. Then, to each 1 ml of nuclease-treated lysate, we added 25 µl of ZnCl2. We mixed it carefully and thoroughly through inversions and placed it in the 37 °C incubator for 10 minutes.
- After incubation, we placed the tube in a high-speed centrifuge, ensured it was balanced, and spun it at 10,000 × rpm for 1 minute. We removed it from the centrifuge and took it back to our aseptic workspace. Using a micropipette, we discarded as much supernatant as possible without disturbing the pellets.
- Next, we resuspended the phage pellet. We distributed 0.1M EDTA equally between all the microcentrifuge tubes from the previous step. We added 200 µl of EDTA to each tube, totaling 1.0 ml. Working quickly and gently, we re-suspended each pellet by pipetting it up and down, then combined all the resuspensions into one clean microcentrifuge tube. To degrade the added nucleases, we added 0.5 µl of Proteinase K, and we also added 50 µl SDS to the nuclease-treated lysate tube to stimulate the activity of Proteinase K. We inverted gently to mix and incubated at 37 °C for ~10 minutes.
- Next, we denatured the proteins to release the phage DNA. We transferred our pellet resuspension to a clean 15 ml conical tube and added 2 ml DNA clean-up resin from our wizard kit. We mixed this with gentle inversions. We then retrieved 2 minicolumns from our wizard kit and labeled them with our initials. We set the column and syringe barrel on a new microcentrifuge tube, then transferred 1.5 ml of our phage DNA/resin solution to the column.
- We inserted a plunger into the syringe, carefully pushed all the liquid through, and collected the liquid in a 15 ml conical tube. We carefully separated the pieces and prepared to wash our column through with 80 % isopropanol. We added 2 ml of this isopropanol and pushed it through in the same fashion. We repeated this rinsing 4 more times to ensure it was thoroughly rinsed. We removed residual isopropanol by spinning our 1.5 ml microcentrifuge tube at 10,000 × g for 5 minutes, removing and transferring the columns to new microcentrifuge tubes, and spinning again at 10,000 x g for another minute. We evaporated the last bits of isopropanol by placing the tube into a 90 °C heating block for 1 minute.
- Next, we placed each column in a clean microcentrifuge tube and applied 50 μl of 90 °C ddH2O directly into each column. We incubated at room temperature for 1 minute and then spun at 10,000 x g for 1 minute. We quantified this phage DNA using a spectrophotometer and then stored it at 4°C.
Results:
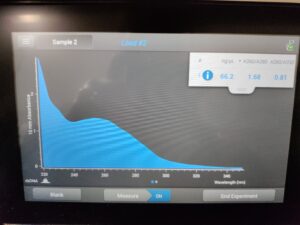
Results of spectrophotometry. Timestamp: 10/25/2023 1:03 PM
Conclusions and Next Steps:
We will do the extraction process again to try and get more DNA
Extraction of Phage DNA Following Phage Precipitation with ZnCl2
Date: 10/30/2023
Redo: Yes
Purpose: Extracting DNA for analysis and quantification using a spectrophotometer.
Notes:
-
- At a prepared workbench, We transferred 5 ml of phage lysate into a 10 ml conical tube. We then added 5 µl nuclease mix (per 1 ml phage lysate) to the lysate for a total of 25 µl. We mixed this gently and thoroughly by repeated inversions and incubated it at 37 °C for ~10 minutes. After this time had passed, we retrieved our tube. Then, using a 5 ml pipette, portion out the nuclease-treated lysate, putting 1 ml aliquots in 5 clean microcentrifuge tubes. Then, to each 1 ml of nuclease-treated lysate, we added 25 µl of ZnCl2. We mixed it carefully and thoroughly through inversions and placed it in the 37 °C incubator for 10 minutes.
- After incubation, we placed the tube in a high-speed centrifuge, ensured it was balanced, and spun it at 10,000 × rpm for 1 minute. We removed it from the centrifuge and took it back to our aseptic workspace. Using a micropipette, we discarded as much supernatant as possible without disturbing the pellets.
- Next, we resuspended the phage pellet. We distributed 0.1M EDTA equally between all the microcentrifuge tubes from the previous step. We added 200 µl of EDTA to each tube, totaling 1.0 ml. Working quickly and gently, we re-suspended each pellet by pipetting it up and down, then combined all the resuspensions into one clean microcentrifuge tube. To degrade the added nucleases, we added 0.5 µl of Proteinase K, and we also added 50 µl SDS to the nuclease-treated lysate tube to stimulate the activity of Proteinase K. We inverted gently to mix and incubated at 37 °C for ~10 minutes.
- Next, we denatured the proteins to release the phage DNA. We transferred our pellet resuspension to a clean 15 ml conical tube and added 2 ml DNA clean-up resin from our wizard kit. We mixed this with gentle inversions. We then retrieved 2 minicolumns from our wizard kit and labeled them with our initials. We set the column and syringe barrel on a new microcentrifuge tube, then transferred 1.5 ml of our phage DNA/resin solution to the column.
- We inserted a plunger into the syringe, carefully pushed all the liquid through, and collected the liquid in a 15 ml conical tube. We carefully separated the pieces and prepared to wash our column through with 80 % isopropanol. We added 2 ml of this isopropanol and pushed it through in the same fashion. We repeated this rinsing 4 more times to ensure it was thoroughly rinsed. We removed residual isopropanol by spinning our 1.5 ml microcentrifuge tube at 10,000 × g for 5 minutes, removing and transferring the columns to new microcentrifuge tubes, and spinning again at 10,000 x g for another minute. We evaporated the last bits of isopropanol by placing the tube into a 90 °C heating block for 1 minute.
- Next, we placed each column in a clean microcentrifuge tube and applied 50 μl of 90 °C ddH2O directly into each column. We incubated at room temperature for 1 minute and then spun at 10,000 x g for 1 minute. We quantified this phage DNA using a spectrophotometer and then stored it at 4°C.
Results:
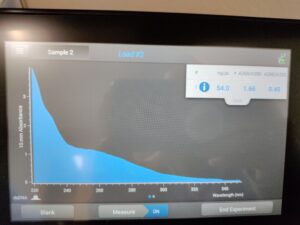
Results of spectrophotometry. Timestamp: 10/30/2023 12:42 PM
Conclusions and Next Steps:
Several mistakes took place during the experiment, which we strongly believe led to this decrease in the graph. We will do the extraction process again to try and get more DNA.
Extraction of Phage DNA Following Phage Precipitation with ZnCl2
Date: 11/01/2023
Redo: Yes
Purpose: Extracting DNA for analysis and quantification using a spectrophotometer.
Notes:
-
- At a prepared workbench, We transferred 5 ml of phage lysate into a 10 ml conical tube. We then added 5 µl nuclease mix (per 1 ml phage lysate) to the lysate for a total of 25 µl. We mixed this gently and thoroughly by repeated inversions and incubated it at 37 °C for ~10 minutes. After this time had passed, we retrieved our tube. Then, using a 5 ml pipette, portion out the nuclease-treated lysate, putting 1 ml aliquots in 5 clean microcentrifuge tubes. Then, to each 1 ml of nuclease-treated lysate, we added 25 µl of ZnCl2. We mixed it carefully and thoroughly through inversions and placed it in the 37 °C incubator for 10 minutes.
- After incubation, we placed the tube in a high-speed centrifuge, ensured it was balanced, and spun it at 10,000 × rpm for 1 minute. We removed it from the centrifuge and took it back to our aseptic workspace. Using a micropipette, we discarded as much supernatant as possible without disturbing the pellets.
- Next, we resuspended the phage pellet. We distributed 0.1M EDTA equally between all the microcentrifuge tubes from the previous step. We added 200 µl of EDTA to each tube, totaling 1.0 ml. Working quickly and gently, we re-suspended each pellet by pipetting it up and down, then combined all the resuspensions into one clean microcentrifuge tube. To degrade the added nucleases, we added 0.5 µl of Proteinase K, and we also added 50 µl SDS to the nuclease-treated lysate tube to stimulate the activity of Proteinase K. We inverted gently to mix and incubated at 37 °C for ~10 minutes.
- Next, we denatured the proteins to release the phage DNA. We transferred our pellet resuspension to a clean 15 ml conical tube and added 2 ml DNA clean-up resin from our wizard kit. We mixed this with gentle inversions. We then retrieved 2 minicolumns from our wizard kit and labeled them with our initials. We set the column and syringe barrel on a new microcentrifuge tube, then transferred 1.5 ml of our phage DNA/resin solution to the column.
- We inserted a plunger into the syringe, carefully pushed all the liquid through, and collected the liquid in a 15 ml conical tube. We carefully separated the pieces and prepared to wash our column through with 80 % isopropanol. We added 2 ml of this isopropanol and pushed it through in the same fashion. We repeated this rinsing 4 more times to ensure it was thoroughly rinsed. We removed residual isopropanol by spinning our 1.5 ml microcentrifuge tube at 10,000 × g for 5 minutes, removing and transferring the columns to new microcentrifuge tubes, and spinning again at 10,000 x g for another minute. We evaporated the last bits of isopropanol by placing the tube into a 90 °C heating block for 1 minute.
- Next, we placed each column in a clean microcentrifuge tube and applied 50 μl of 90 °C ddH2O directly into each column. We incubated at room temperature for 1 minute and then spun at 10,000 x g for 1 minute. We quantified this phage DNA using a spectrophotometer and then stored it at 4°C.
Results:
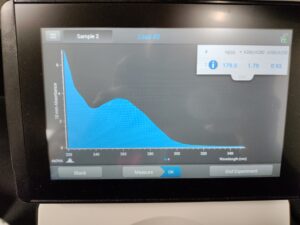
Results of spectrophotometry. Timestamp: 11/01/2023 12:42 PM
Conclusions and Next Steps:
We got a good amount of DNA from this and the first round, so we will combine these and reprecipitate for better DNA results.
Reprecipitation of Phage DNA
Date: 11/02/2023
Redo: Yes
Purpose: Combining and repricipitating DNA for better DNA results.
Notes:
Day 1 (11/02/23)
-
- We washed our hands, put on gloves, and prepared an aseptic workspace. we sprayed with Cideon, wiped with a paper towel, sprayed with 70% Ethanol, and wiped again. We collected the DNA samples from the 1st and the 3rd rounds of DNA extraction and measured both. #1 was 61 microliters, while #2 was 15 microliters. We then combined both samples into the same microcentrifuge tubes.
- Next, we calculated the correct volume of Sodium acetate and ice-cold 100% Ethanol. The sodium acetate was 0.10 vols of the DNA volume, 7.6 microliters. The 100% ice-cold Ethanol was 3 volumes of the sample, at 228 microliters. We combined these volumes with the combined DNA samples and inverted them to mix. WE precipitated by placing in a -80 degree C freezer overnight.
- Day 2 (11/03/23)
- After one night in the freezer, we centrifuged in the freezer for 30 minutes at 4 degrees C. The supernatant was then dispensed into waste, and we added 0.5 mL of 75% ethanol to wash it. The tube was then placed in a 4-degree C centrifuge for 10 minutes. We repeated this twice.
- after removing as much supernatant as possible, we left the tubes in a 30-degree heating block to dry out. After around an hour, we added 50 microliters of nuclease-free water to the tube. and gently inverted to mix the solution.
- We took our sample to the nanodrop machine for spectrophotometry.
Results:
We have a good DNA ratio, but we don’t have enough of our sample to work with.
Conclusions and Next Steps:
We will try a new method of DNA extraction.
DNA extraction 4
Date: 11/06/2023
Redo: Yes
Purpose: Extracting DNA
Notes:
- Day 1 (11/06/23)
-
- We prepared our bench for aseptic work in our typical fashion. We then collected and gently mixed our HVL and put 5 mL into a 15 mL conical tube, then we added 20 microliters of nuclease mix. We gently inverted the tube and incubated it at 37 degrees C for 10 minutes. After this period, we aspirated 1 mL of lysate into 5 microcentrifuge tubes. then we added 20 microliters to each tube, mixed it gently, and incubated it at 37 degrees C for 5 minutes. Then, we centrifuged at 10k rpm for 1 minute to pellet the phage.
- We removed the supernatant by aspiration, being careful not to disturb the pellet. we then resuspended the pellets in 500 microliters of TES buffer per tube and incubated them in a 60-degree C heating block for 15 minutes. After this time had passed, we added 1 microliter of proteinase k to each tube and mixed gently, then moved to an incubator at 37 degrees C for 10 minutes. After incubation, we added 60 microliters of potassium acetate to each tube, mixing well, and then iced for 15 minutes.
- After leaving to sit on ice for 15 minutes, we centrifuged at 4 degrees C for 1 minute at 12k rpm. we removed the supernatant and kept it while discarding the pellets. we placed the supernatant into new microcentrifuge tubes, and added 500 microliters of isopropanol to each of the tubes with the supernatant; we then mixed and left on ice overnight.
- Day 2 (11/08/23)
- The next day, we retrieved our tubes and centrifuged them at top speed for 10 minutes to pellet the DNA. we then discarded the supernatant into a waste tube. Next, to each tube, we added 250 microliters of 70% ethanol and spun again at top speed for 1 minute. We removed the supernatant and discarded it. We then dried our pellets by incubating them in a 30-degree heating block for around an hour. we resuspended the pellet in the first tube in 50 microliters of nuclease-free water, aspirating this, putting it in the next tube, and repeating with each tube until we had one left. All samples were collected into one microcentrifuge tube.
- We brought this to a nanodrop machine and checked DNA quality.
Results:

Results of spectrophotometry.
Conclusions and Next Steps:
These are excellent results, with acceptable concentration rates. we will continue to restriction enzyme digests and gel electrophoresis.