Discovery of Tank18
Tank18 Information
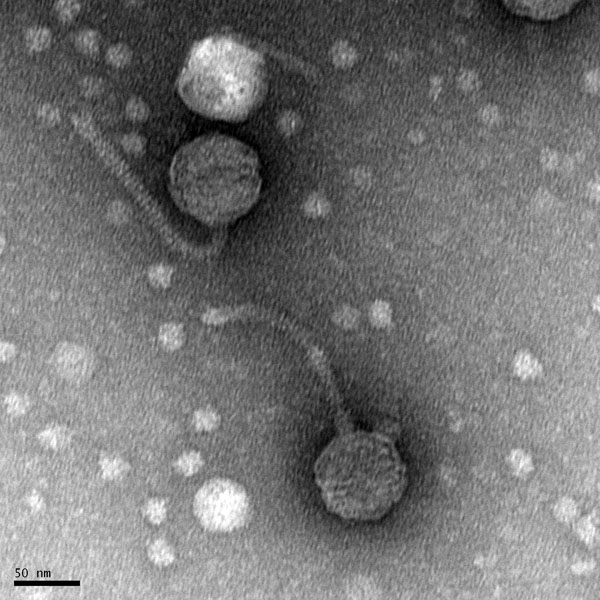
Morphology: Siphoviridae
Sample Collection
| Collector Name: |
Raylon Huckaby | Raylon Huckaby | Jesse Laposky | Jesse Laposky |
| Sample No. | 1 | 2 | 3 | 4 |
| Date of Collection: | 08/24/2020 | 08/24/2020 | 08/24/2020 | 08/24/2020 |
| Sample Type | Soil | Soil | Soil | Liquid |
| General Location | Horse barn | Animal Shelter | Rotten Wood | Tank |
| Location Description | Near a horse barn in a dry environment. | Near the Erath Animal Shelter in a moist environemt. | Underneath a pile of rotten wood | A tank that is very mosey |
| GPS Coordinates | 32.248390, -98.209732 | 32.213740, -98.186560 | 32.172103, -98.035789 | 32.172311, -98.035998 |
| Sample Depth | <1 inch | 1-2 inches | 1-2 inches | <1 inch |
| Ambient Temperature | 33.88 C | 33.88 C | 34.44 | 34.44 |
Isolation/Purification
The Title: Direct Isolation
Date: 08/24/2020 Redo: No Sample: 1
Purpose: This procedure is to extract phages from the environmental sample and infect the host bacteria using a plaque assay.
Notes:
1) For the direct isolation we used sample 1 (Horse barn). The sample was placed in 15 mL conical tube that was about halfway full.
2) Liquid media was added to the soil sample until the sample was submerged in 2-3 mL of media. Invert the tube several times making sure that the sample is mixed thoroughly.
3) Insert the sample into the shaking incubator for 1-2 hours at 250 rpm. Allow the sample to sit and for the soil to sink to the bottom.
3.1) Although there was a little bit of liquid on top of the soil, there was not 2 mL worth.
3.2) More media was added and the sample was placed back in the incubator for 25 minutes.
3.3) Once the sample was removed from the incubator the liquid was definite on the top and the soil had sunk to the bottom allowing procedure to the next part.
4) Open the .22 um syringe filter and attach it to the syringe, then place it back into the package.
5) Remove the plunger from the syringe allowing for the 2 mL of liquid. Remove ~2 mL using the serological pipette and aspirating into the the 5 mL syringe.
6) Dispense the purified liquid into the microcentrifuge tube. Immediately cap the tube keeping it sterile.
7) Insert 500 microliters from the microcentrifuge tube into the 250 microliters of host bacteria. Let them sit untouched for 5-10 minutes.
8) Obtained top agar from the 55°C bath and then prepared the room temperature agar plates to be plated.
9) Using a serological pipette, 3 ml of molten top agar was dispensed into the tube that consisted of the inoculated host.
10) Then the mixture was then sucked back up into the serological pipette and then dispensed onto the agar plate. (Avoid making or withdrawing bubbles)
11) Gently tilt the plates in many different directions making sure the entire bottom of the plates is covered with top agar.
12) The plates sat out between 15-20 minutes, and were then flipped upside down and inserted into the incubator.
13) Incubate the plates for 24-48 hours. The plate incubated for approximately 32 hours.
14) The plates were removed from the incubator to find that plaques were on the plate.
15) The plaques were then circled and labeled to identify the plaque(s) that were going to be used for the plaque assay and serial dilutions.
Results:
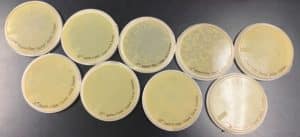
The results were positive. Plaques formed onto the plate.

Image of the plaques sample 1
Conclusions and Next Steps:
The next step is to do a plaque assay and serial dilution on the plaque that was chosen to be used. The plaque that was chosen to be used was the plaque labeled with the number 1.
Title: Direct Isolation
Date: 08/24/2020 Redo: No Sample: 2
Purpose: This procedure is to extract phages from the environmental sample and infect the host bacteria using a plaque assay.
1) For this direct isolation we used sample 2 (Animal Shelter). The sample was placed in 15 mL conical tube that was about halfway full.
2) Liquid media was added to the soil sample until the sample was submerged in 2-3 mL of media. Invert the tube several times making sure that the sample is mixed thoroughly.
3) Insert the sample into the shaking incubator for 1-2 hours at 250 rpm. Allow the sample to sit and for the soil to sink to the bottom.
3.1) After letting the samples shake in the incubator for 78 minutes, the sample had soaked up all of the liquid media that was placed into the tube.
3.2) More liquid media was added to the sample that way there would be liquid that could be aspirated from the top.
3.3) The sample was then shaken vigorously allowing the sample to mix fully.
4) Open the .22 um syringe filter and attach it to the syringe, then place it back into the package.
5) Remove the plunger from the syringe allowing for the 2 mL of liquid. Remove ~2 mL using the serological pipette and aspirating into the the 5 mL syringe.
6) Dispense the purified liquid into the microcentrifuge tube. Immediately cap the tube keeping it sterile.
7) Insert 500 microliters from the microcentrifuge tube into the 250 microliters of host bacteria. Let them sit untouched for 5-10 minutes.
8) Obtained top agar from the 55°C bath and then prepared the room temperature agar plates to be plated.
9) Using a serological pipette, 3 ml of molten top agar was dispensed into the tube that consisted of the inoculated host.
10) Then the mixture was then sucked back up into the serological pipette and then dispensed onto the agar plate. (Avoid making or withdrawing bubbles)
11) Gently tilt the plates in many different directions making sure the entire bottom of the plates is covered with top agar.
12) The plates sat out between 15-20 minutes, and were then flipped upside down and inserted into the incubator.
13) Incubate the plates for 24-48 hours. The plate incubated for approximately 33 hours.
14) The plate did have plaques on it. The plaques that were on this plaque were small approximately .5 centimeters in diameter.
15) Although there were plaques on this plate, we decided to not chose this plate.
Results:
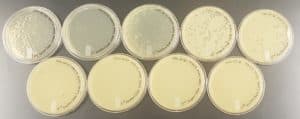
The results were positive. Plaques did appear onto the plate, but they were rather small.
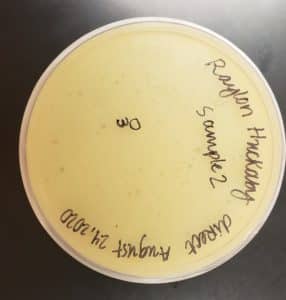
Image of the sample 2 plate
Conclusions and Next Steps:
The next step would have been plaque assay and serial dilution, but we did not select to use this plate.
The Title: Direct Isolation
Date: 08/24/2020 Redo: No Sample: 3
Purpose: This procedure is to extract phages from the environmental sample and infect the host bacteria using a plaque assay.
Notes:
1) For the direct isolation we used sample 3 (Rotten wood). The sample was placed in 15 mL conical tube that was about halfway full.
2) Liquid media was added to the soil sample until the sample was submerged in 2-3 mL of media. Invert the tube several times making sure that the sample is mixed thoroughly.
3) Insert the sample into the shaking incubator for 1-2 hours at 250 rpm. Allow the sample to sit and for the soil to sink to the bottom.
3.1) Although there was a little bit of liquid on top of the soil, there was not 2 mL worth.
3.2) More media was added and the sample was placed back in the incubator for 25 minutes.
3.3) Once the sample was removed from the incubator the liquid was definite on the top and the soil had sunk to the bottom, but the bark that was in the tube floated to the top.
4) Open the .22 um syringe filter and attach it to the syringe, then place it back into the package.
5) Remove the plunger from the syringe allowing for the 2 mL of liquid. Remove ~2 mL using the serological pipette and aspirating into the the 5 mL syringe.
6) Dispense the purified liquid into the microcentrifuge tube. Immediately cap the tube keeping it sterile.
6.1) Unfortunately the purified liquid did not amount to 500 microliters. The full amount that was dispensed was 460 microliters.
7) Insert 460 microliters from the microcentrifuge tube into the 250 microliters of host bacteria. Let them sit untouched for 5-10 minutes.
8) Obtained top agar from the 55°C bath and then prepared the room temperature agar plates to be plated.
9) Using a serological pipette, 3 ml of molten top agar was dispensed into the tube that consisted of the inoculated host.
10) Then the mixture was then sucked back up into the serological pipette and then dispensed onto the agar plate. (Avoid making or withdrawing bubbles)
11) Gently tilt the plates in many different directions making sure the entire bottom of the plates is covered with top agar.
12) The plates sat out between 15-20 minutes, and were then flipped upside down and inserted into the incubator.
13) Incubate the plates for 24-48 hours. The plate incubated for approximately 48 hours.
14) The plates were removed from the incubator to find that no plaques were on the plate.
15) The plate was wrapped and placed in the ice box.
Results:
The results were negative. Plaques did not form onto the plate.
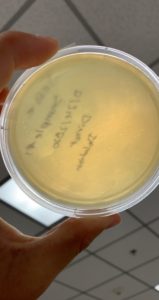
Image of the plate sample 3
Conclusions and Next Steps:
The reason that there could not be plaques formed onto the plate is because there was only 460 microliters instead of 500 microliters. The next step would be to do it again, but already having a plaque formed on one of the other plates the next step was for a plaque assay.
The Title: Direct Isolation
Date: 08/24/2020 Redo: No Sample: 4
Purpose: This procedure is to extract phages from the environmental sample and infect the host bacteria using a plaque assay.
Notes:
1) For the direct isolation we used sample 4 (Mosey tank). The sample was placed in 15 mL conical tube that was about halfway full.
2) Open the .22 um syringe filter and attach it to the syringe, then place it back into the package.
3) Remove the plunger from the syringe allowing for the 2 mL of liquid. Remove ~2 mL using the serological pipette and aspirating into the the 5 mL syringe.
4) Dispense the purified liquid into the microcentrifuge tube. Immediately cap the tube keeping it sterile.
5) Insert 500 microliters from the microcentrifuge tube into the 250 microliters of host bacteria. Let them sit untouched for 5-10 minutes.
6) Obtained top agar from the 55°C bath and then prepared the room temperature agar plates to be plated.
7) Using a serological pipette, 3 ml of molten top agar was dispensed into the tube that consisted of the inoculated host.
8) Tilt the tube gently making sure the bacteria was inoculated to the phage.
9) Then the mixture was then sucked back up into the serological pipette and then dispensed onto the agar plate. (Avoid making or withdrawing bubbles)
10) Gently tilt the plates in many different directions making sure the entire bottom of the plates is covered with top agar.
11) The plates sat out between 15-20 minutes, and were then flipped upside down and inserted into the incubator.
12) Incubate the plates for 24-48 hours. The plate incubated for approximately 48 hours.
13) The plate was removed from the incubator to find that no plaques were on the plate.
14) The plate was wrapped and placed in the ice box.
Results:
The results were negative. Plaques did not form onto the plate.

Image of the plate sample 4
Conclusions and Next Steps:
The reason that there could not be plaques formed onto the plate is because there was that the bacteria was not inoculated by the phage. Mean no phage was mixed into the bacteria inside the tube. The next step would be to do it again, but already having a plaque formed on one of the other plates the next step was for a plaque assay.
Title: Plaque Assay for Purification
Date: 08/26/2020 Redo: No Sample: 1
Purpose: This procedure involves generating well-isolated plaques. Before attempting to identify phage, a clonal phage population must be present. The process involves a plaque that is chosen to be serially diluted in order to do a plaque assay using the diluted samples.
Notes:
Materials:
- Phage samples for Purification
- Phage Buffer
- Microcentrifuge Tubes
- Host Bacteria
- Agar Plates
- Top Agar
- 5 ml Serological Pipettes
Procedure:
1) The agar plates were taken from the incubator and two well-isolated plaques (more than 1.5 cm apart) were chosen to be used for the liquid phage samples as part of the picking a plaque protocol. The plaques that were chosen were labeled as shown below.
Plaque 1: The plaque as shown above is larger in comparison to the tiny plaques surrounding the plaque. The edges of the plaque are smooth and round. In addition, the plaque appears to be a dark shade of grey, however, when held in the light the plaque is transparent.
2) A microcentrifuge was gathered and labeled with the number 1, which corresponded with the plaque from the soil sample collected near the horse barn. Also using a p200 micropipettor and a sterile tip, the microcentrifuge tube was filled with approximately 100 microliters of phage buffer.
3) Next, the top agar was stabbed perpendicularly in the center of the plaque using a sterile tip placed on the micropipettor (Avoided touching other bacteria near the plaque). Then the tip was placed into the microcentrifuge tube labeled “1”, and the phage particles were dispensed into the tube by tapping the sides (Pipetted down to dispense any excess phage particles in the tip). Afterwards the tip was discarded.
4) The process of vortexing was then used to mix the phage buffer and phage particles.
5) Then 8 microcentrifuge tubes were labeled 10-1, 10-2, …….10-8 and filled with approximately 90 microliters of phage buffer.
6) Then 10-fold serial dilutions were performed using the following steps below:
- Added 10 microliters of the undiluted phage sample into the 10-1 microcentrifuge tube by using the micropipettor and a sterile tip
- Mixed well by using the process of vortexing
- Added 10 microliters of the 10-1 sample into the 10-2 sample and vortex
- Repeated this process with each tube until the sample labeled 10-8 had been vortexed
Notice: In between each transfer of 10 microliters of the sample, a new sterile tip was used in order to prevent contamination.
7) The agar plates were taken out the fridge to sit and warm up to room temperature. Then the plates were labeled on the bottom with a reference to the sample, our names, and serial dilution. (Date wasn’t on the agar plates for the first set of serial dilutions, but was recorded in a paper notebook)
8) Once the plates reached room temperature, the dilutions were plated using the following steps from the plaque assay protocol:
- Obtained 250 microliters of host bacterial cultures for each diluted sample that was being plated. (These tubes were labeled 10-1, 10-2, …….10-8)
- Using a micropipettor and a sterile tip, 10 microliters of the diluted samples from the serial dilution protocol were inserted into the corresponding bacterial culture tube
- Mixed the host bacterial culture with the samples in the tube and then let it sit between 5 to 10 minutes
- Obtained top agar from the 55°C bath and then prepared the room temperature agar plates to be plated.
- Using a serological pipette, 3 ml of molten top agar was dispensed into the tubes that consisted of host bacteria mixed with the diltuted sample. Then the mixture was then sucked back up into the serological pippette and then dispensed onto the agar plate. (Repeated this step until all plates were plated)
- The plates sat out between 15-20 minutes, and were then flipped upside down and inserted into the incubator.
9) The plates were taken out of the incubator after 24-48 hours
Results:
The results for the Plaque Assay for Purification was Positive.
Plate Plaque Count
10^-1: The plate appeared to be completely covered
10^-2: The plate appeared to be almost completely covered
10^-3: The plate had approximately 320 plaques
10^-4: The plate had 52 plaques
10^-5: The plate had 4 plaques
10^-6: The plate had 1 plaque
10^-7: The plate had 0 plaques
10^-8: The plate had 0 plaques
The plate labeled 10^-4 didn’t fill the entire surface on the agar plate which is why a clear area is visible in the top corner of the plate
Conclusions and Next Steps:
As shown above in the following image the number of plaques decreased moving from plate to plate starting with 10^-1 and moving to the plate labeled 10^-8. The next step involves choosing another one of the plaques in order to do a second set of serial dilutions to purify the phage to make sure that one type of phage is present.
Title: Plaque Assay for Purification
Date: 08/27/2020 Redo: No Sample: 1
Purpose: This procedure involves generating well-isolated plaques. Before attempting to identify phage, a clonal phage population must be present. The process involves a plaque that is chosen to be serially diluted in order to do a plaque assay using the diluted samples.
Notes:
Procedure:
1) The agar plate was taken from the incubator and one well-isolated plaque was chosen to be used for the liquid phage sample as part of the picking a plaque protocol. The plaque that was chosen was labeled as shown below.

Plaque 1: The plaque as shown above is similar in size compared to the 2 other plaques on the agar plate. The edges of the plaque are smooth and round. In addition, the plaque appears to be a dark shade of grey, however, when held in the light the plaque is transparent.
2) A microcentrifuge was gathered and labeled original, which showed that it was the undiltued sample. Also using a p200 micropipettor and a sterile tip, the microcentrifuge tube was filled with approximately 100 microliters of phage buffer.
3) Next, the top agar was stabbed perpendicularly in the center of the plaque using a sterile tip placed on the micropipettor (Avoided touching other bacteria near the plaque). Then the tip was placed into the microcentrifuge tube labeled “1”, and the phage particles were dispensed into the tube by tapping the sides (Pipetted down to dispense any excess phage particles in the tip). Afterwards the tip was discarded.
4) The process of vortexing was then used to mix the phage buffer and phage particles.
5) Then 8 microcentrifuge tubes were labeled 10-1, 10-2, …….10-8 and filled with approximately 90 microliters of phage buffer.
6) Then a second 10-fold serial dilutions were performed using the following steps below:
- Added 10 microliters of the undiluted phage sample into the 10-1 microcentrifuge tube by using the micropipettor and a sterile tip
- Mixed well by using the process of vortexing
- Added 10 microliters of the 10-1 sample into the 10-2 sample and vortex
- Repeated this process with each tube until the sample labeled 10-8 had been vortexed
Notice: In between each transfer of 10 microliters of the sample, a new sterile tip was used in order to prevent contamination.
7) The agar plates were taken out the fridge to sit and warm up to room temperature. Then the plates were labeled on the bottom with a reference to the sample, our names, and serial dilution. (Date wasn’t on the agar plates for the second set of serial dilutions, but was recorded in a paper notebook)
8) Once the plates reached room temperature, the dilutions were plated using the following steps from the plaque assay protocol:
- Obtained 250 microliters of host bacterial cultures for each diluted sample that was being plated. (These tubes were labeled 10-1, 10-2, …….10-8)
- Using a micropipettor and a sterile tip, 10 microliters of the diluted samples from the serial dilution protocol were inserted into the corresponding bacterial culture tube
- Mixed the host bacterial culture with the samples in the tube and then let it sit between 5 to 10 minutes
- Obtained top agar from the 55°C bath and then prepared the room temperature agar plates to be plated.
- Using a serological pipette, 3 ml of molten top agar was dispensed into the tubes that consisted of host bacteria mixed with the diltuted sample. Then the mixture was then sucked back up into the serological pippette and then dispensed onto the agar plate. (Repeated this step until all plates were plated)
- The plates sat out between 15-20 minutes, and were then flipped upside down and inserted into the incubator.
9) The plates were taken out of the incubator after sitting for 24-48 hours
Results:
The results for the Plaque Assay for Purification were positive for every sample except for the original. Originally when all plates were taken out of the incubator all of them consisted of plaques except for the original, but the next day something grew on the plaque possibly because of contamination when handling the micropipettor when plating the original sample plate.
Plate Plaque Count
Original: The plate was contaminated so it wasn’t used in the Plaque Plate Count
10^-1: The plate appeared to be completely covered
10^-2: The plate appeared to be almost completely covered
10^-3: The plate had many plaques but didn’t cover the entire plate
10^-4: The plate had approximately 50 plaques
10^-5: The plate had 6 plaques
10^-6: The plate had 0 plaques
10^-7: The plate had 0 plaques
10^-8: The plate had 0 plaques
Conclusions and Next Steps:
As shown above in the following image the number of plaques decreased moving from plate to plate starting with 10^-1 and moving to the plate labeled 10^-8. The original sample should’ve covered the entire plate, but because of contamination the plate was para-filmed and put away in the fridge. The next step is to collect a plate lysate for the plate labeled 10^-3.
Title: Collecting A Plate Lysate
Date: 09/1/2020 Redo: No Sample: Sample 1-Plate Labeled 10^-3 used in the second set of Serial Dilution
Purpose: This procedure consists of generating a highly concentrated liquid phage sample.
Notes:
1) The plate labeled 10^-3 was taken from the second set of serial dilutions and the plate was flood with 8 ml of sterile phage buffer. (Liquid was swirled throughout the 2 hours, but not vigorously to prevent splashing)
2) The plate then sat for exactly 2 hours before proceeding to suck up the liquid off of the plate.
3) The plate was tilted with one edge of the plate propped up on the lid of the agar plate. Using a 5 ml syringe the liquid was sucked up out of the plate and then a .22 micrometer filter was prepared and connected to the syringe. Afterwards the liquid was dispensed into a conical tube labeled lysate sample. (When sucking up the liquid the syringe hovered over the liquid making sure not to to touch the agar surface)
4) Step 3 was repeated until majority of the liquid was removed from the plate and transferred over into the conical tube. (Removed the filter after dispensing the liquid and reconnected after sucking up more of the liquid using the same filter)
Results:
The lysate was successfully collected from the plate labeled 10^-3
Conclusion and Next Steps:
Using the lysate collected from the sample a full plate titer will be performed to help calculate the titer of the lysate.
Title: Full Plate Titer
Date: 09/1/2020 Redo: No Sample: Sample 1 Lysate
Purpose: This procedure consists of determining the concentration of phage particles in a lysate by using a plaque assay.
Notes:
1) A microcentrifuge was gathered and labeled with the Original L (The undiluted sample for the lysate serial dilution). Also using a p200 micropipettor and a sterile tip, the microcentrifuge tube was filled with approximately 100 microliters of phage buffer.
2) Next, again using the micropipettor and a sterile tip 10 microliters of the lysate was was placed into the microcentrifuge tube labeled Original L.
3) The process of vortexing was then used to mix the phage buffer and lysate.
4) Then 8 microcentrifuge tubes were labeled 10-1, 10-2, …….10-8 and filled with approximately 90 microliters of phage buffer.
5) Then 10-fold serial dilutions were performed using the following steps below:
- Added 10 microliters of the undiluted lysate sample into the 10-1 microcentrifuge tube by using the micropipettor and a sterile tip
- Mixed well by using the process of vortexing
- Added 10 microliters of the 10-1 sample into the 10-2 sample and vortex
- Repeated this process with each tube until the sample labeled 10-8 had been vortexed
Notice: In between each transfer of 10 microliters of the sample, a new sterile tip was used in order to prevent contamination.
6) The agar plates were taken out the fridge to sit and warm up to room temperature. Then the plates were labeled on the bottom with a reference to the sample, our names, and lysate serial dilution. (Date wasn’t on the agar plates for the first set of lysate serial dilutions, but was recorded in a paper notebook)
7) Once the plates reached room temperature, the dilutions were plated using the following steps from the plaque assay protocol:
- Obtained 250 microliters of host bacterial cultures for each diluted sample that was being plated. (These tubes were labeled 10-1, 10-2, …….10-8)
- Using a micropipettor and a sterile tip, 10 microliters of the diluted samples from the serial dilution protocol were inserted into the corresponding bacterial culture tube
- Mixed the host bacterial culture with the samples in the tube and then let it sit between 5 to 10 minutes
- Obtained top agar from the 55°C bath and then prepared the room temperature agar plates to be plated.
- Using a serological pipette, 3 ml of molten top agar was dispensed into the tubes that consisted of host bacteria mixed with the diltuted lysate sample. Then the mixture was then sucked back up into the serological pippette and then dispensed onto the agar plate. (Repeated this step until all plates were plated)
- The plates sat out between 15-20 minutes, and were then flipped upside down and inserted into the incubator.
8) Plates were placed in the incubator for 24-48 hours
Results:
The results were negative and none of the plates had anything on them.

Conclusion and Next Steps:
The reason for all of the plates to be empty could’ve been because the lysate wasn’t present on any of them. Also the lysate wasn’t in the fridge at 4°C for 24 hours so that could’ve also been another reason for a negative result. The next step is to do another serial dilution with the lysate.
Title: Full Plate Titer
Date: 09/2/2020 Redo: Yes Sample: Sample 1 Lysate
Purpose: This procedure consists of determining the concentration of phage particles in a lysate by using a plaque assay.
Notes:
1) A microcentrifuge was gathered and labeled with the Original L (The undiluted sample for the lysate serial dilution). Also using a p200 micropipettor and a sterile tip, the microcentrifuge tube was filled with approximately 100 microliters of phage buffer.
2) Next, again using the micropipettor and a sterile tip 10 microliters of the lysate was was placed into the microcentrifuge tube labeled Original L.
3) The process of vortexing was then used to mix the phage buffer and lysate.
4) Then 8 microcentrifuge tubes were labeled 10-1, 10-2, …….10-8 and filled with approximately 90 microliters of phage buffer.
5) Then 10-fold serial dilutions were performed using the following steps below:
- Added 10 microliters of the undiluted lysate sample into the 10-1 microcentrifuge tube by using the micropipettor and a sterile tip
- Mixed well by using the process of vortexing
- Added 10 microliters of the 10-1 sample into the 10-2 sample and vortex
- Repeated this process with each tube until the sample labeled 10-8 had been vortexed
Notice: In between each transfer of 10 microliters of the sample, a new sterile tip was used in order to prevent contamination.
6) The agar plates were taken out the fridge to sit and warm up to room temperature. Then the plates were labeled on the bottom with a reference to the sample, our names, and lysate serial dilution. (Date wasn’t on the agar plates for the first set of lysate serial dilutions, but was recorded in a paper notebook)
7) Once the plates reached room temperature, the dilutions were plated using the following steps from the plaque assay protocol:
- Obtained 250 microliters of host bacterial cultures for each diluted sample that was being plated. (These tubes were labeled 10-1, 10-2, …….10-8)
- Using a micropipettor and a sterile tip, 10 microliters of the diluted samples from the serial dilution protocol were inserted into the corresponding bacterial culture tube
- Mixed the host bacterial culture with the samples in the tube and then let it sit between 5 to 10 minutes
- Obtained top agar from the 55°C bath and then prepared the room temperature agar plates to be plated.
- Using a serological pipette, 3 ml of molten top agar was dispensed into the tubes that consisted of host bacteria mixed with the diltuted lysate sample. Then the mixture was then sucked back up into the serological pippette and then dispensed onto the agar plate. (Repeated this step until all plates were plated)
- The plates sat out between 15-20 minutes, and were then flipped upside down and inserted into the incubator.
8) Plates were placed in the incubator for 24-48 hours
9) The plates were taken out of the incubator and the titer was calculated by first counting the number of plaques on the plates labeled 10^-3, 10^-4, and 10^-5.
Calculations for each Titer from the following Plaques:
10^-3
Titer(pfu/ml): (144 pfu/10μl)(10^3μl/ml)(10^3)= 1.44 x 10^7 pfu/ml
10^-4
Titer(pfu/ml): (38 pfu/10μl)(10^3μl/ml)(10^4)= 3.8 x 10^8 pfu/ml
10^-5
Titer(pfu/ml): (5 pfu/10μl)(10^3μl/ml)(10^5)= 5.00 x 10^7 pfu/ml
The titer that was used was from the plate labeled 10^-3.
Results:
The results were positive and the plates had plaques on them. The titer was then calculated to be 1.44 x 10^7 pfu/ml.
Conclusion and Next Steps:
The titer was calculated and the next steps are to make a webbed plate from lysates of known titer.
Amplification
Title: Making Webbed Plates
Date: 09/03/2020 Redo: No Sample: Sample 1 Lysate
Purpose: This procedure is to create a very high density of plaques from a lysate of known titer.
Notes:
1) Using the calculated titer from the Full Plate Titer protocol the volume needed was calculated. The estimated number of plaques was 1500 plaques. The calculations are shown below:
Volume Needed (ml) Lysate:
1.5 x 10^3 pfu (1.44 x 10^7pfu/ml)(1000 μl) = 1.04 x 10^-1μl
2) Using the following volume of lysate needed the 8 plates were plated using a plaque assay. The plates consist of the following microliters of lysate:
2 plates for 1 microliters of 10^-1
2 plates for 2 microliters of 10^-1
1 plate for 1 microliters of 10^-2
1 plate for 9 microliters of 10^-2
1 plate for 10 microliters of 10^-2
1 plate for 11 microliters of 10^-2
3) Another plaque assay was done using the previous values of lysate in microliters that was placed into the corresponding tube that had host bacteria in them. The tubes were left to sit for exactly 20 minutes. (Tubes were swirled in the shape of an eight to mix the lysate and host bacteria well).
4) Then 3 ml of top agar was sucked up and then dispensed into the tube with the lysate and bacteria culture. Then the liquid was sucked back up and then dispensed onto the agar plate.
Notice: Step 3 and 4 were repeated until all the 8 plates were plated
5) The plates were inserted into the incubator for less than 24 hours.
Results:
The results were negative but the closest webbed plate was the plate that contained 2 microliters of the 10^-1 sample.

Conclusions and Next Steps:
The next step is to continue trying to get a better webbed plate.
Title: Making Webbed Plates
Date: 09/04/2020 Redo: No Sample: Sample 1 Lysate
Purpose: This procedure is to create a very high density of plaques from a lysate of known titer.
Notes:
1) Using the calculated titer from the Full Plate Titer protocol the volume needed was calculated. The estimated number of plaques was 1500 plaques. The calculations are shown below:
Volume Needed (ml) Lysate:
1.5 x 10^3 pfu (1.44 x 10^7pfu/ml)(1000 μl) = 1.04 x 10^-1μl
2) Using the following volume of lysate needed the 6 plates were plated using a plaque assay. The plates consist of the following microliters of lysate:
2 plates for 3 microliters of 10^-1
3 plates for 2 microliters of 10^-1
1 plate for 2.5 microliters of 10^-1
3) Another plaque assay was done using the previous values of lysate in microliters that were placed into the corresponding tube that had host bacteria in them. The tubes were left to sit for exactly 20 minutes. (Tubes were swirled in the shape of an eight to mix the lysate and host bacteria well).
4) Then 3 ml of top agar was sucked up and then dispensed into the tube with the lysate and bacteria culture. Then the liquid was sucked back up and then dispensed onto the agar plate.
Notice: Step 3 and 4 were repeated until all the 6 plates were plated
5) The plates were inserted into the incubator.
Results:
The results were positive and all of the plates were webbed. For some of the plates the only minor error was that there were lighter areas on the plates indicating that when swirling the top agar on the agar plate surface the liquid may have not covered the entire surface.

Conclusions and Next Steps:
The next steps involves flooding all of the webbed plates in order to collect a high volume lysate.
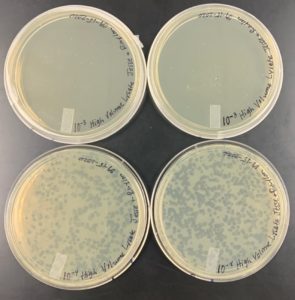
Title: Collecting A High Volume Lysate
Date: 09/8/2020 Redo: No Sample: Best webbed plates from both full plate titer
Purpose: This procedure consists of generating a highly concentrated liquid phage sample.
Notes:
1) The best webbed plates were chosen from the two webbed plate procedures above. The plates were flooded with 8ml of phage buffer. (Liquid was swirled throughout the 2 hours, but not vigorously to prevent splashing)
2) The plates then sat for exactly 2 hours before proceeding to suck up the liquid off of the plates.
3) The plates were tilted with one edge of the plate propped up on the lid of the agar plate. Using a 5 ml syringe the liquid was aspirated up out of the plate and then a .22 micrometer filter was prepared and connected to the syringe. Afterwards the liquid was dispensed into a conical tube labeled high volume lysate sample. (When aspirating the liquid the syringe hovered over the liquid making sure not to to touch the agar surface)
4) Step 3 was repeated until majority of the liquid was removed from the plates and transferred over into the conical tube and placed in a fridge at 4 degrees celsius. (Removed the filter after dispensing the liquid and reconnected after sucking up more of the liquid using the same filter)
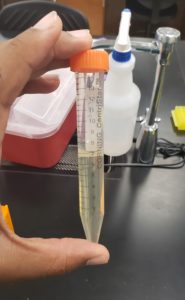
Results:
The lysate was successfully collected from the plates. As shown in the image below over 50 ml of high volume lysate was obtained.
Conclusion and Next Steps:
The next step is to use the lysate and perform a set of 10 fold serial dilutions and plate them.
Title: Full Plate Titer
Date: 09/9/2020 Redo: No Sample: Sample 1 High Volume Lysate
Purpose: This procedure consists of determining the concentration of phage particles in a lysate by using a plaque assay.
Notes:
1) A microcentrifuge was gathered and labeled with the Original H (The undiluted sample for the lysate serial dilution). Also using a p200 micropipettor and a sterile tip, the microcentrifuge tube was filled with approximately 100 microliters of phage buffer.
2) Next, again using the micropipettor and a sterile tip 10 microliters of the lysate was placed into the microcentrifuge tube labeled Original H.
3) The process of vortexing was then used to mix the phage buffer and lysate.
4) Then 8 microcentrifuge tubes were labeled 10-1, 10-2, …….10-8 and filled with approximately 90 microliters of phage buffer.
5) Then 10-fold serial dilutions were performed using the following steps below:
- Added 10 microliters of the undiluted lysate sample into the 10-1 microcentrifuge tube by using the micropipettor and a sterile tip
- Mixed well by using the process of vortexing
- Added 10 microliters of the 10-1 sample into the 10-2 sample and vortex
- Repeated this process with each tube until the sample labeled 10-8 had been vortexed
Notice: In between each transfer of 10 microliters of the sample, a new sterile tip was used in order to prevent contamination.
6) The agar plates were taken out the fridge to sit and warm up to room temperature. Then the plates were labeled on the bottom with a reference to the sample, our names, and lysate serial dilution. (Date wasn’t on the agar plates for the first set of lysate serial dilutions, but was recorded in a paper notebook)
7) Once the plates reached room temperature, the dilutions were plated using the following steps from the plaque assay protocol:
- Obtained 250 microliters of host bacterial cultures for each diluted sample that was being plated. (These tubes were labeled 10-1, 10-2, …….10-8)
- Using a micropipettor and a sterile tip, 10 microliters of the diluted samples from the serial dilution protocol were inserted into the corresponding bacterial culture tube
- Mixed the host bacterial culture with the samples in the tube and then let it sit between 5 to 10 minutes
- Obtained top agar from the 55°C bath and then prepared the room temperature agar plates to be plated.
- Using a serological pipette, 3 ml of molten top agar was dispensed into the tubes that consisted of host bacteria mixed with the diltuted lysate sample. Then the mixture was then sucked back up into the serological pippette and then dispensed onto the agar plate. (Repeated this step until all plates were plated)
- The plates sat out between 15-20 minutes, and were then flipped upside down and inserted into the incubator.
8) Plates were placed in the incubator for 24-48 hours
9) The plates were taken out of the incubator.
10) Titer was calcualted using the following calculations:
10^-4
Titer(pfu/ml): (64 pfu/10μl)(10^3μl/ml)(10^4)= 6.4 x 10^8 pfu/ml
Results:
The results were negative because the titer was still too low. However the plate labeled 10^-3 made a great webbed plate. Also there was a mistake when doing the serial dilutions and the original sample consisted of both phage buffer and the high volume lysate so all of the dilution were off by a multiple of 10.

Conclusion and Next Steps:
Next we will use the plate labeled 10^-4 which was actually labeled 10^-5 to attempt and make webbed plates in order to collect another high volume lysate with higher concentration.
Title: Full Plate Titer
Date: 09/14/2020 Redo: Yes Sample: Sample 1 High Volume Lysate
Purpose: This procedure consists of determining the concentration of phage particles in a lysate by using a plaque assay.
Notes:
1) The agar plates were taken out the fridge to sit and warm up to room temperature. Then the plates were labeled on the bottom with 10^-4, our names, date, and High Volume Lysate.
2) The diluted high volume lysate sample that was labelled 10^-5 (sample really meant to be 10^-4) used in the previous step was taken out of the fridge and was used to plate the 8 agar plates as described in step 3.
3) Once the plates reached room temperature, the dilutions were plated using the following steps from the plaque assay protocol:
- Obtained 250 microliters of host bacterial cultures for each diluted sample that was being plated. (These tubes were labeled 10-1, 10-2, …….10-8)
- Using a micropipettor and a sterile tip, 10 microliters of the diluted samples from the serial dilution protocol were inserted into the corresponding bacterial culture tube
- Mixed the host bacterial culture with the samples in the tube and then let it sit between 5 to 10 minutes
- Obtained top agar from the 55°C bath and then prepared the room temperature agar plates to be plated.
- Using a serological pipette, 3 ml of molten top agar was dispensed into the tubes that consisted of host bacteria mixed with the diltuted lysate sample. Then the mixture was then sucked back up into the serological pippette and then dispensed onto the agar plate. (Repeated this step until all plates were plated)
- The plates sat out between 15-20 minutes, and were then flipped upside down and inserted into the incubator.
4) Plates were placed in the incubator for less than 24 hours
Results:
The results were negative because none of the plates formed a webbed plate. This was because instead of using a new diluted lysate sample, the same sample from the previous day was used again and wasn’t vortexed.

Conclusion and Next Steps:
The next step consists of doing another set of serial dilutions using four plates and seeing what plate forms a webbed plate. The serial dilutions will be performed using the High Volume Lysate sample collected.
Title: Full Plate Titer
Date: 09/15/2020 Redo: No Sample: Sample 1 High Volume Lysate
Purpose: This procedure consists of determining the concentration of phage particles in a lysate by using a plaque assay.
Notes:
1) A microcentrifuge was gathered and labeled with the Original 2H (The undiluted sample for the lysate serial dilution). Also using a p200 micropipettor and a sterile tip, the microcentrifuge tube was filled with 100 microliters of High Volume Lysate.
2) Next, again using the micropipettor and a sterile tip 10 microliters of the lysate was transferred into another microcentrifuge tube labeled 10^-1 2H. (This microcentrifuge tube consisted of 90 microliters of phage buffer along with the other 4 remaining tubes labels 10^-2 2H, 10^-3 2H, and 10^-4 2H)
3) The process of vortexing was then used to mix the phage buffer and lysate.
4) Then 10 microliters of the sample labeled 10^-1 2H was aspirated and dispensed into the tube labeled 10^-2 2H. The sample was then vortexed. (This process was repeated until tube labeled 10^-4 2H was vortexed)
Notice: A new sterile tip was used in between the transfer of the different samples.
5) Then 4 agar plates were taken out the fridge to sit and warm up to room temperature. Then 2 plates were labeled on the bottom with 10^-3, our names, the date, and High Volume Lysate. The other 2 plates were labeled with the same information but the dilution was 10^-4.
6) Once the plates reached room temperature, the dilutions were plated using the following steps from the plaque assay protocol:
- Obtained 250 microliters of host bacterial cultures for each diluted sample that was being plated. (These tubes were labeled 10-1, 10-2, …….10-4)
- Using a micropipettor and a sterile tip, 10 microliters of the diluted samples from the serial dilution protocol were inserted into the corresponding bacterial culture tube
- Mixed the host bacterial culture with the samples in the tube and then let it sit between 5 to 10 minutes
- Obtained top agar from the 55°C bath and then prepared the room temperature agar plates to be plated.
- Using a serological pipette, 3 ml of molten top agar was dispensed into the tubes that consisted of host bacteria mixed with the diluted lysate sample. Then the mixture was then aspirated into the serological pipette and then dispensed onto the agar plate. (Repeated this step until all plates were plated)
- The plates sat out between 15-20 minutes, and were then flipped upside down and inserted into the incubator.
7) Plates were placed in the incubator for less than 24 hours
Results:
The results were negative for the plates labeled 10^-3 due to the fact that the plates were completely covered. Also the plates labeled 10^-4 were negative because the plates didn’t quite form webbed plates.
Conclusion and Next Steps:
Another set of serial dilutions will be performed in order to try and get a webbed plate. However the number of microliters are going to vary in order to increase the likeliness of getting a webbed plate.
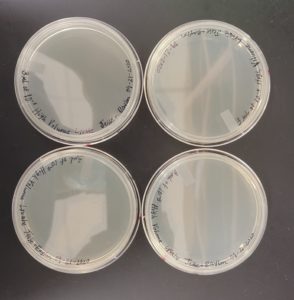
Title: Making Webbed Plates
Date: 09/16/2020 Redo: No Sample: Sample 1 High Volume Lysate
Purpose: This procedure is to create a very high density of plaques from a lysate of known titer.
Notes:
1) A microcentrifuge was gathered and labeled with the Original 3H (The undiluted sample for the lysate serial dilution). Also using a p200 micropipettor and a sterile tip, the microcentrifuge tube was filled with 100 microliters of High Volume Lysate.
2) Next, again using the micropipettor and a sterile tip 10 microliters of the lysate was transferred into another microcentrifuge tube labeled 10^-1 3H. (This microcentrifuge tube consisted of 90 microliters of phage buffer along with the other 4 remaining tubes labels 10^-2 3H, 10^-3 3H, and 10^-4 3H)
3) The process of vortexing was then used to mix the phage buffer and lysate.
4) Then 10 microliters of the sample labeled 10^-1 3H was aspirated and dispensed into the tube labeled 10^-2 3H. The sample was then vortexed. (This process was repeated until tube labeled 10^-4 3H was vortexed)
Notice: A new sterile tip was used in between the transfer of the different samples.
5) It was assumed that a webbed plated would be formed if one plate had 11 microliters of 10^-4 and another plate had 12 microliters of 10^-4. Also another plate contained 3 microliters of 10^-3. Therefore with that being said these plates were created using the following steps.
6) Then agar plates were taken out the fridge to sit and warm up to room temperature. Then 1 plate was labeled on the bottom with 11 microliters of 10^-4, our names, the date, and High Volume Lysate. The other 2 plates were labeled with the same information but one said 12 microliters of 10^-4 and the other said 3 microliters of 10^-3.
7) The plaque assay was done using the previous values of lysate in microliters that was placed into the corresponding tube that had host bacteria in them. The tubes were left to sit for exactly 20 minutes. (Tubes were swirled in the shape of an eight to mix the lysate and host bacteria well).
8) Then 3 ml of top agar was aspirated and then dispensed into the tube with the lysate and bacteria culture. Then the liquid was aspirated again and then dispensed onto the agar plate.
Notice: Step 7 and 8 were repeated until all the 3 plates were plated
9) The plates were inserted into the incubator for less than 24 hours.
Results:
The results were negative for the plates labeled with 11 and 12 microliters of 10^-4 sample. However, for the 3 microliters of 10^-3 a great webbed plate was formed

Conclusions and Next Steps:
Make more webbed plates that are 3 microliters of 10^-3 to collect another high volume lysate.
Title: Making Webbed Plates
Date: 09/21/2020 Redo: Yes Sample: Sample 1 High Volume Lysate
Purpose: This procedure is to create a very high density of plaques from a lysate of known titer.
Notes:
1) A microcentrifuge was gathered and labeled with the Original 4H (The undiluted sample for the lysate serial dilution). Also using a p200 micropipettor and a sterile tip, the microcentrifuge tube was filled with 100 microliters of High Volume Lysate.
2) Next, again using the micropipettor and a sterile tip 10 microliters of the lysate was transferred into another microcentrifuge tube labeled 10^-1 4H. (This microcentrifuge tube consisted of 90 microliters of phage buffer along with the other 4 remaining tubes labels 10^-2 4H, 10^-3 4H, and 10^-4 4H)
3) The process of vortexing was then used to mix the phage buffer and lysate.
4) Then 10 microliters of the sample labeled 10^-1 4H was aspirated and dispensed into the tube labeled 10^-2 4H. The sample was then vortexed. (This process was repeated until tube labeled 10^-4 4H was vortexed)
Notice: A new sterile tip was used in between the transfer of the different samples.
5) It was assumed that a webbed plated would be formed if one plate had 3 microliters of 10^-3. Therefore with that being said these plates were created using the following steps.
6) Then agar plates were taken out the fridge to sit and warm up to room temperature. Then 4 plate were labeled on the bottom with 3 microliters of 10^-3, our names, the date, and High Volume Lysate.
7) The plaque assay was done using the previous values of lysate in microliters that was placed into the corresponding tube that had host bacteria in them. The tubes were left to sit for exactly 20 minutes. (Tubes were swirled in the shape of an eight to mix the lysate and host bacteria well).
8) Then 3 ml of top agar was aspirated and then dispensed into the tube with the lysate and bacteria culture. Then the liquid was aspirated again and then dispensed onto the agar plate.
Notice: Step 7 and 8 were repeated until all the 4 plates were plated
9) The plates were inserted into the incubator for a little over 24 hours.
Results:
The results were negative for all of the plates considering the fact that plates were completely covered with phage particles and they sat in the incubator too long.
Conclusions and Next Steps:
Make more webbed plates that are 3 microliters of 10^-3 to collect another high volume lysate but be sure to take them out of the incubator before the plates are completely covered with phage particles.
Title: Making Webbed Plates
Date: 09/22/2020 Redo: Yes Sample: Sample 1 High Volume Lysate
Purpose: This procedure is to create a very high density of plaques from a lysate of known titer.
Notes:
1) A microcentrifuge was gathered and labeled with the Original 4H (The undiluted sample for the lysate serial dilution). Also using a p200 micropipettor and a sterile tip, the microcentrifuge tube was filled with 100 microliters of High Volume Lysate.
2) Next, again using the micropipettor and a sterile tip 10 microliters of the lysate was transferred into another microcentrifuge tube labeled 10^-1 5H. (This microcentrifuge tube consisted of 90 microliters of phage buffer along with the other 4 remaining tubes labels 10^-2 5H, 10^-3 5H, and 10^-4 5H)
3) The process of vortexing was then used to mix the phage buffer and lysate.
4) Then 10 microliters of the sample labeled 10^-1 5H was aspirated and dispensed into the tube labeled 10^-2 5H. The sample was then vortexed. (This process was repeated until tube labeled 10^-4 5H was vortexed)
Notice: A new sterile tip was used in between the transfer of the different samples.
5) It was assumed that a webbed plated would be formed if one plate had 3 microliters of 10^-3. Therefore with that being said these plates were created using the following steps.
6) Then agar plates were taken out the fridge to sit and warm up to room temperature. Then 8 plates were labeled on the bottom with 3 microliters of 10^-3, our names, the date, and High Volume Lysate.
7) The plaque assay was done using the previous values of lysate in microliters that was placed into the corresponding tube that had host bacteria in them. The tubes were left to sit for exactly 20 minutes. (Tubes were swirled in the shape of an eight to mix the lysate and host bacteria well).
8) Then 3 ml of top agar was aspirated and then dispensed into the tube with the lysate and bacteria culture. Then the liquid was aspirated again and then dispensed onto the agar plate.
Notice: Step 7 and 8 were repeated until all the 8 plates were plated
9) The plates were inserted into the incubator for less 24 hours. (The plates were watched the last 3 hours the plates were in the incubator to make sure the plates didn’t become completely wiped)
Results:
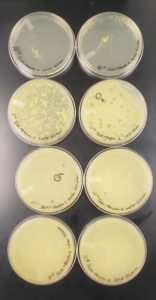
The results were positive and the plates formed nice webbed plates as shown in the image below.

Conclusions and Next Steps:
The next steps involve flooding all of the webbed plates in order to collect another high volume lysate with a higher concentration.
Title: Collecting A High Volume Lysate
Date: 09/23/2020 Redo: Yes Sample: Webbed plates from plates labeled 3 microliters of 10^-3 (Previous Webbed Plate Procedure)
Purpose: This procedure consists of generating a highly concentrated liquid phage sample.
Notes:
1) The best webbed plates were chosen from the webbed plate procedures above. The plates were flooded with 8ml of phage buffer. (Liquid was swirled throughout the 2 hours, but not vigorously to prevent splashing)
2) The plates then sat for exactly 2 hours before proceeding to aspirate the liquid off of the plates.
3) The plates were tilted with one edge of the plate propped up on the lid of the agar plate. Using a 5 ml syringe the liquid was sucked up out of the plate and then a .22 micrometer filter was prepared and connected to the syringe. Afterwards, the liquid was dispensed into a conical tube labeled 2nd high volume lysate sample. (When aspirating the liquid the syringe hovered over the liquid making sure not to to touch the agar surface)
4) Step 3 was repeated until the majority of the liquid was removed from the plates and transferred over into the conical tube and placed in a fridge at 4 degrees celsius. (Removed the filter after dispensing the liquid and reconnected after sucking up more of the liquid using the same filter)
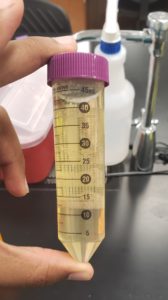
Results:
The high volume lysate was successfully collected from the 8 plates. As shown in the image below over 50 ml of high volume lysate was obtained.
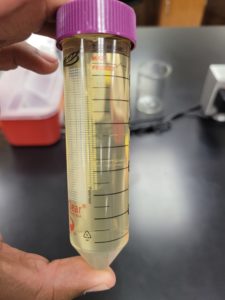
Conclusion and Next Steps:
The next step is to use the high volume lysate and perform a set of 10 fold serial dilutions in order to do a full plate titer.
Title: Full Plate Titer
Date: 09/24/2020 Redo: Yes Sample: 2nd High Volume Lysate
Purpose: This procedure consists of determining the concentration of phage particles in a lysate by using a plaque assay.
Notes:
1) A microcentrifuge was gathered and labeled with the Original 2nd H (The undiluted sample for the lysate serial dilution). Also using a p200 micropipettor and a sterile tip, the microcentrifuge tube was filled with 100 microliters of High Volume Lysate.
2) Next, again using the micropipettor and a sterile tip 10 microliters of the lysate was transferred into another microcentrifuge tube labeled 10^-1 6H. (This microcentrifuge tube consisted of 90 microliters of phage buffer along with the other 8 remaining tubes labeled 10^-2 2nd H all the way to 10^-8 2nd H)
3) The process of vortexing was then used to mix the phage buffer and lysate.
4) Then 10 microliters of the sample labeled 10^-1 2nd H was aspirated and dispensed into the tube labeled 10^-2 2nd H. The sample was then vortexed. (This process was repeated until the tube labeled 10^-8 2nd H was vortexed)
Notice: A new sterile tip was used in between the transfer of the different samples.
5) Then 9 agar plates were taken out the fridge to sit and warm up to room temperature. Then the plates were labeled with a reference to the sample, 2nd HVL, our initials, and the date. (To see how the plates were labeled view the image below in the results section)
6) Once the plates reached room temperature, the dilutions were plated using the following steps from the plaque assay protocol:
- Obtained 250 microliters of host bacterial cultures for each diluted sample that was being plated. (These tubes were labeled 10-1, 10-2, …….10-8)
- Using a micropipettor and a sterile tip, 10 microliters of the diluted samples from the serial dilution protocol were inserted into the corresponding bacterial culture tube
- Mixed the host bacterial culture with the samples in the tube and then let it sit between 5 to 10 minutes
- Obtained top agar from the 55°C bath and then prepared the room temperature agar plates to be plated.
- Using a serological pipette, 3 ml of molten top agar was dispensed into the tubes that consisted of host bacteria mixed with the diluted lysate sample. Then the mixture was then aspirated into the serological pipette and then dispensed onto the agar plate. (Repeated this step until all plates were plated)
- The plates sat out between 15-20 minutes, and were then flipped upside down and inserted into the incubator.
7) Plates were placed in the incubator for less than 24 hours
8) The titer was then calculated using the plate labeled 10^-7. The calculations are shown below:
10^-7
Titer(pfu/ml): (6 pfu/10μl)(10^3μl/ml)(10^7)= 6.0 x 10^9 pfu/ml
Results:
The results were positive because the calculated titer was higher than 5.0 x 10^9. This was calculated using the plate labeled 10^-7 which contained 6 plaques.
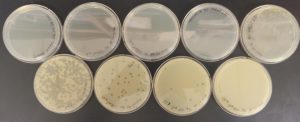
Conclusion and Next Steps:
The next step is to archive the phage sample.
Title: Archiving Phage Sample
Date: 09/25/2020 Redo: No Sample: 2nd High Volume Lysate
Purpose: This procedure consists of using a prepare high-titer lysate for long term storage
Notes:
1) Three barcoding tubes were obtained and barcoded. (Two of the tubes will be sent to the University of Pittsburgh to be stored while the last one will be stored at Tarleton State University)
2) Each tube was then filled with sterile beads to about 1.5 cm from the top of the tube. (This step was done while working close to a flame)
3) Afterwards, the flame was turned off and approximately 2.8 mL of high-titer lysate was dispensed into a 15 mL conical tube.
4) Next 100 microliters of DMSO was aspirated using a p200 micropipettor and dispenses into the same conical tube the high- titer lysate was dispensed into. Once again another 100 microliters was aspirated and placed into the same tube as well. (A new sterile tip was used in between each transfer of DMSO into the conical tube)
5) The mixture of DMSO and High-Titer Lysate was then vortexed for about 15 seconds.
6)Then using a serological pipette, the mixture of DMSO and High-Titer Lysate was aspirated and then each barcoding tube was filled just enough to cover up the beads. (Made sure to not overfill the tube as well as not underfill the tube)
7) The tubes were then placed into the fridge. (2 of the tubes will be shipped, while the other is starting to be frozen)
Results:
The results were positive and the tubes were filled with just the right amount of DMSO/High-Titer Lysate mixture.
Conclusion and Next Steps:
The next step is to begin the electron microscopy.
Title: Electron Microscopy
Date: 09/28/2020 Redo: No Sample: 2nd High Volume Lysate
Purpose: This procedure consists of preparing the phage sample for viewing with a transmission microscope.
Notes:
1) Using an aseptic technique 1 mL of the high volume lysate was transferred into a microcentrifuge tube using a serological pipette.
2) Then in order to centrifuge properly step 1 was repeated in order for the tubes to be balanced. The samples were centrifuged for an hour at 4 C.
3) Using a p200 micropipettor, the supernatant was removed from the microcentrifuge tubes and placed in a waste container.
4) Afterwards 100 microliters of phage buffer was added into each tube, the tubes were inverted for 30 minutes before proceeding to the next step.
The following procedures below were performed under a fume hood and both partners had on gloves and the area was clean
5) A 5×5 piece of parafilm was placed inside of a petri dish and and a piece of double sided tape (PELCO tab) was placed on top of the parafilm.
6) Carefully using EM forceps a grid was taken out of the box of unused grids and placed on the edge of the double sided tape just enough to where the grid stuck to the adhesive from the PELCO tab. (Dark and Shiny side of the grid was facing upwards)
7) Next, 10 microliters of lysate was placed onto the grid (The lysate was placed on the grid by starting a bubble and filling the bubble up with the excess lysate without physically touching the edge of the grid)
8) The phage had time to settle for 2 minutes, and then using a small wedge of filter paper the liquid was absorbed without touching the grid.
9) Next step 7 and 8 were repeated twice with sterile water instead of the lysate. Lastly, one more time with 1% uranyl acetate.
10) After the uranyl acetate dried the grid had a shiny coat that appeared to look like a layer of oil. Finally using the EM forceps the grid was taken off and placed into the grid box in the slot labeled A2.
Results:
The results were positive and grid was placed in the designated grid box for storage.
IMAGE
Conclusion and Next Steps:
The next step is to proceed to the DNA Extraction.
DNA Extraction
Title: DNA Extraction- Day One
Date: 09/30/2020 Redo: No
Purpose: This procedure is to extract DNA from the phage sample.
Notes:
1) 5 mL of the High Volume Lysate was aliquoted into a 15 mL conical tube. Then 20 microliters of nuclease was added to the conical tube.
2) Tube was inverted for about 30 seconds and then placed in the incubator for about 10 minutes at 37°C.
3) Then 5 microcentrifuge tubes were obtained and 1 mL of the lysate form the conical tube was aliquoted into each of the tubes.
4) 20 microliters of Zinc Chloride was added to each tube using a p200 micropipettor, and then the tube was inverted gently and then placed in the incubator for 5 minutes at 37°C. This process results in the phage to be precipitated.
5) The tubes were centrifuged at 10,000 rpm for 1 minute to help pellet the phage.
The next few steps were done very quickly
6) After the tubes were taken out of the incubator, supernatants were removed by aspiration. The tips were discarded into a waste container.
7) Pellets were resuspended in 500 microliters of TES buffer per tube. The tubes were then incubated at 60°C for 15 minutes. This process helps to denature the capsids.
8) 1 microliter of Proteinase K was added to each tube using a micropipette and mixed gently. The tubes were then placed in the incubator for 10 minutes at 37°C.
9) 60 microliters of potassium acetate was added to each tube. The mixture was mixed well and then placed in ice for 15 minutes. A white cloudy precipitate formed which was the capsids.
10) The tubes were then centrifuged at 4°C for 1 min at 12,000 rpm. This process helped pellet the capsids.
11) The supernatants from the tubes were placed into 5 clean microcentrifuge tubes and the tubes containing the pellets were discarded.
12) 500 microliters of isopropanol was added to the tubes which contained the supernatant and the the tubes were mixed gently and left on ice overnight.
Results:
The results will be further discussed in Day Two after the Nanodrop has been used.
Conclusions and Next Steps:
The next step is to proceed to Day 2 of the DNA Extraction.
Title: DNA Extraction-Day Two
Date: 10/01/2020 Redo: No
Purpose: This procedure is to extract the DNA from the phage samples.
Notes:
1) The 5 tubes were centrifuged again at top speed for 10 minutes to pellet the DNA. The supernatant was discarded into a waste container.
2) 250 microliters of 70% ethanol was added into each of the tubes and then centrifuged again for 1 minute at top speed. The supernatants were then discarded into a waste container.
3) The DNA pellets were then dried at room temperature on a paper towel for an hour then they were placed into heat block at 37°C for about another hour.
4) The pellets were then resuspended in 50 microliters of nuclease free water. Then using a micropipettor the liquid was aspirated and dispensed into the next microcentrifuge tube to resuspend the pellets in that tube. (This step was repeated until the tube with the least pellets was resuspended using the same nuclease free water)
5) Then using the Nanodrop the DNA concentration and purity was checked.
Results:
The results were negative and the purity of the sample wasn’t where it needed to be.

Conclusions and Next Steps:
The next step is to reprecipitate the DNA sample.
Title: DNA Extraction Reprecipitation
Date: 10/01/2020 Redo: No
Purpose: This procedure is to extract the DNA from the phage samples.
Notes:
1) 16 microliters of the DNA from the tube that was last resuspended in the protocol for DNA Extraction-Day Two was placed into a new microcentrifuge tube .
2) Also 40 microliters of 100% alcohol was placed into the same tube.
3) Lastly 1.5 microliters of potassium acetate was added to the tube and then the mixture was inverted and then placed in the fridge on ice over the weekend.
Results:
The results will be further discussed in the next protocol.
Conclusions and Next Steps:
The next step is to continue with Day 2 of the reprecipitation process.
Title: DNA Extraction Reprecipitation-Day Two
Date: 10/05/2020 Redo: Yes
Purpose: This procedure is to extract the DNA from the phage samples.
Notes:
1) The tube from the previous protocol was centrifuged at top speed for 10 minutes to pellet the DNA. The supernatant was discarded into a waste container.
2) 250 microliters of 70% ethanol was added into the tube and then centrifuged again for 1 minute at top speed. The supernatant was then discarded into a waste container.
3) The DNA pellets were placed into heat block at 37°C in order to dry completely.
4) The pellets were then resuspended in 50 microliters of nuclease free water.
5) Then using the Nanodrop the DNA concentration and purity was checked.
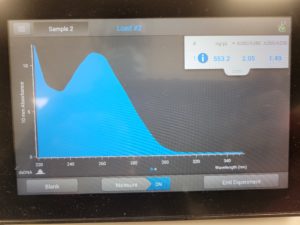
Results:
The results were positive and the Nanodrop readings were close to 1.8 and 2.
A260/A280 : 1.92
A260/A230 : 1.36
Concentration: 219.5 ng/µl

Conclusions and Next Steps:
The next steps involve moving on to the restriction enzyme digest in order to prepare a gel and start the gel electrophoresis.
Title: DNA Extraction- Day One
Date: 10/14/2020 Redo: Yes
Purpose: This procedure is to extract DNA from the phage sample.
Notes:
1) 5 mL of the High Volume Lysate was aliquoted into a 15 mL conical tube. Then 20 microliters of nuclease was added to the conical tube.
2) Tube was inverted for about 30 seconds and then placed in the incubator for about 10 minutes at 37°C.
3) Then 5 microcentrifuge tubes were obtained and 1 mL of the lysate form the conical tube was aliquoted into each of the tubes.
4) 20 microliters of Zinc Chloride was added to each tube using a p200 micropipettor, and then the tube was inverted gently and then placed in the incubator for 5 minutes at 37°C. This process results in the phage to be precipitated.
5) The tubes were centrifuged at 10,000 rpm for 1 minute to help pellet the phage.
The next few steps were done very quickly
6) After the tubes were taken out of the incubator, supernatants were removed by aspiration. The tips were discarded into a waste container.
7) Pellets were resuspended in 500 microliters of TES buffer per tube. The tubes were then incubated at 60°C for 15 minutes. This process helps to denature the capsids.
8) 1 microliter of Proteinase K was added to each tube using a micropipette and mixed gently. The tubes were then placed in the incubator for 10 minutes at 37°C.
9) 60 microliters of potassium acetate was added to each tube. The mixture was mixed well and then placed in ice for 15 minutes. A white cloudy precipitate formed which was the capsids.
10) The tubes were then centrifuged at 4°C for 1 min at 12,000 rpm. This process helped pellet the capsids.
11) The supernatants from the tubes were placed into 5 clean microcentrifuge tubes and the tubes containing the pellets were discarded.
12) 500 microliters of isopropanol was added to the tubes which contained the supernatant and the the tubes were mixed gently and left on ice overnight.
Results:
The results will be further discussed in Day Two after the Nanodrop has been used.
Conclusions and Next Steps:
The next step is to proceed to Day 2 of the DNA Extraction.
Title: DNA Extraction-Day Two
Date: 10/15/2020 Redo: Yes
Purpose: This procedure is to extract the DNA from the phage samples.
Notes:
1) The 5 tubes were centrifuged again at top speed for 10 minutes to pellet the DNA. The supernatant was discarded into a waste container.
2) 250 microliters of 70% ethanol was added into each of the tubes and then centrifuged again for 1 minute at top speed. The supernatants were then discarded into a waste container.
3) The DNA pellets were then dried at room temperature on a paper towel for an hour then they were placed into heat block at 37°C for about another hour.
4) The pellets were then resuspended in 50 microliters of nuclease-free water. Then using a micropipettor the liquid was aspirated and dispensed into the next microcentrifuge tube to resuspend the pellets in that tube. (This step was repeated until the tube with the least pellets was resuspended using the same nuclease-free water)
5) Then using the Nanodrop the DNA concentration and purity was checked.
Results:
The results were positive and the Nanodrop readings were close to 1.8 and 2.
A260/A280 : 2.01
A260/A230 : 1.68
Concentration: 362.8 ng/µl

Conclusions & Next Steps:
The next step is to cast another gel for gel electrophoresis.
Title: DNA Extraction- Day One
Date: 10/27/2020 Redo: Yes
Purpose: This procedure is to extract DNA from the phage sample.
Notes:
1) 5 mL of the High Volume Lysate was aliquoted into a 15 mL conical tube. Then 20 microliters of nuclease-free water was added to the conical tube.
2) Tube was inverted for about 30 seconds and then placed in the incubator for about 10 minutes at 37°C.
3) Then 5 microcentrifuge tubes were obtained and 1 mL of the lysate form the conical tube was aliquoted into each of the tubes.
4) 20 microliters of Zinc Chloride was added to each tube using a p200 micropipettor, and then the tube was inverted gently and then placed in the incubator for 5 minutes at 37°C. This process results in the phage to be precipitated.
5) The tubes were centrifuged at 10,000 rpm for 1 minute to help pellet the phage.
The next few steps were done very quickly
6) After the tubes were taken out of the incubator, supernatants were removed by aspiration. The tips were discarded into a waste container.
7) Pellets were resuspended in 500 microliters of TES buffer per tube. The tubes were then incubated at 60°C for 15 minutes. This process helps to denature the capsids.
(The resuspension wasn’t done correctly, however, the procedure proceeded and if the results are negative this is the cause for incorrect values shown in the Nanodrop reading)
8) 1 microliter of Proteinase K was added to each tube using a micropipette and mixed gently. The tubes were then placed in the incubator for 10 minutes at 37°C.
9) 60 microliters of potassium acetate was added to each tube. The mixture was mixed well and then placed in ice for 15 minutes. A white cloudy precipitate formed which was the capsids.
10) The tubes were then centrifuged at 4°C for 1 min at 12,000 rpm. This process helped pellet the capsids.
11) The supernatants from the tubes were placed into 5 clean microcentrifuge tubes and the tubes containing the pellets were discarded.
12) 500 microliters of isopropanol was added to the tubes which contained the supernatant and the the tubes were mixed gently and left on ice overnight.
Results:
The results will be further discussed in Day Two after the Nanodrop has been used.
Conclusions and Next Steps:
The next step is to proceed to Day 2 of the DNA Extraction.
Title: DNA Extraction-Day Two
Date: 10/28/2020 Redo: Yes
Purpose: This procedure is to extract the DNA from the phage samples.
Notes:
1) The 5 tubes were centrifuged again at top speed for 10 minutes to pellet the DNA. The supernatant was discarded into a waste container.
2) 250 microliters of 70% ethanol was added into each of the tubes and then centrifuged again for 1 minute at top speed. The supernatants were then discarded into a waste container.
3) The DNA pellets were then dried at room temperature on a paper towel for an hour then they were placed into heat block at 37°C for about another hour.
4) The pellets were then resuspended in 50 microliters of nuclease-free water. Then using a micropipettor the liquid was aspirated and dispensed into the next microcentrifuge tube to resuspend the pellets in that tube. (This step was repeated until the tube with the least pellets was resuspended using the same nuclease-free water)
5) Then using the Nanodrop the DNA concentration and purity was checked.
Results:
The results were positive and the Nanodrop readings were close to 1.8 and 2.
A260/A280 : 2.05
A260/A230 : 1.49
Concentration: 553.2 ng/µl
Conclusions & Next Steps:
The next step is to cast another gel for gel electrophoresis.
Title: DNA Extraction- Day One
Date: 10/28/2020 Redo: Yes
Purpose: This procedure is to extract DNA from the phage sample.
Notes:
1) 5 mL of the High Volume Lysate was aliquoted into a 15 mL conical tube. Then 20 microliters of nuclease-free water was added to the conical tube.
2) Tube was inverted for about 30 seconds and then placed in the incubator for about 10 minutes at 37°C.
3) Then 5 microcentrifuge tubes were obtained and 1 mL of the lysate form the conical tube was aliquoted into each of the tubes.
4) 20 microliters of Zinc Chloride was added to each tube using a p200 micropipettor, and then the tube was inverted gently and then placed in the incubator for 5 minutes at 37°C. This process results in the phage to be precipitated.
5) The tubes were centrifuged at 10,000 rpm for 1 minute to help pellet the phage.
The next few steps were done very quickly
6) After the tubes were taken out of the incubator, supernatants were removed by aspiration. The tips were discarded into a waste container.
7) Pellets were resuspended in 500 microliters of TES buffer per tube. The tubes were then incubated at 60°C for 15 minutes. This process helps to denature the capsids.
(The resuspension wasn’t done correctly, however, the procedure proceeded and if the results are negative this is the cause for incorrect values shown in the Nanodrop reading)
8) 1 microliter of Proteinase K was added to each tube using a micropipette and mixed gently. The tubes were then placed in the incubator for 10 minutes at 37°C.
9) 60 microliters of potassium acetate was added to each tube. The mixture was mixed well and then placed in ice for 15 minutes. A white cloudy precipitate formed which was the capsids.
10) The tubes were then centrifuged at 4°C for 1 min at 12,000 rpm. This process helped pellet the capsids.
11) The supernatants from the tubes were placed into 5 clean microcentrifuge tubes and the tubes containing the pellets were discarded.
12) 500 microliters of isopropanol was added to the tubes which contained the supernatant and the the tubes were mixed gently and left over the weekend
Results:
The results will be further discussed in Day Two after the Nanodrop has been used.
Conclusions and Next Steps:
The next step is to proceed to Day 2 of the DNA Extraction.
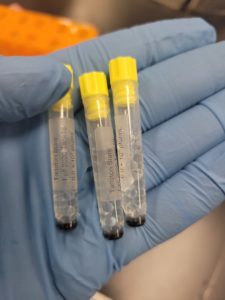
Title: Determining DNA Concentration Using QuBit 3
Date: 10/28/2020 Redo: No
Purpose: The purpose of this procedure is to determine the concentration of DNA without including the salt contamination.
Notes:
1) First 995 microliters of dsDNA buffer was placed into a microcentrifuge tube.
2) Next 5 microliters of Buffer Reagent was added into the same microcentrifuge tube and then the mixture was gently vortexed.
3) Next 5 tubes (tubes used specifically for QuBit) were obtained. 190 microliters of the mixture created in Step 2, was aspirated using a micropipettor and dispensed into the first tube. (This step was repeated with one other tube)
4) The other remaining tubes were filled with 199 microliters of the mixture.
5) The first two tubes were for the standards that were being prepared so 10 microliters of Standard 1 was aspirated and dispensed into the first tube, then the same was done with Standard 2 for the second tube.
6) Next the last three tubes remaining were used for the first three good DNA samples that were collected. In each tube 1 microliter of the corresponding DNA was placed in the tube.
7) Then all of the tubes were vortexed for about 2-3 seconds and then were left to sit for 2 minutes at room temperature.
8) Finally the concentration of each sample was determined using the QuBit, right after the two standards were loaded.
Results:
The concentration of DNA was determined and the results are shown below:
Sample 1 – 15.0 ng/µL
Sample 2 – 11.9 ng/µL
Sample 3 – 35.6 ng/µL
With the concentrations of DNA we calculated the amount of DNA to use to see if we had enough DNA to proceed to the gel electrophoresis.

Sample 1 – 33.33 µL of DNA
Sample 2 – 42.016 µL of DNA
Sample 3 – 35.6 µL of DNA
Conclusions & Next Steps:
The next step is to continue to test the DNA of our sample with the Nanodrop and also collect more DNA samples using the DNA Extraction Protocol.
Title: DNA Extraction-Day Two
Date: 11/2/2020 Redo: Yes
Purpose: This procedure is to extract the DNA from the phage samples.
Notes:
1) The 5 tubes were centrifuged again at top speed for 10 minutes to pellet the DNA. The supernatant was discarded into a waste container.
2) 250 microliters of 70% ethanol was added into each of the tubes and then centrifuged again for 1 minute at top speed. The supernatants were then discarded into a waste container.
3) The DNA pellets were then dried at room temperature on a paper towel for an hour then they were placed into heat block at 37°C for about another hour.
4) The pellets were then resuspended in 50 microliters of nuclease-free water. Then using a micropipettor the liquid was aspirated and dispensed into the next microcentrifuge tube to resuspend the pellets in that tube. (This step was repeated until the tube with the least pellets was resuspended using the same nuclease-free water)
5) Then using the Nanodrop the DNA concentration and purity was checked.
Results:
The results were positive and the Nanodrop readings were close to 1.8 and 2.
A260/A280 : 2.05
A260/A230 : 1.10
Concentration: 942.6 ng/µl

Conclusions & Next Steps:
The next step is to collect another DNA sample because there isn’t enough DNA to use for Gel Electrophoresis.
Title: DNA Extraction- Day One
Date: 11/3/2020 Redo: Yes
Purpose: This procedure is to extract DNA from the phage sample.
Notes:
1) 5 mL of the High Volume Lysate was aliquoted into a 15 mL conical tube. Then 20 microliters of33nuclease-free water was added to the conical tube.
2) Tube was inverted for about 30 seconds and then placed in the incubator for about 10 minutes at 37°C.
3) Then 5 microcentrifuge tubes were obtained and 1 mL of the lysate form the conical tube was aliquoted into each of the tubes.
4) 20 microliters of Zinc Chloride was added to each tube using a p200 micropipettor, and then the tube was inverted gently and then placed in the incubator for 5 minutes at 37°C. This process results in the phage to be precipitated.
5) The tubes were centrifuged at 10,000 rpm for 1 minute to help pellet the phage.
The next few steps were done very quickly
6) After the tubes were taken out of the incubator, supernatants were removed by aspiration. The tips were discarded into a waste container.
7) Pellets were resuspended in 500 microliters of TES buffer per tube. The tubes were then incubated at 60°C for 15 minutes. This process helps to denature the capsids.
(The resuspension wasn’t done correctly, however, the procedure proceeded and if the results are negative this is the cause for incorrect values shown in the Nanodrop reading)
8) 1 microliter of Proteinase K was added to each tube using a micropipette and mixed gently. The tubes were then placed in the incubator for 10 minutes at 37°C.
9) 60 microliters of potassium acetate was added to each tube. The mixture was mixed well and then placed in ice for 15 minutes. A white cloudy precipitate formed which was the capsids.
10) The tubes were then centrifuged at 4°C for 1 min at 12,000 rpm. This process helped pellet the capsids.
11) The supernatants from the tubes were placed into 5 clean microcentrifuge tubes and the tubes containing the pellets were discarded.
12) 500 microliters of isopropanol was added to the tubes which contained the supernatant and the the tubes were mixed gently and left over the weekend
Results:
The results will be further discussed in Day Two after the Nanodrop has been used.
Conclusions and Next Steps:
The next step is to proceed to Day 2 of the DNA Extraction.
Title: DNA Extraction-Day Two
Date: 11/5/2020 Redo: Yes
Purpose: This procedure is to extract the DNA from the phage samples.
Notes:
1) The 5 tubes were centrifuged again at top speed for 10 minutes to pellet the DNA. The supernatant was discarded into a waste container.
2) 250 microliters of 70% ethanol was added into each of the tubes and then centrifuged again for 1 minute at top speed. The supernatants were then discarded into a waste container.
3) The DNA pellets were then dried at room temperature on a paper towel for an hour then they were placed into heat block at 37°C for about another hour.
4) The pellets were then resuspended in 50 microliters of nuclease-free water. Then using a micropipettor the liquid was aspirated and dispensed into the next microcentrifuge tube to resuspend the pellets in that tube. (This step was repeated until the tube with the least pellets was resuspended using the same nuclease-free water)
5) Then using the Nanodrop the DNA concentration and purity was checked.
Results:
The results were positive and the Nanodrop readings were close to 1.8 and 2.
A260/A280 : 2.02
A260/A230 : 1.46
Concentration: 807.4 ng/µl
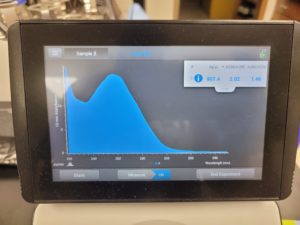
Conclusions & Next Steps:
The next step is to reprecipitate the DNA samples 1, 2, 4, and 5 in a microcentrifuge tube.
Title: Determining DNA Concentration Using QuBit 3
Date: 11/9/2020 Redo: Yes
Purpose: The purpose of this procedure is to determine the concentration of DNA without including the salt contamination.
Notes:
1) First 995 microliters of dsDNA buffer was placed into a microcentrifuge tube.
2) Next 5 microliters of Buffer Reagent was added into the same microcentrifuge tube and then the mixture was gently vortexed.
3) Next 4 tubes (tubes used specifically for QuBit) were obtained. 190 microliters of the mixture created in Step 2, was aspirated using a micropipettor and dispensed into the first tube. (This step was repeated with one other tube)
4) The other remaining tubes were filled with 199 microliters of the mixture.
5) The first two tubes were for the standards that were being prepared so 10 microliters of Standard 1 was aspirated and dispensed into the first tube, then the same was done with Standard 2 for the second tube.
6) Next the last two tubes remaining were used for the last two good DNA samples that were collected. In each tube 1 microliter of the corresponding DNA was placed in the tube.
7) Then all of the tubes were vortexed for about 2-3 seconds and then were left to sit for 2 minutes at room temperature.
8) Finally the concentration of each sample was determined using the QuBit, right after the two standards were loaded.
Results:
The concentration of DNA was determined and the results are shown below:
Sample 1 – 9.12 ng/µL
Sample 2 – 19.1 ng/µL
With the concentrations of DNA, we calculated the amount of DNA to use to see if we had enough DNA to proceed to the gel electrophoresis.

Sample 1 – 54.82 µL of DNA
Sample 2 – 26.17 µL of DNA
Conclusions & Next Steps:
The next step is to combine all of our DNA samples collected except for Sample 3 and reprecipitate them.
Title: Reprecipitation of DNA Samples
Date: 11/9/2020 Redo: Yes
Purpose: The purpose of this procedure is to combine all of the DNA samples collected and determine their concentration in order to run a gel
Notes:
1) First DNA samples were obtained from the freezer except for Sample 3.
2) The DNA from samples 1, 2 , 4, and 5 were combined into a clean microcentrifuge tube. The amount of DNA collected was determined using a micropipettor. The combined amount of DNA was 114.4 microliters of DNA. (The DNA was centrifuged for about 1 minute to make sure all of the DNA was mixed and towards the bottom of the tube).
3) Then 11.44 microliters of Potassium Acetate was added to the tube. This was determined by multiply the amount of DNA by 10%.
4) Next 2.2 microliters of ethanol was added to the tube as well and then the tube was inverted gently and then placed in the freezer for 1 hour.
5) Afterwards, the tube was taken out of the freezer and centrifuged at room temperature for 20 minutes. (The centrifuge was set to 14,000 rpm or in other words top speed).
6) The ethanol was poured out of the tube.
7) Next 250 microliters of 70% ethanol was added to the tube. Then the tube was centrifuge for about 1 minute at top speed.
8) Then the supernatant was discarded so the pellets could be washed again with 250 microliters of 70% ethanol.
9) The supernatant was removed again and then the tube was left to sit in a heat block so the pellets could dry.
10) Afterwards the pellets were submerged in 50 microliters of distilled water.
11) The concentration of the DNA was then determined using the Nanodrop.
Results:
The Nanodrop reading image wasn’t taken however the numbers were memorized
Nanodrop Reading:
A260/A280 : 1.86
A260/A230 : 0.82
Concentration: 70.2 ng/µl
The Nanodrop reading wasn’t great but we still used it for the next step
Conclusions & Next Steps:
The next step is to do another Restriction Enzyme Digest
Title: DNA Extraction- Day One
Date: 11/11/2020 Redo: Yes
Purpose: This procedure is to extract DNA from the phage sample.
Notes:
1) 5 mL of the High Volume Lysate was aliquoted into a 15 mL conical tube. Then 20 microliters of33nuclease-free water was added to the conical tube.
2) Tube was inverted for about 30 seconds and then placed in the incubator for about 10 minutes at 37°C.
3) Then 5 microcentrifuge tubes were obtained and 1 mL of the lysate from the conical tube was aliquoted into each of the tubes.
4) 20 microliters of Zinc Chloride was added to each tube using a p200 micropipettor, and then the tube was inverted gently and then placed in the incubator for 5 minutes at 37°C. This process results in the phage to be precipitated.
5) The tubes were centrifuged at 10,000 rpm for 1 minute to help pellet the phage.
The next few steps were done very quickly
6) After the tubes were taken out of the incubator, supernatants were removed by aspiration. The tips were discarded into a waste container.
7) Pellets were resuspended in 500 microliters of TES buffer per tube. The tubes were then incubated at 60°C for 15 minutes. This process helps to denature the capsids.
(The resuspension wasn’t done correctly, however, the procedure proceeded and if the results are negative this is the cause for incorrect values shown in the Nanodrop reading)
8) 1 microliter of Proteinase K was added to each tube using a micropipette and mixed gently. The tubes were then placed in the incubator for 10 minutes at 37°C.
9) 60 microliters of potassium acetate was added to each tube. The mixture was mixed well and then placed in ice for 15 minutes. A white cloudy precipitate formed which was the capsids.
10) The tubes were then centrifuged at 4°C for 1 min at 12,000 rpm. This process helped pellet the capsids.
11) The supernatants from the tubes were placed into 5 clean microcentrifuge tubes and the tubes containing the pellets were discarded.
12) 500 microliters of isopropanol were added to the tubes which contained the supernatant and the tubes were mixed gently and left overnight on ice.
Results:
The results will be further discussed in Day Two after the Nanodrop has been used.
Conclusions and Next Steps:
The next step is to proceed to Day 2 of the DNA Extraction.
Title: DNA Extraction-Day Two
Date: 11/12/2020 Redo: Yes
Purpose: This procedure is to extract the DNA from the phage samples.
Notes:
1) The 5 tubes were centrifuged again at top speed for 10 minutes to pellet the DNA. The supernatant was discarded into a waste container.
2) 250 microliters of 70% ethanol was added into each of the tubes and then centrifuged again for 1 minute at top speed. The supernatants were then discarded into a waste container.
3) The DNA pellets were then dried at room temperature on a paper towel for an hour then they were placed into heat block at 37°C for about another hour.
4) The pellets were then resuspended in 50 microliters of nuclease-free water. Then using a micropipettor the liquid was aspirated and dispensed into the next microcentrifuge tube to resuspend the pellets in that tube. (This step was repeated until the tube with the least pellets was resuspended using the same nuclease-free water)
5) Then using the Nanodrop the DNA concentration and purity was checked.
Results:
The results were positive and the Nanodrop readings were close to 1.8 and 2.
A260/A280 : 2.10
A260/A230 : 1.99
Concentration: 2119.7 ng/µl

Conclusions & Next Steps:
The next step is to do a quick restriction enzyme digest and gel electrophoresis.
Characterization
Title: Restriction Enzyme Digest
Date: 10/7/2020 Redo: No
Purpose: The purpose is to cut the genome of the phage into multiple fragments based on its DNA sequence.
Notes:
1) The DNA sample used in the last procedure of the DNA Extraction was taken out of the freezer and vortexed at a very low speed.
2) The tube was then placed into a heat block at 65°C for 10 minutes then immediately placed on ice.
3) The tube was then centrifuged for one minute in order to move all of the liquid to the bottom of the tube.
4) The volume to make 0.5 µg of DNA was calculated using the concentration and the following formula below:
0.5µg (mL/219.5µg)(1000µL/1mL) = 2.28 µL
Notice: Instead of using 2.28 µL the number was rounded down to 2.25 µL of DNA
5) Next, all of the restriction enzymes were gathered from the freezer and 5 microcentrifuge tubes were labeled Uncut, HaeIII, NspI, SacII, and SalI.
6) Then the following were added to each tube:
Uncut:
*20.25 µL of Nuclease Free Water
*2.25 µL of DNA
*2.5 µL of 10X TBE Buffer
Remaining 4 Tubes:
*19.75 µL of Nuclease Free Water
*2.25 µL of DNA
*2.5 µL of 10X TBE Buffer
*0.5 µL of the Restriction Enzyme that corresponds with the microcentrifuge tube the liquid
is being added to.
7) The tubes were then quickly spun for about 1 minute in order to get all of the liquid to move to the bottom of the tube. Shortly after, the tubes were placed in the incubator for an hour.
8) The tubes were then spun again for 1 minute and then placed into the freezer until it was time to cast the gel that evening.
Results:
The results will be discussed when the gel electrophoresis has been done.
Conclusions and Next Steps:
The next step is to cast the gel and start the gel electrophoresis.
Title: Casting Agarose Gel
Date: 10/7/2020 Redo: No
Purpose: This procedure is to cast an agarose gel for electrophoresis
Notes:
1) Calculations were done in order to determine how to get 40 mL of 0.8% agarose gel. The following calculations are shown below.
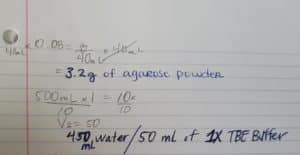
2) After that 3.2 grams of agarose powder was weighed out and placed into an erlenmeyer flask.
3) A larger graduated cylinder was obtained and filled with approximately 450 mL of water and 50 mL of 10X TBE Buffer. (Parafilm was placed over the top of the graduated cylinder in order to mix the solution by inverting it to get 1X TBE Buffer)
4) Then 40 mL of the 1X TBE Buffer was placed into the erlenmeyer flask with the agarose powder and then microwaved until the solution was clear without seeing what looked like crystals forming in the solution.
5) Ethidium Bromide was then added to the solution while it was cooling.
6) The gel was then poured into the gel apparatus with the comb already in position.
7) Next, the comb was taken out after the gel cooled completely. Also the gel platform was pulled up and then turned so that the wells would be on the same end as the cathode (-).
8) Lastly the 1X TBE Buffer was poured into the gel apparatus until the buffer was about 1/4 of an inch above the gel.
Results:
The gel apparatus was set up correctly and the results will be further discussed in the next protocol titled gel electrophoresis.
Conclusions and Next Steps:
The next step is to proceed with the gel electrophoresis and view the results.
Title: Gel Electrophoresis of Restriction Enzyme Digest
Date: 10/7/2020 Redo: No
Purpose: This procedure is to separate DNA fragments via agarose gel electrophoresis
Notes:
1) 5 µL of 6X Loading Dye was added to each of the microcentrifuge tubes from the restriction enzyme digest.
2) The samples were then placed in a heat block at 65°C for 5 minutes. Immediately after the tubes were placed on ice to cool then centrifuged for 15 seconds.
3) Next, the ladder was created using the following ingredients:
Ladder:
20.25 µL of Nuclease Free Water
2.25 µL of 6X Loading Dye
2.5 µL of HindIII
4) Afterwards the wells were loaded using a p200 micropipettor. Each well was filled with 20 µL of the sample that corresponded with the well. In the image below it shows the order of the restriction enzymes and what well they were in.
5) The electrodes were plugged in and the power supply was set to 100 V and the gel electrophoresis ran for about 40 minutes.
6) After the 40 minutes ended the gel was taken out and immediately observed using Ultra Violet light.
Results:
The results were negative and the only lane that consisted of bands was the lane that had the ladder.

Conclusions and Next Steps:
The next step is to do the restriction enzyme digest again in order to prepare another gel electrophoresis.
Title: Restriction Enzyme Digest
Date: 10/9/2020 Redo: Yes
Purpose: The purpose is to cut the genome of the phage into multiple fragments based on its DNA sequence.
Notes:
1) The DNA sample used in the first restriction enzyme digest was taken out of the freezer and vortexed at a very low speed.
The DNA used has the following Nanodrop readings:
A260/A280: 1.92
A260/A230: 1.36
Concentration: 219.5 ng/μl
2) The tube was then placed into a heat block at 65°C for 10 minutes then immediately placed on ice.
3) The tube was then centrifuged for one minute in order to move all of the liquid to the bottom of the tube.
4) The volume to make 0.5 µg of DNA was calculated using the concentration and the following formula below:
0.5µg (mL/219.5µg)(1000µL/1mL) = 2.28 µL
Notice: Instead of rounding like in the first restriction enzyme digest we used the microliters in the above equation.
5) Next, all of the restriction enzymes were gathered from the freezer and 5 microcentrifuge tubes were labeled Uncut, HaeIII, NspI, SacII, and SalI.
6) Then the following were added to each tube:
Uncut:
*20.22 µL of Nuclease Free Water
*2.28 µL of DNA
*2.5 µL of 10X TBE Buffer
Remaining 4 Tubes:
*19.72 µL of Nuclease Free Water
*2.28 µL of DNA
*2.5 µL of 10X TBE Buffer
*0.5 µL of the Restriction Enzyme that corresponds with the microcentrifuge tube the liquid
is being added to.
7) The tubes were then quickly spun for about 1 minute in order to get all of the liquid to move to the bottom of the tube. Shortly after, the tubes were placed in the incubator for an hour.
8) The tubes were then spun again for 1 minute and then placed into the freezer over the weekend.
Results:
The results will be discussed when the gel electrophoresis has been done.
Conclusions and Next Steps:
The next step is to cast the gel and start the gel electrophoresis.
Title: Casting Agarose Gel
Date: 10/13/2020 Redo: Yes
Purpose: This procedure is to cast an agarose gel for electrophoresis
Notes:
1) Calculations were done in order to determine how to get 40 mL of 0.8% agarose gel. The following calculations are shown below.
2) After that 3.2 grams of agarose powder was weighed out and placed into an erlenmeyer flask.
3) A larger graduated cylinder was obtained and filled with approximately 450 mL of water and 50 mL of 10X TBE Buffer. (Parafilm was placed over the top of the graduated cylinder in order to mix the solution by inverting it to get 1X TBE Buffer)
4) Then 40 mL of the 1X TBE Buffer was placed into the erlenmeyer flask with the agarose powder and then microwaved until the solution was clear without seeing what looked like crystals forming in the solution.
5) Ethidium Bromide was then added to the solution while it was cooling.
6) The gel was then poured into the gel apparatus with the comb already in position.
7) Next, the comb was taken out after the gel cooled completely. Also the gel platform was pulled up and then turned so that the wells would be on the same end as the cathode (-).
8) Lastly the 1X TBE Buffer was poured into the gel apparatus until the buffer was about 1/4 of an inch above the gel.
Results:
The gel apparatus was set up correctly and the results will be further discussed in the next protocol titled gel electrophoresis.
Conclusions and Next Steps:
The next step is to proceed with the gel electrophoresis and view the results.
Title: Gel Electrophoresis of Restriction Enzyme Digest
Date: 10/13/2020 Redo: Yes
Purpose: This procedure is to separate DNA fragments via agarose gel electrophoresis
Notes:
1) 5 µL of 6X Loading Dye was added to each of the microcentrifuge tubes from the restriction enzyme digest.
2) The samples were then placed in a heat block at 65°C for 5 minutes. Immediately after the tubes were placed on ice to cool then centrifuged for 15 seconds.
3) Next, the ladder was created using the following ingredients:
Ladder:
20.25 µL of Nuclease Free Water
2.25 µL of 6X Loading Dye
2.5 µL of HindIII
4) Afterwards the wells were loaded using a p200 micropipettor. Each well was filled with 20 µL of the sample that corresponded with the well. In the image below it shows the order of the restriction enzymes and what well they were in.
5) The electrodes were plugged in and the power supply was set to 100 V and the gel electrophoresis ran for about 40 minutes.
6) After the 40 minutes ended the gel was taken out and immediately observed using Ultra Violet light.
Results:
The results were negative and the only lane that consisted of bands was the lane that had the ladder.

Conclusions and Next Steps:
The next step is to redo our DNA Extraction.
Title: Restriction Enzyme Digest
Date: 10/16/2020 Redo: Yes
Purpose: The purpose is to cut the genome of the phage into multiple fragments based on its DNA sequence.
Notes:
1) The DNA sample used in the first restriction enzyme digest was taken out of the freezer and vortexed at a very low speed.
The DNA used has the following Nanodrop readings:
A260/A280: 1.92
A260/A230: 1.36
Concentration: 219.5 ng/μl
2) The tube was then placed into a heat block at 65°C for 10 minutes then immediately placed on ice.
3) The tube was then centrifuged for one minute in order to move all of the liquid to the bottom of the tube.
4) The volume to make 0.5 µg of DNA was calculated using the concentration and the following formula below:
0.5µg (mL/219.5µg)(1000µL/1mL) = 2.28 µL
Notice: Instead of rounding like in the first restriction enzyme digest we used the microliters in the above equation.
5) Next, all of the restriction enzymes were gathered from the freezer and 5 microcentrifuge tubes were labeled Uncut, HaeIII, NspI, SacII, and SalI.
6) Then the following were added to each tube:
Uncut:
*20.22 µL of Nuclease Free Water
*2.28 µL of DNA
*2.5 µL of 10X TBE Buffer
Remaining 4 Tubes:
*19.72 µL of Nuclease Free Water
*2.28 µL of DNA
*2.5 µL of 10X TBE Buffer
*0.5 µL of the Restriction Enzyme that corresponds with the microcentrifuge tube the liquid
is being added to.
7) The tubes were then quickly spun for about 1 minute in order to get all of the liquid to move to the bottom of the tube. Shortly after, the tubes were placed in the incubator for an hour.
8) The tubes were then spun again for 1 minute and then placed into the freezer over the weekend.
Results:
The results will be discussed when the gel electrophoresis has been done.
Conclusions and Next Steps:
The next step is to cast the gel and start the gel electrophoresis.
Title: Casting Agarose Gel
Date: 10/19/2020 Redo: Yes
Purpose: This procedure is to cast an agarose gel for electrophoresis
Notes:
1) Calculations were done in order to determine how to get 40 mL of 0.8% agarose gel. The following calculations are shown below.
2) After that 3.2 grams of agarose powder was weighed out and placed into an Erlenmeyer flask.
3) A larger graduated cylinder was obtained and filled with approximately 450 mL of water and 50 mL of 10X TBE Buffer. (Parafilm was placed over the top of the graduated cylinder in order to mix the solution by inverting it to get 1X TBE Buffer)
4) Then 40 mL of the 1X TBE Buffer was placed into the erlenmeyer flask with the agarose powder and then microwaved until the solution was clear without seeing what looked like crystals forming in the solution.
5) Ethidium Bromide was then added to the solution while it was cooling.
6) The gel was then poured into the gel apparatus with the comb already in position.
7) Next, the comb was taken out after the gel cooled completely. Also, the gel platform was pulled up and then turned so that the wells would be on the same end as the cathode (-).
8) Lastly the 1X TBE Buffer was poured into the gel apparatus until the buffer was about 1/4 of an inch above the gel.
Results:
The gel apparatus was set up correctly and the results will be further discussed in the next protocol titled gel electrophoresis.
Conclusions and Next Steps:
The next step is to proceed with the gel electrophoresis and view the results.
Title: Gel Electrophoresis of Restriction Enzyme Digest
Date: 10/19/2020 Redo: Yes
Purpose: This procedure is to separate DNA fragments via agarose gel electrophoresis
Notes:
1) 5 µL of 6X Loading Dye was added to each of the microcentrifuge tubes from the restriction enzyme digest.
2) The samples were then placed in a heat block at 65°C for 5 minutes. Immediately after the tubes were placed on ice to cool then centrifuged for 15 seconds.
3) Next, the ladder was created using the following ingredients:
Ladder:
20.25 µL of Nuclease Free Water
2.25 µL of 6X Loading Dye
2.5 µL of HindIII
4) Afterwards the wells were loaded using a p200 micropipettor. Each well was filled with 20 µL of the sample that corresponded with the well. In the image below it shows the order of the restriction enzymes and what well they were in.
5) The electrodes were plugged in and the power supply was set to 100 V and the gel electrophoresis ran for about 40 minutes.
6) After the 40 minutes ended the gel was taken out and immediately observed using Ultra Violet light.
Results:
The results were negative and the only lane that consisted of bands was the lane that had the ladder.

Conclusions and Next Steps:
The next step is to redo our DNA Extraction.
Title: Restriction Enzyme Digest
Date: 10/21/2020 Redo: Yes
Purpose: The purpose is to cut the genome of the phage into multiple fragments based on its DNA sequence.
Notes:
1) The DNA sample was taken out of the freezer and vortexed at a very low speed.
The DNA used has the following Nanodrop readings:
A260/A280: 2.01
A260/A230: 1.68
Concentration: 362.8 ng/μl
2) The tube was then placed into a heat block at 65°C for 10 minutes then immediately placed on ice.
3) The tube was then centrifuged for one minute in order to move all of the liquid to the bottom of the tube.
4) Instead of calculating the volume needed for the gel electrophoresis, we just used 5µL of DNA for the restriction enzyme digest and from there the amount of nuclease-free water was determined.
5) Next, all of the restriction enzymes were gathered from the freezer, and 5 microcentrifuge tubes were labeled Uncut, HaeIII, NspI, SacII, and SalI.
6) Then the following were added to each tube:
Uncut:
*20 µL of Nuclease Free Water
*5 µL of DNA
Tubes with HaeIII, NspI, & SacII:
*17 µL of Nuclease Free Water
*5 µL of DNA
*2.5 µL of CutSmart Buffer
*0.5 µL of the Restriction Enzyme that corresponds with the microcentrifuge tube the liquid
is being added to.
Tube with SalI:
*17 µL of Nuclease Free Water
*5 µL of DNA
*2.5 µL of 3.1 Buffer
*0.5 µL of the Restriction Enzyme
(This time the correct buffer was used in the restriction enzymes and may have resulted in a positive result in the gel electrophoresis. Also we made a mistake in previous restriction enzyme digest by adding buffer to the Uncut so this time we didn’t add buffer)
7) The tubes were then quickly spun for about 1 minute in order to get all of the liquid to move to the bottom of the tube. Shortly after, the tubes were placed in the incubator for an hour.
8) The tubes were then spun again for 1 minute and then placed into the freezer over the weekend.
Results:
The results will be discussed when the gel electrophoresis has been done.
Conclusions and Next Steps:
The next step is to cast the gel and start the gel electrophoresis.
Title: Casting Agarose Gel
Date: 10/22/2020 Redo: Yes
Purpose: This procedure is to cast an agarose gel for electrophoresis
Notes:
1) Calculations were done in order to determine how to get 40 mL of 0.8% agarose gel. The following calculations are shown below.
2) After that 3.2 grams of agarose powder was weighed out and placed into an erlenmeyer flask.
3) A larger graduated cylinder was obtained and filled with approximately 450 mL of water and 50 mL of 10X TBE Buffer. (Parafilm was placed over the top of the graduated cylinder in order to mix the solution by inverting it to get 1X TBE Buffer)
4) Then 40 mL of the 1X TBE Buffer was placed into the erlenmeyer flask with the agarose powder and then microwaved until the solution was clear without seeing what looked like crystals forming in the solution.
5) Ethidium Bromide was then added to the solution while it was cooling.
6) The gel was then poured into the gel apparatus with the comb already in position.
7) Next, the comb was taken out after the gel cooled completely. Also, the gel platform was pulled up and then turned so that the wells would be on the same end as the cathode (-).
8) Lastly the 1X TBE Buffer was poured into the gel apparatus until the buffer was about 1/4 of an inch above the gel.
Results:
The gel apparatus was set up correctly and the results will be further discussed in the next protocol titled gel electrophoresis.
Conclusions and Next Steps:
The next step is to proceed with the gel electrophoresis and view the results.
Title: Gel Electrophoresis of Restriction Enzyme Digest
Date: 10/22/2020 Redo: Yes
Purpose: This procedure is to separate DNA fragments via agarose gel electrophoresis
Notes:
1) 5 µL of 6X Loading Dye was added to each of the microcentrifuge tubes from the restriction enzyme digest.
2) The samples were then placed in a heat block at 65°C for 5 minutes. Immediately after the tubes were placed on ice to cool then centrifuged for 15 seconds.
3) Next, the ladder was created using the following ingredients:
Ladder:
20.25 µL of Nuclease Free Water
2.25 µL of 6X Loading Dye
2.5 µL of HindIII
4) Afterwards the wells were loaded using a p200 micropipettor. Each well was filled with 20 µL of the sample that corresponded with the well. In the image below it shows the order of the restriction enzymes and what well they were in.
5) The electrodes were plugged in and the power supply was set to 100 V and the gel electrophoresis ran for about 40 minutes.
6) After the 40 minutes ended the gel was taken out and immediately observed using Ultra Violet light.
7) The bands were very faded so the gel was re-stained using a mix of ethidium bromide and the buffer used in the gel apparatus. The gel was swirled in the mixture for about 5 minutes
8) The gel was taken out and the mix was disposed, then the remaining buffer was placed in the bowl with the gel and swirled again for an additional 10 minutes. Then the gel was viewed again under Ultra Violet light.
Results:
The results were negative, however bands were visible, indicating more DNA needs to be used.
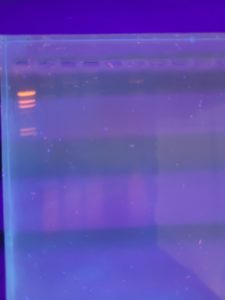
Conclusions and Next Steps:
The next step is to redo our DNA Extraction so we don’t run out of DNA.
Title: Restriction Enzyme Digest
Date: 11/10/2020 Redo: Yes
Purpose: The purpose is to cut the genome of the phage into multiple fragments based on its DNA sequence.
Notes:
1) The DNA sample was taken out of the freezer and vortexed at a very low speed.
The DNA used has the following Nanodrop readings:
A260/A280: 1.86
A260/A230: 0.82
Concentration: 70.2 ng/μl
2) The tube was then placed into a heat block at 65°C for 10 minutes then immediately placed on ice.
3) The tube was then centrifuged for one minute in order to move all of the liquid to the bottom of the tube.
4) Instead of calculating the volume needed for the gel electrophoresis, we just used 5µL of DNA for the restriction enzyme digest and from there the amount of nuclease-free water was determined.
5) Next, all of the restriction enzymes were gathered from the freezer, and 5 microcentrifuge tubes were labeled Uncut, HaeIII, NspI, SacII, and SalI.
6) Then the following were added to each tube:
Uncut:
*11 µL of Nuclease Free Water
*9 µL of DNA
Tubes with HaeIII, NspI, & SacII:
*13 µL of Nuclease Free Water
*9 µL of DNA
*2.5 µL of CutSmart Buffer
*0.5 µL of the Restriction Enzyme that corresponds with the microcentrifuge tube the liquid
is being added to.
Tube with SalI:
*13 µL of Nuclease Free Water
*9 µL of DNA
*2.5 µL of 3.1 Buffer
*0.5 µL of the Restriction Enzyme
7) The tubes were then quickly spun for about 1 minute in order to get all of the liquid to move to the bottom of the tube. Shortly after, the tubes were placed in the incubator for an hour.
8) The tubes were then spun again for 1 minute and then placed into the freezer over the weekend.
Results:
The results will be discussed when the gel electrophoresis has been done.
Conclusions and Next Steps:
The next step is to cast the gel and start the gel electrophoresis.
Title: Casting Agarose Gel
Date: 10/11/2020 Redo: Yes
Purpose: This procedure is to cast an agarose gel for electrophoresis
Notes:
1) Calculations were done in order to determine how to get 40 mL of 0.8% agarose gel. The following calculations are shown below.
2) After that 3.2 grams of agarose powder was weighed out and placed into an erlenmeyer flask.
3) A larger graduated cylinder was obtained and filled with approximately 450 mL of water and 50 mL of 10X TBE Buffer. (Parafilm was placed over the top of the graduated cylinder in order to mix the solution by inverting it to get 1X TBE Buffer)
4) Then 40 mL of the 1X TBE Buffer was placed into the erlenmeyer flask with the agarose powder and then microwaved until the solution was clear without seeing what looked like crystals forming in the solution.
5) Ethidium Bromide was then added to the solution while it was cooling.
6) The gel was then poured into the gel apparatus with the comb already in position.
7) Next, the comb was taken out after the gel cooled completely. Also, the gel platform was pulled up and then turned so that the wells would be on the same end as the cathode (-).
8) Lastly the 1X TBE Buffer was poured into the gel apparatus until the buffer was about 1/4 of an inch above the gel.
Results:
The gel apparatus was set up correctly and the results will be further discussed in the next protocol titled gel electrophoresis.
Conclusions and Next Steps:
The next step is to proceed with the gel electrophoresis and view the results.
Title: Gel Electrophoresis of Restriction Enzyme Digest
Date: 11/11/2020 Redo: Yes
Purpose: This procedure is to separate DNA fragments via agarose gel electrophoresis
Notes:
1) 5 µL of 6X Loading Dye was added to each of the microcentrifuge tubes from the restriction enzyme digest.
2) The samples were then placed in a heat block at 65°C for 5 minutes. Immediately after the tubes were placed on ice to cool then centrifuged for 15 seconds.
3) Next, the ladder was created using the following ingredients:
Ladder:
20.25 µL of Nuclease Free Water
2.25 µL of 6X Loading Dye
2.5 µL of HindIII
4) Afterwards the wells were loaded using a p200 micropipettor. Each well was filled with 20 µL of the sample that corresponded with the well. In the image below it shows the order of the restriction enzymes and what well they were in.
5) The electrodes were plugged in and the power supply was set to 100 V and the gel electrophoresis ran for about 40 minutes.
6) After the 40 minutes ended the gel was taken out and immediately observed using Ultra Violet light.
7) The bands were very faded so the gel was re-stained using a mix of ethidium bromide and the buffer used in the gel apparatus. The gel was swirled in the mixture for about 5 minutes
8) The gel was taken out and the mix was disposed, then the remaining buffer was placed in the bowl with the gel and swirled again for an additional 10 minutes. Then the gel was viewed again under Ultra Violet light.
Results:
The results were negative, however bands the DNA was visible but only near the wells.
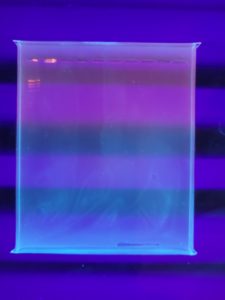
Conclusions and Next Steps:
The next step is to do another DNA Extraction and another Gel Electrophoresis
Title: Restriction Enzyme Digest
Date: 11/23/2020 Redo: Yes
Purpose: The purpose is to cut the genome of the phage into multiple fragments based on its DNA sequence.
Notes:
1) The DNA sample was taken out of the freezer and vortexed at a very low speed.
The DNA used has the following Nanodrop readings:
A260/A280: 2.10
A260/A230: 1.99
Concentration: 2119.7 ng/μl
2) The tube was then placed into a heat block at 65°C for 10 minutes then immediately placed on ice.
3) The tube was then centrifuged for one minute in order to move all of the liquid to the bottom of the tube.
4) A 1:4 dilution was done using the following calculations for the restriction enzyme digest: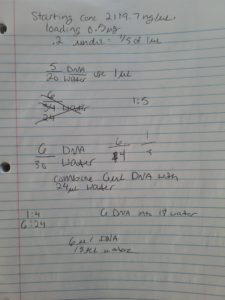
6 microliters was combined with 18 microliters of nuclease free water
5) Next, all of the restriction enzymes were gathered from the freezer, and 5 microcentrifuge tubes were labeled Uncut, HaeIII, NspI, SacII, and SalI.
6) Then the following were added to each tube:
Uncut:
*24 µL of Nuclease Free Water
*1 µL of DNA
Tubes with HaeIII, NspI, & SacII:
* 21µL of Nuclease Free Water
*1 µL of DNA
*2.5 µL of CutSmart Buffer
*0.5 µL of the Restriction Enzyme that corresponds with the microcentrifuge tube the liquid
is being added to.
Tube with SalI:
*21 µL of Nuclease Free Water
*1 µL of DNA
*2.5 µL of 3.1 Buffer
*0.5 µL of the Restriction Enzyme
7) The tubes were then quickly spun for about 1 minute in order to get all of the liquid to move to the bottom of the tube. Shortly after, the tubes were placed in the incubator for an hour.
8) The tubes were then spun again for 1 minute and then placed into the freezer over the weekend.
Results:
The results will be discussed when the gel electrophoresis has been done.
Conclusions and Next Steps:
The next step is to cast the gel and start the gel electrophoresis.
Title: Casting Agarose Gel
Date: 11/23/2020 Redo: Yes
Purpose: This procedure is to cast an agarose gel for electrophoresis
Notes:
1) Calculations were done in order to determine how to get 40 mL of 0.8% agarose gel. The following calculations are shown below.
2) After that 3.2 grams of agarose powder was weighed out and placed into an erlenmeyer flask.
3) A larger graduated cylinder was obtained and filled with approximately 450 mL of water and 50 mL of 10X TBE Buffer. (Parafilm was placed over the top of the graduated cylinder in order to mix the solution by inverting it to get 1X TBE Buffer)
4) Then 40 mL of the 1X TBE Buffer was placed into the erlenmeyer flask with the agarose powder and then microwaved until the solution was clear without seeing what looked like crystals forming in the solution.
5) Ethidium Bromide was then added to the solution while it was cooling.
6) The gel was then poured into the gel apparatus with the comb already in position.
7) Next, the comb was taken out after the gel cooled completely. Also, the gel platform was pulled up and then turned so that the wells would be on the same end as the cathode (-).
8) Lastly the 1X TBE Buffer was poured into the gel apparatus until the buffer was about 1/4 of an inch above the gel.
Results:
The gel apparatus was set up correctly and the results will be further discussed in the next protocol titled gel electrophoresis.
Conclusions and Next Steps:
The next step is to proceed with the gel electrophoresis and view the results.
Title: Gel Electrophoresis of Restriction Enzyme Digest
Date: 11/23/2020 Redo: Yes
Purpose: This procedure is to separate DNA fragments via agarose gel electrophoresis
Notes:
1) 5 µL of 6X Loading Dye was added to each of the microcentrifuge tubes from the restriction enzyme digest.
2) The samples were then placed in a heat block at 65°C for 5 minutes. Immediately after the tubes were placed on ice to cool then centrifuged for 15 seconds.
3) Next, the ladder was created using the following ingredients:
Ladder:
20.25 µL of Nuclease Free Water
2.25 µL of 6X Loading Dye
2.5 µL of HindIII
4) Afterwards the wells were loaded using a p200 micropipettor. Each well was filled with 20 µL of the sample that corresponded with the well. In the image below it shows the order of the restriction enzymes and what well they were in.
5) The electrodes were plugged in and the power supply was set to 100 V and the gel electrophoresis ran for about 40 minutes.
6) After the 40 minutes ended the gel was taken out and immediately observed using Ultra Violet light.
7) The bands were very faded so the gel was re-stained using a mix of ethidium bromide and the buffer used in the gel apparatus. The gel was swirled in the mixture for about 5 minutes
8) The gel was taken out and the mix was disposed, then the remaining buffer was placed in the bowl with the gel and swirled again for an additional 10 minutes. Then the gel was viewed again under Ultra Violet light.
Results:
The results were negative, and the image wasn’t taken but the only thing that showed up was the ladder.
Conclusions and Next Steps:
We completed our research and our DNA was still sent off to be sequenced.
Directory All Phage Researchers
Directory 2024 Phage Researchers
Directory 2023 Phage Researchers
Directory 2022 Phage Researchers
Directory 2021 Phage Researchers
Directory 2020 Phage Researchers
Directory 2019 Phage Researchers
Directory 2018 Phage Researchers
Directory 2017 Phage Researchers
Directory Research Group
Dr. Dustin Edwards Retrovirus Laboratory Researcher Directory.