Discovery of Balloony
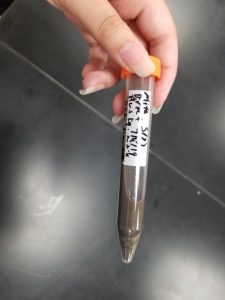
Sample Collection 1
| Collector Name | Abigail Quirl | Abigail Ballard | Jocelyn Hodges |
| Sample No. | 1 | 2 | 3 |
| Date of Collection | 9/2/19 | 9/2/19 | 9/3/19 |
| Sample Type | soil | soil | water |
| General Location | out in the country | forested area near river | Apartment Window |
| Location Description | edge of lawn by ant bed | inside of tree stump | 2-3 week old flower vase |
| GPS Coordinates | latitude: 32.2750 longitude: -98.2923 |
32 50′ 44″ N 97 28′ 18″ W |
latitude: 32.22 longitude: -98.22 |
| Sample Depth | at surface | 2″ below surface | surface level |
| Ambient Temperature | 31.3 degrees celsius | 36.1 degrees celsius | 17.2 degrees celsius |
Sample Collection 2
| Collector Name | Abigail Ballard | Abigail Ballard | Madison Crew |
| Sample No. | 4 | 5 | 6 |
| Date of Collection | 9/17/19 | 9/17/19 | 9/1/19 |
| Sample Type | water | soil | soil |
| General Location | riverbed | riverbed | compost |
| Location Description | still water by riverbed | wet and sandy area | grass field |
| GPS Coordinates |
32 13′ 27″ N
98 11′ 52″ W |
32 13′ 26″ N 98 12′ 01″ W |
latitude: 32.3838 longitude: -98.1665 |
| Sample Depth | 2 cm below surface | 2″ below surface | 10 cm below surface |
| Ambient Temperature | 22.7 degrees celsius | 23.3 degrees celsius | 31 degrees celsius |
Isolation 1
Title: Direct Isolation
Date Started: Sep. 04, 2019 Redo? yes
Purpose: To detect and extract phages from different environmental samples while utilizing specific techniques.
Notes:
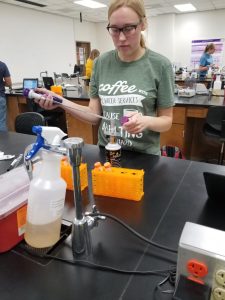
1) First, a workstation was prepared using proper aseptic technique. Then the soil sample collected was placed in a 15 mL conical tube until the tube was approximately half full. After, liquid media was added to submerge the sample before being thoroughly mixed.
2) The tube was then placed in a shaking incubator for approximately an hour at 250 rpm. Then this sample was removed and allowed to settle. A syringe with a filter of 0.22 um was used to remove 2mL of effluent from the tube. Next, 0.5 mL of filtrate was depressed into a labeled micro-centrifuge tube.
3) After, 500 uL of phage sample was dispensed into 250 uL of host bacteria using a micropipettor. The sample was then left undisturbed for approximately 10 minutes.
4) Now the sample required plating by applying approximately 3 mL of top agar to the agar plates. This process was accomplished by using a 5 mL pipette to transfer the top agar to the host tube after inoculation.
5) After aspiration of the sample, the top agar was dispensed and tilted to evenly cover most of the plate. The plate was then left undisturbed for an extended period of time to solidify. Lastly, the plate was inverted and placed in the incubator.
Results:
When results were being checked it was discovered that the plate was accidentally disposed of. Because of this change of events, a new sample will be taken and processed on Monday, Sept. 09, 2019.
Conclusions and Next Steps:
Next we will do another direct isolation on a new sample.
Title: Enriched Isolation
Date Started: Sep. 04, 2019 Redo? no
Purpose: To amplify the concentration of phages present in the sample in preparation for the screening of the enriched culture.
Notes:
1) Monday at 10:00 AM: After an aseptic work area was created and the supplies were assembled, a 50 ml conical tube was filled with Sample 1. In the procedure, it recommended filling the tube to the 15 ml mark: however, not enough sample was collected so the sample reached the 7.5 ml mark. Therefore, only 17.5 ml of liquid media was added, and then the sample was vortexed at 250 rpm for 5 hours.

2) Monday at 4:30 PM: Once coming back into the lab and again preparing with an aseptic work area, the sample was balanced in the centrifuge at 3,000 x g for 10 minutes. Next, the sample was filtered through a .22 micro milliliter vacuum filter to remove unwanted particles. At first, the wrong filter was used with improper syringe technique, so about a milliliter of the sample was lost. The recovered volume was 11.25 ml.
3) Monday at 5:15 PM: 0.5 ml of the bacterial host was added to the conical tube containing the culture. The last step for the day was placing the culture in the incubator. In order to ensure that the culture would be properly aerated, the cap was screwed on one-quarter of a turn and secured with a piece of lab tape. The culture was placed in the incubator at 5:34 PM to remain until 9/9/19.
4) Monday, 9/9/19, at 9:00 AM:
a: After preparing for aseptic work, 1.4 ml of the enriched culture was transferred to 2 separate microcentrifuge tubes so that each had 1.4 ml. Both tubes were then placed into the microcentrifuge for 1 minute at 10,000 speed to pellet the bacteria. Next, the supernatant from each was pipetted into a new microcentrifuge tube while avoiding any bacteria pellet. The microfuge tube was labeled and then we proceeded to the Spot test.
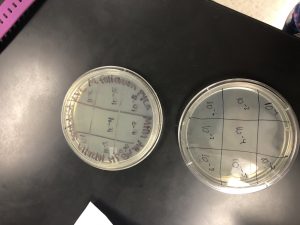
b: To start the Spot test, we labeled the bottom of an agar plate separating it into 3 sections. One section for the control and two sections for the different supernatants. Next, a 250 microliter culture of host bacteria was obtained along with 3 ml of molten top agar. With a sterile 5 ml pipette, 3 ml of the molten top agar was put into the culture tube with the bacteria host and then immediately drawn back into the same pipette. No bubbles ended up being drawn up with it.
c: The top agar-bacteria mixture was placed on the agar plate, and then the plate was tilted to spread the mixture evenly. The plate sat undisturbed for 20 minutes from 10:10-10:30 AM. Then 10 microliters of each sample was aseptically spotted into the properly labeled location on the bacterial lawn. 10 microliters of sterile phage buffer was spotted as a negative control. The liquid was allowed to absorb for 10 minutes and then without inverting placed into the incubator at 10:51 AM to remain until 9/11/19.
Results:
On 9/11/19 we checked the plate. Unfortunately, no clearing was evident. We put parafilm around the plate and disposed of it properly.

Conclusions and Next Steps:
Our data showed only bacterial growth. The circular areas were yellow rather than clear spots where phage would have been evident. Now we will continue the Direct Isolation and then keep trying Direct Isolations until we can successfully isolate phages.
Isolation 2
Title: Direct Isolation
Date Started: Sep. 18, 2019 Redo? yes
Purpose: To detect and extract phages from different environmental samples while utilizing specific techniques.
Notes:
1) First, a workstation was prepared using proper aseptic technique. Then the fifth soil sample collected was placed in a 15 mL conical tube until the tube was 9 mL full. After, 2 mL of liquid media was added to submerge the sample before being thoroughly mixed. The tube was then placed in a shaking incubator for approximately four hours at 250 rpm. Then this sample was removed and allowed to settle.
2) A syringe with a filter of 0.22 um was used to remove 2mL of effluent from the tube. Next, 0.5 mL of filtrate was depressed into a labeled micro-centrifuge tube. After, 500 uL of phage sample was dispensed into 250 uL of host bacteria using a micro pipettor. The sample was then left undisturbed for approximately 10 minutes.
3) Now the sample required plating by applying approximately 3 mL of top agar to the agar plates. This process was accomplished by using a 5 mL pipette to transfer the top agar to the host tube after inoculation.
4) After aspiration of the sample, the top agar was dispensed and tilted to evenly cover most of the plate. The plate was then left undisturbed for an extended period of time to solidify. Lastly, the plate was inverted and placed in the incubator.
Results:
Conclusions and Next Steps:
The fifth sample produced no plaques, so we will now adopt a plaque from another group.
Title: Direct Isolation
Date Started: Sep. 18, 2019 Redo? yes
Purpose: To amplify the concentration of phages present in the sample in preparation for the screening of the enriched culture.
Notes:
1) Monday at 9:00 AM: After an aseptic work area was created and the supplies were assembled, a 50 ml conical tube with the liquid sample 4 was filtered through a .22 micro milliliter filter leaving 0.5 mL in a microcentrifuge tube.
2) After, 500 uL of phage sample was dispensed into 250 uL of host bacteria using a micro pipettor. The sample was then left undisturbed for approximately 10 minutes.
3) Now sample required plating by applying approximately 3 mL of top agar to the agar plates. This process was accomplished by using a 5 mL pipette to transfer the top agar to the host tube after inoculation.
4) After aspiration of the sample, the top agar was dispensed and tilted to evenly cover most of the plate. The plate was then left undisturbed for an extended period of time to solidify. Lastly, the plate was inverted and placed in the incubator.
Results:
Conclusions and Next Steps:
The fourth sample produced no plaques, so we will now continue with the plan to adopt a plaque.
Purification 1
Title: Purification- First serial dilutions
Date Started: Sep. 25, 2019 Redo? no
Purpose: To manipulate the number of phages in a sample to prepare for cloning the phage.
Notes:
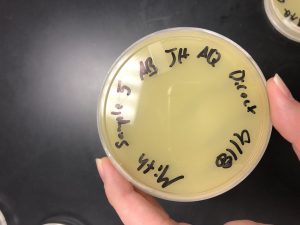
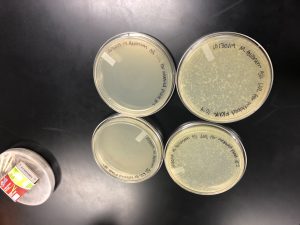
After multiple attempts of direct and enriched isolation, there was no evidence of phage growth. Therefore, we adopted a phage from Madison Crew and designated it sample 6. The plaque was clear and small to medium in size.
1) An aseptic work area was created and the phage we chose was circled in sharpie on the bottom of Madison Crew’s plate. A microcentrifuge tube was filled with 100 micro liters of phage buffer. In order to pick a plaque, a sterile pipette tip was placed on. Holding the pipette perpendicular to the plate the tip was stabbed into the center of the plaque. The tip was then placed into the microcentrifuge tube and tapped to dislodge the phage. The tube was then vortexed.
2) Next, 8 sterile microcentrifuge tubes were collected and labeled 10^-1 etc. all the way to 10^-8. Each tube was filled with 90 micro liters of phage buffer.
3) Then, 10 micro liters of the undiluted phage sample was drawn into a pipette and transferred to the 10^-1 microcentrifuge tube. The 10^-1 tube was vortexed and then a new pipette tip was placed. Next, 10 micro liters of 10^-1 solution was drawn and placed in 10^-2 tube and vortexed. A new pipette tip was placed. This process was repeated until there were 10^-8 diluted samples.
Results:
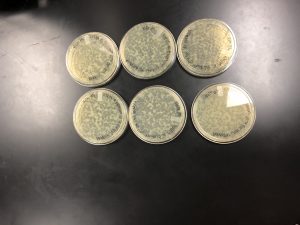
This is Madi’s plate from who we adopted our phage.
Conclusions and Next Steps:
The next step is using the plaque assay protocol to plate each serial dilution.
Title: Purification- Plaque assay
Date Started: Sep. 25, 2019 Redo? no
Purpose: To detect the presence of phages in the sample in order to pick a plaque for second serial dilution.
Notes:
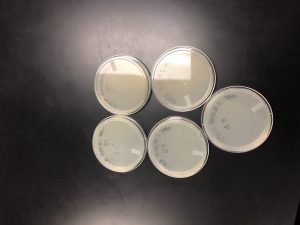
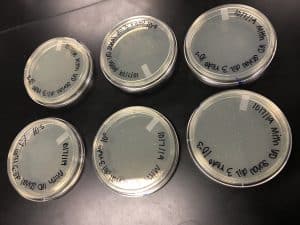
1) After finishing the serial dilutions of the adopted phage from sample 6 , 10 micro liters of each serial dilution was inoculated with 250 micro liters of host bacteria.
2) Next, 8 agar plates were labeled appropriately designating 10^-1, 10^-2, etc all the way to 10^-8. Each host bacteria and serial dilution mixture was mixed with 3 mL of molten top agar, immediately withdrawn back into the pipette, and then transferred onto the correct plate. A new pipette was used for each plate.
3) Each plate was allowed to sit undisturbed for 30 minutes and then inverted and placed into the incubator at 10:30 AM to remain for 48 hours.
Results:

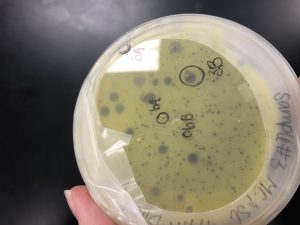
On 9/27/19 the plates were pulled from the incubator. It was evident the phages lysed the bacteria, so the first serial dilution was a success. The plates were para filmed and placed in the fridge.
Conclusions and Next Steps:
The next step is to complete the second serial dilution to see if the phage morphologies are consistent.
Purification 2
Title: Purification- Second serial dilutions
Date Started: Sep. 30, 2019 Redo? no
Purpose: To manipulate the number of phages in a sample to prepare for cloning the phage.
Notes:
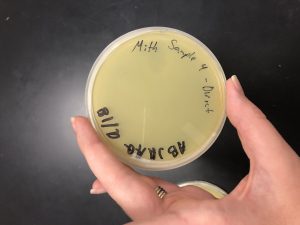
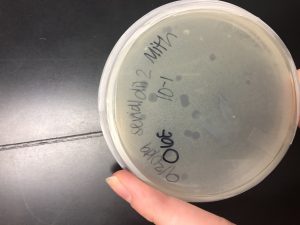
After the first round of serial dilutions, a plaque was picked from the 10^-5 plate and labeled 6B. The plaque was clear and medium in size.
1) An aseptic work area was created and the phage we chose was circled in sharpie on the bottom of the 10^-5 plate. A microcentrifuge tube was filled with 100 micro liters of phage buffer. In order to pick a plaque, a sterile pipette tip was placed on. Holding the pipette perpendicular to the plate the tip was stabbed into the center of the plaque. The tip was then placed into the microcentrifuge tube and tapped to dislodge the phage. The tube was then vortexed.
2) Next, 5 sterile microcentrifuge tubes were collected and labeled 10^-1 etc. all the way to 10^-5. Each tube was filled with 90 micro liters of phage buffer.
3) Then, 10 micro liters of the undiluted phage sample was drawn into a pipette and transferred to the 10^-1 microcentrifuge tube. The 10^-1 tube was vortexed and then a new pipette tip was placed. Next, 10 micro liters of 10^-1 solution was drawn and placed in 10^-2 tube and vortexed. A new pipette tip was placed. This process was repeated until there were 10^-5 diluted samples.
Results:
This is the 10^-5 plate we chose our plaque from for the second serial dilution.
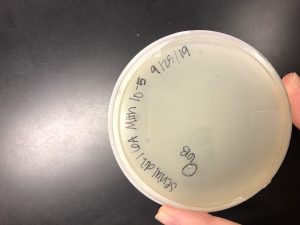
Conclusions and Next Steps:
The next step is using the plaque assay protocol to plate each of the second serial dilutions.
Title: Purification- Plaque assay for second serial dilutions
Date Started: Sep. 30, 2019 Redo? no
Purpose: To purify the phage in the sample in order to prepare for flooding and webbing the chosen plate.
Notes:
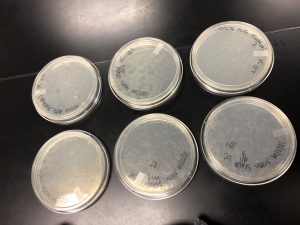
1) After finishing the second round of serial dilutions for 6B, 10 micro liters of each serial dilution was inoculated with 250 micro liters of host bacteria.
2) Next, 5 agar plates were labeled appropriately designating 10^-1, 10^-2, etc. Each host bacteria and serial dilution mixture was mixed with 3 mL of molten top agar, immediately withdrawn back into the pipette, and then transferred onto the correct plate. A new pipette was used for each plate.
3) Each plate was allowed to sit undisturbed for 20 minutes and then inverted and placed into the incubator at 10:22 AM to remain for 24 hours.
Results:
On 10/1/19 the plates were pulled from the incubator.
Conclusions and Next Steps:
After observing the plates, they were not concentrated enough. Therefore, another round of serial dilutions will be done.
Purification 3
Title: Purification- Third serial dilutions
Date Started: October 2, 2019 Redo? no
Purpose: To manipulate the number of phages in a sample to prepare for cloning the phage.
Notes:
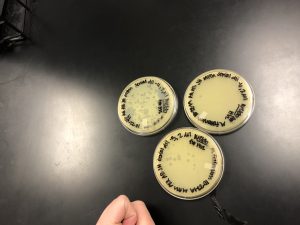
After the second round of serial dilutions, a plaque was picked from the 10^-2 plate and labeled 6C. The plaque was clear and medium in size.
1) An aseptic work area was created and the phage we chose was circled in sharpie on the bottom of the 10^-2 plate. A microcentrifuge tube was filled with 100 micro liters of phage buffer. In order to pick a plaque, a sterile pipette tip was placed on. Holding the pipette perpendicular to the plate the tip was stabbed into the center of the plaque. The tip was then placed into the microcentrifuge tube and tapped to dislodge the phage. The tube was then vortexed.
2) Next, 5 sterile microcentrifuge tubes were collected and labeled 10^-1 etc. all the way to 10^-5. Each tube was filled with 90 micro liters of phage buffer.
3) Then, 10 micro liters of the undiluted phage sample was drawn into a pipette and transferred to the 10^-1 microcentrifuge tube. The 10^-1 tube was vortexed and then a new pipette tip was placed. Next, 10 micro liters of 10^-1 solution was drawn and placed in 10^-2 tube and vortexed. A new pipette tip was placed. This process was repeated until there were 10^-5 diluted samples.
Results:
This is the 10^-2 plate we chose our plaque from for the third serial dilution.

Conclusions and Next Steps:
The next step is using the plaque assay protocol to plate each of the third serial dilutions.
Title: Purification- Plaque assay for third serial dilutions
Date Started: October 2, 2019 Redo? no
Purpose: To purify the phage in the sample in order to prepare for flooding and webbing the chosen plate.
Notes:
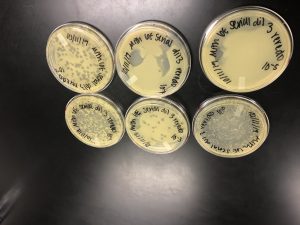
1) After finishing the third round of serial dilutions for 6C, 10 micro liters of each serial dilution and the undiluted sample was inoculated with 250 micro liters of host bacteria.
2) Next, 6 agar plates were labeled appropriately designating 10^0, 10^-1, 10^-2, etc. Each host bacteria and serial dilution mixture was mixed with 3 mL of molten top agar, immediately withdrawn back into the pipette, and then transferred onto the correct plate. A new pipette was used for each plate.
3) Each plate was allowed to sit undisturbed for 25 minutes and then inverted and placed into the incubator at 10:20 AM to remain for 48 hours.
Results:
On 10/4/19 the plates were pulled from the incubator.
Conclusions and Next Steps:
Somehow the plates got contaminated from within the sleeve, so more serial dilutions will be done on Monday.
Purification 3 redo
Title: Purification- Third serial dilutions redo
Date Started: October 7, 2019 Redo? yes
Purpose: To manipulate the number of phages in a sample to prepare for cloning the phage.
Notes:
After the second round of serial dilutions, a plaque was picked from the 10^-2 plate and labeled 6D. The plaque was clear and medium in size.
1) An aseptic work area was created and the phage we chose was circled in sharpie on the bottom of the 10^-2 plate. A microcentrifuge tube was filled with 100 micro liters of phage buffer. In order to pick a plaque, a sterile pipette tip was placed on. Holding the pipette perpendicular to the plate the tip was stabbed into the center of the plaque. The tip was then placed into the microcentrifuge tube and tapped to dislodge the phage. The tube was then vortexed.
2) Next, 5 sterile microcentrifuge tubes were collected and labeled 10^-1 etc. all the way to 10^-5. Each tube was filled with 90 micro liters of phage buffer.
3) Then, 10 micro liters of the undiluted phage sample was drawn into a pipette and transferred to the 10^-1 microcentrifuge tube. The 10^-1 tube was vortexed and then a new pipette tip was placed. Next, 10 micro liters of 10^-1 solution was drawn and placed in 10^-2 tube and vortexed. A new pipette tip was placed. This process was repeated until there were 10^-5 diluted samples.
Results:
This is the 10^-2 plate we chose our plaque from for the third serial dilution redo.

Conclusions and Next Steps:
The next step is using the plaque assay protocol to plate each of the third serial dilutions.
Title: Purification- Plaque assay for third serial dilutions redo
Date Started: October 7, 2019 Redo? yes
Purpose: To purify the phage in the sample in order to prepare for flooding and webbing the chosen plate.
Notes:
1) After finishing the third round of serial dilutions for 6D, 10 micro liters of each serial dilution and the undiluted sample was inoculated with 250 micro liters of host bacteria.
2) Next, 6 agar plates were labeled appropriately designating 10^0, 10^-1,10^-2, etc. Each host bacteria and serial dilution mixture was mixed with 3 mL of molten top agar, immediately withdrawn back into the pipette, and then transferred onto the correct plate. A new pipette was used for each plate.
3) Each plate was allowed to sit undisturbed for 20 minutes and then inverted and placed into the incubator at 10:10 AM to remain for 48 hours.
Results:
On 10/9/19 the plates were pulled from the incubator.
Conclusions and Next Steps:
There was still no growth due to contamination from an unknown source. Will redo serial dilutions again.
Purification 3 second redo
Title: Purification- Third serial dilutions second redo
Date Started: October 11, 2019 Redo? yes
Purpose: To manipulate the number of phages in a sample to prepare for cloning the phage.
Notes:
After the second round of serial dilutions, a plaque was picked from the 10^-1 plate and labeled 6E. The plaque was clear and medium in size.
1) An aseptic work area was created and the phage we chose was circled in sharpie on the bottom of the 10^-1 plate. A microcentrifuge tube was filled with 100 micro liters of phage buffer. In order to pick a plaque, a sterile pipette tip was placed on. Holding the pipette perpendicular to the plate the tip was stabbed into the center of the plaque. The tip was then placed into the microcentrifuge tube and tapped to dislodge the phage. The tube was then vortexed.
2) Next, 5 sterile microcentrifuge tubes were collected and labeled 10^-1 etc. all the way to 10^-5. Each tube was filled with 90 micro liters of phage buffer.
3) Then, 10 micro liters of the undiluted phage sample was drawn into a pipette and transferred to the 10^-1 microcentrifuge tube. The 10^-1 tube was vortexed and then a new pipette tip was placed. Next, 10 micro liters of 10^-1 solution was drawn and placed in 10^-2 tube and vortexed. A new pipette tip was placed. This process was repeated until there were 10^-5 diluted samples.
Results:
This is the 10^-1 plate we chose our plaque from for the third serial dilution redo.
Conclusions and Next Steps:
The next step is using the plaque assay protocol to plate each of the third serial dilutions.
Title: Purification- Plaque assay for third serial dilutions second redo
Date Started: October 11, 2019 Redo? yes
Purpose: To purify the phage in the sample in order to prepare for flooding and webbing the chosen plate.
Notes:
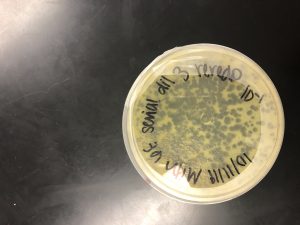
1) After finishing the third round of serial dilutions for 6E, 10 micro liters of each serial dilution and the undiluted sample was inoculated with 250 micro liters of host bacteria.
2) Next, 6 agar plates were labeled appropriately designating 10^0, 10^-1,10^-2, etc. Each host bacteria and serial dilution mixture was mixed with 3 mL of molten top agar, immediately withdrawn back into the pipette, and then transferred onto the correct plate. A new pipette was used for each plate. The molten top agar cooled down too quickly, so it turned clumpy. Before the 10^-5 plate was done, it was allowed to reheat.
3) Each plate was allowed to sit undisturbed for 20 minutes and then inverted and placed into the incubator at 3:45 PM to remain for 24 hours.
Results:
On 10/14/19 the plates were pulled from the incubator.
Conclusions and Next Steps:
The third dilution successfully produced concentrated enough plaques to move on to flooding the plate in preparation for the Full plate titer.
Purification 4
Title: Purification- Flooding webbed plate and full plate titer
Date Started: October 14, 2019 Redo? no
Purpose: The purpose of the flooding is to generate a concentrated volume of lysate. The purpose of the full plate titer is to calculate the total number of phages in the low volume lysate.
Notes:
After the third round of serial dilutions, the 10^-1 plate was chosen to flood for the low volume lysate.
1) 9:40 AM, 10/14/19 The 10^-1 plate was flooded with 8 ml of sterile phage buffer. It sat at room temperature undisturbed for 2 hours and 20 minutes.
12:00 PM, 10/14/19 The flooded plate was tilted by laying it on top of the lid. A 5 ml syringe was used to aspirate the lysate from the plate. Then using a .22 um filter, the lysate was filtered and put into a 50 ml conical tube. A total of 5 ml of low volume lysate was obtained. The low volume lysate was stored in the fridge until serial dilutions could be completed.
2) 9:00 AM, 10/15/19 Next, 8 sterile microcentrifuge tubes were collected and labeled 10^-1 etc. all the way to 10^-8. Each tube was filled with 90 micro liters of phage buffer.
3) Then, 10 micro liters of the low volume lysate was drawn into a pipette and transferred to the 10^-1 microcentrifuge tube. The 10^-1 tube was vortexed and then a new pipette tip was placed. Next, 10 micro liters of 10^-1 solution was drawn and placed in 10^-2 tube and vortexed. A new pipette tip was placed. This process was repeated until there were 10^-8 diluted samples.
4) After finishing the serial dilutions of the low volume lysate, 10 micro liters of each serial dilution was inoculated with 250 micro liters of host bacteria.
5) Next, 8 agar plates were labeled appropriately designating 10^-1,10^-2, etc. Each host bacteria and serial dilution mixture was mixed with 3 mL of molten top agar, immediately withdrawn back into the pipette, and then transferred onto the correct plate. A new pipette was used for each plate.
6) Each plate was allowed to sit undisturbed for 20 minutes and then inverted and placed in the incubator at 5:00 PM on 10/15/19.
Results:

On 10/17/19 the plates were pulled from the incubator.
Conclusions and Next Steps:
Webbed plates were successfully produced. The next step is to do the necessary math to calculate the amount of LVL to produce webbed plates.
Title: Purification- Spot Titer
Date Started: October 18, 2019 Redo? yes
Purpose: To check the new serial dilutions for correct math. This will allow for accurate calculations to produce webbed plates.
Notes:
On 10/18/19, 19 microliters of the serial dilutions from the LVL 10^-4 to 10^-7 were plated. The math was done incorrectly so those plates were invalid.
On 10/20/19, in order to make sure the correct math was done, new serial dilutions were properly labeled and drawn from the LVL. Then they were used to make a spot titer.
1) First, after an aseptic work area was created, 8 microcentrifuge tubes were correctly labeled and filled with 90 microliters of sterile phage buffer.
2) Then, 10 micro liters of the low volume lysate was drawn into a pipette and transferred to the 10^-1 microcentrifuge tube. The 10^-1 tube was vortexed and then a new pipette tip was placed. Next, 10 micro liters of 10^-1 solution was drawn and placed in 10^-2 tube and vortexed. A new pipette tip was placed. This process was repeated until there were 10^-8 diluted samples.
3) Next, an agar plate was correctly labeled and divided into 9 sections. Lastly, 3 microliters of each serial dilution was transferred to the correct position on the plate. The liquid spots absorbed into the plate for 20 minutes and then the plate was inverted and placed in the incubator at 3:00 PM.
As long as the Spot titer ends up being consistent with our data, the LVL will be used for Microscopy.
Results:
On 10/21/19 the plates were pulled from the incubator.
Conclusions and Next Steps:
Due to miscommunication, the inoculation and top agar steps were missed. This caused inappropriate results. A new spot titer will be done today.
Purification 5
Title: Purification- Spot titer and full plate titer
Date Started: October 21, 2019 Redo? yes
Purpose: The purpose of the full plate titer is to calculate the total number of phages in the low volume lysate.
Notes:
1) 9:00 AM, 10/21/19 First, 8 sterile microcentrifuge tubes were collected and labeled 10^-1 etc. all the way to 10^-8. Each tube was filled with 90 micro liters of phage buffer.
3) Then, 10 micro liters of the low volume lysate was drawn into a pipette and transferred to the 10^-1 microcentrifuge tube. The 10^-1 tube was vortexed and then a new pipette tip was placed. Next, 10 micro liters of 10^-1 solution was drawn and placed in 10^-2 tube and vortexed. A new pipette tip was placed. This process was repeated until there were 10^-8 diluted samples.
4) After finishing the serial dilutions of the low volume lysate, 10 micro liters of 10^-4, 10^-5, and 10^-6 serial dilutions were inoculated with 250 micro liters of host bacteria.
5) Next, 3 agar plates were labeled appropriately designating 10^-4,10^-5, etc. Each host bacteria and serial dilution mixture was mixed with 3 mL of molten top agar, immediately withdrawn back into the pipette, and then transferred onto the correct plate. A new pipette was used for each plate.
6) Each plate was allowed to sit undisturbed for 20 minutes and then inverted and placed in the incubator at 10:15 AM on 10/21/19.
Results:

On 10/22/19 the plates were pulled from the incubator.
Conclusions and Next Steps:
New math was done using the 10-6 plate of new serial dilutions. The titer of our LVL ended up being 9.4 * 10^9. The amount of volume and lysate that needs to be plated to produce webbed plates, and therefore HVL, is 2 microliters of 10^-5 dilution. Webbed plates will try to be made today.
Title: Purification- Spot Titer
Date Started: October 21, 2019 Redo? yes
Purpose: To check the new serial dilutions for correct math. This will allow for accurate calculations to move on.
Notes:
The new serial dilutions that were made today were then used for the spot titer.
1) Next, an agar plate was correctly labeled and divided into 9 sections. Lastly, 3 microliters of each serial dilution was transferred to the correct position on the plate as well as 3 microliters of phage buffer for the negative control. The liquid spots absorbed into the plate for 20 minutes and then the plate was inverted and placed in the incubator at 10:15 AM.
As long as the new Spot titer ends up being consistent with our data, the LVL can be used for microscopy.
Results:
On 10/22/19 the plates were pulled from the incubator.
Conclusions and Next Steps:
Now, the math can be used to create webbed plates to collect HVL. Once this is evidently checked, the phage is ready for microscopy!
Purification 6
Title: Purification- Full plate titer
Date Started: October 30, 2019 Redo? yes
Purpose: The purpose of the full plate titer is to calculate the total number of phages in the low volume lysate.
Notes:
1) 9:00 AM, 10/30/19 First, 4 sterile microcentrifuge tubes were collected and labeled 10^-1 etc. all the way to 10^-4. Each tube was filled with 90 micro liters of phage buffer.
3) Then, 10 micro liters of the low volume lysate was drawn into a pipette and transferred to the 10^-1 microcentrifuge tube. The 10^-1 tube was vortexed and then a new pipette tip was placed. Next, 10 micro liters of 10^-1 solution was drawn and placed in 10^-2 tube and vortexed. A new pipette tip was placed. This process was repeated until there were 10^-4 diluted samples.
4) After finishing the serial dilutions of the low volume lysate, 10 micro liters of the serial dilutions were inoculated with 250 micro liters of host bacteria.
5) Next, 4 agar plates were labeled appropriately designating 10^-1,10^-2, etc. Each host bacteria and serial dilution mixture was mixed with 3 mL of molten top agar, immediately withdrawn back into the pipette, and then transferred onto the correct plate. A new pipette was used for each plate.
6) Each plate was allowed to sit undisturbed for 20 minutes and then without inverting were placed in the incubator at 10:30 AM on 10/30/19.
Results:
On 11/1/19 the plates were pulled from the incubator.
Conclusions and Next Steps:
In order to obtain the HVL, the collected lysate from the 10^-3 plate will be used to flood the 10^-4 plate. This will allow for amplification of LVL.
Title: Purification- Flooding webbed plates and repeating webbed plates
Date Started: November 1, 2019 Redo? no
Purpose: To obtain the HVL from the LVL.
Notes:
1) 8 ml of sterile phage buffer was used to flood the 10^-3 plate. The plate was placed in the fridge until the lysate can be collected tomorrow morning.
New serial dilutions were made today starting from 10^-1 to 10^-4. Only the 10^-4 plate needs to be remade to have more LVL, so 2 of them will be created today.
2) 2 agar plates were correctly labeled 10^-4. Then, 10 microliters of the 10^-4 serial dilution was transferred to the tube with host bacteria. Then another 10 microliters of this same dilution was also transferred to a different tube of host bacteria. Both sat for 10 minutes in order for attachment. Lastly, each mixture was mixed with 3 ml of molten top agar, immediately drawn up, and then plated accordingly. The plates sat undisturbed for 20 minutes and were placed in the incubator at 2:30 PM.
Results:

Conclusions and Next Steps:
Webbed plates were successfully created. Now the plates will be flooded with the collected lysate in order to obtain a HVL.
Amplification 1
Title: Making webbed plates from known titer
Date Started: October 22, 2019 Redo? yes
Purpose: To create a plate with a high density of plaques from a calculated titer. This will enable HVL to be collected and verify the phage is ready for microscopy.
Notes:
10/22/19 4:30 PM
1) After the math was done, 2 microliters of the previous serial dilutions 10^-4, 10^-5, and 10^-6 were inoculated with host bacteria. In order to make sure accurate results will be obtained, the pipette tip was placed all the way to the bottom of each serial dilution. They sat with the host bacteria for 10 minutes.
2) Next, 3 ml of molten top agar was mixed with each serial dilution and host bacteria mixture, immediately drawn back up, and then plated accordingly.
3) The plates sat undisturbed for 20 minutes and were inverted and placed in the incubator at 5:20 PM.
Results:
Conclusions and Next Steps:
Webbed plates were not produced. A new amount of serial dilution will be used to try and produce a webbed plate and therefore HVL.
Title: Microscopy
Date Started: October 23, 2019 Redo? no
Purpose: To prepare the phage sample for viewing with a TEM. The sample must be concentrated and cleaned of protein and membrane debris.
Notes:
9:50 AM: 1) After an aseptic work area was created, 1 ml of the LVL was pipetted into a sterile microcentrifuge tube. It was then balanced in the centrifuge for 1 hour at top speed.
2) The microcentrifuge tube was removed from the centrifuge at 10:50 AM. The supernatant was then removed from the top of the pelleted phage. Next, 100 microliters of phage buffer was added. The microcentrifuge tube was stored in the refrigerator to resuspend until the next steps could be done.
12:00 AM: 3) There was already a sterile environment with all the necessary supplies in the fume hood. Bench paper was laid on the top of the fume hood. Wearing sterile gloves, a 5 by 5 piece of parafilm was placed on the lid of a petri dish. Then, a PELCO tab was placed on top of that in the center. With EM forceps, a new grid was placed on the very edge, dark and shiny side up.
4) Using a micro pipettor, 10 microliters of the lysate was placed on the grid without touching the grid. The phage settled and attached for 2 minutes. After that, a small wedge of filter paper was used to wick off the excess fluid from the grid.
5) The grid was then rinsed by adding 10 microliters of sterile water, letting it sit for 2 minutes, and then wicking the excess fluid off. This part was done twice.
6) Next, 10 microliters of 1% uranyl acetate was carefully added, allowed to sit for 2 minutes, and then wicked off.
7) With the EM forceps, the grid was picked up by grabbing the very edge and then placed in grid box A4 in order to be imaged.
Results:
Conclusions and Next Steps:
The next step is moving onto DNA extraction.
Amplification 2
Title: Making webbed plates from known titer
Date Started: October 28, 2019 Redo? yes
Purpose: To create a plate with a high density of plaques from a calculated titer. This will enable HVL to be collected and verify the phage is ready for microscopy.
Notes:
10/28/19 9:15 AM
1) 12, 13, and 14 microliters of the previous serial dilution 10^-4 were each inoculated with host bacteria. There wasn’t enough 10^-4 serial dilution for the last one, so more of it was made. First, 90 microliters of phage buffer was added into a sterile microcentrifuge tube. Then, 10 microliters of the previous 10^-3 serial dilution was pipetted into it. The tube was vortexed and then ready to be used. They all sat with the host bacteria for 10 minutes.
2) Next, 3 ml of molten top agar was mixed with each serial dilution and host bacteria mixture, immediately drawn back up, and then plated accordingly.
3) The plates sat undisturbed for 20 minutes and, without being inverted, were placed in the incubator at 10:00 AM.
Results:

Conclusions and Next Steps:
Webbed plates were not produced. New serial dilutions will be made from 10^1 to 10^-4 and plated to complete new math and attempt to get an HVL from a webbed plate.
Amplification 3
Title: Webbed plates and flooding for HVL
Date Started: November 2, 2019 Redo? yes
Purpose: To create a HVL using the webbed plates and collected lysate.
Notes:
11/2/19 10:00 AM
1) Using a 5 ml sterile syringe, the previously flooded 10^-3 dilution plate was tilted and the lysate was collected. A sterile .22 filter was used to filter the lysate into a 15 ml conical tube. 5 ml of lysate was collected. Next, 3 ml of sterile phage buffer was added to the lysate. Then this mixture was used to flood one of the 10^-4 plates. This plate sat undisturbed at room temperature for 2 hours. Then the lysate was collected, filtered, and used to flood the other 10^-4 plate.
11/3/19 2:30 PM
2) The 10^-4 plate lysate was collected and filtered. This is now our HVL. Then the HVL was used to make new serial dilutions from 10^-1 to 10^-8. Next the serial dilutions and 10 microliters of the undiluted lysate were inoculated with host bacteria. They were given 5 minutes for attachment. The serial dilution and host bacteria mixtures were then mixed with 3 ml of molten top agar, immediately withdrawn up, and plated accordingly. The nine plates were inverted and placed in the incubator at 3:20 PM.
11/4/19
1) 3:00 PM In order to obtain more HVL, the 10^-6 dilution that was made yesterday was plated. 10 microliters of 10^-6 was inoculated with host bacteria 6 separate times and allowed to attach for 10 minutes. Then, 3 ml of molten top agar was added to each dilution and host bacteria mixture, immediately withdrawn, and plated accordingly.
2) 3 of the 10^-6 plates were flooded, allowed to sit for 2 hours, and then collected. The collected lysate was then used to flood the other three 10^-6 plates with 9 ml of sterile phage buffer to fully flood the plates.
Results:
Conclusions and Next Steps:
The HVL was succesfully collected, and the titer ended up being 8.4 * 10^10 pfu/ml.
DNA Extraction
Alternative DNA isolation protocol using ZnCl2
Date Started: Nov. 04, 2019 Redo? no
Purpose: To isolate genomic DNA from phage.
Notes:
11/4/19 9:00 AM
1) First, the HVL was gently mixed, then aliquoted into a 15 mL conical tube. There was only 4.5 ml, so in order to keep the ratio 18 mL of nuclease was added to it. The tube was inverted 4 times and then placed in the incubator at 36 degrees Celsius for 10 minutes. It was then aliquoted into 5 microcentrifuge tubes. Only .9 mL was placed into each tube. Then, 18 mL of ZnCl2 was added to each microcentrifuge tube. They were all inverted gently and incubated at 36.9 degrees Celsius for 5 minutes in order to precipitate the phage. Next, they were centrifuged at 10,000 rpm for 1 minute to pellet the phage.
2) The supernatant was removed, but all 5 pellets were kept in the microcentrifuge tubes. To resuspend the phage, 500 microliters of TES buffer was added to each tube. Then they were incubated at 60 degrees Celsius for 10 minutes. Next, 1 microliters of proteinase K was added and mixed gently. The tubes were incubated at 39.6 degrees Celsius for 10 minutes.
3) 60 microliters of potassium acetate was added to each tube, they were all mixed well, and then placed onto ice for 15 minutes. The tubes were centrifuged at 4 degrees Celsius for 1 minute at 12,000 rpm. The supernatants were then kept this time and placed in new microcentrifuge tubes. The pellet tubes were discarded. Lastly, 500 microliters of isopropanol was added to each tube, mixed, and then placed on ice until Day 2.
11/5/19
1) The tubes were centrifuged at top speed for 10 min to pellet the DNA. Then, the supernatants were collected off the tubes and discarded into a waste tube.
2) 250 microliters of 70% ethanol was added to each tube and then then were spun again for one minute at top speed. The supernatants were then disposed of in the waste tube.
3) The DNA pellets were dried at room temperature for an hour and a half and then put in a heat block at 30 degrees Celsius for 30 minutes.
4) The pellet was resuspended in 50 uL for nuclease-free water. The solution was used to re-suspend the next pellet until all 5 pellets were resuspended in the same 50 uL of water. After combining the DNA into the fifth tube, the solution was too salty, therefore another ethanol wash was conducted.
5) The DNA concentration was then checked with a nanodrop.
Results:
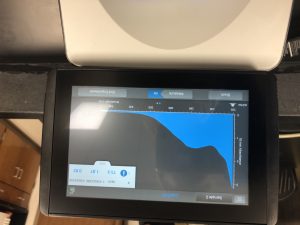
Conclusions and Next Steps:
The peak isn’t over 260 which means that the solution was still too salty. Therefore, the sample was resuspended in 250uL of EtOH and left overnight to precipitate out again. Another isopropanol wash will be done to try and remove the excess salt.
Title: Alternative DNA isolation protocol using ZnCl2
Date Started: November 7, 2019 Redo? yes
Purpose: To isolate genomic DNA from phage.
Notes:
The second isopropanol wash didn’t make the solution less salty, so another DNA extraction was done using the correct amounts of ZnCl2 and nuclease mix (20 uL as opposed to 18 uL) and the new second HVL.
Day 1 – Extraction protocol was followed completely until it was time to centrifuge the capsids out of the supernatant. During this step, number 10, some supernatant was removed, however, the pellet was not condensed enough, therefore, another round of centrifuging at 12,000 rpm for 1min was conducted on all tubes and the remaining supernatant was extracted and placed into 60uL of 100% isopropanol. Tubes were mixed by vigorous inversion before being placed on ice for the following day.
Day 2 – At the start, once the samples had been removed from ice they were centrifuged at top speed, 14,000 rpm, for 10 minutes to pellet the DNA. This step was repeated twice to ensure that the pellet was condensed enough and all supernatant waste extracted. Then, 250uL of 70% ethanol placed into each tube which was again centrifuged this time for 1 min. at top speed. Also, this step was repeated twice to ensure that any excess salts and chemical contamination was removed. Pellets were then dried at room temperature for 2 hrs. before being suspended 50 uL of nuclease-free water.
Results:
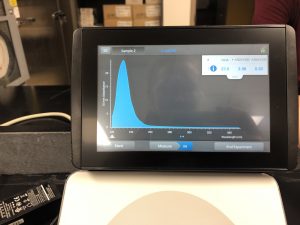
Conclusions and Next Steps:
Although the DNA measured by the nanodrop was better than the first try it was still not enough. Under the instructor’s guidance, another extraction was conducted using a new protocol. After completion of this new protocol, however, results were still not on par with the required standard. The next two DNA extractions were both also unsuccessful and too salty. In spite of this, the HVL was catalogued and sent off for archiving.
Characterization
Title: Procedure
Date Started:Sep. 04, 2019 Redo? yes/no
Purpose: State in a couple of sentences what you are trying to do and why you are doing it.
Notes:
What did you do? Type out the protocols that you are doing, how you did them, and when you did them. Make notes to remind you of what you did, or what you need to do. If you did something different than normal, it is important to write that down.
Results:
Add the date(s) that the results were obtained. Describe the results and make a table, create a figure, or add an image. This is important because this is your data.
Conclusions and Next Steps:
What can be determined from your data? What should you do next?