Discovery of BenitoVP
BenitoVP Information
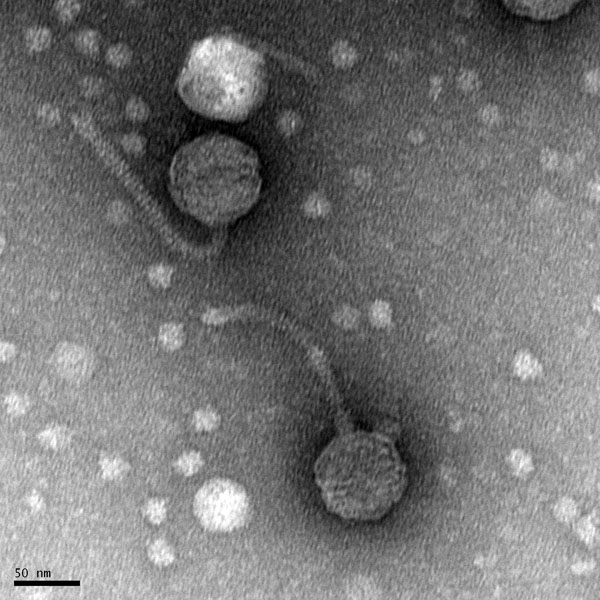
Morphology: Siphoviridae
Sample Collection
| Collector Name |
Virginia Muñoz | Paloma González | Virginia Muñoz | Paloma González | Virginia Muñoz |
| Sample No. | 1 | 2 | 3 | 4 | 5 |
| Date of Collection | 8/29/2021 | 8/29/2021 | 9/7/2021 | 9/7/2021 | 9/12/2021 |
| Sample Type | Soil | Soil | Soil | Soil | Soil |
| General Location | Near a forest | Near a river | Near trees | In a wooded area | Around rocks and bushes |
| Location Description | Between rocks and tree roots | Between rocks on a river shore | Between tree roots | In Between several bushes | Beside a big rock and a bush root |
| GPS Coordinates |
32.060079 -98.302669 |
32.23601 -97.743459 |
32.060129 -98.301929 |
32.275942 -97.763708 |
32.059876 -98.301737 |
| Sample Depth | Surface Level | Surface Level | Surface Level | Surface Level | Surface Level |
| Ambient Temperature | 27°C | 30°C | 21°C | 26°C | 23°C |
| Collector Name |
Paloma Gonzalez | Paloma Gonzalez | Austin Densmore |
| Sample No. | 6 | 7 | 6 |
| Date of Collection | 9/16/2021 | 9/19/2021 | 9/13/2021 |
| Sample Type | Soil | Soil | Soil |
| General Location | In an ant pile | Near chickens | Farm outside of Glen Rose |
| Location Description | In an ant pile beside a garden | In a chicken coop along with manure | Dirt under rock next to a tree |
| GPS Coordinates |
32.275431 -97.763175 |
32.276029 -97.763441 |
32.182178 -97.704097 |
| Sample Depth | Surface Level | Surface Level | Surface Level to 3cm |
| Ambient Temperature | 18°C | 33°C | 18°C |
Isolation/Purification
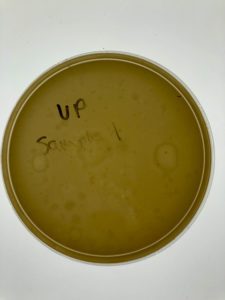
 Title: Direct Isolation

Date: 8/30/2021 Redo: No Sample: #1
Purpose: This procedure is to isolate bacteriophages from the environmental sample and infect the host bacteria using a plaque assay
Notes:
1.The workstation was cleaned and prepared for aseptic work using Cidecon and 70% ethanol. A bunsen burner was ignited to help keep our work field sterile
2. Using a serological pipette, 5mL of liquid media were pipetted into the sample tube and mixed thoroughly by shaking it for a couple of minutes
3. The tube was placed in a shaking incubator and removed after 2 hours
4. Because the tube was accidentally left on its side, the tube was then placed in a centrifuge for 10 minutes to allow the particulate matter to settle
5. 2mL of liquid from the top of the sample were syringed while avoiding to withdrawal any solid material
6. Aseptically attached a syringe filter(0.22 um) and carefully filtered the sample into a 1.5ml microcentrifuge tube
7. Using a micropipette, 250ul of the filtered sample was added to the host bacteria(250ul) and allowed to sit for attachment for 10 minutes
8. Using a serological pipette, 3ml of top agar were pipetted into the inoculated tube and pipetted back up and placed immediately into an agar plate.
9. Since it is very important that the top agar doesn’t cool down because it starts to solidify, we made sure to immediately put it back after we were no longer using it
10. Plate was gently but quickly tilted to evenly coat the entire top with agar mixture
11. Plate sat undisturbed for 20 minutes until the top agar solidified.
12. Incubated the plate and waited 24 hours for results
Results:
Negative result
Because this was our first time conducting this procedure we labeled the plate improperly blocking visibility for the plate. We also did not allow the plate to get to room temperature before adding the agar mixture causing some condensation.
Conclusions and Next Steps:
There was very little to no bacterial growth and we no longer had our sample to proceed with the enriched isolation. The next step is to find another sample and perform direct isolation.
Title: Direct Isolation
Date: 9/1/2021 Redo: Yes Sample: #2
Purpose: This procedure is to isolate bacteriophages from the environmental sample and infect the host bacteria using a plaque assay
Notes:
1. The workstation was cleaned and prepared for aseptic work using Cidecon and 70% ethanol. A bunsen burner was ignited to help keep our work field sterile
2. Using a serological pipette, 5mL of liquid media were pipetted into the sample tube and mixed thoroughly by shaking it for a couple of minutes
3. The tube was placed in a shaking incubator and removed after 1 hour and 10 minutes
4. 2mL of liquid from the top of the sample were syringed while avoiding to withdrawal any solid material
6. Because the sample was grainy the filter got clogged which required an aseptic change of filter
7. Aseptically attached a syringe filter(0.22 um) and carefully filtered the sample into a microcentrifuge tube
8. Using a micropipette, 250ul of the filtered sample was added to the host bacteria(250ul) and allowed to sit for attachment for 10 minutes
9. Using a serological pipette, 3ml of top agar were pipetted into the inoculated tube and pipetted back up and placed immediately into an agar plate.
10 . Since it is very important that the top agar doesn’t cool down because it starts to solidify, we made sure to immediately put it back after we were no longer using it
11. Plate was gently but quickly tilted to evenly coat the entire top with agar mixture
12. Plate sat undisturbed for 20 minutes until the top agar solidified.
13. Incubated the plate and waited 24 hours for results
Results:
Negative

Dark spots can be seen but no bacterial growth
Conclusions and Next Steps:
Sample 2 shows some signs of contamination. Our next step is to gather more samples while trying to better our aseptic technique.
Title: Direct Isolation
Date: 9/8/2021 Redo: Yes Sample: #3
Purpose: This procedure is to isolate bacteriophages from the environmental sample and infect the host bacteria using a plaque assay
Notes:
1. The workstation was cleaned and prepared for aseptic work using Cidecon and 70% ethanol. A bunsen burner was ignited to help keep our work field sterile
2. Using a serological pipette, 5mL of liquid media were pipetted into the sample tube and mixed thoroughly by shaking it for a couple of minutes
3. The tube was placed in a shaking incubator and removed after 1 hour.
4. Due to class time running out, we didn’t have enough time to syringe 2mL of liquid from the top of the sample, attach a syringe filter(0.22 um), and into a 1.5ml microcentrifuge tube.
5. Our sample was placed in the centrifuge until we returned.
6. When we returned to the lab, we attached a syringe filter(0.22 um) and attempted to filter the sample.
7. Due to our sample being thick, we had to move our sample from a 15ml tube to a 50ml tube. We also added 3mL of liquid media, placed it back into the centrifuge (shaking incubator), and removed it after five days.
8. On Monday, September 13, 2021, the workstation was cleaned and prepared using Cidecon and 70% ethanol for aseptic work. A bunsen burner was ignited to help keep our work field sterile
9. We removed our sample from the centrifuge. We also took out an agar plate, which we let cool down to room temperature naturally while finishing the last steps of Direct Isolation.
10. Using a micropipette, 250ul of the filtered sample was added to the host bacteria(250ul) and allowed to sit for attachment for 10 minutes.
11. Using a serological pipette, 3ml of top agar were pipetted into the inoculated tube and pipetted back up and placed immediately into an agar plate.
12. The plate was gently but quickly tilted to evenly coat the entire top with agar mixture.
13. Unfortunately, our plate got bubbles, we quickly tried to eliminate them but our top agar began to solidify.
14. The plate sat undisturbed for 20 minutes until the top agar solidified
15. Incubated the plate and waited 48 hours for results.
Results:
Negative Results
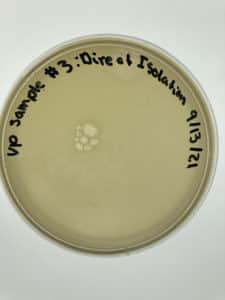
No bacteria growth is present and bubbles are visible.
Conclusions and Next Steps:
More liquid media must be obtained before we redo another sample. We also need to continue collecting more samples and performing direct isolation in search of bacteria.
Title: Direct Isolation
Date: 9/8/2021 Redo: Yes Sample: #4
Purpose: This procedure is to isolate bacteriophages from the environmental sample and infect the host bacteria using a plaque assay
Notes:
1. The workstation was cleaned and prepared for aseptic work using Cidecon and 70% ethanol. A bunsen burner was ignited to help keep our work field sterile
2. Using a serological pipette, 5mL of liquid media were pipetted into the sample tube and mixed thoroughly by shaking it for a couple of minutes
3. The tube was placed in a shaking incubator and removed after 1 hour
4. Attempted to syringe 2mL of liquid from the top of the sample without any withdraw of solid material, but not enough liquid media was added to the sample so only 1.5mL of liquid were syringed
5. Aseptically attached a syringe filter(0.22 um) and carefully filtered the sample into a 1.5ml microcentrifuge tube
6. Using a micropipette, 250ul of the filtered sample was added to the host bacteria(250ul) and allowed to sit for attachment for 10 minutes
7. Using a serological pipette, 3ml of top agar were pipetted into the inoculated tube and pipetted back up and placed immediately into an agar plate.
8. Since it is very important that the top agar doesn’t cool down because it starts to solidify, we made sure to immediately put it back after we were no longer using it
9. Plate was gently but quickly tilted to evenly coat the entire top with agar mixture
10. Plate sat undisturbed for 20 minutes until the top agar solidified.
11. Incubated the plate and waited 24 hours for results
Results:
Negative results
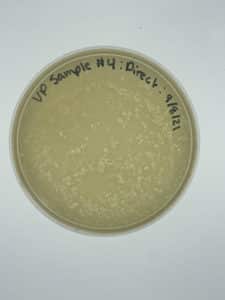
No bacteria growth is visible and many bumps are present meaning that the top agar was left outside for too long before we plated
Conclusions and Next Steps:
New top agar must be obtained before we plate another sample. We also need to continue collecting more samples and performing direct isolation in search of bacteria.
direct isolation in search of bacteria.
Title: Direct Isolation
Date: 9/20/2021 Redo: Yes Sample: #5
Purpose: This procedure is to isolate bacteriophages from the environmental sample and infect the host bacteria using a plaque assay
Notes:
1. The workstation was cleaned and prepared for aseptic work using Cidecon and 70% ethanol. A bunsen burner was ignited to help keep our work field sterile
2. Using a serological pipette, 5mL of liquid media were pipetted into the sample tube and mixed thoroughly by shaking it for a couple of minutes
3. The tube was placed in a shaking incubator and removed after 1 hour
4. Attempted to syringe 2mL of liquid from the top of the sample without any withdraw of solid material, but not enough liquid media was added to the sample so only 1mL of liquid were syringed
5. Decided to add 3ml of liquid media to the sample and we allowed it to centrifuge for another hour
6. Aseptically attached a syringe filter(0.22 um) and carefully filtered the sample into a 1.5ml microcentrifuge tube
7. Using a micropipette, 250ul of the filtered sample was added to the host bacteria(250ul) and allowed to sit for attachment for 10 minutes
8. Using a serological pipette, 3ml of top agar were pipetted into the inoculated tube and pipetted back up and placed immediately into an agar plate.
9. Since it is very important that the top agar doesn’t cool down because it starts to solidify, we made sure to immediately put it back after we were no longer using it
10. Plate was gently but quickly tilted to evenly coat the entire top with agar mixture
11. Plate sat undisturbed for 20 minutes until the top agar solidified.
12. Incubated the plate at 29℃ and waited 24 hours for results
Results:
Negative results

No bacteria growth is visible and many bumps are present meaning that the top agar was left outside for too long before we plated
Conclusions and Next Steps:
New top agar must be obtained before we plate another sample. We also need to continue collecting more samples and performing direct isolation in search of bacteria.
Title: Direct Isolation
Date: 9/20/2021 Redo: Yes Sample: #6
Purpose: This procedure is to isolate bacteriophages from the environmental sample and infect the host bacteria using a plaque assay
Notes:
1. The workstation was cleaned and prepared for aseptic work using Cidecon and 70% ethanol. A bunsen burner was ignited to help keep our work field sterile
2. Using a serological pipette, 5mL of liquid media were pipetted into the sample tube and mixed thoroughly by shaking it for a couple of minutes
3. The tube was placed in a shaking incubator and removed after 1 hour
4. Attempted to syringe 2mL of liquid from the top of the sample without any withdraw of solid material
5. Aseptically attached a syringe filter(0.22 um) and carefully filtered the sample into a 1.5ml microcentrifuge tube
6. Using a micropipette, 250ul of the filtered sample was added to the host bacteria(250ul) and allowed to sit for attachment for 10 minutes
7. Using a serological pipette, 3ml of top agar were pipetted into the inoculated tube and pipetted back up and placed immediately into an agar plate.
8. Since it is very important that the top agar doesn’t cool down because it starts to solidify, we made sure to immediately put it back after we were no longer using it
9. Plate was gently but quickly tilted to evenly coat the entire top with agar mixture
10. Plate sat undisturbed for 20 minutes until the top agar solidified.
11. Incubated the plate at 29℃ and waited 24 hours for results
Results:
Negative results
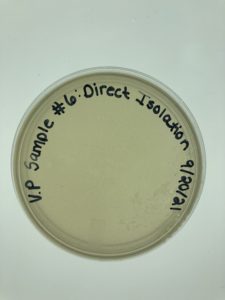
Conclusions and Next Steps:
No plaques are visible meaning that we will have to perform direct isolation once more.
Title: Direct Isolation
Date: 9/20/2021 Redo: Yes Sample: #7
Purpose: This procedure is to isolate bacteriophages from the environmental sample and infect the host bacteria using a plaque assay
Notes:
1. The workstation was cleaned and prepared for aseptic work using Cidecon and 70% ethanol. A bunsen burner was ignited to help keep our work field sterile
2. Using a serological pipette, 5mL of liquid media were pipetted into the sample tube and mixed thoroughly by shaking it for a couple of minutes
3. The tube was placed in a shaking incubator and removed after 1 hour
4. Attempted to syringe 2mL of liquid from the top of the sample without any withdraw of solid material, but very little was obtained
5. Added 3ml more of liquid media and allowed for it to centrifuge are another hour
6. Aseptically attached a syringe filter(0.22 um) and carefully filtered the sample into a 1.5ml microcentrifuge tube
7. Using a micropipette, 250ul of the filtered sample was added to the host bacteria(250ul) and allowed to sit for attachment for 10 minutes
8. Using a serological pipette, 3ml of top agar were pipetted into the inoculated tube and pipetted back up and placed immediately into an agar plate.
9. Since it is very important that the top agar doesn’t cool down because it starts to solidify, we made sure to immediately put it back after we were no longer using it
10. Plate was gently but quickly tilted to evenly coat the entire top with agar mixture
11. Plate sat undisturbed for 20 minutes until the top agar solidified.
12. Incubated the plate at 29℃ and waited 24 hours for results
Results:
Negative results

The plate appears to be contaminated. We believe the contamination my have occurred when switching the filters after we tried to remove the liquid media sitting on top of the sample.
Conclusions and Next Steps:
Because none of our attempts at conducting direct isolation were positive for plaques, our next step will be to adopt from another group and continue with a serial dilution.
Title: Enriched Isolation and Purification
( performed by the group from which we adopted-Austin Densmore and Aryana Pernarelli)
Purpose: This procedure is to isolate bacteriophages from the environmental sample and infect the host bacteria using a plaque assay. This was copied from the notes on GuardianDragon, the sample that was adopted for further study.
Date: 9/13/2021 Redo: Yes Sample: 6B
1. I washed my hands with antibacterial soap, put on gloves, and then cleaned my area to make it sterile. 1. I cleansed my workspace with 1:128 Cidecon and 70% ethanol. I wiped it down with kimwipes.
2. I got out the supplies needed to do the isolation and plaque assay. I got the Bunsen burner, a rack to hold the samples, serological pipette, and my supernate in the 15ml tube.
3. I lit my bunsen burner and prepared to filter my supernate from sample 6
4. Since my supernatant had other bacteria within it, I did a filtration. Once I got the required supplies of a 5ml syringe, a .22um filter, and a serological pipette, I began.
5. I opened the package for the syringe carefully and removed the plunger from the syringe.
6. I serologically pipetted 1ml of supernatant from each microcentrifuge tube (making sure to miss the bacteria pellet at the bottom) into the syringe with the plunger removed. I took a total of 1ml from each microcentrifuge tube and put it into the syringe for a total of 2ml of supernatant.
7. I put the plunger back into the syringe and deposited the supernant into a microcentrifuge tube. I immediately capped the sample and began the plaque assay.
PLAQUE ASSAY
1. I took the 100uL pipette and pipette tips, and got 100uL of isolate from the microcentrifuge tube. I added the full 100uL of isolate into the bacteria tube full of 250uL of bacteria. Since I needed to add 250uL of isolate, I pipetted another 100uL of isolate into the tube. I repeated it for a 3rd time pipetting 50uL of isolate into the bacteria tube for a total of 250uL of isolate added to 250uL of bacteria.
2. I waited for 5 minutes for the bacteriophage to attach to the bacteria in the tube.
3. After waiting for my isolate to attach to the bacteria in the tube, I began the plating process.
4. With a serological pipette, I got 3mL of warm agar, and put it in the tube with the bacteria and isolate together.
5. Right away, I drew up the mixture of warm agar, bacteria, and isolate back into the serological pipette.
6. I dispensed the mixture onto a plate immediately, and tilted the plate slightly to ensure that the top agar was a uniform depth around the plate.
7. I let it sit out for 20 minutes to let the top agar settle.
8. The plate was put into the incubator at 29C at 11:00 on 9/15/2021.
Results:

Conclusions and Next Steps:
We will be picking one plaque from this plate and will proceed with our first serial dilution.
Title: Picking a Plaque and First Serial Dilution
Date: 9/22/2021 Redo: No Sample: #6B
Purpose: To retrieve phage particles from a plaque and create liquid phage samples of decreased concentrations
Notes:
- The workstation was cleaned and prepared for aseptic work using Cidecon and 70% ethanol. A bunsen burner was ignited to help keep our work field sterile
- A plaque was chosen and circled to perform the serial dilution
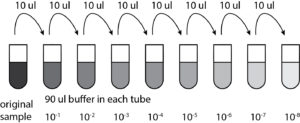
- Prepared and label 6 microcentrifuge tubes( each was label as 10-1,10-2…10-6)
- Using aseptic technique, 90ul of phage buffer were placed into each microcentrifuge tube
- Used a sterile tip with a micropipettor to stab the agar in the center of the plaque(the pipette was held perpendicular to the agar surface)
- Placed the end of the tip into the phage buffer in the microcentrifuge labeled 10-1
- Tapped the tip on the wall of the tube and pipetted up and down to dislodge phage particles and then we proceeded to discard the tip
- Closed the microcentrifuge tube and mixed it well by vortexing for a couple of seconds
- Using the micropipettor and a new tip each time, 10ul of the previous sample were pipetted into the tube next in line(as seen below in the diagram)

- After the 10ul were added into each tube, they were all vortexed for a couple of seconds
- 6 tubes of the host bacteria were gathered in order to inoculate the host bacteria with the phage sample
- Next, 10ul of each microcentrifuge tube were added to each of the 6 host bacteria tubes and allowed to sit for attachment for 10 minutes
- Using a serological pipette, 3ml of top agar were collected and added to the inoculated tubes and sucked back up in order to plate immediately
- These steps were repeated for each of the 6 tubes
- Each of the plates were allowed to sit undisturbed for 20 minutes before being added to the incubator
Results:
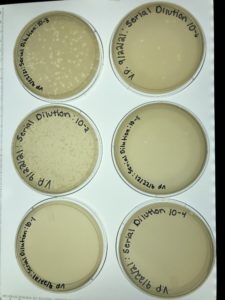
Conclusions and Next Steps:
Our first serial dilution was a success and the next step is to take the plate labeled 10-3 and perform our second serial dilution
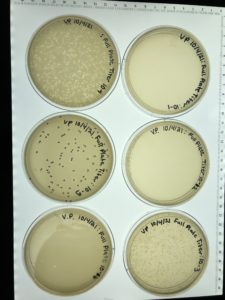
Title: Second Serial Dilution
Date: 9/27/2021 Redo: No Sample: #6B
Purpose: To retrieve phage particles from a plaque and create liquid phage samples of decreased concentrations
Notes:
- The workstation was cleaned and prepared for aseptic work using Cidecon and 70% ethanol. A bunsen burner was ignited to help keep our work field sterile
- A plaque was chosen and circled to perform the serial dilution
- Prepared and label 6 microcentrifuge tubes( each was label as 10-1,10-2…10-6)
- Using aseptic technique, 90ul of phage buffer were placed into each microcentrifuge tube
- Used a sterile tip with a micropipettor to stab the agar in the center of the plaque(the pipette was held perpendicular to the agar surface)
- Placed the end of the tip into the phage buffer in the microcentrifuge labeled 10-4 from our first serial dilution
- Tapped the tip on the wall of the tube and pipetted up and down to dislodge phage particles and then we proceeded to discard the tip
- Closed the microcentrifuge tube and mixed it well by vortexing for a couple of seconds
- Using the micropipettor and a new tip each time, 10ul of the previous sample were pipetted into the tube next in line(as seen below in the diagram)
- After the 10ul were added into each tube, they were all vortexed for a couple of seconds
- 6 tubes of the host bacteria were gathered in order to inoculate the host bacteria with the phage sample
- Next, 10ul of each microcentrifuge tube were added to each of the 6 host bacteria tubes and allowed to sit for attachment for 10 minutes
- Using a serological pipette, 3ml of top agar were collected and added to the inoculated tubes and sucked back up in order to plate immediately
- These steps were repeated for each of the 6 tubes
- Each of the plates were allowed to sit undisturbed for 20 minutes before being added to the incubator
Results:
Conclusions and Next Steps:
Our second serial dilution was a success and the next step is to take the plate labeled 10-4 and flood it
Title: Collecting Plate Lysates
Date: 9/29/2021 Redo: No Sample: #6B
Purpose: To generate a highly concentrated liquid phage sample
Notes:
- The workstation was cleaned and prepared for aseptic work using Cidecon and 70% ethanol. A bunsen burner was ignited to help keep our work field sterile
- Began by flooding the webbed plate
- Using a serological pipette, 8ml of sterile phage buffer were added to the webbed plate 10-4 from the our second serial dilution
- The plate was allowed to sit at room temperature for 2 hours
- After the 2 hours we began to harvest the plate lysate
- The plate was tilted slightly to allow the lysate to pool to one side
- Prepared a 0.22um filter by opening the packaging vut not removing the filter
- Using a serological pipette we aspirated(sucked up) the lysate from the plate
- We intended to aspirate 5ml of the lysate but only 3.5ml were aspirated
- Carefully attached they syring to the filter.Depressed the syring plunger and collected the filtrate in a 15ml sterile conical tube
- The tube with the lysate was labeled and stored in a refrigerator at 4 °C
Results:

This picture was later taken . The original tubed contained 4ml of lysate.
Conclusions and Next Steps:
Flooding the plate and collecting the lysate was a success and the next step is to do a full plate titer.
Title: Full Plate Titer
Date: 10/4/2021 Redo: No Sample: #6B
Purpose: To determine the concentration of phage particles in a lysate by using a plaque assay
Notes:
- The workstation was cleaned and prepared for aseptic work using Cidecon and 70% ethanol. A bunsen burner was ignited to help keep our work field sterile
- Perfomred the same protocal used in the serial dilutions using the lysate previously collected
- Prepared and label 6 microcentrifuge tubes( each was label as 10-1,10-2…10-6)
- Using aseptic technique, 90ul of phage buffer were placed into each microcentrifuge tube
- 10ul were pipetted into the first microcentrifuge tube(labeled 10-1)
- Closed the microcentrifuge tube and mixed it well by vortexing for a couple of seconds
- Using the micropipettor and a new tip each time, 10ul of the previous sample were pipetted into the tube next in line(as seen below in the diagram)
- After the 10ul were added into each tube, they were all vortexed for a couple of seconds
- 6 tubes of the host bacteria were gathered in order to inoculate the host bacteria with the phage sample
- Next, 10ul of each microcentrifuge tube were added to each of the 6 host bacteria tubes and allowed to sit for attachment for 10 minutes
- Using a serological pipette, 3ml of top agar were collected and added to the inoculated tubes and sucked back up in order to plate immediately
- These steps were repeated for each of the 6 tubes
- Each of the plates were allowed to sit undisturbed for 20 minutes before being added to the incubator
Results:
Conclusions and Next Steps:
The full plate titer was a success and the next step is to take one of our webbed plates to make more webbed plates from a lysate of known titer
Amplification
Title: Making Webbed plates from a lysate of known titer
Date: 10/11/2021 Redo: No Sample: #6B
Purpose: To create a plate with a very high density of plaques from a lysate of known titer
Notes:
- The workstation was cleaned and prepared for aseptic work using Cidecon and 70% ethanol. A bunsen burner was ignited to help keep our work field sterile
- Estimated the number of plaques needed to calculate the volume of lysate necesary to generate a webbed plate. This math was used (82pfu/10ul)x(10^3ul/ml)x(10^5) (8.2×10^3×10^5) want:8,000 plaques (8×10^3)/(8×10^8)x1000=.08×10^-2
- Because we were having issues understanding how to get the proper ratio of lysate to buffer, we decided to do another serial dilution but only until 10-3 because that was the plate that produced our best webbed plate.
- Three centrifuge tubes were prepared and labeled(10-1,10-2,10-3)
- Using aseptic technique, 90ul of phage buffer were placed into each microcentrifuge tube
- 10ul were pipetted into the first microcentrifuge tube(labeled 10-1)
- Closed the microcentrifuge tube and mixed it well by vortexing for a couple of seconds
- Using the micropipettor and a new tip each time, 10ul of the previous sample were pipetted into the tube next in line
- After the 10ul were added into each tube, they were all vortexed for a couple of seconds
- 5 tubes of the host bacteria were gathered in order to inoculate the host bacteria with the phage sample
- Next, 10ul of the sample were added to each of the 5 host bacteria tubes from the tube labeled 10-3 and allowed to sit for attachment for 10 minutes
- Using a serological pipette, 3ml of top agar were collected and added to the inoculated tubes and sucked back up in order to plate immediately
- These steps were repeated for each of the 6 tubes
- Each of the plates were allowed to sit undisturbed for 20 minutes before being added to the incubator
Results:

Conclusions and Next Steps:
We successfully made webbed plates and our next step is to flood these plates
Title: Flooding webbed plates and collecting the lysate
Date: 10/13/2021 Redo: No Sample: #6B
Purpose: To generate a highly concentrated liquid phage sample
Notes:
- The workstation was cleaned and prepared for aseptic work using Cidecon and 70% ethanol. A bunsen burner was ignited to help keep our work field sterile
- 8ml of sterile phage buffer wered added to each of the 5 webbed plates
- The plates were allowed to sit at room temperature for 2 hours
- After the 2hours were up, we removed the lid and from the plate and placed it on the bench. The plate was tilted slightly by placing one edge of the plate on the lid allowing the lysate to pool to one side
- A 0.22um filter was prepared by opening the packaging but not removing the filter
- Using a 5ml syring we aspirated as much of the lysate as we could from the plate
- Carefully attached the syringe plunger and collected the filtrate in a 50ml sterile conical tube
- This was repeated for each of the 5 plates
- The lysate was stored at 4 °C.
Title: Entering a Phage into the Actinobacteriophage Database
Date: 10/18/21 Redo: No Sample: #6B
Purpose: This procedure is to include your phage in the Actinobacteriophage Database to make it available for other scientists
Notes:
1. Created an active Phages DB account
2. Our phage was named “BenitoVP” and added to the database according to the naming rules on the database
3. The fields that we had information to were filled to the best of our knowledge.
4. Submitted a request to PhagesDB to be reviewed and approved.
Results:
The submission was approved
Conclusions and Next Steps:
The next step will be to archive our phage sample
Title: Archiving your Phage Sample
Date: 10/18/21 Redo: No Sample: #6B
Purpose: To prepare a high-titer lysate for long-term storage
Notes:
1. The workstation was cleaned and prepared for aseptic work using Cidecon and 70% ethanol.
2. Prepared acrchiving tubes, one for the University of Pittsburgh and the other for our institution
2. We properly labeled each tube with our phage name
3. Every step from here on out was prepared underneath the fume hood
4. We aseptically filled each tube with sterile beads approximately 1cm from the top of the tube
5. The DMSO/lysate mixture was prepared by adding 4mL of our high-titer lysate into a sterile 15mL conical tube. To do this we used a serological pipette
6. Using a pipette, we added 280uL of DMSO to the 15mL conical tube, and then vortexed for a couple of seconds
7. We then aliquoted the mixture into the storage tubes. Using a pipette the lysate/DMSO mixture was added to each of the tubes. Approximately 1.4mL were added as we made sure the cap threads were not covered up.
8. The tubes were then given to our instructor to be stored.
Results:
The procedure was a success
Conclusions and Next Steps:
The next step is to begin DNA extraction
DNA Extraction
Title: DNA Extraction(Alternate 3.5 Protocol) Day 1 and Day 2
Date: 10/20/21 Redo: No Sample: #6B
Purpose: This procedure is to isolate genomic DNA from phage
Notes:
1. The workstation was cleaned and prepared for aseptic work using Cidecon and 70% ethanol.
2. Gently mixed our HVL, aliquoted 5mL of the lysate into a 15mL conical tube. Gave the tube to a TA who added 20uL of nuclease mix
3. Aliquoted lysate into 5 microfuge tubes, 1mL each.
4. Added 20uL of ZnCl2 to each tube, mixed gently and incubated at 37°C for 5min.
5. Centrifuged the tubes at 10,000 f01 1 minute to pellet the phage
6. Kept the pellet. Removed supernatants by aspiration using a pipette as well as carefully watching to not disturb the pellet.
7. Resuspened pellets in 500ul of TES buffer per tube and incubated at 60°C for 15 minutes in a heat block
8. Added 1uL of Proteinase K and mixed gently. Incubted at 37°C for 10 minutes to completely eliminate any residual nuclease activity
9. Added 60uL of potassium acetate to each tube. Mixed well and left the tubes on ice for 15 minutes.
10. Centrifuged the tubes at 4°C for 1 min at 12,000rpm to pellet the capsids. The supernatants were aspirated using a micropipette and placed into new microfuge tubes. Tubes with the pellets were discarded
11. Added 500ul of isopropanol to each of the tubes with the supernatant, mixed, and left them on ice overnight
—————————————-Day 2————————————————
Date: 10/22/2021 Redo: No Sample: 6b
1. Centrifuged the tubes at top speed for 10 minutes to pellet DNA, and discarded the supernatant into a waste tube
2. Added 250uL of 70% ethanol in each tube, and spun again for 1 minute at top speed. This washes the DNA pellet. Discared supernatants into a waste tube
3. Let the DNA pellets dry by tapping out excess liquid and placing it in a 30°C incubator
4. Resuspended the first pellet in 50uL of nuclease water and used that solution to resuspend the next pellet until this was done for all 5 tubes.
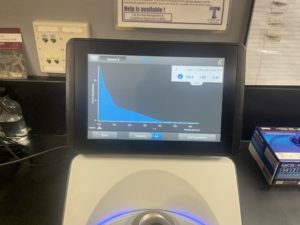
5. Checked the DNA concentration and quality using the Nanodro
Results:

Some issue occured while taking a picture and only optained the right top corner
Conclusions and Next Steps:
Reading were low so will be doing DNA Extraction again to get a higher concentration
Title: DNA Extraction(Alternate 3.5 Protocol) Day 1 and Day 2
Date: 10/25/21 Redo: No Sample: #6B
Purpose: This procedure is to isolate genomic DNA from phage
Notes:
1. The workstation was cleaned and prepared for aseptic work using Cidecon and 70% ethanol.
2. Gently mixed our HVL, aliquoted 5mL of the lysate into a 15mL conical tube. Gave the tube to a TA who added 20uL of nuclease mix
3. Aliquoted lysate into 5 microfuge tubes, 1mL each.
4. Added 20uL of ZnCl2 to each tube, mixed gently and incubated at 37°C for 5min.
5. Centrifuged the tubes at 10,000 f01 1 minute to pellet the phage
6. Kept the pellet. Removed supernatants by aspiration using a pipette as well as carefully watching to not disturb the pellet.
7. Resuspened pellets in 500ul of TES buffer per tube and incubated at 60°C for 15 minutes in a heat block
8. Added 1uL of Proteinase K and mixed gently. Incubted at 37°C for 10 minutes to completely eliminate any residual nuclease activity
9. Added 60uL of potassium acetate to each tube. Mixed well and left the tubes on ice for 15 minutes.
10. Centrifuged the tubes at 4°C for 1 min at 12,000rpm to pellet the capsids. The supernatants were aspirated using a micropipette and placed into new microfuge tubes. Tubes with the pellets were discarded
11. Added 500ul of isopropanol to each of the tubes with the supernatant, mixed, and left them on ice overnight
—————————————-Day 2————————————————
Date: 11/27/2021 Redo: yes Sample: 6b
1. Centrifuged the tubes at top speed for 10 minutes to pellet DNA, and discarded the supernatant into a waste tube
2. Added 250uL of 70% ethanol in each tube, and spun again for 1 minute at top speed. This washes the DNA pellet. Discared supernatants into a waste tube
3. Let the DNA pellets dry by tapping out excess liquid and placing it in a 30°C incubator
4. Resuspended the first pellet in 50uL of nuclease water and used that solution to resuspend the next pellet until this was done for all 5 tubes.
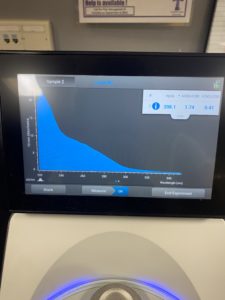
5. Checked the DNA concentration and quality using the Nanodro
Results:
Conclusions and Next Steps:
Reading were low so will be doing DNA Extraction again to get a higher concentration
Title: DNA Extraction(Alternate 3.5 Protocol) Day 1 and Day 2
Date: 11/1/21 Redo: yes Sample: #6B
Purpose: This procedure is to isolate genomic DNA from phage
Notes:
1. The workstation was cleaned and prepared for aseptic work using Cidecon and 70% ethanol.
2. Gently mixed our HVL, aliquoted 5mL of the lysate into a 15mL conical tube. Gave the tube to a TA who added 20uL of nuclease mix
3. Aliquoted lysate into 5 microfuge tubes, 1mL each.
4. Added 20uL of ZnCl2 to each tube, mixed gently and incubated at 37°C for 5min.
5. Centrifuged the tubes at 10,000 f01 1 minute to pellet the phage
6. Kept the pellet. Removed supernatants by aspiration using a pipette as well as carefully watching to not disturb the pellet.
7. Resuspened pellets in 500ul of TES buffer per tube and incubated at 60°C for 15 minutes in a heat block
8. Added 1uL of Proteinase K and mixed gently. Incubted at 37°C for 10 minutes to completely eliminate any residual nuclease activity
9. Added 60uL of potassium acetate to each tube. Mixed well and left the tubes on ice for 15 minutes.
10. Centrifuged the tubes at 4°C for 1 min at 12,000rpm to pellet the capsids. The supernatants were aspirated using a micropipette and placed into new microfuge tubes. Tubes with the pellets were discarded
11. Added 500ul of isopropanol to each of the tubes with the supernatant, mixed, and left them on ice overnight
—————————————-Day 2————————————————
Date: 1/3/21 Redo: Sayesmple: 6b
1. Centrifuged the tubes at top speed for 10 minutes to pellet DNA, and discarded the supernatant into a waste tube
2. Added 250uL of 70% ethanol in each tube, and spun again for 1 minute at top speed. This washes the DNA pellet. Discared supernatants into a waste tube
3. Let the DNA pellets dry by tapping out excess liquid and placing it in a 30°C incubator
4. Resuspended the first pellet in 50uL of nuclease water and used that solution to resuspend the next pellet until this was done for all 5 tubes.
5. Checked the DNA concentration and quality using the Nanodro
Results:
Conclusions and Next Steps:
Readings were low so we will be doing DNA extraction for a final time
Title: DNA Extraction(Alternate 3.5 Protocol) Day 1 and Day 2
Date: 11/10/21 Redo: yes Sample: #6B
Purpose: This procedure is to isolate genomic DNA from phage
Notes:
1. The workstation was cleaned and prepared for aseptic work using Cidecon and 70% ethanol.
2. Gently mixed our HVL, aliquoted 5mL of the lysate into a 15mL conical tube. Gave the tube to a TA who added 20uL of nuclease mix
3. Aliquoted lysate into 5 microfuge tubes, 1mL each.
4. Added 20uL of ZnCl2 to each tube, mixed gently and incubated at 37°C for 5min.
5. Centrifuged the tubes at 10,000 f01 1 minute to pellet the phage
6. Kept the pellet. Removed supernatants by aspiration using a pipette as well as carefully watching to not disturb the pellet.
7. Resuspened pellets in 500ul of TES buffer per tube and incubated at 60°C for 15 minutes in a heat block
8. Added 1uL of Proteinase K and mixed gently. Incubted at 37°C for 10 minutes to completely eliminate any residual nuclease activity
9. Added 60uL of potassium acetate to each tube. Mixed well and left the tubes on ice for 15 minutes.
10. Centrifuged the tubes at 4°C for 1 min at 12,000rpm to pellet the capsids. The supernatants were aspirated using a micropipette and placed into new microfuge tubes. Tubes with the pellets were discarded
11. Added 500ul of isopropanol to each of the tubes with the supernatant, mixed, and left them on ice overnight
—————————————-Day 2————————————————
Date: 11/12/21 Redo:yes sample: 6b
1. Centrifuged the tubes at top speed for 10 minutes to pellet DNA, and discarded the supernatant into a waste tube
2. Added 250uL of 70% ethanol in each tube, and spun again for 1 minute at top speed. This washes the DNA pellet. Discared supernatants into a waste tube
3. Let the DNA pellets dry by tapping out excess liquid and placing it in a 30°C incubator
4. Resuspended the first pellet in 50uL of nuclease water and used that solution to resuspend the next pellet until this was done for all 5 tubes.
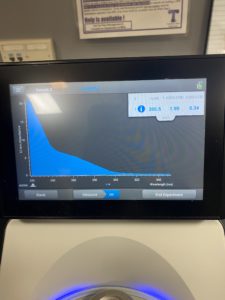
5. Checked the DNA concentration and quality using the Nanodrop
Results:

Something appears to have gone very wrong during the procedure. It was repeated 3 types but the readings were still the same.
Conclusions and Next Steps:
Because we ran out of time in the course DNA extraction can not be performed again.
Characterization
Title: Add Protocol Title
Date: Month/Day/Year Redo: Yes or No Sample: #
Purpose: This procedure is to…
Notes:
Enter notes here
Results:
Enter results here
Conclusions and Next Steps:
Enter conclusions here
Title: Add Protocol Title
Date: Month/Day/Year Redo: Yes or No Sample: #
Purpose: This procedure is to…
Notes:
Enter notes here
Results:
Enter results here
Conclusions and Next Steps:
Enter conclusions here