Discovery of Grapple
Grapple Information
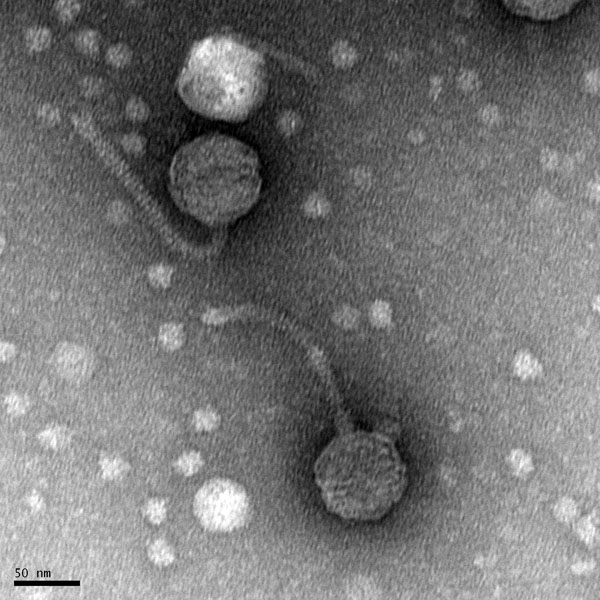
Morphology: Siphoviridae
Sample Collection
| Collector Name |
Ashley Fannin | Ashley Fannin | Megan Ashcraft | Megan Ashcraft | |
| Sample No. | 1 | 2 | 3 | 4 | |
| Date of Collection | 08/27/2021 | 08/28/2021 | 09/06/2021 | 09/06/2021 | |
| Sample Type | Soil | Soil | Soil | Soil | |
| General Location | Farmersville, TX | Stephenville, TX | Cedar Park, TX | Cedar Park, TX | |
| Location Description | On a farm, on the side of a gravel road | Backyard of home under raised garden bed | Open field next to a church parking lot | Open field next to road | |
| GPS Coordinates |
Lat.: 33.215910 Long.: -96.357930 |
Lat.: 32.227546 Long.: -98.216757 |
Lat.: 30.466347 Long.: -97.821345 |
Lat.: 30.511350 Long.: -97.858174 |
|
| Sample Depth | 5 in | 5 in | 4 in | 3 in | |
| Ambient Temperature | 26°C | 25°C | 34°C | 34°C |
Isolations
Title: Direct Isolation
Date: 8/30/21 Redo: No Sample: #1
Purpose: To end up extracting and isolating bacteriophages from an environmental sample. And using Plaque Assay to further detect the presence of phages on bacterial lawns.
Notes:
Protocols: Use aseptic techniques before, during, and after each lab.
Procedures:
- Once our samples were collected we started our lab by using aseptic techniques on our workspace. We washed our hands and put gloves on then sprayed CiDecon and spread it onto the counters with Kimwipes. Following that we sprayed 70% Ethanol to disinfect our counters and used Kimwipes to do so. After being properly sanitized gloves were removed and a Bunsen burner was lit.
- We then took Sample 1, in a 15ml conical tube, and integrated it with the PYCa Media by using a 5ml serological pipette to obtain enough PYCa Media to submerge the sample under 2-3mL.
- Once the sample was submerged, we screwed the lid of the conical tube back on and inverted the sample a few times in order to mix the sample completely.
- Once the sample was mixed thoroughly we incubated the mixture for 2 hours at 250rpm.
- After incubation was complete we allowed the sample to settle by putting it in the balanced centrifuge at 2000 x g for 10 minutes at 12℃ to allow for separation.
- Then using a syringe we removed 2ml of the liquid from the 15ml conical tube
- After the 2ml of liquid was in the syringe we opened the package of the 0.22μm syringe filter while leaving it in the package. Then attached the syringe to the filter and pushed the mixture through the filter dispensing 0.5 ml of the filtrate into a microcentrifuge tube and was capped immediately.
Then we proceeded to perform the Plaque Assay protocol.
- Then we took a culture tube containing 250 μl of the host bacteria and used a serological pipette to dispense 250 μl of the phage sample into the host bacteria.
- After dispensing we gently tapped the tube to make sure the host bacteria and phage sample were mixed.
- We let the mixture sit undisturbed for 10 min, allowing for attachment.
- After the sample set for 10 min we took the top agar from the 55℃ bath and used a syringe to transfer 3ml into the inoculated host tube.
- Immediately aspirated the mixture back into the syringe and transferred it to the appropriate agar plate, hopefully isolating the bacteriophage.
- After the plate set for about 20 min we put the plate into the incubator for 48 hours at 37℃.


Results: Sample 1, resulted in no detection of a virus.
Conclusion: We concluded that it was possible that this sample needed a Serial Isolation so we proceeded to do so.
Analysis: The analysis is further after the Serial Isolation.
Title: Serial Dilution
Date: 9/1/21 Redo: No Sample: #1
Purpose: To end up extracting phages from an environmental sample by diluting it with a phage buffer.
Notes:
Protocols: Use aseptic techniques before, during, and after each lab.
Procedures:
- Taking the phage and pre filtered mixture of the PYCa Media and phage sample from the Direct Isolation. We took 3 microcentrifuge tubes and labeled them 1:10, 1:100, and 1:1000.
- Then 90 microliters of Phage Buffer were dispensed into each one.
- We then went on to use a syringe to dispense 10 microliters of the undiluted phage sample into the 1:10 labeled tube. Making sure to mix by tapping and inverting gently. Then we took 10 microliters of the 1:10 mixture and put it into the 1:100 tube. Repeated the mixing process. Then took 10 microliters of the 1:100 mixture and dispensed into the 1:1000 mixture.
- After the 1:1000 tube was mixed we then depressed the mixture into a culture tube containing 250 μl of the host bacteria. Letting the sample sit for 20 min.
- We took the top agar from the 55℃ bath and used a syringe to transfer 3ml into the inoculated host tube(culture tube of the host bacteria and 1:1000 dilution).
- Immediately aspirated the mixture back into the syringe and transferred it to the appropriate agar plate, hopefully isolating the now diluted bacteriophage.
- After the plate set for about 20 min we put the plate into the incubator for 48 hours at 29℃.
Results: Sample 1, resulted in no detection of a virus, even after dilution. As of 9/3/2021 we are starting on Sample 2 for Direct Isolation.
Conclusion: We did not find any phages in sample #1 so we went on to do Direct Isolation for sample #2.
Analysis(for Sample 1 on Direct Isolation and the Serial Dilution): Our expectations for this research experiment with sample one was to isolate a bacteriophage that could be then used to kill bacteria without any negative effects on the occupant of the species they are living inside of. Our first sample did result in any phages being found through the Direct Isolation and Plaque Assay. We then did Serial Dilution to hopefully dilute the sample and further isolate the possible phages, however the Serial Dilution gave us negative results. We have now started working on isolating the second sample through direct isolation and it will be followed with a plaque assay to further research this sample.
Title: Direct Isolation
Ashley Fannin and Megan Ashcraft
Date: 9/7/21
Sample: 2
Aim/Purpose: To end up extracting and isolating bacteriophages from an environmental sample. And using Plaque Assay to further detect the presence of phages on bacterial lawns.
Protocols: Use aseptic techniques before, during, and after each lab.
Procedures:
- Once our samples were collected we started our lab by using aseptic techniques on our workspace. We washed our hands and put gloves on then sprayed CiDecon and spread it onto the counters with Kimwipes. Following that we sprayed 70% Ethanol to disinfect our counters and used Kimwipes to do so. After being properly sanitized gloves were removed and a Bunsen burner was lit.
- We then took Sample 1, in a 15ml conical tube, and integrated it with the Pyca Media by using a 5ml serological pipette to obtain enough PYCa Media to submerge the sample under 2-3mL.
- Once the sample was submerged, we screwed the lid of the conical tube back on and inverted the sample a few times in order to mix the sample completely.
- Once the sample was mixed thoroughly we incubated the mixture for 2 hours at 250rpm.
- After incubation was complete we allowed the sample to settle by putting it in the balanced centrifuge at 2000 x g for 10 minutes at 12℃ to allow for separation.
- Then using a syringe we removed 2ml of the liquid from the 15ml conical tube
- After the 2ml of liquid was in the syringe we opened the package of the 0.22μm syringe filter while leaving it in the package. Then attached the syringe to the filter and pushed the mixture through the filter dispensing 0.5 ml of the filtrate into a microcentrifuge tube and was capped immediately.
Then we proceeded to perform the Plaque Assay protocol.
- Then we took a culture tube containing 250 μl of the host bacteria and used a serological pipette to dispense 250 μl of the phage sample into the host bacteria.
- After dispensing we gently tapped the tube to make sure the host bacteria and phage sample were mixed.
- We let the mixture sit undisturbed for 10 min, allowing for attachment.
- After the sample set for 10 min we took the top agar from the 55℃ bath and used a syringe to transfer 3ml into the inoculated host tube.
- Immediately aspirated the mixture back into the syringe and transferred it to the appropriate agar plate, hopefully isolating the bacteriophage.
- After the plate set for about 15 min we put the plate into the incubator for 48 hours at 29℃.
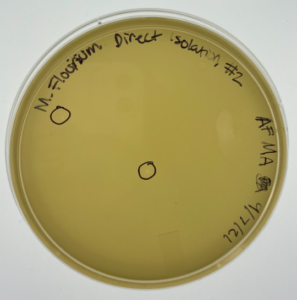
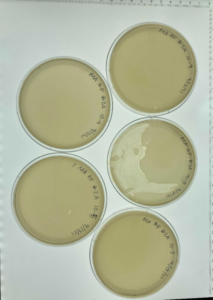
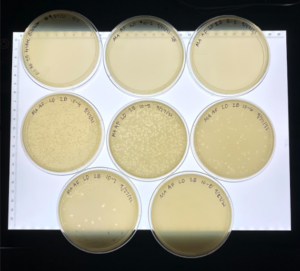
Results: At this point #2 hadn’t been in the incubator for a full 48 hours but this is a progress photo on 9/9/21. The circles indicate possible phages.
Analysis: Our expectations for this research experiment with sample two was to hopefully isolate a bacteriophage that could be then used to kill bacteria without any negative effects on the occupant of the species they are living inside of. Our first sample did not result in any phages being found. We then started working on isolating the second sample through direct isolation and was followed with a plaque assay to further research of this sample. This past week we performed the plaque assay and plating sample #2 on an agar plate to allow for incubation with hopes of a positive result of the presence of our phage. We currently think that there are possible phages in this sample, so we have placed this sample in the refrigerator at 4℃ to allow for slower growth and more time for research. In the meantime we will acquire a second round of samples in case this current sample is also negative and will repeat the experiments necessary to isolate the phage if need be.
Conclusion: We decided to move on while sample 2 was still incubating and in the meantime we will acquire a second round of samples in case this current sample is also negative. And, will repeat the experiments necessary to isolate the phage if need be.
On 9/8/21 we did both Direct and Enriched Isolation on Sample #3
Title: Direct Isolation
Ashley Fannin and Megan Ashcraft
Date: 9/8/21
Sample: 3
Aim/Purpose: To end up extracting and isolating bacteriophages from an environmental sample. And using Plaque Assay to further detect the presence of phages on bacterial lawns.
Protocols: Use aseptic techniques before, during, and after each lab.
Procedures:
- Once our samples were collected we started our lab by using aseptic techniques on our workspace. We washed our hands and put gloves on then sprayed CiDecon and spread it onto the counters with Kimwipes. Following that we sprayed 70% Ethanol to disinfect our counters and used Kimwipes to do so. After being properly sanitized gloves were removed and a Bunsen burner was lit.
- We then took Sample 3, in a 15ml conical tube, and integrated it with the PYCa Media by using a 5ml syringe to obtain enough PYCa Media to submerge the sample under 2-3mL.
- Once the sample was submerged, we screwed the lid of the conical tube back on and inverted the sample a few times in order to mix the sample completely.
- Once the sample was mixed, thoroughly we incubated the mixture for 2 hours at 250rpm.
- After incubation was complete we allowed the sample to settle by putting it in the balanced centrifuge at 2000 gravities for 10 minutes at 12℃ to allow for separation.
- Then using a syringe we removed 2ml of the liquid from the 15ml conical tube
- After the 2ml of liquid was in the syringe we opened the package of the 0.22μm syringe filter while leaving it in the package. Then attached the syringe to the filter and pushed the mixture through the filter dispensing 0.5 ml of the filtrate into a microcentrifuge tube and was capped immediately.
Then we proceeded to perform the Plaque Assay protocol.
- Then we took a culture tube containing 250 μl of the host bacteria and used a serological pipette to dispense 250 μl of the phage sample into the host bacteria.
- After dispensing we gently tapped the tube to make sure the host bacteria and phage sample were mixed.
- We let the mixture sit undisturbed for 10 min, allowing for attachment.
- After the sample set for 10 min we took the top agar from the 55℃ bath and used a syringe to transfer 3ml into the inoculated host tube.
- Immediately aspirated the mixture back into the syringe and transferred it to the appropriate agar plate, hopefully isolating the bacteriophage.
- After the plate set for about 15 min we put the plate into the incubator for 48 hours at 29℃.

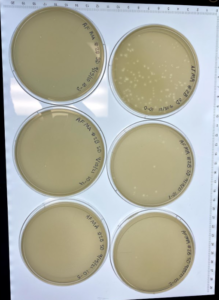
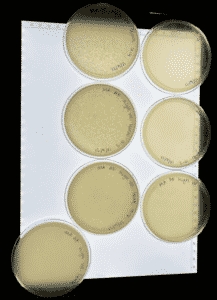
Results: This is sample #3 after 24 hours of incubation and the circles indicate possible phages. We let the sample stay in the incubator for another 24 hours and decided to place it into the refrigerator at 4℃ (don’t have a new picture yet).
Analysis: For this research experiment we hoped that it would give us some success with sample #3. So we decided to follow through with Direct Isolation and Plaque Assay. We did this in order to isolate a bacteriophage that could be then used to kill bacteria without any negative effects on the occupant of the species they are living inside of. Our first sample did result in any phages being found and our second sample is currently ongoing/has a very good chance of containing phages. We worked on isolating the third sample and allowed for the plate to incubate. We saw a promise of phages, so the plate was placed into the refrigerator at 4℃.
Conclusion: We might have phages so we decided to place the sample into the refrigerator at 4℃.
Title: Enriched Isolation
Ashley Fannin and Megan Ashcraft
Date: 9/8/21
Sample: 3
Aim/Purpose: To amplify the phages present in the environmental sample.
Protocols: Use aseptic techniques before, during, and after each lab.
Procedure:
- After we obtained sample 3 we filled a 50ml conical tube with the environmental dirt sample up to the 15 ml line.
- We then used a 5 ml serological pipette to submerge our sample to the 35 ml mark and then briefly vortex to mix.
- We then put our sample into the incubator and incubated the mixture for 2 hours shaking at 250rpm.
- After the incubation we balanced the tubes and centrifuged the sample at 2,000 g x 10 minutes in order to get the soil to the bottom of the sample.
- After the centrifuge we used a syringe to be able to filter the PYCa Media and sample mixture through a 0.22 µm filter to remove unwanted bacteria and soil particles.
- Then we added 0.5 ml of bacterial host culture to the conical tube and let it incubate for 5 days shaking at 220 rpm.
- After our sample was in the incubator for 5 days we used a serological pipette to dispense 1.4 ml of our enriched culture into two 1.5mL centrifuge tubes.
- Once both centrifuge tubes were filled we centrifuged them at 9000 x g for 1 minute, in hopes of creating a pellet of all the unwanted bacteria and sample.
- After the pellet was made in each tube we then used the serological pipette to absorb all of the supernatant and put into two new 1.5mL centrifuge tubes, and cap immediately.
- Then we aspirated about 2 mL of the supernatant and dispensed it into a culture tube containing 250 μl of the host bacteria, letting that mixture sit for 10 min
- After the sample set we took the top agar from the 55℃ bath and used a serological pipette to transfer 3ml into the inoculated host tube.
- Immediately aspirated the mixture back into the syringe and transferred it to the appropriate agar plate, hopefully isolating the bacteriophage.
- Then we transferred the plate into the incubator for 24 – 48 hours.

Results: Our sample did have plaques, however it was contaminated, so we autoclaved this plate.
Analysis: Because our environmental sample #3 was so organic and rich we decided to do both the Enriched Isolation and Direct Isolation. This was our first time doing the Enriched Isolation in hopes that we would really be able to isolate the plaques in this sample. So we went through with the Enriched Isolation and everything went great until we found out that the plate was contaminated but with plaques. However, we already have other previous plaques from Direct Isolations, so we are able to use those instead.
Conclusion: Sample #3 for Enriched was contaminated and is now autoclaved.
Title: Phage Purification
Ashley Fannin and Megan Ashcraft
Date: 9/13/21
Sample: 2A
Aim/Purpose: To generate well-isolated plaques and then to prepare liquid phage samples of decreasing concentrations.
- We were able to find plaques in our sample #2 and #3(direct). So we first used one of the two plaques that we found in sample #2 and labeled it 2A.
- After we made sure we had found the plaque, we then set up our procedure for the serial dilution.
- First we got out 5 1.5mL centrifuge tubes and labeled them 10-1 through 10-5 for the serial dilution.
- Then we put 90mL of our phage buffer into each one of the tubes.
- After that we used a 0.1-10uL pipette tip to poke our plaque and then distributed it into the centrifuge tube labeled 10-1, and was capped immediately.
- After the phage buffer and the plaque were inverted and mixed we used a pipettor to extract 10 ml of the 10-1 dilution and put it into the 10-2 centrifuge tube.
- We continued this process all the way until 10-5.
- After the phage buffer was used to dilute the plaque we then were ready to add 10 μl of the phage buffer and plaque dilution mixture to the culture tube containing 250 μl of the host bacteria.
- Then letting that sit for 10 minutes to allow attachment
- After the 10 min we got our top agar out of the 55℃ bath and used a serological pipette to transfer 3ml into each inoculated host tube at a time.
- Plating each one immediately after the agar was dispensed into each tube, one at a time, starting with 10-1 and going to 10-5.
- After we plated each dilution in our labeled agar plates, we let them sit in the incubator for 24 hours, inorder for growth.
Results: We didn’t necessarily get any clear phages that we wanted to use from this dilution.
Conclusion: After the original dilution of 2A we tried it again, however after we did the dilutions in the centrifuge tubes we realized that we used non sterile tubes, therefore contaminating the experiment and we decided to move to 2B because we had poked 2A twice.
Analysis: Because we did the original serial dilution on 2A and didn’t get much. Then started to do it again from the original plaque, but used non sterile centrifuge tubes so we decided to move on to plaque 2B.
Title: Phage Purification
Ashley Fannin and Megan Ashcraft
Date: 9/13/21
Sample: 2B
Aim/Purpose: To generate well-isolated plaques and then to prepare liquid phage samples of decreasing concentrations.
- We moved on to plaque 2B because we had already punctured 2A twice.
- After we made sure we had found the plaque, we then set up our procedure for the serial dilution.
- First we got out 6 1.5mL centrifuge tubes and labeled them 10-0 through 10-5 for the serial dilution.
- Then we put 90mL of our phage buffer into each one of the tubes.
- After that we used a 1-200uL pipette tip to poke our plaque and then distributed it into the centrifuge tube labeled 10-0, and was capped immediately.
- After the phage buffer and the plaque were inverted and mixed we used a pipettor to extract 10 ml of the 10-0 dilution and put it into the 10-1 centrifuge tube.
- We continued this process all the way until 10-5.
- After the phage buffer was used to dilute the plaque we then were ready to add 10 μl of the phage buffer and plaque dilution mixture to the culture tube containing 250 μl of the host bacteria.
- Then letting that sit for 10 minutes to allow attachment
- After the 10 min we got our top agar out of the 55℃ bath and used a serological pipette to transfer 3ml into each inoculated host tube at a time.
- Plating each one immediately after the agar was dispensed into each tube, one at a time, starting with 10-0 and going to 10-5.
- After we plated each dilution in the corresponding labeled agar plate and then let them sit in the incubator for 24 hours, inorder for growth.
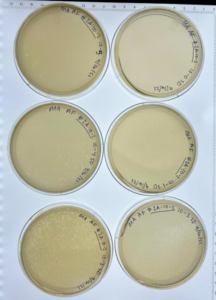
Results: This dilution did result in plaques in most of the plates.
Conclusion: We did a serial dilution for plaque 2B and chose to start another one starting from plate 10-2.
Analysis: We decided to do a second round of serial dilutions picking plaques from the 10-2 plate.
Title: 2nd Serial Dilution
Ashley Fannin and Megan Ashcraft
Date: 9/13/21
Sample: 2B: 10-2
Aim/Purpose: To further generate well-isolated plaques and then to prepare liquid phage samples of decreasing concentrations, through a second round of serial dilutions.
- After we did our serial dilution directly from our sample #2 and plaque 2B we
- After we made sure we had found the plaque, we then set up our procedure for the serial dilution.
- First we got out 6 1.5mL centrifuge tubes and labeled them 10-0 through 10-5 for the serial dilution.
- Then we put 90mL of our phage buffer into each one of the tubes.
- After that we used a 1-200uL pipette tip to poke our plaque and then distributed it into the centrifuge tube labeled 10-0, and was capped immediately.
- After the phage buffer and the plaque were inverted and mixed we used a pipettor to extract 10 ml of the 10-0 dilution and put it into the 10-1 centrifuge tube.
- We continued this process all the way until 10-5.
- After the phage buffer was used to dilute the plaque, we then were ready to add 10 μl of the phage buffer and plaque dilution mixture to the culture tube containing 250 μl of the host bacteria.
- Then letting each of those sit for 10 minutes to allow attachment
- After the 10 min we got our top agar out of the 55℃ bath and used a serological pipette to transfer 3ml into each inoculated host tube at a time.
- Plating each one immediately after the agar was dispensed into each tube, one at a time, starting with 10-0 and going to 10-5.
- After we plated each dilution in our labeled agar plates, we let them sit in the incubator for 24 hours, inorder for growth.
The plates were meant to say “2B:10-2” instead of “2A:10-2”
Results: These plates did result in plaques and were sealed and put into the refrigerator.
Conclusion: So far we can conclude that the plates are resulting plaques
Analysis: Currently we are letting these plates sit in the refrigerator, sealed. And then will continue on 9/27/21 for possibly a third round of serial dilution.
Purification
Title: Collecting Plate Lysates – Spot Titer
Ashley Fannin and Megan Ashcraft
Date: 9/20/21
Sample: 2B: 10-2 – 10-2
Aim/Purpose: To generate a highly concentrated liquid phage sample
Procedures:
- For this procedure we decided to use our 10-2 plate from the 2B: 10-2 serial dilution because it had the most webbing.
- We unsealed our 2B:10-2 – 10-2 plate and used a serological syringe to aspirate 8 ml of our sterile phage buffer.
- Then dispensed the phage buffer on to the plate 2B: 10-2 – 10-2, making sure not to spill the phage buffer.
- After the phage buffer covered the plate we resealed our plate and put it into the refrigerator at 4℃ until 9/22/21.
- After our plate was in the refrigerator for two days we took out our plate and unsealed it.
- Then in order to harvest our lysate we slightly tilted our plate for all the lysate to go to one side.
- Taking a 5 ml syringe we aspirated the lysate and then attached a 0.22 μm filter and dispensed 4.5 ml of lysate into a 15 ml sterile conical tube.
After we had the lysate we decided to perform a Spot Titer
- We first made sure our new plate was room temperature before labeling our plate with the correct sections for the dilution.
- We labeled 9 squares on the plate starting with -1 to -8 and the first square of our control the buffer.
- We then prepared our bacterial lawn by getting a culture tube containing 250 μl of host bacteria and putting in the same tube 3ml of our top agar using a serological syringe.
- Then immediately transferred the mixture and plating it, allowing it to sit for 10 min.
- After we got out 9 1.5mL centrifuge tubes and labeled them 10-0 through 10-8, along with one labeled buffer.
- Then we put 90mL of our phage buffer into each one of the tubes, except for the buffer tube where we put 100mL of the phage buffer.
- After that we used a 1-200uL pipette tip to distribute 10mL of our lysate directly into the 10-1 tube. Then taking 10mL of the 10-1 and transferring it to the 10-2 and repeating until finished.
- Then after all the dilutions were made we took the pipette and put 10mL of each dilution and one for the buffer and put them in the corresponding section on the plate.
- While not ever inverting the plate we put the plate into the incubator for 48 hours.
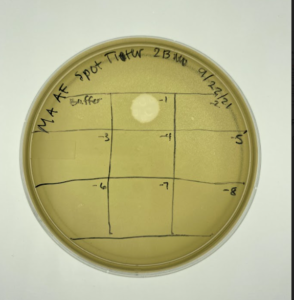
Results: Our plate resulted in phages, however they would be easier to find and use through a serial dilution.
Conclusion: We can concluded that are plaques in our plate, but we need to be able to see them through a serial dilution.
Analysis: We have decided that it would be the best right step to go and do a serial dilution with our collected lysate.
Title: Full Plate Titer
Ashley Fannin and Megan Ashcraft
Date: 9/27/21
Sample: Lysate from 2B
Aim/Purpose: To be able to calculate the total number of phage particles in our lysate by performing serial dilutions.
Procedure:
- First we got out 8 1.5mL centrifuge tubes and labeled them 10-0 through 10-8 for the serial dilution.
- Then we put 90mL of our phage buffer into each one of the tubes.
- After that we used a 1-200uL pipette tip to acquire 10mL of our low volume lysate and then distributed it into the centrifuge tube labeled 10-1, and was capped immediately.
- After the phage buffer and the lysate were inverted and mixed we used a pipettor to extract 10 ml of the 10-0 dilution and put it into the 10-1 centrifuge tube.
- We continued this process all the way until 10-8.
- After the phage buffer was used to dilute the plaque, we then were ready to add 10 μl of the phage buffer and plaque dilution mixture to the culture tube containing 250 μl of the host bacteria.
- Then letting each of those sit for 10 minutes to allow attachment
- After the 10 min we got our top agar out of the 55℃ bath and used a serological pipette to transfer 3ml into each inoculated host tube at a time.
- Plating each one immediately after the agar was dispensed into each tube, one at a time, starting with 10-0 and going to 10-8.
- After we plated each dilution in our labeled agar plates, we let them sit in the incubator for 24 hours, inorder for growth.
Results: Our plates were showing good signs of webbing and phages.
Conclusion: Overall it was easier to see the concentration of our phages because of the fact that every dilution was on it’s own plate. Allowing us to move on and be able to do our calculations.
Analysis: We are then going to proceed to do 7.1 Phage Amplification.
Amplification
Title: Phage Amplification
Ashley Fannin and Megan Ashcraft
Date: 10/4/21
Sample: Low volume lysate from 2B
Aim/Purpose: To make a plate with a very high density of plaques from a lysate of known titer.
Procedure:
- First we needed to estimate how many plaques we were going to have in our webbed plates.
- So we took our 10-6 plate from the previous Titer and counted 111 plaques on the plate.
- Then we continued to go through with the math that is involved with the estimation.
- We estimated how many we had:
= (111 pfu/10 μl) x (103 μl/ ml) x (106)
= 11.1 x 10⁹ pfu/ml
And we needed only one number in front of the decimal:
= 1.1 x 10¹⁰ pfu/ml (what we have)
5. Then we estimated that we want 11,100 plaques or 1.1 x 10⁴ pfu/ml. So we divided what we wanted by what we have:
= 1.1 x 10⁴ pfu/ml ÷ 1.1 x 10¹⁰ pfu/ml
= 1.1 x 10⁻⁶ pfu/ml
6. Then we needed to convert 1.1 x 10⁻⁶ pfu/ml to μl:
= (1.1 x 10⁻⁶ pfu/ml) (1000 μl/ml)
= 1.1 x 10⁻³ μl
7. From that we were able to conclude that we needed all of our plates to be at a 1:1000 dilution which is equivalent to 1.1 x 10⁻³ μl dilution.
We then moved on to the full plate titer of our 1.1 x 10⁻³ μl dilution.
- We started with a 1.5mL microcentrifuge tube of 999 μl of our sterile phage buffer along with 1 μl of our low volume lysate.
- Then after we inverted the first tube a couple of times, we had a second microcentrifuge tube with 63 μl of the sterile phage buffer and in it we added 7 μl of the solution of the first centrifuge tube.
- We inverted that solution, and after that we got 7 culture tubes containing 250 μl of the host bacteria, and added 10 μl into each host bacteria.
- Letting each one sit for 10 minutes to allow for attachment.
- After attachment and making sure not to let them sit for too long due to their fragile nature, we plated them immediately.
- After we got our top agar out of the 55℃ bath and used a serological pipette to transfer 3ml into each inoculated host tube at a time.
- Plating each one immediately after the agar was dispensed into each tube, one at a time.
- After we plated each dilution in our labeled agar plates, we let them sit in the incubator for 24 hours, inorder for growth.

Results: Our procedure resulted in 6 webbed plates of 1.1 x 10⁻³ μl.
Conclusion: Overall it was easier to see the concentration of our phages because of the fact that they were all consistent.
Analysis: We now are able to flood these plates and collect the high volume lysate.
Title: Collecting High Volume Lysate
Ashley Fannin and Megan Ashcraft
Date: 10/5/21
Sample: Webbed Plates
Aim/Purpose: To generate a highly concentrated liquid phage sample.
Procedure:
- For this procedure we used a serological syringe to aspirate 8 ml of our sterile phage buffer into each plate, making sure not to spill the phage buffer.
- After the phage buffer covered each plate we placed our plates into the refrigerator at 4℃ until the morning of 10/6/21.
- Then in order to harvest our lysate we slightly tilted our plate for all the lysate to go to one side.
- Taking a serological syringe and aspirating it into a 50 mL conical tube.
- After each plates’ lysate was put into the 50 mL tube, we took a 5 ml syringe and we aspirated the lysate and then attached a 0.22 μm filter and dispensed all of the lysate into a new 50 mL sterile conical tube.
Title: Full Plate Dilution of High Volume Lysate
Ashley Fannin and Megan Ashcraft
Date: 10/6/21
Sample: High Volume Lysate
Aim/Purpose: To prepare liquid phage samples of decreasing concentrations.
Procedure:
- First we got out 7 1.5mL centrifuge tubes and labeled them 10-1 through 10-7 for the serial dilution.
- Then we put 90 μl of our phage buffer into each one of the tubes, except for 10-1, where we put 100 μl of the phage buffer.
- After that we used a 1-200μl pipette tip to acquire 10mL of our high volume lysate and then distributed it into the centrifuge tube labeled 10-1, and was capped immediately.
- After the phage buffer and the lysate were inverted and mixed we used a pipettor to extract 10 μl of the 10-1 dilution and put it into the 10-2 centrifuge tube.
- We continued this process all the way until 10-7.
- After the phage buffer was used to dilute the plaque, we then were ready to add 10 μl of the phage buffer and plaque dilution mixture to the culture tube containing 250 μl of the host bacteria.
- Then letting each of those sit for 10 minutes to allow attachment
- After the 10 min we got our top agar out of the 55℃ bath and used a serological pipette to transfer 3ml into each inoculated host tube at a time.
- Plating each one immediately after the agar was dispensed into each tube, one at a time, starting with 10-1 and going to 10-7.
- After we plated each dilution in our labeled agar plates, we let them sit in the incubator for 24 hours, inorder for growth.
Results: We have a very nice spread dilution to use for more calculations.
Conclusion: Overall it was easier to see the concentration of our phages because of the fact that every dilution was on it’s own plate. Allowing us to move on and be able to do our calculations for further amplification.
Analysis: We will continue with our estimation calculations on 10/11/21
DNA Extraction
Title: Archiving Phage Sample
Ashley Fannin and Megan Ashcraft
Date: 10/13/21
Sample: HVL 2.2 x 10^11 pfu/ml
Aim/Purpose: To prepare a high-titer lysate for long-term storage
Procedure:
- We certified our phage on Phagesdb.org
- We retrieved two barcoded tubes for storage from the University of Pittsburgh and a third tube for storage.
- We printed labels and labeled each tube
- Then we prepared our DMSO/Lysate mixture, by dispensing 4.0 ml of your high-titer lysate into a sterile 15 ml conical tube.
- Next we added 280 μl DMSO to the tube, cap the tube, and then vortex the mixture.
- We filled the tubes with cryo beads and then submerged 1.4mL about of our lysate and DMSO mixture.
- Then they have been kept in the fridge to present day.
Title: Day One DNA Extraction
Ashley Fannin and Megan Ashcraft
Date: 10/15/21
Sample: 5ml HVL
Aim/Purpose: Isolate the DNA from the HVL in order to have a pure concentration of the DNA to analyze.
Procedure:
- Gently mix your HVL, then aliquot 5mL of your lysate into a 15 mL conical tube. Give that tube to a GSI or TA who will add 20uL of nuclease mix for you.
- Once nuclease has been added, gently invert the tube and incubate at 37°C for 10min.
- Aliquot lysate into 5 microfuge tubes, 1mL each.
- To each tube, add 20uL of ZnCl2, mix gently by inversion, and incubate at 37°C for 5min. This “precipitates” the phage.
- Centrifuge at 10,000rpm for 1 min to pellet the phage.
STEPS 6 and 7 MUST BE DONE QUICKLY AND EFFICIENTLY
- KEEP THE PELLET. Remove supernatants by aspiration, but try not to disturb the pellet. Discard the liquid filled pipette tips in the sharps trash.
- Resuspend pellets in 500uL TES buffer per tube, and incubate at 60°C for 15min. This will denature the capsids, exposing the DNA, while protecting it from the nuclease activity (EDTA in the TES sequesters divalent cations required for nuclease function).
- Add 1uL of Proteinase K and mix gently. Incubate at 37°C for 10min to completely eliminate any residual nuclease activity.
- Add 60uL of potassium acetate to each tube. Mix well and leave on ice for 15 min. A white, dense precipitate will form. This represents your capsids.
- Centrifuge at 4°C for 1min at 12,000rpm to pellet the capsids. KEEP THE SUPERNATANTS containing your DNA, and place them into new microfuge tubes. You can throw away the tubes with the pellets.
- Add 500uL of isopropanol to each of the tubes with the supernatant, mix, and leave on ice overnight (or until next lab).
Results: The samples were compromised due to assisting classmate error. Day one was repeated the following class time on 10/18/21.
Title: DNA Extraction Day One
Ashley Fannin and Megan Ashcraft
Date: 10/18/21
Sample: High Volume Lysate
Aim/Purpose: To prepare liquid phage samples of decreasing concentrations.
Procedures:
- Gently mix your HVL, then aliquot 5mL of your lysate into a 15 mL conical tube. Give that tube to a GSI or TA who will add 20uL of nuclease mix for you.
- Once nuclease has been added, gently invert the tube and incubate at 37°C for 10min.
- Aliquot lysate into 5 microfuge tubes, 1mL each.
- To each tube, add 20uL of ZnCl2, mix gently by inversion, and incubate at 37°C for 5min. This “precipitates” the phage.
- Centrifuge at 10,000rpm for 1 min to pellet the phage.
STEPS 6 and 7 MUST BE DONE QUICKLY AND EFFICIENTLY
- KEEP THE PELLET. Remove supernatants by aspiration, but try not to disturb the pellet. Discard the liquid filled pipette tips in the sharps trash.
- Resuspend pellets in 500uL TES buffer per tube, and incubate at 60°C for 15min. This will denature the capsids, exposing the DNA, while protecting it from the nuclease activity (EDTA in the TES sequesters divalent cations required for nuclease function).
- Add 1uL of Proteinase K and mix gently. Incubate at 37°C for 10min to completely eliminate any residual nuclease activity.
- Add 60uL of potassium acetate to each tube. Mix well and leave on ice for 15 min. A white, dense precipitate will form. This represents your capsids.
- Centrifuge at 4°C for 1min at 12,000rpm to pellet the capsids. KEEP THE SUPERNATANTS containing your DNA, and place them into new microfuge tubes. You can throw away the tubes with the pellets.
- Add 500uL of isopropanol to each of the tubes with the supernatant, mix, and leave on ice overnight (or until next lab).
Results: Precipitation did not form the fluff layer to the degree desired but was deemed acceptable to continue onto Day 2 procedures after being left on ice overnight for the next lab day.
Conclusions: We believe the fluff layer did not form completely to the desired thickness because we did not mix as aggressively enough before icing.
Title: DNA Extraction Day Two
Ashley Fannin and Megan Ashcraft
Date: 10/18/21
Sample: High Volume Lysate
Aim/Purpose: To prepare liquid phage samples of decreasing concentrations.
Procedures:
- We centrifuged our tubes at 14000 rpm for 10 minutes, to get a DNA pellet
- Then we discarded the supernatant liquid to isolate the pellet
- Then we added 250 ul of our 70% ethanol to each tube, and then centrifuged at top speed for 1 minute, in order for us to wash our pellet
- Then we dried the DNA pellets at room temperature by turning upside-down onto paper towels, tapping out excess liquid, and leaving upside-down until pellets begin to turn clear. The tubes can also be placed in a fume hood or 30⁰C incubator to help with drying. DO NOT RUSH THIS STEP! If not dry enough, you will NOT recover enough DNA!
- We resuspended the first pellet in 50uL nuclease-free water. Then use that solution to resuspend the next pellet. Continue until all 5 pellets have been resuspended in the same 50uL of water
- We then checked our DNA concentration and quality with the Nanodrop.
Results:
Conclusion: We need to redo our Day 1 to hopefully get less contamination and a high concentration.
Title: 2nd – DNA Extraction Day One
Ashley Fannin and Megan Ashcraft
Date: 10/21/21
Sample: High Volume Lysate
Aim/Purpose: To prepare liquid phage samples of decreasing concentrations.
Procedures:
- Gently mix your HVL, then aliquot 5mL of your lysate into a 15 mL conical tube. Give that tube to a GSI or TA who will add 20uL of nuclease mix for you.
- Once nuclease has been added, gently invert the tube and incubate at 37°C for 10min.
- Aliquot lysate into 5 microfuge tubes, 1mL each.
- To each tube, add 20uL of ZnCl2, mix gently by inversion, and incubate at 37°C for 5min. This “precipitates” the phage.
- Centrifuge at 10,000rpm for 1 min to pellet the phage.
STEPS 6 and 7 MUST BE DONE QUICKLY AND EFFICIENTLY
- KEEP THE PELLET. Remove supernatants by aspiration, but try not to disturb the pellet. Discard the liquid filled pipette tips in the sharps trash.
- Resuspend pellets in 500uL TES buffer per tube, and incubate at 60°C for 15min. This will denature the capsids, exposing the DNA, while protecting it from the nuclease activity (EDTA in the TES sequesters divalent cations required for nuclease function).
- Add 1uL of Proteinase K and mix gently. Incubate at 37°C for 10min to completely eliminate any residual nuclease activity.
- Add 60uL of potassium acetate to each tube. Mix well and leave on ice for 15 min. A white, dense precipitate will form. This represents your capsids.
- Centrifuge at 4°C for 1min at 12,000rpm to pellet the capsids. KEEP THE SUPERNATANTS containing your DNA, and place them into new microfuge tubes. You can throw away the tubes with the pellets.
- Add 500uL of isopropanol to each of the tubes with the supernatant, mix, and leave on ice overnight (or until next lab).
Results: So far precipitation did form more than the first time. The tubes are going to sit on ice in the refrigerator at 4℃ until 10/25/21
Conclusions: We will proceed with day 2 procedures on 10/25/21.
Title: 2nd – DNA Extraction Day Two
Ashley Fannin and Megan Ashcraft
Date: 10/25/21
Sample: High Volume Lysate
Aim/Purpose: To prepare liquid phage samples of decreasing concentrations.
Procedures:
- We centrifuged our tubes at 14000 rpm for 10 minutes, to get a DNA pellet
- Then we discarded the supernatant liquid to isolate the pellet
- Then we added 250 ul of our 70% ethanol to each tube, and then centrifuged at top speed for 1 minute, in order for us to wash our pellet
- Then we dried the DNA pellets at room temperature by turning upside-down onto paper towels, tapping out excess liquid, and leaving upside-down until pellets begin to turn clear. The tubes can also be placed in a fume hood or 30⁰C incubator to help with drying. DO NOT RUSH THIS STEP! If not dry enough, you will NOT recover enough DNA!
- We resuspended the first pellet in 50uL nuclease-free water. Then use that solution to resuspend the next pellet. Continue until all 5 pellets have been resuspended in the same 50uL of water
- We then checked our DNA concentration and quality with the Nanodrop.
Results:
Conclusion: Our results were more contaminated and worse so we decided redo it a third time.
Title: 3rd – DNA Extraction Day One
Ashley Fannin and Megan Ashcraft
Date: 10/27/21
Sample: High Volume Lysate
Aim/Purpose: To prepare liquid phage samples of decreasing concentrations.
Procedures:
- Gently mix your HVL, then aliquot 5mL of your lysate into a 15 mL conical tube. Give that tube to a GSI or TA who will add 20uL of nuclease mix for you.
- Once nuclease has been added, gently invert the tube and incubate at 37°C for 10min.
- Aliquot lysate into 5 microfuge tubes, 1mL each.
- To each tube, add 20uL of ZnCl2, mix gently by inversion, and incubate at 37°C for 5min. This “precipitates” the phage.
- Centrifuge at 10,000rpm for 1 min to pellet the phage.
STEPS 6 and 7 MUST BE DONE QUICKLY AND EFFICIENTLY
- KEEP THE PELLET. Remove supernatants by aspiration, but try not to disturb the pellet. Discard the liquid filled pipette tips in the sharps trash.
- Resuspend pellets in 500uL TES buffer per tube, and incubate at 60°C for 15min. This will denature the capsids, exposing the DNA, while protecting it from the nuclease activity (EDTA in the TES sequesters divalent cations required for nuclease function).
- Add 1uL of Proteinase K and mix gently. Incubate at 37°C for 10min to completely eliminate any residual nuclease activity.
- Add 60uL of potassium acetate to each tube. Mix well and leave on ice for 15 min. A white, dense precipitate will form. This represents your capsids.
- Centrifuge at 4°C for 1min at 12,000rpm to pellet the capsids. KEEP THE SUPERNATANTS containing your DNA, and place them into new microfuge tubes. You can throw away the tubes with the pellets.
- Add 500uL of isopropanol to each of the tubes with the supernatant, mix, and leave on ice overnight (or until next lab).
Results: So far precipitation did form more than the first time. The tubes are going to sit on ice in the refrigerator at 4℃ overnight.
Conclusions: We will proceed with day 2 procedures on 10/28/21.
Title: 3rd – DNA Extraction Day Two
Ashley Fannin and Megan Ashcraft
Date: 10/28/21
Sample: High Volume Lysate
Aim/Purpose: To prepare liquid phage samples of decreasing concentrations.
Procedures:
- We centrifuged our tubes at 14000 rpm for 10 minutes, to get a DNA pellet
- Then we discarded the supernatant liquid to isolate the pellet
- Then we added 250 ul of our 70% ethanol to each tube, and then centrifuged at top speed for 1 minute, in order for us to wash our pellet
- Then we dried the DNA pellets at room temperature by turning upside-down onto paper towels, tapping out excess liquid, and leaving upside-down until pellets begin to turn clear. The tubes can also be placed in a fume hood or 30⁰C incubator to help with drying. DO NOT RUSH THIS STEP! If not dry enough, you will NOT recover enough DNA!
- We resuspended the first pellet in 50uL nuclease-free water. Then use that solution to resuspend the next pellet. Continue until all 5 pellets have been resuspended in the same 50uL of water
- We then checked our DNA concentration and quality with the Nanodrop.
Results:
Conclusion: We have concluded that we got the best results from our first try and decided to use our first try for TEM.
Title: 4th- DNA Extraction Day One
Ashley Fannin and Megan Ashcraft
Date: 11/8/21
Sample: HVL
Aim/Purpose: To extract DNA
Procedures:
- Gently mix your HVL, then aliquot 5mL of your lysate into a 15 mL conical tube. Give that tube to a GSI or TA who will add 20uL of nuclease mix for you.
- Once nuclease has been added, gently invert the tube and incubate at 37°C for 10min.
- Aliquot lysate into 5 microfuge tubes, 1mL each.
- To each tube, add 20uL of ZnCl2, mix gently by inversion, and incubate at 37°C for 5min. This “precipitates” the phage.
- Centrifuge at 10,000rpm for 1 min to pellet the phage.
STEPS 6 and 7 MUST BE DONE QUICKLY AND EFFICIENTLY
- KEEP THE PELLET. Remove supernatants by aspiration, but try not to disturb the pellet. Discard the liquid filled pipette tips in the sharps trash.
- Resuspend pellets in 500uL TES buffer per tube, and incubate at 60°C for 15min. This will denature the capsids, exposing the DNA, while protecting it from the nuclease activity (EDTA in the TES sequesters divalent cations required for nuclease function).
- Add 1uL of Proteinase K and mix gently. Incubate at 37°C for 10min to completely eliminate any residual nuclease activity.
- Add 60uL of potassium acetate to each tube. Mix well and leave on ice for 15 min. A white, dense precipitate will form. This represents your capsids.
- Centrifuge at 4°C for 1min at 12,000rpm to pellet the capsids. KEEP THE SUPERNATANTS containing your DNA, and place them into new microfuge tubes. You can throw away the tubes with the pellets.
- Add 500uL of isopropanol to each of the tubes with the supernatant, mix, and leave on ice overnight (or until next lab).
Results/Conclusion: We will move onto Day two of DNA Extraction on 11/9/21.
Title: 4th – DNA Extraction Day Two
Ashley Fannin and Megan Ashcraft
Date: 11/9/21
Sample: DNA Day 1
Aim/Purpose: To extract our DNA
Procedures:
- We centrifuged our tubes at 14000 rpm for 10 minutes, to get a DNA pellet
- Then we discarded the supernatant liquid to isolate the pellet
- Then we added 250 ul of our 70% ethanol to each tube, and then centrifuged at top speed for 1 minute, in order for us to wash our pellet
- Then we dried the DNA pellets at room temperature by turning upside-down onto paper towels, tapping out excess liquid, and leaving upside-down until pellets begin to turn clear. The tubes can also be placed in a fume hood or 30⁰C incubator to help with drying. DO NOT RUSH THIS STEP! If not dry enough, you will NOT recover enough DNA!
- We resuspended the first pellet in 50uL nuclease-free water. Then use that solution to resuspend the next pellet. Continue until all 5 pellets have been resuspended in the same 50uL of water
- We then checked our DNA concentration and quality with the Nanodrop.
Results/Conclusion: Our results for this DNA Extraction were significantly worse than the previous. And because of the DNA deadline we decided to go ahead a re precipitate our two best DNA results.
Title: Ethanol Precipitation of RNA/DNA
Ashley Fannin and Megan Ashcraft
Date: 11/10/21
Sample: DNA Extraction #3 and #3.2
Aim/Purpose: To prepare liquid phage samples of decreasing concentrations.
Procedures:
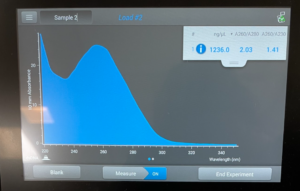
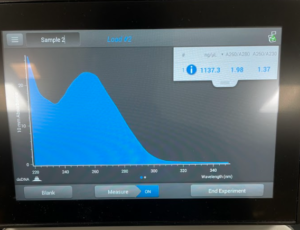
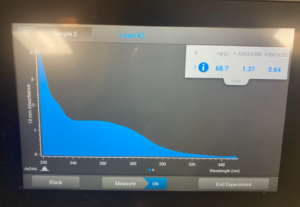
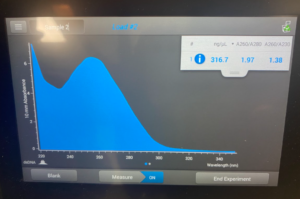
To start this we decided to use our DNA 3 and 3.2. To get what we call 3.2 DNA is we took the tubes at the end of the DNA extraction for #3 where you resuspend the pellet and then Nanodrop it. And, basically re-resuspended our pellet and did the Nanodrop again to see if we could get a better candidate for the precipitation protocol. So after we did the Nanodrop for #3.2 this was the result:
- We started by collecting the materials needed: 3M Sodium Acetate, ice-cold 100% Ethanol, extracted DNA from phage samples, micropipettes, microcentrifuge tube.
- We used our two microcentrifuge tubes containing the extracted DNA (#3 and #3.2).
- Both tubes had the DNA samples extracted via micropipette, the volume recorded and aspirated into one final microcentrifuge tube.
- #3 had about 61ul of DNA and #3.2 had about 50ul of DNA. We then added them together for a final volume of 111ul.
- We then divided 111ul by 10 to see how much Sodium Acetate was needed. And came to the number 11.1ul of Sodium Acetate.
- Then we multiplied the total volume of 111ul by 2 (since we were using 2 samples) and got 222ul of the 100% ethanol to be put into the tube with the DNA and acetate.
- The tube was vortexed lightly (on 5) and given to the -80°C freezer for about 1 hour.
- After one hour , the tube was placed in the centrifuge at 14,000rpm at 4°C for 30 minutes.
- After 30 minutes, the supernatant was removed with a pipette and the pellet was left in the tube.
- 0.5ml of ice-cold 75% Ethanol was added to the tube with the pellet and placed in the centrifuge at 14,000rpm at 4°C for 10 minutes.
- After 10 minutes, the supernatant was removed with a pipette and the pellet was left in the tube.
- 0.5ml of ice-cold 75% Ethanol was added to the tube for a second time with the pellet and placed in the centrifuge at 14,000rpm at 4°C for 10 minutes.
- After 10 minutes, the supernatant was removed via pipette and the pellet was left in the tube.
- The tube was placed in the centrifuge on the lab bench for 1 minute at top speed.
- The tube was placed in a heat block at 37°C for 10 minutes to dry.
- After the pellet was dried, 50μl of nuclease-free water was added to the tube via pipette.
- The tube was gently flicked with a finger 4 times.
- 1μl of nuclease-free water was released on the Nanodrop pedestal to calibrate the Nanodrop.
- The pedestal was then wiped with a kim-wipe.
- 1μl of the precipitated DNA sample was released on the Nanodrop pedestal.
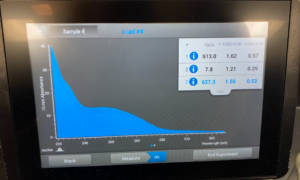
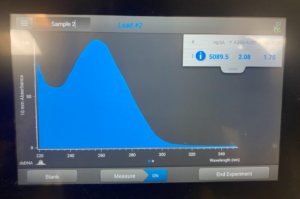
Results/Conclusion: Our results were a very high concentration and then we moved on to do a Qubit reading, and then to restriction enzyme digest.
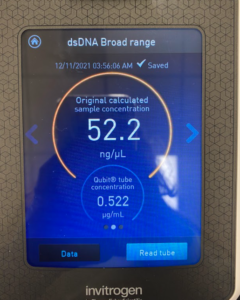
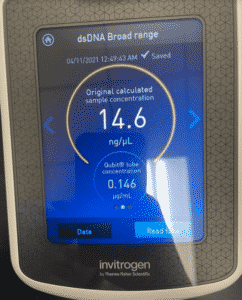
Title: Qubit Reading
Ashley Fannin and Megan Ashcraft
Date: 11/11/21
Sample: DNA Precipitation Sample
Aim/Purpose: To get another good reading of the concentration of our DNA
Procedures:
- The DNA was tested in the Qubit 3.
- Three microcentrifuge tubes were retrieved from the bag next to the Qubit.
- One 1.5 microcentrifuge tube was collected.
- 796μl of broad range Qubit buffer was added to the 1.5 microcentrifuge tube with a micropipette.
- Then 4μl of broad range reagent dye was added to the tube of the buffer with a micropipette.
- The tube was lightly vortexed.
- Then we labeled three small tubes “1, 2, and D”.
- 190μl of the buffer/dye solution was added to each tube labeled “1” and “2” via micropipette.
- 198μl of the buffer/dye solution was added to the tube labeled “D” via micropipette.
- 10μl of standard 1 was added to the tube labeled “1” via micropipette.
- 10μl of standard 2 was added to the tube labeled “2” via micropipette.
- 2μl of the DNA to be tested was added to the tube labeled “D” via micropipette.
- All three tubes were vortexed lightly and left to sit undisturbed for 2 minutes.
- The Qubit was plugged in.
- Double stranded DNA was selected.
- Broad range was selected.
- The button “read standards” was selected.
- Tube 1 was placed into the slot and the “read standard” button was selected.
- Tube 1 was removed.
- Tube 2 was placed into the slot and the “read standard” button was selected.
- Tube 2 was removed.
- Tube D was placed into the slot and the “read sample” button was selected.
- A photo of the results was taken and tube D was removed.
- All four tubes were then autoclaved.
Results/Conclusion: The results were a very high concentration and we decided to move on to the enzyme Digest protocol.
Characterization
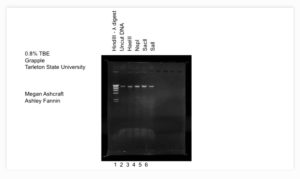
Title: Gel Electrophoresis
Ashley Fannin and Megan Ashcraft
Date: 11/3/21
Sample: DNA Sample
Aim/Purpose: Gel electrophoresis is a technique for sorting DNA fragments by size. The gel is made with agarose polymer, which is bought as a powder, suspended in a liquid buffer, and melted before use. The amount of agarose in your gel is determined by the size of the DNA fragments you want to separate. Typically, agarose gels are made at concentrations ranging from 0.7% to 2%.
Procedures:
- First we prepared enough of our agarose gel mixture to be able to cover the combs and make wells in the gel.
- (insert math, I have to ask about this on 11/8/21)
- After we weighed the correct amount of our agarose powder to an erlenmeyer flask, we then added the correct amount of our 1X TBE buffer.
- Swirled around the mixture, stopped the top with a rolled paper towel or tampon and heated the mixture until clear, making sure not to let it boil too much.
- We removed the flask from the microwave and let it cool.
- Once the mixture cooled we added the dye and then proceeded to let the gel set in the electrophoresis apparatus, with the comb set.
- We let that cool for 15-20 minutes.
- After the gel cooled we removed the comb straight up.
- Then we proceeded to pour our 1X TBE buffer in the apparatus allowing it to cover the gel by about a ¼ inch, while also filling the sides.
Then proceeded on to loading our samples into for gel electrophoresis
- Then we added 5ul of concentrated 6x loading dye to each sample.
- Then we proceeded to fill each well in this order: ladder, HaeIII, NspI, SacII, and SalI.
- Then we ran the gel for an hour and then photographed it.

Results: The results of our gel electrophoresis was weak banding, showing that the concentration of our DNA was not as strong as we needed it to be.
Conclusion: Because our DNA was not strong enough, we have to go back to our two day DNA extraction steps and redo them. Unfortunately, because we need 5ml of our HVL to do this step we have to make more HVL from our LVL to start our DNA extraction.
Title: Mounting Samples for TEM
Ashley Fannin and Megan Ashcraft
Date: 10/28/21
Sample: HVL
Aim/Purpose: To prepare liquid phage samples of decreasing concentrations.
Procedures:
- We first transferred 1 ml of our high volume lysate(HVL) into a sterile centrifuge tube and centrifuged for 1 hour at 4℃ at top speed (14,000 rpm).
- We then removed as much of the supernatant as possible, while not disturbing the concentrated phage at the bottom of the tube.
- Add 100 μl of the phage buffer and let it resuspend at 4℃ for 30 minutes.
- Then we made our grid, by taking a 5 x 5 cm piece of parafilm and placed it on the lid of a petri dish.
- Then placed a PELCO Tab on the piece of parafilm, making sure to peel both sides.
- We then used EM forceps to remove a fresh grid and only touch the very edge to the PELCO Tab, with the dark side up.
- We placed 10 μl of our lysate on the grid without touching the grid with the tip.
- We allowed this to sit for 2 minutes.
- Then used a small piece of paper (flat edge) to carefully absorb the excess fluid off.
- Then we carefully placed sterile water onto the grid and allowed it to sit for two minutes.
- And absorbed it with a new piece of paper, we did this part a total of two times.
- Then we added 10 μl of 1% uranyl acetate to the grid.
- Let it sit for 2 minutes.
- Again absorb the excess with the flat edge of a piece of paper.
- We put the grid in the storage box in B4.
Results: We don’t currently know the results, however our grid was dropped, so we had to redo it.
Title: Making more HVL
Ashley Fannin and Megan Ashcraft
Date: 11/4/21
Sample: Low Volume Lysate
Aim/Purpose: To make a plate with a very high density of plaques from a lysate of known titer.
Procedures:
- We started with a 1.5mL microcentrifuge tube of 999 μl of our sterile phage buffer along with 1 μl of our low volume lysate.
- Then after we inverted the first tube a couple of times, we had a second microcentrifuge tube with 63 μl of the sterile phage buffer and in it we added 7 μl of the solution of the first centrifuge tube.
- We inverted that solution, and after that we got 6 culture tubes containing 250 μl of the host bacteria, and added 10 μl into each host bacteria.
- Letting each one sit for 10 minutes to allow for attachment.
- After attachment and making sure not to let them sit for too long due to their fragile nature, we plated them immediately.
- After we got our top agar out of the 55℃ bath and used a serological pipette to transfer 3ml into each inoculated host tube at a time.
- Plating each one immediately after the agar was dispensed into each tube, one at a time.
- After we plated each dilution in our labeled agar plates, we let them sit in the incubator for 24 hours, inorder for growth.
Results/Conclusion: Lysate stayed in the refrigerator at 4℃ overnight and then the HVL was ready to be collected.
Title: Collecting High Volume Lysate
Ashley Fannin and Megan Ashcraft
Date: 11/5/21 & 11/7/21
Sample: Webbed Plates
Aim/Purpose: To generate a highly concentrated liquid phage sample.
Procedure:
- For this procedure we used a serological syringe to aspirate 8 ml of our sterile phage buffer into each plate, making sure not to spill the phage buffer.
- After the phage buffer covered each plate we placed our plates into the refrigerator at 4℃ until the morning of 10/6/21.
- Then in order to harvest our lysate we slightly tilted our plate for all the lysate to go to one side.
- Taking a serological syringe and aspirating it into a 50 mL conical tube.
- After each plates’ lysate was put into the 50 mL tube, we took a 5 ml syringe and we aspirated the lysate and then attached a 0.22 μm filter and dispensed all of the lysate into a new 50 mL sterile conical tube.
Results/Conclusion: We have now collected our new HVL and are able to use it for more DNA Extractions.
Title: Restriction Enzyme Digests
Ashley Fannin and Megan Ashcraft
Date: 11/11/21
Sample: DNA Sample
Aim/Purpose: To cut your phage genome into multiple fragments based on its DNA sequence
Procedures:
- First we gently mixed our DNA sample by either flicking the closed tube.
- Incubated the tube at 65 °C for 10 minutes, and then quickly placed it on ice. Quick spined the tube in a microcentrifuge for less than 1 minute to move all of the liquid to the bottom of the tube.
- Using the concentration of our DNA sample, calculate the volume of DNA sample needed to obtain 0.5 µg of DNA.
- Then we added: 2.5ul of the 10X Reaction Buffer, 0.5ul of the reaction enzyme, 5ul of DNA, and 17ul of nuclease free water into each tube. Except for our uncut tube we did 17.5ul of nuclease free water due to the lack of the reaction enzyme. To end with a total of 25ul in each tube.
- We quickly spined the tube in a microcentrifuge for less than 1 minute to move all of the liquid to the bottom of the tube.
- Then incubated them at 37℃ for one hour.
- Then for each enzyme we used neb.com and looked up all of our enzymes: HaeIII, NspI, SacII, and SalI, to see how much longer we should incubate them. For HaeIII it was 80℃ for 20 min and for NspI, SacII, and SalI, it was 65℃ for 20 min.
- Then we stored them in -20℃ until we needed them for gel electrophoresis.
Results/Conclusion: We stored them until we needed them for gel electrophoresis.
Title: Gel Electrophoresis
Ashley Fannin and Megan Ashcraft
Date: 11/11/21
Sample: DNA Sample
Aim/Purpose: Gel electrophoresis is a technique for sorting DNA fragments by size. The gel is made with agarose polymer, which is bought as a powder, suspended in a liquid buffer, and melted before use. The amount of agarose in your gel is determined by the size of the DNA fragments you want to separate. Typically, agarose gels are made at concentrations ranging from 0.7% to 2%.
Procedures:
- First we prepared enough of our agarose gel mixture to be able to cover the combs and make wells in the gel.
- After we weighed the correct amount of our agarose powder (0.24g) and put it into an erlenmeyer flask, we then added 30ml of our 1X TBE buffer.
- Swirled around the mixture, stopped the top with a rolled paper towel(tampon) and heated the mixture for 30 seconds then swirled and then another 30 seconds until clear, making sure not to let it boil too much.
- We removed the flask from the microwave and let it cool.
- Once the mixture cooled we added the Ethidium Bromide dye and then proceeded to let the gel set in the electrophoresis apparatus, with the comb set.
- We let that cool for 15-20 minutes.
- Then we proceeded to pour our 1X TBE buffer in the apparatus allowing it to cover the gel by about a ¼ inch, while also filling the sides.
- Then we removed the comb straight up.
- We also made the ladder which consisted of: 1ul of Hindi III Digest and 24ul of Nuclease free water.
Then proceeded on to loading our samples into for gel electrophoresis
- Then we added 5ul of concentrated 6x loading dye to each sample.
- And incubated each sample for 5 min at 65℃ with the dye. And then placed them on ice immediately.
- Then we proceeded to fill each well in this order: ladder, uncut DNA, HaeIII, NspI, SacII, and SalI.
- Then we ran the gel for an hour and then photographed it.
Results: The gel resulted in great strong banding and which will be sent off for DNA testing.

This was the picture uploaded to PhagedDB.org: