Discovery of Phambo
Phambo Information
Morphology: Siphoviridae

Sample Collection
| Collector Name |
Brady Morgan | Brady Morgan | Becca Zoda | |
| Sample No. | 1 | 2 | 3 | |
| Date of Collection | 08/28/2022 | 08/28/2022 | 08/27/2022 | |
| Sample Type | soil | soil | soil | |
| General Location | Stephenville, TX | Stephenville, TX | Stephenville, TX | |
| Location Description | Backyard of a home, under a wood post | Between two bushes next to a road | City Park | |
| GPS Coordinates | 32.22378, 98.21723 | 32.22365, 98.21729 | 32.21468N, 98.20113W | |
| Sample Depth | 15 cm | 20 cm | 16cm | |
| Ambient Temperature | 35°C | 35°C | 30°C |
Isolation/Purification
thenTitle: Direct Isolation
Date: 08/31/2022 Redo: No Sample: #1, #2, and #3
Purpose: The purpose of this procedure is to isolate bacteriophages from an environmental soil sample and to infect the host bacteria using a plaque assay.
Notes: Performed direct isolation on soil sample collected from three samples:
Under a wood post. The sample was collected on August, 28, 2022 at 32°13’25.608″N 98°13’2.028″E (32.22378, 98.21723) 8 inches down. Recorded temperature at time of collection: 35°C.
From in between bushes. The sample was collected on August, 28, 2022 at 32°13’25.14″N 98°13’2.244″E (32.22365, 98.21729) 6 inches down. Recorded temperature at time of collection: 35°C.
Near parking lot in the city park. The sample was collected August 27,2022 at 32.21468N, 98.20113W 16 cm down. Recorded ambient temperature was 30°C.
Protocols: Use aseptic techniques
before, during, and after each lab.
Procedure:
- Added 7 mL of the soil sample in to a 15mL conical.
- Added 4 mL enrichment broth to soil sample and incubated the sample while it was vigorously shaken for 2 hours (10:00AM-12:00PM).
- Spun down sample at 4°C, 1,000 RPM, for 10 min and allowed all particles to settle at the bottom.
- Prepared a phage filtrate using the aseptic technique. Using a syringe we removed 2 mL of liquid from the top of the samples and used a 0.22μm filter to filtrate 0.5 mL into microcentrifuge tubes.
We then proceeded to the plaque assay protocol.
- Then we took a culture tube containing 250 μl of the host bacteria and used a serological pipette to dispense 250 μl of the phage sample into the host bacteria.
- After dispensing we carefully tapped the tube to make sure the host bacteria and phage sample were mixed. We let the mixture sit for 10 min, allowing for attachment.
- After the sample set for 10 min we took the top agar from the 55℃ bath and used a syringe to transfer 3ml into the inoculated host tube.
- Immediately aspirated the mixture back into the syringe and transferred it to the appropriate agar plate, hopefully isolating the bacteriophage.
- After the plate set for about 20 min we put the plate into the incubator for 48 hours at 37℃.
Results:
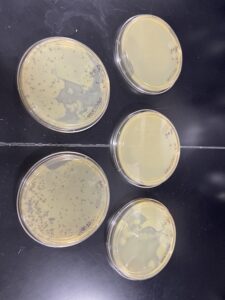
Our phages were present after 48 hours, however, we decided to leave them until 09/07/2022 to continue growing before picking our plaques. No photos taken.
Conclusions and Next Steps:
We concluded that we had a positive samples and had plaques growing on two of our agar samples to use, we then proceeded onto picking our plaque.
Title: Picking a Plaque
Date: 09/07/2022 Redo: No Sample: #1
Purpose: The purpose of this procedure is to retrieve phage particles from a plaque and create a liquid sample.
Notes:
Protocols: Use aseptic technique
s before, during, and after each lab.
Procedure:
- We first prepared our bench for aseptic work and assembled our supplies.
- We then labelled our plaques with a black sharpie by circling them and adding a unique letter.
- Recorded the detailed morphology of each plaque we had circled.
- Using 2 microcentrifuge tubes, we labelled each with the correspoding plaque. Using the aseptic technique we added 100 μl of phage buffer into each microcentrifuge tube.
- Placed a sterile tip onto a p200 micropipettor. Holding the pipettor perpendicular to the agar surface, we gently stabbed the top agar in the center of the plaque.
- Placed the end of the tip into the phage buffer in the corresponding microcentrifuge tube. Then tapped the tip on the wall of the tube and pipette up and down to dislodge phage particles. mixed well by vortexing.
Results:


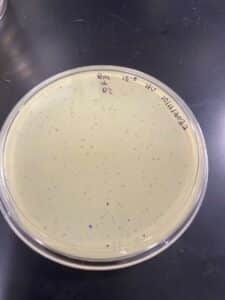
The experiment resulted in multiple small plaques on each agar plate. We chose our first sample plate because it had the biggest and most plaques available and we circled and labeled our plaques. On our agar plate we observed 3 small plaques of varying size. Each plaque was a clear hole with slight cloudiness around the rim.
Conclusions and Next Steps:
We concluded that there were sufficent samples and proceeded onto perform the Serial Dilutions protocol.
Title: Serial Dilutions
Date: 09/07/2022 Redo: No Sample: #1
Purpose: The purpose of this procedure is to prepare liquid phage samples of decreasing concentrations, this is used to manipulate the number of phages in a sample.
Notes:
Protocols:
Use aseptic techniques before, during, and after each lab.
Procedure:
- We began by preparing our bench for aseptic work and assembled our supplies.
- Set up 10-fold serial dilutions by arranging the proper number of microcentrifuge tubes in a rack labeled from 10-1 to 10-8. We then added 90 μl of phage buffer to each of the tubes.
- We then performed our 10-fold dilution by adding 10 μl of our undiluted phage sample to the “10-1” tube and vortexed well. Next, we transferred 10 μl of the “10 -1” sample to the “10-2” tube and vortexed well, we continued this process with all microcentrifuge tubes up to 10-8.
- We then allowed the plates to incubate for 48 hours. Before moving on to plaque assay to visually determine the presence of our phages.
Results:
This experiment resulted in no viable diluted samples. A few of our plates did not set properly, we believe this was due to not giving the plates enough time to cool down before incubation.
Conclusions and Next Steps:
We concluded that our experiment was unsuccessful and we then decided to redo the procedure.
Title: Diluted Plaque Assay
Date: 09/12/2022 Redo: Yes Sample: #2
Purpose: The purpose of this procedure is to plate our liquid phage samples of decreasing concentrations, this is used to manipulate the number of phages in a sample and visually determine the presence of our phage on each plate.
Notes:
Protocols: Use aseptic techniques before, during, and after each lab.
Procedure:
- We began by preparing our bench for aseptic work and assembled our supplies.
- Then we took a culture tube containing 250 μl of the host bacteria and used a serological pipette to dispense 10 μl of each diluted phage sample into the host bacteria.
- After dispensing we carefully tapped the tube to make sure the host bacteria and phage sample were mixed. We let the mixture sit for 10 min, allowing for attachment.
- After each sample set for 10 min we took the top agar from the 55℃ bath and used a syringe to transfer 3ml into the inoculated host tube.
- Immediately aspirated the mixture back into the syringe and transferred it to the appropriate agar plate, hopefully isolating the bacteriophage.
- After the plate set for about 20 min we put the plate into the incubator for 48 hours at 37℃.
Results:
This experiment resulted in no viable diluted samples. There were no visible phages growing on our plates, we believe the wrong plates were used during this procedure and it needed to be redone again.
Conclusions and Next Steps:
We concluded that the diluted samples were not usable and decided to redo the procedure.
Title: Diluted Plaque Assay
Date: 09/14/2
022 Redo: Yes Sample: #2
Purpose:The purpose of this procedure is to plate our liquid phage samples of decreasing concentrations, this is used to manipulate the number of phages in a sample and visually determine the presence of our phage on each plate.
Notes:
Protocols: Use aseptic techniques before, during, and after each lab.
Procedure:
- We began by preparing our bench for aseptic work and assembled our supplies.
- Then we took a culture tube containing 250 μl of the host bacteria and used a serological pipette to dispense 10 μl of each diluted phage sample into the host bacteria.
- After dispensing we carefully tapped the tube to make sure the host bacteria and phage sample were mixed. We let the mixture sit for 10 min, allowing for attachment.
- After each sample set for 10 min we took the top agar from the 55℃ bath and used a syringe to transfer 3ml into the inoculated host tube.
- Immediately aspirated the mixture back into the syringe and transferred it to the appropriate agar plate, hopefully isolating the bacteriophage.
- After the plate set for about 20 min we put the plate into the incubator for 48 hours at 37℃.
Results:
This experiment resulted in no viable diluted samples. While there was phage presence on our plates, there was not enough consistency throughout the plates. We are going to go back and try our other sample.
Conclusions and Next Steps:
We concluded that the diluted samples were not usable and decided to redo the procedure on another sample we collected.
Title: Serial Dilutions
Date: 09/19/2022 Redo: Yes Sample: #2
Purpose: The purpose of this procedure is to prepare liquid phage samples of decreasing concentrations, this is used to manipulate the number of phages in a sample.
Notes:
Protocols: Use aseptic techniques before, during, and after each lab.
Procedure:
- We began by preparing our bench for aseptic work and assembled our supplies.
- Set up 10-fold serial dilutions by arranging the proper number of microcentrifuge tubes in a rack labeled from 10-1 to 10-8. We then added 90 μl of phage buffer to each of the tubes.
- We then performed our 10-fold dilution by adding 10 μl of our undiluted phage sample to the “10-1” tube and vortexed well. Next, we transferred 10 μl of the “10 -1” sample to the “10-2” tube and vortexed well, we continued this process with all microcentrifuge tubes up to 10-8.
- We then allowed the samples to settle and moved onto Diluted Plaque Assay.
Title: Diluted Plaque Assay
Date: 09/19/2022 Redo: Yes Sample: #2
Purpose: The purpose of this procedure is to plate our liquid phage samples of decreasing concentrations, this is used to manipulate the number of phages in a sample and visually determine the presence of our phage on each plate.
Notes:
Protocols: Use aseptic techniques before, during, and after each lab.
Procedure:
- We began by preparing our bench for aseptic work and assembled our supplies.
- Then we took a culture tube containing 250 μl of the host bacteria and used a serological pipette to dispense 10 μl of each diluted phage sample into the host bacteria.
- After dispensing we carefully tapped the tube to make sure the host bacteria and phage sample were mixed. We let the mixture sit for 10 min, allowing for attachment.
- After each sample set for 10 min we took the top agar from the 55℃ bath and used a syringe to transfer 3ml into the inoculated host tube.
- Immediately aspirated the mixture back into the syringe and transferred it to the appropriate agar plate, hopefully isolating the bacteriophage.
- After the plate set for about 20 min we put the plate into the incubator for 48 hours at 37℃.
Results:

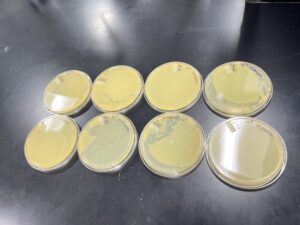
This experiment had positive results, our initial plate 10-1 was a webbed plate with the following plates having fewer plaques until there were none on the final plates. We observed the plaques and determined our clearest independent plaque.
Conclusions and Next Steps:
We concluded that our serial dilution and plaque assay were successful and we decided to move on to our second serial dilution.
Title: Second Serial Dilutions
Date: 09/21/2022 Redo: No Sample: #2
Purpose: The purpose of this procedure is to prepare liquid phage samples of decreasing concentrations, this is used to manipulate the number of phages in a sample.
Notes:
Protocols: Use aseptic techniques before, during, and after each lab.
Procedure:
- We began by preparing our bench for aseptic work and assembled our supplies.
- Set up 10-fold serial dilutions by arranging the proper number of microcentrifuge tubes in a rack labeled from 10-1 to 10-8. We then added 90 μl of phage buffer to each of the tubes.
- We then performed our 10-fold dilution by adding 10 μl of our undiluted phage sample to the “10-1” tube and vortexed well. Next, we transferred 10 μl of the “10 -1” sample to the “10-2” tube and vortexed well, we continued this process with all microcentrifuge tubes up to 10-8.
- We then allowed the samples to settle and moved onto our second Diluted Plaque Assay.
Title: Second Diluted Plaque Assay
Date: 09/21/2022 Redo: No Sample: #2
Purpose: The purpose of this procedure is to plate our liquid phage samples of decreasing concentrations, this is used to manipulate the number of phages in a sample and visually determine the presence of our phage on each plate.
Notes:
Protocols: Use aseptic techniques before, during, and after each lab.
Procedure:
- We began by preparing our bench for aseptic work and assembled our supplies.
- Then we took a culture tube containing 250 μl of the host bacteria and used a serological pipette to dispense 10 μl of each diluted phage sample into the host bacteria.
- After dispensing we carefully tapped the tube to make sure the host bacteria and phage sample were mixed. We let the mixture sit for 10 min, allowing for attachment.
- After each sample set for 10 min we took the top agar from the 55℃ bath and used a syringe to transfer 3ml into the inoculated host tube.
- Immediately aspirated the mixture back into the syringe and transferred it to the appropriate agar plate, hopefully isolating the bacteriophage.
- After the plate set for about 20 min we put the plate into the incubator for 48 hours at 37℃.
Results:

This experiment resulted in positive results, the number of plaques on each plate decreased with each dilution.
Conclusions and Next Steps:
We concluded this was a successful step and will be moving on to collecting plate lysates.
Title: Collecting Plate Lysates (Low Volume)
Date: 09/26/2022 Redo: No Sample: #2
Purpose: The purpose of this procedure is to generate a highly concentrated liquid phage sample.
Notes:
Protocols: Use aseptic techniques before, during, and after each lab.
Procedure:
- We began by preparing our bench for aseptic work and assembled our supplies.
- We identified our webbed plate from our second serial dilution and flooded the plate by applying 8 mL of phage buffer to the webbed plate and we let it sit for 2-4 hours at room temperature.
- The phage buffer was then swirled gently and harvested.
- To harvest the phage buffer we carefully tilted the plate to one side and used a 5 mL syringe to suck up the low-volume lysate and used a 0.22μm filter to collect the filtrate in a 15 ml sterile conical tube.
- The low-volume lysate was stored at 4 degrees celsius until needed again.
Results:
This experiment resulted in a highly concentrated liquid phage sample (low-volume lysate).
Conclusions and Next Steps:
We concluded that our low-volume lysate was successful and decided to move onto Serial Dilutions (6.2) protocol on our sample to titer and set up a Plaque Assay (5.3).
Title: Full Plate Titer
Date: 09/28/2022 Redo: No Sample: #2
Purpose: The purpose of this procedure is to determine the concentration of phage particles in a low-volume lysate by using a plaque assay.
Notes:
Protocols: Use aseptic techniques before, during, and after each lab.
Procedure:
- We began by preparing our bench for aseptic work and assembled our supplies.
- We performed the Serial Dilutions (6.2) protocol on our sample to titer and set up a Plaque Assay (5.3) for the dilutions.
- The next day we checked the plates and confirmed that our dilutions were valid to harvest the phage buffer we carefully tilted the plate to one side and used a 5 mL syringe to suck up the low-volume lysate and used a 0.22μm filter to collect the filtrate in a 15 ml sterile conical tube.
- We then calculated the titer in pfu/ml using the formula:
Titer (pfu/ml) = (# pfu/ volume used in μl) x (103 μl/ml) x dilution factor
Results:

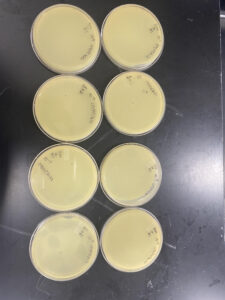
Our results showed that we had a clear webbed plate on plate 5, allowing us to move on.
Conclusions and Next Steps:
We concluded that we could continue on using our webbed plate and moving on to creating a high volume lystate and preforming another serial dilution.
Title: Collecting Plate Lysates (High Volume)
Date: 09/26/2022 Redo: No Sample: #2
Purpose: The purpose of this procedure is to generate a high volume, highly concentrated liquid phage sample.
Notes:
Protocols: Use aseptic techniques before, during, and after each lab.
Procedure:
- We began by preparing our bench for aseptic work and assembled our supplies.
- We identified our webbed plate from our second serial dilution and flooded the plate by applying 8 mL of phage buffer to the webbed plate and we let it sit for 2-4 hours at room temperature.
- The phage buffer was then swirled gently and harvested.
- To harvest the phage buffer we carefully tilted the plate to one side and used a 5 mL syringe to suck up the low-volume lysate and used a 0.22μm filter to collect the filtrate in a 15 ml sterile conical tube.
- The high-volume lysate was stored at 4 degrees celsius until needed again.
Results:
This experiment resulted in a highly concentrated liquid phage sample (high-volume lysate).
Conclusions and Next Steps:
We concluded that our low-volume lysate was successful and decided to move onto Serial Dilutions (6.2) protocol on our sample to titer and set up a Plaque Assay (5.3).
Title: Full Plate Titer
Date: 09/28/2022 Redo: No Sample: #2
Purpose: The purpose of this procedure is to determine the concentration of phage particles in a high-volume lysate by using a plaque assay.
Notes:
Protocols: Use aseptic techniques before, during, and after each lab.
Procedure:
- We began by preparing our bench for aseptic work and assembled our supplies.
- We performed the Serial Dilutions (6.2) protocol on our sample to titer and set up a Plaque Assay (5.3) for the dilutions.
- The next day we checked the plates and confirmed that our dilutions were valid to harvest the phage buffer we carefully tilted the plate to one side and used a 5 mL syringe to suck up the low-volume lysate and used a 0.22μm filter to collect the filtrate in a 15 ml sterile conical tube.
- We then calculated the titer in pfu/ml using the formula:
Titer (pfu/ml) = (# pfu/ volume used in μl) x (103 μl/ml) x dilution factor
Results:
Our results showed a clear webbed plate on plate #8, we were then able to calculate the titer. The titer of this plate came out to be 28.7 x 10^11 pfu/mL.
Conclusions and Next Steps:
We concluded that our high-volume lysate was successful and we decided to make more webbed plates for more lysate and move on to the cryoarchive and database.
Amplification
Title: Making Webbed Plates From Known Titer
Date: 10/19/22 Redo: No Sample: #2
Purpose: This procedure aims to create a plate with a very high density of plaques from a lysate of known titer.
Notes
Protocols: Use aseptic techniques before, during, and after each lab.
Procedure:
- We began by preparing our bench for aseptic work and assembled our supplies.
- Using the titered lysate we prepared from our last round of phage purification using the Collecting Plate Lysates (6.3) protocol and consult the protocols in chapter 6 for calculating titer.
- We then estimated the number of plaques we needed and calculated the volume of lysate necessary to generate a webbed plate.
- Next, we set up a Plaque Assay (5.3) for the calculated titer and plated the sample.
- The next day we checked the plates and confirmed that our dilutions were valid to harvest the phage buffer we carefully tilted the plate to one side and used a 5 mL syringe to suck up the low-volume lysate and used a 0.22μm filter to collect the filtrate in a 15 ml sterile conical tube.
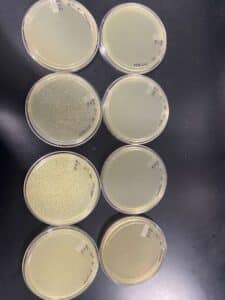
Results:
This procedure resulted in 10 mL of our high-volume lysate.
Conclusions and Next Steps:
We concluded we now had a sufficient amount of high-volume lysate to move on to DNA extraction and imputing our phage in the database.
Title:
Date: Redo: Sample:
Purpose:
Notes:
Results:
Conclusions and Next Steps:
DNA Extraction
Title: DNA Isolation
Date: 10/24/22 Redo: No Sample: #2
Purpose: The purpose of this procedure was to isolate DNA from our sample using ZnCl2.
Notes:
Procedure:
2. Once nuclease has been added, we gently inverted the tube and incubated at 37°C for 10min.
3. Aliquoted lysate into 5 microfuge tubes, 1mL each.
4. To each tube, added 20uL of ZnCl2, mixed gently by inversion, and incubated at 37°C for 5min. This
“precipitated” the phage.
5. Centrifuged at 10,000rpm for 1min to pellet the phage.
6. We then removed supernatants by aspiration, and discarded the liquid filled pipette tips in the sharps trash.
7. Resuspended pellets and in 500uL TES buffer per tube, and incubated at 60°C for 15min. This denatured the capsids, exposing the DNA while protecting it from the nuclease activity.
8. Added 1uL of Proteinase K and mixed gently. Incubated at 37°C for 10min to completely eliminate any residual nuclease activity.
9. Added 60uL of potassium acetate to each tube. Mixed well and leave on ice for 15min. A white,
dense precipitate formed.
11. Added 500uL of isopropanol to each of the tubes with the supernatant, mixed, and left on ice overnight.
Results:
The experiment resulted in a white liquid substance that will be centrifuged to give us pellets to continue the experiment.
Conclusions and Next Steps:
Our experiment was a success and we decided to move on to day 2 of the protocol.
Title: DNA Isolation
Date: 10/26/22 Redo: No Sample: #2
Purpose: The purpose of this procedure was to isolate DNA from our sample using ZnCl2.
Notes:
Procedure:
1. Centrifuged at top speed for 10min to pellet DNA, and discarded the supernatant into a WASTE
tube.
2. Added 250uL of 70% ethanol in each tube, and spun again for 1min, at top speed. This washed our DNA pellet. Discard supernatants into a WASTE tube.
3. Dried the DNA pellets at room temperature by turning them upside-down onto paper towels, tapping out excess liquid, and leaving them upside-down until pellets begin to turn clear.
4. Resuspended the first pellet in 50uL nuclease-free water. Then used that solution to resuspend the next pellet. Continued until all 5 pellets have been resuspended in the same 50uL of water.
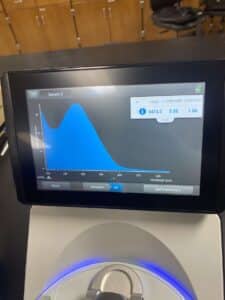
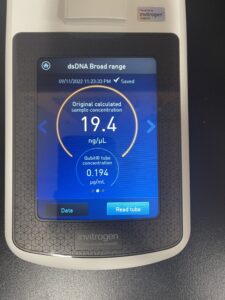
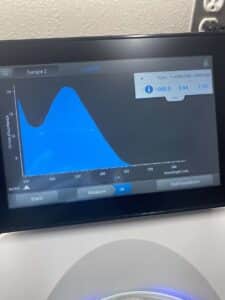
5. Finally, we checked our DNA concentration and quality (A260:280 and A260:230) with the Nanodrop.
Results:
Upon completion of the experiment, we had successfully isolated 5 mL of DNA.
Conclusions and Next Steps:
We concluded that our DNA extraction was successful and moved on to Gel electrophoresis.
Title: DNA Isolation
Date: 11/09/22 Redo: Yes Sample:#2
Purpose: The purpose of this procedure was to isolate DNA from our sample using ZnCl2.
Notes:
Procedure:
2. Once nuclease has been added, we gently inverted the tube and incubated at 37°C for 10min.
3. Aliquoted lysate into 5 microfuge tubes, 1mL each.
4. To each tube, added 20uL of ZnCl2, mixed gently by inversion, and incubated at 37°C for 5min. This
“precipitated” the phage.
5. Centrifuged at 10,000rpm for 1min to pellet the phage.
6. We then removed supernatants by aspiration, and discarded the liquid filled pipette tips in the sharps trash.
7. Resuspended pellets and in 500uL TES buffer per tube, and incubated at 60°C for 15min. This denatured the capsids, exposing the DNA while protecting it from the nuclease activity.
8. Added 1uL of Proteinase K and mixed gently. Incubated at 37°C for 10min to completely eliminate any residual nuclease activity.
9. Added 60uL of potassium acetate to each tube. Mixed well and leave on ice for 15min. A white,
11. Added 500uL of isopropanol to each of the tubes with the supernatant, mixed, and left on ice overnight.
Results:
The experiment resulted in a white liquid substance that will be centrifuged to give us pellets to continue the experiment.
Conclusions and Next Steps:
Our experiment was a success and we decided to move on to day 2 of the protocol.
Title: DNA Isolation
Date: 11/09/22 Redo: Yes Sample: #2
Purpose: The purpose of this procedure was to isolate DNA from our sample using ZnCl2.
Notes:
Procedure:
1. Centrifuged at top speed for 10min to pellet DNA, and discarded the supernatant into a WASTE
tube.
2. Added 250uL of 70% ethanol in each tube, and spun again for 1min, at top speed. This washed our DNA pellet. Discard supernatants into a WASTE tube.
3. Dried the DNA pellets at room temperature by turning them upside-down onto paper towels, tapping out excess liquid, and leaving them upside-down until pellets begin to turn clear.
4. Resuspended the first pellet in 50uL nuclease-free water. Then used that solution to resuspend the next pellet. Continued until all 5 pellets have been resuspended in the same 50uL of water.
5. Finally, we checked our DNA concentration and quality (A260:280 and A260:230) with the Nanodrop.
Results:

Upon completion of the experiment, we had successfully isolated 5 mL of DNA.
Conclusions and Next Steps:
We concluded that our DNA extraction was successful and moved on to Gel electrophoresis.
Characterization
Title: Gel Electrophoresis of Restriction Enzyme Digests
Date: 11/02/22 Redo: No Sample: #2
Purpose: The purpose of this experiment was to separate DNA fragments via agarose gel electrophoresis.
Notes:
Procedure:
- Prepared our genomic DNA.
- Gently mixed our DNA sample by vortexing it on low.
- Incubated the tube at 65 °C for 10 minutes, and then quickly placed it on ice. Quickly spun the tube in a microcentrifuge for less than 1 minute to move all of the liquid to the bottom of the tube.
- Using the concentration of our DNA sample, we calculated the volume of DNA sample needed to obtain 0.5 µg of DNA.
- Set up restriction enzyme digest reactions.
- Set up a reaction in a microcentrifuge tube for each enzyme according to Table 10.1-1. Including a negative control in which no restriction enzyme is added.
- Mixed the contents of each tube gently and quickly spun the tube in a microcentrifuge for less than 1 minute to move all of the liquid to the bottom of the tube. Incubated at 37 °C for 1 hour.
- Quick spin the tube in a microcentrifuge for less than 1 minute to move all of the liquid to the bottom of the tube. Store at -20 °C until ready to use.
- We then moved on to pour a 0.8 % (w/v) agarose gel.
- Set up gel apparatus and prepared enough 0.8 % agarose gel to cover the tips of the gel combs by ~2–3 mm.
- Weighed out the appropriate mass of agarose powder, and then transferred the powder to an Erlenmeyer flask.
- Added the appropriate volume of 1X TBE buffer to the agarose powder. Swirled gently to mix.
- Heated the mixture in the microwave just until it boils (1–2 minutes).
- Allowed the solution to cool to between 50 °C and 60 °C. Once the solution was sufficiently cool, we added the gel dye.
- Poured the agarose/EtBr mixture into the prepared gel apparatus and inserted the comb to cast the wells before cooling the gel for 30 minutes.
- Once the Gel was dried we removed the comb and lifted out the gel platform. We placed the gel into the gel box and connected the cathodes before pouring 1X TBE buffer, submerging the gel by a quarter inch, loading our samples, and running the experiment.
Results:

After running the gel we were unable to see our DNA, we believe this could be due to the DNA extraction process.
Conclusions and Next Steps:
We concluded that it was our DNA that caused the experiment to fail, we decided to redo the DNA extraction protocol and double the amount made, so that we can perform this experiment again to get better results.
Title: Gel Electrophoresis of Restriction Enzyme Digests
Date: 11/09/22 Redo: Yes Sample: #2
Purpose: The purpose of this experiment was to separate DNA fragments via agarose gel electrophoresis.
Notes:
Procedure:
- Prepared our genomic DNA.
- Gently mixed our DNA sample by vortexing it on low.
- Incubated the tube at 65 °C for 10 minutes, and then quickly placed it on ice. Quickly spun the tube in a microcentrifuge for less than 1 minute to move all of the liquid to the bottom of the tube.
- Using the concentration of our DNA sample, we calculated the volume of DNA sample needed to obtain 0.5 µg of DNA.
- Set up restriction enzyme digest reactions.
- Set up a reaction in a microcentrifuge tube for each enzyme according to Table 10.1-1. Including a negative control in which no restriction enzyme is added.
- Mixed the contents of each tube gently and quickly spun the tube in a microcentrifuge for less than 1 minute to move all of the liquid to the bottom of the tube. Incubated at 37 °C for 1 hour.
- Quick spin the tube in a microcentrifuge for less than 1 minute to move all of the liquid to the bottom of the tube. Store at -20 °C until ready to use.
- We then moved on to pour a 0.8 % (w/v) agarose gel.
- Set up gel apparatus and prepared enough 0.8 % agarose gel to cover the tips of the gel combs by ~2–3 mm.
- Weighed out the appropriate mass of agarose powder, and then transferred the powder to an Erlenmeyer flask.
- Added the appropriate volume of 1X TBE buffer to the agarose powder. Swirled gently to mix.
- Heated the mixture in the microwave just until it boils (1–2 minutes).
- Allowed the solution to cool to between 50 °C and 60 °C. Once the solution was sufficiently cool, we added the gel dye.
- Poured the agarose/EtBr mixture into the prepared gel apparatus and inserted the comb to cast the wells before cooling the gel for 30 minutes.
- Once the Gel was dried we removed the comb and lifted out the gel platform. We placed the gel into the gel box and connected the cathodes before pouring 1X TBE buffer, submerging the gel by a quarter inch, loading our samples, and running the experiment.
Results:

After running the gel we were satisfied with our results and were able to clearly see our DNA.
Conclusions and Next Steps:
We concluded that our experiment was successful and decided to move on to further analysis.