Discovery of Vero
Collecting The Environmental Samples
From Sept. 2nd to Sept. 4th, 2017, our objective was to collect three environmental samples from around our town, preferably near a source of water. I collected three decent samples from around my house in the front, side and back gardens to test by Direct Isolation and an Enriched Isolation.However, I, unfortunately, failed at finding a Bacteriophage within my samples, so I used my partners Bacteriophage, Nuggs to test off of. Megan Adam’s bacteriophage, Nuggs was found through the “Direct Isolation- City Beach Sample”.
Direct Isolation ” Megan Adams’ City Beach Sample”
September 6. 2017
Purpose and Objective:
The purpose of this was to find bacteriophages in an environmental sample selected and the objective was to extract the bacteriophages from that environmental sample, by using the Direct Isolation process.
Materials:
- Environmental Sample
- 5 ml syringe
- Enrichment Broth
- 0.22-micrometer syringe filter
- 5 ml serological pipettes
- Microcentrifuge tubes
- 15 ml conical tube
Procedure:
- Prepared area for aseptic technique using a portable burner
- Gathered environmental sample two (City Beach)
- Filled a 15 ml conical tube with approximately one-third of soil from the City Beach sample
- Added 3 ml of enrichment broth to the tube, capped tube and inverted several times
- Placed the tube in a shaking incubator at 250 rpm for 2 hours (from 10:35 am – 12:35 pm)
- Allowed sample to sit for 20 minutes, but the contents did not separate enough to obtain a liquid sample
- Placed the 15 ml conical tube containing the sample in a centrifuge 3 times, for 10-minute cycles each, then tried to filter the sample by pipetting a portion of liquid sample into the 5 ml syringe and the 0.22-micrometer syringe but the filter clogged
- Added more enrichment broth to the tube containing the sample and centrifuged again for 10 minutes
- Recovered liquid sample using another 5 ml syringe and dispensed sample into two microcentrifuge tubes each containing approximately 0.5 ml of liquid sample
- Placed the two microcentrifuge tubes in a microcentrifuge for five minutes
- Pipetted the liquid sample contents from the two tubes into one microcentrifuge tube and capped the tube quickly
- Continued on to the Plaque Assay technique
Analysis:
“The environmental sample that was used for the direct isolation process known as the City Beach sample was obtained from the lake bed of Lake Grandbury. This sample did not separate easily because it was a more silt like the texture and contained a few large particles. The use of the microcentrifuge to determine if a liquid sample could be recovered was directed by Dr. Edwards. The use of the 0.22-micrometer filters was not needed after obtaining the samples from the microcentrifuge”(Megan Adams Notebook).
Plaque Assay Protocol using Nuggs Plaque Pick- Day 1 & 2
September 11th, 2017
Objective:
Using means Direct sample “Nuggs”, do a plaque pick and then create a plaque assay with her sample and hope for either a new phage or a remake of her original.
Materials:
- Plaque pick from Megan’s direct isolation protocol
- Agar plates
- Host bacteria (250 microliters/ plate)
- Phage buffer
- Top agar
- Microcentrifuge tubes
- Negative control
5 ml serological pipettes
Procedure:
Day 1 for me: September 11th, 2017
- Prepared area for aseptic work, with portable burner
- Gathered direct isolation phage sample from picking Megan’s plaque
- Obtained two units of 250 microliter host bacterial cultures, one for the phage sample Nuggs and one for my negative control
- I Micropipetted 10 microliters of phage buffer into the tube labeled ‘negative control’ containing host bacteria
- Need to mix by flicking the bottom of the tube
- Take 500 microliters of the direct isolation sample, ‘Nuggs’, and pipetted it into the DI host bacterial tube and also mixed it by flicking the bottom of the tube. MISTAKE: DIDN’T LET THE SAMPLES SIT UNDISTURBED FOR 10 MINUTES.
- Obtained two agar plates, one for the direct isolation sample, ‘Nuggs’ and one for negative control, then labeled them accordingly with my initials, date and the two sample names.
- Prepared the station now with a sterile 5 ml pipette and a syringe top that will be used to transfer 3 ml of the top agar to each host bacteria tube (containing direct sample or negative control)
- Remove the bottle of top agar from the 55 degree Celsius bath, obtained 3ml of this auger and quickly dispense it into the bacterial host and the DI sample and then re-draw all of it back up and dispense it back onto the auger plate smoothly.
- Swirl until the top auger is spaced evenly and remove the bubbles before the top auger solidifies.
- Repeat the two Steps above for the negative control sample as well.
- Let the auger plates sit undisturbed for 20-30 minutes of complete solidification and then after it has solidified, add 5 micrometers of your DI sample to the DI auger plate and then with a different sterile tip add 5 micrometers to the other plate labeled negative.
- Allow this to settle and soak for another 20 minutes for better results.
- Incubate it at 37 degrees Celsius for 24-48 hours.
Day 2 for me- September 14, 2017
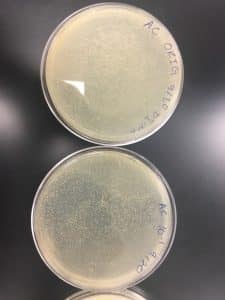
Removed the plates from the incubator and observe both plates. The negative sample was clean and the Direct Isolation Nuggs ended up showing up on my plate as well.

Characteristic of my plaque of Nuggs:
- Number of Plaques: I presume one plaque
- Size: about 2.5cm
- Shape: Circular that spreads
- Features different from Megan’s Nuggs: Its not one tiny clean circle, this is at least 3x the size of hers. It spreader, but did incubate 24 more hours than hers.
Procedure for Picking Nuggs for The Procedure Above
Objective: To pick a successful piece of Nuggs from Megan’s DI sample and mix it with some phage buffer to apply it on the plate.
Materials:
- Auger Plates with the sample of Nuggs
- Phage Buffer
- Microcentrifuge tubes ( 1.5mL sterile)
Protocol
- Prepared bench for aseptic work with portable burner
- Circled the phage on the plaque I was going to pick.
- Didn’t record what it looked like, but had Megan’s data to reference back to- small, circular only one phage on her plaque.
- Labeled and prepared the 1.5mL sterile microcentrifuge tubes
- Use aseptic technique to aliquot 100 microliters of phage buffer into the microcentrifuge tube
- Used a sterile micropipette tip to poke the identified phage plaque, avoiding the bacteria surrounding it, and used that to mix in my phage buffer into the microcentrifuge tube.
- After that, Vortex to be sure it’s completely mixed, and then did the above procedure: Plaque Assay Protocol
Attempted Spot Test prior to this, was unsuccessful for my Enriched and Direct Isolation sample.
Discovery of Vero: Serial Dilution 1
September 20th, 2017
Objective: Start Dilutions by preparing liquid phage samples of decreasing dilutions to further isolate the particular bacteriophage. Ended up possibly fining a new bacteriophage who I named Vero.
Materials:
- Phage Buffer
- Samples required for diluting (picked phage)
- Microcentrifuger tubes ( 1.5mL steril)
- Top Auger
- Plaque assays
- Bacterial Host
- 5Ml steril pipet
- Syringe end for pipet
Protocol:
- Prepare the table for aseptic work with portable burner
- Set up 6-fold serial dilution (label it orig, 10^-1 to 10^-5) with the micro centrifuge tubes
- Add 100 Mircoliters of phage buffer to each centertube
- Add a plauqe pick from the phage into the original labeled tube, vortex and then change tips take 10 micrometers from the original and dilute it into the 10^-1. Then change tips and add 10 micorliters to the 10^-2 from the 10^-1, then 10 Microliters of the 10^-2 dilution to the 10^-3 dilution. Continue to do this till 10^-5 dilution.
- After Diluting your samples, collect 6 host bacterial tubes and label them accordingly to each of the tubes.
- Add you’re original to one host bacterial tube labeled orig. then the 10^-1 to the bacterial host labeled now 10^-1 and so on so forth.
- After this, flick the bottom of each to mix evenly and then allow this to sit for 10 minute before putting it on the plaque assay.
- After 10 minutes, obtain you’re top auger that we used in the other experiments that is sitting at 55.5 degrees celsius and six auger plates and label them accordingly along with date and initials.
- After that is done, Obtain the first host bacteria labeled Orig. and your syringe top attached to your 5mL sterile pipet, pipetting out 3mL of the top auger, mixing it with the bacterial host and applying it on the auger using the same technique with swirling until even and pipetting out any bubbles.
- Do this for each dilution 10^-1 through 10^-5
- After this, allow it to sit for 25-30 minutes to allow for complete saturation and solidification for better results.
- Incubate at 37 degrees Celsius again for 24-48 hours.
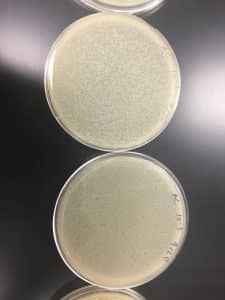
Analysis: Ended up comparing my plates of Nuggs #2 with Megan’s Nuggs Orig and the growth stages in each dilution were different, possibly indicating that I isolated a different bacteriophage wishing hers. My 10^-4 sample auger must have slid from not being completely dry even though was allowed to sit for just as long as the other plates.