Discovery of Carino
Carino Information
Morphology: Siphoviridae

Sample Collection
| Collector Name |
Dafne Balderas | Dafne Balderas | Toby Barrera | Toby Barrera | Toby Barrera |
| Sample No. | 1 | 2 | 3 | 4 | 5 |
| Date of Collection | 8/25/25 | 8/25/25 | 8/23/25 | 8/23/25 | 9/1/25 |
| Sample Type | soil | Ant Bed | soil | soil | Ant Bed |
| General Location | The sample was collected from the soil directly adjacent to my house. The house was located on W Park St. | The sample was collected at a fire ant bed located near my house. The house was located on W Park St. | The sample was collected from the soil at the Waco Wetlands. | The sample was collected from the soil at the Waco Wetlands. | The sample was collected at a fire ant bed located at Dinosaur Valley State Park in Glenrose. |
| Location Description | The sample was collected near my front door. The soil was brittle and almost sand-like. No trees near with little to no flowers nearby. | The sample was collected near an ant hill in my front yard. The grass has not been mowed for a week. The grass was green. | The sample was collected near a pond, and the grass was around an inch tall. The dirt was dry and brittle. | The sample was collected near flourishing flowers and vegetation. The grass was short, around an inch tall. Bees were pollinating the flowers near the soil. | The sample was collected next to a series of ant beds, all connected and close in proximity. It was next to long grass where monarch larvae were hatching. |
|
GPS Coordinates.
|
32.22398804010444, -98.22279642405333 | 32.223965423438614, -98.22280150893472 | 31.609536582414723, -97.30718444054587 | 31.609721330052327, -97.30708493821709 | 32.24804418489067, -97.81648254162877 |
| Sample Depth | 3 cm | 3.5 cm | 4 cm | 2 cm | 10 cm |
| Ambient Temperature | 22.7 C | 22.7 C | 28.3 C | 28.3 C | 25.5 C |
Isolation/Purification
letter
Direct Isolation Sample (3)
Date: 08/25/2025
Redo: No
Purpose: The purpose of this week’s lab was to perform a Direct Isolation on our sample (3)
Day One:
Notes:
- We sprayed the lab bench with CiDecon and let it sit for thirty seconds, then wiped it off. Next, we sprayed 70% EtOH and waited thirty seconds, then wiped completely dry. We lit a Bunsen burner to use aseptic technique during the lab.
- A 15 mL conical tube was filled about one-third to one-half full with our soil sample #3
- Add 2 mL of liquid media to the sample. Cap the tube and vigorously invert the tube several times to mix the soil and media.
- Incubate the tube at 250 rpm for one hour
- After letting the tube sit undisturbed for 2-20 minutes to allow most of the particulate matter to settle.
- Use aseptic technique, open the 0.22 μm syringe filter, and leave the filter until ready to use.
- Draw 2 mL of liquid from the top of the syringe, taking care not to withdraw any sediment.
- Attach the syringe to the filter, removing the filter from its packaging, and confirming it is firmly connected.
- Depress the syringe plunger slowly and collect at least 0.5 mL of filtrate into a labeled microcentrifuge tube.
- If the filter clogs, stop and discard the clogged filter, replacing it with a new one.
- Cap the microcentrifuge tube immediately, discard the used syringe and filter.
- Wipe down the bench as stated in step 1
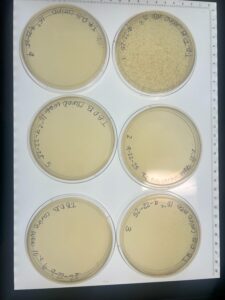
Plaque Assay (3)
- Prepare the bench for aseptic work by spraying CiDecon and letting it sit for thirty seconds. Spray next with 70% EtOH and wait thirty seconds before wiping dry. Prepare a Bunsen burner apparatus.
- Assemble phage samples you want to assay
- Inoculate the host bacteria with your phage sample
- —-Obtain aliquots of 250 μl host bacteria equal to the number of phage samples and Label tubes accordingly
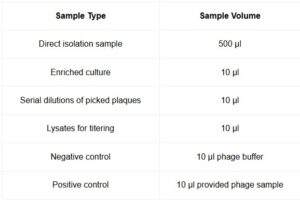
- —–Using a micropipettor, dispense the appropriate volume of phage sample into its corresponding host culture tube according to the table below

- Gently tap each tube to mix the phage with the host bacteria, ensuring contact is made
- Allow the sample to sit undisturbed for 5-10 minutes for attachment
- Plate samples with top agar. You will need 3 mL of molten top agar for each sample
- Obtain the same number of agar plates as samples. Label plates accordingly
- Remove the top agar from the 55°C bath
- Important: Keep the agar in the bath for as long as possible to avoid it prematurely solidifying
- For each sample:
- Use a sterile 5 mL pipette, transfer 3 mL of molten top agar to the corresponding inoculated host tube
- Important: Avoid creating bubbles while transferring agar, as it could look like phage plaques
- Immediately aspirate (suck-up) the agar-bacteria-phage mixture into the pipette and transfer it onto the appropriately labeled agar plate
- Gently tilt the plate in multiple directions to evenly coat the surface with the mixture
- Repeat for each sample
- Allow plates to sit undisturbed for ~20 minutes or until the top agar is solidified
- Once solidified, gently invert plate and incubate them
Day Two:
- Check the plates for plaques
- Remove plates from the incubator and hold them to a light source to examine for plaques
- If no plaques are visible, return the plates to the incubator and check at a later date
- Record observations in your notebook. Count the number of plaques, describing size, shape, and other distinct characteristics
- Wipe down lab bench with CiDecon and EtOH as described in step 1
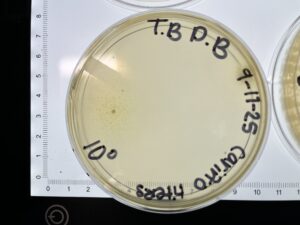
Results: No Plaques were found, plate was discarded
Conclusions and Next Steps: We will perform an enriched isolation on our next soil sample (1)
Enriched Isolation Sample (1)
Date: 09/01/2025
Redo: no
Purpose: The purpose of this week’s lab is to perform an Enriched Isolation on our soil sample (1).
Notes:
1.Fill a 50 ml conical tube with your sample to the 15 ml mark.
2. Add liquid media to the 35 ml mark and vortex briefly.
3. Place the sample on a shaker at ~250 rpm for 1–2 hours.
-
Balance the tubes and centrifuge at 2,000 × g for 10 minutes to pellet most of the soil.
-
Filter the supernatant through a 0.22 µm filter to remove unwanted bacteria and soil particles.
-
Collect the flow-through in a sterile baffled Erlenmeyer flask or a 50 ml sterile conical tube (recovered volumes will range between 20–25 ml).
-
Add 0.5 ml of bacterial host culture to the flask or conical tube.
-
Incubate at the appropriate temperature, shaking at 220 rpm for 2–5 days.
-
If using a conical tube, keep the culture properly aerated: loosen the cap by a quarter turn, secure it with a short piece of lab tape, and check to ensure the tube remains loosely capped.
-
Tubes must remain upright while shaking to prevent spillage.
-
-
If working with a liquid environmental sample, add the appropriate volume of 10X liquid media to support host bacteria growth.
-
Filter the enriched culture.
Processing the Enriched Culture
-
Using a pipette, transfer 1.4 ml of enriched culture into a microcentrifuge tube.
-
Repeat this to prepare two tubes, each with 1.4 ml.
-
Spin the tubes at high speed in a microcentrifuge for 1 minute to pellet the bacteria.
-
If the supernatant is cloudy or you suspect contamination, filter it through a 0.22 µm filter:
-
Remove the plunger from a sterile syringe.
-
Attach a sterile 0.22 µm filter to the syringe barrel.
-
Pipette 1 ml of supernatant from each tube (total 2 ml) into the syringe.
-
Place the filter tip over a sterile microcentrifuge tube, reinsert the plunger, and press to collect the filtrate.
-
-
Transfer the clear supernatant into a fresh microcentrifuge tube, avoiding the pellet.
-
Immediately cap the tube, label it, and store at 4 °C.
-
Either return the enrichment culture to the incubator for continued use or dispose of it according to your instructor’s directions.
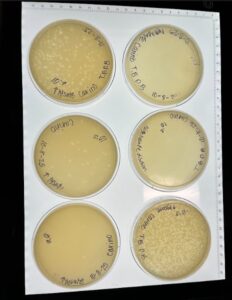
Plaque Assay (1)
- Prepare the bench for aseptic work by spraying CiDecon and letting it sit for thirty seconds. Spray next with 70% EtOH and wait thirty seconds before wiping dry. Prepare a Bunsen burner apparatus.
- Assemble phage samples you want to assay
- Inoculate the host bacteria with your phage sample
- —-Obtain aliquots of 250 μl host bacteria equal to the number of phage samples and Label tubes accordingly
- —–Using a micropipettor, dispense the appropriate volume of phage sample into its corresponding host culture tube according to the table below
- Gently tap each tube to mix the phage with the host bacteria, ensuring contact is made
- Allow the sample to sit undisturbed for 5-10 minutes for attachment
- Plate samples with top agar. You will need 3 mL of molten top agar for each sample
- Obtain the same number of agar plates as samples. Label plates accordingly
- Remove the top agar from the 55°C bath
- Important: Keep the agar in the bath for as long as possible to avoid it prematurely solidifying
- For each sample:
- Use a sterile 5 mL pipette, transfer 3 mL of molten top agar to the corresponding inoculated host tube
- Important: Avoid creating bubbles while transferring agar, as it could look like phage plaques
- Immediately aspirate (suck-up) the agar-bacteria-phage mixture into the pipette and transfer it onto the appropriately labeled agar plate
- Gently tilt the plate in multiple directions to evenly coat the surface with the mixture
- Repeat for each sample
- Allow plates to sit undisturbed for ~20 minutes or until the top agar is solidified
- Once solidified, gently invert plate and incubate them
Day Two:
- Check the plates for plaques
- Remove plates from the incubator and hold them to a light source to examine for plaques
- If no plaques are visible, return the plates to the incubator and check at a later date
- Record observations in your notebook. Count the number of plaques, describing size, shape, and other distinct characteristics
- Wipe down lab bench with CiDecon and EtOH as described in step 1

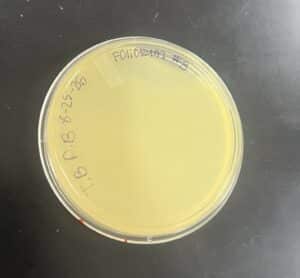
Results: Plate HAD Plaques Present
Picking a Plaque
- Prepare your workbench: Set up the workbench for aseptic work
- Label the plaques that you intended to pick by circling them on the bottom of the agar plate with a labeling pen
- When picking multiple plaques, give each plaque a unique identifier (latter, number, symbol) and ensure labeling is consistent across plates
- Record detailed plaque morphologies in the lab notebook, including size, clarity (cloudy or clear), and margin type
- Label microcentrifuge tubes to match each plaque identifier and prepare one tube per plaque
- Using aseptic technique, aliquot 100 μl of phage buffer into each labeled tube
- To pick plaques, place a sterile tip on a p200 micropipettor
- Holding the pipettor perpendicular to the agar surface, stab into the center of the selected plaque, avoiding surrounding bacterial growth
- Place the micropipette tip into the corresponding microcentrifuge tube and tap it against the wall of the tube while pipetting up and down to release phage particles into the buffer
- Discard the tip after use
- Vortex each tube to mix thoroughly
- Repeat steps 7-11 for every plaque selected
- After plaque picking, proceed with the next step as instructed-either the Serial Dilutions (6.2) or the Spot Test (5.6)
Serial Dilutions
Preparation
1. clean and prepare your bench for aseptic work
2. Gather all necessary materials and supplies
setup
3. place the required number of microcentrfuge tubes in the rack
4. label the tubes requentially as 10⁻¹, 10⁻², 10⁻³ … up to 10⁻⁸
5. Add 90μl of phage buffer to each tube
Dilution Procedure
6. using a sterile pipette tip, add 10 μl of the undiluted phage sample into the 10⁻¹ tube. vortec thoroughly , this produces a 1:10 dilution
7. With a fresh pipette tip, transfer 10 μl from the 10⁻¹ tube into the 10⁻² tube. Vortex thoroughly, this produces a 1:100 dilution (10⁻²)
8. Continue transferring 10 μl from each previous tube into the next labled tube, vortexing well after each transfer
9. proceed until final dilution tube is reached
Conclusions and Next Steps:
Add conclusions and next steps here.
Amplification
2nd Serial Dilution
Date: 9/15/2025
Redo: no
Purpose: The purpose of this experiment is to determine whether our plaque morphologies remain consistent and to check for any webbed plates that could provide a low-volume lystate
Notes:
-
Cleaned the lab workbench using CiDecon and 70% ethanol.
-
Set up a Bunsen burner to maintain aseptic technique.
-
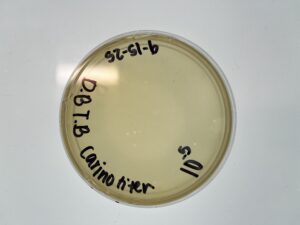
Selected a single plaque from the plate containing the 10⁻⁵ dilution, which showed three plaques.
-
Used a 200 µL pipette tip to pick the plaque and placed the tip into 100 µL of phage buffer.
-
Vortexed the solution to create the base sample for the second serial dilution.
-
Labeled six microcentrifuge tubes with their corresponding dilution factors (10⁻¹ to 10⁻⁶).
-
Added 90 µL of phage buffer to each tube.
-
Prepared the serial dilutions by transferring 10 µL of the sample into the next tube, diluting by a factor of ten each time.
-
Labeled six PyCa plates with their respective dilution factors.
-
Performed the plaque assay protocol using each of the six dilution samples.
-
Allowed the top agar and the inoculated bacteria mixture to solidify on each plate.
-
Placed all plates into the incubator and incubated at 29°C.
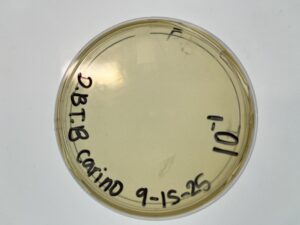
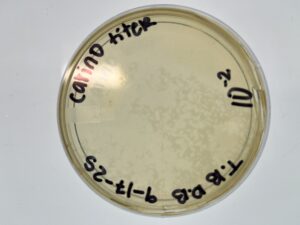
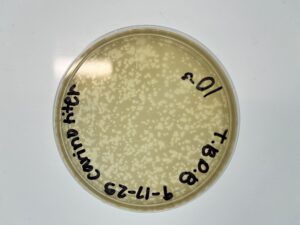
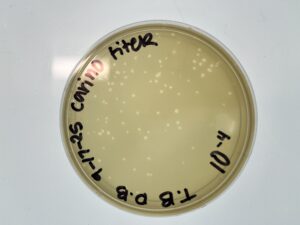
Results: Our plates resembled our morphologies from before. The titer we calculated was 1.1×10^8 pfu/ml from 10^-4

Conclusions and Next Steps:
We make 6 webbed plates of our 10^-2 plate. To eventually flood them to create our low-volume lysate.
Webbed PLates (10^-2)
Date: 9/22/2025
Redo: No
Purpose:
The purpose of this experiment is to create 6 webbed plates in order to flood them to get a low-volume lysate.
Procedure:
-
Cleaned the lab bench using CiDecon and 70% ethanol.
- Complete a dilution two times to get 10^-2
- Perform a plaque essay 6 times with the 10^-2 dilution
- Place in Incubator at 29 degrees C for no less than 24 hours
Results: 2 out of the 6 plates had successfully reached a web state.
Conclusions and Next Steps: We will flood the 2 plates and collect our lysate in order to eventually make a high-volume lysate.
Collection of Low-Volume Lysate
Date: 9/22/2025
Redo: No
Purpose:
The goal of this procedure is to collect a low-concentration phage sample for further analysis.
Procedure:
-
Cleaned the lab bench using CiDecon and 70% ethanol.
-
Retrieved plaques from the second serial dilution; the 10⁻2 plate from that set was selected and flooded.
-
Sterilized the phage buffer by spraying 70% ethanol around the sides of the conical tube.
-
Aspirated 8 mL of phage buffer and used it to flood and pool the plate.
-
Allow the flooded plate to incubate at 4°C for 12–14 hours
Results: We collected around 8 mL of Low-Titer Lysate. The titer calculated for the 2nd SD 10^-4 was 1.1×10^8 pfu/ml.
Conclusions and Next Steps: We will use the low-titer lysate to make a high-volume lysate.
Making Webbed Plates
Date: 10/1/25
Redo: YES 4 times
Purpose: The purpose of this procedure is to create multiple webbed plates from 10^-4 to flood them and collect our high-volume lysate.
Procedure:
- Clean the workbench using CiDecon, followed by 70% ethanol (EtOH).
- Prepare a new 10^-4 dilution by performing a fresh series of serial dilutions from the low-titer lysate up to the 10⁻⁴ concentration.
- Using the 10^-4dilution, set up six plates and perform a plaque assay on each one.
- Place all plates in the incubator at 29°C, and allow them to incubate for approximately 24 hours.
Conclusion: This took us 4 attempts, as attempts 1-3 did not yield any webbed plates. Pictures were not captured of attempts 1-3; they were thrown away, as they did not produce plaques. Attempt 4 yielded webbed plates, and we used this attempt to go ahead with flooding them to collect High-volume lysate.
Results:

Collection of High-Titer Lysate
Date: 10/6/25
Redo: No
Purpose: The purpose of this experiment is to collect enough volume of High-volume lysate to use for titering.
Procedure:
- Clean the workbench using CiDecon followed by 70% ethanol (EtOH).
- Gather all required materials, including a Bunsen burner, 5 mL serological pipette tips, phage buffer, and a 50 mL conical tube with a filter apparatus.
- Obtain six plates and add 8 mL of phage buffer to each one to flood them. Allow the plates to incubate at room temperature.
- After incubation, collect the lysate from each plate using vacuum filtration.
Results: 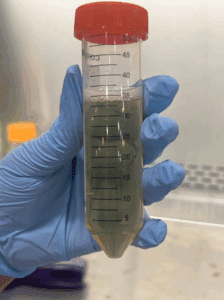
Conclusion: We collected an adequate amount of lysate to perform one final serial dilution to determine the concentration of our lysate.
Titer Calculation
Date: 10/8/25
Redo: no
Purpose: The purpose of this experiment is to perform a full plate titer to calculate our phage concentration.
Procedure:
- We cleaned our bench using CiDecon and 70% EtOH
- Perform serial dilutions of the lysate up to the 10^-6 dilution (Serial Dilution Protocol for reference).
- Inoculate each M. foliorum colony with 10 µL of the appropriately diluted lysate.
- Prepare and perform a plaque assay on each sample using 3 mL of top agar per plate (refer to Plaque Assay Protocol).
- Place the plates in the incubator set to 29 °C.
Results: After incubating for around 24 hours, they were placed in the fridge until the start of next week. When we looked at our plates, they were sufficient for calculating our titer. Our 10^-6 plate was the one we decided to use going forward. Our titer was calculated to be 2.0×10^8.
Conclusion: We will use our High-volume lysate to continue with DNA extraction and Transmission Electron Microscopy.
Characterization
Casting Agarose Gel & Gel Electrophoresis
Date: 11/17/2025
Redo: no
Purpose: To prepare an agarose gel for electrophoresis to separate DNA fragments by agarose gel electrophoresis.
Notes:
-
-
Prepare the workspace:
Wash hands, put on gloves, and disinfect the bench. Clean first with CiDecon and wipe with Kimwipes, then repeat with 70% ethanol. -
Gather DNA samples:
Remove the tubes containing the restriction digest reactions and the uncut DNA from the freezer. Allow them to warm to room temperature while collecting materials for gel casting. -
Set up gel equipment:
Assemble the gel tray and comb so it is ready for pouring the agarose. -
Calculate gel components:
Determine the amount of agarose needed for 30 mL of a 0.8% gel. This calculation shows that 0.24 g agarose is required. -
Measure buffer:
Measure 30 mL of 1X TBE buffer, which will dissolve the agarose powder. -
Dissolve agarose:
Add the agarose powder and TBE buffer into an Erlenmeyer flask. Gently swirl to mix. -
Heat the mixture:
Microwave the flask for 1 minute. Pause at 30 seconds to swirl the solution and return it to finish heating. -
Cool the solution:
Using a heat-resistant glove, remove the flask and swirl again. Allow it to cool for about 10–15 minutes until the temperature drops to around 50–60°C. -
Pour the gel: Slowly pour the agarose/EtBr mixture into the gel mold, avoiding air bubbles. Insert the comb to form wells.
-
Solidify the gel: Let the gel sit undisturbed for 20–30 minutes until completely firm.
-
Remove the comb: Carefully pull the comb straight upward to avoid tearing the wells.
-
Transfer the gel: Lift the gel tray out of the casting mold and place the gel into the electrophoresis chamber with the wells positioned at the negative (black) electrode.
-
Add running buffer: Pour 1X TBE buffer into the chamber until the gel is covered by roughly a quarter inch of liquid (about 30 mL).
-
Creating Ladder and Uncut DNA samples:
- Calculate the DNA concentration for the uncut sample. For us, it turned out to be 3.2 μl of DNA,2 μl of Dye, and 4.8 μl of Sterile H2O. Add all substances into a microcentrifuge tube and invert a couple of times to mix.
- Next, create your ladder, add 1 μl of Hindi III digest, 24 μl of nuclease-free water, and 5 μl of 6X loading dye into a new microcentrifuge tube.
- To match the concentration of our DNA, we had to dilute the ladder in H2O. We did a 1:1 ratio of ladder and sterile H2O
- Place your samples at 65 °C in a heat block for 5 minutes, then immediately place the samples on ice to cool before spinning them in the microcentrifuge for about 15 seconds at 10,000 RPM, which prevents annealing of the cohesive ends of the phage DNA.
- Load the DNA ladder: Start by pipetting the correct volume of your DNA ladder into the first well.
- Load the samples: Using a fresh pipette tip for every reaction, carefully load 20 μL of each restriction digest into the remaining wells in the correct order.
- Prepare for electrophoresis: Attach the leads from the gel box to the power supply, ensuring the electrodes are connected to the appropriate terminals.
- Run the gel: Turn on the power supply and set it to 100 V. Allow the gel to run until the loading dye has migrated roughly 4–5 inches from the wells (about 1 hour).
- Stop the run and document: When the dye front reaches the appropriate distance, turn off the power supply, disconnect the electrodes
- Stain the dye with 6 μl of Ethidium Bromide and 15o μl of water
- Shake the gel in the water for 15 minutes
- After the time is up, take the gel and put it into a new container filled with DI water. Gently shake for 10 minutes
- Gently take the gel out and place it on the Gel Transilluminator and take a photo of the results.
- Clean up the gel rig: Pour the used buffer back into its original container for future use. Wash the gel tray and equipment with warm water and soap, then set them aside to dry.
- Dispose of materials: Discard the used gel in the designated waste container and wipe down the bench with a Kimwipe.
Results:

Conclusion:
The results show a faint band, but it can be seen. Photos will be uploaded to PhagesD
DNA Extraction
DNA Extraction
Date: 10/15/2025
Redo: yes
Purpose: The purpose of the experiment was to isolate DNA using ZnCL2
Notes:
Day 1
- Cleaned the workbench with CiDecon and ethanol; wiped dry with paper towels.
- Put on lab coats and gloves for safety.
- Aliquot 5 mL of high-volume lysate into a 15 mL conical tube.
- TA added 20 µL of nuclease to the tube.
- Inverted the tube several times to mix.
- Incubated the sample at 37 °C for 10 minutes.
- Label five microcentrifuge tubes and aliquot 1 mL of lysate into each.
- Add 20 µL of ZnCl₂ to each tube.
- Inverted each tube several times to mix.
- Incubate at 37 °C for 5 minutes.
- Centrifuged tubes at 10,000 rpm for 1 minute.
- Remove and discard the supernatant using an electronic pipette.
- Add 500 µL of TES buffer to each tube.
- Incubate samples at 60 °C for 15 minutes.
- Add 1 µL of Proteinase K to each tube.
- Incubate at 37 °C for 10 minutes.
- Add 60 µL of sodium acetate to each tube and mix gently.
- Place samples on ice for 15 minutes.
- Centrifuge samples at 12,000 rpm and 4 °C for 1 minute.
- Transfer the supernatant from each tube into new microcentrifuge tubes; discard pellets.
- Add 500 µL of 100% isopropanol to each new tube.
- Store samples on ice in a refrigerator at 4 °C overnight.
Day 2
- Clean the workbench with CiDecon and ethanol; wipe with paper towels.
- Put on lab coats and gloves for protection.
- Retrieve the five microcentrifuge tubes from Day 1.
- Centrifuge samples at maximum speed for 10 minutes.
- Add 250 µL of 70% ethanol to each tube.
- Centrifuged samples for 1 minute.
- Remove and discard the supernatant into a waste tube.
- Invert tubes onto paper towels with lids open; gently tap to remove excess liquid.
- Allow samples to air-dry completely.
- Add 50 µL of nuclease-free water to the first tube and mix gently.
- Transfer 50 µL from tube 1 to tube 2; repeat for tubes 3–5.
- Load 3 µL of DNA precipitate onto the NanoDrop.
Recorded DNA concentration readings.
Results:
The results indicated high levels of salinity.
Conclusions and Next Steps:
Since the results indicated high levels of salinity, we continued to follow the precipitation protocol as done by the phage “Loca”.
Title: Reprecipitation of DNA
Date: 10/27/2025 Redo: no
Purpose: To make the previous DNA extraction more accurate in order to get an acceptable Nanodrop reading.
Notes:
Day 1:
1. Wash hands and put on gloves
2. Disinfect the work area using technique by spraying CiDecon and spray the station again with 70% Ethanol and wipe down.
3. Retrieve DNA samples from storage in the freezer and allow them to thaw at room temperature.
4. Once thawed, determine the volume of each sample by aspirating the entire liquid into a micropipette and adjusting the pipette volume until no air bubbles remain in the tip.
5. Calculate the required volume of Sodium Acetate and ice-cold 100% Ethanol:
-
Sodium Acetate: 0.10 × 17.8 µL = 1.78 µL
-
Ice-cold 100% Ethanol: 3 × 1.78µL = 53.4 µL
6. Add both the Sodium Acetate and Ethanol to the tube containing the DNA sample using a micropipette. invert to mix.
7. Place the tube in a -80 °C freezer to allow precipitation overnight.
Day 2:
8.Remove the sample from the freezer and centrifuge at full speed, 4°C for 30 minutes.
9. Discard the supernatant into a waste tube, then add 0.5 mL of 75% Ethanol to wash the pellet.
10.Centrifuge again at 4°C for 10 minutes and discard the supernatant. Repeat this wash step once more.
11. After removing as much liquid as possible, place the tube in a 30°C incubator to air-dry. Ensure all liquid droplets have fully evaporated before continuing.
12. Add 50 µL of nuclease-free water to the tube and pipette up and down to mix
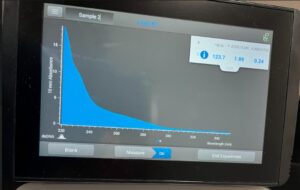
13. Take he tube to the NanoDrop to assess DNA concentration and quality
14. Turn on the NanoDrop and select “dsDNA
15. Prepare a blank by dispensing 1 µL of nuclease-free water onto the NanoDrop plate using careful pipetting technique to prevent re-aspiration into the tip.
16. Close the NanoDrop lid gently and run the blank. Once complete, wipe the water off using a Kimwipe
17. Dispense 1 µL of the DNA sample from the tube onto the plate and close the lid.
18. Run the sample and take a photo of the results
Results:
Conclusions and Next steps:
Since the reprecipitation of DNA was not a success, DNA extraction will have to be repeated. We threw away the DNA after the failed attempt.
DNA Extraction
Date: 11/3/2025
Redo: yes
Purpose: The purpose of the experiment was to isolate DNA using ZnCl2
Notes:
Day 1
- Cleaned the workbench with CiDecon and ethanol; wiped dry with paper towels.
- Put on lab coats and gloves for safety.
- Aliquot 5 mL of high-volume lysate into a 15 mL conical tube.
- TA added 20 µL of nuclease to the tube.
- Inverted the tube several times to mix.
- Incubated the sample at 37 °C for 10 minutes.
- Label five microcentrifuge tubes and aliquot 1 mL of lysate into each.
- Add 20 µL of ZnCl₂ to each tube.
- Inverted each tube several times to mix.
- Incubate at 37 °C for 5 minutes.
- Centrifuged tubes at 10,000 rpm for 1 minute.
- Remove and discard the supernatant using an electronic pipette.
- Add 500 µL of TES buffer to each tube.
- Incubate samples at 60 °C for 15 minutes.
- Add 1 µL of Proteinase K to each tube.
- Incubate at 37 °C for 10 minutes.
- Add 60 µL of sodium acetate to each tube and mix gently.
- Place samples on ice for 15 minutes.
- Centrifuge samples at 12,000 rpm and 4 °C for 1 minute.
- Transfer the supernatant from each tube into new microcentrifuge tubes; discard pellets.
- Add 500 µL of 100% isopropanol to each new tube.
- Store samples on ice in a refrigerator at 4 °C overnight.
Day 2
- Clean the workbench with CiDecon and ethanol; wipe with paper towels.
- Put on lab coats and gloves for protection.
- Retrieve the five microcentrifuge tubes from Day 1.
- Centrifuge samples at maximum speed for 10 minutes.
- Add 250 µL of 70% ethanol to each tube.
- Centrifuged samples for 1 minute.
- Remove and discard the supernatant into a waste tube.
- Invert tubes onto paper towels with lids open; gently tap to remove excess liquid.
- Allow samples to air-dry completely.
- Add 50 µL of nuclease-free water to the first tube and mix gently.
- Transfer 50 µL from tube 1 to tube 2; repeat for tubes 3–5.
- Load 3 µL of DNA precipitate onto the NanoDrop.
Results:
Our results show our DNA has too high a salinity
Conclusion & Next Steps:
We will perform reprecipitation again and hopefully reach the correct values. If not, we will do DNA extraction again and pool our samples together.
Title: Reprecipitation of DNA
Date: 11/5/2025 Redo: yes
Purpose: To make the previous DNA extraction more accurate in order to get an acceptable Nanodrop reading.
Notes:
Day 1:
1. Wash hands and put on gloves
2. Disinfect the work area using technique by spraying CiDecon and spray the station again with 70% Ethanol and wipe down.
3. Retrieve DNA samples from storage in the freezer and allow them to thaw at room temperature.
4. Once thawed, determine the volume of each sample by aspirating the entire liquid into a micropipette and adjusting the pipette volume until no air bubbles remain in the tip.
5. Calculate the required volume of Sodium Acetate and ice-cold 100% Ethanol:
-
Sodium Acetate: 0.10 × 32.6 µL = 3.26 µL
-
Ice-cold 100% Ethanol: 3 × 3.26 µL = 9.78 µL
6. Add both the Sodium Acetate and Ethanol to the tube containing the DNA sample using a micropipette. invert to mix.
7. Place the tube in a -80 °C freezer to allow precipitation overnight.
Day 2:
8.Remove the sample from the freezer and centrifuge at full speed, 4°C for 30 minutes.
9. Discard the supernatant into a waste tube, then add 0.5 mL of 75% Ethanol to wash the pellet.
10.Centrifuge again at 4°C for 10 minutes and discard the supernatant. Repeat this wash step once more.
11. After removing as much liquid as possible, place the tube in a 30°C incubator to air-dry. Ensure all liquid droplets have fully evaporated before continuing.
12. Add 50 µL of nuclease-free water to the tube and pipette up and down to mix
13. Take he tube to the NanoDrop to assess DNA concentration and quality
14. Turn on the NanoDrop and select “dsDNA
15. Prepare a blank by dispensing 1 µL of nuclease-free water onto the NanoDrop plate using careful pipetting technique to prevent re-aspiration into the tip.
16. Close the NanoDrop lid gently and run the blank. Once complete, wipe the water off using a Kimwipe
17. Dispense 1 µL of the DNA sample from the tube onto the plate and close the lid.
18. Run the sample and take a photo of the results
Results:
Conclusion:
The concentration is still not where we want it to be. We will run another DNA extraction and combine both samples for a concentration.
DNA Extraction
Date: 11/12/2025
Redo: yes
Purpose: The purpose of the experiment was to isolate DNA using ZnCl2
Notes:
Day 1
- Cleaned the workbench with CiDecon and ethanol; wiped dry with paper towels.
- Put on lab coats and gloves for safety.
- Aliquot 5 mL of high-volume lysate into a 15 mL conical tube.
- TA added 20 µL of nuclease to the tube.
- Inverted the tube several times to mix.
- Incubated the sample at 37 °C for 10 minutes.
- Label five microcentrifuge tubes and aliquot 1 mL of lysate into each.
- Add 20 µL of ZnCl₂ to each tube.
- Inverted each tube several times to mix.
- Incubate at 37 °C for 5 minutes.
- Centrifuged tubes at 10,000 rpm for 1 minute.
- Remove and discard the supernatant using an electronic pipette.
- Add 500 µL of TES buffer to each tube.
- Incubate samples at 60 °C for 15 minutes.
- Add 1 µL of Proteinase K to each tube.
- Incubate at 37 °C for 10 minutes.
- Add 60 µL of sodium acetate to each tube and mix gently.
- Place samples on ice for 15 minutes.
- Centrifuge samples at 12,000 rpm and 4 °C for 1 minute.
- Transfer the supernatant from each tube into new microcentrifuge tubes; discard pellets.
- Add 500 µL of 100% isopropanol to each new tube.
- Store samples on ice in a refrigerator at 4 °C overnight.
Day 2
- Clean the workbench with CiDecon and ethanol; wipe with paper towels.
- Put on lab coats and gloves for protection.
- Retrieve the five microcentrifuge tubes from Day 1.
- Centrifuge samples at maximum speed for 10 minutes.
- Add 250 µL of 70% ethanol to each tube.
- Centrifuged samples for 1 minute.
- Remove and discard the supernatant into a waste tube.
- Invert tubes onto paper towels with lids open; gently tap to remove excess liquid.
- Allow samples to air-dry completely.
- Add 50 µL of nuclease-free water to the first tube and mix gently.
- Transfer 50 µL from tube 1 to tube 2; repeat for tubes 3–5.
- Load 3 µL of DNA precipitate onto the NanoDrop.
Results:
The sample was not loaded into the NanoDrop; instead will precipitate and combine the previous sample with this one.
Title: Reprecipitation of DNA
Date: 11/12/2025 Redo: yes
Purpose: To make the previous DNA extraction more accurate in order to get an acceptable Nanodrop reading.
Notes:
Day 1:
1. Wash hands and put on gloves
2. Disinfect the work area using technique by spraying CiDecon and spray the station again with 70% Ethanol and wipe down.
3. Retrieve DNA samples from storage in the freezer and allow them to thaw at room temperature.
4. Once thawed, determine the volume of each sample by aspirating the entire liquid into a micropipette and adjusting the pipette volume until no air bubbles remain in the tip.
5. Calculate the required volume of Sodium Acetate and ice-cold 100% Ethanol:
-
Sodium Acetate: 0.10 × 63 µL = 6.3µL
-
Ice-cold 100% Ethanol: 3 × 6.3 µL = 18.9 µL
6. Add both the Sodium Acetate and Ethanol to the tube containing the DNA sample using a micropipette. invert to mix.
7. Place the tube in a -80 °C freezer to allow precipitation overnight.
Day 2:
8.Remove the sample from the freezer and centrifuge at full speed, 4°C for 30 minutes.
9. Discard the supernatant into a waste tube, then add 0.5 mL of 75% Ethanol to wash the pellet.
10.Centrifuge again at 4°C for 10 minutes and discard the supernatant. Repeat this wash step once more.
11. After removing as much liquid as possible, place the tube in a 30°C incubator to air-dry. Ensure all liquid droplets have fully evaporated before continuing.
12. Add 50 µL of nuclease-free water to the tube and pipette up and down to mix
13. Take he tube to the NanoDrop to assess DNA concentration and quality
14. Turn on the NanoDrop and select “dsDNA
15. Prepare a blank by dispensing 1 µL of nuclease-free water onto the NanoDrop plate using careful pipetting technique to prevent re-aspiration into the tip.
16. Close the NanoDrop lid gently and run the blank. Once complete, wipe the water off using a Kimwipe
17. Dispense 1 µL of the DNA sample from the tube onto the plate and close the lid.
18. Run the sample and take a photo of the results
Results:
Conclusion:
The concentration was accepted, and we will continue to move on to Gel Electrophoresis