Discovery of Eppendorf
Eppendorf Information
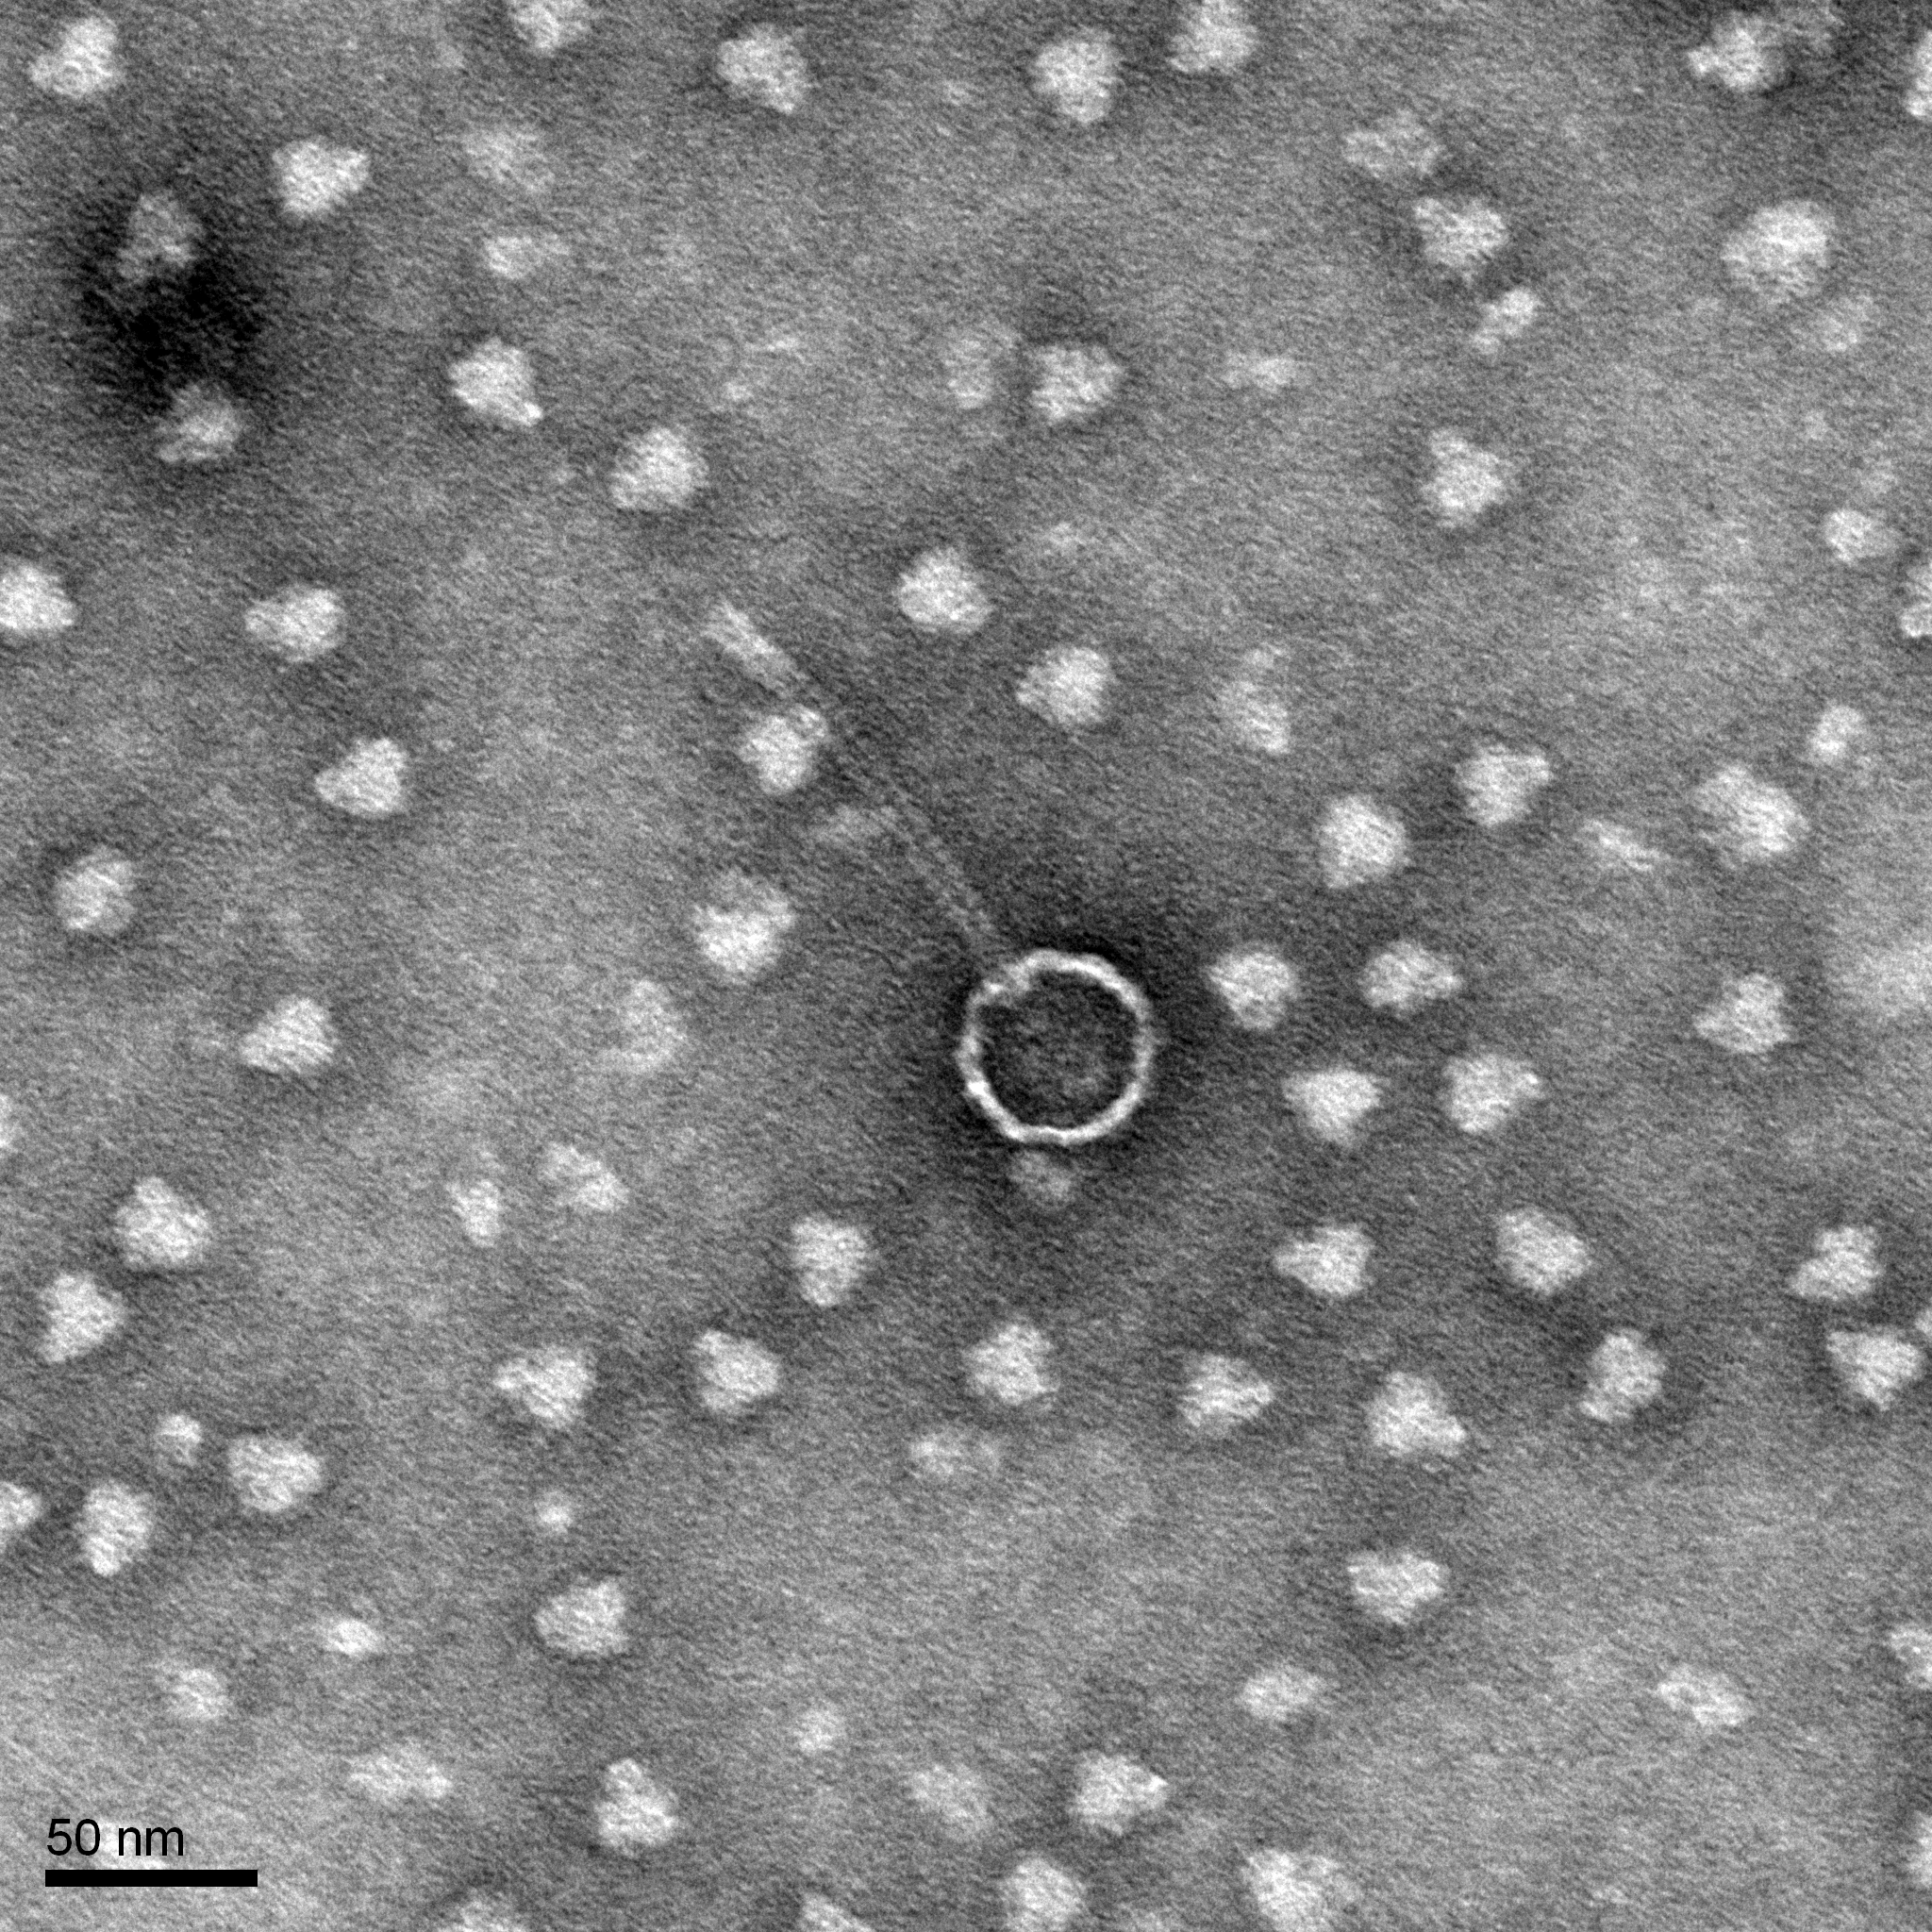
Morphology: Siphoviridae
Sample Collection
°
| Collector Name |
Elizabeth Ronck | |||
| Sample No. | 1 | 2 | 3 | 4 |
| Date of Collection | 8/27/24 | |||
| Sample Type | soil | soil | soil | soil |
| General Location | Stephenville, TX | |||
| Location Description | Ant pile in the shade beneath a tree, backyard | |||
| GPS Coordinates | 32°13’20″N 98013’42″W | |||
| Sample Depth | Surface level to 1″ deep | |||
| Ambient Temperature | 33°C |
Isolation/Purification
Direct Isolation of Sample 1
Date: 08/27/2024
Redo: No
Purpose: To isolate a bacteriophage from an environmental sample and use the isolated phage to infect host bacteria using plaque assay.
Notes:
-
- Dress in appropriate PPE and sterilize the lab bench, light bunsen burner to maintain a sterile field to work under
- Grab the refrigerated soil sample in a 15 ml conical tube and 5ml of PYCa liquid media. Soil sample #1 filled half conical tube.
- Using a 5 ml sterile pipette, add the PYCa liquid media to the 15 ml conical tube until the soil is submerged under 2-3 ml.
- Once the liquid media has been added, cap the sample and invert several times to mix
- Place the sample in a shaking incubator operating at 250 rpm for 1-2 hours
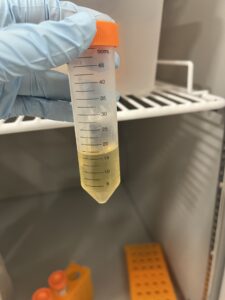
- Allow the sample to sit for 10 minutes to settle. Our sample had been divided into 3 layers, the bottom consisting of soil, the middle a murky liquid, and the top floating debris
- Using a .22 μm syringe filter and a 5 ml sterile syringe we extracted the middle liquid layer from the 15 ml conical tube
- Placing the .22 μm filter above a microcentrifuge tube allowed us to capture the filtered drainage
- Once at least .5 ml had been filtered into the microcentrifuge tube, we immediately capped it. Now begin preparing for plaque assay
- Obtain 250 μl host bacteria
- Using a 5 ml serological pipette, transfer the liquid in the microcentrifuge tube to the host bacteria and rotate/flick the test tube to mix
- Let the test tube sit for 10 minutes to allow attachment
- Grab molten top agar stored at 55-60C, using a 5ml serological pipette we transferred 3ml of top molten agar into the test tube and immediately aspirated it back into the pipette.
- We quickly dispersed the molten agar and host bacteria mixture onto the agar plate leaving a tiny amount in the pipette to prevent the formation of bubbles.
- Once the mixture made contact with the agar plate, we gently tilted to ensure all areas of the agar plate were evenly covered
- The agar plate was left to sit for 20 minutes to allow the agar to solidify, then placed in an incubator at 29C f to sit for 48 hours.
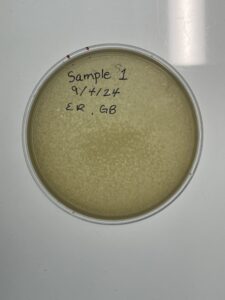
Results: 9/6/24
The plate showed phage growth.
Conclusions and Next Steps: Sample 1 showed phage growth. We will now use our sample #1 plate isolate a single phage using plaque assay and serial dilution.
Serial Dilution #1
Date: 09/9/2024
Redo: No
Purpose: To use serial dilution and plaque assay to isolate a single phage
Notes:
-
- Sterilize bench and begin aseptic technique by lighting bunsen burner to maintain a sterile environment.
- Prepare for serial dilution by gathering an appropriate number of microcentrifuge tubes, today we used six (10^-1, 10^-2, 10^-3, 10^-4, 10^-5, 10^-6)
- Label each microcentrifuge tube with its corresponding dilution 10^-1, 10^-2…
- Distribute 90 ul of phage buffer into each of the microcentrifuge tubes
- Using a 100 microliter micropipette select one phage from the sample 1 plate
- Circle the phage that was used
- Using the micropipette deposit the phage into your first (10^-1) dilution.
- Transfer 10 ul from 10^-1 t0 10^-2, making sure to gently mix the samples together
- Continue to add 10 ul to each of the 1o fold dilutions, switching the tip of the micropipette after every dilution
- Add plates to the incubator set at 29C while you perform other steps to ensure they will be ready
- Gather six tubes of host bacteria M. Foluriom and label them the same as the microcentrifuge tubes
- Add 10 ul of the microcentrifuge tubes to each of the corresponding host bacteria tubes
- Gently swirl the tubes to mix and let them sit for 10 minutes to allow attachment
- Remove PYCa plates from the incubator and label date, initals, and which dilution each plates will be (10^-1, 10^-2, 10^-3, 10^-4, 10^-5, 10^-6).
- Draw up 3 ml of top agar stored at 55C using a 5 ml serological pipette and add to the host bacteria
- Immediately aspirate and dispense the mixture into the corresponding PYCa plate
- Do this for each of the dilutions
- Let plates sit for 20 minutes to allow them to solidify
- Place plates in incubator at 29C for 24-48 hours
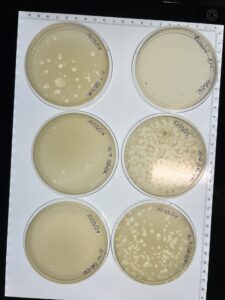
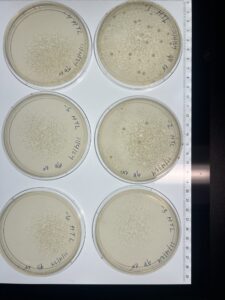
Results: 9/11/24
10^-1: Uncountable number of phages
10^-2: Uncountable number of phages
10^-3: Around 60 phages
10^-4: Around 30 phages
10^-5: 17 Phages
10^-6: 11 Phages
Conclusions and Next Steps:
The 10-fold dilution did show bacterial growth that decreased with each concentration. We will use the 10^-6 dilution to continue our second serial dilution. The plates were sealed with parafilm and refrigerated.
Serial Dilution #2
Date: 9/11/2024
Redo: No
Purpose: To dilute and plate phage sample until a single isolated phage remains
Plate used: 10^-6
Notes:
-
- Steralize bench and begin aseptic technique by a lightning bunsen burner to maintain sterile environment
- Prepare for serial dilution by gathering an appropriate number of microcentrifuge tubes, today we used four (10^-7, 10^-8, 10^-9, 10^-9)
- Label each microcentrifuge tube with the corresponding dilution
- Distribute 90 ul of phage buffer into each of the microcentrifuge tubes
- Using a 100 microliter micropipette set the volume to 10 ul
- Select one phage from 10^-6 and mark the circle sample used on the plate
- Deposit 10 ul of the phage into the first dilution (10^-7)
- Transfer 10 ul from 10^-7 into the 10^-8 tube, making sure to gently mix together
- Continue this process through the remaining samples changing the tip after every dilution
- Gather PYCa plates and place them in an incubator at 29C to prepare for plaque assay
- Gather four tubes of host bacteria (M. Foluriom) tube for every microcentrifuge sample and label them 10^-7, 10^-8, 10^-9, 10^-10
- Add 10 ul of the microcentrifuge tubes to the corresponding host bacteria tubes
- Gently swirl the tubes to mix and let them sit for 10 minutes to allow attachment
- While waiting, label each PYCa plate with the correct dilutions: 10^-7, 10^-8, 10^-9, 10^-10
- Draw up 3 ml of top agar stored at 55C , working quickly using a 5 ml serological pipette, and add to the host bacteria
- Immediately aspirate and dispense into the appropriate plate, do this for each of the dilutions
- Let the plates sit for 20 minutes to allow them to solidify
- Place in an incubator at 29C for 24-48 hours
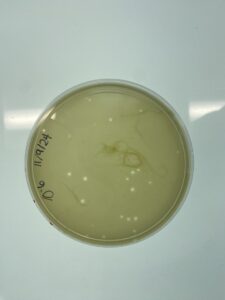
Results: 9/13/24
10^7: Uncountable number of phage
10^-8:Uncountable number of phage
10^-9:Uncountable number of phage
10^-10: About 50 phages
Conclusions and Next Steps:
Using the 10^-10 diluted plates we will repeat this process of 10-fold dilutions to further isolate the phages to narrow it down to a single phage. The plates were sealed with parafilm and refrigerated.
Serial Dilution #3
Date: 9/18/2024
Redo: No
Plate Used: 10^-10
Purpose: To dilute and plate phage sample until a single isolated phage remains
Notes:
-
- Steralize bench and begin aseptic technique by a lightning bunsen burner to maintain sterile environment
- Prepare for serial dilution by gathering an appropriate number of microcentrifuge tubes, today we used 4 (10^-11, 10^-12, 10^-13, 10^-14)
- Label each microcentrifuge tube with the corresponding dilution
- Distribute 90 ul of phage buffer into the microcentrifuge tube
- Using a 100 microliter micropipette select one phage from 10^-10 and mark the circle sample used on the plate
- Deposit the phage into the first dilution (10^-11)
- Transfer 10 ul from 10^-11 into the 10^-12 tube, making sure to gently mix together
- Continue this process through the remaining samples
- Gather agar plates and place them in an incubator at 29C to prepare for plaque assay
- Gather a host bacteria (M. Foluriom) tube for every microcentrifuge sample and label them 10^-11, 10^-12, 10^-13, 10^-14
- Add 10 ul of the microcentrifuge tubes to the corresponding host bacteria tubes
- Gently swirl the tubes to mix and let them sit for 10 minutes to allow attachment
- While waiting, label each plate with the correct dilutions: 10^-11, 10^-12, 10^-13, 10^-14
- Draw up 3 ml of top agar stored at 55C , working quickly using a 5 ml serological pipette, and add to the host bacteria
- Immediately aspirate and dispense into the appropriate plate
- Do this for each of the 10-fold dilutions, then place in an incubator at 29C for 48 hours
Results:
Conclusions and Next Step
We will use the 10^-13 plate to make low volume lysate
Harvesting Low-Volume Lysate (First Attempt)
Date: 09/23/2024
Redo: No
Purpose: To make a low-volume lysate to determine titer.
Notes:
-
-
- Sterilize bench and light Bunsen burner to maintain a sterile field
- Using the 10^-13 dilution from the third serial dilution to make low-volume lysate
- Flood the plate using 8 ml of phage buffer
- Leave the plate to sit (room temperature) for 2 hours with the lid on
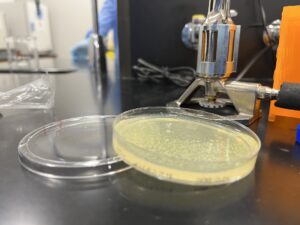
- To collect the lysate, gently remove the plate lid and place it on the lab bench
- Carefully prop the plate pooled with lysate under its lid to create a tilt
- Gather .22um filter and a 5ml syringe filter
- Use the 5 ml syringe to gather the pooled lysate
- Attach the .22um filter to the 5 ml syringe with lysate and dispense into a 15 ml sterile conical tube
- Label the conical tube low volume lysate, date, and initials
- Record the volume and place in refrigerator until use
-
Results:
Conclusions and Next Step:
We now have a low-volume lysate, we can now perform a spot titer and make a webbed plate.
Spot Titer (Low-Volume Lysate)
Date: 09/25/2024
Redo: No
Purpose: To determine titer for webbed plate.
Notes:
1. Sterilize lab bench and light bunsen burner to maintain sterile field
Place a single PYCa plate into the incubator to ensure it is ready by the time it is needed
- 3. Once the plate is ready, mark it into a 3×3 grid.
- 4. Label each square in the grid with the appropriate dilution (-1, -2, -3, -4, -5, -6, -7, -8)
- 5. Have one tube of 250 ul culture bacteria ready
- 6. Using a 5ml sterile pipette transfer 2ml of top molten agar into the pipette and draw back into the 250 culture bacteria tube
- 7. Immediately aspirate back up and dispense onto the plate (making sure to work quickly with the top agar)
- 8. Let this sit to cool for 15 minutes (or until solid)
- 9. Using our low-volume lysate, perform 8 dilutions
- 10. Grab 8 microcentrifuge tubes (one for every dilution, for the spot titer we did eight)
- 11. Add 90 ul of phage buffer into each microcentrifuge tube
- 12. Label each tube with its corresponding dilution (-1, -2, -3, -4, -5, -6, -7, -8)
- 13. Using a micropipette set the volume adjustment to 10 ul
- 14. Collect the 10 ul in the micropipette from the low-volume lysate
- 15. Dispense into the first (10^-1) diluted microcentrifuge tube
- 16. Changing the tip after each dilution, work your way down dilutions using 10 ul from each microcentrifuge tube into the next one.
- 17. Switching the volume adjuster on the micropipette to 3 ul takes three microliters from each dilution in the microcentrifuge tubes and dispenses them into their corresponding dilution on the PYCa plate
- 18. Leave the dilutions to set on the PYCa plate, after about 15 minutes place in the incubator at 29 C for 48 hours
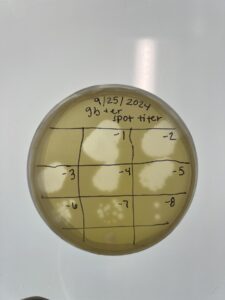
Results:
Success, there was phage growth.
Conclusions and Next Step:
We will use our spot titer to calculate our phage titer and perform a full plate titer.
Full Plate Titer #1 (Low-Volume Lysate)
Date: 09/30/2024
Redo: No
Purpose: Make webbed plates
Notes:
-
- Using the spot titer, calculate the titer to use to make a webbed plate
- We used the equation Titer(pfu/ml)= (#pfu/volume used in ul)(10^3 ul/ml)(dilution factor)
- We observed 2 plaques in our 10^-8 dilution using 3 ul
- (⅔) (10^3)(10^*)
- Our titer is .66×10^11
- Sterilize bench and light bunsen burner to maintain sterile field
- Place one PYCa plate in the incubator at 29C
- Gather 11 microcentrifuge tubes and label 1-11
- Fill each microcentrifuge tube with 90 ul of phage buffer
- Using a micropipette, draw up 10 ul of low-volume lysate and add it to the 10^-1 dilution the fold
- Switching tips after every dilution, add 10 uls of the lysate/buffer solution down each of the dilutions
- Knowing our titer, we are only going to keep the 10^-11 dilution
- Remove the plate from the incubator and label intials, date, low volume
- Gather 250 ul culture of host bacteria (M. Folorium) and add 10 ul of the 10^-11 microcentrifuge tube into the host bacteria tube
- Gently swirl to mix and leave it to sit for 10 minutes to allow attachment
- Using top molten agar stored at 55C, draw up 3 ml of agar and dispense into the host bacteria tube
- Immediately draw this back up and add to the PYCa plate
- Let the plate sit for 20 minutes or until solid and incubate for 48 hours at 29C
Results:
The results were negative, there was no phage growth
Conclusions and Next Step:
We will repeat the full plate titer in hopes of making a webbed plate
Full Plate Titer #2 (L0w-Volume Lysate)
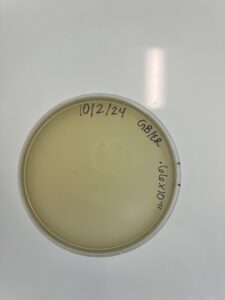
Date: 10/02/2024
Redo: Yes (2nd attempt)
Purpose: To make webbed plate
Notes:
- Sterilze bench and light bunsen burner to maintain sterile field
- Place a Pyca plate in the incubator for ready-use
- Gather 11 microcentrifuge tubes
- Set the volume of the micropipette to 90 uls
- Fill each microcentrifuge tube with 90 ul of phage buffer
- Repeating the steps from the low-volume serial dilution
- Set the volume of the micropipette to 10 ul and draw up 10 uls of low-volume lysate
- Add the 10 ul of low volume lysate to the 10^-1 microcentrifuge tube
- Switching tips after every dilution, add 10 uls of the lysate/buffer solution down each of the dilutions
- Knowing our titer, we are only plating the 10^-11 diltuion
- Remove the PYCa plate from the incubator and label the plate
- Gather 250 ul of host bacteria (M. Folorium) and add 10 ul of the 10^-11 microcentrifuge tube into the host bacteria tube
- Gently swirl to mix and leave it to sit for 10 minutes to allow attachment
- Use top molten agar stored at 55C, draw up 3 ml of agar and dispense it into the host bacteria tube
- Immediately draw this back up and add to the Pyca plate
- Let the plate sit for 20 minutes or until solid and incubate for 48 hours at 29C
Results:
Results were negetive, there was no phage growth
Conclusions and Next Step:
We will perform another full plate titer
Full Plate Titer #3 (Low-Volume Lysate)
Date: 10/07/2024
Redo: Yes (3rd attempt)
Purpose: To make webbed plate
Notes:
- Sterilize bench and light bunsen burner to maintain sterile field
- Place two Pyca plates in the incubator for ready-use
- Gather 11 microcentrifuge tubes
- Set micropipette volume to 90 ul and fill each microcentrifuge tube with 90 ul of phage buffer
- Repeating the steps from the low-volume serial dilution
- Set micropipette volume to 10 ul
- Draw up 10 ul of low-volume lysate and add it to the 10^-1 dilution the fold
- Switching tips after every dilution, add 10 uls of the lysate/buffer solution down each of the dilutions
- We know we have to use 10^-11 dilution from our titer, we will also plate our 10^-10 dilution
- Remove the plates from the incubator and label them appropriately
- Gather two tubes of 250 ul of host bacteria (M. Folorium)
- Using 10 ul from the 10^-10 from the microcentrifuge tube, add to the host bacteria
- Do the same for the 10^-11 dilution
- Gently swirl to mix and leave it to sit for 10 minutes to allow attachment
- Using top molten agar stored at 55C, draw up 3 ml of agar and dispense it into the host bacteria tube
- Immediately draw this back up and add it to the Pyca plate
- Repeat this step for both the 10^-10 and 10^-11 dilutions
- Let the plate sit for 20 minutes or until sold and incubate for 48 hours at 29C
Results:
The results were negative, there was no phage growth
Conclusions and Next Step:
We will repeat the full plate titer, but plate more dilutions lower in concentration
Full Plate Titer #4 (Low-Volume Lysate)
Date: 10/09/2024
Redo: Yes (4th attempt)
Purpose: To make webbed plate
Notes:
- Sterilize the lab bench and light bunsen burner to maintain sterile field to work under
- Place five PYCa plates in the incubator (29C) for ready-use
- Gather 11 microcentrifuge tubes and label them 10^-1 through 10^-11
- Using 100 microliter pipette set the volume to 90 ul
- Fill each microcentrifuge tube with 90 ul of phage buffer and label them
- Repeating the steps from the low-volume serial dilution
- Set the micropipette to 10 ul
- Add 10 ul of low-volume lysate and add it to the 10^-1 dilution
- Switching tips after every dilution, add 10 uls of the lysate/buffer solution down each of the dilutions
- Remove the plates from the incubator and label
- Gather five tubes 250 ul of host bacteria (M. Folorium)
- We are plating dilutions 10^-5 through 10^-9
- Add 10 ul from each of the microcentrifuge tubes into their corresponding host bacteria tube
- Wait 10 minutes to allow attachment
- Using top molten agar stored at 55C, draw up 3 ml of agar and dispense into the host bacteria tube
- Immediately draw this backup and add it to the Pyca plate
- Plate all 5 tubes onto the corresponding plates
- Let the plate sit for 20 minutes or until sold and incubate for 48 hours at 29C
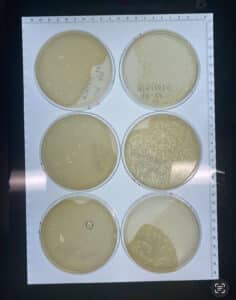
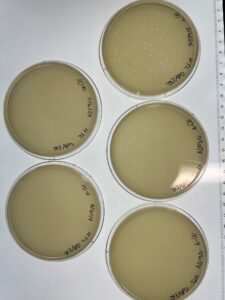
Results:
Conclusions and Next Step:
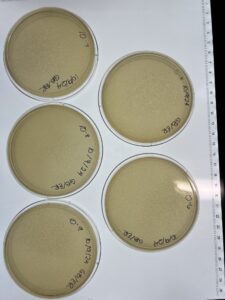
Our titer seems to have been incorrect. The 10^-2 plate has the best optimal phage growth to make high titer lysate. We will use the 10^-2 dilution to get to make a webbed plate and then a high-titer lysate.
Harvesting Low-Volume Lysate (Second Attempt)
Date: 10/21/2024
Redo: Yes (2nd)
Purpose: To be to able to determine titer
Notes:
- Sterilize bench and light Bunsen burner to maintain a sterile field
- Using the 10^-14 dilution from the third serial dilution to make low-volume lysate
- To flood the plate, use 8 ml of phage buffer
- Leave the plate to sit (room temperature) for 2 hours with the lid on
- To collect the lysate, gently remove the plates lid and place it on the lab bench
- Carefully prop the plate pooled with lysate under its lid to create a tilt
- Gather .22um filter and a 5ml syringe filter
- Use the 5 ml syringe to gather the pooled lysate
- Attach the .22um filter to the 5 ml syringe with lysate and dispense into a 15 ml sterile conical tube
- Label the conical tube low volume lysate, date, and initials
- Place in refrigerator until use
Results:
5 ml of low volume lysate
Conclusions and Next Step:
Now that low-volume lysate has been made it will be used to determine titer in a serial dilution.
Full Plate Titer (High-Titer Lysate)
Date: 10/23/2024
Redo: Yes
Purpose: To make webbed plate
Notes:
- Sterilize lab bench and light bunsen burner to maintain sterile field to work under
- Place eight PYCa plates in the incubator at 29C for ready use
- Gather eight microcentrifuge tubes and label -1, -2, -3, -4, -5, -6, -7, -8
- Using 100 microliter micropipette set the volume to 90 ul
- Add 90 ul to each of the eight microcentrifuge tubes
- Set the volume of micropipette to 10 ul
- Add 10 ul of low-volume lysate to the 10^-1 microcentrifuge tube
- Further dilute this by adding 10 ul down the fold, changing the tip of the micropipette after every dilution
- Gather eight tubes of 250 ul of host bacteria (M. Folorium) and label them to match the microcentrifuge tubes
- Add 10 ul from each of the microcentrifuge tubes into its corresponding host bacteria tube
- Let the tubes sit for 10 minutes to allow attachment
- Remove the PYCa plates from the incubator and label initials, date, and dilution (10^-1, 10^-2, 10^-3, 10^-4, 10^-5, 10^-6, 10^-7, 10^-8)
- Using top agar stored at 55C draw up 3 ml and add to each bacteria tube
- Immediately draw back up from the host bacteria tube and add onto the right PYCa plate
- Do this for all 8 dilutions
- Let the plates sit for 20 minutes or until solidified and incubate for 24-48 hours at 29C
Results:
The 10^-2 plate is webbed
Conclusions and Next Step
The 10^-2 full plate titer is a webbed plate. We will continue to make copies of the 10^-2 plate to make our high-titer lysate.
Amplification
Making Webbed Plates from Known Titer (Low-Volume)
Date: 10/16/2024
Redo: No
Purpose: Create more copies to make high titer lysate
Notes:
-
- Sterilize the lab bench and light Bunsen burner to maintain a sterile field
- Place 6 pyca plates from the fridge into the incubator
- Select plate from the previous round of dilutions that best made webbed plate (we used our 10^-2)
- Place phage buffer (90 ul) into two microcentrifuge tubes to get to your 10^-2 dilution
- Only using the 10^-2 serial fold dilution now
- Have 6 different host bacteria tubes ready, and place 10 ul from the microcentrifuge tubes into each of the tubes containing host bacteria
- Label each of the host bacteria tubes with the appropriate dilution (-1, -2, -3, -4, -5, -6)
- Let this sit for 10 minutes after swirling gently
- Remove the pyca plates from the incubator and label them with the correct dilution that will be plated
- Using a serological pipette draw up 2 ml of top agar and dispense into the first (10^-1) dilution in the bacteria tube
- Immediately draw back up and dispense onto the pyca plate
- Repeat this step for the remaining five host bacteria tubes
- Once all six dilutions have been plated, let them sit for 20 minutes or until they solidify.
Results:
Conclusions and Next Steps:
Making Webbed Plates from Lysate of Known Titer (Low-Volume)
Date: 10/28/2024
Redo: No
Purpose: To create copies of the webbed plate 10^-2 made from our low volume lysate so that we can flood them to create high titer lysate.
Notes:
-
- Sterilize lab bench and light Bunsen burner to maintain sterile field
- Gather 10 microcentrifuge tubes and place 5 PYCa plates into the incubator at 29C
- We needed the 10^-2 dilution to make our webbed plates so we made 5 separate 10-fold dilutions (only diluting the 1 and 2) labeling them -1 and -2.
- Add 90 uls of phage buffer into each of the 10 microcentrifuge tubes. Because we have to make five plates to the 10^-2 we are doing five separate serial dilutions.
- We gathered the low-volume lysate previously made and added 10 uls to each of the -1 dilutions of the fold
- Then for each group, we switched the tip of the micropipette and diluted the original 10 ul in the -1 into the -2 microcentrifuge tube
- We repeated this step so that we had five separate microcentrifuge tubes diluted to the 10^-2. We then discarded the -1 microcentrifuge tubes
- We then gathered 5 tubes of host bacteria M.Folrium so each of the microcentrifuge tubes has a bacteria to be added to
- We then added 10 uls of the -2 microcentrifuge tubes into its corresponding M.Folorium
- We let this sit for 10 minutes to allow attachment
- Toward the end of the 10 minutes, we removed our 5 PYCa plates from the incubator and labeled them with our initials, date, and concentration
- We gathered a serological pipette and top agar
- Using the serological pipette we drew 3 ml of top molten agar and dispensed that into our first tube
- We immediately drew this backup and plated it onto our first PYCa plate
- We repeated this for the other four plates and set them out to rest for 15 minutes to solidify
- Once solidified we placed the plates in the incubator set at 29C for 48 hours.
Results:
The five (10^-2) plates did create webbed plates.
Conclusions and Next Steps:
We will flood these 5 plates and the oringial plate made in the full plate titer to create our high-titer lysate. We are also going to make more plates to ensure we have enough HVL for future steps.
Harvesting High-Volume Lysate
Date: 10/30/2024
Redo: No
Purpose: Flood webbed plates and gather media to harvest a high-titer lysate to use for DNA extraction.
Notes:
- Sterilize lab bench and light bunsen burner to maintain sterile field
- Gather the six webbed plates made to the 10^-2 (five of the plates were made 10/28/24 and the other made 10/23/24)
- Grab phage buffer, using a serological pipette and add 8 ml onto each of the six PYCa plates
- Close the lid of the plates and let the buffer sit on the plates for two hours
- Once the two hours had passed we began to filter the buffer to collect the high-titer lysate
- We assembled a vacuum filter because of the amount of plates needing to be filtered
- We took the lid of the first plate and laid it flat on the lab bench. We rested the plate on top of the lid to create a tilt for the liquid to pool in. This makes it easier to collect.
- Using a serological pipette we carefully drew up all the buffer we could manage and added it into the funnel of the vacuum filter
- Once all the buffer had been added from all six of the places we turned on the vacuum handle and allowed it to sit and filter
- The vacuum filter eventually stopped being able to filter the buffer so using a 5ml sterile syringe we drew up the remaining buffer from the vacuum filter funnel
- We attached the 5 ml sterile syringe to a .22 um filter and working under the flame filtered into collected high volume lysate
- We made sure to label our lysate and place it in the fridge at 5C
Results:
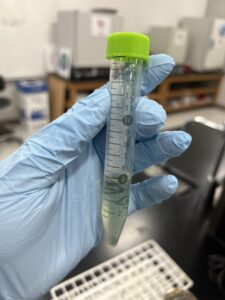
We collected 16 ml of high-titer lysate
Conclusions and Next Step
Now that we have our high titer lysate we will perform a full plate titer with out HTL to determine our titer.
Full Plate Titer using HTL
Date: 11/4/2024
Redo: No
Purpose: To determine titer of HTL to use for electron microscopy
Notes:
- Sterilize lab bench and lit bunsen burner to maintain sterile field to work under.
- We removed six PYCa plates from the refrigerator (5C) and placed them in the incubator set at 29C
- We gathered and labeled 6 microcentrifuge tubes -1, -2, -3, -4, -5, -6
- We added 90 ul of phage buffer into all six of our labeled microcentrifuge tubes
- Then we set our micropipette volume to 10 ul and gathered out high titer lysate made on 10/30/24
- 10 ul of high titer lysate was dispensed into the first microcentrifuge tube (-1)
- We then continued to further dilute transferring 10 uls through all six of the microcentrifuge tubes, making sure to switch the micropipette tip after every use
- We then labeled our six tubes of host bacteria M. Folorium -1, -2, -3, -4, -5, -6
- We added 10 uls of media from the microcentrifuge tubes to their corresponding host bacteria tubes
- Once added we gently swirled the tubes and it to sit for 10 minutes to allow for attachment
- While waiting, we removed the six PYCa plates from the incubator and labeled them with our initials, date, dilution (10^-1, 10^-2, 10^-3, 10^-4, 10^-5, 10^-6), and high titer lysate (HTL)
- Using the serological pipette we drew up 3 ml of top agar warmed to 55C and added it to the first tube (-1) of host bacteria. We immediately aspirated this back into the serological pipette and dispensed it onto the corresponding (-1) plate
- We repeated this step for all the concentrations
- We let them sit out for 15-20 minutes to allow the agar to solidify and then placed them in an incubator at 29C for 48 hours
Results:
Unsuccessful, bacteria covered too much
Conclusions and Next Step:
Redo full plate titer using HTL and plate higher dilutions (7 through 11).
Full Plate Titer Using HTL
Date: 11/6/2024
Redo: Yes
Purpose: To determine the titer of HTL to use for electron microscopy
Notes:
- Sterilize lab bench and light Bunsen burner to maintain sterile field to work under
- We gathered 11 microcentrifuge tubes and added 90 ul of phage buffer to each
- We labeled the microcentrifuge tubes -7, -8, -9, -10, -11
- We placed five PYCa plates into the incubator at 29C
- Using a micropipette (now set at 10 ul ) we used our high titer lysate to add to the first (-1) dilution in the fold
- We then continued to further dilute transferring 10 uls through all eleven of the microcentrifuge tubes
- We used five tubes of host bacteria M. Folorium for each of the microcentrifuge tubes in the 10-fold dilution
- We labeled each of the host bacteria tubes the same as the microcentrifuge tubes -7, -8, -9, -10, -11
- We added 10 uls from the microcentrifuge tubes to their matching host bacteria tubes
- Once finished we allowed this to sit for 10 minutes to allow for attachment
- While waiting we removed the five PYCa plates from the incubator and labeled them with our initials, date, dilution, and high titer lysate (HTL)
- Using a serological pipette and 3 ml of a top molten agar warmed to 55C
- We drew up 3 ml of top molten agar added it to the -7 host bacteria tube and immediately drew back up
- We then added to the -7 plate and set it aside to solidify
- We repeated this step with the other four dilutions
- Once solidified we set the incubator at 29C for 24 hours
Results:
Unsuccessful
Conclusions and Next Step
We are going to attempt a full plate titer using HTL again, this time retrying 6,7,8 plates.
Full Plate Titer using HTL
Date:11/9/2024
Redo: Yes
Purpose: To determine titer of HTL to use for electron microscopy
Notes:
- Sterilize lab bench and light bunsen burner to maintain sterile field to work under
- We gathered eight microcentrifuge tubes and added 90 ul of phage buffer to each
- We labeled the microcentrifuge tubes -1, through -8
- We placed three PYCa plates into the incubator at 29C. We are only plating 6-8 because they were the closest to our desired results on the last attempt
- Using a micropipette (now set at 10 ul ) we used our high titer lysate to add to the first (-1) dilution in the fold
- We then continued to further dilute transferring 10 uls through all 8 of the microcentrifuge tubes
- We used five tubes of host bacteria M. Folorium for each of the microcentrifuge tubes in the 10-fold dilution
- We labeled each of the host bacteria tubes the same as the microcentrifuge tubes, -6, -7, -8
- We added 10 uls from the microcentrifuge tubes to their matching host bacteria tubes. Once finished we allowed this to sit for 10 minutes to allow for attachment
- While waiting we removed the five PYCa plates from the incubator and labeled them with our initials, date, dilution, and high titer lysate (HTL)
- Using a serological pipette and 3 ml of a top molten agar warmed to 55C
- We drew up 3 ml of top molten agar added it to the -6 host bacteria tube and immediately drew back up
- We then added it to the -6 plate and set it aside to solidify
- We repeated this step with the other two dilutions
- Once solidified we set the incubator at 29C for 48 hours
Results:
The 10^-6 was successful
Conclusions and Next Step:
We will use the 10^-6 plate to determine titer and then use our titer and HTL for electron microscopy.
Characterization
Title: Transmission Electron Microscopy (TEM) Grids
Date: 11/11/2024
Redo: No
Purpose: Help characterize DNA
Notes:
Calculating Titer
- To calculate our titer, we used the following formula:
Titer (pfu/ml) = (# pfu/ volume used in μl) x (10^3 μl/ml) x dilution factor
2. With our personal data applied:
- We counted 23 plaques on the 10^6 dilution
(2.3 pfu/μl) x (10^3 μl/ml) x (10^6)
This resulted in a titer of 2.3 x10^9
Preparing Phage Sample
- Sterilize lab bench and light bunsen burner to maintain sterile field to work under
- Using a serological pipette we transferred 1 ml of high-titer lysate into a sterile microcentrifuge tube
- We placed the microcentrifuge tube with the high titer lysate into the centrifuge set at 4C, top speed, for an hour. We observed a pellet formed at the bottom of the microcentrifuge tube.
- Using a micropipette we carefully removed all the supernatant resting above the pellet, making sure not to disturb the pellet itself
- Using a micropipette set at 100 ul we added phage buffer into the microcentrifuge tube
- We then placed this in the fridge at 5 C to resuspend for 30 minutes
Preparation of work area (set up for us)
- Cover the designated work area with bench paper or a Kimwipe to create a clean work surface.
- Remove the cover from a 5 x 5 cm piece of parafilm, and place the parafilm into the lid of the Petri dish.
- Place a PELCO Tab or small piece of double-sided tape onto the parafilm in the lid of the Petri dish. Expose the adhesive or the tab.
- Using EM forceps, remove a fresh grid from a box of unused grids, touching only the very edge of the grid.
- Place the grid dark-and-shiny side UP, on the edge of the tab or double-sided tape so that only the very edge of the grid (no more than 0.5 mm) is touching the adhesive.
Mounting Phage Samples for TEM and Staining with Uranyl Acetate
- Using a micropipetter set at 10 ul we added our HTL that had finished resuspending in the fridge onto the grid. We were careful not to touch the grid with the micropitte. We set a timer for the lysate for 2 minutes
- Once the 2 minutes were up, we used the sharp edge of Watman filter paper to remove the liquid. Gently coming in at an angle and wicking the lysate off the grid
- We then needed to rinse off the grid, to do this we used 10 ul of water. Repeating the same steps as above, we carefully placed the entirety of the 10 ul of water onto the grid, allowed it to sit for 2 minutes, and then using a fresh sheet of filter paper wicked the water off the grid. Repeat this step again.
- Now that the grid is rinsed off use 1% uranyl acetate.
- Add 10 ul of 1% uranyl acetate to the grid. Allow this to sit for 2 minutes. Wick off carefully when time is up.
- Let the grid air dry before putting the grid into its slot
Results:
Conclusions and Next Steps:
DNA Extraction
DNA Extraction #1
Date: 11/14/2024
Redo: No
Purpose: To get a concentrated DNA sample
Notes:
- Day 1
- Because we are working with Nuclease, we made sure to do the following step under the fume hood
- Using the high-titer lysate and a serological pipette, we added 5 ml of our high-titer lysate into a 15 ml conical tube
- Now using a micropipette set to 20 ul, we added the nuclease into the 15 ml conical tube with the high titer lysate.
- We gently inverted the tube to mix 5 times and then incubated at 37C for for 10 minutes
- While the lysate and nuclease is incubating, gather 5 microcentrifuge tubes and and ZnCl2 from the fridge
- Once the HTL and Nuclease have incubated for 10 minutes aliquot 1 ml from the conical tube into each of the 5 microcentrifuge tubes. Then add 20 ul of ZnCL2 to each of the 5 microcentrifuge tubes and incubate at 37 C for 5 minutes.
- Once the 5 minutes is up, centrifuge at 10,000 rpm for 1 minute
- Steps 9 through 15 must be done quickly
- After the tubes have centrifuged a pellet has been formed at the bottom. Using a micropipette, remove all the supernatant resting above the pellet. We got as much as we could without disturbing the pellet. While removing the supernatant, any tips filled with liquid were disposed of into the sharps trash.
- To resuspend the pellets we added 500 ul of TES phage buffer into each of the five microcentrifuge tubes and incubated for 60C for 15 minutes
- Using the micropipette, add 1 ul of protein K and mix gently. Because 1 ul was so small we made sure to dispense the protein k to the side of the microcentrifuge tube and then watch it mix. Incubate the 5 microcentrifuge tubes at 37C for 10 minutes
- Add 60 ul of potassium acetate to each of the microcentrifuge tubes. We inverted 5 times to mix and then placed it in a tub of ice for 15 minutes
- After the 15 minutes are up, centrifuge the tubes at 4C for 1 minute at 12,000 rpm
- Gather 5 new microcentrifuge tubes. From the original microcentrifuge tubes, use a micropipette to remove the supernatant. This time we are keeping the supernant and placing them into the new unused microcentrifuge tubes. The microcentrifuge tubes with the capsids are okay to be discarded.
- Add 500 ul of isopropanol to each of the new microcentrifuge tubes holding the collected supernatant. Place the microcentrifuge tubes back on ice and leave them for 24 hours.
Day 2
- Gather the microcentrifuge tubes left in ice from the previous lab day
- Centrifuge the tubes at top speed for 10 minutes
- We removed the centrifuge tubes and using a micropipette collected the supernatant from the tubes and disposed into the sharps. We made sure not to disturb the pellet.
- We added 250 ul of 70% ethanol into each of the tubes. The tubes were then placed into the centrifuge for 1 minute at top speed.
- We collected the supernatant using a micropipette and then discarded them into the sharps waste.
- To dry the tubes we placed the microcentrifuge tubes upside down onto a paper towel to get the initial liquid all out. Then we placed them into the incubator set at 30C. We made sure to check they were completely dry before moving on to the next step.
- We dispensed 50 ul of nuclease-free water into the first tube and then gathered it all completely back up to place into the next. I did this until everything was in the last tube.
- Using the nanodrop we checked our DNA sample. We made sure to clean with water before placing our DNA sample.
Results:
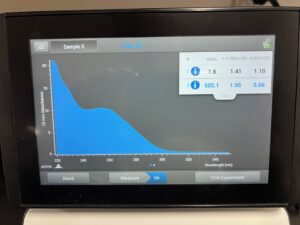
505.1, 1.95, .66
Conclusions and Next Steps:
DNA was not ideal, we are going to reprecipitate the DNA and make another attempt.
Re-precipitation of DNA #1
Date: 11/18/2024
Redo: Yes
Purpose: To get a concentrated DNA sample
Notes:
- Day 1
- Sterilized lab bench
- We removed the DNA precipitate kept from DNA extraction on 11/15/24
- To measure the volume of DNA, we set the volume of a micropipette to 50 ul (since that is the amount of nuclease-free water that was added)
- We decreased the volume of the micropipette until there was no air gap in the tip and a bubble formed. We had 46 uL of DNA precipitate remaining
- We transferred the DNA precipitate into a new microcentrifuge tube
- Into the microcentrifuge tube, we added 10% sodium acetate of the DNA precipitation volume (4.6) and then 300% of the DNA precipitation of 100%Ethanol (138)
- In the new microcentrifuge tube, we had 188.6 ul of precipitate
- Day 2
-
- Sterilize lab bench
- We removed the DNA precipitate from the fridge and placed it into the centrifuge set at 15,000 rpm, 4C, for 30 minutes
- We then removed the supernatant and added .5 ml of 75% ethanol to the tube and centrifuged it for 10 minutes, 15,000 rpm, at 4C. Once the time is up remove the supernatant and repeat this again
- We placed the tube in an incubator set at 30C to completely dry
- Once the tube was dry we added 50 in ul of nuclease-free water, using the 50 ul pipette we aspirated the water out of the tube and then added it back in to mix
- Then using the nanodrop we dispensed 1 ul of water onto the sensor to clean ( did it twice) and wiped the water off so the DNA could now analyze
- 1 ul of DNA was placed onto the sensor and analyzed
- The DNA precipitate was placed in the fridge (5C) overnight
-
Results: 11/19/24
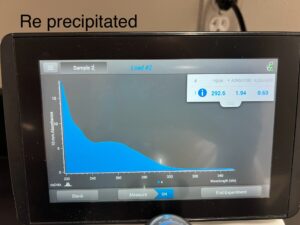
292.6, 1.94, .63
Conclusions and Next Steps:
DNA Extraction #2
Date: 11/18/2024
Redo: Yes
Purpose: To get a concentrated DNA sample
Notes:
Day 1
- Because we are working with Nuclease, we made sure to do the following step under the hood
- Using the high-titer lysate and a serological pipette, we added 5 ml of our high-titer lysate into a 15 ml conical tube
- Now using a micropipette set to 20 ul, we added the nuclease into the 15 ml conical tube with the high titer lysate.
- We gently inverted the tube to mix 5 times and then incubated at 37C for for 10 minutes
- While the lysate and nuclease is incubating, gather 5 microcentrifuge tubes and and ZnCl2 from the fridge
- Once the HTL and Nuclease have incubated for 10 minutes aliquot 1 ml from the conical tube into each of the 5 microcentrifuge tubes. Then add 20 ul of ZnCL2 to each of the 5 microcentrifuge tubes and incubate at 37 C for 5 minutes.
- Once the 5 minutes is up, centrifuge at 10,000 rpm for 1 minute
- Steps 9 through 15 must be done quickly
- After the tubes have centrifuged a pellet has been formed at the bottom. Using a micropipette, remove all the supernatant resting above the pellet. We got as much as we could without disturbing the pellet. While removing the supernatant, any tips filled with liquid were disposed of into the sharps trash.
- To resuspend the pellets we added 500 ul of TES phage buffer into each of the five microcentrifuge tubes and incubated for 60C for 15 minutes
- Using the micropipette, add 1 ul of protein K and mix gently. Because 1 ul was so small we made sure to dispense the protein k to the side of the microcentrifuge tube and then watch it mix. Incubate the 5 microcentrifuge tubes at 37C for 10 minutes
- Add 60 ul of potassium acetate to each of the microcentrifuge tubes. We inverted 5 times to mix and then placed it in a tub of ice for 15 minutes
- After the 15 minutes are up, centrifuge the tubes at 4C for 1 minute at 12,000 rpm
- Gather 5 new microcentrifuge tubes. From the original microcentrifuge tubes, use a micropipette to remove the supernatant. This time we are keeping the supernant and placing them into the new unused microcentrifuge tubes. The microcentrifuge tubes with the capsids are okay to be discarded.
- Add 500 ul of isopropanol to each of the new microcentrifuge tubes holding the collected supernatant. Place the microcentrifuge tubes back on ice and leave them for 24 hours.
Day 2
- Gather the microcentrifuge tubes left in ice from the previous lab day
- Centrifuge the tubes at top speed for 10 minutes
- We removed the centrifuge tubes and using a micropipette collected the supernatant from the tubes and disposed into the sharps. We made sure not to disturb the pellet.
- We added 250 ul of 70% ethanol into each of the tubes. The tubes were then placed into the centrifuge for 1 minute at top speed.
- We collected the supernatant using a micropipette and then discarded them into the sharps waste.
- To dry the tubes we placed the microcentrifuge tubes upside down onto a paper towel to get the initial liquid all out. Then we placed them into the incubator set at 30C. We made sure to check they were completely dry before moving on to the next step.
- We dispensed 50 ul of nuclease-free water into the first tube and then gathered it all completely back up to place into the next. I did this until everything was in the last tube.
- Using the nanodrop we checked our DNA sample. We made sure to clean with water before placing our DNA sample.
Results: 11/19/24
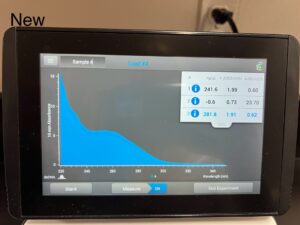
281.8, 1.91, .62
Conclusions and Next Steps:
