Discovery of Rira
Rira Information
Morphology: Siphoviridae

Sample Collection
| Collector Name |
Aliana Ramos | Aliana Ramos | Richard Turner | Richard Turner | |
| Sample No. | 1 | 2 | 3 | 4 | |
| Date of Collection | 8/24/25 | 8/24/25 | 08/25/25 | 08/25/25 | |
| Sample Type | Soil | Soil | soil | soil | |
| General Location | Laura St. Rockdale TX | Laura St. Rockdale TX |
Rose Heath Ln, Fort. worth, Tx
|
Chapin Rd/ Fox Trail Ln, Fort Worth, Tx | |
| Location Description | Soil beneath mouse enclosure | Underneath horse manure | near ant bed | near open field | |
|
GPS Coordinates.
|
30° 39′ 55.6″ N 97° 0′ 15.24″ W |
30° 39′ 55.6″ N 97° 0′ 15.24″ W |
32’43’56.5″N 97’31’3104.5″W | 32’44’01.8″N 97’31’12.8″W | |
| Sample Depth | 2 in | 5 in | 2 inch | 2 inch | |
| Ambient Temperature | 98°F | 98°F | 30°C | 30°C |
Isolation/Purification
Direct Isolation – Sample 1
Date: 08/25/2025
Redo: No
Purpose: The purpose of this experiment is to obtain phages from a direct isolation to prepare for a plaque assay
Procedure:
Prepared workspace using aseptic technique
- Spray lab bench with CiDecon and let it sit for thirty seconds, then wiped it off. Then, sprayed 70% EtOH and waited thirty seconds, then wiped completely dry. We then lit a Bunsen burner to keep a sterile field when working.
- A 15 mL conical tube was filled about half full with soil sample #1 and 2 mL of PyCA liquid media was added to the sample.
- Cap the tube and vigorously invert several times to saturate the soil with the liquid media.
- Incubate the tube while vigorously shaking at 250 rpm for one hour
- letting the tube sit undisturbed for 2-20 minutes to allow most of the particulate matter to settle.
- Use aseptic technique, open the 0.22 μm syringe filter, and leave until further use.
- Using a 2ml sero-pipette, aspirate approximately 2 ml of liquid from the top of the flooded sample, careful not to collect sediments from the bottom as they will clog the filter
- Attach the syringe to the filter, then secure that to a microcentrifuge tube
- Depress the syringe plunger slowly collecting at least 0.5 mL of filtrate.
- If the filter clogs, stop and discard the clogged filter and replace with a new one
- Cap the microcentrifuge tube immediately and discard the used syringe and filter.
- Prepare for plaque assay
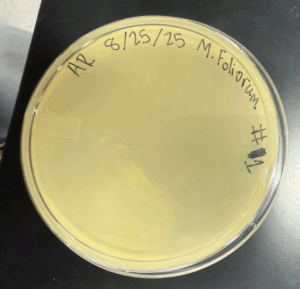
Plaque assay – Sample 1
- Obtain microcentrifuge tube with potential isolated phages
- Inoculate host bacteria with phage sample
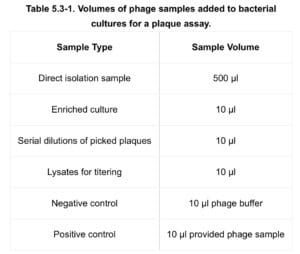
- Obtain aliquots of 250 µl host bacteria equaling the number of phage samples, labeling tubes accordingly.
- Using a 2 ml serological pipette, dispense the appropriate volume of phage sample into corresponding bacterial host tube. (volumes calculated using table 5.3 – 1 below)
- Mix each inoculated host culture by gently tapping the tube ( make sure sample comes into contact with host bacteria as it may adhear to the sides of the tube rather than in your bacteria)
- Let sample sit undisturbed for 5 – 10 minutes to allow attachment
- Plating the samples – obtain the same number of plates as you have samples, labeling the plates acordingly
- Remove Molten top agar from the 55° C bath (work quickly during steps 9 & 10 to prevent top agar from solidifying)
- Using a steril 5ml serological pipette aseptically transfer 3 ml of top agar to the inoculated host tube (Try to avod making bubbles as they can appar as plaques on the plates)
- immediatly aspirate the mixture back into the sero pipette and transfer it onto the appropriate plate. Discard the pipette
- Quickly but gently, swirl the plate in different directions until the top agar evenly coats the agar plate.
- allow plates to sit undisturbed for ~ 20 minutes to let the top agar solidify
- Carefully flip plates upside down and place into incubator labeled M. Foliorum which is set at 29°C
- incubate for 24 – 48 hrs
- wipe workspace using CiDecon and EtOH as described previously
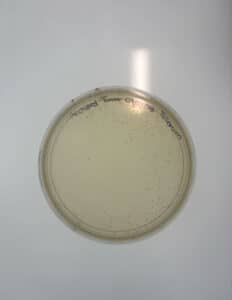
Results: No Phages observed
Conclusions and Next Steps:
No phage activity observed, plate discarded and will proceed with Enriched Isolation for Sample 2
Direct Isolation – Sample 3
Date: 08/27/2025
Redo: no
Purpose: The purpose of this experiment is to obtain a phage from a direct isolation.
Notes:
-
- After collecting an environmental sample in a 15 mL colonial tube, 2 mL of liquid media was added to the tube to submerge the sample.
- The tube containing the sample and the liquid media was then moved to a shaking incubator at 250 rpm, incubating from 10:23 a.m. until 11:36 a.m..
- Once incubation was complete, the sample was allowed to sit for 10 minutes to allow it to settle.
- Once settled a syringe was used to remove 2 mL of liquid from the sample.
- The syringe was then screwed on to a syringe filter (22 um) and the sample was depressed into a microcentrifuge tube.
- The sample was then prepared for plaque assay
Plaque assay on direct isolation (sample 3):
Purpose: The purpose of this technique is to detect the presence of phages in a sample.
-
- Since there was only one sample to test only one aliquot of 250 ul of host bacteria (M. foliorum) was collected.
- Using a micropipette 10 ul of the sample was added to the tube containing M. foliorum.
- The tube was then allowed to sit for 10 minutes.
- After 10 minutes, a bottle of top agar was removed from the 55 C bath and brought to the bench.
- Using a sterile 5 mL pipette, 3 mL of the top agar was added the tube containing the sample and the host bacteria mix.
- This mix was then immediately aspirated back into the pipette and plated onto an agar plate.
- The plate was then allowed to solidify to room temperature and mover to a 29 C incubator.
- After 48 hours the plates were checked for plaques, resulting in no plaques present (with some contamination on plates).
Results:
After 48 hours the plates were checked for plaques, resulting in no plaques present (with some contamination on plates).

Conclusions and Next Steps:
Since no plaques formed from a direct isolation, plates were discarded and an enriched isolation will be performed to potentially obtain phages.
Enriched Isolation – Sample 4
Date: 09/02/2025
Redo: no
Purpose: The purpose of this experiment is to obtain phages from an enriched isolation.
Notes:
-
- A second environmental sample was collected in a 15 mL colonial tube to perform an enriched isolation.
- The sample was then moved to a 50 mL colonial tube.
- Liquid media was added to the sample up to the 35 mL line in the 50 mL tube.
- The tube was then placed into a shaking incubator for 2 hours at 250 rpm. (the tube tipped over in the incubator)
- After the 2 hours, the tube was removed and allowed to sit at the bench for 15 minutes to allow the sample to settle.
- The supernatant was then removed for the tube and filtered through a .22 um filter into a new 50 colonial mL tube.
- The tube was then loosely capped and tapped to avoid spillage.
- The tube was moved to the shaking incubator and was incubated at 220 rpm for 7 days.
- After 7 days, using a pipette, 1.4 ml of the enriched culture was transferred to a microcentrifuge tube.
- The tube was centrifuged at high speed for 1 minute to pellet the bacteria.
- The supernatant was then transferred into a clean microcentrifuge tube avoiding contact with the bacterial pellet.
- Immediately, the tube was capped stored at 4° C
Plaque assay on enriched isolation (sample 4):
-
- Since there was only one sample to test only one aliquot of 250 ul of host bacteria (M. foliorum) was collected.
- Using a micropipette 10 ul of the sample was added to the tube containing M. foliorum.
- The tube was then allowed to sit for 8 minutes.
- After 10 minutes, a bottle of top agar was removed from the 55 C bath and brought to the bench.
- Using a sterile 5 mL pipette, 3 mL of the top agar was added the tube containing the sample and the host bacteria mix.
- This mix was then immediately aspirated back into the pipette and plated onto an agar plate.
- The plate was then allowed to solidify to room temperature and mover to a 29 C incubator.
Results:
After 48 hours the plates were checked for plaques, resulting in no plaques present.
Conclusions and Next Steps:
Since no plaques formed from direct/enriched isolation from samples 3 and 4, sample 2 was used for the remainder of the procedures.
Enriched Isolation – Sample 2
Date: 09/2/2025
Redo: No
Purpose: The purpose of this experiment is to obtain phages from an enriched isolation.
Procedure:
-
- Fill a 50 ml conical tube with soil sample to the 15 ml mark.
- Add liquid media to the 35 ml mark, then vortex
- Incubate and shake vigorously at ~250 rpm for 1- 2 hours
- Balance and centrifuge at 2,000 x g for 10 minutes to form pellets.
- filter the supernatent throught] a 0.22 µm filter to remove unwanted bacteria and soil particles
- Collect the flow in a 50 ml steril conical tube (volume should range from 20 – 25 ml)
- Add 0.5 ml of host bacteria into conical tube
- Incubate tube and shake at 220 rpm for 2 – 5 days
- Filtering the enriched culture –
- Using the appropriate pipette transfer 1.4 ml of the enriched culture to a microcentrifuge tube (repeat this procedure so that you have 2 microcentrifuge tubes containing the enriched culture)
- Centrifuge the tubes at high speed for 1 minute to pellet the bacteria.
- Transfer supernatant into a clean microcentrifuge tube avoiding the bacterial pellet.
- immiediatly cap the microcentrifuge tube containing the supenatent and label accordingly it then should be stored at 4° C
- Prepare for plaque assay
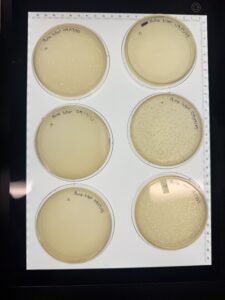
Plaque assay – Sample 2
- Obtain microcentrifuge tube with potential isolated phages
- Inoculate host bacteria with phage sample
- Obtain aliquots of 250 µl host bacteria equaling the number of phage samples, labeling tubes accordingly.
- Using a 2 ml serological pipette, dispense the appropriate volume of phage sample into corresponding bacterial host tube. (volumes calculated using table 5.3 – 1 below)
- Mix each inoculated host culture by gently tapping the tube ( make sure sample comes into contact with host bacteria as it may adhear to the sides of the tube rather than in your bacteria)
- Let sample sit undisturbed for 5 – 10 minutes to allow attachment
- Plating the samples – obtain the same number of plates as you have samples, labeling the plates acordingly
- Remove Molten top agar from the 55° C bath (work quickly during steps 9 & 10 to prevent top agar from solidifying)
- Using a steril 5ml serological pipette aseptically transfer 3 ml of top agar to the inoculated host tube (Try to avod making bubbles as they can appar as plaques on the plates)
- immediatly aspirate the mixture back into the sero pipette and transfer it onto the appropriate plate. Discard the pipette
- Quickly but gently, swirl the plate in different directions until the top agar evenly coats the agar plate.
- allow plates to sit undisturbed for ~ 20 minutes to let the top agar solidify
- Carefully flip plates upside down and place into incubator labeled M. Foliorum which is set at 29°C
- incubate for 24 – 48 hrs
- wipe workspace using CiDecon and EtOH as described previously
Results:
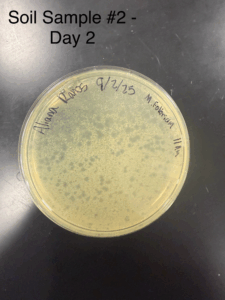
Conclusions and Next Steps:
Significant phages detected, will wrap in parafilm and store in fridge at 4° C then prepare to pick a plaque and perform serial dilutions
Plaques were identified as small, slightly turbid and poorly defined (indicating lysogenic phage)
Picking a Plaque – Sample 2
- Prepare workspace using aseptic technique
- Mark the plaques you intend to pick by circling them on the bottom of the agar plate with a marker or pen (use unique identifiers to ensure consistent labeling)
- Label microcentrifuge tubes accordingly based of the plaque identifiers you used – prepare 1 tube per plaque
- Using aseptic technique, aliquot 100 µl of phage buffer into each tube
- Then using a steril p200 micropipette hold the pippettor perpendicular to the agar surface, then gently stab into the center of the plaque, avoiding the surrounding bacterial growth
- Place the micropipette tip into the corresponding microcentrifuge tube and tap against the sides while pipetting up and down, releasing the phage particles into the buffer.
- Discard each tip after use
- vortex each tube to mix appropriately.
- Proceed to serial dilution.
Amplification
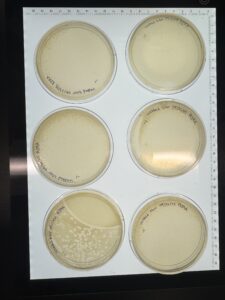
Serial Dilutions / Titer Test – Sample 2
Date: 09/08/2025
Redo: No
Purpose: The purpose of this experiment is to find which dilution factor provides an optimal titer or phage count
Procedure:
- We began by prepping our workspace using aseptic technique by spraying CiDecon and 70% EtOH, afterwards a bunsen burner was ignited to provide a steril feild
- We obtained and labeled 5 microcentrifuge tubes and labeled with their respective dilution factor (10^-1, 10^-2, 10^,3……)
- Then set up dilutions by adding 90 µl of phage buffer into each of the 5 tubes
- starting with our original sample containing phage & 100µl of buffer, use a steril micropipette to add 10µl of the original sample to the first tube (10^-1)
- Then tansfer 10µl of the 10^-1 into the next tube (10^-2), repeat for the rest of the tubes, diluting them by a factor of 10 for each time.
- After obtaining our 10^-5 dilution, we used 5 PyCa plates and labled them according to the dilution factor (-1,-2,-3,-4,-5)
- We then preformed a plaque assay for all 5 plates using their assigned dilution sample.
- We then incubated at 29°C for 48 hrs
Results: We obtained optimal phage concentration at the 10^-4 dilution factor
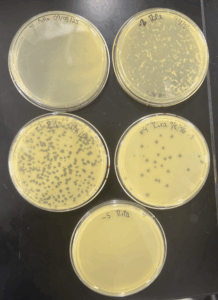
Conclusion and next steps:
Using our 10^-4 plate, we used the Picking a plaque procedure to preform another serial dilution to ensure the phages are isolated and obtain the correct titer.
Serial Dilution Sample 2 (pt. 2)
Date: 09/10/2025
Redo: No
Purpose: To Find which dilution factor provides optimal titer or phage count
- We began by prepping our workspace using aseptic technique by spraying CiDecon and 70% EtOH, afterwards a bunsen burner was ignited to provide a sterile field
- We obtained and labeled 5 microcentrifuge tubes and labeled with their respective dilution factor (10^-1, 10^-2, 10^,3……)
- Then set up dilutions by adding 90 µl of phage buffer into each of the 5 tubes
- starting with our original sample we obtained from the 10^-4 dilution, use a steril micropipette to add 10µl of the original sample to the first tube (10^-1)
- Then tansfer 10µl of the 10^-1 into the next tube (10^-2), repeat for the rest of the tubes, diluting them by a factor of 10 for each time.
- After obtaining our 10^-5 dilution, we used 5 PyCa plates and labled them according to the dilution factor (-1,-2,-3,-4,-5)
- We then preformed a plaque assay for all 5 plates using their assigned dilution sample.
- We then incubated at 29°C for 48 hrs.
Results:
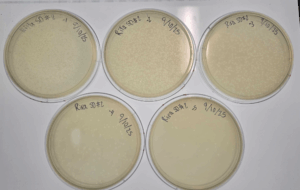
Conclusions and Next Steps:
Using the 10^-1 dilution webbed plate, a low volume lysate will be collected and a titer will be obtained from the plates. More webbed plates will then be made and a high volume lysate will then be collected.
Low-Volume Lysate Collection
Date: 09/15/2025
Redo: no
Purpose: The purpose of this experiment is to collect a low-volume lysate sample.
Notes:
-
- First, The 10^-1 webbed plate from the second serial dilution was flooded with 8 mL of phage buffer.
- The buffer on the plate was allowed to sit at room temperature from 10:42-12:40 a.m. (2 hours).
- After 2 hours, the plate was tilted to allow the buffer to pool to one side.
- Using a syringe and a 22 um filter, as much liquid as possible was removed from the plate.
Results:
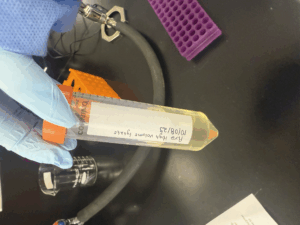
Approximately 5.5 mL of low-volume lysate was collected and stored at 4 C.
Next Steps:
A serial dilution will be performed on the low-volume lysate sample to obtain a titer.
Serial Dilution on Low-Volume Lysate Sample
Date: 09/17/2025
Redo: no
Purpose: The purpose of this experiment is to dilute the low volume lysate sample to obtain a titer.
Notes:
-
- The low volume lysate was removed from storage and brought to the bench along with phage buffer and 6 microcentrifuge tubes.
- 90 uL of phage buffer was added to each microcentrifuge tube.
- 10 uL of the low-volume lysate was added to one tube with buffer, becoming the first dilution.
- 10 uL of the first dilution tube was added to the next tube, making that tube the 10^-1 dilution. this was then done for each following tube resulting in 10^-2,10^-3, 10^-4, and 10^-5 tubes.
- After completing the serial dilution, a plaque assay was performed resulting in six plates.
Results:
The 10^-3 plate was used to obtain the titer for the low-volume dilution which gave a value of 18.1e6 pfu/uL
Next Steps:
Multiple webbed plates will be made from the low-volume lysate filtrate to collect high-volume lysate.
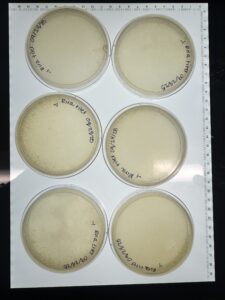
Making Webbed Plates/Collecting High-Volume Lysate
Making webbed plates
Date: 09/22/2025
Redo: yes
Purpose: The purpose of this experiment is to obtain multiple webbed plates.
Notes:
-
- We obtained our low-volume lysate and seven microcentrifuge tubes.
- 90 uL of phage buffer was dispensed into each tube.
- A serial dilution was performed, making six 10^-1 tubes.
- After completing the serial dilution six plates were made by performing a plaque assay.
- The plates were then incubated at 29 C at 10:24 a.m for 2 days.
Results:
After 2 days there was some webbing on the plates however the plates may have incubated too long causing some of the plates to blow out.
Conclusions and Next Steps:
To obtain better webbed plates we redid the procedure and allowed them to incubate for a shorter duration (1 day instead of 2).
Making webbed plates (pt. 2)
Notes:
-
- We obtained our low-volume lysate and seven microcentrifuge tubes.
- 90 uL of phage buffer was dispense into each tube.
- A serial dilution was performed, making six 10^-1 tubes.
- After completing the serial dilution six plates were made by performing a plaque assay.
- The plates were then incubated at 29 C at 10:36 a.m for 1 day.
Results:
Plaques were formed and 6 webbed plates were produced.
Conclusions and Next Steps:
Using newly webbed plates, each plate will be flooded in order to obtain a high -volume lysate.
Title: Collecting High-Volume Lysate
Date: 09/29/2025
Redo: no
Purpose: The purpose of this experiment is to obtain a high-volume lysate from webbed plates.
Notes:
-
- We gathered all six of the webbed plates and flooded them with 8 mL of phage buffer.
- The plates were then allowed to incubate at room temperature from 10:02 a.m. until 12:06 a.m (2 hours).
- After the two hours, the plates were tilted to allow them to pool and the lysate solution was aspirated from each plate into a pipette (one by one).
- The solution was released onto a 22 um filter and vacuum filtration was used to move the solution into a new 50 mL colonial tube.
Results:
About 40 mL of high-volume lysate was collected in a 50 mL colonial tube.
Conclusions and Next Steps:
A serial dilution will be performed using the high-volume lysate to obtain a titer.
DNA Extraction
Title: DNA Extraction
Date: 10/27/2025
Redo: Yes
Purpose: The purpose of this experiment is to isolate DNA
Notes:
Part 1
-
- We first aliquoted 5 mL of high volume lysate into a 15 mL conical tube.
- We then added 20 uL of nuclease into the tube in the fume hood
- Then using 5 microcentrifuge tubes, we aliquoted 1 mL of lysate/nuclease mix into the each tube
- Each tube was then placed into a heat block set to 37C, for 10 minutes
- the tubes were the removed from the heat block and 20 uL of ZnCl2 was a added to each tube
- The tubres were moved back to the 37C heat block for 5 more minutes
- After the 5 minutes, the tubes were centrifuged at 10,000 rpm for 1 minute
- The supernatant was removed from the tubes and disgared and IMMEDIATLEY after 500 uL of phage buffer was added to each tube keeping the pellet from drying out. ***IMPORTANT: do NOT use phage buffer as done in this step use TES buffer***
- The tubes were then placed into at heat block set to 60C for 15 minutes
- Once the 15 minutes were up, 1 uL of protease K was added to each tube and each tube was placed into the heat block set to 37C for another 10 minutes
- We then added 60 uL of potassium acetate to each tube and placed them on ice for 15 minutes
- After the 15 mintues, we centrifuged the tubes at 4 C for 1 minute
- We remove the supernatants from each tube and immediately added 500 uL of 100% isopropanol to each tube
- Finally, we placed them on ice in a beaker and put them in the 4C refrigerator until out next lab
Part 2
Date: 10/29/2025
-
- We removed the tubes from the refrigerator and centrifuged them at top speed for 10 minutes
- 250 uL of 70% ethanol was then added to each tube and the tubes were cntrifuged again for 1 minute
- We then disposed of the supernatant
- The tubes were then dried by flipping them upside down onto a paper towel with the lids open
- We then move them to the fume hood and allowed them to dry for about 30 minutes
- After the 30 minutes, the tubes were dry and we added 50 uL of nuclease-free water to one of the microcentrifuge tubes and mixed it
- We then took 50 uL of liquid from the tube with the nuclease-free water in it and added into another one of the microcentrifuge tubes
- The process in step 7 was then repeated for each tube, leaving one tube with the nuclease-free water
- We then used the remaining tube with nuclease-free water to get our DNA concentration using a nanodrop
Results:
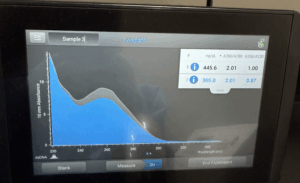
Conclusions and Next Steps:
The Sample did not have acceptable values, So we will preform a reprecipitation of DNA, which will combine our samples in hopes of better numbers.
Title: Reprecipitation of DNA
Date: 11/03/2025
Redo: No
Purpose: To combine two previous DNA extraction samples to gather a more accurate Nanodrop reading.
Notes:
Day 1:
- We washed our hands and put on gloves. We proceeded with aseptic technique by spraying the station with CiDecon and wiping with Kimwipes. After CiDecon, we sprayed the station with 70% Ethanol and wiped it with Kimwipes.
- The two DNA samples from DNA Isolation (Samples 1 and 2) were removed from their storage in the freezer and set out at room temperature to thaw.
- Once the samples returned to a liquid state, a micropipette was used to aspirate and calculate the volume of each sample. This was done by aspirating all of the liquid into the micropipette, and then gradually decreasing the micropipette reading until there were no air bubbles left in the micropipette tip. Both volumes were then dispensed together into a new microcentrifuge tube.
- With the combined volume, the volume of Sodium acetate and ice cold 100% Ethanol was calculated. The Sodium acetate would be 0.10 vols of the DNA volume, or 9.2ul. The ice cold 100% Ethanol would be 3 volumes of the DNA volume, or 276ul.
- All volumes from step 4 were aspirated using a micropipette and dispensed into the microcentrifuge tube containing the 92ul of DNA sample. The contents were inverted to mix.
- The microcentrifuge tube was then precipitated by being placed in a -80°C freezer overnight.
Day 2:
- After one day, the sample was retrieved from the freezer and centrifuged at full speed at 4°C for 30 min.
- The supernatant was then dispensed into a waste tube, and 0.5mL of 75% Ethanol was added to the microcentrifuge tube to wash it. The tube was placed in the centrifuge at 4°C for 10 min. This step was conducted twice, with all supernatants being discarded in a waste tube.
- After aspirating as much liquid out of the microcentrifuge tube, the tube was set in a 30°C incubator to air dry. It was important to not proceed with the next step until all liquid droplets were evaporated from the tube.
- Once ALL liquid was dried out of the tube, 50ul of nuclease-free water was added to the tube. The liquid was pipetted up and down to mix the solution.
- The tube was taken to a Nanodrop machine, where the DNA concentration and quality (A260:280 and A260:230) was checked.
- Once the Nanodrop was turned on, the button for dsDNA was selected.
- A blank was needed, so 1ul of nuclease-free water was dispensed onto the Nanodrop plate using a micropipette. It was necessary to stabilize the micropipette and push down the plunger entirely to ensure that the liquid does not aspirate back into the pipette.
- The Nanodrop was gently closed and the blank reading was conducted. Once the reader deemed it successful, the nuclease-free water was gently cleaned using a Kimwipe.
- 1ul of the liquid from the microcentrifuge tube was aspirated and dispensed using the same technique as step b.
- After lowering the Nanodrop, the liquid was analyzed and a photo was taken of the results.
Results:
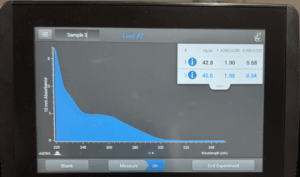
Conclusion and next steps:
The values were still inadequate, we will Perform a new DNA isolation in hopes of better numbers.
Title: DNA Extraction
Date: 11/04/2025
Redo: Yes
Purpose: The purpose of this experiment is to isolate DNA
Notes:
Day 1
-
- We first aliquoted 5 mL of high volume lysate into a 15 mL conical tube.
- We then added 20 uL of nuclease into the tube in the fume hood
- Then using 5 microcentrifuge tubes, we aliquoted 1 mL of lysate/nuclease mix into the each tube
- Each tube was then placed into a heat block set to 37C, for 10 minutes
- the tubes were the removed from the heat block and 20 uL of ZnCl2 was a added to each tube
- The tubres were moved back to the 37C heat block for 5 more minutes
- After the 5 minutes, the tubes were centrifuged at 10,000 rpm for 1 minute
- The supernatant was removed from the tubes and disgared and IMMEDIATLEY after 500 uL of phage buffer was added to each tube keeping the pellet from drying out. ***IMPORTANT: do NOT use phage buffer as done in this step use TES buffer***
- The tubes were then placed into at heat block set to 60C for 15 minutes
- Once the 15 minutes were up, 1 uL of protease K was added to each tube and each tube was placed into the heat block set to 37C for another 10 minutes
- We then added 60 uL of potassium acetate to each tube and placed them on ice for 15 minutes
- After the 15 mintues, we centrifuged the tubes at 4 C for 1 minute
- We remove the supernatants from each tube and immediately added 500 uL of 100% isopropanol to each tube
- Finally, we placed them on ice in a beaker and put them in the 4C refrigerator until out next lab
Day 2
Date: 11/05/2025
-
- We removed the tubes from the refrigerator and centrifuged them at top speed for 10 minutes
- 250 uL of 70% ethanol was then added to each tube and the tubes were cntrifuged again for 1 minute
- We then disposed of the supernatant
- The tubes were then dried by flipping them upside down onto a paper towel with the lids open
- We then move them to the fume hood and allowed them to dry for about 30 minutes
- After the 30 minutes, the tubes were dry and we added 50 uL of nuclease-free water to one of the microcentrifuge tubes and mixed it
- We then took 50 uL of liquid from the tube with the nuclease-free water in it and added into another one of the microcentrifuge tubes
- The process in step 7 was then repeated for each tube, leaving one tube with the nuclease-free water
- We then used the remaining tube with nuclease-free water to get our DNA concentration using a nanodrop
Results:
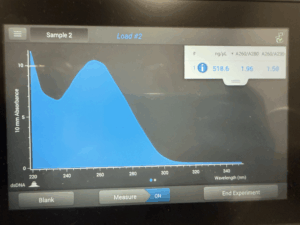
Conclusion and next steps:
The numbers yielded appropriate results, so we can proceed with Gel Electrophoresis.
Characterization
Total Electron Microscopy
Date: 11/03/2025
Redo: no
Purpose: The purpose of this experiment is to visualize and characterize our phage through observing its morphology.
Notes:
-
- We aseptically transferred 1 mL of our high-volume lysate into a microcentrifuge tube.
- The microcentrifuge tube was then placed into a centrifuge at 4C for 1 hour, allow the phage particles to concentrate near the bottom of the tube.
- We removed the microcentrifuge tube from the centrifuge, then using a micropipette, we removed as much of the supernatant as possible without distubing the pellet.
- 100 uL of phage buffer was then added to the tube and the tube was moved to the 4C refrigerator for 32 minutes.
- After the 32 mintues we move the tube to a fume hood to continue the procedure.
- Using forceps, we removed a grid from a grid box (shiny side up) onto (near) a pre-prepared adhesive pelco tab.
- This was done meticulously and slowly, allowing the grid to stick on the outside of the tab.
- without touching the grid, we put 10 uL of lyaste onto the grid
- The lysate was allowed to sit on the grid for 5 mintues (based on our lysate titer of 10^8)
- After 5 minutes, excess liquid was removed from the grid by wicking it with the edge of filter paper
- 10 uL of sterile water was then added to the grid and allowed to sit for two minutes then was wicked off using filter paper just as in the last step.
- Step 11 was repeated using 10 uL more of sterile water allowing for a full rinse of the grid
- 10 uL of 1% uranyl acetate was added to the grid and allowed to sit for two minutes.
- After the two minutes, the the excess was wicked off with filter paper similar to the last few steps.
- We let it sit for 7 minutes to dry, once the grid looked like a rainbow oil slick
- The grid was then placed into a grid box with other grids from the lab and place into a vaccum dry chamber
- This will be sent off from electron microscopy
Gel Electrophoresis
Date: 11/17/2025
Redo: no
Purpose: To prepare an agarose gel for electrophoresis in order to separate DNA fragments by agarose gel electrophoresis.
Notes:
Casting Agarose Gels:
- We washed our hands and put on gloves. We proceeded with aseptic technique by spraying the station with CiDecon and wiping with Kimwipes. After CiDecon, we sprayed the station with 70% Ethanol and wiped it with Kimwipes.
- Retrieved our 5 microcentrifuge tubes containing the restriction enzyme digest reactions and the Uncut DNA from the freezer and allowed them to warm up to room temperature while we collected the rest of the materials needed to cast the agarose gel and conduct Gel Electrophoresis.
- Begin by setting up your gel apparatus and calculate the amount of powdered agarose needed to prepare 30 mL of 0.8% agarose gel.
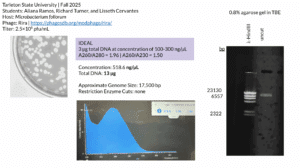
- It was found that 0.24 g of the agarose powder is needed in order to prepare 30 mL of 0.8% agarose. From this, we calculated that the appropriate volume of 1X TBE buffer to add was 30 mL to get 30 mL of 0.8% agarose gel.
- After calculation, the proper amount of agarose powder and 1X TBE buffer was added into an Erlenmeyer flask, swirled gently, and heated in the microwave for 1 minute. Make sure to take it out of the microwave at 30 seconds to gently swirl the mixture once more before allowing it to heat up for the remaining 30 seconds.
- Remove the flask from the microwave using a heat-resistant glove and swirl the mixture once more before allowing it to cool for about 10-15 minutes to a temperature between 50°C and 60 °C.
- Once the mixture has cooled sufficiently, calculate the appropriate volume of ethidium bromide (EtBr) needed to use as a DNA dye in order to reach a proper final concentration of 0.5 μg/ml. It was found the 1.5 μl of EtBr was needed to reach this concentration; therefore, 1.5 μl of EtBr was added to the mixture and was swirled to mix.
- Carefully pour the agarose/EtBr mixture into the prepared gel apparatus, making sure not to allow for the creation of bubbles, and insert the comb to cast the wells needed to perform gel electrophoresis.
- Allow for the gel to cool for 20-30 minutes then carefully extract the comb by pulling it straight up slowly. Once the comb is removed, gently lift the gel platform out of the casting tray and place the solidified gel into the gel box. Ensure that the wells are at the cathode (-) end of the box, where the black lead is connected.
- Finally, pour 30 mL of the 1X TBE buffer into the gel apparatus until the gel is properly submerged by about ¼ inch of the buffer.
Gel Electrophoresis:
- Begin by creating your ladder, add 1 μl of Hindi III digest, 7 μl of nuclease-free water, and 2 μl of purple 6X loading dye into a new microcentrifuge tube.
- Prepare your uncut DNA sample by adding 1µl of your DNA sample 2µl of purple 6X loading dye and 7µl of Nuclease free water.
- Place your samples at 65 °C in a heat block for 5 minutes then immediately place the samples on ice to cool before spinning them in the microcentrifuge for about 15 seconds at 10,000 RPM which prevents annealing of the cohesive ends of the phage DNA.
- Load the gel in the following order: Ladder, Uncut DNA, (space) Ladder, Uncut DNA
- Begin by loading the gel with the proper volume of your DNA ladder, then continue, making sure to use a new tip on your micropipettor for each sample, by pipetting 20 μl of each restriction enzyme reaction into the wells in the order mentioned above.
- Once each well has been filled with the proper sample, we drew a picture of the gel in our lab notebook and plugged in our electrodes to the proper locations on the power supply. Turn the power supply on and set the voltage to 100 V.
- Run the gel until the purple dye has migrated at least 4 to 5 inches from the well which will take approximately 1 hour. At this time we turned off our power supply and photographed the gel.
- Once a photograph has been taken and the gel has been removed, empty the buffer back into the original container to be used again, rinse out the gel apparatus with water and soap and set it aside to dry.
- Dispose of the gel in the proper receptacle and clean the station.
- Results:

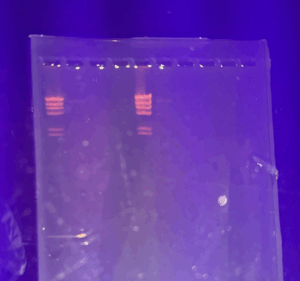
Conclusion and Next steps:
The following image will be uploaded to PhagesDB.org